![[kaneko lab.]](https://www.kkaneko.jp/info/logo_png.png)
LCNNによる消失点推定
【概要】
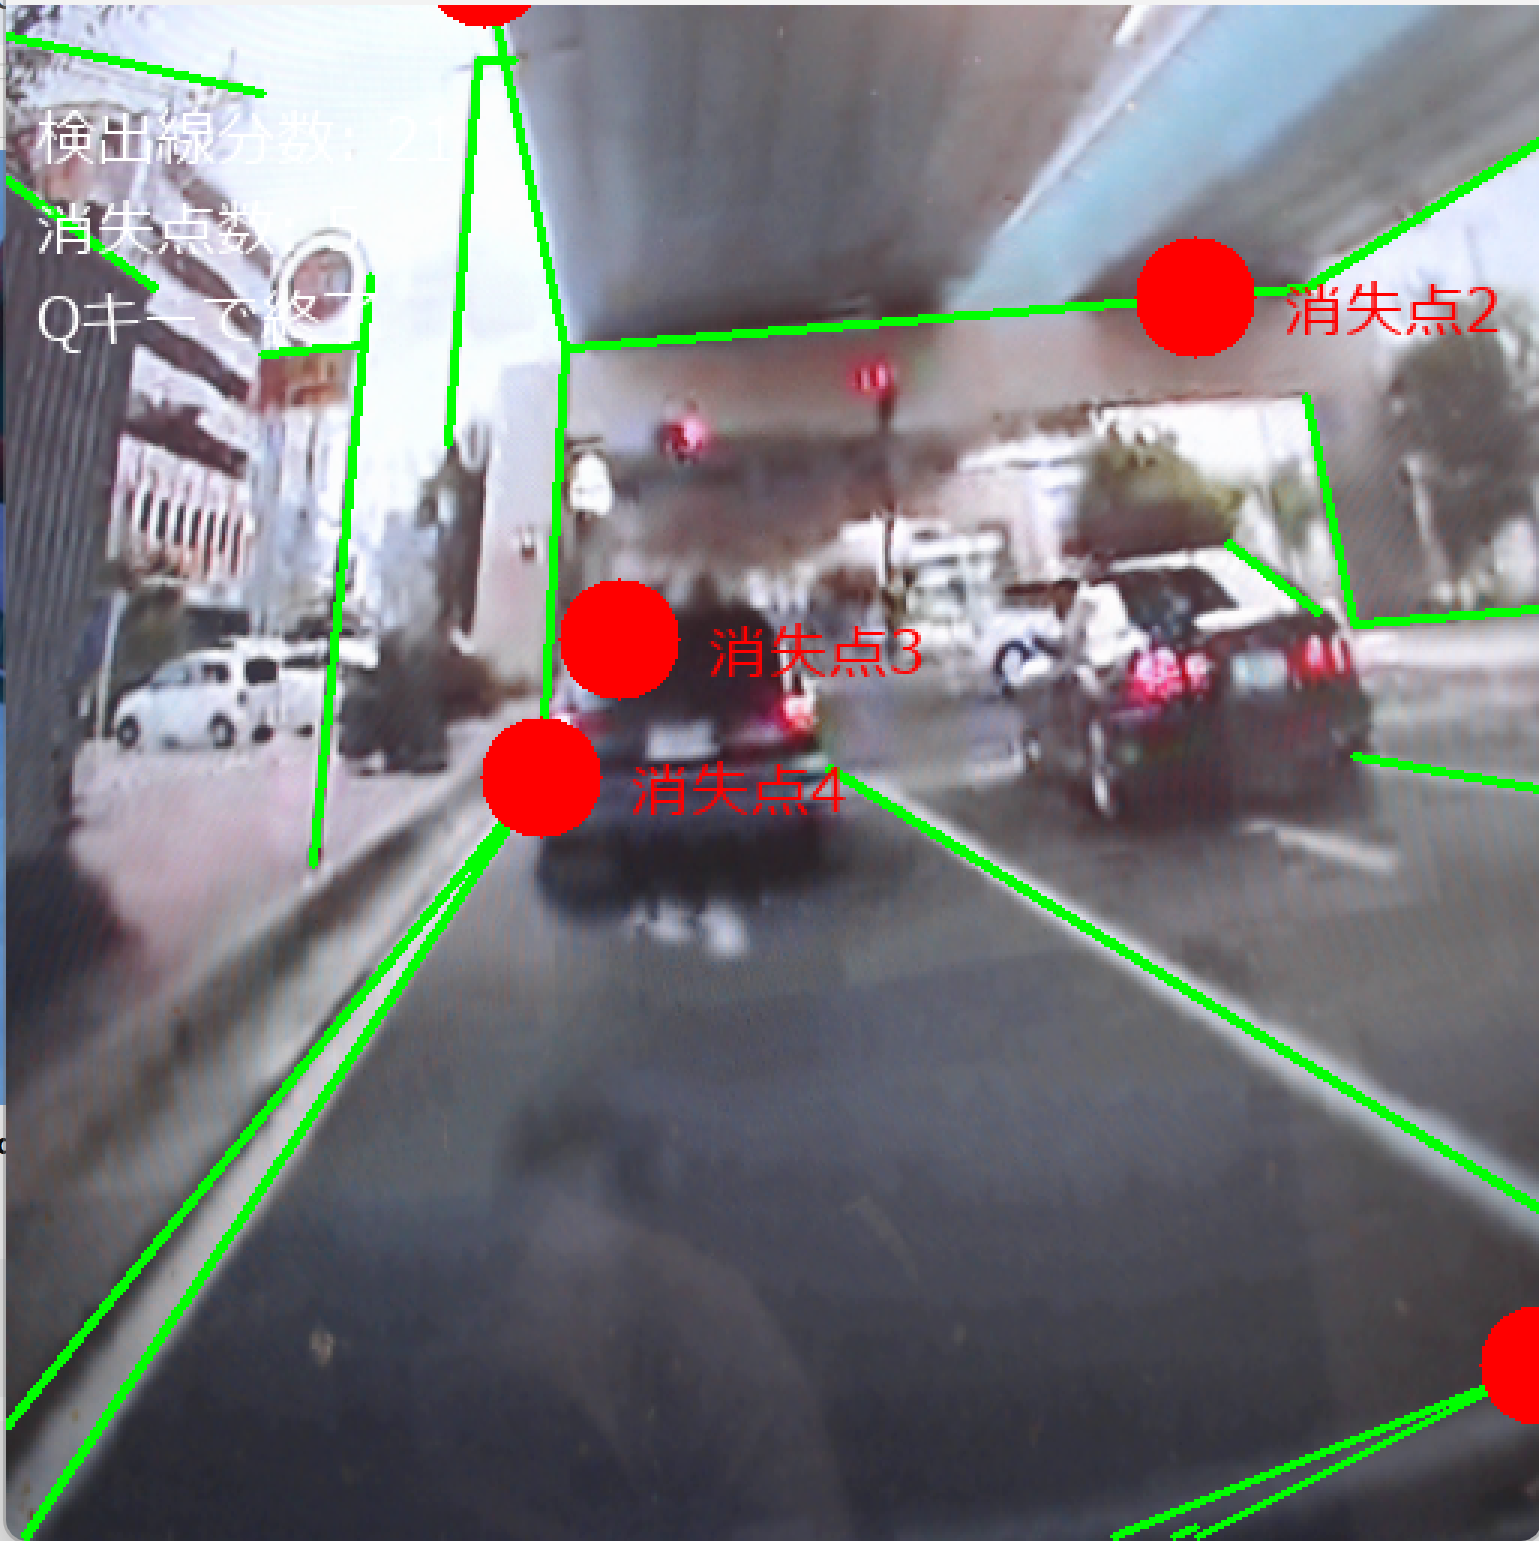
LCNNは、建築物や室内の画像から線分と接合点を検出し、構造的な線画(wireframe)を抽出する深層学習モデルである。LCNN自体は消失点を直接推定しないため、本教材のプログラムでは、LCNNが検出した線分を方向ごとにクラスタリングし、Manhattan World仮定とRANSACを組み合わせて消失点を推定する。Webカメラや動画の映像に対してこの処理を繰り返し、線分と消失点の変化を画面で確認する。
【目次】
- 1. LCNN
- 2. LCNN消失点検出プログラムの概要
- 3. 事前準備
- 4. Python 3.12 のインストール
- 5. Python の開発環境 Visual Studio Code のインストールと Python 用の設定
- 6. プログラムコード
- 7. 使用方法
- 8. 実験・探求のアイデア
【関連する外部ページ】
- 論文「End-to-End Wireframe Parsing」(ICCV 2019): https://arxiv.org/abs/1905.03246
- LCNNのGitHubリポジトリ: https://github.com/zhou13/lcnn
【サイト内の関連情報】
1. LCNN
概要
LCNN(論文中の表記はL-CNN)は、建築物や室内の画像から線分と接合点を検出し、構造的な線画(wireframe:物体の輪郭や境界を線分と接合点で表した図)を抽出することを目的とした深層学習モデルである。論文「End-to-End Wireframe Parsing」では、中間的なヒートマップを経由して発見的な手法で直線を取り出す従来手法と異なり、端から端まで学習可能な構成でベクトル化された線画を直接出力し、従来手法を上回る検出性能を示している。
主要機能
LCNNの主要機能は以下の通りである。
- 線分検出(Line Segment Detection)
- 接合点検出(Junction Detection)
- 構造化された線画解析(Wireframe Parsing)
論文情報
論文タイトル: End-to-End Wireframe Parsing(2019年)
著者: Yichao Zhou, Haozhi Qi, Yi Ma
発表: ICCV 2019
arXiv: https://arxiv.org/abs/1905.03246
技術的特徴
アーキテクチャ構成
LCNNは以下の4つのモジュールで構成される。
- 特徴抽出バックボーン: Stacked Hourglass Network(後続モジュールが共有する中間特徴マップを出力する)
- 接合点提案モジュール(junction proposal module): 接合点の候補の検出
- 線分サンプリングモジュール(line sampling module): 接合点の候補から線分候補を生成
- 線分検証モジュール(line verification module): 線分候補の分類
主要な技術的貢献
- 線分検出を端点ペアの組み合わせ問題として定式化
- 接合点検出と線分検出を統合的に学習
- 従来手法(LSD、Hough変換)より高精度な検出性能
- 線分の重なりや誤った接続を減点する、線画のための評価指標を提案
GitHubリポジトリ
リポジトリURL: https://github.com/zhou13/lcnn
主要ファイル構成
- demo.py: 単一画像での推論デモ
- process.py: 複数画像のバッチ処理
- eval-*.py: 評価スクリプト群
- config/wireframe.yaml: 学習設定ファイル
- lcnn/models/: モデル実装
学習済みモデル
- HuggingFaceのリポジトリ https://huggingface.co/yichaozhou/lcnn の Pretrained フォルダで配布(config/wireframe.yaml の設定で312k iterations 学習)
- Wireframeデータセットで学習済み
推論の基本的な流れ
- 画像の前処理(リサイズ、正規化)
- モデルによる推論(junction, line maps)
- 後処理(重なった線分の除去、線分の復元)
- 結果の可視化
カスタマイズのポイント
- config/wireframe.yamlで検出閾値の調整
- 出力される線分情報を消失点推定アルゴリズムに接続
- バッチ処理時はprocess.pyをベースに改造
消失点推定への応用
消失点推定との関係
LCNNの出力(高品質な線分)は消失点推定の入力として利用できる。ただし、LCNN自体は消失点を直接推定しない。
応用フロー
- LCNN: 画像 → 線分・接合点検出
- 後処理: 検出された線分 → 消失点推定(別途アルゴリズムが必要)
消失点推定の実装方法
LCNNで検出された線分情報から消失点を推定する方法は次のとおりである。
- 線分のグループ化: 検出された線分を方向別にクラスタリング
- RANSACによる消失点推定: 各グループ内で交点を計算(RANSAC:無作為に選んだ少数のデータから仮の解を作り、それを支持するデータが最も多い解を採用する手法)
- Manhattan World仮定: 3つの主要な消失点を抽出(Manhattan World仮定:人工環境の直線が互いに直交する3方向に揃うという前提)
実装上の利点
- 高品質な線分検出により、ノイズの少ない消失点推定が可能
- 接合点情報を活用した構造的な制約の導入が可能
モデルロードの要件
LCNNモデルを正しくロードするには、以下の要素が必要である。
- LCNNのリポジトリを取得し、Pythonから読み込めるようにすること
- モデルアーキテクチャの正しい構築
- チェックポイントの適切なロード
- 前処理・後処理の実装
評価
このモデルは建築物や室内シーンの構造解析において、従来手法より優れた性能を示しており、消失点推定タスクへの応用に適していると評価できる。
2. LCNN消失点検出プログラムの概要
主要技術名
LCNN(論文中の表記はL-CNN)
論文情報
論文名称:End-to-End Wireframe Parsing
著者:Yichao Zhou, Haozhi Qi, Yi Ma
出典:ICCV 2019
arXiv:https://arxiv.org/abs/1905.03246
技術の新規性・特徴と特徴を活かせるアプリ例
LCNNは、建築物や室内の画像から線分と接合点を検出し、構造的な線画(wireframe)を抽出する深層学習モデルである。従来の線分検出手法(LSD、Hough変換)と異なり、線分検出を端点ペアの組み合わせ問題として定式化し、接合点検出と線分検出を統合的に学習する。これにより高精度な構造解析が可能となる。建築図面の自動解析、室内レイアウト認識、拡張現実における平面検出、ロボットナビゲーションにおける環境理解などに応用できる。
技術を実際に実行して学ぶ体験価値
リアルタイムWebカメラ映像から線分を検出し、消失点を推定する過程を通じて、深層学習による構造解析の実際の動作を体験できる。Manhattan World仮定やRANSACアルゴリズムの組み合わせによる頑健な推定手法を学習し、AIがどのように画像内の幾何学的構造を抽出し、空間の遠近感を自動的に認識するかを理解できる。
3. 事前準備
管理者権限でコマンドプロンプトを起動する
(手順:Windowsキーまたはスタートメニュー → cmd と入力 → 右クリック → 「管理者として実行」)。
Gitをインストールするため、次を実行する。
REM Git をシステム領域にインストール
winget install --scope machine --id Git.Git -e --silent --disable-interactivity --force --accept-source-agreements --accept-package-agreements --override "/VERYSILENT /NORESTART /NOCANCEL /SP- /CLOSEAPPLICATIONS /RESTARTAPPLICATIONS /COMPONENTS=""icons,ext\reg\shellhere,assoc,assoc_sh"" /o:PathOption=Cmd /o:CRLFOption=CRLFCommitAsIs /o:BashTerminalOption=MinTTY /o:DefaultBranchOption=main /o:EditorOption=VIM /o:SSHOption=OpenSSH /o:UseCredentialManager=Enabled /o:PerformanceTweaksFSCache=Enabled /o:EnableSymlinks=Disabled /o:EnableFSMonitor=Disabled"
インストールしたGitをコマンドとして使えるようにするため、いったんコマンドプロンプトを閉じる。そのうえで、あらためて次の操作を行う。
管理者権限でコマンドプロンプトを起動する
(手順:Windowsキーまたはスタートメニュー → cmd と入力 → 右クリック → 「管理者として実行」)。
次を実行して、PyTorchと関連パッケージをインストールし、LCNNのリポジトリを取得する。--no-user は、ユーザ領域ではなくシステム領域へインストールするオプションである。
REM PyTorch をインストール(GPU対応版,CUDA 12.8)
set "PYTHON_PATH=C:\Program Files\Python312"
set "CUDA_TAG=cu128"
"%PYTHON_PATH%\Scripts\pip" install --no-user -U numpy torch torchvision torchaudio --index-url https://download.pytorch.org/whl/%CUDA_TAG%
"%PYTHON_PATH%\Scripts\pip" install --no-user -U opencv-python matplotlib scipy scikit-image scikit-learn tensorboard tensorboardX huggingface-hub pyyaml

REM リポジトリをクローン
cd /d c:%HOMEPATH%\Documents
git clone https://github.com/zhou13/lcnn.git
日本語の画面表示には OpenCV 5 の cv2.FontFace("uni") を使うため、フォントファイルの用意は不要である。
学習済みモデルの準備
LCNNのGitHubリポジトリの指示に従い、学習済みモデル(190418-201834-f8934c6-lr4d10-312k.pth)を HuggingFace のリポジトリ https://huggingface.co/yichaozhou/lcnn の Pretrained フォルダからダウンロードし、%USERPROFILE%\Documents\lcnn\pretrained\Pretrained\ フォルダに配置する。
4. Python 3.12 のインストール
Pythonのインストールを行い、Pythonのプログラムを実行する環境を整える。扱う環境は、Windows搭載パソコンである。金子研究室では、Python 3.12.10を推奨する。
[Windows での Python 3.12 のインストール手順を見るには、ここをクリック]
Windows での Python 3.12 のインストール
以下のいずれかの方法でPython 3.12をインストールする。Pythonがインストール済みの場合、この手順は不要である。
方法 1:winget によるインストール
【インストールコマンドの実行方法】
管理者権限でコマンドプロンプトを起動する(手順:Windowsキーまたはスタートメニュー → cmd と入力 → 右クリック → 「管理者として実行」)。そして、コマンド全体をコマンドプロンプトにコピー&ペーストする。
--scope machine を指定することで、システム全体(全ユーザー向け)にインストールされる。このオプションの実行には管理者権限が必要である。インストール完了後、コマンドプロンプトを再起動するとPATHが反映される。
REM Python 3.12 をシステム領域にインストール
winget install --id Python.Python.3.12 -e --scope machine --silent --accept-source-agreements --accept-package-agreements --override "/quiet InstallAllUsers=1 PrependPath=1 Include_test=0 Include_pip=1 Include_launcher=1 InstallLauncherAllUsers=1 TargetDir=\"C:\Program Files\Python312\""
if not "%ERRORLEVEL%"=="0" ( color 0c & echo Python 3.12 のインストールに失敗しました & ping 127.0.0.1 -n 6 >nul & color )

REM Python と Scripts を PATH 先頭に追加
powershell -NoProfile -Command "$p='C:\Program Files\Python312'; $s=\"$p\Scripts\"; if(Test-Path $p){$k=[Microsoft.Win32.Registry]::LocalMachine.OpenSubKey('SYSTEM\CurrentControlSet\Control\Session Manager\Environment',$true); $c=$k.GetValue('Path','',[Microsoft.Win32.RegistryValueOptions]::DoNotExpandEnvironmentNames); $t=$k.GetValueKind('Path'); $new=$c; if((';'+$new+';') -notlike \"*;$p;*\"){$new=$p+';'+$new}; if((';'+$new+';') -notlike \"*;$s;*\"){$new=$s+';'+$new}; if($new -ne $c){$k.SetValue('Path',$new,$t)}; $k.Close()}"

REM 現在のセッションにも反映(システムPATHを再取得して連結)
for /f "usebackq tokens=2,*" %A in (`reg query "HKLM\SYSTEM\CurrentControlSet\Control\Session Manager\Environment" /v Path`) do set "PATH=%B"

REM pip / wheel の更新
python -m pip install --no-user -U pip wheel
if not "%ERRORLEVEL%"=="0" ( color 0c & echo pip / wheel の更新に失敗しました & ping 127.0.0.1 -n 6 >nul & color )
方法 2:インストーラーによるインストール
- Python公式サイト(https://www.python.org/downloads/)にアクセスし、「Download Python 3.x.x」ボタンからWindows用インストーラーをダウンロードする。
- ダウンロードしたインストーラーを実行する。
- 初期画面の下部に表示される「Add python.exe to PATH」にチェックを入れてから「Customize installation」を選択する。このチェックを入れ忘れると、コマンドプロンプトから
pythonコマンドを実行できない。 - 「Install Python 3.xx for all users」にチェックを入れ、「Install」をクリックする。
インストールの確認
コマンドプロンプトで以下を実行する。
python --versionバージョン番号(例:Python 3.12.x)が表示されればインストール成功である。「'python' は、内部コマンドまたは外部コマンドとして認識されていません。」と表示される場合は、インストールが正常に完了していない。
5. Python の開発環境 Visual Studio Code のインストールと Python 用の設定
Python の開発環境Visual Studio Code(プログラムを編集するソフトウェア。以下、VS Code)を整える。
[Windows での Visual Studio Code のインストールと Python 用の設定手順を見るには、ここをクリック]
Windows での Visual Studio Code のインストールと Python 用の設定手順
1. VS Code と拡張機能のインストール
以下のコマンドにより,既存の VS Code を削除し,全ユーザー共有の設定で再インストールしたうえで,拡張機能(VS Code に機能を追加するソフトウェア)をまとめて導入する.
【インストールコマンドの実行方法】
管理者権限でコマンドプロンプトを起動する(手順:Windows キーまたはスタートメニュー → cmd と入力 → 右クリック → 「管理者として実行」)。そして,コマンド全体をコマンドプロンプトにコピー&ペーストする。
インストールコマンド
REM ============================================================
REM Microsoft Visual Studio Code
REM ============================================================
REM Build Tools + Desktop development with C++(VCTools)+ 追加コンポーネント(一括)
REM 未インストール時: winget で新規インストール
REM インストール済み時: setup.exe modify でコンポーネント追加(バージョンは変更しない)
winget list --id Microsoft.VisualStudio.BuildTools 2>nul | findstr /i "BuildTools" >nul 2>&1
if %ERRORLEVEL% EQU 0 (
    for /f "usebackq delims=" %P in (`"C:\Program Files (x86)\Microsoft Visual Studio\Installer\vswhere.exe" -products Microsoft.VisualStudio.Product.BuildTools -property installationPath`) do start /wait "" "C:\Program Files (x86)\Microsoft Visual Studio\Installer\setup.exe" modify --installPath "%P" --add Microsoft.VisualStudio.Workload.VCTools --add Microsoft.VisualStudio.Workload.MSBuildTools --add Microsoft.VisualStudio.Component.VC.CMake.Project --add Microsoft.VisualStudio.Component.VC.Llvm.Clang --add Microsoft.VisualStudio.Component.VC.Llvm.ClangToolset --add Microsoft.VisualStudio.Component.Windows11SDK.26100 --add Microsoft.VisualStudio.Component.VC.v143.x86.x64 --includeRecommended --quiet --norestart --nocache
    if not "%ERRORLEVEL%"=="0" ( color 0c & echo Build Tools のコンポーネント追加に失敗しました & ping 127.0.0.1 -n 6 >nul & color )
) else (
    winget install --scope machine --id Microsoft.VisualStudio.BuildTools -e --silent --disable-interactivity --force --accept-source-agreements --accept-package-agreements --override "--quiet --wait --norestart --nocache --add Microsoft.VisualStudio.Workload.VCTools --includeRecommended --add Microsoft.VisualStudio.Workload.MSBuildTools --add Microsoft.VisualStudio.Component.VC.CMake.Project --add Microsoft.VisualStudio.Component.VC.Llvm.Clang --add Microsoft.VisualStudio.Component.VC.Llvm.ClangToolset --add Microsoft.VisualStudio.Component.Windows11SDK.26100 --add Microsoft.VisualStudio.Component.VC.v143.x86.x64"
    if not "%ERRORLEVEL%"=="0" ( color 0c & echo Build Tools のインストールに失敗しました & ping 127.0.0.1 -n 6 >nul & color )
)

REM 全ユーザー共有の拡張機能フォルダ
if not exist "C:\ProgramData\vscode-extensions" mkdir "C:\ProgramData\vscode-extensions"
icacls "C:\ProgramData\vscode-extensions" /grant "Everyone:(OI)(CI)M" /T

REM スタートメニューのショートカットを --extensions-dir 付きで再作成
if exist "C:\ProgramData\Microsoft\Windows\Start Menu\Programs\Visual Studio Code" rmdir /s /q "C:\ProgramData\Microsoft\Windows\Start Menu\Programs\Visual Studio Code"
if exist "C:\ProgramData\Microsoft\Windows\Start Menu\Programs\Visual Studio Code.lnk" del "C:\ProgramData\Microsoft\Windows\Start Menu\Programs\Visual Studio Code.lnk"
powershell -NoProfile -Command "$s=New-Object -ComObject WScript.Shell; $lnk=$s.CreateShortcut('C:\ProgramData\Microsoft\Windows\Start Menu\Programs\Visual Studio Code.lnk'); $lnk.TargetPath='C:\Program Files\Microsoft VS Code\Code.exe'; $lnk.Arguments='--extensions-dir \"C:\ProgramData\vscode-extensions\"'; $lnk.Save()"
REM ショートカットの検証
powershell -NoProfile -Command "$s=New-Object -ComObject WScript.Shell; $lnk=$s.CreateShortcut('C:\ProgramData\Microsoft\Windows\Start Menu\Programs\Visual Studio Code.lnk'); Write-Host 'TargetPath:' $lnk.TargetPath; Write-Host 'Arguments:' $lnk.Arguments"

REM ファイル / フォルダ右クリックの「Code で開く」を登録
reg add "HKLM\SOFTWARE\Classes\*\shell\VSCode\command" /ve /d "\"C:\Program Files\Microsoft VS Code\Code.exe\" --extensions-dir \"C:\ProgramData\vscode-extensions\" \"%1\"" /f
reg add "HKLM\SOFTWARE\Classes\Directory\shell\VSCode\command" /ve /d "\"C:\Program Files\Microsoft VS Code\Code.exe\" --extensions-dir \"C:\ProgramData\vscode-extensions\" \"%1\"" /f
reg add "HKLM\SOFTWARE\Classes\Directory\Background\shell\VSCode\command" /ve /d "\"C:\Program Files\Microsoft VS Code\Code.exe\" --extensions-dir \"C:\ProgramData\vscode-extensions\" \"%V\"" /f

REM --extensions-dir 付きで起動する code.cmd ラッパを作成
REM (%* を echo で書くと対話的 cmd で失われるため、PowerShell で [char]37+'*' を書き出す)
powershell -NoProfile -Command "$pct=[char]37; $q=[char]34; $c='@echo off'+[char]13+[char]10+$q+'C:\Program Files\Microsoft VS Code\bin\code.cmd'+$q+' --extensions-dir '+$q+'C:\ProgramData\vscode-extensions'+$q+' '+$pct+'*'+[char]13+[char]10; [IO.File]::WriteAllText('C:\ProgramData\vscode-extensions\vscode.cmd',$c,[Text.Encoding]::ASCII)"

REM 拡張機能のインストール
set "CODE=C:\Program Files\Microsoft VS Code\bin\code.cmd"
"%CODE%" --extensions-dir "C:\ProgramData\vscode-extensions" --uninstall-extension GitHub.copilot
"%CODE%" --extensions-dir "C:\ProgramData\vscode-extensions" --uninstall-extension GitHub.copilot-chat
"%CODE%" --extensions-dir "C:\ProgramData\vscode-extensions" --install-extension ms-python.python
"%CODE%" --extensions-dir "C:\ProgramData\vscode-extensions" --install-extension ms-python.vscode-pylance
"%CODE%" --extensions-dir "C:\ProgramData\vscode-extensions" --install-extension ms-python.debugpy
"%CODE%" --extensions-dir "C:\ProgramData\vscode-extensions" --install-extension MS-CEINTL.vscode-language-pack-ja
"%CODE%" --extensions-dir "C:\ProgramData\vscode-extensions" --install-extension saoudrizwan.claude-dev
"%CODE%" --extensions-dir "C:\ProgramData\vscode-extensions" --install-extension rust-lang.rust-analyzer
"%CODE%" --extensions-dir "C:\ProgramData\vscode-extensions" --install-extension tamasfe.even-better-toml
"%CODE%" --extensions-dir "C:\ProgramData\vscode-extensions" --install-extension anthropic.claude-code
"%CODE%" --extensions-dir "C:\ProgramData\vscode-extensions" --install-extension almenon.arepl
"%CODE%" --extensions-dir "C:\ProgramData\vscode-extensions" --list-extensions --show-versions

REM settings.json を作成(自動更新オフ、Python、Claude Code 設定)
if not exist "%APPDATA%\Code\User" mkdir "%APPDATA%\Code\User"
python -c "import json,os;data={'update.mode':'none','update.enableWindowsBackgroundUpdates':False,'extensions.autoUpdate':False,'python.defaultInterpreterPath':r'C:\Program Files\Python312\python.exe','claudeCode.environmentVariables':[{'name':'ANTHROPIC_API_KEY','value':'not-needed'},{'name':'ANTHROPIC_AUTH_TOKEN','value':'ollama'},{'name':'ANTHROPIC_BASE_URL','value':'http://localhost:11434'},{'name':'ANTHROPIC_MODEL','value':'glm-4.7-flash'},{'name':'CLAUDE_CODE_DISABLE_NONESSENTIAL_TRAFFIC','value':'1'}]};p=os.path.join(os.environ['APPDATA'],'Code','User','settings.json');open(p,'w',encoding='utf-8').write(json.dumps(data,indent=4));print('Done:',p)"

REM 自動更新の抑止ポリシー(settings.json に加えて、レジストリ側でも明示的にオフ)
reg add "HKLM\SOFTWARE\Policies\Microsoft\VSCode" /v "UpdateMode" /t REG_SZ /d "none" /f
echo === セットアップ完了 ===
2. Python インタプリタの選択
同一マシンに複数の Python がインストールされている場合,VS Code で使用する Python 本体(インタプリタ:Python プログラムを解釈・実行するソフトウェア)を選択する必要がある.
- コマンドパレット(コマンド名で機能を呼び出す VS Code の入力欄)を開く(
Ctrl+Shift+P) Python: Select Interpreterと入力する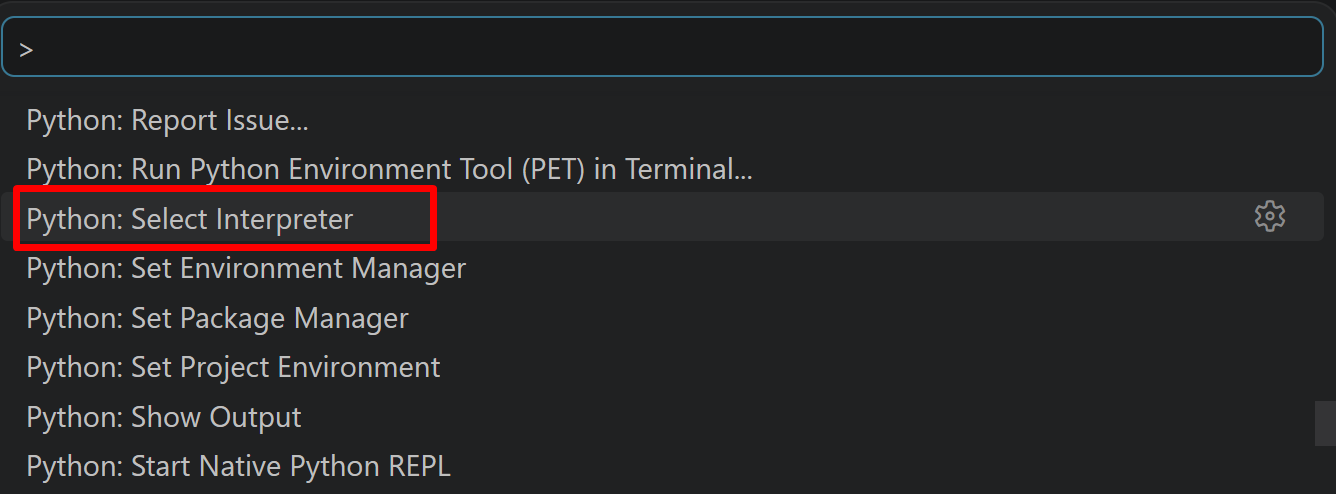
- 表示される一覧から,使用する Python(例:
C:\Program Files\Python312\python.exe)を選択する.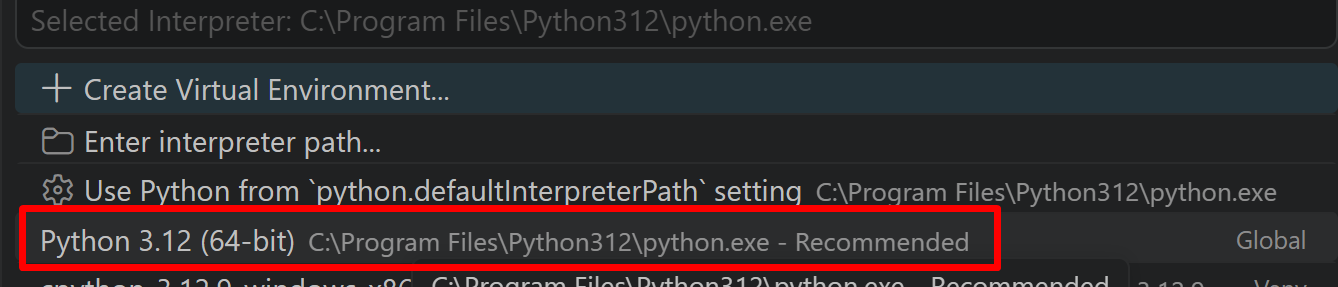
6. プログラムコード
# LCNN消失点検出プログラム
# リアルタイムWebカメラ入力による線分検出と消失点推定
# 論文: "End-to-End Wireframe Parsing" (ICCV 2019)
# GitHub: https://github.com/zhou13/lcnn
# 特徴: LCNNは線分と接合点を統合的に推定し,建築物や室内シーンの構造解析に利用できる
# 前準備: pip install --no-user -U opencv-python numpy scikit-image scikit-learn matplotlib scipy tensorboard tensorboardX pyyaml docopt
# cd /d c:%HOMEPATH%\Documents
# git clone https://github.com/zhou13/lcnn.git
# 設計方針:
# • 計算および描画はキャンバス座標系(512×512)で統一する
# • LCNN出力のH["lines"]は128×128のヒートマップ座標系の(y,x)形式であるため,
# 公式実装(demo.py)と同じく128で割ってからキャンバス幅・高さを掛け,(x,y)形式へ変換する
# • LCNNは同一の線分を繰り返して出力を埋めるため,公式実装と同じ方法で末尾の重複を取り除く
# • 画面上のテキスト描画は OpenCV の FontFace("uni") を使用し,外部フォントファイルを必要としない
# • cap.read() → if not ret: break の取得処理は変更しない
import os
import cv2
import numpy as np
import torch
import skimage.transform
import sys
import time
from datetime import datetime
import tkinter as tk
from tkinter import filedialog
import urllib.request
# 定数定義
INTERSECTION_THRESHOLD = 1e-10
MIN_LINE_LENGTH = 50
SCORE_THRESHOLD = 0.8
RANSAC_ITERATIONS = 1000
RANSAC_SAMPLE_SIZE = 2
RANSAC_DISTANCE_THRESHOLD = 5.0
MANHATTAN_ANGLE_TOLERANCE = 30.0
HISTOGRAM_BIN_WIDTH = 5.0
ITERATION_MAX_COUNT = 5
CONVERGENCE_THRESHOLD = 1.0
CLUSTER_RANGE = 15.0
RANDOM_SEED = 42
CANVAS_SIZE = 512 # 計算・描画をこの座標系で統一
VP_RADIUS = 15
# 日本語テキスト描画(OpenCV 5 の FontFace。外部フォントファイルを必要としない)
FONT = cv2.FontFace("uni")
FONT_SIZE = 20
TEXT_COLOR = (255, 255, 255)
VP_COLORS = [(255, 0, 0), (0, 255, 0), (0, 0, 255)]
# プログラム概要と操作方法の表示
print("=== LCNN消失点検出プログラム ===")
print("概要: 動画/カメラ映像から線分を検出し、Manhattan World制約とRANSACで消失点を推定する。")
print("操作方法: q キー: プログラム終了")
print("注意事項:")
print(" - カメラに直線的な構造物が映るように調整する")
print(" - 初回実行時はモデルの読み込みに時間がかかる場合がある")
print(" - 消失点はキャンバス座標系(512×512)で可視化する")
# LCNNパスを追加
lcnn_path = os.path.join(os.path.expanduser('~'), 'Documents', 'lcnn')
sys.path.insert(0, lcnn_path)
# LCNNライブラリのインポート
import lcnn
from lcnn.config import C, M
from lcnn.models.line_vectorizer import LineVectorizer
from lcnn.models.multitask_learner import MultitaskHead, MultitaskLearner
from lcnn.postprocess import postprocess
# パス設定
config_path = os.path.join(lcnn_path, 'config', 'wireframe.yaml')
checkpoint_path = os.path.join(lcnn_path, 'pretrained', 'Pretrained', '190418-201834-f8934c6-lr4d10-312k.pth')
# GPU/CPU自動選択
device = torch.device('cuda' if torch.cuda.is_available() else 'cpu')
print(f'デバイス: {str(device)}')
# GPU使用時の最適化
if device.type == 'cuda':
torch.backends.cudnn.benchmark = True
# LCNNモデルをロード
print("モデルを読み込み中...")
C.update(C.from_yaml(filename=config_path))
M.update(C.model)
# LCNNの配布チェックポイントは重み以外の情報も含むため weights_only=False を指定する
checkpoint = torch.load(checkpoint_path, map_location=device, weights_only=False)
model = lcnn.models.hg(
depth=M.depth,
head=lambda c_in, c_out: MultitaskHead(c_in, c_out),
num_stacks=M.num_stacks,
num_blocks=M.num_blocks,
num_classes=sum(sum(M.head_size, [])),
)
model = MultitaskLearner(model)
model = LineVectorizer(model)
model.load_state_dict(checkpoint["model_state_dict"])
model = model.to(device)
model.eval()
print("モデルの読み込み完了")
# LCNN出力をキャンバス座標系へ変換するヘルパ
def autoscale_lines_to_canvas(lines_yx, canvas_h, canvas_w):
"""
lines_yx: shape (N, 2, 2) with (y,x) order from LCNN(128×128のヒートマップ座標系)
戻り値: (x,y)形式に変換されたキャンバス座標の線分配列
"""
if len(lines_yx) == 0:
return lines_yx
scaled = lines_yx.astype(np.float32) / 128.0
lines_xy = np.zeros_like(scaled)
lines_xy[:, :, 0] = scaled[:, :, 1] * canvas_w # x座標
lines_xy[:, :, 1] = scaled[:, :, 0] * canvas_h # y座標
return lines_xy
# RANSACの初期シード設定(反復外で一度だけ設定)
np.random.seed(RANDOM_SEED)
# グローバル変数
frame_count = 0
results_log = []
def video_frame_processing(frame):
global frame_count
current_time = time.time()
frame_count += 1
# BGR→RGB変換(OpenCVはBGR,その後の処理はRGB想定)
frame_rgb = cv2.cvtColor(frame, cv2.COLOR_BGR2RGB)
# ネットワーク入力用にキャンバスへリサイズ(RGB形式で処理)
im = frame_rgb
if im.ndim == 2:
im = np.repeat(im[:, :, None], 3, 2)
im = im[:, :, :3]
im_resized = skimage.transform.resize(im, (CANVAS_SIZE, CANVAS_SIZE)) * 255.0 # RGB, float
image = (im_resized - M.image.mean) / M.image.stddev
image = torch.from_numpy(np.rollaxis(image, 2)[None].copy()).float()
# 推論実行
with torch.no_grad():
input_dict = {
"image": image.to(device),
"meta": [
{
"junc": torch.zeros(1, 2).to(device),
"jtyp": torch.zeros(1, dtype=torch.uint8).to(device),
"Lpos": torch.zeros(2, 2, dtype=torch.uint8).to(device),
"Lneg": torch.zeros(2, 2, dtype=torch.uint8).to(device),
}
],
"target": {
"jmap": torch.zeros([1, 1, 128, 128]).to(device),
"joff": torch.zeros([1, 1, 2, 128, 128]).to(device),
},
"mode": "testing",
}
H = model(input_dict)["preds"]
# LCNN出力((y,x))をキャンバス座標系の(x,y)へ変換
raw_lines = H["lines"][0].cpu().numpy() # (N,2,2) in (y,x)
scores = H["score"][0].cpu().numpy()
lines = autoscale_lines_to_canvas(raw_lines, CANVAS_SIZE, CANVAS_SIZE)
# 重複線分除去(LCNNは先頭の線分を繰り返して出力を埋めるため,その位置で打ち切る)
for i in range(1, len(lines)):
if (lines[i] == lines[0]).all():
lines = lines[:i]
scores = scores[:i]
break
# 後処理(キャンバス座標系で実施)
if len(lines) > 0:
diag = (CANVAS_SIZE**2 + CANVAS_SIZE**2) ** 0.5
nlines, nscores = postprocess(lines, scores, diag * 0.01, 0, False)
else:
nlines = []
nscores = []
# スコア閾値フィルタ
filtered_lines = []
filtered_scores = []
for line, score in zip(nlines, nscores):
if score >= SCORE_THRESHOLD:
filtered_lines.append(line)
filtered_scores.append(score)
# 線分から消失点を検出(既に(x,y)形式)
vanishing_points = []
if len(filtered_lines) >= 2:
height, width = CANVAS_SIZE, CANVAS_SIZE
# 線分の長さフィルタリング(座標系統一済み)
length_filtered_lines = []
length_filtered_scores = []
for line, score in zip(filtered_lines, filtered_scores):
(x1, y1), (x2, y2) = line # 既に(x,y)形式
length = np.hypot(x2 - x1, y2 - y1)
if length >= MIN_LINE_LENGTH:
length_filtered_lines.append([(x1, y1), (x2, y2)])
length_filtered_scores.append(score)
if len(length_filtered_lines) >= 2:
# 段階1: 方向クラスタリング
line_angles = []
for (x1, y1), (x2, y2) in length_filtered_lines:
angle = np.degrees(np.arctan2(y2 - y1, x2 - x1)) % 180.0
line_angles.append(angle)
num_bins = int(180 / HISTOGRAM_BIN_WIDTH)
angle_histogram = np.zeros(num_bins)
for angle in line_angles:
bin_idx = int(angle / HISTOGRAM_BIN_WIDTH)
if 0 <= bin_idx < num_bins:
angle_histogram[bin_idx] += 1
peak_threshold = max(1, int(len(length_filtered_lines) * 0.1))
peak_angles = []
for i in range(len(angle_histogram)):
if angle_histogram[i] >= peak_threshold:
is_peak = True
if i > 0 and angle_histogram[i] < angle_histogram[i - 1]:
is_peak = False
if i < len(angle_histogram) - 1 and angle_histogram[i] < angle_histogram[i + 1]:
is_peak = False
if is_peak:
peak_angles.append(i * HISTOGRAM_BIN_WIDTH)
direction_clusters = []
for peak_angle in peak_angles:
cluster_lines = []
cluster_scores = []
for i, angle in enumerate(line_angles):
angle_diff = min(abs(angle - peak_angle), 180 - abs(angle - peak_angle))
if angle_diff <= CLUSTER_RANGE:
cluster_lines.append(length_filtered_lines[i])
cluster_scores.append(length_filtered_scores[i])
if len(cluster_lines) >= 2:
direction_clusters.append((cluster_lines, cluster_scores, peak_angle))
# 段階2: Manhattan World制約
manhattan_groups = []
if len(direction_clusters) >= 2:
horizontal_clusters = []
vertical_clusters = []
for cluster_lines, cluster_scores, peak_angle in direction_clusters:
if (peak_angle <= MANHATTAN_ANGLE_TOLERANCE or
peak_angle >= 180 - MANHATTAN_ANGLE_TOLERANCE):
horizontal_clusters.append((cluster_lines, cluster_scores, peak_angle))
elif abs(peak_angle - 90) <= MANHATTAN_ANGLE_TOLERANCE:
vertical_clusters.append((cluster_lines, cluster_scores, peak_angle))
else:
manhattan_groups.append(((cluster_lines, cluster_scores, peak_angle), "diagonal"))
if horizontal_clusters:
horizontal_clusters.sort(key=lambda x: len(x[0]), reverse=True)
manhattan_groups.insert(0, (horizontal_clusters[0], "horizontal"))
if vertical_clusters:
vertical_clusters.sort(key=lambda x: len(x[0]), reverse=True)
manhattan_groups.insert(0, (vertical_clusters[0], "vertical"))
if len(manhattan_groups) == 0:
all_lines_group = [(line, score) for line, score in zip(length_filtered_lines, length_filtered_scores)]
manhattan_groups = [(all_lines_group, "general")]
else:
labeled_groups = []
for group_data, label in manhattan_groups:
cluster_lines, cluster_scores, _ = group_data
labeled_groups.append(([(line, score) for line, score in zip(cluster_lines, cluster_scores)], label))
manhattan_groups = labeled_groups
# 段階3-5: RANSAC + 重み付き最小二乗 + 反復改善
estimated_vps = []
for group_data, _group_type in manhattan_groups:
if len(group_data) >= 2:
group_lines = [item[0] for item in group_data]
group_scores = [item[1] for item in group_data]
# RANSAC(スコア重み付きサンプリング)
best_vp = None
best_support = 0
# スコアによる重み付きサンプリング確率を計算
normalized_scores = np.array(group_scores) / np.sum(group_scores)
for _ in range(RANSAC_ITERATIONS):
if len(group_lines) >= RANSAC_SAMPLE_SIZE:
# スコアに基づく重み付きサンプリング
indices = np.random.choice(len(group_lines), RANSAC_SAMPLE_SIZE,
replace=False, p=normalized_scores)
i1, i2 = indices[0], indices[1]
(x1, y1), (x2, y2) = group_lines[i1]
(x3, y3), (x4, y4) = group_lines[i2]
v1 = np.array([x2 - x1, y2 - y1], dtype=np.float64)
v2 = np.array([x4 - x3, y4 - y3], dtype=np.float64)
denom = v1[0] * v2[1] - v1[1] * v2[0]
if abs(denom) > INTERSECTION_THRESHOLD:
dx = x3 - x1
dy = y3 - y1
t = (dx * v2[1] - dy * v2[0]) / denom
vp_x = x1 + t * v1[0]
vp_y = y1 + t * v1[1]
# 一貫した境界判定
if -width * 2 <= vp_x <= width * 3 and -height * 2 <= vp_y <= height * 3:
support_count = 0
for (tx1, ty1), (tx2, ty2) in group_lines:
line_length = np.hypot(tx2 - tx1, ty2 - ty1)
if line_length > 0:
distance = abs((ty2 - ty1) * vp_x - (tx2 - tx1) * vp_y +
tx2 * ty1 - ty2 * tx1) / line_length
if distance <= RANSAC_DISTANCE_THRESHOLD:
support_count += 1
if support_count > best_support:
best_support = support_count
best_vp = (vp_x, vp_y)
if best_vp is not None and best_support >= 2:
vp_x, vp_y = best_vp
for _ in range(ITERATION_MAX_COUNT):
# 現在の距離計算
current_distances = []
for (x1, y1), (x2, y2) in group_lines:
line_length = np.hypot(x2 - x1, y2 - y1)
if line_length > 0:
distance = abs((y2 - y1) * vp_x - (x2 - x1) * vp_y +
x2 * y1 - y2 * x1) / line_length
current_distances.append(distance)
else:
current_distances.append(float('inf'))
# 重み付き最小二乗
A_matrix = []
b_vector = []
weights = []
for i, ((x1, y1), (x2, y2)) in enumerate(group_lines):
length = np.hypot(x2 - x1, y2 - y1)
confidence = group_scores[i]
distance = current_distances[i]
if length > 0 and distance < float('inf'):
weight = length * confidence / (1 + distance * distance)
a = y2 - y1
b_coeff = x1 - x2
c = x2 * y1 - x1 * y2
norm = np.hypot(a, b_coeff)
if norm > 0:
a /= norm
b_coeff /= norm
c /= norm
A_matrix.append([a, b_coeff])
b_vector.append(-c)
weights.append(weight)
if len(A_matrix) >= 2:
A_matrix = np.array(A_matrix, dtype=np.float64)
b_vector = np.array(b_vector, dtype=np.float64)
weights = np.array(weights, dtype=np.float64)
W = np.diag(weights)
AtWA = A_matrix.T @ W @ A_matrix
AtWb = A_matrix.T @ W @ b_vector
# 数値安定性向上:正則化係数を加える
AtWA += 1e-2 * np.eye(2)
# 判定閾値
if np.linalg.det(AtWA) > 1e-6:
solution = np.linalg.solve(AtWA, AtWb)
new_vp_x, new_vp_y = solution
change = np.hypot(new_vp_x - vp_x, new_vp_y - vp_y)
vp_x, vp_y = new_vp_x, new_vp_y
if change < CONVERGENCE_THRESHOLD:
break
estimated_vps.append((vp_x, vp_y, best_support))
# 画像境界の拡張範囲でフィルタ(一貫した判定)
for vp_x, vp_y, support in estimated_vps:
if -width * 2 <= vp_x <= width * 3 and -height * 2 <= vp_y <= height * 3:
vanishing_points.append((int(vp_x), int(vp_y), support))
# 表示用フレーム(RGB形式で作成)
result = np.clip(im_resized, 0, 255).astype(np.uint8)
# 線分描画(OpenCV用にBGRに変換)
result_bgr = cv2.cvtColor(result, cv2.COLOR_RGB2BGR)
for (x1, y1), (x2, y2) in filtered_lines:
cv2.line(result_bgr, (int(x1), int(y1)), (int(x2), int(y2)), (0, 255, 0), 2)
# 消失点を描画(円とラベル)
for i, (vp_x, vp_y, _count) in enumerate(vanishing_points):
cv2.circle(result_bgr, (vp_x, vp_y), VP_RADIUS, VP_COLORS[i % len(VP_COLORS)], -1)
cv2.putText(result_bgr, f"消失点{i+1}", (vp_x + 20, vp_y - 10), TEXT_COLOR, FONT, FONT_SIZE)
# 情報表示
cv2.putText(result_bgr, f"線分数: {len(filtered_lines)}, 消失点: {len(vanishing_points)}",
(10, 30), TEXT_COLOR, FONT, FONT_SIZE)
# 結果文字列の作成
result_str = f"消失点数: {len(vanishing_points)}個, 線分数: {len(filtered_lines)}"
if vanishing_points:
result_str += " 座標:"
for i, (vp_x, vp_y, support) in enumerate(vanishing_points):
result_str += f" 消失点{i+1}({vp_x},{vp_y},支持:{support})"
return result_bgr, result_str, current_time
# --- 実行開始 ---
print("0: 動画ファイル")
print("1: カメラ")
print("2: サンプル動画")
choice = input("選択: ")
if choice == '0':
root = tk.Tk()
root.withdraw()
path = filedialog.askopenfilename()
if not path:
print('ファイルが選択されませんでした。終了します。')
sys.exit(0)
cap = cv2.VideoCapture(path)
elif choice == '1':
cap = cv2.VideoCapture(0, cv2.CAP_DSHOW)
if not cap.isOpened():
cap = cv2.VideoCapture(0)
cap.set(cv2.CAP_PROP_BUFFERSIZE, 1)
else:
SAMPLE_URL = 'https://raw.githubusercontent.com/opencv/opencv/master/samples/data/vtest.avi'
SAMPLE_FILE = 'vtest.avi'
urllib.request.urlretrieve(SAMPLE_URL, SAMPLE_FILE)
cap = cv2.VideoCapture(SAMPLE_FILE)
if not cap.isOpened():
print('動画ファイル・カメラを開けませんでした')
sys.exit(1)
print('\n=== 動画処理開始 ===')
print('操作方法: q キー: プログラム終了')
try:
while True:
ret, frame = cap.read()
if not ret:
break
MAIN_FUNC_DESC = "LCNN消失点検出"
processed_frame, result, current_time = video_frame_processing(frame)
cv2.imshow(MAIN_FUNC_DESC, processed_frame)
if choice == '1':
prefix = datetime.fromtimestamp(current_time).strftime("%Y-%m-%d %H:%M:%S.%f")[:-3]
else:
prefix = str(frame_count)
log_line = f"{prefix} {result}"
print(log_line)
results_log.append(log_line)
if cv2.waitKey(1) & 0xFF == ord('q'):
break
finally:
print('\n=== プログラム終了 ===')
cap.release()
cv2.destroyAllWindows()
if results_log:
with open('result.txt', 'w', encoding='utf-8') as f:
f.write('=== 結果 ===\n')
f.write(f'処理フレーム数: {frame_count}\n')
f.write(f'使用デバイス: {str(device).upper()}\n')
if device.type == 'cuda':
f.write(f'GPU: {torch.cuda.get_device_name(0)}\n')
f.write('\n')
f.write('\n'.join(results_log))
print('\n処理結果をresult.txtに保存しました')
7. 使用方法
実行手順
- プログラムファイルを
lcnn_vanishing_point.pyとして%USERPROFILE%\Documentsに保存する。 - Webカメラを使う場合は、Webカメラが接続されていることを確認する。
- コマンドプロンプトで次を実行する。
cd /d c:%HOMEPATH%\Documents
python lcnn_vanishing_point.py
- 入力を「0:動画ファイル,1:カメラ,2:サンプル動画」から選ぶ。
- リアルタイムで線分検出と消失点推定が実行される。
- 緑色の線が検出された線分、赤・緑・青の円と「消失点1」などのラベルが推定された消失点を示す。
- 'q'キーを押すとプログラムが終了し、各フレームの結果が result.txt に保存される。
動作確認のポイント
建築物や室内の角、直線的な構造物をカメラに向けると、線分が検出され消失点が推定される。Manhattan World仮定に基づく3つの主要な消失点(水平方向2つ、垂直方向1つ)の検出が期待される。
8. 実験・探求のアイデア
AIモデル選択による比較実験
LCNN以外の線分検出手法との比較実験を実施し、検出精度や処理速度の違いを評価する。比較の相手としては、OpenCVのHoughLinesPやLSDのような従来手法のほか、LCNNより後に提案された学習ベースの手法(HAWP、M-LSD、DeepLSD、ScaleLSDなど)も候補になる。config/wireframe.yaml内の設定変更による検出挙動の変化を観察する。
実験要素の調整
プログラム内の定数(SCORE_THRESHOLD、MIN_LINE_LENGTH、RANSAC_ITERATIONS等)を変更し、検出性能への影響を観察する。Manhattan World制約の有無による消失点推定精度の変化を検証する。
体験・実験・探求のアイデア
異なる環境(屋外建築物、室内空間、人工構造物)での検出性能の違いを調査する。カメラの角度や距離を変化させて、消失点推定の安定性を評価する。複数の消失点が同時に検出される条件を探求し、3点透視図法の原理を実際に確認する。検出された線分情報を用いて、建築物の3次元構造推定や平面検出への応用可能性を検討する。静止画入力への改造や処理速度の最適化についても実験し、LCNNの内部動作(接合点提案モジュール、線分サンプリングモジュール、線分検証モジュール)の理解を深める。