MMPretrain による画像分類(静止画像向けプログラム)(ソースコードと説明と利用ガイド)
プログラム利用ガイド
1. このプログラムの利用シーン
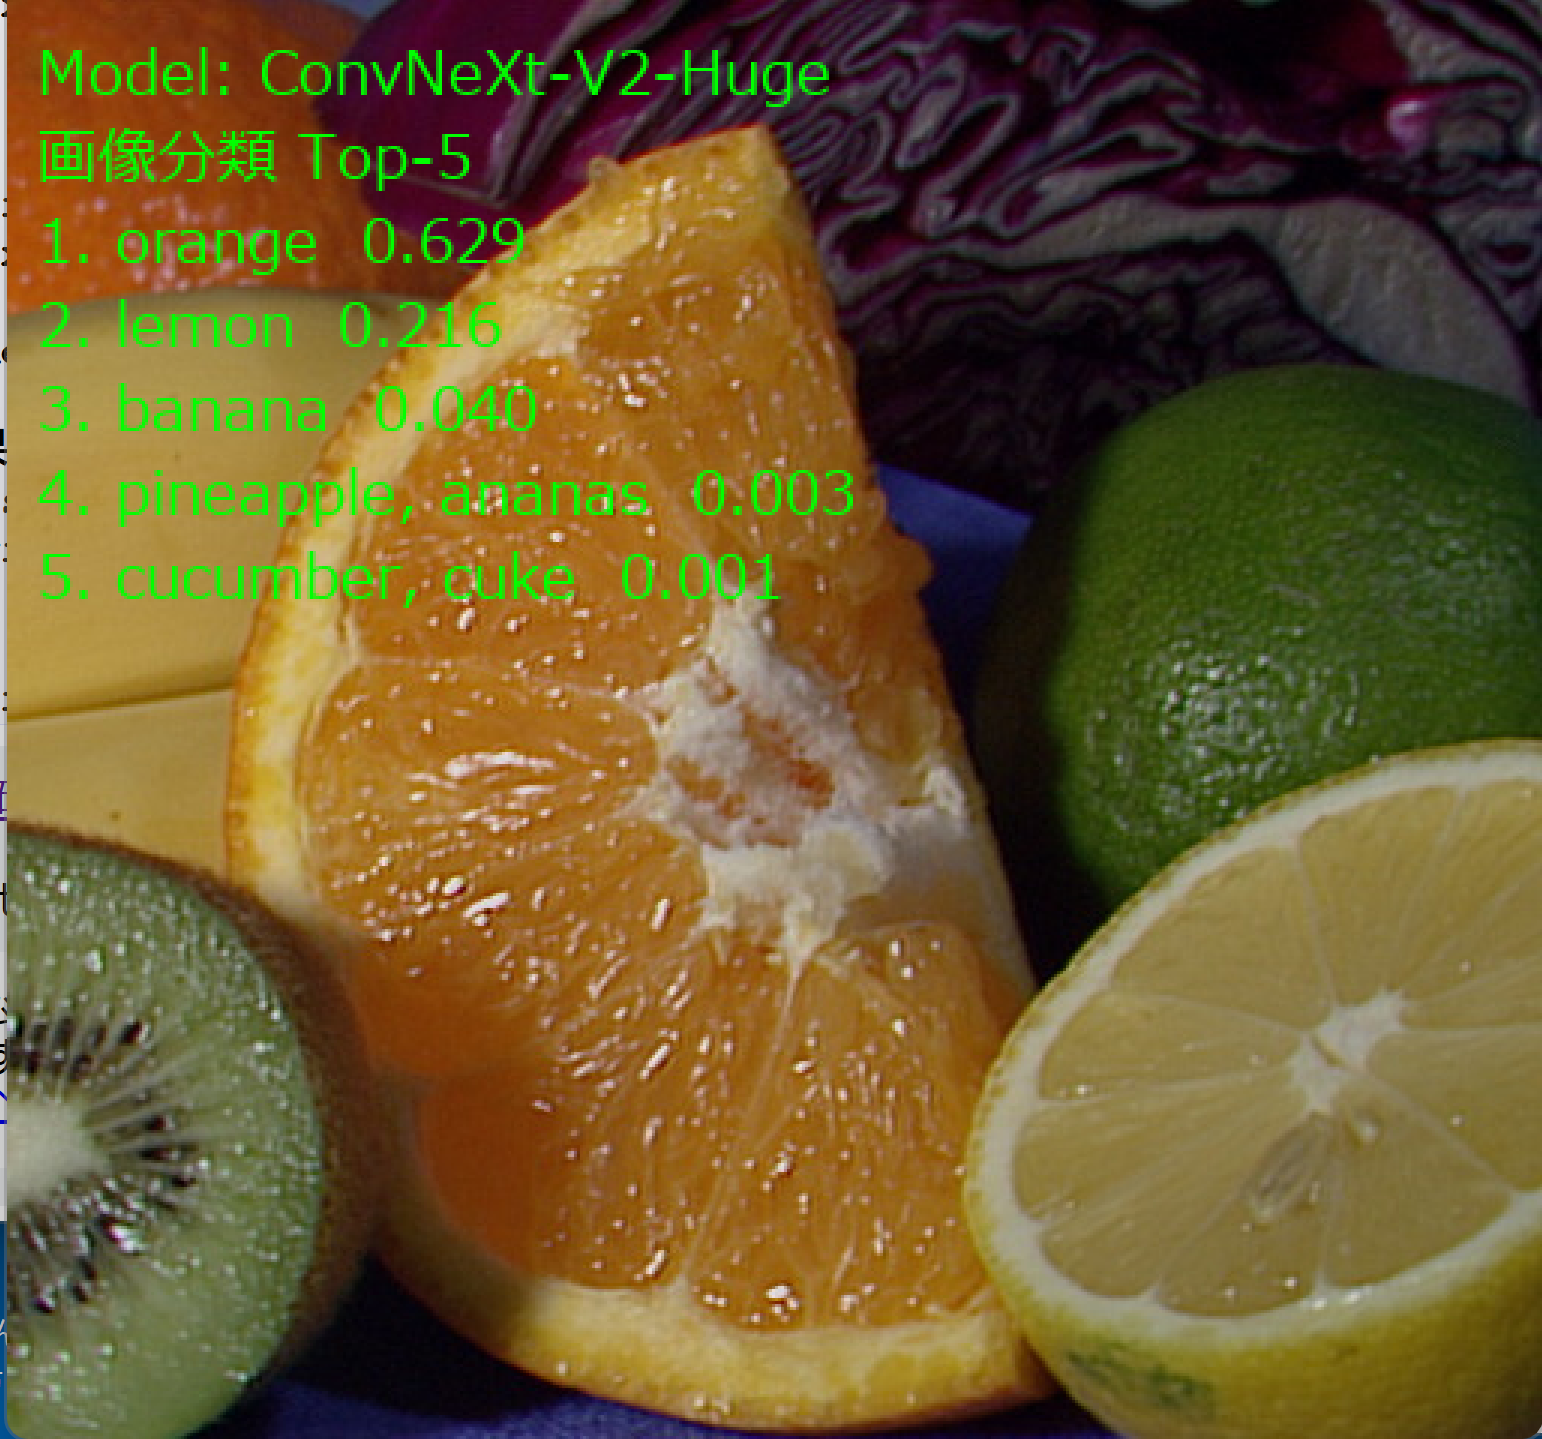
静止画像の内容を自動的に識別するプログラムである。写真に写っている物体や動物、風景などを判定し、上位5つの候補とその確率を表示する。
2. 主な機能
- 6種類のCNNモデルから選択可能である。モデルによってパラメータ数と精度が異なる。
- 画像ファイル、Webカメラ、サンプル画像の3つの入力方法に対応する。
- 分類結果をTop-5形式で画面とファイルに出力する。
- GPU利用可能な環境では自動的にGPUを使用する。
3. 基本的な使い方
- モデル選択
プログラム起動後、0から5の番号を入力してモデルを選択する。初回実行時はモデルの自動ダウンロードが行われる。
- 入力方法の選択
0(画像ファイル)、1(カメラ)、2(サンプル画像)のいずれかを入力する。
- 画像の処理
- 画像ファイル選択時:ダイアログで画像を選択すると、分類結果が表示される。
- カメラ選択時:スペースキーで撮影し、qキーで終了する。
- サンプル画像選択時:自動的にダウンロードされ、分類結果が表示される。
- 終了
任意のキーを押してプログラムを終了する。
4. 便利な機能
- 複数画像の一括処理
画像ファイル選択時、複数の画像を同時に選択して一括処理できる。
- 結果の自動保存
すべての分類結果がresult.txtファイルに自動保存される。
- 視覚的な結果表示
元画像と分類結果を並べて表示するため、結果を直感的に確認できる。
Python 3.12 のインストール
Pythonのインストールを行い、Pythonのプログラムを実行する環境を整える。扱う環境は、Windows搭載パソコンである。金子研究室では、Python 3.12.10を推奨する。
[Windows での Python 3.12 のインストール手順を見るには、ここをクリック]
Windows での Python 3.12 のインストール
以下のいずれかの方法でPython 3.12をインストールする。Pythonがインストール済みの場合、この手順は不要である。
方法 1:winget によるインストール
【インストールコマンドの実行方法】
管理者権限でコマンドプロンプトを起動する(手順:Windowsキーまたはスタートメニュー → cmd と入力 → 右クリック → 「管理者として実行」)。そして、コマンド全体をコマンドプロンプトにコピー&ペーストする。
--scope machine を指定することで、システム全体(全ユーザー向け)にインストールされる。このオプションの実行には管理者権限が必要である。インストール完了後、コマンドプロンプトを再起動するとPATHが反映される。
REM Python 3.12 をシステム領域にインストール
winget install --id Python.Python.3.12 -e --scope machine --silent --accept-source-agreements --accept-package-agreements --override "/quiet InstallAllUsers=1 PrependPath=1 Include_test=0 Include_pip=1 Include_launcher=1 InstallLauncherAllUsers=1 TargetDir=\"C:\Program Files\Python312\""

REM Python と Scripts を PATH 先頭に追加
powershell -NoProfile -Command "$p='C:\Program Files\Python312'; $s=\"$p\Scripts\"; $c=[Environment]::GetEnvironmentVariable('Path','Machine'); if((Test-Path $p) -and (';'+$c+';' -notlike \"*;$p;*\") -and (';'+$c+';' -notlike \"*;$s;*\")){[Environment]::SetEnvironmentVariable('Path',\"$p;$s;$c\",'Machine')}"
方法 2:インストーラーによるインストール
- Python公式サイト(https://www.python.org/downloads/)にアクセスし、「Download Python 3.x.x」ボタンからWindows用インストーラーをダウンロードする。
- ダウンロードしたインストーラーを実行する。
- 初期画面の下部に表示される「Add python.exe to PATH」にチェックを入れてから「Customize installation」を選択する。このチェックを入れ忘れると、コマンドプロンプトから
pythonコマンドを実行できない。 - 「Install Python 3.xx for all users」にチェックを入れ、「Install」をクリックする。
インストールの確認
コマンドプロンプトで以下を実行する。
python --versionバージョン番号(例:Python 3.12.x)が表示されればインストール成功である。「'python' は、内部コマンドまたは外部コマンドとして認識されていません。」と表示される場合は、インストールが正常に完了していない。
Python の開発環境 Visual Studio Code のインストールと Python 用の設定
Python の開発環境Visual Studio Code(プログラムを編集するソフトウェア。以下、VS Code)を整える。
[Windows での Visual Studio Code のインストールと Python 用の設定手順を見るには、ここをクリック]
Windows での Visual Studio Code のインストールと Python 用の設定手順
1. VS Code と拡張機能のインストール
以下のコマンドにより,既存の VS Code を削除し,全ユーザー共有の設定で再インストールしたうえで,拡張機能(VS Code に機能を追加するソフトウェア)をまとめて導入する.
【インストールコマンドの実行方法】
管理者権限でコマンドプロンプトを起動する(手順:Windows キーまたはスタートメニュー → cmd と入力 → 右クリック → 「管理者として実行」)。そして,コマンド全体をコマンドプロンプトにコピー&ペーストする。
インストールコマンド
REM ============================================================
REM Microsoft Visual Studio Code
REM ============================================================
winget uninstall -e --id Microsoft.VisualStudioCode --silent --disable-interactivity --accept-source-agreements
rmdir /s /q C:\ProgramData\vscode-extensions 2>nul
rmdir /s /q "%APPDATA%\Code" 2>nul
rmdir /s /q "%USERPROFILE%\.vscode" 2>nul
rmdir /s /q "%LOCALAPPDATA%\Microsoft\vscode-update" 2>nul

REM VS Code をシステム領域に新規インストール
winget install --scope machine --id Microsoft.VisualStudioCode -e --silent --accept-source-agreements --accept-package-agreements

REM 全ユーザー共有の拡張機能フォルダ
mkdir C:\ProgramData\vscode-extensions 2>nul
icacls "C:\ProgramData\vscode-extensions" /grant "Everyone:(OI)(CI)M" /T

REM スタートメニューのショートカットを --extensions-dir 付きで再作成
rmdir /s /q "C:\ProgramData\Microsoft\Windows\Start Menu\Programs\Visual Studio Code" 2>nul
del "C:\ProgramData\Microsoft\Windows\Start Menu\Programs\Visual Studio Code.lnk" 2>nul
powershell -NoProfile -Command "$s=New-Object -ComObject WScript.Shell; $lnk=$s.CreateShortcut('C:\ProgramData\Microsoft\Windows\Start Menu\Programs\Visual Studio Code.lnk'); $lnk.TargetPath='C:\Program Files\Microsoft VS Code\Code.exe'; $lnk.Arguments='--extensions-dir \"C:\ProgramData\vscode-extensions\"'; $lnk.Save()"
REM ショートカットの検証
powershell -NoProfile -Command "$s=New-Object -ComObject WScript.Shell; $lnk=$s.CreateShortcut('C:\ProgramData\Microsoft\Windows\Start Menu\Programs\Visual Studio Code.lnk'); Write-Host 'TargetPath:' $lnk.TargetPath; Write-Host 'Arguments:' $lnk.Arguments"

REM ファイル / フォルダ右クリックの「Code で開く」を登録
reg add "HKLM\SOFTWARE\Classes\*\shell\VSCode\command" /ve /d "\"C:\Program Files\Microsoft VS Code\Code.exe\" --extensions-dir \"C:\ProgramData\vscode-extensions\" \"%1\"" /f
reg add "HKLM\SOFTWARE\Classes\Directory\shell\VSCode\command" /ve /d "\"C:\Program Files\Microsoft VS Code\Code.exe\" --extensions-dir \"C:\ProgramData\vscode-extensions\" \"%1\"" /f
reg add "HKLM\SOFTWARE\Classes\Directory\Background\shell\VSCode\command" /ve /d "\"C:\Program Files\Microsoft VS Code\Code.exe\" --extensions-dir \"C:\ProgramData\vscode-extensions\" \"%V\"" /f

REM --extensions-dir 付きで起動する code.cmd ラッパを作成
REM (%* を echo で書くと対話的 cmd で失われるため、PowerShell で [char]37+'*' を書き出す)
powershell -NoProfile -Command "$pct=[char]37; $q=[char]34; $c='@echo off'+[char]13+[char]10+$q+'C:\Program Files\Microsoft VS Code\bin\code.cmd'+$q+' --extensions-dir '+$q+'C:\ProgramData\vscode-extensions'+$q+' '+$pct+'*'+[char]13+[char]10; [IO.File]::WriteAllText('C:\ProgramData\vscode-extensions\vscode.cmd',$c,[Text.Encoding]::ASCII)"

REM 拡張機能のインストール
set "CODE=C:\Program Files\Microsoft VS Code\bin\code.cmd"
"%CODE%" --extensions-dir "C:\ProgramData\vscode-extensions" --uninstall-extension GitHub.copilot
"%CODE%" --extensions-dir "C:\ProgramData\vscode-extensions" --uninstall-extension GitHub.copilot-chat
"%CODE%" --extensions-dir "C:\ProgramData\vscode-extensions" --install-extension ms-python.python
"%CODE%" --extensions-dir "C:\ProgramData\vscode-extensions" --install-extension ms-python.vscode-pylance
"%CODE%" --extensions-dir "C:\ProgramData\vscode-extensions" --install-extension ms-python.debugpy
"%CODE%" --extensions-dir "C:\ProgramData\vscode-extensions" --install-extension MS-CEINTL.vscode-language-pack-ja
"%CODE%" --extensions-dir "C:\ProgramData\vscode-extensions" --install-extension saoudrizwan.claude-dev
"%CODE%" --extensions-dir "C:\ProgramData\vscode-extensions" --install-extension rust-lang.rust-analyzer
"%CODE%" --extensions-dir "C:\ProgramData\vscode-extensions" --install-extension tamasfe.even-better-toml
"%CODE%" --extensions-dir "C:\ProgramData\vscode-extensions" --install-extension anthropic.claude-code
"%CODE%" --extensions-dir "C:\ProgramData\vscode-extensions" --install-extension almenon.arepl
"%CODE%" --extensions-dir "C:\ProgramData\vscode-extensions" --list-extensions --show-versions
echo === セットアップ完了 ===
2. Python インタプリタの選択
同一マシンに複数の Python がインストールされている場合,VS Code で使用する Python 本体(インタプリタ:Python プログラムを解釈・実行するソフトウェア)を選択する必要がある.
- コマンドパレット(コマンド名で機能を呼び出す VS Code の入力欄)を開く(
Ctrl+Shift+P) Python: Select Interpreterと入力する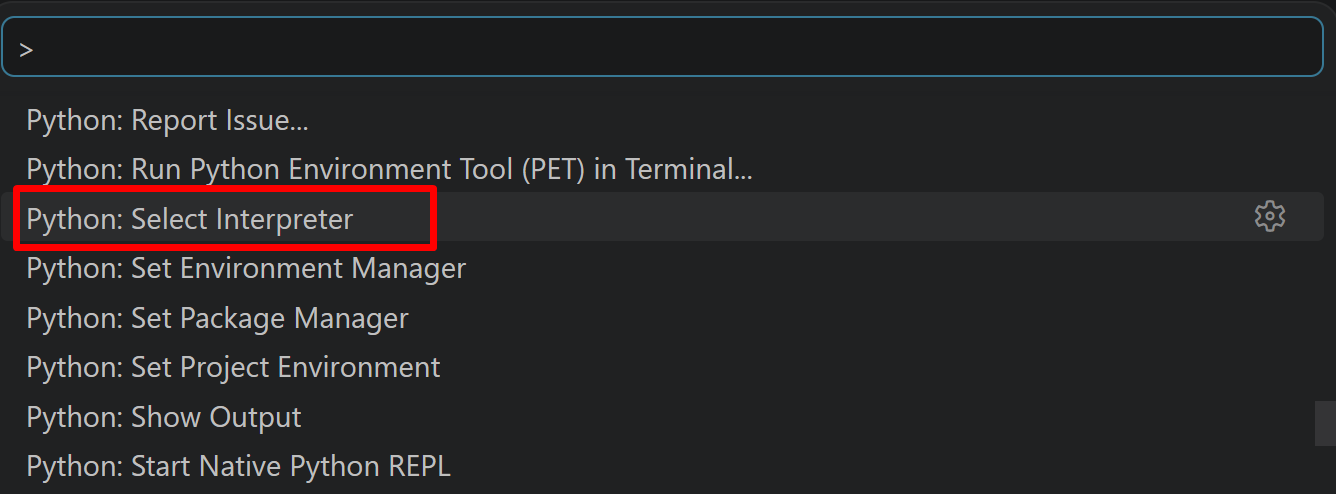
- 表示される一覧から,使用する Python(例:
C:\Program Files\Python312\python.exe)を選択する.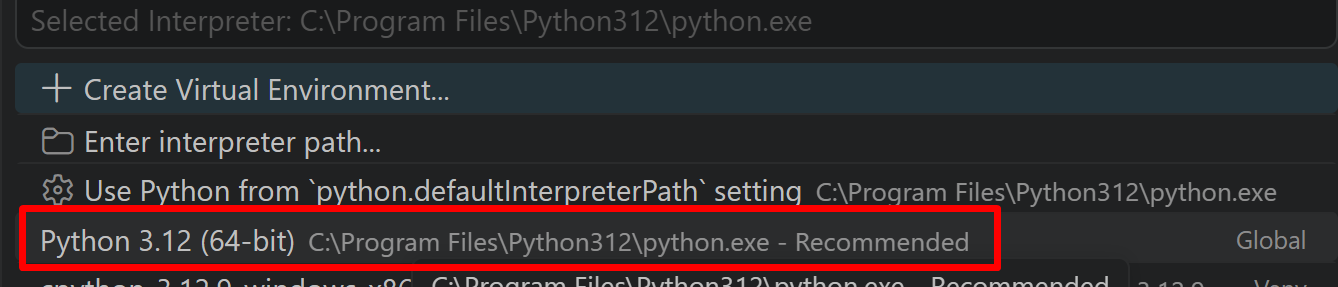
必要なライブラリをシステム領域にインストール
管理者権限のコマンドプロンプトで以下を実行する。管理者権限のコマンドプロンプトを起動するには、Windows キーまたはスタートメニューから「cmd」と入力し、表示された「コマンドプロンプト」を右クリックして「管理者として実行」を選択する。
REM PyTorch をインストール(GPU対応版)
set "CUDA_TAG=cu128"
set "PYTHON_PATH=C:\Program Files\Python312"
"%PYTHON_PATH%\Scripts\pip" install --no-user -U numpy torch torchvision torchaudio --index-url https://download.pytorch.org/whl/%CUDA_TAG%
pip install mmengine mmcv-lite opencv-python pillow
pip install transformers==4.36.2 --force-reinstall
pip install --no-build-isolation mmpretrain
MMPretrain画像分類プログラム
概要
このプログラムは、MMPretrainライブラリを使用して静止画像の分類を行う。事前訓練済みの畳み込みニューラルネットワーク(CNN)モデルを用いて、入力画像に対するTop-5分類結果を出力する。
主要技術
ConvNeXt V2
2023年にWooらが提案した純粋畳み込みアーキテクチャである[1]。Fully Convolutional Masked Autoencoder(FCMAE)とGlobal Response Normalization(GRN)を組み合わせることで、Transformerを使用せずにImageNet分類で競争力のある性能を達成する。
MMPretrain
OpenMMLab が開発する画像分類・事前訓練のためのツールボックスである[2]。統一されたAPIにより、複数の事前訓練モデルを簡単に利用できる。
技術的特徴
- FCMAE(Fully Convolutional Masked Autoencoder)
畳み込み層のみで構成されたマスク画像モデリングフレームワークである。入力画像の一部をマスクし、残りの領域から元の画像を再構成することで特徴表現を学習する。
- GRN(Global Response Normalization)
チャンネル間の特徴競合を強化する正規化層である。各チャンネルの応答を全体的に正規化することで、マスク入力に対する学習を改善する。
- 純粋畳み込みアーキテクチャ
Vision Transformerと異なり、self-attentionを使用せず畳み込み層のみで構成される。これにより計算効率を維持しながら競争力のある精度を実現する。
- モデルスケーリング
3.7Mパラメータ(Atto)から650Mパラメータ(Huge)まで、用途に応じたモデルサイズを選択できる。
実装の特色
- 複数モデル対応
ResNet50、ConvNeXt-Tiny、ConvNeXt-Base、EfficientNet-B4、ConvNeXt-V2-Atto、ConvNeXt-V2-Hugeの6種類から選択可能である。
- 柔軟な入力方法
画像ファイル選択、Webカメラからの撮影、サンプル画像ダウンロードの3つの入力方法に対応する。
- デバイス自動選択
CUDA対応GPUが利用可能な場合は自動的にGPUを使用し、それ以外はCPUで動作する。
- 日本語表示対応
Pillowライブラリを使用して、OpenCV画面上に日本語フォント(Meiryo)で分類結果を表示する。
- 結果の永続化
すべての分類結果をresult.txtファイルに保存し、使用デバイス情報とともに記録する。
参考文献
[1] Woo, S., Debnath, S., Hu, R., Chen, X., Liu, Z., Kweon, I. S., & Xie, S. (2023). ConvNeXt V2: Co-designing and Scaling ConvNets with Masked Autoencoders. In Proceedings of the IEEE/CVF Conference on Computer Vision and Pattern Recognition (CVPR) (pp. 16133-16142). https://openaccess.thecvf.com/content/CVPR2023/papers/
[2] MMPretrain Contributors. (2023). OpenMMLab's Pre-training Toolbox and Benchmark. https://github.com/open-mmlab/mmpretrain
ソースコード
"""
- プログラム名: MMPretrain画像分類デモプログラム
- 特徴技術名: ConvNeXt V2(純粋ConvNet)
- 出典: S. Woo, S. Debnath, R. Hu, X. Chen, Z. Liu, I. S. Kweon, and S. Xie, "ConvNeXt V2: Co-designing and Scaling ConvNets with Masked Autoencoders," in Proc. IEEE/CVF Conf. Computer Vision and Pattern Recognition (CVPR), 2023, pp. 16133-16142.
- 特徴機能: Fully Convolutional Masked Autoencoder (FCMAE)とGlobal Response Normalization (GRN)による自己教師あり学習。従来のConvNetでImageNet精度を達成し、公開データのみを使用した手法
- 特徴技術および学習済みモデルの利用制限: ImageNet事前訓練・ファインチューニング済みモデルはCC-BY-NC-4.0ライセンス(非商用のみ、帰属表示必須)。商用利用には制限あり。コード自体はMITライセンス。必ず利用者自身で公式リポジトリ(https://github.com/facebookresearch/ConvNeXt-V2)の利用制限を確認すること。
- 学習済みモデル:
各モデルの学習済み重みの詳細情報
- ResNet50: 25.6Mパラメータ 98MBファイルサイズ 224x224入力 ImageNet-1k 1.28M画像 90エポック訓練
- ConvNeXt-Tiny: 28.6Mパラメータ 109MBファイルサイズ 224x224入力 ImageNet-1k 1.28M画像 300エポック訓練
- ConvNeXt-Base: 88.6Mパラメータ 338MBファイルサイズ 224x224入力 ImageNet-1k 1.28M画像 300エポック訓練
- EfficientNet-B4: 19.3Mパラメータ 74MBファイルサイズ 380x380入力 ImageNet-1k 1.28M画像訓練
- ConvNeXt-V2-Atto: 3.7Mパラメータ 15MBファイルサイズ 224x224入力 FCMAE自己教師あり事前訓練→ImageNet-1kファインチューニング
- ConvNeXt-V2-Huge: 650Mパラメータ 2.4GBファイルサイズ 224x224入力 ImageNet-22k 14M画像FCMAE事前訓練→ImageNet-1kファインチューニング
全モデル MMPretrainライブラリ経由で自動ダウンロード
- 方式設計
- 関連利用技術:
* MMPretrain(OpenMMLab画像分類ツールボックス、統一的なAPIと豊富な事前訓練モデルを提供)
* PyTorch(深層学習フレームワーク、動的計算グラフと柔軟なモデル定義を提供)
* MMCV(OpenMMLab基盤ライブラリ、画像処理とデータ変換機能を提供)
- 入力と出力:
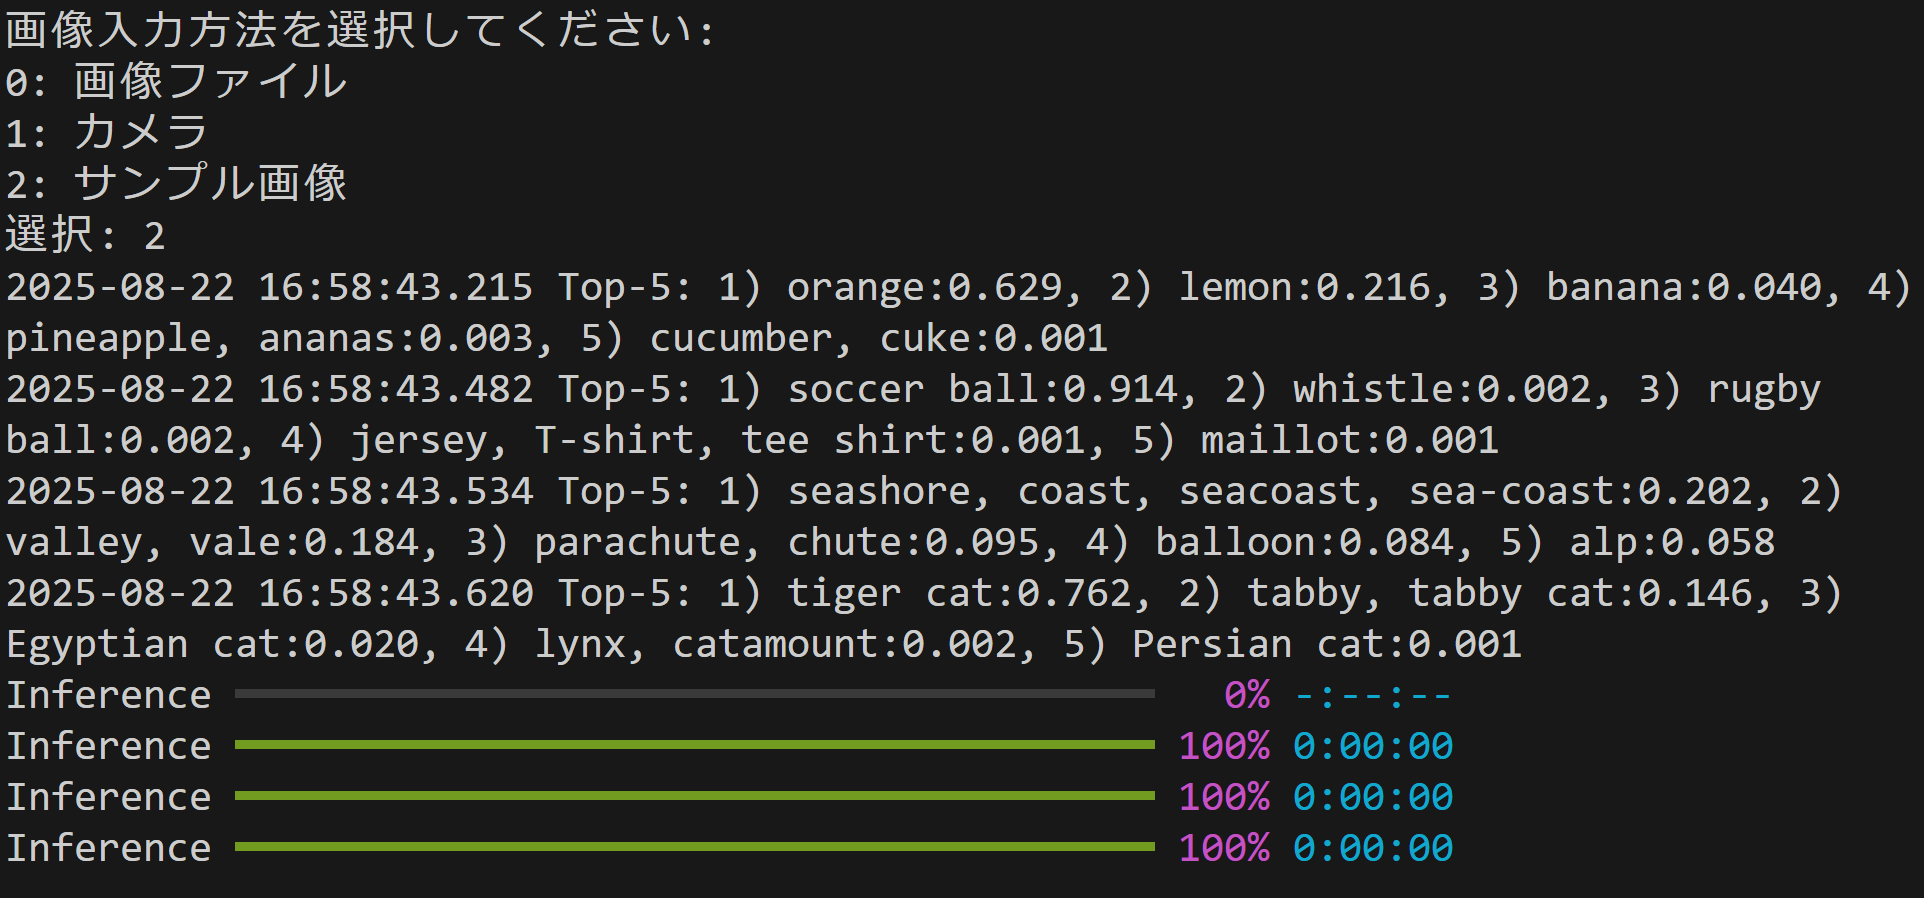
入力: 1つの静止画像,カメラ(ユーザは「0:画像ファイル,1:カメラ,2:サンプル画像」のメニューで選択.0:画像ファイルの場合はtkinterでファイル選択可能.1の場合はOpenCVでカメラが開き,スペースキーで撮影.2の場合はhttps://raw.githubusercontent.com/opencv/opencv/master/samples/data/fruits.jpg とhttps://raw.githubusercontent.com/opencv/opencv/master/samples/data/messi5.jpgとhttps://raw.githubusercontent.com/opencv/opencv/master/samples/data/aero3.jpgとhttps://upload.wikimedia.org/wikipedia/commons/3/3a/Cat03.jpgからダウンロード)
出力: 処理結果をOpenCV画面でリアルタイムに表示.OpenCV画面内に処理結果をテキストで表示.さらに,print()で処理結果を表示.プログラム終了時にprint()で表示した処理結果をresult.txtファイルに保存し,「result.txtに保存」したことをprint()で表示.プログラム開始時に,プログラムの概要,ユーザが行う必要がある操作(もしあれば)をprint()で表示
- 処理手順: 1)モデル初期化(ConvNeXt V2事前訓練モデル読み込み)、2)画像入力(ファイル/カメラ/サンプルから選択)、3)前処理(画像リサイズと正規化)、4)推論実行(FCMAE学習とGRNによる特徴抽出と分類)、5)結果出力(予測クラスと信頼度表示)
- 前処理、後処理: 前処理:画像を224x224ピクセルにリサイズ、ImageNet統計による正規化(平均値と標準偏差でピクセル値を正規化)。後処理:softmax関数による確率変換、上位予測クラスの選択
- 追加処理: なし
- 調整を必要とする設定値: なし(デモプログラムのため固定設定)
- 将来方策: デモプログラムのため特別な調整値なし
- その他の重要事項: 初回実行時はモデルの自動ダウンロードが発生し時間を要する場合がある
- 前準備:
pip install mmengine mmcv-lite opencv-python pillow
pip install transformers==4.36.2 --force-reinstall
pip install --no-build-isolation mmpretrain
"""
import cv2
import tkinter as tk
from tkinter import filedialog
import urllib.request
import os
import ssl
import time
from datetime import datetime
import traceback
import numpy as np
import torch
from PIL import Image, ImageDraw, ImageFont
from mmpretrain import ImageClassificationInferencer
ssl._create_default_https_context = ssl._create_unverified_context
# 日本語フォント設定
FONT_PATH = 'C:/Windows/Fonts/meiryo.ttc'
FONT_SIZE = 20
# GPU/CPU自動選択
device = torch.device('cuda' if torch.cuda.is_available() else 'cpu')
print(f'デバイス: {str(device)}')
# GPU使用時の最適化
if device.type == 'cuda':
torch.backends.cudnn.benchmark = True
# モデル一覧(環境のmmpretrain版によりID差異の可能性あり)
models = {
'0': {'name': 'ResNet50', 'model_id': 'resnet50_8xb32_in1k', 'params': '25.6M', 'size': '98MB', 'input': '224x224', 'pretrain': 'ImageNet-1k 1.28M画像 90エポック'},
'1': {'name': 'ConvNeXt-Tiny', 'model_id': 'convnext-tiny_32xb128_in1k', 'params': '28.6M', 'size': '109MB', 'input': '224x224', 'pretrain': 'ImageNet-1k 1.28M画像 300エポック'},
'2': {'name': 'ConvNeXt-Base', 'model_id': 'convnext-base_32xb128_in1k', 'params': '88.6M', 'size': '338MB', 'input': '224x224', 'pretrain': 'ImageNet-1k 1.28M画像 300エポック'},
'3': {'name': 'EfficientNet-B4', 'model_id': 'efficientnet-b4_3rdparty_8xb32_in1k', 'params': '19.3M', 'size': '74MB', 'input': '380x380', 'pretrain': 'ImageNet-1k 1.28M画像'},
'4': {'name': 'ConvNeXt-V2-Atto', 'model_id': 'convnext-v2-atto_fcmae-pre_3rdparty_in1k', 'params': '3.7M', 'size': '15MB', 'input': '224x224', 'pretrain': 'FCMAE→ImageNet-1k'},
'5': {'name': 'ConvNeXt-V2-Huge', 'model_id': 'convnext-v2-huge_fcmae-pre_3rdparty_in1k', 'params': '650M', 'size': '2.4GB', 'input': '224x224', 'pretrain': 'ImageNet-22k FCMAE→ImageNet-1k'}
}
results_log = []
inferencer = None
selected_model = None
def load_font():
try:
return ImageFont.truetype(FONT_PATH, FONT_SIZE)
except Exception:
return ImageFont.load_default()
def draw_text_lines_bgr(img_bgr, lines, color=(0, 255, 0), anchor=(10, 10), line_gap=28):
font = load_font()
img_pil = Image.fromarray(cv2.cvtColor(img_bgr, cv2.COLOR_BGR2RGB))
draw = ImageDraw.Draw(img_pil)
x, y = anchor
for line in lines:
draw.text((x, y), line, font=font, fill=color)
y += line_gap
return cv2.cvtColor(np.array(img_pil), cv2.COLOR_RGB2BGR)
def format_topk(classes, scores, k=5):
idx = np.argsort(scores)[::-1][:k]
items = []
lines = []
for rank, i in enumerate(idx, start=1):
label = classes[i] if (classes is not None and i < len(classes)) else str(i)
sc = float(scores[i])
items.append(f"{rank}) {label}:{sc:.3f}")
lines.append(f"{rank}. {label} {sc:.3f}")
return "Top-5: " + ", ".join(items), lines
def resolve_classes_from_inferencer(out):
cls = getattr(inferencer, 'classes', None)
if cls is not None:
return cls
mdl = getattr(inferencer, 'model', None)
if mdl is not None:
dm = getattr(mdl, 'dataset_meta', None)
if isinstance(dm, dict) and 'classes' in dm:
return dm['classes']
if isinstance(out, dict) and 'classes' in out:
return out['classes']
return None
def image_processing(img_bgr):
current_time = time.time()
try:
result = inferencer(img_bgr)
out = result[0]
if hasattr(out, 'pred_scores'):
scores = out.pred_scores
elif hasattr(out, 'get'):
scores = out.get('pred_scores', None)
else:
print(f"ERROR: Cannot find pred_scores")
raise ValueError("pred_scores not found")
if scores is None:
score = float(out.get('pred_score', 0.0))
scores = np.array([score], dtype=np.float32)
else:
if hasattr(scores, 'detach'):
scores = scores.detach().cpu().numpy()
elif hasattr(scores, 'numpy'):
scores = scores.numpy()
else:
scores = np.asarray(scores)
classes = resolve_classes_from_inferencer(out)
top5_line, top5_lines = format_topk(classes, scores, k=min(5, len(scores)))
lines = [
f"Model: {selected_model['name']}",
"画像分類 Top-5"
] + top5_lines
processed = draw_text_lines_bgr(img_bgr.copy(), lines, color=(0, 255, 0), anchor=(10, 10))
result_text = f"{top5_line}"
return processed, result_text, current_time
except Exception as e:
print(f"\n=== エラー詳細 ===")
print(traceback.format_exc())
print(f"=== エラー詳細終了 ===\n")
err_msg = f"推論エラー: {e}"
processed = draw_text_lines_bgr(img_bgr.copy(), [err_msg], color=(0, 0, 255), anchor=(10, 10))
return processed, err_msg, current_time
def process_and_display_images(image_sources, source_type):
display_index = 1
for source in image_sources:
img = cv2.imread(source) if source_type == 'file' else source
if img is None:
continue
cv2.imshow(f'Image_{display_index}', img)
processed_img, result, current_time = image_processing(img)
cv2.imshow(f'画像分類 Top-5_{display_index}', processed_img)
print(datetime.fromtimestamp(current_time).strftime("%Y-%m-%d %H:%M:%S.%f")[:-3], result)
results_log.append(result)
display_index += 1
print("=" * 60)
print("MMPretrain 画像分類デモプログラム")
print("=" * 60)
print("概要: 事前訓練モデルを用いて静止画の画像分類(Top-5)を行う")
print("操作方法:")
print(" 1) モデル番号を選択する")
print(" 2) 入力方法を選択する(0:画像ファイル, 1:カメラ, 2:サンプル画像)")
print(" 3) カメラ選択時はスペースキーで撮影、qキーで終了")
print("注意: 初回実行時はモデルの自動ダウンロードに時間を要する場合がある")
print("=" * 60)
print("\n利用可能なモデル:")
print("-" * 110)
print(f"{'No.':<3} {'Model':<18} {'Parameters':<12} {'Size':<8} {'Input':<10} {'学習済みモデル':<30}")
print("-" * 110)
for key, model in models.items():
print(f"{key:<3} {model['name']:<18} {model['params']:<12} {model['size']:<8} {model['input']:<10} {model['pretrain']:<30}")
print("-" * 110)
model_choice = input("モデル番号を選択 (0-5): ").strip()
if model_choice not in models:
print("無効な選択です")
raise SystemExit
selected_model = models[model_choice]
print(f"\n選択されたモデル: {selected_model['name']} ({selected_model['params']} parameters)")
inferencer = ImageClassificationInferencer(selected_model['model_id'], pretrained=True, device=str(device))
print("\n画像入力方法を選択してください:")
print("0: 画像ファイル")
print("1: カメラ")
print("2: サンプル画像")
choice = input("選択: ").strip()
try:
if choice == '0':
root = tk.Tk()
root.withdraw()
if not (paths := filedialog.askopenfilenames()):
raise SystemExit
process_and_display_images(paths, 'file')
cv2.waitKey(0)
elif choice == '1':
cap = cv2.VideoCapture(0, cv2.CAP_DSHOW)
if not cap.isOpened():
cap = cv2.VideoCapture(0)
cap.set(cv2.CAP_PROP_BUFFERSIZE, 1)
try:
while True:
ret, frame = cap.read()
if not ret:
break
cv2.imshow('Camera', frame)
key = cv2.waitKey(1) & 0xFF
if key == ord(' '):
processed_img, result, current_time = image_processing(frame)
cv2.imshow('画像分類 Top-5', processed_img)
print(datetime.fromtimestamp(current_time).strftime("%Y-%m-%d %H:%M:%S.%f")[:-3], result)
results_log.append(result)
elif key == ord('q'):
break
finally:
cap.release()
else:
print("\nサンプル画像をダウンロードしています...")
opener = urllib.request.build_opener()
opener.addheaders = [('User-Agent', 'Mozilla/5.0')]
urllib.request.install_opener(opener)
urls = [
"https://raw.githubusercontent.com/opencv/opencv/master/samples/data/fruits.jpg",
"https://raw.githubusercontent.com/opencv/opencv/master/samples/data/messi5.jpg",
"https://raw.githubusercontent.com/opencv/opencv/master/samples/data/aero3.jpg",
"https://upload.wikimedia.org/wikipedia/commons/3/3a/Cat03.jpg"
]
downloaded_files = []
for i, url in enumerate(urls):
try:
urllib.request.urlretrieve(url, f"sample_{i}.jpg")
downloaded_files.append(f"sample_{i}.jpg")
print(f"sample_{i}.jpg をダウンロードしました")
except Exception as e:
print(f"画像のダウンロードに失敗しました: {url}")
print(f"エラー: {e}")
if downloaded_files:
print(f"\n{len(downloaded_files)}個のサンプル画像の処理を開始します...\n")
process_and_display_images(downloaded_files, 'file')
print("\n画像を表示中です。任意のキーを押すと終了します。")
cv2.waitKey(0)
else:
print("\nサンプル画像のダウンロードに失敗しました。")
finally:
print('\n=== プログラム終了 ===')
cv2.destroyAllWindows()
if results_log:
with open('result.txt', 'w', encoding='utf-8') as f:
f.write('=== 結果 ===\n')
f.write(f'使用デバイス: {str(device).upper()}\n')
if device.type == 'cuda':
f.write(f'GPU: {torch.cuda.get_device_name(0)}\n')
f.write('\n')
f.write('\n'.join(results_log))
print(f'\n処理結果をresult.txtに保存しました')