CLIPによる画像とテキストの類似性算出(ソースコードと実行結果)
Python開発環境,ライブラリ類
ここでは、最低限の事前準備について説明する。機械学習や深層学習を行う場合は、NVIDIA CUDA、Visual Studio、Cursorなどを追加でインストールすると便利である。これらについては別ページ https://www.kkaneko.jp/cc/dev/aiassist.htmlで詳しく解説しているので、必要に応じて参照してください。
Python 3.12 のインストール(Windows 上) [クリックして展開]
以下のいずれかの方法で Python 3.12 をインストールする。Python がインストール済みの場合、この手順は不要である。
方法1:winget によるインストール
管理者権限のコマンドプロンプトで以下を実行する。管理者権限のコマンドプロンプトを起動するには、Windows キーまたはスタートメニューから「cmd」と入力し、表示された「コマンドプロンプト」を右クリックして「管理者として実行」を選択する。
winget install --id Python.Python.3.12 -e --scope machine --silent --accept-source-agreements --accept-package-agreements --override "/quiet InstallAllUsers=1 PrependPath=1 Include_test=0 Include_pip=1 Include_launcher=1 InstallLauncherAllUsers=1 TargetDir=\"C:\Program Files\Python312\""
powershell -Command "$p='C:\Program Files\Python312'; $s=\"$p\Scripts\"; $m=[Environment]::GetEnvironmentVariable('Path','Machine'); if($m -notlike \"*$s*\") { [Environment]::SetEnvironmentVariable('Path', \"$p;$s;$m\", 'Machine') }"
--scope machine を指定することで、システム全体(全ユーザー向け)にインストールされる。このオプションの実行には管理者権限が必要である。インストール完了後、コマンドプロンプトを再起動すると PATH が自動的に設定される。
方法2:インストーラーによるインストール
- Python 公式サイト(https://www.python.org/downloads/)にアクセスし、「Download Python 3.x.x」ボタンから Windows 用インストーラーをダウンロードする。
- ダウンロードしたインストーラーを実行する。
- 初期画面の下部に表示される「Add python.exe to PATH」に必ずチェックを入れてから「Customize installation」を選択する。このチェックを入れ忘れると、コマンドプロンプトから
pythonコマンドを実行できない。 - 「Install Python 3.xx for all users」にチェックを入れ、「Install」をクリックする。
インストールの確認
コマンドプロンプトで以下を実行する。
python --versionバージョン番号(例:Python 3.12.x)が表示されればインストール成功である。「'python' は、内部コマンドまたは外部コマンドとして認識されていません。」と表示される場合は、インストールが正常に完了していない。
AIエディタ Windsurf のインストール(Windows 上) [クリックして展開]
Pythonプログラムの編集・実行には、AIエディタの利用を推奨する。ここでは、Windsurfのインストールを説明する。Windsurf がインストール済みの場合、この手順は不要である。
管理者権限のコマンドプロンプトで以下を実行する。管理者権限のコマンドプロンプトを起動するには、Windows キーまたはスタートメニューから「cmd」と入力し、表示された「コマンドプロンプト」を右クリックして「管理者として実行」を選択する。
winget install --scope machine --id Codeium.Windsurf -e --silent --disable-interactivity --force --accept-source-agreements --accept-package-agreements --custom "/SP- /SUPPRESSMSGBOXES /NORESTART /CLOSEAPPLICATIONS /DIR=""C:\Program Files\Windsurf"" /MERGETASKS=!runcode,addtopath,associatewithfiles,!desktopicon"
powershell -Command "$env:Path=[System.Environment]::GetEnvironmentVariable('Path','Machine')+';'+[System.Environment]::GetEnvironmentVariable('Path','User'); windsurf --install-extension MS-CEINTL.vscode-language-pack-ja --force; windsurf --install-extension ms-python.python --force; windsurf --install-extension Codeium.windsurfPyright --force"
--scope machine を指定することで、システム全体(全ユーザー向け)にインストールされる。このオプションの実行には管理者権限が必要である。インストール完了後、コマンドプロンプトを再起動すると PATH が自動的に設定される。
【関連する外部ページ】
Windsurf の公式ページ: https://windsurf.com/
必要なライブラリをシステム領域にインストール
管理者権限のコマンドプロンプトで以下を実行する。管理者権限のコマンドプロンプトを起動するには、Windows キーまたはスタートメニューから「cmd」と入力し、表示された「コマンドプロンプト」を右クリックして「管理者として実行」を選択する。
REM PyTorch をインストール(GPU対応版)
set "CUDA_TAG=cu128"
set "PYTHON_PATH=C:\Program Files\Python312"
"%PYTHON_PATH%\Scripts\pip" install -U numpy torch torchvision torchaudio --index-url https://download.pytorch.org/whl/%CUDA_TAG%
pip install transformers pillow opencv-python open-clip-torch
CLIPによる画像とテキストの類似性算出プログラム
特徴
このプログラムは、プログラムは事前学習済みモデルを使用し、追加の学習なしで画像と任意のテキスト記述との類似度を計算できる。
主要技術
- CLIP (Contrastive Language-Image Pre-training)
CLIPは2021年にOpenAIが発表した技術である[1]。4億組の画像とテキストのペアで事前学習され、画像とテキストを共通の埋め込み空間にマッピングすることで、両者の意味的な類似度を計算できる。画像エンコーダ(Vision Transformer)とテキストエンコーダ(Transformer)の2つのエンコーダで構成され、コントラスティブ学習により訓練される。 - Vision Transformer (ViT)
Vision Transformerは、自然言語処理で成功したTransformerアーキテクチャをコンピュータビジョンに適用した技術である[2]。画像を固定サイズのパッチに分割し、各パッチをトークンとして扱い、自己注意機構により画像の異なる部分間の大域的な関係を捉える。CNNと異なり、局所的な畳み込みではなく、画像全体の文脈を理解できる。
参考文献
- [1] Radford, A., Kim, J. W., Hallacy, C., Ramesh, A., Goh, G., Agarwal, S., Sastry, G., Askell, A., Mishkin, P., Clark, J., Krueger, G., & Sutskever, I. (2021). Learning transferable visual models from natural language supervision. In International Conference on Machine Learning (pp. 8748-8763). PMLR. Available at: https://proceedings.mlr.press/v139/radford21a
- [2] Dosovitskiy, A., Beyer, L., Kolesnikov, A., Weissenborn, D., Zhai, X., Unterthiner, T., Dehghani, M., Minderer, M., Heigold, G., Gelly, S., Uszkoreit, J., & Houlsby, N. (2021). An image is worth 16x16 words: Transformers for image recognition at scale. In International Conference on Learning Representations. Available at: https://openreview.net/forum?id=YicbFdNTTy
- [3] OpenAI. (2021). CLIP: Connecting text and images. https://openai.com/index/clip/
ソースコード
# プログラム名: CLIPによる画像とテキストの類似性算出プログラム
# 特徴技術名: CLIP (Contrastive Language-Image Pre-training) / SigLIP (Sigmoid Loss for Language Image Pre-Training)
# 出典: Radford, A., et al. (2021). Learning Transferable Visual Models From Natural Language Supervision. Proceedings of the 38th International Conference on Machine Learning, PMLR 139:8748-8763.
# 特徴機能: ゼロショット画像分類 - 事前学習済みモデルが追加学習なしで任意のテキストクエリと画像の類似度を算出し、新規カテゴリの分類を可能にする機能
# 学習済みモデル:
# - OpenAI CLIP (ViT-B/32, ViT-B/16, ViT-L/14等) - Hugging Face Hub経由でダウンロード
# - OpenCLIP (ViT-B-32, ViT-L-14, ViT-H-14, xlm-roberta-base-ViT-B-32) - LAION-AI実装
# - SigLIP (Base, Large) - Google Research、2023年
# - URL: https://huggingface.co/openai/, https://huggingface.co/google/, OpenCLIP公式リポジトリ
# 方式設計:
# - 関連利用技術:
# - OpenCLIP: LAION-AIによるCLIPの再実装、多言語対応モデル提供
# - SigLIP: Google Researchによる画像-テキストマッチングモデル(2023年)
# - Transformers (Hugging Face): 事前学習済みモデルの読み込みと推論
# - PyTorch: テンソル演算と深層学習処理基盤
# - PIL (Pillow): 画像の読み込みと前処理、日本語テキスト描画
# - OpenCV: 画像表示とカメラ入力処理
# - 入力と出力:
# - 入力: 静止画像(ユーザは「0:画像ファイル,1:カメラ,2:サンプル画像」のメニューで選択.0:画像ファイルの場合はtkinterで複数ファイル選択可能.1の場合はOpenCVでカメラが開き,スペースキーで撮影(複数回可能).2の場合はhttps://raw.githubusercontent.com/opencv/opencv/master/samples/data/fruits.jpg とhttps://raw.githubusercontent.com/opencv/opencv/master/samples/data/messi5.jpgとhttps://raw.githubusercontent.com/opencv/opencv/master/samples/data/aero3.jpgを使用)
# - 出力: 処理結果が画像化できる場合にはOpenCV画面でリアルタイムに表示.OpenCV画面内に処理結果をテキストで表示.print()で処理結果を表示.プログラム終了時にprint()で表示した処理結果をresult.txtファイルに保存し,「result.txtに保存」したことをprint()で表示.プログラム開始時に,プログラムの概要,ユーザが行う必要がある操作(もしあれば)をprint()で表示.
# - 処理手順:
# 1. 画像入力(ファイル/カメラ/サンプル)
# 2. テキストクエリの設定(標準クエリまたはカスタムクエリ)
# 3. CLIPモデルによる画像エンコーディング
# 4. テキストエンコーディング
# 5. コサイン類似度計算による類似度スコア算出
# 6. 結果の表示と保存
# - 前処理、後処理:
# - 前処理: モデル固有の画像リサイズ(224x224、256x256、336x336、384x384等)、正規化(ImageNet標準化パラメータ使用)
# - 後処理: logits_per_imageの生スコア表示(softmax適用なし、100倍スケーリング済み)
# - 追加処理: 日本語テキストの画像内描画(PillowのImageDrawとTrueTypeフォント使用)、カスタムクエリによる対話的な再分析機能
# - 調整を必要とする設定値: TEXT_QUERIES - 分析対象画像の内容に応じて適切なクエリテキストを設定(デフォルト:猫、犬、風景、料理、人物、建物)
# 将来方策: TEXT_QUERIESの自動生成機能 - WordNetやConceptNetなどの知識ベースAPIと連携し、画像の初期分析結果から関連する概念を自動抽出してクエリリストを動的生成する機能の実装
# その他の重要事項: Windows環境専用(フォントパスはWindows標準のMSゴシックを使用)、GPU利用可能時は自動でCUDA使用
# 前準備:
# - pip install -U numpy torch torchvision torchaudio --index-url https://download.pytorch.org/whl/cu126
# - pip install transformers pillow opencv-python open-clip-torch
import cv2
import tkinter as tk
from tkinter import filedialog
import urllib.request
import os
import torch
from PIL import Image, ImageFont, ImageDraw
from transformers import CLIPProcessor, CLIPModel, SiglipProcessor, SiglipModel
import numpy as np
import time
import open_clip
# ===== 設定値(必要に応じて調整) =====
DEFAULT_MODEL = '0' # デフォルトモデル選択
FONT_PATH = "C:/Windows/Fonts/msgothic.ttc" # 日本語フォントパス
FONT_SIZE = 30 # フォントサイズ
Y_START = 30 # テキスト描画開始Y座標
Y_STEP = 30 # テキスト描画行間
# 標準クエリテキスト(分析対象に応じて変更)
TEXT_QUERIES = [
'猫の写真',
'犬の写真',
'風景写真',
'料理の写真',
'人物の写真',
'建物の写真'
]
# 利用可能なモデル
MODELS = {
'0': ('openai/clip-vit-base-patch32', 'OpenAI CLIP ViT-B/32', '英語のみ', 'huggingface'),
'1': ('openai/clip-vit-base-patch16', 'OpenAI CLIP ViT-B/16', '英語のみ', 'huggingface'),
'2': ('openai/clip-vit-large-patch14', 'OpenAI CLIP ViT-L/14', '英語のみ', 'huggingface'),
'3': ('openai/clip-vit-large-patch14-336', 'OpenAI CLIP ViT-L/14@336px', '英語のみ', 'huggingface'),
'4': ('ViT-B-32', 'OpenCLIP ViT-B/32', '英語のみ', 'openclip'),
'5': ('ViT-L-14', 'OpenCLIP ViT-L/14', '英語のみ', 'openclip'),
'6': ('ViT-H-14', 'OpenCLIP ViT-H/14', '英語のみ', 'openclip'),
'7': ('xlm-roberta-base-ViT-B-32', 'OpenCLIP XLM-RoBERTa ViT-B/32', '多言語対応(日本語含む)', 'openclip'),
'8': ('google/siglip-base-patch16-224', 'SigLIP Base 224px', '多言語対応', 'siglip'),
'9': ('google/siglip-large-patch16-384', 'SigLIP Large 384px', '多言語対応', 'siglip')
}
# グローバル変数
log = []
# プログラム開始時の説明
print('CLIP画像分析プログラム')
print('画像とテキストの類似度を計算します')
print('')
# モデル選択
print('使用するモデルを選択してください:')
for key, (_, desc, lang_support, _) in MODELS.items():
print(f'{key}: {desc} - {lang_support}')
model_choice = input(f'選択 (デフォルト: {DEFAULT_MODEL}): ').strip()
if model_choice not in MODELS:
model_choice = DEFAULT_MODEL
MODEL_NAME, model_desc, lang_support, model_type = MODELS[model_choice]
print(f'選択されたモデル: {model_desc}')
print(f'対応言語: {lang_support}')
print('')
# 言語に関する案内
if model_type == 'siglip':
print('注意: SigLIPは多言語対応モデルで、日本語のクエリも処理可能です')
elif MODEL_NAME == 'xlm-roberta-base-ViT-B-32':
print('注意: このモデルは多言語対応であり、日本語のクエリも処理可能です')
print('言語間のスコア傾向はクエリや画像内容に依存します')
else:
print('注意: このモデルは主に英語データで学習されています')
print('日本語のクエリも処理可能ですが、英語の表現の方がスコアが安定する場合があります')
print('例: 「猫の写真」→「cat photo」')
print('')
# デバイス設定(GPU/CPUフォールバック)
device = torch.device('cuda' if torch.cuda.is_available() else 'cpu')
print(f'使用デバイス: {device}')
# モデルとプロセッサのセットアップ
print('モデルを読み込んでいます...')
if model_type == 'huggingface':
model = CLIPModel.from_pretrained(MODEL_NAME).to(device)
model.eval()
processor = CLIPProcessor.from_pretrained(MODEL_NAME)
tokenizer = None
preprocess = None
elif model_type == 'siglip':
# SigLIPモデルの読み込み
model = SiglipModel.from_pretrained(MODEL_NAME).to(device)
model.eval()
processor = SiglipProcessor.from_pretrained(MODEL_NAME)
tokenizer = None
preprocess = None
else: # openclip
if MODEL_NAME == 'xlm-roberta-base-ViT-B-32':
# 多言語モデルの読み込み
model, _, preprocess = open_clip.create_model_and_transforms(
'xlm-roberta-base-ViT-B-32',
pretrained='laion5b_s13b_b90k'
)
tokenizer = open_clip.get_tokenizer('xlm-roberta-base-ViT-B-32')
elif MODEL_NAME == 'ViT-H-14':
model, _, preprocess = open_clip.create_model_and_transforms(
'ViT-H-14',
pretrained='laion2b_s32b_b79k'
)
tokenizer = open_clip.get_tokenizer('ViT-H-14')
elif MODEL_NAME == 'ViT-L-14':
model, _, preprocess = open_clip.create_model_and_transforms(
'ViT-L-14',
pretrained='laion2b_s32b_b82k'
)
tokenizer = open_clip.get_tokenizer('ViT-L-14')
else: # ViT-B-32
model, _, preprocess = open_clip.create_model_and_transforms(
'ViT-B-32',
pretrained='laion2b_s34b_b79k'
)
tokenizer = open_clip.get_tokenizer('ViT-B-32')
model = model.to(device)
model.eval()
processor = None
print('モデルの読み込みが完了しました')
print('')
# フォント読み込み(外部リソースアクセス)
try:
font = ImageFont.truetype(FONT_PATH, FONT_SIZE)
except:
print(f'フォントファイルの読み込みに失敗しました: {FONT_PATH}')
exit()
def calc_similarity(pil_image, queries):
# 類似度計算の共通処理
if processor is not None and model_type == 'huggingface': # Hugging Face CLIP
inputs = processor(text=queries, images=pil_image, return_tensors='pt', padding=True)
inputs = {k: v.to(device) for k, v in inputs.items()}
with torch.no_grad():
outputs = model(**inputs)
scores = outputs.logits_per_image.detach().cpu().numpy()[0]
elif processor is not None and model_type == 'siglip': # SigLIP
inputs = processor(text=queries, images=pil_image, return_tensors='pt', padding=True)
inputs = {k: v.to(device) for k, v in inputs.items()}
with torch.no_grad():
outputs = model(**inputs)
scores = outputs.logits_per_image.detach().cpu().numpy()[0]
else: # OpenCLIP
image_tensor = preprocess(pil_image).unsqueeze(0).to(device)
text_tokens = tokenizer(queries).to(device)
with torch.no_grad():
image_features = model.encode_image(image_tensor)
text_features = model.encode_text(text_tokens)
# 正規化とコサイン類似度計算
image_features /= image_features.norm(dim=-1, keepdim=True)
text_features /= text_features.norm(dim=-1, keepdim=True)
scores = (100.0 * image_features @ text_features.T).detach().cpu().numpy()[0]
return scores
def image_processing(img):
if img is None:
return None
# BGR→RGB変換
img_rgb = cv2.cvtColor(img, cv2.COLOR_BGR2RGB)
pil_image = Image.fromarray(img_rgb)
# 類似度計算
scores = calc_similarity(pil_image, TEXT_QUERIES)
# 結果をテキストで表示
timestamp = time.strftime('%Y-%m-%d %H:%M:%S')
result_text = f'[{timestamp}] 分析結果:'
print(result_text)
log.append(result_text)
global font
# 日本語表示
img_pil = Image.fromarray(cv2.cvtColor(img, cv2.COLOR_BGR2RGB)).convert("RGB")
for i, (text, score) in enumerate(zip(TEXT_QUERIES, scores)):
result_line = f'「{text}」: {score:.2f}'
print(result_line)
# RGB→BGR変換
result_img = cv2.cvtColor(np.array(img_pil), cv2.COLOR_RGB2BGR)
print('')
log.append('')
return result_img
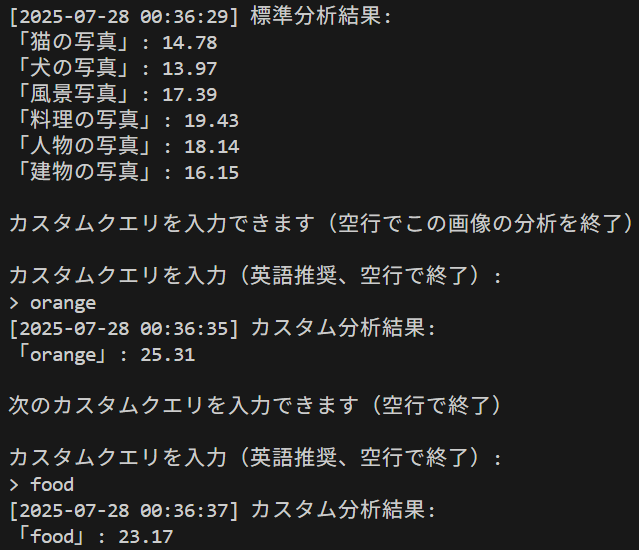
def custom_query(img):
print('カスタムクエリを入力できます(空行で終了)')
while True:
print('')
if model_type == 'siglip':
print('カスタムクエリを入力(日本語・英語可、空行で終了):')
elif MODEL_NAME == 'xlm-roberta-base-ViT-B-32':
print('カスタムクエリを入力(日本語・英語可、空行で終了):')
else:
print('カスタムクエリを入力(英語を用いるとスコアが安定する場合があります、空行で終了):')
query = input('> ')
if query == '':
print('カスタムクエリ分析を終了します')
break
# BGR→RGB変換
img_rgb = cv2.cvtColor(img, cv2.COLOR_BGR2RGB)
pil_image = Image.fromarray(img_rgb)
# 類似度計算
scores = calc_similarity(pil_image, [query])
# 結果を表示
timestamp = time.strftime('%Y-%m-%d %H:%M:%S')
result_text = f'[{timestamp}] カスタムクエリ結果:'
print(result_text)
log.append(result_text)
result_line = f'「{query}」: {scores[0]:.2f}'
print(result_line)
log.append(result_line)
# 日本語表示
img_pil = Image.fromarray(cv2.cvtColor(img, cv2.COLOR_BGR2RGB))
ImageDraw.Draw(img_pil).text((10, Y_START), result_line, font=font, fill=(0, 255, 0))
result_img = cv2.cvtColor(np.array(img_pil), cv2.COLOR_RGB2BGR)
cv2.imshow('Custom Query Result', result_img)
cv2.waitKey(0)
print('')
log.append('')
def show_image(img, window_name):
if img is None:
print('画像の読み込みに失敗しました')
return
processed_img = image_processing(img)
cv2.imshow(window_name, processed_img)
cv2.waitKey(0)
# カスタムクエリ処理
custom_query(img)
print('操作説明:')
print('- 標準分析後、カスタムクエリを入力できます')
print('- 空行入力で次の画像に進みます')
print('- カメラ選択時: スペースキーで撮影、qキーで終了')
print('')
print('0: 画像ファイル')
print('1: カメラ')
print('2: サンプル画像')
choice = input('選択: ')
if choice == '0':
root = tk.Tk()
root.withdraw()
paths = filedialog.askopenfilenames()
if not paths:
exit()
for path in paths:
show_image(cv2.imread(path), 'Image')
elif choice == '1':
cap = cv2.VideoCapture(0, cv2.CAP_DSHOW)
try:
while True:
cap.grab()
ret, frame = cap.retrieve()
if not ret:
break
cv2.imshow('Camera', frame)
key = cv2.waitKey(1) & 0xFF
if key == ord(' '):
show_image(frame, 'Image')
elif key == ord('q'):
break
finally:
cap.release()
elif choice == '2':
urls = [
'https://raw.githubusercontent.com/opencv/opencv/master/samples/data/fruits.jpg',
'https://raw.githubusercontent.com/opencv/opencv/master/samples/data/messi5.jpg',
'https://raw.githubusercontent.com/opencv/opencv/master/samples/data/aero3.jpg'
]
temp_files = []
for i, url in enumerate(urls):
filename = f'sample_{i}.jpg'
try:
urllib.request.urlretrieve(url, filename)
temp_files.append(filename)
show_image(cv2.imread(filename), 'Sample Image')
except Exception as e:
print(f'画像のダウンロードに失敗しました: {url}')
print(f'エラー: {e}')
continue
# 一時ファイルの削除
for filename in temp_files:
try:
os.remove(filename)
except OSError:
pass
cv2.destroyAllWindows()
# 結果をファイルに保存
if log:
with open('result.txt', 'w', encoding='utf-8') as f:
f.write('\n'.join(log))
print('result.txtに保存しました')