MMDetection と Co-DINO(Swin-L) による物体検出プログラム(COCO 80クラス)(ソースコードと説明と利用ガイド)
ツール利用ガイド
1. このプログラムの利用シーン
動画ファイルやウェブカメラの映像から、自動的に物体を検出・認識するためのソフトウェアである。監視カメラの映像解析、交通量調査、製造業での品質検査、研究目的での物体追跡など、様々な映像解析タスクに利用できる。Transformerベースの物体検出モデルにより、人、車両、動物、日用品など多様な物体カテゴリを検出する。
2. 主な機能
- リアルタイム物体検出: 動画の各フレームに対して、物体の種類と位置(バウンディングボックス)を検出する。
- 多様な入力ソース: 動画ファイル、ウェブカメラ、サンプル動画の3つの入力方式に対応する。
- 自動モデル管理: 初回実行時に必要な設定ファイルと学習済みモデルを自動ダウンロードする。
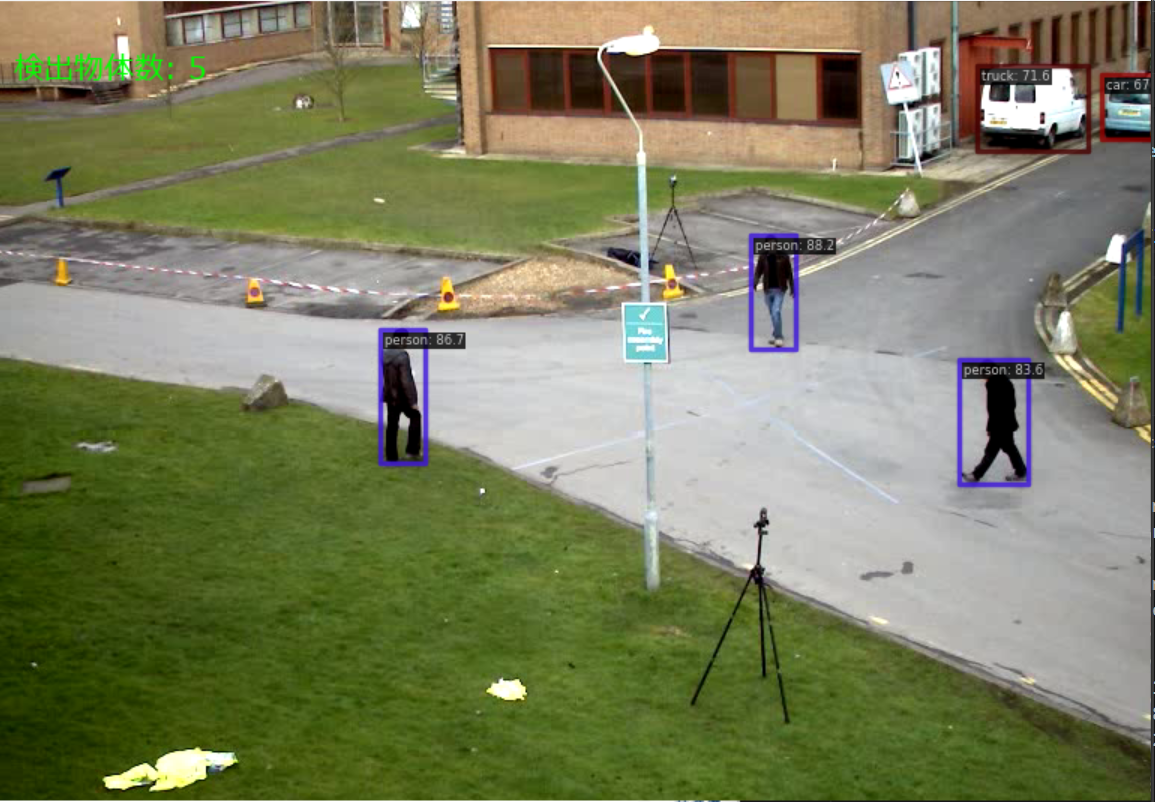
- 結果の可視化: OpenCVウィンドウで検出結果をリアルタイム表示し、検出物体数を画面上に表示する。
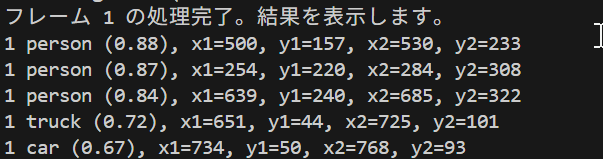
- ログ機能: 全ての検出結果をタイムスタンプ付きでresult.txtファイルに保存する。
- ハードウェア自動選択: GPU利用可能時は自動的にGPUを使用し、処理を加速する。
3. 基本的な使い方
- プログラムの起動:
Pythonで実行する。
- 入力ソースの選択:
キーボードで 0(動画ファイル)、1(ウェブカメラ)、2(サンプル動画)のいずれかを入力する。
- 処理の実行:
選択した入力ソースに応じて物体検出が開始され、結果がOpenCVウィンドウに表示される。
- プログラムの終了:
結果表示ウィンドウを選択した状態で、キーボードのqキーを押す。
4. 便利な機能
- 自動前処理: CLAHE(適応的ヒストグラム均等化)により、暗い映像や低コントラストの映像でも検出精度を向上させる。
- 詳細な検出情報: 各物体について、クラス名、信頼度スコア、座標情報を取得できる。
- 処理状況の表示: フレーム処理の進行状況をコンソールに表示し、処理状態を把握できる。
- 結果ファイルの自動保存: プログラム終了時に、使用モデル、処理フレーム数、デバイス情報と共に全検出結果が保存される。
- ファイル形式の自動判別: 動画ファイル選択時は、mp4、avi、movなどの主要形式に対応している。
Python開発環境,ライブラリ類
ここでは、最低限の事前準備について説明する。機械学習や深層学習を行う場合は、NVIDIA CUDA、Visual Studio、Cursorなどを追加でインストールすると便利である。これらについては別ページ https://www.kkaneko.jp/cc/dev/aiassist.htmlで詳しく解説しているので、必要に応じて参照してください。
Build Tools for Visual Studio 2026 のインストール(Windows 上) [クリックして展開]
Build Tools for Visual Studio は,Visual Studio の IDE を含まない C/C++ コンパイラ,ライブラリ,ビルドツール等のコマンドライン向け開発ツールセットである。インストール済みの場合、この手順は不要である。
管理者権限のコマンドプロンプトで以下を実行する。管理者権限のコマンドプロンプトを起動するには、Windows キーまたはスタートメニューから「cmd」と入力し、表示された「コマンドプロンプト」を右クリックして「管理者として実行」を選択する。
REM VC++ ランタイム
winget install --scope machine --id Microsoft.VCRedist.2015+.x64 -e --silent --disable-interactivity --force --accept-source-agreements --accept-package-agreements --override "/quiet /norestart"

REM Build Tools + Desktop development with C++(VCTools)+ 追加コンポーネント(一括)
winget list --id Microsoft.VisualStudio.BuildTools 2>nul | findstr /i "BuildTools" >nul 2>&1
if %ERRORLEVEL% EQU 0 (
    for /f "delims=" %P in ('"C:\Program Files (x86)\Microsoft Visual Studio\Installer\vswhere.exe" -products * -property installationPath') do start /wait "" "C:\Program Files (x86)\Microsoft Visual Studio\Installer\setup.exe" modify --installPath "%P" --add Microsoft.VisualStudio.Workload.VCTools --add Microsoft.VisualStudio.Workload.MSBuildTools --add Microsoft.VisualStudio.Component.VC.CMake.Project --add Microsoft.VisualStudio.Component.VC.Llvm.Clang --add Microsoft.VisualStudio.Component.VC.Llvm.ClangToolset --add Microsoft.VisualStudio.Component.Windows11SDK.26100 --includeRecommended --quiet --norestart
) else (
    winget install --scope machine --id Microsoft.VisualStudio.BuildTools -e --silent --disable-interactivity --force --accept-source-agreements --accept-package-agreements --override "--quiet --wait --norestart --nocache --add Microsoft.VisualStudio.Workload.VCTools --includeRecommended --add Microsoft.VisualStudio.Workload.MSBuildTools --add Microsoft.VisualStudio.Component.VC.CMake.Project --add Microsoft.VisualStudio.Component.VC.Llvm.Clang --add Microsoft.VisualStudio.Component.VC.Llvm.ClangToolset --add Microsoft.VisualStudio.Component.Windows11SDK.26100"
)
REM  何らかの理由で BuildTools の動作がおかしくなった場合は,以下を実行すると,既存のインストールのファイル破損・欠損を修復し正常な状態に復元する効果がある.
REM "C:\Program Files (x86)\Microsoft Visual Studio\Installer\setup.exe" repair --installPath "C:\Program Files (x86)\Microsoft Visual Studio\18\BuildTools" --quiet --norestart
REM 以下で正常であることを確認する.パスが表示されれば正常である.
REM "C:\Program Files (x86)\Microsoft Visual Studio\Installer\vswhere.exe" -products * -requires Microsoft.VisualStudio.Workload.VCTools -property installationPath
--add で追加されるコンポーネント
上記のコマンドでは,まず Build Tools 本体と Visual C++ 再頒布可能パッケージをインストールし,次に setup.exe を用いて以下のコンポーネントを追加している。
VCTools:C++ デスクトップ開発ワークロード(--includeRecommendedにより、MSVC コンパイラ、C++ AddressSanitizer、vcpkg、CMake ツール、Windows 11 SDK 等の推奨コンポーネントが含まれる)VC.Llvm.Clang:Windows 向け C++ Clang コンパイラClangCL:clang-cl ツールセットを含むコンポーネントグループ(MSBuild から Clang を使用するために必要)VC.CMake.Project:Windows 向け C++ CMake ツールWindows11SDK.26100:Windows 11 SDK(ビルド 10.0.26100)
インストール完了の確認
winget list Microsoft.VisualStudio.BuildTools上記以外の追加のコンポーネントが必要になった場合は Visual Studio Installer で個別にインストールできる。
Visual Studio の機能を必要とする場合は、追加インストールできる。
Python 3.12 のインストール(Windows 上) [クリックして展開]
以下のいずれかの方法で Python 3.12 をインストールする。Python がインストール済みの場合、この手順は不要である。
方法1:winget によるインストール
管理者権限のコマンドプロンプトで以下を実行する。管理者権限のコマンドプロンプトを起動するには、Windows キーまたはスタートメニューから「cmd」と入力し、表示された「コマンドプロンプト」を右クリックして「管理者として実行」を選択する。
winget install --id Python.Python.3.12 -e --scope machine --silent --accept-source-agreements --accept-package-agreements --override "/quiet InstallAllUsers=1 PrependPath=1 Include_test=0 Include_pip=1 Include_launcher=1 InstallLauncherAllUsers=1 TargetDir=\"C:\Program Files\Python312\""
powershell -Command "$p='C:\Program Files\Python312'; $s=\"$p\Scripts\"; $m=[Environment]::GetEnvironmentVariable('Path','Machine'); if($m -notlike \"*$s*\") { [Environment]::SetEnvironmentVariable('Path', \"$p;$s;$m\", 'Machine') }"
--scope machine を指定することで、システム全体(全ユーザー向け)にインストールされる。このオプションの実行には管理者権限が必要である。インストール完了後、コマンドプロンプトを再起動すると PATH が自動的に設定される。
方法2:インストーラーによるインストール
- Python 公式サイト(https://www.python.org/downloads/)にアクセスし、「Download Python 3.x.x」ボタンから Windows 用インストーラーをダウンロードする。
- ダウンロードしたインストーラーを実行する。
- 初期画面の下部に表示される「Add python.exe to PATH」に必ずチェックを入れてから「Customize installation」を選択する。このチェックを入れ忘れると、コマンドプロンプトから
pythonコマンドを実行できない。 - 「Install Python 3.xx for all users」にチェックを入れ、「Install」をクリックする。
インストールの確認
コマンドプロンプトで以下を実行する。
python --versionバージョン番号(例:Python 3.12.x)が表示されればインストール成功である。「'python' は、内部コマンドまたは外部コマンドとして認識されていません。」と表示される場合は、インストールが正常に完了していない。
AIエディタ Windsurf のインストール(Windows 上) [クリックして展開]
Pythonプログラムの編集・実行には、AIエディタの利用を推奨する。ここでは、Windsurfのインストールを説明する。Windsurf がインストール済みの場合、この手順は不要である。
管理者権限のコマンドプロンプトで以下を実行する。管理者権限のコマンドプロンプトを起動するには、Windows キーまたはスタートメニューから「cmd」と入力し、表示された「コマンドプロンプト」を右クリックして「管理者として実行」を選択する。
winget install --scope machine --id Codeium.Windsurf -e --silent --disable-interactivity --force --accept-source-agreements --accept-package-agreements --custom "/SP- /SUPPRESSMSGBOXES /NORESTART /CLOSEAPPLICATIONS /DIR=""C:\Program Files\Windsurf"" /MERGETASKS=!runcode,addtopath,associatewithfiles,!desktopicon"
powershell -Command "$env:Path=[System.Environment]::GetEnvironmentVariable('Path','Machine')+';'+[System.Environment]::GetEnvironmentVariable('Path','User'); windsurf --install-extension MS-CEINTL.vscode-language-pack-ja --force; windsurf --install-extension ms-python.python --force; windsurf --install-extension Codeium.windsurfPyright --force"
--scope machine を指定することで、システム全体(全ユーザー向け)にインストールされる。このオプションの実行には管理者権限が必要である。インストール完了後、コマンドプロンプトを再起動すると PATH が自動的に設定される。
【関連する外部ページ】
Windsurf の公式ページ: https://windsurf.com/
必要なライブラリをシステム領域にインストール
管理者権限のコマンドプロンプトで以下を実行する。管理者権限のコマンドプロンプトを起動するには、Windows キーまたはスタートメニューから「cmd」と入力し、表示された「コマンドプロンプト」を右クリックして「管理者として実行」を選択する。
REM PyTorch をインストール(GPU対応版)
set "CUDA_TAG=cu128"
set "PYTHON_PATH=C:\Program Files\Python312"
"%PYTHON_PATH%\Scripts\pip" install --no-user -U numpy torch torchvision torchaudio --index-url https://download.pytorch.org/whl/%CUDA_TAG%
"C:\Program Files (x86)\Microsoft Visual Studio\2022\BuildTools\VC\Auxiliary\Build\vcvars64.bat"
set DISTUTILS_USE_SDK=1
pip install -U setuptools wheel
pip install -U mmengine mmcv==2.1.0 mmdet opencv-python pillow tqdm matplotlib transformers tokenizers sentencepiece
【関連する外部ページ】
- MMDetection の GitHub のページ: https://github.com/open-mmlab/mmdetection
- MMDetection の公式ドキュメント: https://mmdetection.readthedocs.io
- MMDetection の訓練,検証,推論の公式チュートリアル: https://github.com/open-mmlab/mmdetection/blob/master/demo/MMDet_Tutorial.ipynb
- MMDetection の公式の学習済みモデル: https://github.com/open-mmlab/mmdetection/blob/master/docs/en/model_zoo.md
MMDetection と Co-DINO(Swin-L) による物体検出プログラム(COCO 80クラス)
概要
このプログラムは、MMDetectionフレームワーク v3.3.0 とTransformerベースの物体検出モデルを使用して、動画フレームから物体を検出する。Co-DINO検出アルゴリズム、CLAHEによる前処理を適用することで、動画の各フレームに対して物体の位置と種類を特定する。
主要技術
MMDetection フレームワーク
OpenMMLabが開発したPyTorchベースのオープンソース物体検出ツールボックスである[1]。200以上の学習済みモデルを提供し、モジュラーデザインにより様々な検出手法を統合している。本プログラムでは、MMDetection v3.3.0 を使用してモデル初期化(init_detector)と推論(inference_detector)を実行する。
Co-DINO (Collaborative DETR with Improved DeNoising Anchor Boxes)
DINOアルゴリズム[2]をベースとしたTransformerベースの物体検出モデルである。デノイジングアンカーボックスの改良により、従来のDETRライクなモデルと比較して性能と効率を向上させている。Swin-Lバックボーンを使用した構成では64.1 mAPを達成する。
技術的特徴
- Transformerアーキテクチャによる End-to-End 検出
CNNバックボーンとTransformerエンコーダ・デコーダを組み合わせた構造により、後処理を必要としない直接的な物体検出を実現する。
- CLAHE前処理による画像品質向上
Contrast Limited Adaptive Histogram Equalization(CLAHE)[3]を適用し、局所的なコントラスト改善により物体検出精度を向上させる。YUV色空間で輝度チャンネルのみに適用(clipLimit=2.0、tileGridSize=8x8)。
- 5スケール特徴抽出
5つの解像度レベルで特徴を抽出し、異なるサイズの物体に対応する検出能力を持つ。
- Objects365 + COCOデータセットによる事前学習
大規模データセットでの事前学習により、多様な物体カテゴリに対する汎化性能を獲得している。
実装の特色
動画処理に特化した設計となっており、以下の機能を備える:
- 3つの入力ソース対応(動画ファイル、ウェブカメラ、サンプル動画)
- 自動モデルダウンロード機能による初回セットアップの簡素化
- MMDetection Visualizerを使用した検出結果の描画
- フレーム単位での検出結果ログ出力(カメラ使用時はタイムスタンプ付き)
- GPU/CPU自動選択によるハードウェア適応
- 検出閾値の調整可能性(デフォルト0.4)
参考文献
[1] Chen, K., et al. (2019). MMDetection: Open MMLab Detection Toolbox and Benchmark. arXiv preprint arXiv:1906.07155. https://arxiv.org/abs/1906.07155
[2] Zhang, H., et al. (2022). DINO: DETR with Improved DeNoising Anchor Boxes for End-to-End Object Detection. arXiv preprint arXiv:2203.03605. https://arxiv.org/abs/2203.03605
[3] Zuiderveld, K. (1994). Contrast limited adaptive histogram equalization. Graphics gems, 474-485.
ソースコード
"""
- プログラム名: MMDetection と Co-DINO(Swin-L) による物体検出プログラム(COCO 80クラス)
- 特徴技術名: Co-DINO, Grounding DINO
- 特徴機能: Transformerベースのアーキテクチャによる物体検出
- 方式設計: MMDetectionフレームワークを使用した物体検出
- 関連利用技術:
  * MMDetection - OpenMMLab物体検出フレームワーク
  * init_detector, inference_detector - MMDetectionの標準的な推論API
  * PyTorch - 深層学習フレームワーク
- 入力と出力: 入力: 動画(ユーザは「0:動画ファイル,1:カメラ,2:サンプル動画」のメニューで選択)、出力: OpenCV画面で処理したフレームを順次表示。プログラム終了時に処理結果をresult.txtファイルに保存
- 処理手順: 1)MMDetection設定ファイルと学習済みモデルをダウンロード、2)init_detectorでモデルを初期化、3)CLAHEで前処理、4)フレーム毎にinference_detectorで推論、5)Visualizerで結果を描画
- その他の重要事項: Transformerベースのモデルは処理が低速なため、リアルタイム性能は期待できません。初回実行時は設定ファイルとモデルのダウンロードに時間がかかります
- 特徴技術および学習済モデルの利用制限: MMDetectionはApache 2.0ライセンス。学習データ(Objects365、COCO)の利用規約を確認すること。必ず利用者自身で利用制限を確認すること
"C:\Program Files (x86)\Microsoft Visual Studio\2022\BuildTools\VC\Auxiliary\Build\vcvars64.bat"
set DISTUTILS_USE_SDK=1
pip install -U setuptools wheel
pip install -U mmengine mmcv==2.1.0 mmdet opencv-python pillow tqdm matplotlib transformers tokenizers sentencepiece
"""

import os
import cv2
import time
import torch
import urllib.request
import ssl
import numpy as np
import tkinter as tk
from tkinter import filedialog
from datetime import datetime
from PIL import Image, ImageDraw, ImageFont
import warnings
import zipfile
import shutil
from pathlib import Path
import sys
import threading
from mmdet.apis import init_detector, inference_detector
from mmdet.registry import VISUALIZERS

# 重要でないUserWarningを最小限に抑制
warnings.filterwarnings("once", category=UserWarning)

# SSL証明書検証を無効化
ssl._create_default_https_context = ssl._create_unverified_context

# GPU/CPU自動選択
device = torch.device('cuda' if torch.cuda.is_available() else 'cpu')
print(f'デバイス: {str(device)}')

# GPU使用時の最適化
if device.type == 'cuda':
    torch.backends.cudnn.benchmark = True

# モデル設定
MODELS = [
    {
        'name': 'Co-DINO (Swin-L, 64.1 mAP)',
        'config_file': 'projects/CO-DETR/configs/codino/co_dino_5scale_swin_l_16xb1_16e_o365tococo.py',
        'checkpoint_url': 'https://download.openmmlab.com/mmdetection/v3.0/codetr/co_dino_5scale_swin_large_16e_o365tococo-614254c9.pth',
        'checkpoint_file': 'co_dino_5scale_swin_large_16e_o365tococo-614254c9.pth',
        'dataset': 'Objects365 + COCO',
        'is_project': True
    }
]

# 調整可能な設定値
MMDET_VERSION = "v3.3.0"
BASE_DIR = Path("./mmdetection_repository")
PRED_SCORE_THR = 0.4
CLAHE_CLIP_LIMIT = 2.0
CLAHE_TILE_SIZE = (8, 8)
FONT_PATH = 'C:/Windows/Fonts/meiryo.ttc'
FONT_SIZE = 20
SAMPLE_URL = 'https://raw.githubusercontent.com/opencv/opencv/master/samples/data/vtest.avi'
WINDOW_NAME = "Object Detection"

# CLAHEオブジェクト
clahe = cv2.createCLAHE(clipLimit=CLAHE_CLIP_LIMIT, tileGridSize=CLAHE_TILE_SIZE)

# グローバル変数
frame_count = 0
results_log = []
model = None
visualizer = None
selected_model_config = None


class ThreadedVideoCapture:
    """スレッド化されたVideoCapture(常に最新フレームを取得)"""
    def __init__(self, src, is_camera=False):
        if is_camera:
            self.cap = cv2.VideoCapture(src, cv2.CAP_DSHOW)
            fourcc = cv2.VideoWriter_fourcc('M', 'J', 'P', 'G')
            self.cap.set(cv2.CAP_PROP_FOURCC, fourcc)
            self.cap.set(cv2.CAP_PROP_FPS, 60)
        else:
            self.cap = cv2.VideoCapture(src)

        self.grabbed, self.frame = self.cap.read()
        self.stopped = False
        self.lock = threading.Lock()
        self.thread = threading.Thread(target=self.update, args=())
        self.thread.daemon = True
        self.thread.start()

    def update(self):
        """バックグラウンドでフレームを取得し続ける"""
        while not self.stopped:
            grabbed, frame = self.cap.read()
            with self.lock:
                self.grabbed = grabbed
                if grabbed:
                    self.frame = frame

    def read(self):
        """最新フレームを返す"""
        with self.lock:
            return self.grabbed, self.frame.copy() if self.grabbed else None

    def isOpened(self):
        return self.cap.isOpened()

    def get(self, prop):
        return self.cap.get(prop)

    def release(self):
        self.stopped = True
        self.thread.join()
        self.cap.release()


def display_program_header():
    """プログラムヘッダー表示"""
    print("=" * 60)
    print("=== MMDetection/Transformerモデル物体検出プログラム ===")
    print("=" * 60)
    print("概要: MMDetection/Transformerモデルで物体検出を行います")
    print("機能: Co-DINO (Swin-L) による物体検出")
    print("技術: CLAHE (コントラスト強化), Transformer-based Detection")
    print("操作方法:")
    print(" 1) モデルを選択する")
    print(" 2) 入力を選択する(0:動画ファイル, 1:カメラ, 2:サンプル動画)")
    print(" 3) OpenCVウィンドウで結果を確認し、q キーで終了")
    print("注意事項: Transformerベースのモデルは処理が低速です")
    print()


def download_and_setup_model(model_config):
    """MMDetectionの設定とモデルファイルをダウンロード・セットアップする"""
    config_root = BASE_DIR
    if not config_root.exists():
        print(f"MMDetection v{MMDET_VERSION} の設定ファイルをダウンロード中...")
        config_root.mkdir(parents=True, exist_ok=True)

        zip_url = f"https://github.com/open-mmlab/mmdetection/archive/refs/tags/{MMDET_VERSION}.zip"
        zip_path = config_root / "mmdetection.zip"
        urllib.request.urlretrieve(zip_url, str(zip_path))

        print("設定ファイルを展開中...")
        with zipfile.ZipFile(zip_path, 'r') as zip_ref:
            for member in zip_ref.namelist():
                if (f"mmdetection-{MMDET_VERSION[1:]}/configs/" in member or
                    f"mmdetection-{MMDET_VERSION[1:]}/projects/" in member):
                    target_path = member.replace(f"mmdetection-{MMDET_VERSION[1:]}/", "")
                    target_file = config_root / target_path
                    if member.endswith('/'):
                        target_file.mkdir(parents=True, exist_ok=True)
                    else:
                        with zip_ref.open(member) as source, open(target_file, 'wb') as target:
                            shutil.copyfileobj(source, target)
        zip_path.unlink()
        print("設定ファイルの準備完了")

    checkpoint_file = Path(model_config['checkpoint_file'])
    if not checkpoint_file.exists():
        print(f"モデル '{model_config['name']}' をダウンロード中...")
        urllib.request.urlretrieve(model_config['checkpoint_url'], str(checkpoint_file))
        print("モデルのダウンロード完了")

    mmdet_repo_path = str(config_root.resolve())
    if mmdet_repo_path not in sys.path:
        sys.path.insert(0, mmdet_repo_path)

    if model_config.get('is_project', False):
        config_path = config_root / model_config['config_file']
    else:
        config_path = config_root / "configs" / model_config['config_file']

    return str(config_path), str(checkpoint_file)


def draw_detection_results(frame, vis_frame, obj_lines):
    """物体検出の描画処理(Visualizerを使用)"""
    try:
        font = ImageFont.truetype(FONT_PATH, FONT_SIZE)
        img_pil = Image.fromarray(cv2.cvtColor(vis_frame, cv2.COLOR_BGR2RGB))
        draw = ImageDraw.Draw(img_pil)
        draw.text((10, 30), f"検出物体数: {len(obj_lines)}", font=font, fill=(0, 255, 0))
        vis_frame = cv2.cvtColor(np.array(img_pil), cv2.COLOR_RGB2BGR)
    except OSError:
        pass

    return vis_frame


def format_detection_output(obj_lines):
    """物体検出の出力フォーマット"""
    if len(obj_lines) == 0:
        return 'count=0'
    else:
        return f'count={len(obj_lines)}; ' + ' | '.join(obj_lines)


def detect_objects(frame):
    """共通の検出処理(CLAHE、推論、検出を実行)"""
    global model, visualizer

    # AIモデルの入力用にCLAHEを適用(YUV色空間で輝度チャンネルのみ処理)
    yuv_img = cv2.cvtColor(frame, cv2.COLOR_BGR2YUV)
    yuv_img[:,:,0] = clahe.apply(yuv_img[:,:,0])
    clahe_frame = cv2.cvtColor(yuv_img, cv2.COLOR_YUV2BGR)

    # 推論処理
    result = inference_detector(model, clahe_frame)

    # Visualizerで結果を描画
    visualizer.add_datasample(
        'frame',
        frame,
        data_sample=result,
        draw_gt=False,
        pred_score_thr=PRED_SCORE_THR
    )
    vis_frame = visualizer.get_image()

    # 検出結果を構造化
    obj_lines = []
    pred_instances = result.pred_instances
    bboxes = pred_instances.bboxes.cpu().numpy()
    labels = pred_instances.labels.cpu().numpy()
    scores = pred_instances.scores.cpu().numpy()

    for bbox, label, score in zip(bboxes, labels, scores):
        if score < PRED_SCORE_THR:
            continue
        class_name = visualizer.dataset_meta['classes'][int(label)]
        obj_lines.append(
            f"{class_name} ({score:.2f}), x1={bbox[0]:.0f}, y1={bbox[1]:.0f}, x2={bbox[2]:.0f}, y2={bbox[3]:.0f}"
        )

    return vis_frame, obj_lines


def process_video_frame(frame, timestamp_ms, is_camera):
    """動画フレーム処理(標準形式)"""
    vis_frame, obj_lines = detect_objects(frame)
    frame_with_info = draw_detection_results(frame, vis_frame, obj_lines)
    result = format_detection_output(obj_lines)
    return frame_with_info, result


def video_frame_processing(frame, timestamp_ms, is_camera):
    """動画フレーム処理"""
    global frame_count
    current_time = time.time()
    frame_count += 1

    processed_frame, result = process_video_frame(frame, timestamp_ms, is_camera)
    return processed_frame, result, current_time


# メイン処理開始
display_program_header()

# モデル選択
print("\nモデルを選択してください:")
for i, model_info in enumerate(MODELS, 1):
    print(f"{i}. {model_info['name']:<30} | 学習データ: {model_info['dataset']}")

choice_idx = -1
while choice_idx == -1:
    try:
        if len(MODELS) == 1:
            print("利用可能なモデルが1つのため、自動的に選択します")
            choice_idx = 0
        else:
            choice = int(input(f"モデル選択 (1-{len(MODELS)}): "))
            if 1 <= choice <= len(MODELS):
                choice_idx = choice - 1
            else:
                print("無効な番号です")
    except ValueError:
        print("数値を入力してください")

selected_model_config = MODELS[choice_idx]
print(f"\nモデル '{selected_model_config['name']}' を使用します")

# モデルの初期化
config_path, checkpoint_path = download_and_setup_model(selected_model_config)
print("モデルを初期化中...(時間がかかる場合があります)")
model = init_detector(config_path, checkpoint_path, device=device)
print("モデルの初期化完了")

visualizer = VISUALIZERS.build(model.cfg.visualizer)
visualizer.dataset_meta = model.dataset_meta

# 入力選択
print('\n0: 動画ファイル')
print('1: カメラ')
print('2: サンプル動画')
choice = input('選択: ')

is_camera = (choice == '1')

if choice == '0':
    root = tk.Tk()
    root.withdraw()
    path = filedialog.askopenfilename()
    if not path:
        raise SystemExit(1)
    cap = cv2.VideoCapture(path)
elif choice == '1':
    cap = ThreadedVideoCapture(0, is_camera=True)
else:
    SAMPLE_FILE = 'vtest.avi'
    print('サンプル動画をダウンロード中...')
    urllib.request.urlretrieve(SAMPLE_URL, SAMPLE_FILE)
    cap = cv2.VideoCapture(SAMPLE_FILE)

if not cap.isOpened():
    print('動画ファイル・カメラを開けませんでした')
    raise SystemExit(1)

# フレームレートの取得とタイムスタンプ増分の計算
if is_camera:
    actual_fps = cap.get(cv2.CAP_PROP_FPS)
    print(f'カメラのfps: {actual_fps}')
    timestamp_increment = int(1000 / actual_fps) if actual_fps > 0 else 33
else:
    video_fps = cap.get(cv2.CAP_PROP_FPS)
    timestamp_increment = int(1000 / video_fps) if video_fps > 0 else 33

frame_count = 0
results_log = []
start_time = time.time()
last_info_time = start_time
info_interval = 10.0
timestamp_ms = 0
total_processing_time = 0.0

try:
    while True:
        ret, frame = cap.read()
        if not ret:
            break

        timestamp_ms += timestamp_increment

        processing_start = time.time()
        processed_frame, result, current_time = video_frame_processing(frame, timestamp_ms, is_camera)
        processing_time = time.time() - processing_start
        total_processing_time += processing_time
        cv2.imshow(WINDOW_NAME, processed_frame)

        if result:
            if is_camera:
                timestamp = datetime.fromtimestamp(current_time).strftime("%Y-%m-%d %H:%M:%S.%f")[:-3]
                print(f'{timestamp}, {result}')
            else:
                print(f'Frame {frame_count}: {result}')

            results_log.append(result)

        # 情報提供(カメラモードのみ、info_interval秒ごと)
        if is_camera:
            elapsed = current_time - last_info_time
            if elapsed >= info_interval:
                total_elapsed = current_time - start_time
                actual_fps = frame_count / total_elapsed if total_elapsed > 0 else 0
                avg_processing_time = (total_processing_time / frame_count * 1000) if frame_count > 0 else 0
                print(f'[情報] 経過時間: {total_elapsed:.1f}秒, 処理フレーム数: {frame_count}, 実測fps: {actual_fps:.1f}, 平均処理時間: {avg_processing_time:.1f}ms')
                last_info_time = current_time

        if cv2.waitKey(1) & 0xFF == ord('q'):
            break

finally:
    print('\n=== プログラム終了 ===')
    cap.release()
    cv2.destroyAllWindows()

    if results_log:
        with open('result.txt', 'w', encoding='utf-8') as f:
            f.write(f"=== 物体検出結果 ===\n")
            f.write(f"モデル: {selected_model_config['name']}\n")
            f.write(f'処理フレーム数: {frame_count}\n')
            f.write(f'使用デバイス: {str(device).upper()}\n')
            if device.type == 'cuda':
                f.write(f'GPU: {torch.cuda.get_device_name(0)}\n')
            f.write(f'画像処理: CLAHE適用(YUV色空間)\n')
            f.write(f'信頼度閾値: {PRED_SCORE_THR}\n')
            if is_camera:
                f.write('形式: タイムスタンプ, 検出結果\n')
            else:
                f.write('形式: フレーム番号, 検出結果\n')
            f.write('\n')
            f.write('\n'.join(results_log))
        print('処理結果をresult.txtに保存しました')