CoTracker3による動画ポイント追跡(ソースコードと実行結果)
Python開発環境,ライブラリ類
ここでは、最低限の事前準備について説明する。機械学習や深層学習を行う場合は、NVIDIA CUDA、Visual Studio、Cursorなどを追加でインストールすると便利である。これらについては別ページ https://www.kkaneko.jp/cc/dev/aiassist.htmlで詳しく解説しているので、必要に応じて参照してください。
Python 3.12 のインストール
Pythonのインストールを行い、Pythonのプログラムを実行する環境を整える。扱う環境は、Windows搭載パソコンである。金子研究室では、Python 3.12.10を推奨する。
[Windows での Python 3.12 のインストール手順を見るには、ここをクリック]
Windows での Python 3.12 のインストール
以下のいずれかの方法でPython 3.12をインストールする。Pythonがインストール済みの場合、この手順は不要である。
方法 1:winget によるインストール
【インストールコマンドの実行方法】
管理者権限でコマンドプロンプトを起動する(手順:Windowsキーまたはスタートメニュー → cmd と入力 → 右クリック → 「管理者として実行」)。そして、コマンド全体をコマンドプロンプトにコピー&ペーストする。
--scope machine を指定することで、システム全体(全ユーザー向け)にインストールされる。このオプションの実行には管理者権限が必要である。インストール完了後、コマンドプロンプトを再起動するとPATHが反映される。
REM Python 3.12 をシステム領域にインストール
winget install --id Python.Python.3.12 -e --scope machine --silent --accept-source-agreements --accept-package-agreements --override "/quiet InstallAllUsers=1 PrependPath=1 Include_test=0 Include_pip=1 Include_launcher=1 InstallLauncherAllUsers=1 TargetDir=\"C:\Program Files\Python312\""

REM Python と Scripts を PATH 先頭に追加
powershell -NoProfile -Command "$p='C:\Program Files\Python312'; $s=\"$p\Scripts\"; $c=[Environment]::GetEnvironmentVariable('Path','Machine'); if((Test-Path $p) -and (';'+$c+';' -notlike \"*;$p;*\") -and (';'+$c+';' -notlike \"*;$s;*\")){[Environment]::SetEnvironmentVariable('Path',\"$p;$s;$c\",'Machine')}"
方法 2:インストーラーによるインストール
- Python公式サイト(https://www.python.org/downloads/)にアクセスし、「Download Python 3.x.x」ボタンからWindows用インストーラーをダウンロードする。
- ダウンロードしたインストーラーを実行する。
- 初期画面の下部に表示される「Add python.exe to PATH」にチェックを入れてから「Customize installation」を選択する。このチェックを入れ忘れると、コマンドプロンプトから
pythonコマンドを実行できない。 - 「Install Python 3.xx for all users」にチェックを入れ、「Install」をクリックする。
インストールの確認
コマンドプロンプトで以下を実行する。
python --versionバージョン番号(例:Python 3.12.x)が表示されればインストール成功である。「'python' は、内部コマンドまたは外部コマンドとして認識されていません。」と表示される場合は、インストールが正常に完了していない。
Python の開発環境 Visual Studio Code のインストールと Python 用の設定
Python の開発環境Visual Studio Code(プログラムを編集するソフトウェア。以下、VS Code)を整える。
[Windows での Visual Studio Code のインストールと Python 用の設定手順を見るには、ここをクリック]
Windows での Visual Studio Code のインストールと Python 用の設定手順
1. VS Code と拡張機能のインストール
以下のコマンドにより,既存の VS Code を削除し,全ユーザー共有の設定で再インストールしたうえで,拡張機能(VS Code に機能を追加するソフトウェア)をまとめて導入する.
【インストールコマンドの実行方法】
管理者権限でコマンドプロンプトを起動する(手順:Windows キーまたはスタートメニュー → cmd と入力 → 右クリック → 「管理者として実行」)。そして,コマンド全体をコマンドプロンプトにコピー&ペーストする。
インストールコマンド
REM ============================================================
REM Microsoft Visual Studio Code
REM ============================================================
winget uninstall -e --id Microsoft.VisualStudioCode --silent --disable-interactivity --accept-source-agreements
rmdir /s /q C:\ProgramData\vscode-extensions 2>nul
rmdir /s /q "%APPDATA%\Code" 2>nul
rmdir /s /q "%USERPROFILE%\.vscode" 2>nul
rmdir /s /q "%LOCALAPPDATA%\Microsoft\vscode-update" 2>nul

REM VS Code をシステム領域に新規インストール
winget install --scope machine --id Microsoft.VisualStudioCode -e --silent --accept-source-agreements --accept-package-agreements

REM 全ユーザー共有の拡張機能フォルダ
mkdir C:\ProgramData\vscode-extensions 2>nul
icacls "C:\ProgramData\vscode-extensions" /grant "Everyone:(OI)(CI)M" /T

REM スタートメニューのショートカットを --extensions-dir 付きで再作成
rmdir /s /q "C:\ProgramData\Microsoft\Windows\Start Menu\Programs\Visual Studio Code" 2>nul
del "C:\ProgramData\Microsoft\Windows\Start Menu\Programs\Visual Studio Code.lnk" 2>nul
powershell -NoProfile -Command "$s=New-Object -ComObject WScript.Shell; $lnk=$s.CreateShortcut('C:\ProgramData\Microsoft\Windows\Start Menu\Programs\Visual Studio Code.lnk'); $lnk.TargetPath='C:\Program Files\Microsoft VS Code\Code.exe'; $lnk.Arguments='--extensions-dir \"C:\ProgramData\vscode-extensions\"'; $lnk.Save()"
REM ショートカットの検証
powershell -NoProfile -Command "$s=New-Object -ComObject WScript.Shell; $lnk=$s.CreateShortcut('C:\ProgramData\Microsoft\Windows\Start Menu\Programs\Visual Studio Code.lnk'); Write-Host 'TargetPath:' $lnk.TargetPath; Write-Host 'Arguments:' $lnk.Arguments"

REM ファイル / フォルダ右クリックの「Code で開く」を登録
reg add "HKLM\SOFTWARE\Classes\*\shell\VSCode\command" /ve /d "\"C:\Program Files\Microsoft VS Code\Code.exe\" --extensions-dir \"C:\ProgramData\vscode-extensions\" \"%1\"" /f
reg add "HKLM\SOFTWARE\Classes\Directory\shell\VSCode\command" /ve /d "\"C:\Program Files\Microsoft VS Code\Code.exe\" --extensions-dir \"C:\ProgramData\vscode-extensions\" \"%1\"" /f
reg add "HKLM\SOFTWARE\Classes\Directory\Background\shell\VSCode\command" /ve /d "\"C:\Program Files\Microsoft VS Code\Code.exe\" --extensions-dir \"C:\ProgramData\vscode-extensions\" \"%V\"" /f

REM --extensions-dir 付きで起動する code.cmd ラッパを作成
REM (%* を echo で書くと対話的 cmd で失われるため、PowerShell で [char]37+'*' を書き出す)
powershell -NoProfile -Command "$pct=[char]37; $q=[char]34; $c='@echo off'+[char]13+[char]10+$q+'C:\Program Files\Microsoft VS Code\bin\code.cmd'+$q+' --extensions-dir '+$q+'C:\ProgramData\vscode-extensions'+$q+' '+$pct+'*'+[char]13+[char]10; [IO.File]::WriteAllText('C:\ProgramData\vscode-extensions\vscode.cmd',$c,[Text.Encoding]::ASCII)"

REM 拡張機能のインストール
set "CODE=C:\Program Files\Microsoft VS Code\bin\code.cmd"
"%CODE%" --extensions-dir "C:\ProgramData\vscode-extensions" --uninstall-extension GitHub.copilot
"%CODE%" --extensions-dir "C:\ProgramData\vscode-extensions" --uninstall-extension GitHub.copilot-chat
"%CODE%" --extensions-dir "C:\ProgramData\vscode-extensions" --install-extension ms-python.python
"%CODE%" --extensions-dir "C:\ProgramData\vscode-extensions" --install-extension ms-python.vscode-pylance
"%CODE%" --extensions-dir "C:\ProgramData\vscode-extensions" --install-extension ms-python.debugpy
"%CODE%" --extensions-dir "C:\ProgramData\vscode-extensions" --install-extension MS-CEINTL.vscode-language-pack-ja
"%CODE%" --extensions-dir "C:\ProgramData\vscode-extensions" --install-extension saoudrizwan.claude-dev
"%CODE%" --extensions-dir "C:\ProgramData\vscode-extensions" --install-extension rust-lang.rust-analyzer
"%CODE%" --extensions-dir "C:\ProgramData\vscode-extensions" --install-extension tamasfe.even-better-toml
"%CODE%" --extensions-dir "C:\ProgramData\vscode-extensions" --install-extension anthropic.claude-code
"%CODE%" --extensions-dir "C:\ProgramData\vscode-extensions" --install-extension almenon.arepl
"%CODE%" --extensions-dir "C:\ProgramData\vscode-extensions" --list-extensions --show-versions
echo === セットアップ完了 ===
2. Python インタプリタの選択
同一マシンに複数の Python がインストールされている場合,VS Code で使用する Python 本体(インタプリタ:Python プログラムを解釈・実行するソフトウェア)を選択する必要がある.
- コマンドパレット(コマンド名で機能を呼び出す VS Code の入力欄)を開く(
Ctrl+Shift+P) Python: Select Interpreterと入力する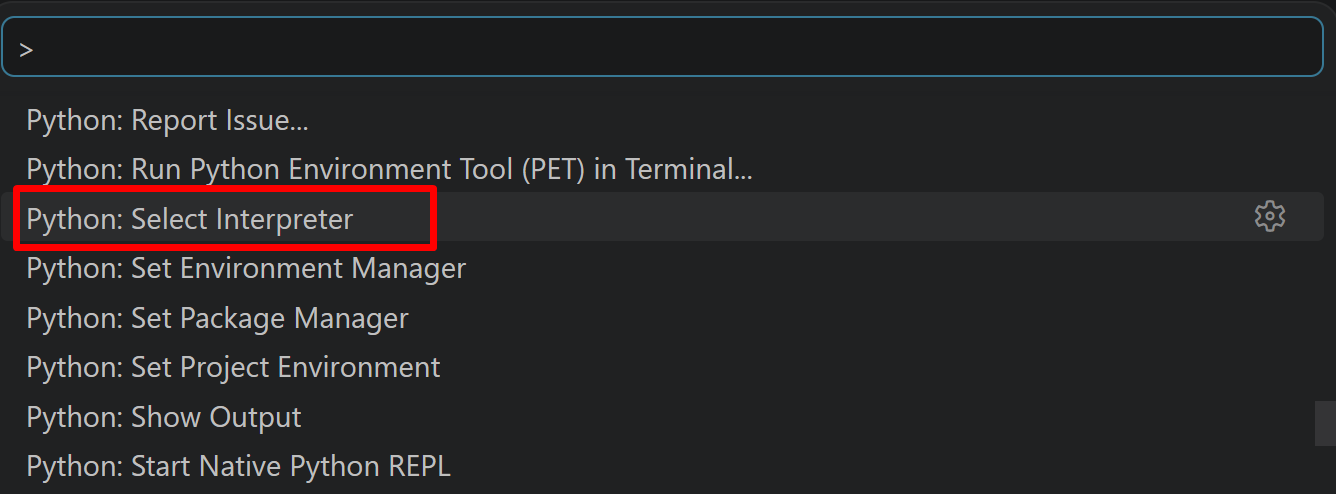
- 表示される一覧から,使用する Python(例:
C:\Program Files\Python312\python.exe)を選択する.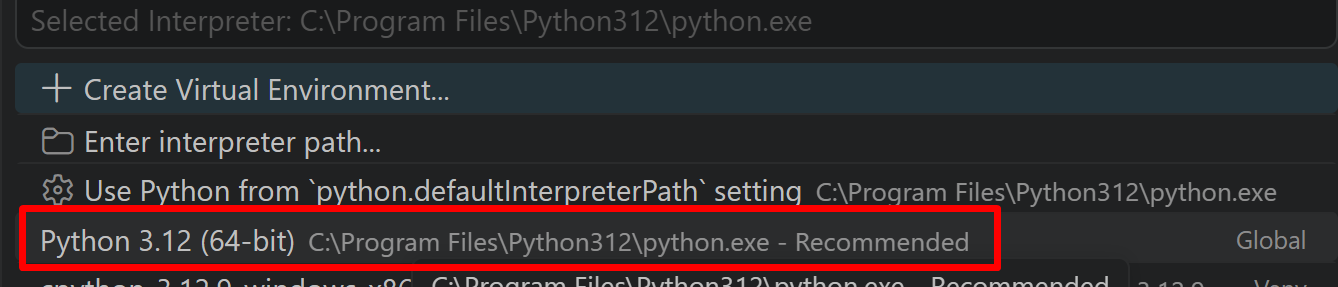
必要なライブラリをシステム領域にインストール
管理者権限のコマンドプロンプトで以下を実行する。管理者権限のコマンドプロンプトを起動するには、Windows キーまたはスタートメニューから「cmd」と入力し、表示された「コマンドプロンプト」を右クリックして「管理者として実行」を選択する。
REM PyTorch をインストール(GPU対応版)
set "CUDA_TAG=cu128"
set "PYTHON_PATH=C:\Program Files\Python312"
"%PYTHON_PATH%\Scripts\pip" install --no-user -U numpy torch torchvision torchaudio --index-url https://download.pytorch.org/whl/%CUDA_TAG%
pip install opencv-python imageio[ffmpeg] pillow
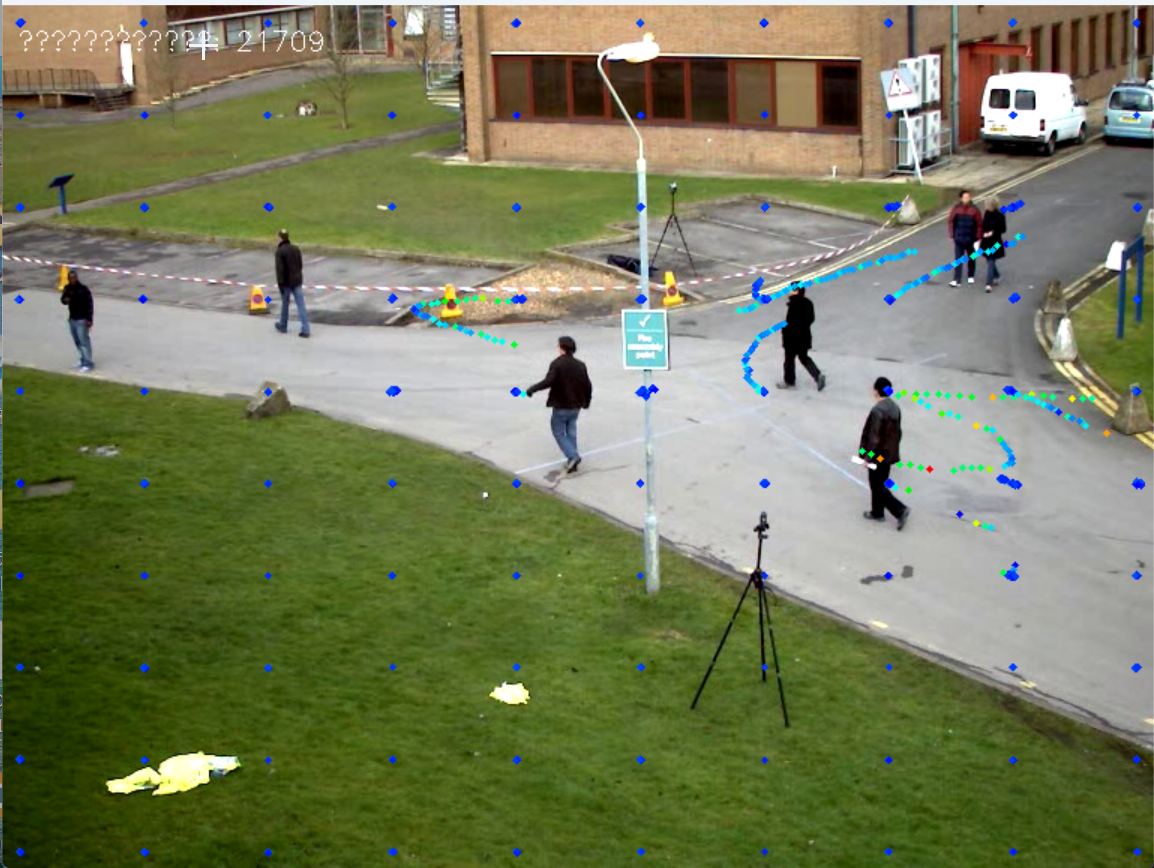
CoTracker3による動画ポイント追跡プログラム
ソースコード
# CoTracker3による動画ポイント追跡プログラム
# 特徴技術名: CoTracker3
# 出典: Karaev, N., Makarov, I., Wang, J., Rocco, I., Graham, B., Neverova, N., Vedaldi, A., & Rupprecht, C. (2024). CoTracker3: Simpler and Better Point Tracking by Pseudo-Labelling Real Videos. arXiv:2410.11831.
# 特徴機能: Co-tracking(協調追跡)機能。複数ポイントを相互関係を活用してグループとして追跡
# 学習済みモデル: CoTracker3 (online/offline), PyTorch Hub経由で利用可能
# 方式設計
# 関連利用技術: OpenCV(動画処理), PyTorch(深層学習), tkinter(ファイル選択), urllib(ダウンロード), Pillow(日本語表示)
# 入力と出力: 入力: 動画(0:動画ファイル,1:カメラ,2:サンプル動画), 出力: 動画でのポイント追跡結果をOpenCV画面でリアルタイム表示
# 処理手順: 1.動画フレーム読み込み → 2.CoTracker3モデル読み込み → 3.グリッドポイント設定 → 4.協調追跡実行 → 5.結果可視化
# 前処理、後処理: 前処理:動画フレームのテンソル変換とGPU転送, 後処理:追跡結果の可視化とファイル保存
# 追加処理: グリッドベースポイントサンプリング,協調追跡による相互関係活用,可視性判定
# 調整を必要とする設定値: grid_size(追跡グリッドサイズ,デフォルト10), window_size(ウィンドウサイズ,デフォルト16)
# 将来方策: 動的grid_size調整機能,カスタムポイント選択機能
# その他の重要事項: GPU使用推奨,メモリ効率のためのオンライン/オフライン選択
# 前準備: pip install -U numpy torch torchvision torchaudio --index-url https://download.pytorch.org/whl/cu126
# pip install opencv-python imageio[ffmpeg] pillow
import cv2
import torch
import tkinter as tk
from tkinter import filedialog
import urllib.request
import numpy as np
from PIL import Image, ImageDraw, ImageFont
import time
from datetime import datetime
# GPU/CPU自動選択
device = torch.device('cuda' if torch.cuda.is_available() else 'cpu')
print(f'デバイス: {str(device)}')
# GPU使用時の最適化
if device.type == 'cuda':
torch.backends.cudnn.benchmark = True
# グローバル変数
frame_count = 0
results_log = []
cotracker_model = None
grid_size = 10
frame_buffer = []
window_size = 16 # オンラインモデルのウィンドウサイズ
point_history = {}
max_speed_global = 1.0
fps = 30
model_type = 'online' # 'online' or 'offline'
def load_cotracker_model():
global cotracker_model, model_type
try:
# オンラインモデルを使用(リアルタイム処理向け)
cotracker_model = torch.hub.load('facebookresearch/co-tracker', 'cotracker3_online').to(device)
model_type = 'online'
print(f'CoTracker3オンラインモデル読み込み完了')
except Exception as e:
print(f'モデル読み込みエラー: {e}')
exit()
def process_online_tracking(frames_tensor):
"""オンラインモデルでの追跡処理"""
global cotracker_model, grid_size
try:
# 初回処理
if len(point_history) == 0:
cotracker_model(video_chunk=frames_tensor, is_first_step=True, grid_size=grid_size)
# 追跡実行
pred_tracks, pred_visibility = cotracker_model(video_chunk=frames_tensor)
return pred_tracks, pred_visibility
except Exception as e:
print(f'オンライン追跡エラー: {e}')
return None, None
def get_speed_color(speed, max_speed):
"""速度に応じた色を生成"""
if max_speed == 0:
ratio = 0
else:
ratio = min(speed / max_speed, 1.0)
# 緑(低速)から赤(高速)へのグラデーション
hue = int(120 * (1 - ratio))
hsv = np.uint8([[[hue, 255, 255]]])
bgr = cv2.cvtColor(hsv, cv2.COLOR_HSV2BGR)[0][0]
return int(bgr[0]), int(bgr[1]), int(bgr[2])
def video_frame_processing(frame):
global frame_count, cotracker_model, grid_size, results_log, frame_buffer
global point_history, max_speed_global, fps, window_size, model_type
current_time = time.time()
frame_count += 1
if cotracker_model is None:
return frame, "モデル未読込", current_time
# フレームをバッファに追加
frame_buffer.append(frame.copy())
# オンラインモデルの処理
if model_type == 'online' and len(frame_buffer) >= window_size:
# ウィンドウサイズ分のフレームを取得
window_frames = frame_buffer[-window_size:]
frames_array = np.stack(window_frames)
video_tensor = torch.tensor(frames_array).permute(0, 3, 1, 2)[None].float().to(device)
pred_tracks, pred_visibility = process_online_tracking(video_tensor)
if pred_tracks is not None and pred_visibility is not None:
num_points = pred_tracks.shape[2]
tracks_np = pred_tracks[0].cpu().numpy()
visibility_np = pred_visibility[0].cpu().numpy()
# 最新フレームの追跡結果を処理
latest_frame_idx = len(frame_buffer) - 1
t = window_size - 1 # 最新フレームのインデックス
frame_data = []
for pid in range(num_points):
if visibility_np[t, pid] > 0.5:
x, y = int(tracks_np[t, pid, 0]), int(tracks_np[t, pid, 1])
if 0 <= x < frame.shape[1] and 0 <= y < frame.shape[0]:
# 速度計算(ピクセル/フレーム → ピクセル/秒)
speed = 0.0
if t > 0 and visibility_np[t-1, pid] > 0.5:
prev_x, prev_y = tracks_np[t-1, pid, 0], tracks_np[t-1, pid, 1]
pixel_distance = np.sqrt((x - prev_x)**2 + (y - prev_y)**2)
# 1フレーム間の移動距離をfpsで掛けて秒速に変換
speed = pixel_distance * fps
if speed > 0:
max_speed_global = max(max_speed_global, speed)
frame_data.append((pid, x, y, speed))
# CSV用データ記録(重複チェック改善)
log_entry = f'{pid},{latest_frame_idx},{x},{y},{speed:.2f}'
if log_entry not in results_log:
results_log.append(log_entry)
if frame_data:
point_history[latest_frame_idx] = frame_data
# 可視化処理
vis_frame = frame.copy()
# 履歴の全点を速度に応じた色で描画
for frame_idx, frame_data in point_history.items():
for pid, x, y, speed in frame_data:
color = get_speed_color(speed, max_speed_global)
cv2.circle(vis_frame, (x, y), 3, color, -1)
# 現在フレームの強調表示
if frame_count - 1 in point_history:
for pid, x, y, speed in point_history[frame_count - 1]:
cv2.circle(vis_frame, (x, y), 5, (255, 255, 255), 2)
# 状態表示(日本語)
FONT_PATH = 'C:/Windows/Fonts/meiryo.ttc'
FONT_SIZE = 16
try:
font = ImageFont.truetype(FONT_PATH, FONT_SIZE)
img_pil = Image.fromarray(cv2.cvtColor(vis_frame, cv2.COLOR_BGR2RGB))
draw = ImageDraw.Draw(img_pil)
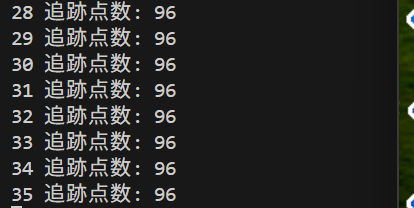
total_points = len(point_history.get(frame_count - 1, []))
draw.text((10, 10), f'追跡点数: {total_points}', font=font, fill=(255, 255, 255))
draw.text((10, 35), f'フレーム: {frame_count}', font=font, fill=(255, 255, 255))
draw.text((10, 60), f'モデル: {model_type}', font=font, fill=(255, 255, 255))
if len(frame_buffer) < window_size:
status_text = f'バッファリング中: {len(frame_buffer)}/{window_size}'
draw.text((10, 85), status_text, font=font, fill=(255, 255, 0))
if max_speed_global > 0:
draw.text((10, 110), f'最大速度: {max_speed_global:.1f} px/s', font=font, fill=(0, 255, 0))
# 色凡例
draw.text((10, 135), '速度:', font=font, fill=(255, 255, 255))
draw.text((60, 135), '低', font=font, fill=(0, 255, 0))
draw.text((85, 135), '→', font=font, fill=(255, 255, 255))
draw.text((105, 135), '高', font=font, fill=(255, 0, 0))
vis_frame = cv2.cvtColor(np.array(img_pil), cv2.COLOR_RGB2BGR)
except Exception:
# 英語表示
total_points = len(point_history.get(frame_count - 1, []))
cv2.putText(vis_frame, f'Points: {total_points}', (10, 30), cv2.FONT_HERSHEY_SIMPLEX, 0.6, (255, 255, 255), 1)
cv2.putText(vis_frame, f'Frame: {frame_count}', (10, 55), cv2.FONT_HERSHEY_SIMPLEX, 0.6, (255, 255, 255), 1)
cv2.putText(vis_frame, f'Model: {model_type}', (10, 80), cv2.FONT_HERSHEY_SIMPLEX, 0.6, (255, 255, 255), 1)
result = f"追跡点数: {len(point_history.get(frame_count - 1, []))}"
return vis_frame, result, current_time
# メイン処理
print('========================================')
print('CoTracker3動画ポイント追跡プログラム')
print('========================================')
print('概要: 複数ポイントの協調追跡により、オクルージョンに対応した追跡を実現')
print('特徴: オンラインモデルでリアルタイム処理を実行')
print('注意事項:')
print(' - GPU使用時は処理が高速化されます')
print(' - 初回実行時はモデルのダウンロードに時間がかかります')
print(' - オンラインモデルはメモリ効率的でリアルタイム処理に適しています')
print('操作方法:')
print(' q キー: プログラム終了')
print('========================================')
load_cotracker_model()
print("\n0: 動画ファイル")
print("1: カメラ")
print("2: サンプル動画")
choice = input("選択: ")
if choice == '0':
root = tk.Tk()
root.withdraw()
path = filedialog.askopenfilename()
if not path:
exit()
cap = cv2.VideoCapture(path)
fps = cap.get(cv2.CAP_PROP_FPS) or 30
elif choice == '1':
cap = cv2.VideoCapture(0, cv2.CAP_DSHOW)
if not cap.isOpened():
cap = cv2.VideoCapture(0)
cap.set(cv2.CAP_PROP_BUFFERSIZE, 1)
fps = cap.get(cv2.CAP_PROP_FPS) or 30
else:
# サンプル動画ダウンロード・処理
SAMPLE_URL = 'https://raw.githubusercontent.com/opencv/opencv/master/samples/data/vtest.avi'
SAMPLE_FILE = 'vtest.avi'
urllib.request.urlretrieve(SAMPLE_URL, SAMPLE_FILE)
cap = cv2.VideoCapture(SAMPLE_FILE)
fps = cap.get(cv2.CAP_PROP_FPS) or 30
if not cap.isOpened():
print('動画ファイル・カメラを開けませんでした')
exit()
# メイン処理
print('\n=== 動画処理開始 ===')
print('操作方法:')
print(' q キー: プログラム終了')
try:
while True:
ret, frame = cap.read()
if not ret:
break
MAIN_FUNC_DESC = "CoTracker3追跡"
processed_frame, result, current_time = video_frame_processing(frame)
cv2.imshow(MAIN_FUNC_DESC, processed_frame)
if choice == '1': # カメラの場合
print(datetime.fromtimestamp(current_time).strftime("%Y-%m-%d %H:%M:%S.%f")[:-3], result)
else: # 動画ファイルの場合
print(frame_count, result)
if cv2.waitKey(1) & 0xFF == ord('q'):
break
finally:
print('\n=== プログラム終了 ===')
cap.release()
cv2.destroyAllWindows()
if results_log:
with open('result.txt', 'w', encoding='utf-8') as f:
f.write('=== 結果 ===\n')
f.write(f'処理フレーム数: {frame_count}\n')
f.write(f'使用デバイス: {str(device).upper()}\n')
if device.type == 'cuda':
f.write(f'GPU: {torch.cuda.get_device_name(0)}\n')
f.write(f'モデルタイプ: {model_type}\n')
f.write('\n=== 追跡データ (PID,Frame,X,Y,Speed[px/s]) ===\n')
f.write('\n'.join(results_log))
print(f'\n処理結果をresult.txtに保存しました')