EfficientADによる床面異常検出

Python開発環境,ライブラリ類
ここでは、最低限の事前準備について説明する。機械学習や深層学習を行う場合は、NVIDIA CUDA、Visual Studio、Cursorなどを追加でインストールすると便利である。これらについては別ページ https://www.kkaneko.jp/cc/dev/aiassist.htmlで詳しく解説しているので、必要に応じて参照してください。
Python 3.12 のインストール(Windows 上) [クリックして展開]
以下のいずれかの方法で Python 3.12 をインストールする。Python がインストール済みの場合、この手順は不要である。
方法1:winget によるインストール
管理者権限のコマンドプロンプトで以下を実行する。管理者権限のコマンドプロンプトを起動するには、Windows キーまたはスタートメニューから「cmd」と入力し、表示された「コマンドプロンプト」を右クリックして「管理者として実行」を選択する。
winget install --id Python.Python.3.12 -e --scope machine --silent --accept-source-agreements --accept-package-agreements --override "/quiet InstallAllUsers=1 PrependPath=1 Include_test=0 Include_pip=1 Include_launcher=1 InstallLauncherAllUsers=1 TargetDir=\"C:\Program Files\Python312\""
powershell -Command "$p='C:\Program Files\Python312'; $s=\"$p\Scripts\"; $m=[Environment]::GetEnvironmentVariable('Path','Machine'); if($m -notlike \"*$s*\") { [Environment]::SetEnvironmentVariable('Path', \"$p;$s;$m\", 'Machine') }"
--scope machine を指定することで、システム全体(全ユーザー向け)にインストールされる。このオプションの実行には管理者権限が必要である。インストール完了後、コマンドプロンプトを再起動すると PATH が自動的に設定される。
方法2:インストーラーによるインストール
- Python 公式サイト(https://www.python.org/downloads/)にアクセスし、「Download Python 3.x.x」ボタンから Windows 用インストーラーをダウンロードする。
- ダウンロードしたインストーラーを実行する。
- 初期画面の下部に表示される「Add python.exe to PATH」に必ずチェックを入れてから「Customize installation」を選択する。このチェックを入れ忘れると、コマンドプロンプトから
pythonコマンドを実行できない。 - 「Install Python 3.xx for all users」にチェックを入れ、「Install」をクリックする。
インストールの確認
コマンドプロンプトで以下を実行する。
python --versionバージョン番号(例:Python 3.12.x)が表示されればインストール成功である。「'python' は、内部コマンドまたは外部コマンドとして認識されていません。」と表示される場合は、インストールが正常に完了していない。
AIエディタ Windsurf のインストール(Windows 上) [クリックして展開]
Pythonプログラムの編集・実行には、AIエディタの利用を推奨する。ここでは、Windsurfのインストールを説明する。Windsurf がインストール済みの場合、この手順は不要である。
管理者権限のコマンドプロンプトで以下を実行する。管理者権限のコマンドプロンプトを起動するには、Windows キーまたはスタートメニューから「cmd」と入力し、表示された「コマンドプロンプト」を右クリックして「管理者として実行」を選択する。
winget install --scope machine --id Codeium.Windsurf -e --silent --disable-interactivity --force --accept-source-agreements --accept-package-agreements --custom "/SP- /SUPPRESSMSGBOXES /NORESTART /CLOSEAPPLICATIONS /DIR=""C:\Program Files\Windsurf"" /MERGETASKS=!runcode,addtopath,associatewithfiles,!desktopicon"
powershell -Command "$env:Path=[System.Environment]::GetEnvironmentVariable('Path','Machine')+';'+[System.Environment]::GetEnvironmentVariable('Path','User'); windsurf --install-extension MS-CEINTL.vscode-language-pack-ja --force; windsurf --install-extension ms-python.python --force; windsurf --install-extension Codeium.windsurfPyright --force"
--scope machine を指定することで、システム全体(全ユーザー向け)にインストールされる。このオプションの実行には管理者権限が必要である。インストール完了後、コマンドプロンプトを再起動すると PATH が自動的に設定される。
【関連する外部ページ】
Windsurf の公式ページ: https://windsurf.com/
必要なライブラリをシステム領域にインストール
管理者権限のコマンドプロンプトで以下を実行する。管理者権限のコマンドプロンプトを起動するには、Windows キーまたはスタートメニューから「cmd」と入力し、表示された「コマンドプロンプト」を右クリックして「管理者として実行」を選択する。
REM PyTorch をインストール(GPU対応版)
set "CUDA_TAG=cu128"
set "PYTHON_PATH=C:\Program Files\Python312"
"%PYTHON_PATH%\Scripts\pip" install --no-user -U numpy torch torchvision torchaudio --index-url https://download.pytorch.org/whl/%CUDA_TAG%
pip install opencv-python numpy scipy scikit-image matplotlib pillow
EfficientADによる床面異常検出プログラム
概要
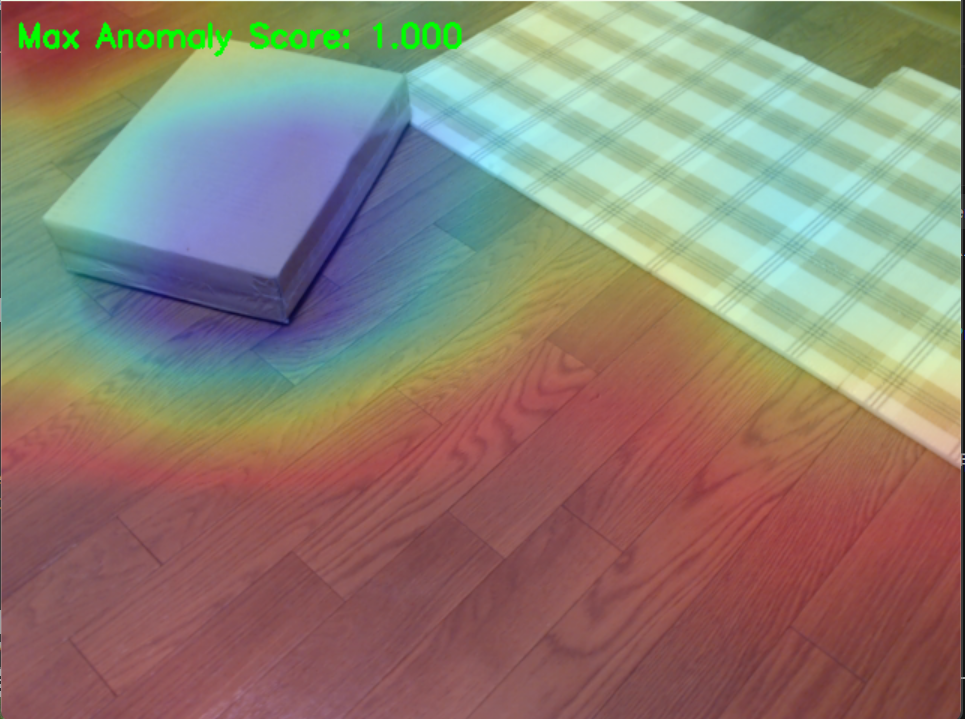
カメラから取得した画像を分析し、正常パターンとの差異を検出することで床面の異常を認識する。 EfficientADを用いた異常検出プログラムは、正常な床面画像のパターンを学習し、新たに入力された画像との差異を検出する能力を持つ。教師-生徒アーキテクチャにより、正常パターンからの逸脱を数値化し、視覚的にヒートマップとして表示する。この手法により、事前に異常パターンを定義することなく、正常データのみから異常を検出できる。
主要技術
- EfficientAD [1]
教師-生徒アーキテクチャを用いた異常検出手法である。軽量な特徴抽出器から抽出された特徴を生徒ネットワークが予測するよう学習し、テスト時に正常画像の特徴予測に失敗することで異常を検出する。さらに論理的異常検出のためにオートエンコーダを組み込んでいる。 - WideResNet [2]
ResNetアーキテクチャの幅を拡張したCNNモデルである。各層のチャンネル数を増やすことで、深さを抑えながら表現力を向上させている。ImageNetで事前学習されたモデルは、特徴抽出器として転移学習に広く利用される。
参考文献
[1] Batzner, K., Heckler, L., & König, R. (2024). EfficientAD: Accurate Visual Anomaly Detection at Millisecond-Level Latencies. In Proceedings of the IEEE/CVF Winter Conference on Applications of Computer Vision (pp. 128-138). https://openaccess.thecvf.com/content/WACV2024/html/Batzner_EfficientAD_Accurate_Visual_Anomaly_Detection_at_Millisecond-Level_Latencies_WACV_2024_paper.html
[2] Zagoruyko, S., & Komodakis, N. (2016). Wide residual networks. In Proceedings of the British Machine Vision Conference (BMVC) (pp. 87.1-87.12). https://bmva-archive.org.uk/bmvc/2016/papers/paper087/index.html
ソースコード
# EfficientADによる異常検出プログラム
# 特徴技術名: EfficientAD
# 出典: Batzner, K., Heckler, L., & König, R. (2024). EfficientAD: Accurate Visual Anomaly Detection at Millisecond-Level Latencies. In WACV (pp. 128-138).
# 特徴機能: PDN(Patch Description Network)と教師-生徒アーキテクチャ、オートエンコーダによる構造的・論理的異常の検出
# 学習済みモデル: 教師モデルはPDNを用いる
# 方式設計:
#   - 関連利用技術: PDN(特徴抽出)、教師-生徒モデル(知識蒸留)、オートエンコーダ(論理的異常検出)
#   - 入力と出力: 入力: 画像(256x256)、出力: 異常検出結果(構造的+論理的異常の統合スコア)
#   - 前処理、後処理: ImageNet統計で正規化、ガウシアンフィルタ、画像ごとのmin-max正規化(判定は上位10%平均値)
#   - 追加処理: Hard negative mining、penalty loss
# 調整可能な設定: 閾値、学習率、ガウシアンsigma、上位割合
# 前準備: pip install -U numpy torch torchvision torchaudio --index-url https://download.pytorch.org/whl/cu126
#          pip install opencv-python numpy scipy scikit-image matplotlib pillow

import torch
import torch.nn as nn
import torch.nn.functional as F
import torch.optim as optim
from torch.utils.data import DataLoader, TensorDataset
import torchvision.transforms as transforms

import cv2
import numpy as np
from scipy.ndimage import gaussian_filter
import matplotlib.pyplot as plt
import tkinter as tk
from tkinter import filedialog
import urllib.request
import os
import time
from datetime import datetime
from PIL import Image, ImageDraw, ImageFont

# GPU/CPU自動選択
device = torch.device('cuda' if torch.cuda.is_available() else 'cpu')
print(f'デバイス: {str(device)}')
# GPU使用時の最適化
if device.type == 'cuda':
    torch.backends.cudnn.benchmark = True

# ===== 設定値 =====
# 基本設定
MIN_NORMAL_IMAGES = 3
SAMPLE_PREFIX = 'sample_'
RESULT_FILE = 'result.txt'

# モデル設定
IMAGE_SIZE = 256
OUT_CHANNELS = 384
TEACHER_INIT_EPOCHS = 10
STUDENT_EPOCHS = 70
AE_EPOCHS = 70

# 学習設定
LEARNING_RATE = 1e-4
BATCH_SIZE = 8
HARD_RATIO = 0.999

# 後処理・判定
GAUSSIAN_SIGMA = 4
ANOMALY_THRESHOLD = 0.7        # 固定閾値(画像ごとのmin-max正規化後に適用)
TOPK_RATIO = 0.10              # 上位10%平均値で判定

# 日本語フォント設定
FONT_PATH = 'C:/Windows/Fonts/meiryo.ttc'
FONT_SIZE = 20

# サンプル画像URL
SAMPLE_URLS = [
    'https://github.com/opencv/opencv/raw/master/samples/data/fruits.jpg',
    'https://github.com/opencv/opencv/raw/master/samples/data/messi5.jpg',
    'https://github.com/opencv/opencv/raw/master/samples/data/aero3.jpg'
]


# ===== PDN (Patch Description Network) =====
class PDN(nn.Module):
    """Patch Description Network"""
    def __init__(self, out_channels=384):
        super(PDN, self).__init__()
        self.pdn = nn.Sequential(
            nn.Conv2d(3, 128, kernel_size=4, stride=1, padding=3),
            nn.ReLU(inplace=True),
            nn.AvgPool2d(kernel_size=2, stride=2, padding=1),

            nn.Conv2d(128, 256, kernel_size=4, stride=1, padding=3),
            nn.ReLU(inplace=True),
            nn.AvgPool2d(kernel_size=2, stride=2, padding=1),

            nn.Conv2d(256, 256, kernel_size=3, stride=1, padding=1),
            nn.ReLU(inplace=True),

            nn.Conv2d(256, out_channels, kernel_size=4, stride=1, padding=0)
        )

    def forward(self, x):
        return self.pdn(x)


# ===== オートエンコーダ(GroupNorm) =====
class Autoencoder(nn.Module):
    """論理的異常検出用の軽量オートエンコーダ"""
    def __init__(self, in_channels=384, latent_dim=64):
        super(Autoencoder, self).__init__()
        self.encoder = nn.Sequential(
            nn.Conv2d(in_channels, 256, kernel_size=1),
            nn.GroupNorm(32, 256),
            nn.ReLU(inplace=True),
            nn.Conv2d(256, 128, kernel_size=1),
            nn.GroupNorm(16, 128),
            nn.ReLU(inplace=True),
            nn.Conv2d(128, latent_dim, kernel_size=1)
        )
        self.decoder = nn.Sequential(
            nn.Conv2d(latent_dim, 128, kernel_size=1),
            nn.GroupNorm(16, 128),
            nn.ReLU(inplace=True),
            nn.Conv2d(128, 256, kernel_size=1),
            nn.GroupNorm(32, 256),
            nn.ReLU(inplace=True),
            nn.Conv2d(256, in_channels, kernel_size=1)
        )

    def forward(self, x):
        z = self.encoder(x)
        x_recon = self.decoder(z)
        return x_recon


# ===== 日本語テキスト描画ユーティリティ =====
class TextRenderer:
    """日本語テキスト描画の統一処理"""
    def __init__(self, font_path=FONT_PATH, font_size=FONT_SIZE):
        self.font_path = font_path
        self.font_size = font_size
        self.font = None
        self.use_japanese = False
        try:
            self.font = ImageFont.truetype(self.font_path, self.font_size)
            self.use_japanese = True
        except:
            self.use_japanese = False

    def draw_text(self, image, text, position, color, font_scale=1.0):
        if self.use_japanese and self.font:
            img_pil = Image.fromarray(cv2.cvtColor(image, cv2.COLOR_BGR2RGB))
            draw = ImageDraw.Draw(img_pil)
            rgb_color = color[::-1] if len(color) == 3 else color  # BGR→RGB
            draw.text(position, text, font=self.font, fill=rgb_color)
            return cv2.cvtColor(np.array(img_pil), cv2.COLOR_RGB2BGR)
        else:
            font = cv2.FONT_HERSHEY_SIMPLEX
            thickness = max(1, int(2 * font_scale))
            cv2.putText(image, text, position, font, 0.7 * font_scale, color, thickness)
            return image


# ===== EfficientADモデル =====
class EfficientAD:
    def __init__(self):
        self.device = device

        self.teacher = PDN(OUT_CHANNELS).to(self.device)
        self.student = PDN(OUT_CHANNELS).to(self.device)
        self.autoencoder = Autoencoder(OUT_CHANNELS).to(self.device)

        self.transform = transforms.Compose([
            transforms.ToPILImage(),
            transforms.Resize((IMAGE_SIZE, IMAGE_SIZE)),
            transforms.ToTensor(),
            transforms.Normalize(mean=[0.485, 0.456, 0.406],
                                 std=[0.229, 0.224, 0.225])
        ])

        self.text_renderer = TextRenderer()
        self.normal_images = []
        self.teacher_outputs = []  # 学習済み教師出力(デバッグ・分析用途で保持)
        self.results_log = []

    # ---- 補助関数 ----
    def _bgr_to_rgb(self, img_bgr: np.ndarray) -> np.ndarray:
        return cv2.cvtColor(img_bgr, cv2.COLOR_BGR2RGB)

    def channel_standardize(self, x: torch.Tensor, eps: float = 1e-6) -> torch.Tensor:
        """各サンプル・各チャネルで空間平均0・分散1に標準化"""
        mu = x.mean(dim=(2, 3), keepdim=True)
        std = x.std(dim=(2, 3), keepdim=True) + eps
        return (x - mu) / std

    def prepare_batch_data(self, images):
        tensors = []
        for img in images:
            img_rgb = self._bgr_to_rgb(img)
            img_tensor = self.transform(img_rgb)
            tensors.append(img_tensor)
        return torch.stack(tensors)

    def extract_features(self, images, model):
        if isinstance(images, list):
            batch_tensor = self.prepare_batch_data(images).to(self.device)
        elif isinstance(images, np.ndarray):
            img_rgb = self._bgr_to_rgb(images)
            img_tensor = self.transform(img_rgb).unsqueeze(0).to(self.device)
            batch_tensor = img_tensor
        else:
            batch_tensor = images.to(self.device)
        with torch.no_grad():
            features = model(batch_tensor)
        return features

    # ---- 学習 ----
    def compute_hard_loss(self, teacher_output, student_output, hard_ratio=HARD_RATIO):
        distance = (teacher_output - student_output) ** 2
        distance_flat = distance.view(-1)
        if distance_flat.numel() < 100:
            return torch.mean(distance)
        # Hard negative mining: 損失が大きい(難しい)サンプルを選択
        hard_threshold = torch.quantile(distance_flat, 1.0 - hard_ratio)
        hard_mask = distance >= hard_threshold
        return torch.mean(distance[hard_mask]) if hard_mask.sum() > 0 else torch.mean(distance)

    def train_teacher(self, images):
        if TEACHER_INIT_EPOCHS == 0:
            return
        print(f"教師モデルを{TEACHER_INIT_EPOCHS}エポック初期学習中...")
        image_tensors = self.prepare_batch_data(images)
        dataset = TensorDataset(image_tensors)
        dataloader = build_dataloader(dataset, batch_size=BATCH_SIZE, shuffle=True)
        optimizer = optim.Adam(self.teacher.parameters(), lr=LEARNING_RATE)
        self.teacher.train()
        for epoch in range(TEACHER_INIT_EPOCHS):
            total_loss = 0
            batch_count = 0
            for batch_images, in dataloader:
                batch_images = batch_images.to(self.device)
                features = self.teacher(batch_images)
                # 特徴量の多様性を促進
                loss = -torch.mean(torch.std(features, dim=0))
                optimizer.zero_grad()
                loss.backward()
                optimizer.step()
                total_loss += loss.item()
                batch_count += 1
            avg_loss = total_loss / batch_count
            log_epoch('教師モデル', epoch, TEACHER_INIT_EPOCHS, avg_loss, interval=5)
        self.teacher.eval()
        print("教師モデルの初期学習完了")

    def train_student(self, images):
        print(f"\n生徒モデルを{STUDENT_EPOCHS}エポック学習中...")
        image_tensors = self.prepare_batch_data(images)
        self.teacher.eval()
        with torch.no_grad():
            teacher_outputs = self.extract_features(image_tensors, self.teacher)
        dataset = TensorDataset(image_tensors, teacher_outputs.cpu())
        dataloader = build_dataloader(dataset, batch_size=BATCH_SIZE, shuffle=True)
        optimizer = optim.Adam(self.student.parameters(), lr=LEARNING_RATE)
        self.student.train()
        for epoch in range(STUDENT_EPOCHS):
            total_loss = 0
            batch_count = 0
            for batch_images, batch_teacher_outputs in dataloader:
                batch_images = batch_images.to(self.device)
                batch_teacher_outputs = batch_teacher_outputs.to(self.device)
                student_out = self.student(batch_images)
                loss_hard = self.compute_hard_loss(batch_teacher_outputs, student_out, HARD_RATIO)
                if epoch % 10 == 0:
                    noise = torch.randn_like(batch_images) * 0.1
                    noisy_input = batch_images + noise
                    student_out_noise = self.student(noisy_input)
                    loss_penalty = torch.mean(student_out_noise ** 2) * 0.1
                else:
                    loss_penalty = 0
                loss = loss_hard + loss_penalty
                optimizer.zero_grad()
                loss.backward()
                optimizer.step()
                total_loss += loss.item()
                batch_count += 1
            avg_loss = total_loss / batch_count
            log_epoch('生徒モデル', epoch, STUDENT_EPOCHS, avg_loss, interval=10)
        self.student.eval()
        print("生徒モデルの学習完了")
        self.teacher_outputs = teacher_outputs  # 学習済み教師出力を保持(解析用途)

    def train_autoencoder(self, images):
        print(f"\nオートエンコーダを{AE_EPOCHS}エポック学習中...")
        image_tensors = self.prepare_batch_data(images)
        self.teacher.eval()
        with torch.no_grad():
            features = self.extract_features(image_tensors, self.teacher)
            features_norm = self.channel_standardize(features)
        dataset = TensorDataset(features_norm.cpu())
        dataloader = build_dataloader(dataset, batch_size=BATCH_SIZE, shuffle=True)
        optimizer = optim.Adam(self.autoencoder.parameters(), lr=LEARNING_RATE)
        self.autoencoder.train()
        for epoch in range(AE_EPOCHS):
            total_loss = 0
            batch_count = 0
            for batch_features_norm, in dataloader:
                batch_features_norm = batch_features_norm.to(self.device)
                recon = self.autoencoder(batch_features_norm)
                loss = F.mse_loss(recon, batch_features_norm)
                optimizer.zero_grad()
                loss.backward()
                optimizer.step()
                total_loss += loss.item()
                batch_count += 1
            avg_loss = total_loss / batch_count
            log_epoch('オートエンコーダ', epoch, AE_EPOCHS, avg_loss, interval=10)
        self.autoencoder.eval()
        print("オートエンコーダの学習完了")

    def train_on_normal(self, normals):
        self.normal_images = normals
        self.train_teacher(normals)
        self.train_student(normals)
        self.train_autoencoder(normals)
        print("\n全ての学習が完了しました")

    # ---- 推論 ----
    def detect_anomaly(self, image):
        img_rgb = self._bgr_to_rgb(image)
        img_tensor = self.transform(img_rgb).unsqueeze(0)
        with torch.no_grad():
            teacher_feat = self.extract_features(img_tensor, self.teacher)
            student_feat = self.extract_features(img_tensor, self.student)
            # AEは標準化した教師特徴を再構成
            teacher_norm = self.channel_standardize(teacher_feat)
            ae_recon = self.autoencoder(teacher_norm)
        # 構造的異常(教師-生徒)
        structural_diff = torch.abs(teacher_feat - student_feat)
        structural_score = torch.mean(structural_diff, dim=1).squeeze().cpu().numpy()
        # 論理的異常(標準化後教師 - 再構成)
        logical_diff = torch.abs(teacher_norm - ae_recon)
        logical_score = torch.mean(logical_diff, dim=1).squeeze().cpu().numpy()
        # 統合(構造0.7, 論理0.3)
        combined_score = 0.7 * structural_score + 0.3 * logical_score
        # リサイズと平滑化
        h, w = image.shape[:2]
        combined_map = cv2.resize(combined_score, (w, h), interpolation=cv2.INTER_LINEAR)
        combined_map = gaussian_filter(combined_map, sigma=GAUSSIAN_SIGMA)
        # 画像ごとのmin-max正規化
        if combined_map.max() > combined_map.min():
            combined_map = (combined_map - combined_map.min()) / (combined_map.max() - combined_map.min())
        return combined_map, structural_score, logical_score


# ===== ユーティリティ関数 =====
def download_samples(prefix=SAMPLE_PREFIX, urls=None):
    images = []
    temp_files = []
    urls = urls if urls is not None else SAMPLE_URLS
    for i, url in enumerate(urls):
        filename = f'{prefix}{i}.jpg'
        try:
            print(f'サンプル画像をダウンロード中: {url}')
            urllib.request.urlretrieve(url, filename)
            temp_files.append(filename)
            img = cv2.imread(filename)
            if img is not None:
                images.append(img)
        except Exception as e:
            print(f'画像のダウンロードに失敗しました: {url}')
            print(f'エラー: {e}')
            continue
    return images, temp_files


def cleanup_files(files):
    for filename in files:
        try:
            os.remove(filename)
        except OSError:
            pass


def build_dataloader(dataset, batch_size=BATCH_SIZE, shuffle=True):
    return DataLoader(dataset, batch_size=batch_size, shuffle=shuffle)


def log_epoch(label, epoch, total_epochs, avg_loss, interval):
    if (epoch + 1) % interval == 0:
        print(f'エポック {epoch+1}/{total_epochs}, 平均損失: {avg_loss:.6f}')


def open_camera():
    cap = cv2.VideoCapture(0, cv2.CAP_DSHOW)
    if not cap.isOpened():
        cap = cv2.VideoCapture(0)
    cap.set(cv2.CAP_PROP_BUFFERSIZE, 1)
    return cap


def run_camera_loop(mode, model, normal_images=None, min_required=None):
    cap = open_camera()
    text_renderer = model.text_renderer
    try:
        while True:
            ret, frame = cap.read()
            if not ret:
                break

            display_frame = frame.copy()

            # テキスト描画
            if mode == 'capture':
                display_frame = text_renderer.draw_text(
                    display_frame,
                    f'正常画像: {len(normal_images)}枚 (最低{MIN_NORMAL_IMAGES}枚必要)',
                    (10, 10),
                    (0, 255, 0)
                )
                display_frame = text_renderer.draw_text(
                    display_frame,
                    'スペース: 撮影, Q: 終了',
                    (10, 40),
                    (0, 255, 0)
                )
            else:
                display_frame = text_renderer.draw_text(
                    display_frame,
                    'スペース: 検出実行, Q: 終了',
                    (10, 10),
                    (255, 255, 0)
                )

            cv2.imshow('Camera', display_frame)
            key = cv2.waitKey(1) & 0xFF
            if key == ord(' '):
                if mode == 'capture':
                    normal_images.append(frame.copy())
                    print(f'正常画像 {len(normal_images)} 枚目を撮影した')
                else:
                    processed_img, result, current_time = image_processing(frame, model)
                    cv2.imshow('異常検出結果', processed_img)
                    print(result)
                    model.results_log.append(result)
            elif key == ord('q'):
                if mode == 'capture' and min_required is not None:
                    if len(normal_images) >= min_required:
                        break
                else:
                    break
    finally:
        cap.release()


# ===== メイン処理 =====
def image_processing(image, model):
    current_time = time.time()
    amap, structural, logical = model.detect_anomaly(image)

    # 可視化とテキスト描画
    heatmap_rgb = (plt.cm.jet(amap)[:, :, :3] * 255).astype(np.uint8)
    heatmap_bgr = cv2.cvtColor(heatmap_rgb, cv2.COLOR_RGB2BGR)
    overlay = cv2.addWeighted(image, 0.7, heatmap_bgr, 0.3, 0)

    flat = amap.reshape(-1)
    k = max(1, int(TOPK_RATIO * flat.size))
    topk = np.partition(flat, -k)[-k:]
    topk_mean = float(np.mean(topk))
    is_anomaly = topk_mean > ANOMALY_THRESHOLD

    text_renderer = model.text_renderer
    if text_renderer.use_japanese:
        status_text = '異常検出' if is_anomaly else '正常'
        score_line = f'上位{int(TOPK_RATIO*100)}%平均: {topk_mean:.3f} - {status_text}'
        thr_line = f'閾値: {ANOMALY_THRESHOLD:.3f}'
        detail_prefix_struct = '構造的異常'
        detail_prefix_logic = '論理的異常'
    else:
        status_text = 'ANOMALY' if is_anomaly else 'NORMAL'
        score_line = f'Top-{int(TOPK_RATIO*100)}% mean: {topk_mean:.3f} - {status_text}'
        thr_line = f'Threshold: {ANOMALY_THRESHOLD:.3f}'
        detail_prefix_struct = 'Structural'
        detail_prefix_logic = 'Logical'

    status_color = (0, 0, 255) if is_anomaly else (0, 255, 0)
    overlay = text_renderer.draw_text(overlay, score_line, (10, 10), status_color)
    overlay = text_renderer.draw_text(overlay, thr_line, (10, 40), (255, 255, 255))

    if structural is not None and logical is not None:
        struct_max = float(np.max(structural))
        logic_max = float(np.max(logical))
        detail_text = f'{detail_prefix_struct}: {struct_max:.3f}, {detail_prefix_logic}: {logic_max:.3f}'
        overlay = text_renderer.draw_text(overlay, detail_text, (10, 70), (255, 255, 255))

    # 結果の記録
    if current_time is not None:
        timestamp = datetime.fromtimestamp(current_time).strftime("%Y-%m-%d %H:%M:%S.%f")[:-3]
    else:
        timestamp = datetime.now().strftime("%Y-%m-%d %H:%M:%S.%f")[:-3]

    if text_renderer.use_japanese:
        result_text = f'{timestamp} - 上位{int(TOPK_RATIO*100)}%平均: {topk_mean:.3f}, 判定: {"異常" if is_anomaly else "正常"}'
    else:
        result_text = f'{timestamp} - Top-{int(TOPK_RATIO*100)}% mean: {topk_mean:.3f}, Result: {"ANOMALY" if is_anomaly else "NORMAL"}'
    if structural is not None and logical is not None:
        result_text += f' (Struct: {float(np.max(structural)):.3f}, Logic: {float(np.max(logical)):.3f})'

    return overlay, result_text, current_time


def process_and_display_images(image_sources, source_type, model):
    display_index = 1
    results_log_ref = model.results_log
    for source in image_sources:
        img = cv2.imread(source) if source_type == 'file' else source
        if img is None:
            continue
        cv2.imshow(f'Image_{display_index}', img)
        processed_img, result, current_time = image_processing(img, model)
        cv2.imshow(f'異常検出結果_{display_index}', processed_img)
        print(result)
        results_log_ref.append(result)
        display_index += 1
    return results_log_ref


def write_results(results_log, device, result_file=RESULT_FILE):
    with open(result_file, 'w', encoding='utf-8') as f:
        f.write('=== 結果 ===\n')
        f.write(f'使用デバイス: {str(device).upper()}\n')
        if device.type == 'cuda':
            f.write(f'GPU: {torch.cuda.get_device_name(0)}\n')
        f.write('\n')
        f.write('\n'.join(results_log))
    print(f'\n処理結果を{result_file}に保存しました')


def print_stats(results_log):
    anomaly_count = sum(1 for r in results_log if ('異常' in r and '判定' in r) or ('ANOMALY' in r and 'Result' in r))
    normal_count = len(results_log) - anomaly_count
    print(f'\n【検出統計】')
    print(f'総検出数: {len(results_log)}')
    print(f'異常検出: {anomaly_count}')
    print(f'正常判定: {normal_count}')
    if len(results_log) > 0:
        print(f'異常率: {anomaly_count/len(results_log)*100:.1f}%')


def main():
    print('=== EfficientAD(論文準拠版)による異常検出プログラム ===')
    print('\n【プログラム概要】')
    print('PDN(Patch Description Network)と教師-生徒アーキテクチャ、')
    print('オートエンコーダを組み合わせた異常検出を行う。')
    print('\n【操作方法】')
    print('1. 正常画像を3枚以上入力して学習')
    print('2. テスト画像で異常検出を実行')
    print('3. カメラモード: スペースキーで撮影/検出、Qキーで終了')
    print('\n【注意事項】')
    print('- 正常画像は同じカテゴリの画像を使用する')
    print('- 学習には時間がかかる場合がある')
    print(f'- 異常判定閾値: {ANOMALY_THRESHOLD:.3f}')
    print(f'- バッチサイズ: {BATCH_SIZE}')

    model = EfficientAD()

    print('\n=== 正常画像の学習フェーズ ===')
    print(f'正常パターンを学習するため、{MIN_NORMAL_IMAGES}枚以上の正常画像が必要である。')
    print('\n0: 画像ファイル')
    print('1: カメラ')
    print('2: サンプル画像')

    choice = input('\n正常画像の入力方法を選択: ')
    normal_images = []

    if choice == '0':
        root = tk.Tk()
        root.withdraw()
        print(f'正常画像ファイルを{MIN_NORMAL_IMAGES}枚以上選択する')
        paths = filedialog.askopenfilenames()
        if not paths or len(paths) < MIN_NORMAL_IMAGES:
            print(f'{MIN_NORMAL_IMAGES}枚以上の画像が必要である')
            return
        for path in paths:
            img = cv2.imread(path)
            if img is not None:
                normal_images.append(img)
    elif choice == '1':
        print(f'\nカメラから正常画像を{MIN_NORMAL_IMAGES}枚以上撮影する')
        print(f'スペースキー: 撮影、Qキー: 撮影終了({MIN_NORMAL_IMAGES}枚以上撮影後)')
        run_camera_loop(mode='capture', model=model, normal_images=normal_images, min_required=MIN_NORMAL_IMAGES)
    elif choice == '2':
        normal_images, temp_files = download_samples()
        cleanup_files(temp_files)

    if len(normal_images) < MIN_NORMAL_IMAGES:
        print(f'正常画像が{MIN_NORMAL_IMAGES}枚未満のため終了する')
        return

    model.train_on_normal(normal_images)

    print('\n=== 異常検出フェーズ ===')
    print('構造的異常と論理的異常の両方を検出する。')
    print('\n0: 画像ファイル')
    print('1: カメラ')
    print('2: サンプル画像')

    choice = input('\nテスト画像の入力方法を選択: ')

    try:
        if choice == '0':
            root = tk.Tk()
            root.withdraw()
            if not (paths := filedialog.askopenfilenames()):
                return
            process_and_display_images(paths, 'file', model)
            cv2.waitKey(0)

        elif choice == '1':
            print('\nカメラモード: スペースキーで検出実行、Qキーで終了')
            run_camera_loop(mode='detect', model=model)

        else:
            urls = [
                "https://raw.githubusercontent.com/opencv/opencv/master/samples/data/fruits.jpg",
                "https://raw.githubusercontent.com/opencv/opencv/master/samples/data/messi5.jpg",
                "https://raw.githubusercontent.com/opencv/opencv/master/samples/data/aero3.jpg",
                "https://upload.wikimedia.org/wikipedia/commons/3/3a/Cat03.jpg"
            ]
            images, downloaded_files = download_samples(prefix=SAMPLE_PREFIX, urls=urls)
            process_and_display_images(downloaded_files, 'file', model)
            cv2.waitKey(0)
            cleanup_files(downloaded_files)

    finally:
        print('\n=== プログラム終了 ===')
        cv2.destroyAllWindows()
        if model.results_log:
            write_results(model.results_log, device, RESULT_FILE)
            print_stats(model.results_log)


if __name__ == '__main__':
    main()