Hunyuan-MT-7B 日本語・英語翻訳(ソースコードと実行結果)
Python開発環境,ライブラリ類
ここでは、最低限の事前準備について説明する。機械学習や深層学習を行う場合は、NVIDIA CUDA、Visual Studio、Cursorなどを追加でインストールすると便利である。これらについては別ページ https://www.kkaneko.jp/cc/dev/aiassist.htmlで詳しく解説しているので、必要に応じて参照してください。
Python 3.12 のインストール(Windows 上) [クリックして展開]
以下のいずれかの方法で Python 3.12 をインストールする。Python がインストール済みの場合、この手順は不要である。
方法1:winget によるインストール
管理者権限のコマンドプロンプトで以下を実行する。管理者権限のコマンドプロンプトを起動するには、Windows キーまたはスタートメニューから「cmd」と入力し、表示された「コマンドプロンプト」を右クリックして「管理者として実行」を選択する。
winget install --id Python.Python.3.12 -e --scope machine --silent --accept-source-agreements --accept-package-agreements --override "/quiet InstallAllUsers=1 PrependPath=1 Include_test=0 Include_pip=1 Include_launcher=1 InstallLauncherAllUsers=1 TargetDir=\"C:\Program Files\Python312\""
powershell -Command "$p='C:\Program Files\Python312'; $s=\"$p\Scripts\"; $m=[Environment]::GetEnvironmentVariable('Path','Machine'); if($m -notlike \"*$s*\") { [Environment]::SetEnvironmentVariable('Path', \"$p;$s;$m\", 'Machine') }"
--scope machine を指定することで、システム全体(全ユーザー向け)にインストールされる。このオプションの実行には管理者権限が必要である。インストール完了後、コマンドプロンプトを再起動すると PATH が自動的に設定される。
方法2:インストーラーによるインストール
- Python 公式サイト(https://www.python.org/downloads/)にアクセスし、「Download Python 3.x.x」ボタンから Windows 用インストーラーをダウンロードする。
- ダウンロードしたインストーラーを実行する。
- 初期画面の下部に表示される「Add python.exe to PATH」に必ずチェックを入れてから「Customize installation」を選択する。このチェックを入れ忘れると、コマンドプロンプトから
pythonコマンドを実行できない。 - 「Install Python 3.xx for all users」にチェックを入れ、「Install」をクリックする。
インストールの確認
コマンドプロンプトで以下を実行する。
python --versionバージョン番号(例:Python 3.12.x)が表示されればインストール成功である。「'python' は、内部コマンドまたは外部コマンドとして認識されていません。」と表示される場合は、インストールが正常に完了していない。
AIエディタ Windsurf のインストール(Windows 上) [クリックして展開]
Pythonプログラムの編集・実行には、AIエディタの利用を推奨する。ここでは、Windsurfのインストールを説明する。Windsurf がインストール済みの場合、この手順は不要である。
管理者権限のコマンドプロンプトで以下を実行する。管理者権限のコマンドプロンプトを起動するには、Windows キーまたはスタートメニューから「cmd」と入力し、表示された「コマンドプロンプト」を右クリックして「管理者として実行」を選択する。
winget install --scope machine --id Codeium.Windsurf -e --silent --disable-interactivity --force --accept-source-agreements --accept-package-agreements --custom "/SP- /SUPPRESSMSGBOXES /NORESTART /CLOSEAPPLICATIONS /DIR=""C:\Program Files\Windsurf"" /MERGETASKS=!runcode,addtopath,associatewithfiles,!desktopicon"
powershell -Command "$env:Path=[System.Environment]::GetEnvironmentVariable('Path','Machine')+';'+[System.Environment]::GetEnvironmentVariable('Path','User'); windsurf --install-extension MS-CEINTL.vscode-language-pack-ja --force; windsurf --install-extension ms-python.python --force; windsurf --install-extension Codeium.windsurfPyright --force"
--scope machine を指定することで、システム全体(全ユーザー向け)にインストールされる。このオプションの実行には管理者権限が必要である。インストール完了後、コマンドプロンプトを再起動すると PATH が自動的に設定される。
【関連する外部ページ】
Windsurf の公式ページ: https://windsurf.com/
必要なライブラリをシステム領域にインストール
管理者権限のコマンドプロンプトで以下を実行する。管理者権限のコマンドプロンプトを起動するには、Windows キーまたはスタートメニューから「cmd」と入力し、表示された「コマンドプロンプト」を右クリックして「管理者として実行」を選択する。
REM PyTorch をインストール(GPU対応版)
set "CUDA_TAG=cu128"
set "PYTHON_PATH=C:\Program Files\Python312"
"%PYTHON_PATH%\Scripts\pip" install --no-user -U numpy torch torchvision torchaudio --index-url https://download.pytorch.org/whl/%CUDA_TAG%
pip install transformers accelerate protobuf
Hunyuan-MT-7B 日本語・英語翻訳プログラム
概要
このプログラムは、Tencent社が開発したHunyuan-MT-7Bモデルを使用して、日本語から英語への翻訳を実行するPythonプログラムである。
主要技術
Hunyuan-MT-7B
Tencentが公開した翻訳特化型の7Bパラメータモデル[1]。33言語間の相互翻訳に対応。
Transformers Library
Hugging Face社が開発するトランスフォーマーモデル実装ライブラリ[2]。AutoTokenizerとAutoModelForCausalLMクラスを通じて、事前学習済みモデルの読み込みと推論を実現する。バージョン4.56.0以降でtrust_remote_codeパラメータによる新規モデルタイプへの対応が可能となっている。
実装の特色
- 対話型インターフェース(サンプル文章機能、カスタム入力機能)
- max_new_tokens=256による出力長制御
- デバイス情報とGPU名の表示
参考文献
[1] Tencent. Hunyuan-MT. GitHub Repository. https://github.com/Tencent-Hunyuan/Hunyuan-MT
[2] Wolf, T., et al. (2020). Transformers: State-of-the-Art Natural Language Processing. Proceedings of the 2020 Conference on Empirical Methods in Natural Language Processing: System Demonstrations, 38-45. https://www.aclweb.org/anthology/2020.emnlp-demos.6
ソースコード
# Hunyuan-MT-7B 日本語・英語翻訳プログラム
# 特徴: Hunyuan-MT-7B は Tencent の翻訳特化 7B モデル。33言語の相互翻訳に対応。
# 翻訳品質向上のためのアンサンブル版 Hunyuan-MT-Chimera も公開(必要に応じて利用可)。
# WMT25 で参加31タスク中30で1位(公式README/報道参照)。
# 参考: HFモデル https://huggingface.co/tencent/Hunyuan-MT-7B
# コレクション https://huggingface.co/collections/tencent/hunyuan-mt-68b42f76d473f82798882597
# GitHub https://github.com/Tencent-Hunyuan/Hunyuan-MT
# ModelScope https://modelscope.cn/collections/Hunyuan-MT-2ca6b8e1b4934f
# 重要: Transformers は v4.56.0 推奨。model_type が新規("hunyuan_v1_dense")のため
# pipeline("translation") では未対応→ AutoModelForCausalLM + trust_remote_code を使用。
# Windows で protobuf>=5 が入っていると "MessageFactory.GetPrototype" 表示が出る場合あり→
# 初回は7BのDLで数GBの空き容量が必要。GPU推奨。
# 前準備
# pip install -U numpy torch torchvision torchaudio --index-url https://download.pytorch.org/whl/cu126
# pip install transformers accelerate protobuf
import torch
from transformers import AutoTokenizer, AutoModelForCausalLM
# GPU/CPU自動選択
device = torch.device('cuda' if torch.cuda.is_available() else 'cpu')
print(f'デバイス: {str(device)}')
# GPU使用時の最適化
if device.type == 'cuda':
torch.backends.cudnn.benchmark = True
print("Hunyuan-MT-7B モデルを読み込み中...")
model_name = "tencent/Hunyuan-MT-7B"
try:
tokenizer = AutoTokenizer.from_pretrained(
model_name,
trust_remote_code=True
)
# device_map を削除し、手動でdeviceを指定
model = AutoModelForCausalLM.from_pretrained(
model_name,
trust_remote_code=True,
torch_dtype=torch.float16 if device.type == 'cuda' else torch.float32
).to(device)
print("モデルの読み込みが完了しました。")
if device.type == 'cuda':
print(f'GPU: {torch.cuda.get_device_name(0)}')
except Exception as e:
print(f"モデル読み込みエラー: {e}")
print("pip install transformers torch を実行してください")
exit()
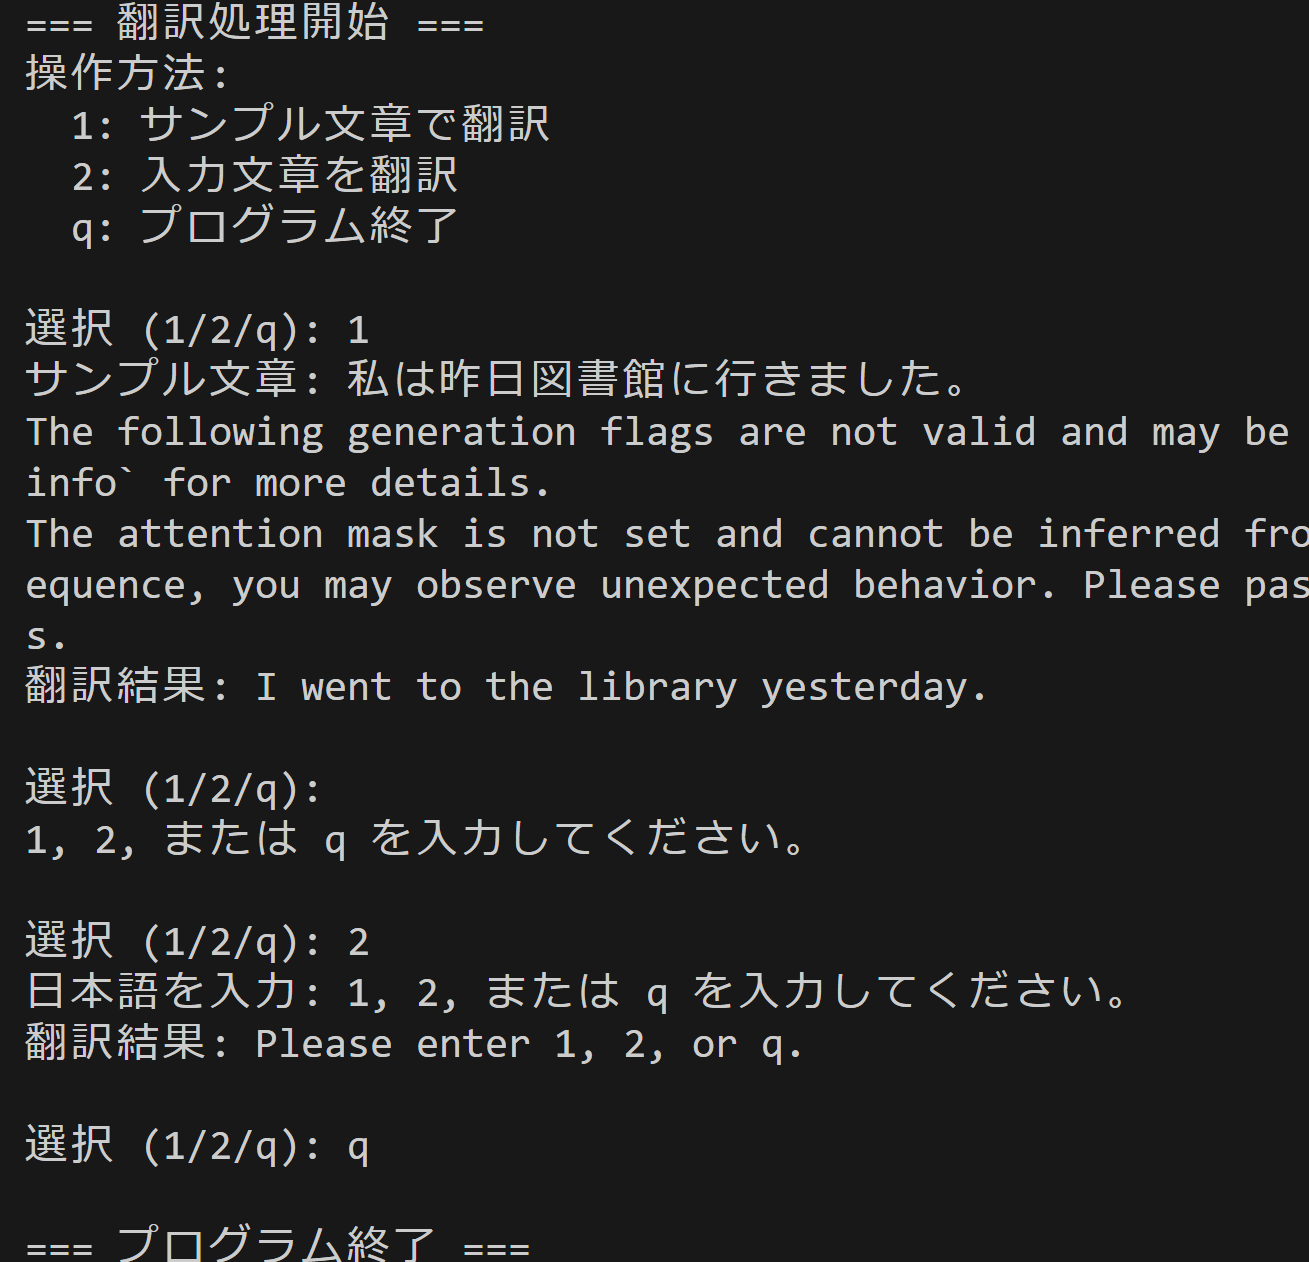
print("\n=== 翻訳処理開始 ===")
print("操作方法:")
print(" 1: サンプル文章で翻訳")
print(" 2: 入力文章を翻訳")
print(" q: プログラム終了")
try:
while True:
choice = input("\n選択 (1/2/q): ").strip()
if choice.lower() == 'q':
break
elif choice == '1':
japanese_text = "私は昨日図書館に行きました。"
print(f"サンプル文章: {japanese_text}")
elif choice == '2':
japanese_text = input("日本語を入力: ").strip()
if not japanese_text:
print("入力が空です。")
continue
else:
print("1, 2, または q を入力してください。")
continue
# 翻訳処理
try:
message = [{
"role": "user",
"content": f"Translate the following segment into English, without additional explanation.\n\n{japanese_text}"
}]
input_ids = tokenizer.apply_chat_template(
message,
add_generation_prompt=False,
return_tensors="pt"
).to(device)
with torch.no_grad():
output = model.generate(
input_ids,
max_new_tokens=256,
do_sample=False,
temperature=1.0,
pad_token_id=tokenizer.eos_token_id
)
translated_text = tokenizer.decode(
output[0][input_ids.shape[-1]:],
skip_special_tokens=True
)
print(f"翻訳結果: {translated_text}")
except Exception as e:
print(f"翻訳処理エラー: {e}")
finally:
print('\n=== プログラム終了 ===')