Mask2Former による動画セグメンテーション(パノプティック,インスタンス,セマンティック)(ソースコードと実行結果)
Python開発環境,ライブラリ類
ここでは、最低限の事前準備について説明する。機械学習や深層学習を行う場合は、NVIDIA CUDA、Visual Studio、Cursorなどを追加でインストールすると便利である。これらについては別ページ https://www.kkaneko.jp/cc/dev/aiassist.htmlで詳しく解説しているので、必要に応じて参照してください。
Python 3.12 のインストール(Windows 上) [クリックして展開]
以下のいずれかの方法で Python 3.12 をインストールする。Python がインストール済みの場合、この手順は不要である。
方法1:winget によるインストール
管理者権限のコマンドプロンプトで以下を実行する。管理者権限のコマンドプロンプトを起動するには、Windows キーまたはスタートメニューから「cmd」と入力し、表示された「コマンドプロンプト」を右クリックして「管理者として実行」を選択する。
winget install --id Python.Python.3.12 -e --scope machine --silent --accept-source-agreements --accept-package-agreements --override "/quiet InstallAllUsers=1 PrependPath=1 Include_test=0 Include_pip=1 Include_launcher=1 InstallLauncherAllUsers=1 TargetDir=\"C:\Program Files\Python312\""
powershell -Command "$p='C:\Program Files\Python312'; $s=\"$p\Scripts\"; $m=[Environment]::GetEnvironmentVariable('Path','Machine'); if($m -notlike \"*$s*\") { [Environment]::SetEnvironmentVariable('Path', \"$p;$s;$m\", 'Machine') }"
--scope machine を指定することで、システム全体(全ユーザー向け)にインストールされる。このオプションの実行には管理者権限が必要である。インストール完了後、コマンドプロンプトを再起動すると PATH が自動的に設定される。
方法2:インストーラーによるインストール
- Python 公式サイト(https://www.python.org/downloads/)にアクセスし、「Download Python 3.x.x」ボタンから Windows 用インストーラーをダウンロードする。
- ダウンロードしたインストーラーを実行する。
- 初期画面の下部に表示される「Add python.exe to PATH」に必ずチェックを入れてから「Customize installation」を選択する。このチェックを入れ忘れると、コマンドプロンプトから
pythonコマンドを実行できない。 - 「Install Python 3.xx for all users」にチェックを入れ、「Install」をクリックする。
インストールの確認
コマンドプロンプトで以下を実行する。
python --versionバージョン番号(例:Python 3.12.x)が表示されればインストール成功である。「'python' は、内部コマンドまたは外部コマンドとして認識されていません。」と表示される場合は、インストールが正常に完了していない。
AIエディタ Windsurf のインストール(Windows 上) [クリックして展開]
Pythonプログラムの編集・実行には、AIエディタの利用を推奨する。ここでは、Windsurfのインストールを説明する。Windsurf がインストール済みの場合、この手順は不要である。
管理者権限のコマンドプロンプトで以下を実行する。管理者権限のコマンドプロンプトを起動するには、Windows キーまたはスタートメニューから「cmd」と入力し、表示された「コマンドプロンプト」を右クリックして「管理者として実行」を選択する。
winget install --scope machine --id Codeium.Windsurf -e --silent --disable-interactivity --force --accept-source-agreements --accept-package-agreements --custom "/SP- /SUPPRESSMSGBOXES /NORESTART /CLOSEAPPLICATIONS /DIR=""C:\Program Files\Windsurf"" /MERGETASKS=!runcode,addtopath,associatewithfiles,!desktopicon"
powershell -Command "$env:Path=[System.Environment]::GetEnvironmentVariable('Path','Machine')+';'+[System.Environment]::GetEnvironmentVariable('Path','User'); windsurf --install-extension MS-CEINTL.vscode-language-pack-ja --force; windsurf --install-extension ms-python.python --force; windsurf --install-extension Codeium.windsurfPyright --force"
--scope machine を指定することで、システム全体(全ユーザー向け)にインストールされる。このオプションの実行には管理者権限が必要である。インストール完了後、コマンドプロンプトを再起動すると PATH が自動的に設定される。
【関連する外部ページ】
Windsurf の公式ページ: https://windsurf.com/
必要なライブラリをシステム領域にインストール
管理者権限のコマンドプロンプトで以下を実行する。管理者権限のコマンドプロンプトを起動するには、Windows キーまたはスタートメニューから「cmd」と入力し、表示された「コマンドプロンプト」を右クリックして「管理者として実行」を選択する。
REM PyTorch をインストール(GPU対応版)
set "CUDA_TAG=cu128"
set "PYTHON_PATH=C:\Program Files\Python312"
"%PYTHON_PATH%\Scripts\pip" install --no-user -U numpy torch torchvision torchaudio --index-url https://download.pytorch.org/whl/%CUDA_TAG%
pip install hf_xet install transformers pillow opencv-python
Mask2Former による動画セグメンテーション(パノプティック,インスタンス,セマンティック)プログラム
概要
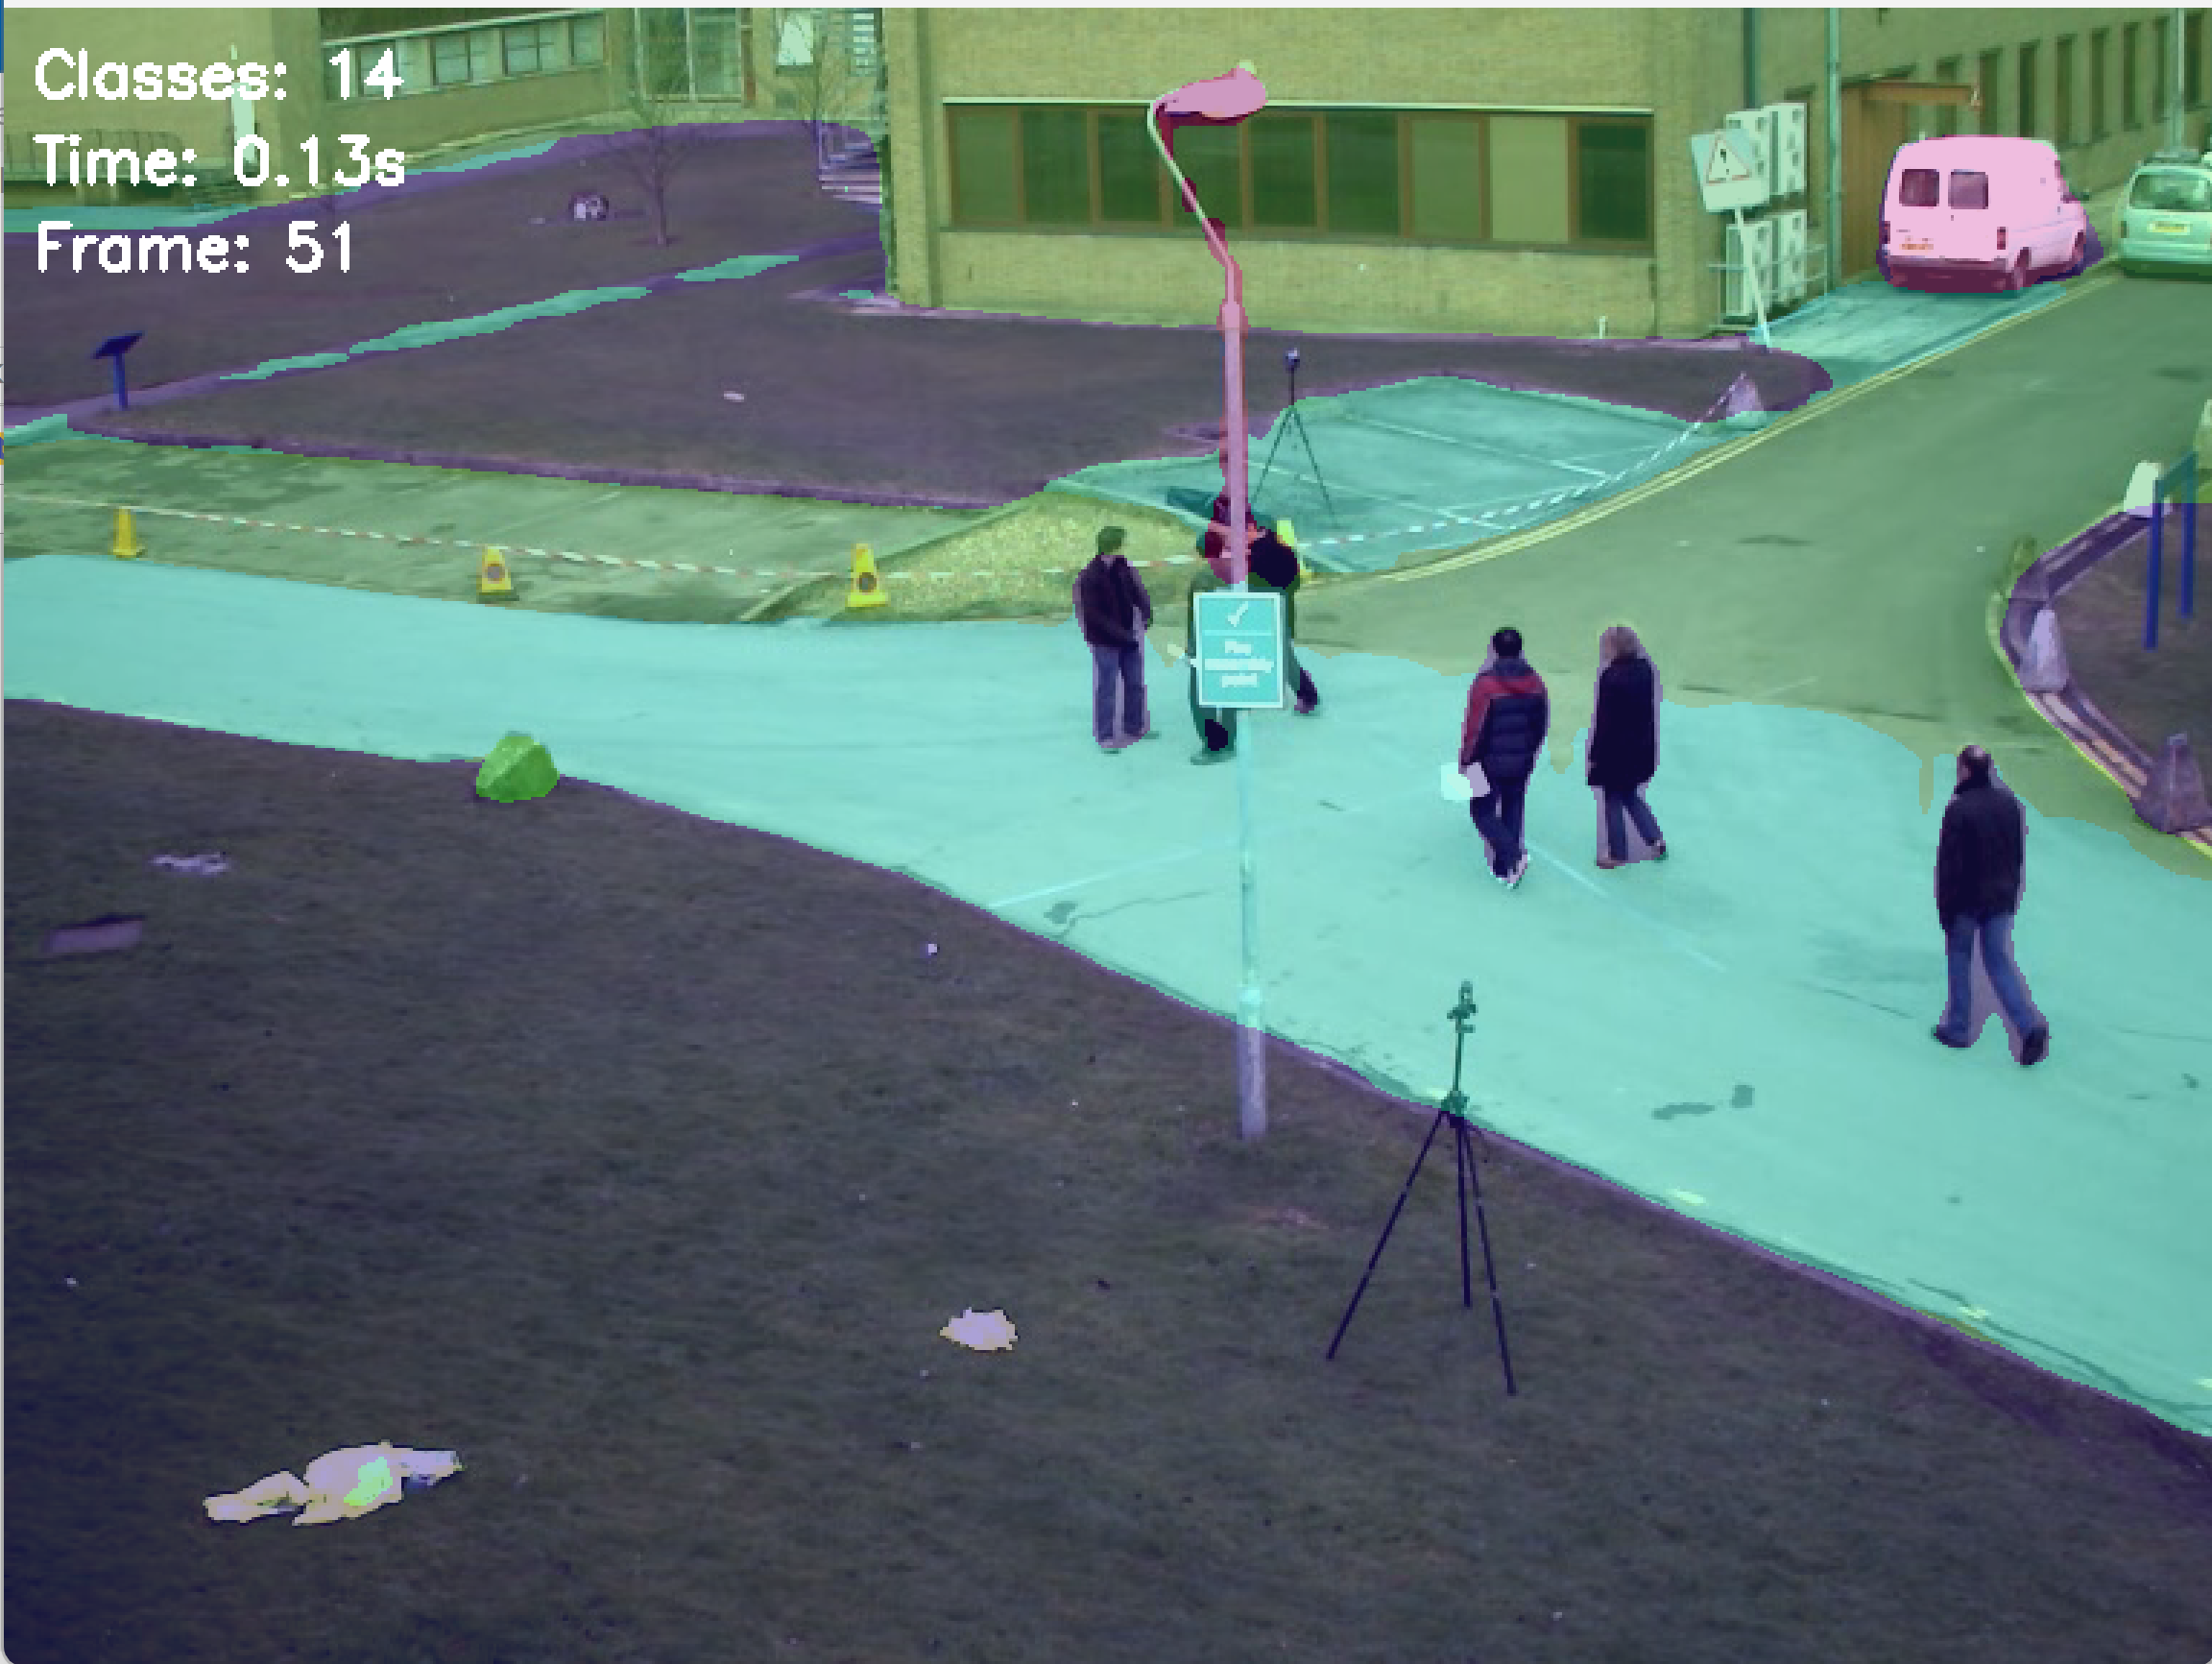
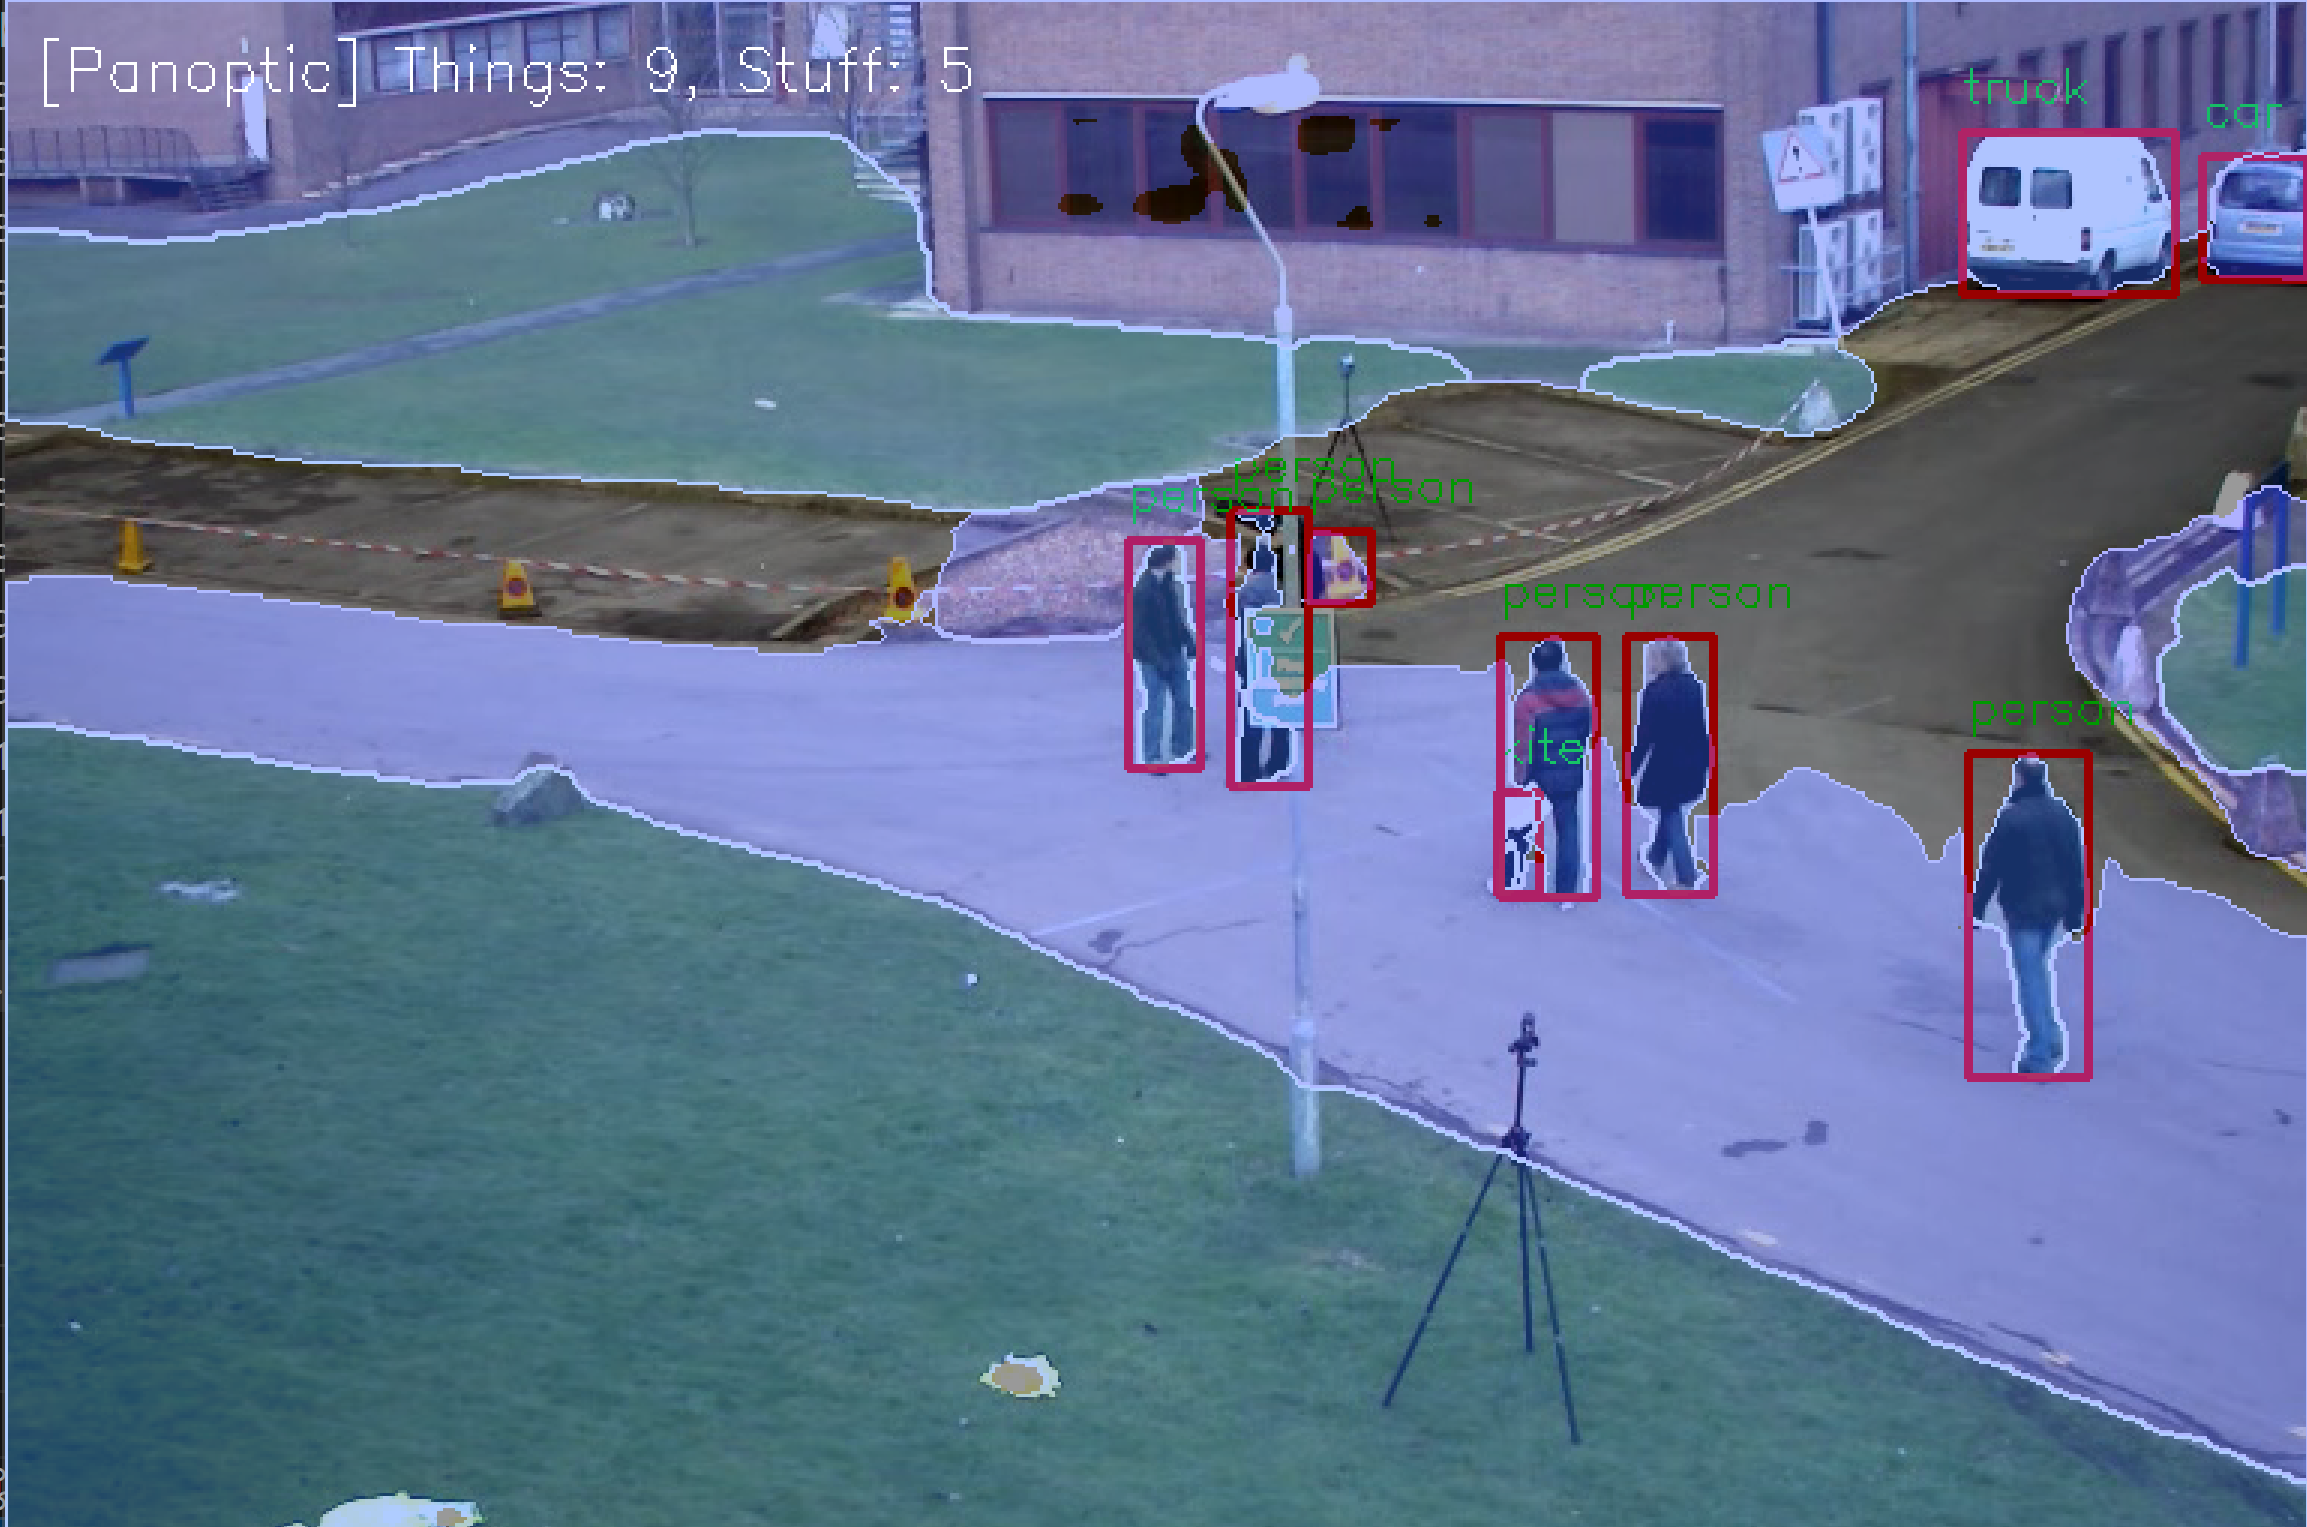
本プログラムは、Mask2Formerアーキテクチャを使用して動画の各フレームに対してセグメンテーション処理を実行する。セマンティックセグメンテーション(領域分類)、インスタンスセグメンテーション(個別物体識別)、パノプティックセグメンテーション(物体と背景の統合分析)の3種類のタスクに対応し、ユーザーが選択した事前学習モデルによって異なる用途に最適化された処理を実現する。
主要技術
Mask2Former(Masked-attention Mask Transformer)
Chengらが2022年に提案した統一的画像セグメンテーションアーキテクチャ[1]。従来のセグメンテーション手法では個別に設計されていたセマンティック、インスタンス、パノプティックの各タスクを、単一のアーキテクチャで処理可能にした。中核となるMasked-attention Mechanismは、予測されたマスク領域内でクロスアテンションを制約することで、局所化された特徴を効率的に抽出する。
Swin Transformer
Liuらが2021年に開発した階層的Vision Transformer[2]。シフトウィンドウ機構により計算効率を改善し、様々な解像度での特徴抽出を可能にする。本プログラムでは、Tiny(48M)、Small(69M)、Base(102M)、Large(197M)の4種類のバックボーンモデルサイズに対応している。
技術的特徴
本実装では、HuggingFace Transformersライブラリを通じて8種類の事前学習済みMask2Formerモデルを提供する。各モデルは異なるデータセット(COCO、Cityscapes、ADE20K)で学習されており、用途に応じた選択が可能である。COCOデータセット[3]は80種類の物体カテゴリと53種類の背景カテゴリを含む一般的な画像認識タスク向け、Cityscapesデータセット[4]は19クラスの都市景観に特化、ADE20Kデータセット[5]は150クラスの屋内外シーンを網羅する。
処理フローは以下の通りである:動画フレームをBGRからRGB形式に変換後、PIL.Image形式に変換し、AutoImageProcessorによる正規化とテンソル化を実行する。推論実行後、タスクタイプに応じた後処理(post_process_semantic_segmentation、post_process_instance_segmentation、post_process_panoptic_segmentation)を適用し、セグメンテーションマップを生成する。
実装の特色
本プログラムは実用性を重視した設計となっている。GPU(CUDA)とCPUの自動選択機能により、利用可能なハードウェアリソースに応じた最適な実行環境を自動的に選択する。動画入力は、ファイル選択(tkinterによるGUI)、カメラキャプチャ(OpenCV)、サンプル動画の3種類に対応する。
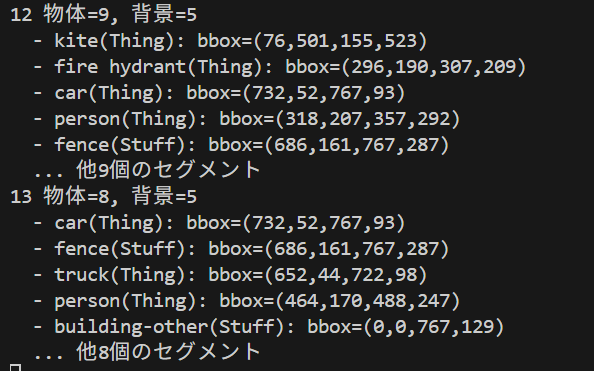
可視化機能として、セグメンテーション結果をカラーマップでオーバーレイ表示し、インスタンスセグメンテーションとパノプティックセグメンテーションでは物体境界ボックスを描画する。検出されたクラス数、物体数、背景領域数をリアルタイムで表示し、処理結果は自動的にテキストファイル(result.txt)に保存される。日本語表示にも対応しており、Windows環境でのメイリオフォントを使用した情報表示が可能である。
パフォーマンス最適化として、640ピクセルを上限とする動的リサイズ処理により、高解像度動画でも安定した処理速度を維持する。処理後は元の解像度に復元されるため、出力品質は保持される。
参考文献
[1] Cheng, B., Misra, I., Schwing, A. G., Kirillov, A., & Girdhar, R. (2022). Masked-attention Mask Transformer for Universal Image Segmentation. In Proceedings of the IEEE/CVF Conference on Computer Vision and Pattern Recognition (pp. 1290-1299). https://arxiv.org/abs/2112.01527
[2] Liu, Z., Lin, Y., Cao, Y., Hu, H., Wei, Y., Zhang, Z., Lin, S., & Guo, B. (2021). Swin Transformer: Hierarchical Vision Transformer using Shifted Windows. In Proceedings of the IEEE/CVF International Conference on Computer Vision (pp. 10012-10022). https://arxiv.org/abs/2103.14030
[3] Lin, T. Y., Maire, M., Belongie, S., Hays, J., Perona, P., Ramanan, D., Dollár, P., & Zitnick, C. L. (2014). Microsoft COCO: Common Objects in Context. In European Conference on Computer Vision (pp. 740-755). https://arxiv.org/abs/1405.0312
[4] Cordts, M., Omran, M., Ramos, S., Rehfeld, T., Enzweiler, M., Benenson, R., Franke, U., Roth, S., & Schiele, B. (2016). The Cityscapes Dataset for Semantic Urban Scene Understanding. In Proceedings of the IEEE Conference on Computer Vision and Pattern Recognition (pp. 3213-3223). https://arxiv.org/abs/1604.01685
[5] Zhou, B., Zhao, H., Puig, X., Fidler, S., Barriuso, A., & Torralba, A. (2017). Scene Parsing through ADE20K Dataset. In Proceedings of the IEEE Conference on Computer Vision and Pattern Recognition (pp. 633-641). https://arxiv.org/abs/1608.05442
ソースコード
# Mask2Former による動画セグメンテーション(セマンティック/インスタンス/パノプティック)
# 特徴技術名: Mask2Former(Masked-attention Mask Transformer for Universal Image Segmentation)
# 出典: Cheng, B., Misra, I., Schwing, A. G., Kirillov, A., & Girdhar, R. (2022). Masked-attention Mask Transformer for Universal Image Segmentation. In Proceedings of the IEEE/CVF Conference on Computer Vision and Pattern Recognition (pp. 1290-1299). arXiv:2112.01527
# 特徴機能: Masked-attention Mechanism - 予測されたマスク領域内でクロスアテンションを制約することで局所化された特徴を抽出し、セマンティック、インスタンス、パノプティックセグメンテーションを統一的に処理するアテンション機構
# 学習済みモデル: facebook/mask2former-swin-large-ade-semantic(Swin-Transformer-Large バックボーンを使用)。ADE20kデータセット(150の屋内・屋外シーン150クラス、25,574枚の訓練画像、2,000枚の検証画像)で学習済み。セマンティックセグメンテーション専用に最適化。URL: https://huggingface.co/facebook/mask2former-swin-large-ade-semantic
# 方式設計:
#   関連利用技術: HuggingFace Transformers(モデル読み込み・推論)、PyTorch(深層学習フレームワーク)、PIL(画像前処理)、OpenCV(動画入出力・可視化)、tkinter(ファイル選択UI)、urllib(リソースダウンロード)、NumPy(数値計算)
#   入力と出力: 入力: 動画(ユーザは「0:動画ファイル,1:カメラ,2:サンプル動画」のメニューで選択.0:動画ファイルの場合はtkinterでファイル選択.1の場合はOpenCVでカメラが開く.2の場合はhttps://github.com/opencv/opencv/raw/master/samples/data/vtest.aviを使用)、出力: セグメンテーション結果をOpenCV画面でリアルタイムに表示.OpenCV画面内に処理結果をテキストで表示.各フレームごとに処理結果を表示.プログラム終了時にresult.txtファイルに保存
#   処理手順: 1. HuggingFace AutoImageProcessorとMask2FormerForUniversalSegmentationの読み込み、2. 動画フレーム取得とPIL形式への変換、3. Masked-attention Mechanismによるセグメンテーション実行、4. タスクタイプに応じた後処理、5. カラーマップ適用と可視化、6. リアルタイム表示と結果記録
#   前処理、後処理: 前処理: BGR→RGB変換、PIL.Image形式への変換、プロセッサによる正規化・テンソル化、後処理: セグメンテーションマップ抽出、ランダムカラーマップ生成、オーバーレイ合成
#   追加処理: GPU/CPU自動選択による推論最適化、検出クラス数のリアルタイム表示
#   調整を必要とする設定値: なし(事前学習済みモデルを使用し、動画解像度に自動適応)
# 将来方策: 異なる学習済みモデル(COCO、Cityscapes等)への切り替え機能の実装による、用途に応じたセグメンテーション性能の実現
# その他の重要事項: Windows環境でのCUDA利用によるGPU加速対応、リアルタイム処理のためのフレームバッファリング最適化
# 前準備: pip install -U numpy torch torchvision torchaudio --index-url https://download.pytorch.org/whl/cu126
#          pip install transformers pillow opencv-python

import cv2
import torch
import numpy as np
import tkinter as tk
from tkinter import filedialog
import os
import time
from datetime import datetime
from PIL import Image, ImageFont, ImageDraw
from transformers import AutoImageProcessor, Mask2FormerForUniversalSegmentation
import warnings
import urllib.request

warnings.filterwarnings('ignore')

# ===== 定数定義 =====
THRESHOLD = 0.1
OVERLAP_THRESHOLD = 0.5
MAX_IMAGE_SIZE = 640
NUM_COLORS = 200
RANDOM_SEED = 42
BUFFER_SIZE = 1
BBOX_COLOR = (0, 0, 255)
TEXT_COLOR = (255, 255, 255)
CONTOUR_COLOR = (255, 255, 255)
FONT_SIZE = 16
OVERLAY_ALPHA = 0.6
SEG_ALPHA = 0.4
SAMPLE_VIDEO_URL = "https://raw.githubusercontent.com/opencv/opencv/master/samples/data/vtest.avi"
SAMPLE_VIDEO_NAME = "vtest.avi"
OUTPUT_FILE = "result.txt"
FONT_PATH = 'C:/Windows/Fonts/meiryo.ttc'
FONT_SIZE_JP = 20

# ===== モデル定義 =====
AVAILABLE_MODELS = {
    # パノプティックセグメンテーション
    "1": {
        "model_id": "facebook/mask2former-swin-large-coco-panoptic",
        "name": "COCO-Panoptic-Large",
        "task_type": "panoptic",
        "backbone": "Swin-Large",
        "parameters": "197M",
        "dataset": "COCO Panoptic",
        "classes": "133 (80 things + 53 stuff)",
        "description": "【パノプティック】COCO精度、一般用途向け"
    },
    "2": {
        "model_id": "facebook/mask2former-swin-base-coco-panoptic",
        "name": "COCO-Panoptic-Base",
        "task_type": "panoptic",
        "backbone": "Swin-Base",
        "parameters": "102M",
        "dataset": "COCO Panoptic",
        "classes": "133 (80 things + 53 stuff)",
        "description": "【パノプティック】COCO中性能、バランス型"
    },
    "3": {
        "model_id": "facebook/mask2former-swin-tiny-coco-panoptic",
        "name": "COCO-Panoptic-Tiny",
        "task_type": "panoptic",
        "backbone": "Swin-Tiny",
        "parameters": "48M",
        "dataset": "COCO Panoptic",
        "classes": "133 (80 things + 53 stuff)",
        "description": "【パノプティック】COCO軽量、処理向け"
    },
    "4": {
        "model_id": "facebook/mask2former-swin-large-cityscapes-panoptic",
        "name": "Cityscapes-Panoptic-Large",
        "task_type": "panoptic",
        "backbone": "Swin-Large",
        "parameters": "197M",
        "dataset": "Cityscapes Panoptic",
        "classes": "19 (8 things + 11 stuff)",
        "description": "【パノプティック】都市景観特化、自動運転向け"
    },
    # インスタンスセグメンテーション
    "5": {
        "model_id": "facebook/mask2former-swin-large-coco-instance",
        "name": "COCO-Instance-Large",
        "task_type": "instance",
        "backbone": "Swin-Large",
        "parameters": "197M",
        "dataset": "COCO Instance",
        "classes": "80 (things only)",
        "description": "【インスタンス】COCO精度、物体検出特化"
    },
    "6": {
        "model_id": "facebook/mask2former-swin-base-IN21k-coco-instance",
        "name": "COCO-Instance-Base-IN21k",
        "task_type": "instance",
        "backbone": "Swin-Base",
        "parameters": "102M",
        "dataset": "ImageNet-21K → COCO Instance",
        "classes": "80 (things only)",
        "description": "【インスタンス】ImageNet事前学習版"
    },
    "7": {
        "model_id": "facebook/mask2former-swin-small-coco-instance",
        "name": "COCO-Instance-Small",
        "task_type": "instance",
        "backbone": "Swin-Small",
        "parameters": "69M",
        "dataset": "COCO Instance",
        "classes": "80 (things only)",
        "description": "【インスタンス】軽量版、個別物体識別"
    },
    # セマンティックセグメンテーション
    "8": {
        "model_id": "facebook/mask2former-swin-large-ade-semantic",
        "name": "ADE20K-Semantic-Large",
        "task_type": "semantic",
        "backbone": "Swin-Large",
        "parameters": "197M",
        "dataset": "ADE20K Semantic",
        "classes": "150 (semantic classes)",
        "description": "【セマンティック】室内外シーン、領域分類特化"
    }
}

# ===== プログラム開始時の説明 =====
print("=" * 80)
print("動画セグメンテーション - Mask2Former")
print("=" * 80)
print("【概要説明】")
print("  Mask2Formerを使用して動画のセグメンテーションを実行")
print("  パノプティック・インスタンス・セマンティックの3タスクに対応")
print()
print("【操作方法】")
print("  1. モデルを選択")
print("  2. 入力ソースを選択(0:ファイル, 1:カメラ, 2:サンプル)")
print("  3. 処理中は'q'キーで終了")
print("  4. 結果は自動的にresult.txtに保存")
print()
print("【注意事項】")
print("  - 初回実行時はモデルのダウンロードに時間がかかります")
print("  - GPU使用時は処理が加速されます")
print("=" * 80)
print()

def select_model():
    """モデル選択メニュー"""
    print("=" * 100)
    print("利用可能なMask2Formerモデル一覧")
    print("=" * 100)

    print("\n■ パノプティックセグメンテーション(物体+背景の統合)")
    print("-" * 80)
    for key in ["1", "2", "3", "4"]:
        model_info = AVAILABLE_MODELS[key]
        print(f"[{key}] {model_info['name']} | {model_info['backbone']} | {model_info['parameters']} | {model_info['description']}")

    print("\n■ インスタンスセグメンテーション(個別物体の識別)")
    print("-" * 80)
    for key in ["5", "6", "7"]:
        model_info = AVAILABLE_MODELS[key]
        print(f"[{key}] {model_info['name']} | {model_info['backbone']} | {model_info['parameters']} | {model_info['description']}")

    print("\n■ セマンティックセグメンテーション(領域分類)")
    print("-" * 80)
    for key in ["8"]:
        model_info = AVAILABLE_MODELS[key]
        print(f"[{key}] {model_info['name']} | {model_info['backbone']} | {model_info['parameters']} | {model_info['description']}")

    print("\n" + "=" * 100)

    while True:
        choice = input("\nモデル番号を選択してください (1-8): ")
        if choice in AVAILABLE_MODELS:
            selected_model = AVAILABLE_MODELS[choice]
            print(f"\n選択されたモデル: {selected_model['name']}")
            print(f"タスクタイプ: {selected_model['task_type'].upper()}")
            print(f"モデルID: {selected_model['model_id']}")
            return selected_model['model_id'], selected_model
        else:
            print("無効な選択です。1-8の番号を入力してください。")

# モデル選択
MODEL_ID, selected_model_info = select_model()
TASK_TYPE = selected_model_info['task_type']

print("\n" + "=" * 80)
print(f"選択モデルの詳細情報:")
print(f"  正式名称: {selected_model_info['name']}")
print(f"  タスクタイプ: {TASK_TYPE.upper()}")
print(f"  バックボーン: {selected_model_info['backbone']}")
print(f"  パラメータ数: {selected_model_info['parameters']}")
print(f"  データセット: {selected_model_info['dataset']}")
print(f"  対応クラス: {selected_model_info['classes']}")
print("=" * 80)
print()

# GPU/CPU自動選択
device = torch.device('cuda' if torch.cuda.is_available() else 'cpu')
print(f'デバイス: {str(device)}')
# GPU使用時の最適化
if device.type == 'cuda':
    torch.backends.cudnn.benchmark = True
if device.type == 'cpu':
    print("警告: CPU使用のため処理速度が低下します")
print()

# ===== カテゴリリスト =====
COCO_THINGS_CATEGORIES = [
    'person', 'bicycle', 'car', 'motorcycle', 'airplane', 'bus', 'train', 'truck', 'boat', 'traffic light',
    'fire hydrant', 'stop sign', 'parking meter', 'bench', 'bird', 'cat', 'dog', 'horse', 'sheep', 'cow',
    'elephant', 'bear', 'zebra', 'giraffe', 'backpack', 'umbrella', 'handbag', 'tie', 'suitcase', 'frisbee',
    'skis', 'snowboard', 'sports ball', 'kite', 'baseball bat', 'baseball glove', 'skateboard', 'surfboard',
    'tennis racket', 'bottle', 'wine glass', 'cup', 'fork', 'knife', 'spoon', 'bowl', 'banana', 'apple',
    'sandwich', 'orange', 'broccoli', 'carrot', 'hot dog', 'pizza', 'donut', 'cake', 'chair', 'couch',
    'potted plant', 'bed', 'dining table', 'toilet', 'tv', 'laptop', 'mouse', 'remote', 'keyboard', 'cell phone',
    'microwave', 'oven', 'toaster', 'sink', 'refrigerator', 'book', 'clock', 'vase', 'scissors', 'teddy bear',
    'hair drier', 'toothbrush'
]

COCO_STUFF_CATEGORIES = [
    'banner', 'blanket', 'bridge', 'cardboard', 'counter', 'curtain', 'door-stuff',
    'floor-wood', 'flower', 'fruit', 'gravel', 'house', 'light', 'mirror-stuff', 'net', 'pillow', 'platform',
    'playingfield', 'railroad', 'river', 'road', 'roof', 'sand', 'sea', 'shelf', 'snow', 'stairs',
    'tent', 'towel', 'wall-brick', 'wall-stone', 'wall-tile', 'wall-wood', 'water-other', 'window-blind',
    'window-other', 'tree', 'fence', 'ceiling-other', 'sky-other', 'cabinet', 'table', 'floor-other',
    'pavement', 'mountain', 'grass', 'dirt', 'paper', 'food-other', 'building-other', 'rock', 'wall-other', 'rug'
]

CITYSCAPES_CATEGORIES = [
    'road', 'sidewalk', 'building', 'wall', 'fence', 'pole', 'traffic light', 'traffic sign',
    'vegetation', 'terrain', 'sky', 'person', 'rider', 'car', 'truck', 'bus', 'train', 'motorcycle', 'bicycle'
]

ADE20K_CATEGORIES = [
    'wall', 'building', 'sky', 'floor', 'tree', 'ceiling', 'road', 'bed', 'windowpane', 'grass',
    'cabinet', 'sidewalk', 'person', 'earth', 'door', 'table', 'mountain', 'plant', 'curtain', 'chair',
    'car', 'water', 'painting', 'sofa', 'shelf', 'house', 'sea', 'mirror', 'rug', 'field',
    'armchair', 'seat', 'fence', 'desk', 'rock', 'wardrobe', 'lamp', 'bathtub', 'railing', 'cushion',
    'base', 'box', 'column', 'signboard', 'chest of drawers', 'counter', 'sand', 'sink', 'skyscraper', 'fireplace',
    'refrigerator', 'grandstand', 'path', 'stairs', 'runway', 'case', 'pool table', 'pillow', 'screen door', 'stairway',
    'river', 'bridge', 'bookcase', 'blind', 'coffee table', 'toilet', 'flower', 'book', 'hill', 'bench',
    'countertop', 'stove', 'palm', 'kitchen island', 'computer', 'swivel chair', 'boat', 'bar', 'arcade machine', 'hovel',
    'bus', 'towel', 'light', 'truck', 'tower', 'chandelier', 'awning', 'streetlight', 'booth', 'television receiver',
    'airplane', 'dirt track', 'apparel', 'pole', 'land', 'bannister', 'escalator', 'ottoman', 'bottle', 'buffet',
    'poster', 'stage', 'van', 'ship', 'fountain', 'conveyer belt', 'canopy', 'washer', 'plaything', 'swimming pool',
    'stool', 'barrel', 'basket', 'waterfall', 'tent', 'bag', 'minibike', 'cradle', 'oven', 'ball',
    'food', 'step', 'tank', 'trade name', 'microwave', 'pot', 'animal', 'bicycle', 'lake', 'dishwasher',
    'screen', 'blanket', 'sculpture', 'hood', 'sconce', 'vase', 'traffic light', 'tray', 'ashcan', 'fan',
    'pier', 'crt screen', 'plate', 'monitor', 'bulletin board', 'shower', 'radiator', 'glass', 'clock', 'flag'
]

# ===== カラーマップ生成 =====
np.random.seed(RANDOM_SEED)
hsv_colors = np.zeros((NUM_COLORS, 3))
hsv_colors[:, 0] = np.linspace(0, 179, NUM_COLORS)
hsv_colors[:, 1] = 200
hsv_colors[:, 2] = 255
RGB_COLORS = cv2.cvtColor(hsv_colors.reshape(1, -1, 3).astype(np.uint8), cv2.COLOR_HSV2RGB).reshape(-1, 3)

# ===== グローバル変数 =====
frame_count = 0
results_log = []

# カテゴリリスト選択
if "cityscapes" in MODEL_ID.lower():
    CATEGORIES = CITYSCAPES_CATEGORIES
elif "ade" in MODEL_ID.lower():
    CATEGORIES = ADE20K_CATEGORIES
else:
    if TASK_TYPE == "panoptic":
        CATEGORIES = COCO_THINGS_CATEGORIES + COCO_STUFF_CATEGORIES
    else:
        CATEGORIES = COCO_THINGS_CATEGORIES

def load_model():
    """Mask2Formerモデルをロード"""
    print(f"モデル {MODEL_ID} をロード中...")
    try:
        processor = AutoImageProcessor.from_pretrained(MODEL_ID)
        model = Mask2FormerForUniversalSegmentation.from_pretrained(MODEL_ID)
        model = model.to(device)
        model.eval()
        total_params = sum(p.numel() for p in model.parameters())
        print(f"実際のモデルパラメータ数: {total_params/1e6:.1f}M")
        print(f"公称パラメータ数: {selected_model_info['parameters']}")
        print("モデルのロードが完了しました\n")
        return model, processor
    except Exception as e:
        print(f"モデルの読み込みに失敗しました: {e}")
        exit()

def add_text_opencv(frame, text, position, font_size=16, color=(0, 255, 0), thickness=1):
    """OpenCVを使用してテキストを追加"""
    font = cv2.FONT_HERSHEY_SIMPLEX
    scale = font_size / 30.0
    cv2.putText(frame, text, position, font, scale, color, thickness)
    return frame

def add_text_with_japanese(frame, text, position, font_size=20, color=(255, 255, 255)):
    """日本語テキスト表示機能"""
    try:
        font = ImageFont.truetype(FONT_PATH, font_size)
        img_pil = Image.fromarray(cv2.cvtColor(frame, cv2.COLOR_BGR2RGB))
        draw = ImageDraw.Draw(img_pil)
        draw.text(position, text, font=font, fill=color)
        return cv2.cvtColor(np.array(img_pil), cv2.COLOR_RGB2BGR)
    except:
        return add_text_opencv(frame, text, position, font_size, color)

def get_category_name(label_id):
    """カテゴリ名を取得"""
    if 0 <= label_id < len(CATEGORIES):
        return CATEGORIES[label_id]
    return f"class_{label_id}"

def video_frame_processing(frame):
    """フレームを処理"""
    global frame_count
    current_time = time.time()
    frame_count += 1

    h, w = frame.shape[:2]

    # リサイズ
    if max(h, w) > MAX_IMAGE_SIZE:
        scale = MAX_IMAGE_SIZE / max(h, w)
        new_w, new_h = int(w * scale), int(h * scale)
        frame_resized = cv2.resize(frame, (new_w, new_h))
        scale_back = True
    else:
        frame_resized = frame
        new_h, new_w = h, w
        scale_back = False

    # 推論
    frame_rgb = cv2.cvtColor(frame_resized, cv2.COLOR_BGR2RGB)
    pil_image = Image.fromarray(frame_rgb)
    inputs = processor(images=pil_image, return_tensors="pt")
    inputs = {k: v.to(device) for k, v in inputs.items()}

    with torch.no_grad():
        outputs = model(**inputs)

    # タスク別後処理
    if TASK_TYPE == "semantic":
        result = processor.post_process_semantic_segmentation(
            outputs, target_sizes=[(new_h, new_w)]
        )[0]
        semantic_seg = result.cpu().numpy()

        unique_labels = np.unique(semantic_seg)
        segments_info = []

        for label in unique_labels:
            if label == 0:
                continue
            mask_area = np.sum(semantic_seg == label)
            if mask_area < 100:
                continue
            # セマンティックセグメンテーションではlabelがそのままlabel_idとなる
            segments_info.append({
                "id": int(label),
                "label_id": int(label - 1) if label > 0 else 0,  # ADE20Kは1-indexed
                "area": int(mask_area),
                "isthing": False
            })

        segmentation_map = semantic_seg

    elif TASK_TYPE == "instance":
        result = processor.post_process_instance_segmentation(
            outputs, target_sizes=[(new_h, new_w)],
            threshold=THRESHOLD
        )[0]

        if "segmentation" in result:
            segmentation_map = result["segmentation"].cpu().numpy()
            segments_info = result["segments_info"]
            for seg in segments_info:
                seg["isthing"] = True
        else:
            segmentation_map = np.zeros((new_h, new_w), dtype=np.uint16)
            segments_info = []

    else:  # panoptic
        result = processor.post_process_panoptic_segmentation(
            outputs, target_sizes=[(new_h, new_w)],
            threshold=THRESHOLD,
            overlap_mask_area_threshold=OVERLAP_THRESHOLD,
            label_ids_to_fuse=[]
        )[0]

        segmentation_map = result["segmentation"].cpu().numpy()
        segments_info = result["segments_info"]

        for seg in segments_info:
            label_id = seg.get("label_id", 0)
            if "coco" in MODEL_ID.lower():
                seg["isthing"] = label_id < 80
            elif "cityscapes" in MODEL_ID.lower():
                seg["isthing"] = label_id in [11, 12, 13, 14, 15, 16, 17, 18]

    # リサイズ戻し
    if scale_back:
        segmentation_map = cv2.resize(segmentation_map.astype(np.uint16), (w, h), interpolation=cv2.INTER_NEAREST)

    # 可視化
    vis_frame = frame.copy()
    overlay = np.zeros_like(vis_frame)
    thing_count = 0
    stuff_count = 0
    detection_details = []

    for seg in segments_info:
        seg_id = seg["id"]
        label_id = seg.get("label_id", 0)
        is_thing = seg.get("isthing", False)

        if TASK_TYPE == "instance":
            thing_count += 1
        elif TASK_TYPE == "panoptic":
            if is_thing:
                thing_count += 1
            else:
                stuff_count += 1

        mask = (segmentation_map == seg_id).astype(np.uint8)
        if np.sum(mask) == 0:
            continue

        color = RGB_COLORS[seg_id % NUM_COLORS]
        overlay[mask > 0] = color

        if TASK_TYPE != "semantic":
            contours, _ = cv2.findContours(mask, cv2.RETR_EXTERNAL, cv2.CHAIN_APPROX_SIMPLE)
            cv2.drawContours(vis_frame, contours, -1, CONTOUR_COLOR, 1)

        y_indices, x_indices = np.where(mask > 0)
        if len(y_indices) > 0:
            x_min, y_min = int(np.min(x_indices)), int(np.min(y_indices))
            x_max, y_max = int(np.max(x_indices)), int(np.max(y_indices))

            label = get_category_name(label_id)

            detection_details.append({
                "class": label,
                "x1": x_min,
                "y1": y_min,
                "x2": x_max,
                "y2": y_max,
                "isthing": is_thing,
                "instance_id": seg_id,
                "area": int(seg.get("area", np.sum(mask))),
                "label_id": label_id
            })

            if TASK_TYPE == "instance":
                cv2.rectangle(vis_frame, (x_min, y_min), (x_max, y_max), BBOX_COLOR, 2)
                display_label = f"{label}_ID{seg_id}"
                vis_frame = add_text_opencv(vis_frame, display_label, (x_min, y_min - 10))
            elif TASK_TYPE == "panoptic" and is_thing:
                cv2.rectangle(vis_frame, (x_min, y_min), (x_max, y_max), BBOX_COLOR, 2)
                vis_frame = add_text_opencv(vis_frame, label, (x_min, y_min - 10))

    # オーバーレイ適用
    vis_frame = cv2.addWeighted(vis_frame, OVERLAY_ALPHA, overlay, SEG_ALPHA, 0)

    # 情報表示
    if TASK_TYPE == "semantic":
        info_text = f"[Semantic] Classes: {len(segments_info)}"
        result_str = f"セマンティッククラス={len(segments_info)}"
    elif TASK_TYPE == "instance":
        info_text = f"[Instance] Objects: {thing_count}"
        result_str = f"インスタンス={thing_count}"
    else:
        info_text = f"[Panoptic] Things: {thing_count}, Stuff: {stuff_count}"
        result_str = f"物体={thing_count}, 背景={stuff_count}"

    vis_frame = add_text_opencv(vis_frame, info_text, (10, 30), font_size=20, color=(255, 255, 255))

    # 詳細情報追加
    for detail in detection_details[:5]:
        if TASK_TYPE == "semantic":
            detail_str = f"  - {detail['class']}: area={detail['area']}"
        elif TASK_TYPE == "instance":
            detail_str = f"  - {detail['class']}_ID{detail['instance_id']}: bbox=({detail['x1']},{detail['y1']},{detail['x2']},{detail['y2']})"
        else:
            type_str = "Thing" if detail['isthing'] else "Stuff"
            detail_str = f"  - {detail['class']}({type_str}): bbox=({detail['x1']},{detail['y1']},{detail['x2']},{detail['y2']})"
        result_str += f"\n{detail_str}"

    if len(detection_details) > 5:
        result_str += f"\n  ... 他{len(detection_details) - 5}個のセグメント"

    return vis_frame, result_str, current_time

# モデルロード
model, processor = load_model()

# メイン処理
print("0: 動画ファイル")
print("1: カメラ")
print("2: サンプル動画")

choice = input("選択: ")

if choice == '0':
    root = tk.Tk()
    root.withdraw()
    path = filedialog.askopenfilename()
    if not path:
        exit()
    cap = cv2.VideoCapture(path)
elif choice == '1':
    cap = cv2.VideoCapture(0, cv2.CAP_DSHOW)
    if not cap.isOpened():
        cap = cv2.VideoCapture(0)
    cap.set(cv2.CAP_PROP_BUFFERSIZE, 1)
else:
    # サンプル動画ダウンロード・処理
    SAMPLE_URL = 'https://raw.githubusercontent.com/opencv/opencv/master/samples/data/vtest.avi'
    SAMPLE_FILE = 'vtest.avi'
    urllib.request.urlretrieve(SAMPLE_URL, SAMPLE_FILE)
    cap = cv2.VideoCapture(SAMPLE_FILE)

if not cap.isOpened():
    print('動画ファイル・カメラを開けませんでした')
    exit()

# メイン処理
print('\n=== 動画処理開始 ===')
print('操作方法:')
print('  q キー: プログラム終了')
try:
    while True:
        ret, frame = cap.read()
        if not ret:
            break

        MAIN_FUNC_DESC = "Mask2Former Segmentation"
        processed_frame, result, current_time = video_frame_processing(frame)
        cv2.imshow(MAIN_FUNC_DESC, processed_frame)
        if choice == '1':  # カメラの場合
            print(datetime.fromtimestamp(current_time).strftime("%Y-%m-%d %H:%M:%S.%f")[:-3], result)
        else:  # 動画ファイルの場合
            print(frame_count, result)
        results_log.append(result)
        if cv2.waitKey(1) & 0xFF == ord('q'):
            break
finally:
    print('\n=== プログラム終了 ===')
    cap.release()
    cv2.destroyAllWindows()
    if results_log:
        with open('result.txt', 'w', encoding='utf-8') as f:
            f.write('=== 結果 ===\n')
            f.write(f'処理フレーム数: {frame_count}\n')
            f.write(f'使用デバイス: {str(device).upper()}\n')
            if device.type == 'cuda':
                f.write(f'GPU: {torch.cuda.get_device_name(0)}\n')
            f.write('\n')
            f.write('\n'.join(results_log))
        print(f'\n処理結果をresult.txtに保存しました')