MediaPipe前景・背景セグメンテーション(ソースコードと実行結果)
Python開発環境,ライブラリ類
ここでは、最低限の事前準備について説明する。機械学習や深層学習を行う場合は、NVIDIA CUDA、Visual Studio、Cursorなどを追加でインストールすると便利である。これらについては別ページ https://www.kkaneko.jp/cc/dev/aiassist.htmlで詳しく解説しているので、必要に応じて参照してください。
Build Tools for Visual Studio 2026 のインストール(Windows 上) [クリックして展開]
Build Tools for Visual Studio は,Visual Studio の IDE を含まない C/C++ コンパイラ,ライブラリ,ビルドツール等のコマンドライン向け開発ツールセットである。インストール済みの場合、この手順は不要である。
管理者権限のコマンドプロンプトで以下を実行する。管理者権限のコマンドプロンプトを起動するには、Windows キーまたはスタートメニューから「cmd」と入力し、表示された「コマンドプロンプト」を右クリックして「管理者として実行」を選択する。
REM VC++ ランタイム
winget install --scope machine --id Microsoft.VCRedist.2015+.x64 -e --silent --disable-interactivity --force --accept-source-agreements --accept-package-agreements --override "/quiet /norestart"

REM Build Tools + Desktop development with C++(VCTools)+ 追加コンポーネント(一括)
winget list --id Microsoft.VisualStudio.BuildTools 2>nul | findstr /i "BuildTools" >nul 2>&1
if %ERRORLEVEL% EQU 0 (
    for /f "delims=" %P in ('"C:\Program Files (x86)\Microsoft Visual Studio\Installer\vswhere.exe" -products * -property installationPath') do start /wait "" "C:\Program Files (x86)\Microsoft Visual Studio\Installer\setup.exe" modify --installPath "%P" --add Microsoft.VisualStudio.Workload.VCTools --add Microsoft.VisualStudio.Workload.MSBuildTools --add Microsoft.VisualStudio.Component.VC.CMake.Project --add Microsoft.VisualStudio.Component.VC.Llvm.Clang --add Microsoft.VisualStudio.Component.VC.Llvm.ClangToolset --add Microsoft.VisualStudio.Component.Windows11SDK.26100 --includeRecommended --quiet --norestart
) else (
    winget install --scope machine --id Microsoft.VisualStudio.BuildTools -e --silent --disable-interactivity --force --accept-source-agreements --accept-package-agreements --override "--quiet --wait --norestart --nocache --add Microsoft.VisualStudio.Workload.VCTools --includeRecommended --add Microsoft.VisualStudio.Workload.MSBuildTools --add Microsoft.VisualStudio.Component.VC.CMake.Project --add Microsoft.VisualStudio.Component.VC.Llvm.Clang --add Microsoft.VisualStudio.Component.VC.Llvm.ClangToolset --add Microsoft.VisualStudio.Component.Windows11SDK.26100"
)
REM  何らかの理由で BuildTools の動作がおかしくなった場合は,以下を実行すると,既存のインストールのファイル破損・欠損を修復し正常な状態に復元する効果がある.
REM "C:\Program Files (x86)\Microsoft Visual Studio\Installer\setup.exe" repair --installPath "C:\Program Files (x86)\Microsoft Visual Studio\18\BuildTools" --quiet --norestart
REM 以下で正常であることを確認する.パスが表示されれば正常である.
REM "C:\Program Files (x86)\Microsoft Visual Studio\Installer\vswhere.exe" -products * -requires Microsoft.VisualStudio.Workload.VCTools -property installationPath
--add で追加されるコンポーネント
上記のコマンドでは,まず Build Tools 本体と Visual C++ 再頒布可能パッケージをインストールし,次に setup.exe を用いて以下のコンポーネントを追加している。
VCTools:C++ デスクトップ開発ワークロード(--includeRecommendedにより、MSVC コンパイラ、C++ AddressSanitizer、vcpkg、CMake ツール、Windows 11 SDK 等の推奨コンポーネントが含まれる)VC.Llvm.Clang:Windows 向け C++ Clang コンパイラClangCL:clang-cl ツールセットを含むコンポーネントグループ(MSBuild から Clang を使用するために必要)VC.CMake.Project:Windows 向け C++ CMake ツールWindows11SDK.26100:Windows 11 SDK(ビルド 10.0.26100)
インストール完了の確認
winget list Microsoft.VisualStudio.BuildTools上記以外の追加のコンポーネントが必要になった場合は Visual Studio Installer で個別にインストールできる。
Visual Studio の機能を必要とする場合は、追加インストールできる。
Python 3.12 のインストール(Windows 上) [クリックして展開]
以下のいずれかの方法で Python 3.12 をインストールする。Python がインストール済みの場合、この手順は不要である。
方法1:winget によるインストール
管理者権限のコマンドプロンプトで以下を実行する。管理者権限のコマンドプロンプトを起動するには、Windows キーまたはスタートメニューから「cmd」と入力し、表示された「コマンドプロンプト」を右クリックして「管理者として実行」を選択する。
winget install --id Python.Python.3.12 -e --scope machine --silent --accept-source-agreements --accept-package-agreements --override "/quiet InstallAllUsers=1 PrependPath=1 Include_test=0 Include_pip=1 Include_launcher=1 InstallLauncherAllUsers=1 TargetDir=\"C:\Program Files\Python312\""
powershell -Command "$p='C:\Program Files\Python312'; $s=\"$p\Scripts\"; $m=[Environment]::GetEnvironmentVariable('Path','Machine'); if($m -notlike \"*$s*\") { [Environment]::SetEnvironmentVariable('Path', \"$p;$s;$m\", 'Machine') }"
--scope machine を指定することで、システム全体(全ユーザー向け)にインストールされる。このオプションの実行には管理者権限が必要である。インストール完了後、コマンドプロンプトを再起動すると PATH が自動的に設定される。
方法2:インストーラーによるインストール
- Python 公式サイト(https://www.python.org/downloads/)にアクセスし、「Download Python 3.x.x」ボタンから Windows 用インストーラーをダウンロードする。
- ダウンロードしたインストーラーを実行する。
- 初期画面の下部に表示される「Add python.exe to PATH」に必ずチェックを入れてから「Customize installation」を選択する。このチェックを入れ忘れると、コマンドプロンプトから
pythonコマンドを実行できない。 - 「Install Python 3.xx for all users」にチェックを入れ、「Install」をクリックする。
インストールの確認
コマンドプロンプトで以下を実行する。
python --versionバージョン番号(例:Python 3.12.x)が表示されればインストール成功である。「'python' は、内部コマンドまたは外部コマンドとして認識されていません。」と表示される場合は、インストールが正常に完了していない。
AIエディタ Windsurf のインストール(Windows 上) [クリックして展開]
Pythonプログラムの編集・実行には、AIエディタの利用を推奨する。ここでは、Windsurfのインストールを説明する。Windsurf がインストール済みの場合、この手順は不要である。
管理者権限のコマンドプロンプトで以下を実行する。管理者権限のコマンドプロンプトを起動するには、Windows キーまたはスタートメニューから「cmd」と入力し、表示された「コマンドプロンプト」を右クリックして「管理者として実行」を選択する。
winget install --scope machine --id Codeium.Windsurf -e --silent --disable-interactivity --force --accept-source-agreements --accept-package-agreements --custom "/SP- /SUPPRESSMSGBOXES /NORESTART /CLOSEAPPLICATIONS /DIR=""C:\Program Files\Windsurf"" /MERGETASKS=!runcode,addtopath,associatewithfiles,!desktopicon"
powershell -Command "$env:Path=[System.Environment]::GetEnvironmentVariable('Path','Machine')+';'+[System.Environment]::GetEnvironmentVariable('Path','User'); windsurf --install-extension MS-CEINTL.vscode-language-pack-ja --force; windsurf --install-extension ms-python.python --force; windsurf --install-extension Codeium.windsurfPyright --force"
--scope machine を指定することで、システム全体(全ユーザー向け)にインストールされる。このオプションの実行には管理者権限が必要である。インストール完了後、コマンドプロンプトを再起動すると PATH が自動的に設定される。
【関連する外部ページ】
Windsurf の公式ページ: https://windsurf.com/
必要なライブラリをシステム領域にインストール
管理者権限のコマンドプロンプトで以下を実行する。管理者権限のコマンドプロンプトを起動するには、Windows キーまたはスタートメニューから「cmd」と入力し、表示された「コマンドプロンプト」を右クリックして「管理者として実行」を選択する。
pip install mediapipe==0.9.3.0 opencv-python numpy pillow
MediaPipe前景・背景セグメンテーションプログラム
概要
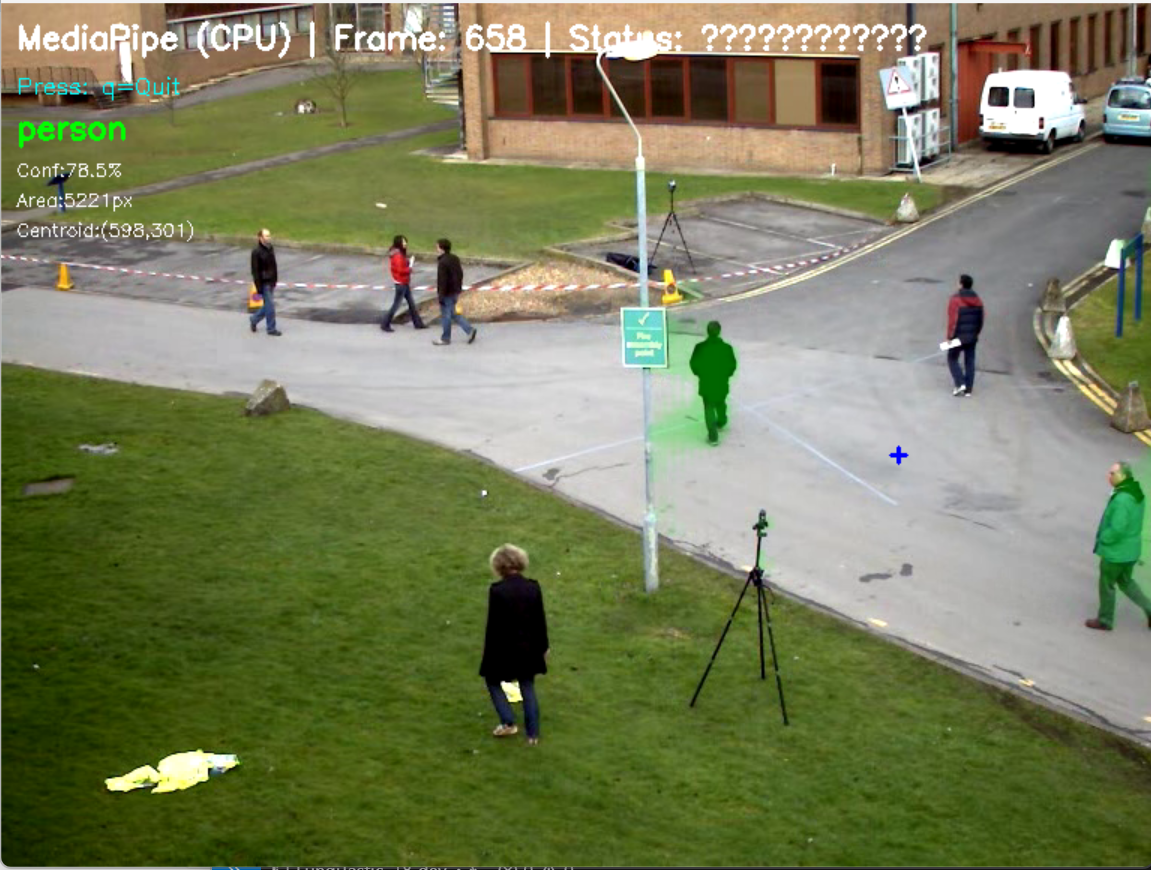
このプログラムは、MediaPipe Selfie Segmentationを用いて動画の各フレームから人物等の前景を自動的に検出し、背景から分離する。リアルタイム処理に対応し、検出された前景領域を半透明マスクで可視化する。動画ファイル、Webカメラ、サンプル動画の3種類の入力ソースに対応し、処理結果をフレームごとに出力する。
主要技術
MediaPipe Selfie Segmentation
Googleが開発した軽量なセグメンテーションソリューションである[1]。機械学習モデルを用いて画像から人物領域を高速に抽出し、256×256ピクセルの入力に対して各ピクセルの前景確率を0から1の値で出力する。2つのモデルバリエーション(一般用途モデルと横向き画像最適化モデル)を提供し、CPUでのリアルタイム処理を実現している[2]。
技術的特徴
- 信頼度ベースの閾値処理:セグメンテーションマスクの各ピクセル値を信頼度として扱い、設定可能な閾値(デフォルト0.5)により前景・背景を二値化する
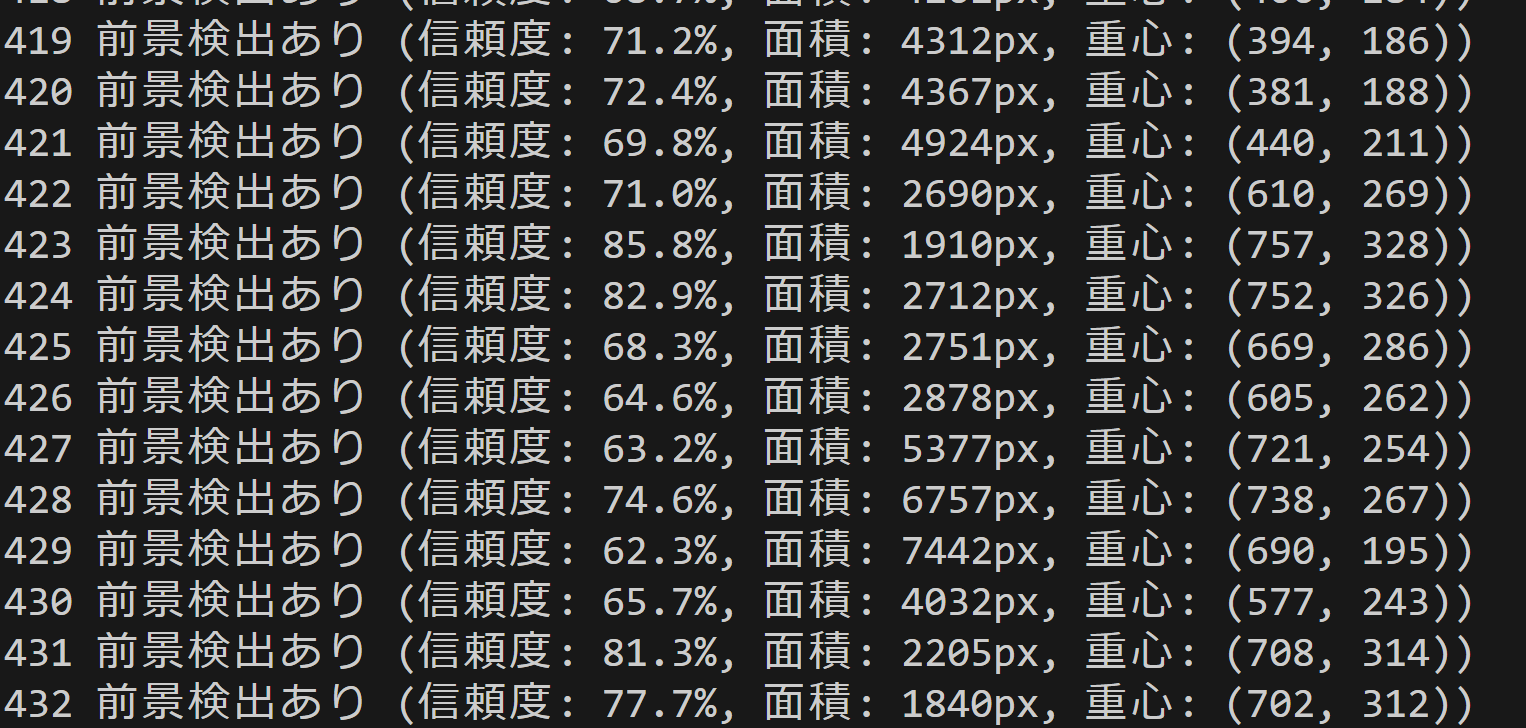
- 統計情報の算出:検出された前景領域の面積(ピクセル数)、重心座標、平均信頼度をフレームごとに計算する
- 半透明マスク描画:前景領域を40%の透明度で緑色にオーバーレイし、元画像と合成して視覚的にわかりやすく表示する
- マルチプラットフォーム対応:MediaPipe Legacy Solutions APIを使用し、Windows環境でCPUのみで動作する
実装の特色
本実装では、MediaPipeの基本機能に加えて独自の拡張機能を実装している。前景領域の重心位置を計算し、十字マークで表示することで、検出対象の位置を明確に示す。また、Windows環境向けに日本語フォント(メイリオ)を用いた情報表示に対応し、フォントが利用できない場合は英語表示にフォールバックする。
入力ソースの柔軟性も特徴の一つである。tkinterを用いたファイル選択ダイアログによる動画ファイルの選択、OpenCVによるWebカメラのキャプチャ、インターネットからのサンプル動画の自動ダウンロードという3つの入力方法を提供する。処理結果は標準出力にリアルタイムで表示されるとともに、プログラム終了時にresult.txtファイルに保存される。
参考文献
[1] Google. (2021). MediaPipe Selfie Segmentation. MediaPipe Solutions Guide. https://developers.google.com/mediapipe/solutions/vision/image_segmenter
[2] Bazarevsky, V., et al. (2020). BlazePose: On-device Real-time Body Pose tracking. arXiv preprint arXiv:2006.10204. https://arxiv.org/abs/2006.10204
ソースコード
# プログラム名: MediaPipe前景・背景セグメンテーションプログラム
# 特徴技術名: MediaPipe
# 出典: MediaPipe Tasks - Google
# 特徴機能: MediaPipe Selfie Segmentationによる前景・背景分離。リアルタイムで動作する軽量な前景抽出
# 学習済みモデル: Selfie Segmentation内蔵モデル(前景・背景分離)
# 方式設計:
#   - 関連利用技術:
#     - MediaPipe: Googleが開発したマルチプラットフォーム機械学習ソリューション(Legacy Solutions APIを使用)
#     - OpenCV: 画像処理、カメラ制御、描画処理、動画入出力管理
#     - Pillow: 日本語テキスト描画用
#   - 入力と出力: 入力: 動画(ユーザは「0:動画ファイル,1:カメラ,2:サンプル動画」のメニューで選択.0:動画ファイルの場合はtkinterでファイル選択.1の場合はOpenCVでカメラが開く.2の場合はhttps://raw.githubusercontent.com/opencv/opencv/master/samples/data/vtest.aviを使用)、出力: OpenCV画面でリアルタイム表示(検出した前景を半透明マスクで表示)、各フレームごとにprint()で処理結果表示、プログラム終了時にresult.txtファイルに保存
#   - 処理手順: 1.フレーム取得、2.MediaPipe推論実行、3.前景・背景分離、4.信頼度閾値による選別、5.半透明マスク描画
#   - 前処理、後処理: 前処理:MediaPipe内部で自動実行。後処理:信頼度による閾値フィルタリングを実施
#   - 追加処理: セグメンテーションマスクの平均信頼度計算、前景領域の面積・重心計算
#   - 調整を必要とする設定値: CONF_THRESH(セグメンテーション信頼度閾値、デフォルト0.5)- 値を上げると誤検出が減少するが検出漏れが増加
# 将来方策: CONF_THRESHの動的調整機能。フレーム毎のマスク面積を監視し、面積が閾値を超えた場合は信頼度を上げ、面積が少ない場合は下げる適応的制御の実装
# その他の重要事項: Windows環境専用設計、複数人物が存在する場合も単一の前景マスクとして処理。MediaPipe Legacy Solutions(2023年3月サポート終了)を使用しているが動作に問題なし
# 前準備:
#   - pip install mediapipe opencv-python numpy pillow

import cv2
import tkinter as tk
from tkinter import filedialog
import os
import numpy as np
import mediapipe as mp
import warnings
import time
import urllib.request
from PIL import Image, ImageDraw, ImageFont
from datetime import datetime

warnings.filterwarnings('ignore')

# ===== 設定・定数管理 =====
# MediaPipe設定(Legacy Solutions APIを使用)
mp_selfie_segmentation = mp.solutions.selfie_segmentation

# モデル選択(0, 1から選択可能)
MODEL_SIZE = '0'  # 使用するモデルサイズ(0=一般モデル, 1=横向き画像最適化モデル)

# モデル情報
MODEL_INFO = {
    '0': {
        'name': 'General Model',
        'desc': '一般用途(推奨)',
        'model_selection': 0
    },
    '1': {
        'name': 'Landscape Model',
        'desc': '横向き画像最適化',
        'model_selection': 1
    }
}

# クラス名(前景)
CLASS_NAME = '前景'

# 前景用の色(緑)
FOREGROUND_COLOR = (0, 255, 0)

# カメラ設定
WINDOW_WIDTH = 1280  # カメラ解像度幅
WINDOW_HEIGHT = 720  # カメラ解像度高さ
FPS = 30  # フレームレート

# 検出パラメータ(調整可能)
CONF_THRESH = 0.5  # セグメンテーション信頼度閾値(0.0-1.0)

# 日本語フォント設定
FONT_PATH = 'C:/Windows/Fonts/meiryo.ttc'
FONT_SIZE_LARGE = 24
FONT_SIZE_MEDIUM = 18
FONT_SIZE_SMALL = 14

# プログラム概要表示
print('=== MediaPipe前景・背景セグメンテーションプログラム ===')
print('概要: リアルタイムで前景を抽出し、半透明マスクで表示します')
print('機能: MediaPipe Selfie Segmentationによる前景・背景分離')
print('注意: Legacy Solutions API使用(2023年3月サポート終了済み、動作に問題なし)')
print('操作: qキーで終了')
print('出力: 各フレームごとの処理結果表示、終了時にresult.txt保存')
print()

# システム初期化
print('システム初期化中...')
start_time = time.time()

# MediaPipeモデル初期化
segmentation = None
try:
    print(f'MediaPipe Selfie Segmentation {MODEL_INFO[MODEL_SIZE]["name"]}モデルを初期化中...')
    segmentation = mp_selfie_segmentation.SelfieSegmentation(
        model_selection=MODEL_INFO[MODEL_SIZE]["model_selection"]
    )
    print(f'MediaPipe Selfie Segmentation {MODEL_INFO[MODEL_SIZE]["name"]}モデルの初期化が完了しました')
    print(f'モデル: {MODEL_INFO[MODEL_SIZE]["name"]} ({MODEL_INFO[MODEL_SIZE]["desc"]})')
    print(f'セグメンテーション対象: 前景(人物等)')
except Exception as e:
    print('MediaPipe Selfie Segmentationモデルの初期化に失敗しました')
    print(f'エラー: {e}')
    exit()

print('CPUモード')
print('初期化完了')
print()

# グローバル変数
frame_count = 0
results_log = []

# 日本語フォント読み込み
try:
    font_large = ImageFont.truetype(FONT_PATH, FONT_SIZE_LARGE)
    font_medium = ImageFont.truetype(FONT_PATH, FONT_SIZE_MEDIUM)
    font_small = ImageFont.truetype(FONT_PATH, FONT_SIZE_SMALL)
    use_japanese_font = True
except:
    print('日本語フォントの読み込みに失敗しました。英語表示になります。')
    use_japanese_font = False


def draw_japanese_text(img, text, position, font, color):
    """日本語テキストを画像に描画"""
    if not use_japanese_font:
        # フォールバック:OpenCVで英語表示
        cv2.putText(img, text, position, cv2.FONT_HERSHEY_SIMPLEX, 0.6, color, 2)
        return img

    # PILで日本語描画
    img_pil = Image.fromarray(cv2.cvtColor(img, cv2.COLOR_BGR2RGB))
    draw = ImageDraw.Draw(img_pil)
    draw.text(position, text, font=font, fill=color)
    return cv2.cvtColor(np.array(img_pil), cv2.COLOR_RGB2BGR)


def video_frame_processing(frame):
    """フレーム処理メイン関数"""
    global frame_count
    current_time = time.time()
    frame_count += 1

    # RGB変換(MediaPipeはRGBを期待)
    rgb_frame = cv2.cvtColor(frame, cv2.COLOR_BGR2RGB)

    # セグメンテーション実行
    results = segmentation.process(rgb_frame)

    foreground_detected = False
    confidence = 0.0
    area = 0
    centroid_x = 0
    centroid_y = 0

    if results.segmentation_mask is not None:
        # マスクを取得
        mask = results.segmentation_mask

        # 閾値処理
        binary_mask = (mask > CONF_THRESH).astype(np.uint8)

        # 前景が検出された場合
        if np.any(binary_mask):
            foreground_detected = True
            # マスクの平均信頼度を計算
            confidence = np.mean(mask[binary_mask == 1])

            # 面積計算(ピクセル数)
            area = np.sum(binary_mask)

            # 重心計算
            y_indices, x_indices = np.where(binary_mask == 1)
            if len(x_indices) > 0:
                centroid_x = int(np.mean(x_indices))
                centroid_y = int(np.mean(y_indices))

    # 結果文字列の生成
    if foreground_detected:
        result = f'前景検出あり (信頼度: {confidence:.1%}, 面積: {area}px, 重心: ({centroid_x}, {centroid_y}))'
    else:
        result = '前景検出なし'

    # 描画処理
    output_frame = frame.copy()

    if foreground_detected and results.segmentation_mask is not None:
        mask = results.segmentation_mask

        # 半透明マスクの作成
        colored_mask = np.zeros_like(frame)
        colored_mask[:, :] = FOREGROUND_COLOR

        # マスクを適用(半透明)
        alpha = 0.4
        mask_3channel = np.stack([mask] * 3, axis=-1)
        output_frame = output_frame * (1 - mask_3channel * alpha) + colored_mask * mask_3channel * alpha
        output_frame = output_frame.astype(np.uint8)

        # ラベル表示(日本語対応)
        if use_japanese_font:
            output_frame = draw_japanese_text(output_frame, CLASS_NAME, (10, 90), font_large, FOREGROUND_COLOR)
            output_frame = draw_japanese_text(output_frame, f'信頼度:{confidence:.1%}', (10, 115), font_small, (255, 255, 255))
            output_frame = draw_japanese_text(output_frame, f'面積:{area}px', (10, 135), font_small, (255, 255, 255))
            output_frame = draw_japanese_text(output_frame, f'重心:({centroid_x},{centroid_y})', (10, 155), font_small, (255, 255, 255))
        else:
            cv2.putText(output_frame, CLASS_NAME, (10, 90), cv2.FONT_HERSHEY_SIMPLEX, 0.7, FOREGROUND_COLOR, 2)
            cv2.putText(output_frame, f'Conf:{confidence:.1%}', (10, 115), cv2.FONT_HERSHEY_SIMPLEX, 0.4, (255, 255, 255), 1)
            cv2.putText(output_frame, f'Area:{area}px', (10, 135), cv2.FONT_HERSHEY_SIMPLEX, 0.4, (255, 255, 255), 1)
            cv2.putText(output_frame, f'Centroid:({centroid_x},{centroid_y})', (10, 155), cv2.FONT_HERSHEY_SIMPLEX, 0.4, (255, 255, 255), 1)

        # 重心に十字マーク表示
        cv2.drawMarker(output_frame, (centroid_x, centroid_y), (255, 0, 0), cv2.MARKER_CROSS, 10, 2)

    # システム情報表示
    status = '前景あり' if foreground_detected else '前景なし'
    if use_japanese_font:
        info1 = f'MediaPipe (CPU) | フレーム: {frame_count} | 状態: {status}'
        info2 = '操作: q=終了'
        output_frame = draw_japanese_text(output_frame, info1, (10, 30), font_medium, (255, 255, 255))
        output_frame = draw_japanese_text(output_frame, info2, (10, 60), font_small, (255, 255, 0))
    else:
        info1 = f'MediaPipe (CPU) | Frame: {frame_count} | Status: {status}'
        info2 = 'Press: q=Quit'
        cv2.putText(output_frame, info1, (10, 30), cv2.FONT_HERSHEY_SIMPLEX, 0.7, (255, 255, 255), 2)
        cv2.putText(output_frame, info2, (10, 60), cv2.FONT_HERSHEY_SIMPLEX, 0.5, (255, 255, 0), 1)

    return output_frame, result, current_time


# 入力選択
print('0: 動画ファイル')
print('1: カメラ')
print('2: サンプル動画')

choice = input('選択: ')

if choice == '0':
    root = tk.Tk()
    root.withdraw()
    path = filedialog.askopenfilename()
    if not path:
        exit()
    cap = cv2.VideoCapture(path)
elif choice == '1':
    cap = cv2.VideoCapture(0, cv2.CAP_DSHOW)
    if not cap.isOpened():
        cap = cv2.VideoCapture(0)
    cap.set(cv2.CAP_PROP_BUFFERSIZE, 1)
else:
    # サンプル動画ダウンロード・処理
    SAMPLE_URL = 'https://raw.githubusercontent.com/opencv/opencv/master/samples/data/vtest.avi'
    SAMPLE_FILE = 'vtest.avi'
    urllib.request.urlretrieve(SAMPLE_URL, SAMPLE_FILE)
    cap = cv2.VideoCapture(SAMPLE_FILE)

if not cap.isOpened():
    print('動画ファイル・カメラを開けませんでした')
    exit()

# メイン処理
print('\n=== 動画処理開始 ===')
print('操作方法:')
print('  q キー: プログラム終了')
try:
    while True:
        ret, frame = cap.read()
        if not ret:
            break

        MAIN_FUNC_DESC = "前景・背景セグメンテーション"
        processed_frame, result, current_time = video_frame_processing(frame)
        cv2.imshow(MAIN_FUNC_DESC, processed_frame)
        if choice == '1':  # カメラの場合
            print(datetime.fromtimestamp(current_time).strftime("%Y-%m-%d %H:%M:%S.%f")[:-3], result)
        else:  # 動画ファイルの場合
            print(frame_count, result)
        results_log.append(result)
        if cv2.waitKey(1) & 0xFF == ord('q'):
            break
finally:
    print('\n=== プログラム終了 ===')
    cap.release()
    cv2.destroyAllWindows()
    segmentation.close()
    if results_log:
        with open('result.txt', 'w', encoding='utf-8') as f:
            f.write('=== 結果 ===\n')
            f.write(f'処理フレーム数: {frame_count}\n')
            f.write(f'使用デバイス: CPU\n')
            f.write('\n')
            f.write('\n'.join(results_log))
        print(f'\n処理結果をresult.txtに保存しました')