OpenVINO OMZ による頭部姿勢推定(ソースコードと実行結果)
Python開発環境,ライブラリ類
ここでは、最低限の事前準備について説明する。機械学習や深層学習を行う場合は、NVIDIA CUDA、Visual Studio、Cursorなどを追加でインストールすると便利である。これらについては別ページ https://www.kkaneko.jp/cc/dev/aiassist.htmlで詳しく解説しているので、必要に応じて参照してください。
Python 3.12 のインストール(Windows 上) [クリックして展開]
以下のいずれかの方法で Python 3.12 をインストールする。Python がインストール済みの場合、この手順は不要である。
方法1:winget によるインストール
管理者権限のコマンドプロンプトで以下を実行する。管理者権限のコマンドプロンプトを起動するには、Windows キーまたはスタートメニューから「cmd」と入力し、表示された「コマンドプロンプト」を右クリックして「管理者として実行」を選択する。
winget install --id Python.Python.3.12 -e --scope machine --silent --accept-source-agreements --accept-package-agreements --override "/quiet InstallAllUsers=1 PrependPath=1 Include_test=0 Include_pip=1 Include_launcher=1 InstallLauncherAllUsers=1 TargetDir=\"C:\Program Files\Python312\""
powershell -Command "$p='C:\Program Files\Python312'; $s=\"$p\Scripts\"; $m=[Environment]::GetEnvironmentVariable('Path','Machine'); if($m -notlike \"*$s*\") { [Environment]::SetEnvironmentVariable('Path', \"$p;$s;$m\", 'Machine') }"
--scope machine を指定することで、システム全体(全ユーザー向け)にインストールされる。このオプションの実行には管理者権限が必要である。インストール完了後、コマンドプロンプトを再起動すると PATH が自動的に設定される。
方法2:インストーラーによるインストール
- Python 公式サイト(https://www.python.org/downloads/)にアクセスし、「Download Python 3.x.x」ボタンから Windows 用インストーラーをダウンロードする。
- ダウンロードしたインストーラーを実行する。
- 初期画面の下部に表示される「Add python.exe to PATH」に必ずチェックを入れてから「Customize installation」を選択する。このチェックを入れ忘れると、コマンドプロンプトから
pythonコマンドを実行できない。 - 「Install Python 3.xx for all users」にチェックを入れ、「Install」をクリックする。
インストールの確認
コマンドプロンプトで以下を実行する。
python --versionバージョン番号(例:Python 3.12.x)が表示されればインストール成功である。「'python' は、内部コマンドまたは外部コマンドとして認識されていません。」と表示される場合は、インストールが正常に完了していない。
AIエディタ Windsurf のインストール(Windows 上) [クリックして展開]
Pythonプログラムの編集・実行には、AIエディタの利用を推奨する。ここでは、Windsurfのインストールを説明する。Windsurf がインストール済みの場合、この手順は不要である。
管理者権限のコマンドプロンプトで以下を実行する。管理者権限のコマンドプロンプトを起動するには、Windows キーまたはスタートメニューから「cmd」と入力し、表示された「コマンドプロンプト」を右クリックして「管理者として実行」を選択する。
winget install --scope machine --id Codeium.Windsurf -e --silent --disable-interactivity --force --accept-source-agreements --accept-package-agreements --custom "/SP- /SUPPRESSMSGBOXES /NORESTART /CLOSEAPPLICATIONS /DIR=""C:\Program Files\Windsurf"" /MERGETASKS=!runcode,addtopath,associatewithfiles,!desktopicon"
powershell -Command "$env:Path=[System.Environment]::GetEnvironmentVariable('Path','Machine')+';'+[System.Environment]::GetEnvironmentVariable('Path','User'); windsurf --install-extension MS-CEINTL.vscode-language-pack-ja --force; windsurf --install-extension ms-python.python --force; windsurf --install-extension Codeium.windsurfPyright --force"
--scope machine を指定することで、システム全体(全ユーザー向け)にインストールされる。このオプションの実行には管理者権限が必要である。インストール完了後、コマンドプロンプトを再起動すると PATH が自動的に設定される。
【関連する外部ページ】
Windsurf の公式ページ: https://windsurf.com/
必要なライブラリをシステム領域にインストール
管理者権限のコマンドプロンプトで以下を実行する。管理者権限のコマンドプロンプトを起動するには、Windows キーまたはスタートメニューから「cmd」と入力し、表示された「コマンドプロンプト」を右クリックして「管理者として実行」を選択する。
REM PyTorch をインストール(GPU対応版)
set "CUDA_TAG=cu128"
set "PYTHON_PATH=C:\Program Files\Python312"
"%PYTHON_PATH%\Scripts\pip" install --no-user -U numpy torch torchvision torchaudio --index-url https://download.pytorch.org/whl/%CUDA_TAG%
pip install openvino opencv-python pillow
OpenVINO OMZ による頭部姿勢推定プログラム
概要
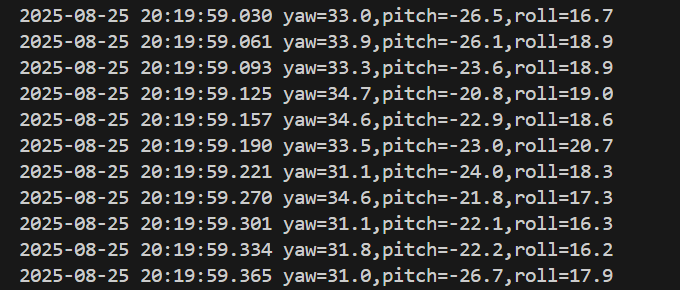
このプログラムは、Intel Open Model Zooの事前学習済みモデルを使用して、動画や画像から頭部姿勢をリアルタイムで推定する。顔検出、ランドマーク検出、頭部姿勢推定の3段階の処理により、yaw(左右回転)、pitch(上下回転)、roll(傾き)の3軸回転角を度単位で算出する[1][2]。
主要技術
OpenVINO Runtime
Intel製の深層学習推論エンジンであり、事前学習済みモデルの高速推論を実現する[1]。CPUやGPU、VPU等の複数のハードウェアに対応し、モデルの最適化と推論の高速化を提供する。
Open Model Zoo
Intelが提供する200以上の事前学習済みモデルのリポジトリである[2]。本プログラムでは、face-detection-adas-0001、landmarks-regression-retail-0009、head-pose-estimation-adas-0001の3つのモデルを使用する。
カスケード型処理アーキテクチャ
顔検出、ランドマーク検出、姿勢推定を順次実行する3段階の処理構造を採用している[5]。各段階の出力が次段階の入力となることで、精度の高い姿勢推定を実現する。
技術的特徴
本プログラムは3つの独立したニューラルネットワークモデルを組み合わせて動作する。face-detection-adas-0001モデルは384x672ピクセルの入力から顔領域を検出し[3]、landmarks-regression-retail-0009モデルは48x48ピクセルの顔画像から5点の特徴点を抽出する[4]。head-pose-estimation-adas-0001モデルは60x60ピクセルの顔画像から3軸の回転角度を推定する[2]。
各モデルは異なる入力サイズを要求するため、動的な前処理によりBGR画像を適切なサイズにリサイズし、CHW形式に変換後、float32型に変換する。推論結果は正規化座標で出力されるため、元の画像座標系に変換する後処理を実装している。
実装の特色
複数の顔を同時に検出し、各顔に対して個別に姿勢推定を行う機能を実装している。検出された各顔に対して、3D座標軸を描画することで姿勢を視覚的に表現する。日本語フォントに対応したオーバーレイ表示により、推定結果を画面上にリアルタイム表示する。
処理結果は自動的にテキストファイルに保存され、フレームごとの姿勢角度データを後から分析可能である。顔検出の信頼度閾値(FACE_CONF_TH)は調整可能であり、環境に応じた最適化が可能である。画像境界のクリッピング処理により、境界付近の顔に対しても安定した検出を実現している。
参考文献
[1] Intel Corporation. (2024). OpenVINO™ Toolkit Documentation. https://docs.openvino.ai/
[2] Intel Corporation. (2024). Head Pose Estimation ADAS-0001. Open Model Zoo. https://github.com/openvinotoolkit/open_model_zoo/blob/master/models/intel/head-pose-estimation-adas-0001/README.md
[3] Intel Corporation. (2024). Face Detection ADAS-0001. Open Model Zoo. https://github.com/openvinotoolkit/open_model_zoo/blob/master/models/intel/face-detection-adas-0001/README.md
[4] Intel Corporation. (2024). Facial Landmarks Regression Retail-0009. Open Model Zoo. https://github.com/openvinotoolkit/open_model_zoo/blob/master/models/intel/landmarks-regression-retail-0009/README.md
[5] Ranjan, R., Patel, V. M., & Chellappa, R. (2017). HyperFace: A Deep Multi-Task Learning Framework for Face Detection, Landmark Localization, Pose Estimation, and Gender Recognition. IEEE Transactions on Pattern Analysis and Machine Intelligence, 41(1), 121-135.
ソースコード
# プログラム名: Windows向けリアルタイム頭部姿勢推定(OpenVINO OMZ)
# 特徴技術名: Intel Open Model Zoo「head-pose-estimation-adas-0001」(OpenVINO Runtime)
# 出典(APA形式):
# - Intel. (2021–2024). Head Pose Estimation (head-pose-estimation-adas-0001). Open Model Zoo. https://github.com/openvinotoolkit/open_model_zoo/blob/master/models/intel/head-pose-estimation-adas-0001/README.md
# - Intel. (2021–2024). Facial Landmarks (landmarks-regression-retail-0009). Open Model Zoo. https://github.com/openvinotoolkit/open_model_zoo/blob/master/models/intel/landmarks-regression-retail-0009/README.md
# - Intel. (2021–2024). Face Detection (face-detection-adas-0001). Open Model Zoo. https://github.com/openvinotoolkit/open_model_zoo/blob/master/models/intel/face-detection-adas-0001/README.md
# - Intel. (2021–2024). OpenVINO Runtime. https://docs.openvino.ai/
# 特徴機能: 顔画像から頭部の3軸回転角(yaw, pitch, roll)を推定。顔検出後、頭部姿勢角を度単位で算出し画像上に表示
# 学習済みモデル:
# - head-pose-estimation-adas-0001: 頭部姿勢推定モデル。入力: 60x60x3 BGR画像、出力: fc_y(yaw)/fc_p(pitch)/fc_r(roll)角度(度)
# - landmarks-regression-retail-0009: 5点顔ランドマーク検出。入力: 48x48x3 BGR画像、出力: 10次元ベクトル(5点のx,y座標)
# - face-detection-adas-0001: 顔検出モデル。入力: 384x672x3 BGR画像、出力: 検出ボックスと信頼度
# 方式設計:
#   - 関連利用技術: OpenVINO Runtime(推論エンジン)、OpenCV(画像入出力・前処理)、Pillow(日本語テキスト描画)、PyTorch(GPU/CPU判定用)
#   - 入力と出力:
#     入力: 動画(ユーザは「0:動画ファイル,1:カメラ,2:サンプル動画」のメニューで選択.0:動画ファイルの場合はtkinterでファイル選択.1の場合はOpenCVでカメラが開く.2の場合はhttps://raw.githubusercontent.com/opencv/opencv/master/samples/data/vtest.aviを使用)
#     出力: OpenCV画面でリアルタイム表示(検出ボックス、ランドマーク、姿勢角をオーバーレイ)、print()でフレームごとの姿勢角出力、終了時にresult.txtへ保存
#   - 処理手順: 1) 顔検出で最大信頼度の顔を選択 2) 顔領域から5点ランドマーク検出 3) 顔領域から頭部姿勢角(yaw, pitch, roll)推定 4) 結果を画像上に描画
#   - 前処理、後処理:
#     前処理: BGR画像を各モデルの入力サイズにリサイズ、CHW形式に変換、float32型に変換
#     後処理: 正規化座標を画像座標に変換、検出結果の境界チェック
#   - 追加処理: 顔検出ボックスの画像境界クリッピング処理(画像外参照防止)
#   - 調整を必要とする設定値: FACE_CONF_TH=0.5(顔検出の信頼度閾値。低すぎると誤検出、高すぎると未検出)
# 将来方策: FACE_CONF_TH値を動的に調整する機能(検出率に応じて閾値を自動調整)
# その他の重要事項: 外部リソース(モデルファイル、サンプル動画)取得失敗時はエラーメッセージ表示後終了
# 前準備:
#   pip install -U numpy torch torchvision torchaudio --index-url https://download.pytorch.org/whl/cu126
#   pip install openvino opencv-python pillow

import os
import cv2
import urllib.request
import numpy as np
import time
import tkinter as tk
from tkinter import filedialog
from datetime import datetime
from PIL import Image, ImageDraw, ImageFont
from openvino.runtime import Core
import torch
import sys
import io
import math

# 標準出力エンコーディング設定
sys.stdout = io.TextIOWrapper(sys.stdout.buffer, encoding='utf-8', line_buffering=True)

# 設定値
FACE_CONF_TH = 0.5  # 顔検出の信頼度閾値
FONT_PATH = 'C:/Windows/Fonts/meiryo.ttc'  # 日本語フォントパス
FONT_SIZE = 18  # フォントサイズ
BOX_COLOR = (0, 255, 0)  # 顔検出ボックスの色 (BGR)
BOX_THICKNESS = 2  # ボックスの線の太さ
LM_RADIUS = 3  # ランドマーク円の半径
LM_COLORS = [(255, 0, 0), (255, 0, 0), (0, 255, 0), (0, 0, 255), (0, 0, 255)]  # 各ランドマークの色
TEXT_COLOR = (0, 255, 0)  # テキストの色 (BGR)
TEXT_X = 10  # テキスト表示開始X座標
TEXT_Y = 10  # テキスト表示開始Y座標
TEXT_LINE_H = 22  # テキスト行間

# プログラム開始時のガイダンス
print('=== OpenVINO OMZ 頭部姿勢推定プログラム ===')
print('')
print('【概要説明】')
print('Intel Open Model Zooの事前学習済みモデルを使用した頭部姿勢推定を行います')
print('複数の顔を同時に検出し、各顔の姿勢を個別に推定します')
print('')
print('【操作方法】')
print('- qキー: プログラム終了')
print('- 画面に各顔の姿勢角度(pitch, yaw, roll)と3D軸が表示されます')
print('')
print('【注意事項】')
print('- 顔が検出されない場合は姿勢推定を行いません')
print('- 処理結果は自動的にresult.txtに保存されます')
print('')

# GPU/CPU自動選択
device = torch.device('cuda' if torch.cuda.is_available() else 'cpu')
print(f'デバイス: {str(device)}')
# GPU使用時の最適化
if device.type == 'cuda':
    torch.backends.cudnn.benchmark = True

# モデルURL(Open Model Zoo 2021.4 models_bin/1, FP32)
OMZ = "https://storage.openvinotoolkit.org/repositories/open_model_zoo/2021.4/models_bin/1"
MODELS = {
    "face.xml": f"{OMZ}/face-detection-adas-0001/FP32/face-detection-adas-0001.xml",
    "face.bin": f"{OMZ}/face-detection-adas-0001/FP32/face-detection-adas-0001.bin",
    "lmk.xml": f"{OMZ}/landmarks-regression-retail-0009/FP32/landmarks-regression-retail-0009.xml",
    "lmk.bin": f"{OMZ}/landmarks-regression-retail-0009/FP32/landmarks-regression-retail-0009.bin",
    "pose.xml": f"{OMZ}/head-pose-estimation-adas-0001/FP32/head-pose-estimation-adas-0001.xml",
    "pose.bin": f"{OMZ}/head-pose-estimation-adas-0001/FP32/head-pose-estimation-adas-0001.bin",
}


def download_models():
    os.makedirs("models", exist_ok=True)
    for local, url in MODELS.items():
        path = os.path.join("models", local)
        if not os.path.exists(path):
            try:
                print(f"モデルダウンロード中: {local}")
                urllib.request.urlretrieve(url, path)
            except Exception as e:
                print(f"モデルのダウンロードに失敗しました: {url}\n{e}")
                exit()


download_models()

# OpenVINOモデル読み込み
core = Core()
face_net = core.compile_model(os.path.join("models", "face.xml"), "CPU")
lmk_net = core.compile_model(os.path.join("models", "lmk.xml"), "CPU")
pose_net = core.compile_model(os.path.join("models", "pose.xml"), "CPU")

# 日本語フォント設定
font = ImageFont.truetype(FONT_PATH, FONT_SIZE)

frame_count = 0
results_log = []


def to_blob(bgr, shape_hw):
    h, w = shape_hw
    img = cv2.resize(bgr, (w, h))
    blob = np.expand_dims(np.transpose(img, (2, 0, 1)), 0).astype(np.float32)
    return blob


def clip_box(x1, y1, x2, y2, W, H):
    return max(0, x1), max(0, y1), min(W, x2), min(H, y2)


def infer_face(frame):
    """複数顔対応の顔検出"""
    ih, iw = face_net.input(0).shape[2], face_net.input(0).shape[3]
    blob = to_blob(frame, (ih, iw))
    out = list(face_net([blob]).values())[0][0, 0]
    faces = []
    for det in out:
        conf = float(det[2])
        if conf > FACE_CONF_TH:
            xmin, ymin = det[3] * frame.shape[1], det[4] * frame.shape[0]
            xmax, ymax = det[5]