InsightFace顔検出・プライバシー保護と動画保存(ソースコードと説明と利用ガイド)
プログラム利用ガイド
1. このプログラムの利用シーン
動画公開において個人のプライバシーを保護する必要がある場面で活用される。監視カメラ映像の公開、教育用動画の撮影、オンライン会議の録画と公開において、関係者以外の顔を自動的にぼかす処理を行う。リアルタイム処理に対応するため、ライブ配信での利用のためのプログラムを改変することも可能である。
2. 主な機能
- 顔検出とぼかし処理: InsightFaceのSCRFDアルゴリズムにより顔検出を実行し、楕円領域にガウシアンぼかしを適用する
- 入力ソース選択: Webカメラ、動画ファイル、サンプル動画の3種類から入力を選択できる
- モデル選択: buffalo_sc(高速・軽量)とbuffalo_l(高精度)の2つのモデルから用途に応じて選択可能である
- パラメータ調整: 検出信頼度閾値とぼかし強度倍率をGUIのスライダーでリアルタイムに調整できる
- ハードウェア自動選択: CUDA、DirectML、CPUから利用可能な最速のデバイスを自動的に選択する
- 動画保存: 処理結果をresult.mp4として自動保存する。保存される動画にはぼかしが適用される
3. 基本的な使い方
- 起動と初期設定:
プログラムを起動すると自動的にハードウェアを検出し、モデルを初期化する。初回起動時はモデルのダウンロードに時間がかかる場合がある。
- 入力ソースの選択:
コントロールパネルで「カメラ」「動画ファイル」「サンプル動画」から入力を選択する。動画ファイルを選択した場合はファイル選択ダイアログが表示される。
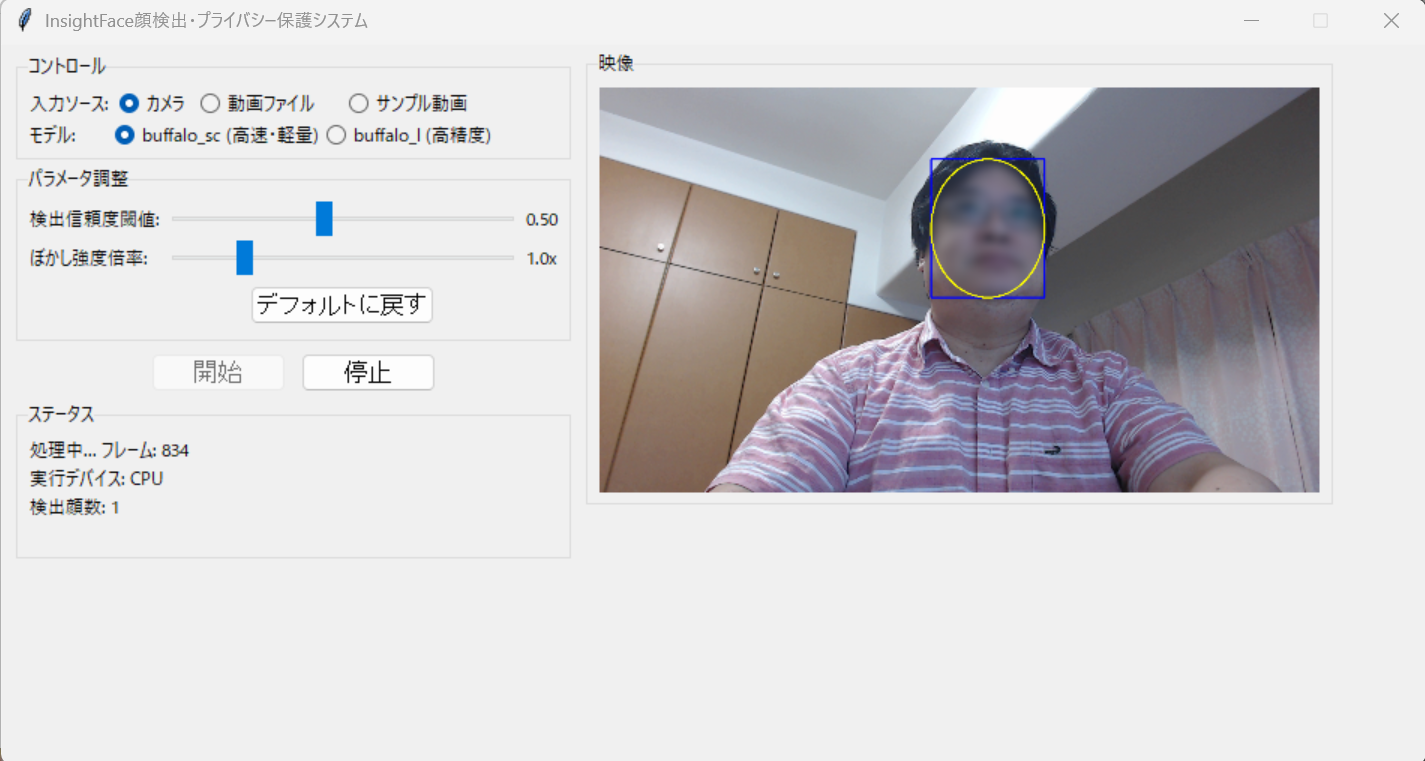
- 処理の開始:
「開始」ボタンをクリックすると処理が開始される。映像表示領域にリアルタイムで処理結果が表示される。青い矩形がMBR、黄色の楕円が実際のぼかし領域を示す。
- 処理の停止:
「停止」ボタンをクリックすると処理が終了し、result.mp4として動画が保存される。
4. 便利な機能
- リアルタイムパラメータ調整: 処理中でも検出信頼度閾値とぼかし強度倍率を調整可能である。閾値を上げると誤検出が減少し、下げると検出漏れが減少する
- モデル切り替え: buffalo_scは処理速度を優先する場合、buffalo_lは検出精度を重視する場合に選択する。モデル変更時は自動的に最適な閾値が設定される
- デフォルトに戻す: パラメータ調整後、「デフォルトに戻す」ボタンで初期値に復帰できる
- ステータス表示: 処理中のフレーム数、検出顔数、使用デバイスなどの情報がリアルタイムで表示される
- 自動フレーム補完: カメラ入力時は指定FPSを維持するようフレーム補完を行い、安定した動画出力を実現する
Python開発環境,ライブラリ類
ここでは、最低限の事前準備について説明する。機械学習や深層学習を行う場合は、NVIDIA CUDA、Visual Studio、Cursorなどを追加でインストールすると便利である。これらについては別ページ https://www.kkaneko.jp/cc/dev/aiassist.htmlで詳しく解説しているので、必要に応じて参照してください。
Python 3.12 のインストール(Windows 上) [クリックして展開]
以下のいずれかの方法で Python 3.12 をインストールする。Python がインストール済みの場合、この手順は不要である。
方法1:winget によるインストール
管理者権限のコマンドプロンプトで以下を実行する。管理者権限のコマンドプロンプトを起動するには、Windows キーまたはスタートメニューから「cmd」と入力し、表示された「コマンドプロンプト」を右クリックして「管理者として実行」を選択する。
winget install --id Python.Python.3.12 -e --scope machine --silent --accept-source-agreements --accept-package-agreements --override "/quiet InstallAllUsers=1 PrependPath=1 Include_test=0 Include_pip=1 Include_launcher=1 InstallLauncherAllUsers=1 TargetDir=\"C:\Program Files\Python312\""
powershell -Command "$p='C:\Program Files\Python312'; $s=\"$p\Scripts\"; $m=[Environment]::GetEnvironmentVariable('Path','Machine'); if($m -notlike \"*$s*\") { [Environment]::SetEnvironmentVariable('Path', \"$p;$s;$m\", 'Machine') }"
--scope machine を指定することで、システム全体(全ユーザー向け)にインストールされる。このオプションの実行には管理者権限が必要である。インストール完了後、コマンドプロンプトを再起動すると PATH が自動的に設定される。
方法2:インストーラーによるインストール
- Python 公式サイト(https://www.python.org/downloads/)にアクセスし、「Download Python 3.x.x」ボタンから Windows 用インストーラーをダウンロードする。
- ダウンロードしたインストーラーを実行する。
- 初期画面の下部に表示される「Add python.exe to PATH」に必ずチェックを入れてから「Customize installation」を選択する。このチェックを入れ忘れると、コマンドプロンプトから
pythonコマンドを実行できない。 - 「Install Python 3.xx for all users」にチェックを入れ、「Install」をクリックする。
インストールの確認
コマンドプロンプトで以下を実行する。
python --versionバージョン番号(例:Python 3.12.x)が表示されればインストール成功である。「'python' は、内部コマンドまたは外部コマンドとして認識されていません。」と表示される場合は、インストールが正常に完了していない。
AIエディタ Windsurf のインストール(Windows 上) [クリックして展開]
Pythonプログラムの編集・実行には、AIエディタの利用を推奨する。ここでは、Windsurfのインストールを説明する。Windsurf がインストール済みの場合、この手順は不要である。
管理者権限のコマンドプロンプトで以下を実行する。管理者権限のコマンドプロンプトを起動するには、Windows キーまたはスタートメニューから「cmd」と入力し、表示された「コマンドプロンプト」を右クリックして「管理者として実行」を選択する。
winget install --scope machine --id Codeium.Windsurf -e --silent --disable-interactivity --force --accept-source-agreements --accept-package-agreements --custom "/SP- /SUPPRESSMSGBOXES /NORESTART /CLOSEAPPLICATIONS /DIR=""C:\Program Files\Windsurf"" /MERGETASKS=!runcode,addtopath,associatewithfiles,!desktopicon"
powershell -Command "$env:Path=[System.Environment]::GetEnvironmentVariable('Path','Machine')+';'+[System.Environment]::GetEnvironmentVariable('Path','User'); windsurf --install-extension MS-CEINTL.vscode-language-pack-ja --force; windsurf --install-extension ms-python.python --force; windsurf --install-extension Codeium.windsurfPyright --force"
--scope machine を指定することで、システム全体(全ユーザー向け)にインストールされる。このオプションの実行には管理者権限が必要である。インストール完了後、コマンドプロンプトを再起動すると PATH が自動的に設定される。
【関連する外部ページ】
Windsurf の公式ページ: https://windsurf.com/
Windows での FFmpeg インストール手順(手動インストール)
公式ビルド版を使用
-
ダウンロード
- https://www.gyan.dev/ffmpeg/builds/ にアクセス
- 「release builds」セクションの「full」版をダウンロード
- ファイル名例:
ffmpeg-release-full.7z - essentials版ではなくfull版を選択(ffprobeも含まれる)
- ファイル名例:
-
解凍
- ダウンロードした7zファイルを右クリック
- 7-Zip等で解凍(Windows標準では7z非対応のため、7-Zipが必要)
- 7-Zipダウンロード: https://www.7-zip.org/
- 解凍先を
C:\ffmpegにする(推奨)- フォルダ構造:
C:\ffmpeg\bin\ffmpeg.exeとなるように配置
- フォルダ構造:
-
環境変数PATHの設定
- Windowsキー + R → 「sysdm.cpl」と入力してEnter
- 「詳細設定」タブ → 「環境変数」ボタンをクリック
- 「システム環境変数」の「Path」を選択 → 「編集」
- 「新規」をクリック →
C:\ffmpeg\binを追加 - 「OK」を3回クリックして設定を保存
-
動作確認
- コマンドプロンプトを新規で開く(既存のものは閉じる)
- 以下のコマンドを実行:
ffmpeg -version ffprobe -version - バージョン情報が表示されれば成功
必要なライブラリをシステム領域にインストール
管理者権限のコマンドプロンプトで以下を実行する。管理者権限のコマンドプロンプトを起動するには、Windows キーまたはスタートメニューから「cmd」と入力し、表示された「コマンドプロンプト」を右クリックして「管理者として実行」を選択する。
pip install insightface opencv-python onnxruntime numpy pillow
GPU使用の場合,追加で次を実行
pip install onnxruntime-gpu
InsightFace顔検出・プライバシー保護プログラム
概要
このプログラムは、InsightFaceのSCRFDアルゴリズムを用いて動画内の顔を検出し、プライバシー保護のため顔の楕円領域にガウシアンぼかしを適用する。GUIによるパラメータ調整機能を備える。
主要技術
SCRFD (Sample and Computation Redistribution for Efficient Face Detection)
Guo, J.らが2022年に発表した顔検出アルゴリズム[1]。
InsightFace Framework
深層学習ベースの顔分析フレームワーク[2]。SCRFDを含む複数の顔検出・認識モデルを統合し、ONNX Runtimeを介して推論を実現する。buffalo_scモデルは軽量版で約300MB、buffalo_lは高精度版で約1GBのサイズである。
技術的特徴
マルチプラットフォーム推論エンジン対応
ONNX Runtimeの実行プロバイダを自動検出し、CUDA、DirectML、CPUの順で最適なハードウェアアクセラレーションを選択する。これにより、環境に応じた動作を行う。
実装の特色
最小外接矩形(MBR)ベースの楕円ぼかし処理
検出された顔領域のMBRから楕円パラメータを算出し、楕円マスクを生成してガウシアンフィルタを適用する。楕円面積に応じてカーネルサイズを動的に調整することで、顔のサイズに適応したぼかし強度を実現する。
非同期GUI更新
動画処理を別スレッドで実行し、GUIの応答性を維持しながら処理を行う。カメラ入力時は,処理が間に合わない(フレームスキップ)ことがあり得る.その場合は,前フレームの結果をそのまま使っての補完により、一定のFPSでの動画保存を行う。
出力
GUI表示用(MBRと楕円枠付き)と保存用(ぼかしのみ)で異なる出力を行う.表示用では青色のMBRと黄色の楕円枠を描画し、検出領域を明確に示す。
動的パラメータ調整機能
tkinterベースのGUIにより、検出信頼度閾値(0.1-1.0)とぼかし強度倍率(0.5-3.0)をスライダーで調整可能である。モデル切り替え時は自動的に最適なデフォルト値に設定される。
参考文献
[1] Guo, J., et al. (2022). Sample and Computation Redistribution for Efficient Face Detection. ICLR 2022. https://openreview.net/forum?id=04A8QdsP_M4
[2] InsightFace Contributors. (2024). InsightFace: State-of-the-art 2D and 3D Face Analysis Project. GitHub Repository. https://github.com/deepinsight/insightface
ソースコード
# プログラム名: InsightFace顔検出・プライバシー保護プログラム
# 特徴技術名: SCRFD (Sample and Computation Redistribution for Efficient Face Detection) + プライバシー保護
# 出典: Guo, J., et al. (2022). Sample and Computation Redistribution for Efficient Face Detection. ICLR 2022. https://github.com/deepinsight/insightface
# 特徴機能: 顔検出とMBR(最小外接矩形)に基づく楕円領域のガウシアンぼかしによるプライバシー保護、音声トラック保持、エラーログ自動保存、処理進捗表示
# 学習済みモデル:
# - buffalo_sc: 高速・軽量モデル(約300MB、検出閾値デフォルト0.5、det_size: 640x640)
# - buffalo_l: 高精度モデル(約1GB、検出閾値デフォルト0.3、det_size: 640x640)
# 初回実行時に選択したモデルを自動ダウンロード(~/.insightface/modelsに保存)
# 学習済みモデルの利用条件:
# - buffalo_sc/buffalo_l: InsightFaceプロジェクトが提供する事前学習済みモデル
# - ライセンス: MIT License(https://github.com/deepinsight/insightface/blob/master/LICENSE)
# - 商用利用: 可能(MIT Licenseに準拠)
# - 帰属表示: InsightFaceプロジェクトへの帰属表示が必要
# - 学習データ: MS1MV3データセット(顔画像データセット)で学習
# - 制限事項: 顔認証・個人識別目的での使用は各国の法規制に従うこと
# - モデル配布元: https://github.com/deepinsight/insightface/tree/master/model_zoo
# 方式設計:
# - 関連利用技術:
# - InsightFace: SCRFDアルゴリズムによる顔検出、CNN基盤の深層学習手法(MIT License)
# - OpenCV: 画像処理、カメラ制御、描画処理、ガウシアンフィルタ(Apache 2.0 License)
# - ONNX Runtime: モデル推論エンジン、GPU(CUDA)/DirectML/CPUの実行プロバイダを自動選択(MIT License)
# - tkinter: GUIインタフェース(Python標準ライブラリ、PSF License)
# - FFmpeg/FFprobe: 音声トラック検出・抽出・結合(LGPL/GPL、別途インストール必要)
# - logging: タイムスタンプ付きエラーログをlogsフォルダに自動保存(Python標準ライブラリ)
# - tempfile: 映像処理用一時ファイル管理(Python標準ライブラリ)
# - threading: 動画処理を別スレッドで実行しGUI応答性を維持(Python標準ライブラリ)
# - 入力と出力:
# - 入力: カメラ(DirectShow優先)、動画ファイル(mp4/avi/mov/mkv)、サンプル動画(自動ダウンロード)
# - 出力: GUI内リアルタイム表示(MBR青枠・楕円黄枠の表示ON/OFF切替可能)、ユーザ指定ファイル名で保存(デフォルトresult.mp4)
# - 処理手順:
# 1. 入力ソース選択とモデル初期化(buffalo_sc/buffalo_l選択可能)
# 2. 動画フレーム読み込みと総フレーム数取得(動画ファイルの場合)
# 3. InsightFace(SCRFD)で顔検出、信頼度閾値でフィルタリング
# 4. MBR計算と楕円領域の面積に応じた動的カーネルサイズ決定
# 5. ガウシアンぼかし適用(楕円マスク使用)
# 6. 表示用(枠あり/なし)と保存用(枠なし)を別処理
# 7. 一時ファイルに映像書き込み(カメラ入力時はフレーム補完)
# 8. FFmpegで元動画の音声トラックを結合(音声がある場合のみ)
# - 前処理、後処理:
# - 前処理: ffprobeによる音声トラック有無確認、ハードウェア検出(CUDA/DirectML/CPU)
# - 後処理: 楕円面積に応じたガウシアンぼかし(15-99ピクセル×倍率0.5-3.0)、音声トラック結合、一時ファイル削除
# - 追加処理:
# - プログレスバー表示(処理済み/総フレーム数、進捗率、残り時間推定)
# - リアルタイム検出顔数表示
# - エラー発生時のメッセージボックス表示とログ記録(トレースバック付き)
# - モデル切り替え時の自動閾値調整
# - 調整を必要とする設定値:
# - 検出信頼度閾値(0.1-1.0、スライダー調整、モデル別デフォルト値)
# - ぼかし強度倍率(0.5-3.0、スライダー調整)
# - 枠線表示ON/OFF(チェックボックス)
# - 出力ファイル名(ファイル保存ダイアログで指定)
# - モデル選択(buffalo_sc/buffalo_l、ラジオボタン)
# その他の重要事項:
# - Windows環境専用(cv2.CAP_DSHOW使用)
# - 初回実行時は選択モデルのダウンロードに時間がかかる(~/.insightface/modelsに保存)
# - GPU(CUDA)/DirectML/CPUを自動検出して最速デバイスを選択
# - logsフォルダに日時付きログファイル自動生成(UTF-8エンコーディング)
# - 音声保持にはFFmpegのインストールとPATH設定が必要(なくても動作するが音声なし)
# - GUI縦幅520px、横幅950px固定、リサイズ不可
# - 動画表示領域480x360px(アスペクト比保持してリサイズ)
# 前準備:
# - pip install insightface opencv-python onnxruntime numpy pillow
# - GPU使用の場合: pip install onnxruntime-gpu
# - DirectML利用の場合(Windows): pip install onnxruntime-directml
# - 音声保持機能を使用する場合: FFmpegをインストールしてPATHに追加(https://ffmpeg.org/download.html)
import cv2
import tkinter as tk
from tkinter import ttk, filedialog, font, messagebox
import os
import numpy as np
from insightface.app import FaceAnalysis
import warnings
import urllib.request
from PIL import Image, ImageTk
import threading
from datetime import datetime
import logging
import traceback
import tempfile
import subprocess
import shutil
# InsightFace関連の将来警告・ユーザ警告を抑制(他の警告は抑制しない)
warnings.filterwarnings('ignore', category=FutureWarning, module='insightface')
warnings.filterwarnings('ignore', category=UserWarning, module='insightface')
# ===== ログ設定 =====
LOG_DIR = "logs"
if not os.path.exists(LOG_DIR):
os.makedirs(LOG_DIR)
log_filename = os.path.join(LOG_DIR, f"privacy_app_{datetime.now().strftime('%Y%m%d_%H%M%S')}.log")
logging.basicConfig(
level=logging.INFO,
format='%(asctime)s - %(levelname)s - %(message)s',
handlers=[
logging.FileHandler(log_filename, encoding='utf-8'),
logging.StreamHandler()
]
)
logger = logging.getLogger(__name__)
# ===== モデル設定 =====
MODEL_CONFIG = {
'buffalo_sc': {
'name': 'buffalo_sc',
'description': '高速・軽量',
'size': '約300MB',
'default_threshold': 0.5,
'det_size': (640, 640)
},
'buffalo_l': {
'name': 'buffalo_l',
'description': '高精度',
'size': '約1GB',
'default_threshold': 0.3,
'det_size': (640, 640)
}
}
# ===== 設定・定数管理 =====
SAMPLE_VIDEO_URL = 'https://raw.githubusercontent.com/opencv/opencv/master/samples/data/vtest.avi'
SAMPLE_VIDEO_NAME = 'vtest.avi'
DEFAULT_OUTPUT_VIDEO = 'result.mp4'
# GUI設定
GUI_WIDTH = 950
GUI_HEIGHT = 520 # 進捗バー追加のため高さ増加
VIDEO_DISPLAY_WIDTH = 480 # 動画表示領域の幅
VIDEO_DISPLAY_HEIGHT = 360 # 動画表示領域の高さ
# カメラ設定
CAMERA_WIDTH = 1280
CAMERA_HEIGHT = 720
FPS = 30
# 顔とMBRの表示色(BGR形式)
MBR_COLOR = (255, 0, 0) # MBR用(青)
ELLIPSE_COLOR = (0, 255, 255) # 楕円枠用(黄)
# ぼかし強度の基本設定
BASE_MIN_BLUR_SIZE = 15 # 基本最小カーネルサイズ
BASE_MAX_BLUR_SIZE = 99 # 基本最大カーネルサイズ
MIN_FACE_AREA = 1000 # 最小顔面積
MAX_FACE_AREA = 100000 # 最大顔面積
class FacePrivacyApp:
def __init__(self, root):
self.root = root
self.root.title("InsightFace顔検出・プライバシー保護システム")
self.root.geometry(f"{GUI_WIDTH}x{GUI_HEIGHT}")
self.root.resizable(False, False)
logger.info("アプリケーション起動")
# フォント設定
self.button_font = font.Font(size=12) # ボタン用フォント
# 変数初期化
self.cap = None
self.app = None
self.is_running = False
self.video_writer = None
self.selected_model = 'buffalo_sc'
self.ctx_id = -1
self.providers = ['CPUExecutionProvider']
self.device_label = 'CPU'
self.frame_count = 0
self.total_frames = 0
self.last_face_count = 0
self.current_frame = None
self.input_video_path = None
self.output_video_path = DEFAULT_OUTPUT_VIDEO
self.temp_video_path = None
self.has_audio = False
# 枠線表示フラグ
self.show_boxes = tk.BooleanVar(value=True)
# 調整可能パラメータ
self.score_threshold = tk.DoubleVar(value=MODEL_CONFIG['buffalo_sc']['default_threshold'])
self.blur_multiplier = tk.DoubleVar(value=1.0)
# GUI構築
self.setup_gui()
# GPU検出とモデル初期化
self.detect_hardware()
self.initialize_model()
def setup_gui(self):
# スタイル設定
style = ttk.Style()
style.configure('Large.TButton', font=('', 12))
# メインフレーム
main_frame = ttk.Frame(self.root, padding="5")
main_frame.grid(row=0, column=0, sticky=(tk.W, tk.E, tk.N, tk.S))
# 左側パネル
left_panel = ttk.Frame(main_frame)
left_panel.grid(row=0, column=0, sticky=(tk.N, tk.W), padx=5)
# コントロールパネル
control_frame = ttk.LabelFrame(left_panel, text="コントロール", padding="5")
control_frame.grid(row=0, column=0, sticky=(tk.W, tk.E), pady=2)
# 入力選択
ttk.Label(control_frame, text="入力ソース:").grid(row=0, column=0, sticky=tk.W)
self.source_var = tk.StringVar(value="camera")
ttk.Radiobutton(control_frame, text="カメラ", variable=self.source_var,
value="camera").grid(row=0, column=1)
ttk.Radiobutton(control_frame, text="動画ファイル", variable=self.source_var,
value="file").grid(row=0, column=2)
ttk.Radiobutton(control_frame, text="サンプル動画", variable=self.source_var,
value="sample").grid(row=0, column=3)
# モデル選択
ttk.Label(control_frame, text="モデル:").grid(row=1, column=0, sticky=tk.W)
self.model_var = tk.StringVar(value="buffalo_sc")
ttk.Radiobutton(control_frame, text="buffalo_sc (高速・軽量)", variable=self.model_var,
value="buffalo_sc", command=self.on_model_change).grid(row=1, column=1, columnspan=2)
ttk.Radiobutton(control_frame, text="buffalo_l (高精度)", variable=self.model_var,
value="buffalo_l", command=self.on_model_change).grid(row=1, column=3)
# 出力ファイル設定
ttk.Label(control_frame, text="出力ファイル:").grid(row=2, column=0, sticky=tk.W)
self.output_label = ttk.Label(control_frame, text=self.output_video_path, width=30)
self.output_label.grid(row=2, column=1, columnspan=2)
ttk.Button(control_frame, text="変更", command=self.select_output_file).grid(row=2, column=3)
# パラメータ調整パネル
param_frame = ttk.LabelFrame(left_panel, text="パラメータ調整", padding="5")
param_frame.grid(row=1, column=0, sticky=(tk.W, tk.E), pady=2)
# 検出信頼度閾値スライダー
ttk.Label(param_frame, text="検出信頼度閾値:").grid(row=0, column=0, sticky=tk.W)
self.threshold_slider = ttk.Scale(param_frame, from_=0.1, to=1.0,
variable=self.score_threshold,
orient=tk.HORIZONTAL, length=230,
command=self.on_threshold_change)
self.threshold_slider.grid(row=0, column=1, padx=5)
self.threshold_label = ttk.Label(param_frame, text=f"{self.score_threshold.get():.2f}")
self.threshold_label.grid(row=0, column=2)
# ぼかし強度倍率スライダー
ttk.Label(param_frame, text="ぼかし強度倍率:").grid(row=1, column=0, sticky=tk.W)
self.blur_slider = ttk.Scale(param_frame, from_=0.5, to=3.0,
variable=self.blur_multiplier,
orient=tk.HORIZONTAL, length=230,
command=self.on_blur_change)
self.blur_slider.grid(row=1, column=1, padx=5)
self.blur_label = ttk.Label(param_frame, text=f"{self.blur_multiplier.get():.1f}x")
self.blur_label.grid(row=1, column=2)
# 枠線表示チェックボックス
self.show_boxes_check = ttk.Checkbutton(param_frame, text="枠線を表示(MBR・楕円)",
variable=self.show_boxes)
self.show_boxes_check.grid(row=2, column=0, columnspan=2, sticky=tk.W, pady=5)
# リセットボタン
ttk.Button(param_frame, text="デフォルトに戻す",
command=self.reset_parameters, style='Large.TButton').grid(row=3, column=1, pady=5)
# 操作ボタン
button_frame = ttk.Frame(left_panel)
button_frame.grid(row=2, column=0, pady=5)
self.start_button = ttk.Button(button_frame, text="開始", command=self.start_processing,
style='Large.TButton', width=10)
self.start_button.grid(row=0, column=0, padx=5)
self.stop_button = ttk.Button(button_frame, text="停止", command=self.stop_processing,
style='Large.TButton', width=10, state=tk.DISABLED)
self.stop_button.grid(row=0, column=1, padx=5)
# 進捗表示
progress_frame = ttk.LabelFrame(left_panel, text="進捗", padding="5")
progress_frame.grid(row=3, column=0, sticky=(tk.W, tk.E), pady=2)
self.progress_bar = ttk.Progressbar(progress_frame, length=400, mode='determinate')
self.progress_bar.grid(row=0, column=0, columnspan=2, pady=5)
self.progress_label = ttk.Label(progress_frame, text="待機中")
self.progress_label.grid(row=1, column=0, sticky=tk.W)
self.time_label = ttk.Label(progress_frame, text="")
self.time_label.grid(row=1, column=1, sticky=tk.E)
# ステータス表示
status_frame = ttk.LabelFrame(left_panel, text="ステータス", padding="5")
status_frame.grid(row=4, column=0, sticky=(tk.W, tk.E), pady=2)
self.status_label = ttk.Label(status_frame, text="待機中")
self.status_label.grid(row=0, column=0, sticky=tk.W)
self.device_label_widget = ttk.Label(status_frame, text="")
self.device_label_widget.grid(row=1, column=0, sticky=tk.W)
self.detection_count_label = ttk.Label(status_frame, text="検出顔数: -")
self.detection_count_label.grid(row=2, column=0, sticky=tk.W)
self.save_status_label = ttk.Label(status_frame, text="")
self.save_status_label.grid(row=3, column=0, sticky=tk.W)
# 右側:動画表示領域
video_frame = ttk.LabelFrame(main_frame, text="映像", padding="5")
video_frame.grid(row=0, column=1, sticky=(tk.N, tk.W), padx=5)
# 黒い初期画像を表示
black_image = np.zeros((VIDEO_DISPLAY_HEIGHT, VIDEO_DISPLAY_WIDTH, 3), dtype=np.uint8)
img = Image.fromarray(black_image)
imgtk = ImageTk.PhotoImage(image=img)
self.video_label = ttk.Label(video_frame, image=imgtk)
self.video_label.image = imgtk # 参照を保持
self.video_label.grid(row=0, column=0)
def select_output_file(self):
filename = filedialog.asksaveasfilename(
title="出力ファイル名を指定",
defaultextension=".mp4",
filetypes=[("MP4ファイル", "*.mp4"), ("AVIファイル", "*.avi")],
initialfile=self.output_video_path
)
if filename:
self.output_video_path = filename
# 表示用に短縮
display_name = filename if len(filename) <= 30 else "..." + filename[-27:]
self.output_label.config(text=display_name)
logger.info(f"出力ファイル設定: {filename}")
def on_model_change(self):
# モデル変更時にデフォルト閾値を更新
model_config = MODEL_CONFIG[self.model_var.get()]
self.score_threshold.set(model_config['default_threshold'])
self.threshold_label.config(text=f"{self.score_threshold.get():.2f}")
def on_threshold_change(self, value):
self.threshold_label.config(text=f"{float(value):.2f}")
def on_blur_change(self, value):
self.blur_label.config(text=f"{float(value):.1f}x")
def reset_parameters(self):
# デフォルト値にリセット
model_config = MODEL_CONFIG[self.model_var.get()]
self.score_threshold.set(model_config['default_threshold'])
self.blur_multiplier.set(1.0)
self.threshold_label.config(text=f"{self.score_threshold.get():.2f}")
self.blur_label.config(text=f"{self.blur_multiplier.get():.1f}x")
def detect_hardware(self):
try:
import onnxruntime as ort
providers = ort.get_available_providers()
if 'CUDAExecutionProvider' in providers:
self.ctx_id = 0
self.providers = ['CUDAExecutionProvider', 'CPUExecutionProvider']
self.device_label = 'CUDA'
elif 'DmlExecutionProvider' in providers:
self.ctx_id = -1
self.providers = ['DmlExecutionProvider', 'CPUExecutionProvider']
self.device_label = 'DirectML'
else:
self.ctx_id = -1
self.providers = ['CPUExecutionProvider']
self.device_label = 'CPU'
self.device_label_widget.config(text=f"実行デバイス: {self.device_label}")
logger.info(f"実行デバイス: {self.device_label}")
except Exception as e:
logger.error(f"ハードウェア検出エラー: {str(e)}\n{traceback.format_exc()}")
self.device_label_widget.config(text="実行デバイス: エラー")
def initialize_model(self):
try:
model_config = MODEL_CONFIG[self.selected_model]
self.status_label.config(text=f"モデル初期化中: {model_config['name']}")
logger.info(f"モデル初期化開始: {model_config['name']}")
# モデルダウンロード確認
model_dir = os.path.join(os.path.expanduser('~'), '.insightface', 'models',
model_config['name'])
if not os.path.exists(model_dir):
self.status_label.config(text=f"モデルダウンロード中: {model_config['name']} ({model_config['size']})")
logger.info(f"モデルダウンロード中: {model_config['name']}")
# 顔検出アプリケーション初期化
self.app = FaceAnalysis(name=model_config['name'], providers=self.providers)
self.app.prepare(ctx_id=self.ctx_id, det_size=model_config['det_size'])
self.status_label.config(text="モデル初期化完了")
logger.info("モデル初期化完了")
except Exception as e:
error_msg = f"モデル初期化エラー: {str(e)}"
logger.error(f"{error_msg}\n{traceback.format_exc()}")
self.status_label.config(text="モデル初期化失敗")
messagebox.showerror("エラー", error_msg)
def check_audio(self, video_path):
"""動画に音声トラックがあるかチェック"""
try:
# ffprobeを使って音声ストリームを確認
result = subprocess.run(
['ffprobe', '-v', 'error', '-select_streams', 'a:0',
'-show_entries', 'stream=codec_type', '-of', 'csv=p=0', video_path],
capture_output=True, text=True
)
return result.stdout.strip() == 'audio'
except:
# ffprobeが利用できない場合はFalseを返す
return False
def calculate_blur_kernel_size(self, ellipse_area):
# 楕円面積に基づいてカーネルサイズを計算(倍率適用)
normalized_area = (ellipse_area - MIN_FACE_AREA) / (MAX_FACE_AREA - MIN_FACE_AREA)
normalized_area = np.clip(normalized_area, 0, 1)
# 倍率を適用
multiplier = self.blur_multiplier.get()
min_blur = int(BASE_MIN_BLUR_SIZE * multiplier)
max_blur = int(BASE_MAX_BLUR_SIZE * multiplier)
# 最大値を制限(OpenCVの制限)
max_blur = min(max_blur, 255)
kernel_size = int(min_blur + normalized_area * (max_blur - min_blur))
# カーネルサイズは奇数である必要がある
if kernel_size % 2 == 0:
kernel_size += 1
return max(3, kernel_size) # 最小値は3
def apply_ellipse_blur(self, frame, bbox, draw_boxes=True):
# MBR(最小外接矩形)から楕円パラメータを計算
x1, y1, x2, y2 = bbox
center_x = (x1 + x2) // 2
center_y = (y1 + y2) // 2
width = x2 - x1
height = y2 - y1
# 楕円の軸長
axes = (width // 2, height // 2)
# 楕円面積計算
ellipse_area = np.pi * axes[0] * axes[1]
# ぼかし強度を決定
kernel_size = self.calculate_blur_kernel_size(ellipse_area)
# 楕円マスク作成
mask = np.zeros(frame.shape[:2], dtype=np.uint8)
cv2.ellipse(mask, (center_x, center_y), axes, 0, 0, 360, 255, -1)
# ぼかし処理
blurred = cv2.GaussianBlur(frame, (kernel_size, kernel_size), 0)
# マスクを使用してぼかし領域と元画像を合成
frame_copy = frame.copy()
frame_copy[mask > 0] = blurred[mask > 0]
# 表示用の場合のみ枠を描画
if draw_boxes:
# MBR表示(青い矩形)
cv2.rectangle(frame_copy, (x1, y1), (x2, y2), MBR_COLOR, 2)
# 楕円枠表示(黄色)
cv2.ellipse(frame_copy, (center_x, center_y), axes, 0, 0, 360, ELLIPSE_COLOR, 2)
return frame_copy
def process_frame(self, frame, draw_boxes=True):
try:
# 顔検出
faces = self.app.get(frame)
# 現在の閾値でフィルタリング
current_threshold = self.score_threshold.get()
faces = [face for face in faces if face.det_score >= current_threshold]
# 検出数を保存
self.last_face_count = len(faces)
# 各顔に対してぼかし処理
for face in faces:
bbox = face.bbox.astype(int)
frame = self.apply_ellipse_blur(frame, bbox, draw_boxes)
return frame
except Exception as e:
logger.error(f"フレーム処理エラー: {str(e)}\n{traceback.format_exc()}")
return frame
def update_progress(self, current, total):
"""進捗バーを更新"""
if total > 0:
progress = (current / total) * 100
self.progress_bar['value'] = progress
self.progress_label.config(text=f"{current}/{total} フレーム ({progress:.1f}%)")
# 残り時間の推定(簡易版)
if current > 0 and hasattr(self, 'start_time'):
elapsed = datetime.now() - self.start_time
total_time = elapsed * total / current
remaining = total_time - elapsed
self.time_label.config(text=f"残り時間: {str(remaining).split('.')[0]}")
def video_processing_thread(self):
try:
self.start_time = datetime.now()
fourcc = cv2.VideoWriter_fourcc(*'mp4v')
fps = self.cap.get(cv2.CAP_PROP_FPS) if self.cap else 30
# 総フレーム数を取得(動画ファイルの場合)
if self.source_var.get() != "camera":
self.total_frames = int(self.cap.get(cv2.CAP_PROP_FRAME_COUNT))
else:
self.total_frames = 0
# 最初のフレームを取得してサイズを確認
ret, first_frame = self.cap.read()
if not ret:
logger.error("最初のフレームの取得に失敗")
return
height, width = first_frame.shape[:2]
# 一時ファイルパスを生成
self.temp_video_path = tempfile.mktemp(suffix='.mp4')
self.video_writer = cv2.VideoWriter(self.temp_video_path, fourcc, fps, (width, height))
logger.info(f"処理開始 - 入力: {self.input_video_path or 'カメラ'}, 出力: {self.output_video_path}")
# 最初のフレームを処理
processed_frame_display = self.process_frame(first_frame, draw_boxes=self.show_boxes.get())
processed_frame_save = self.process_frame(first_frame, draw_boxes=False)
self.video_writer.write(processed_frame_save)
self.display_frame(processed_frame_display)
self.frame_count = 1
self.update_progress(self.frame_count, self.total_frames)
last_processed_frame_save = processed_frame_save
# カメラ入力の場合のみタイミング制御
is_camera = (self.source_var.get() == "camera")
if is_camera:
start_time = cv2.getTickCount() / cv2.getTickFrequency()
expected_frame_count = 1
while self.is_running and self.cap and self.cap.isOpened():
ret, frame = self.cap.read()
if not ret:
if not is_camera: # 動画ファイルの場合は終了
self.stop_processing()
break
# フレーム処理(表示用と保存用を別々に)
processed_frame_display = self.process_frame(frame, draw_boxes=self.show_boxes.get())
processed_frame_save = self.process_frame(frame, draw_boxes=False)
last_processed_frame_save = processed_frame_save
# GUI表示
self.display_frame(processed_frame_display)
if is_camera:
# カメラ入力時のみフレーム補完
current_time = cv2.getTickCount() / cv2.getTickFrequency()
elapsed_time = current_time - start_time
expected_frame_count = int(elapsed_time * fps) + 1
frames_to_write = expected_frame_count - self.frame_count
for _ in range(frames_to_write):
if self.video_writer:
self.video_writer.write(last_processed_frame_save)
self.frame_count += 1
else:
# 動画ファイル入力時は単純に書き込み
if self.video_writer:
self.video_writer.write(processed_frame_save)
self.frame_count += 1
self.status_label.config(text=f"処理中... フレーム: {self.frame_count}")
self.detection_count_label.config(text=f"検出顔数: {self.last_face_count}")
self.update_progress(self.frame_count, self.total_frames)
except Exception as e:
error_msg = f"動画処理エラー: {str(e)}"
logger.error(f"{error_msg}\n{traceback.format_exc()}")
self.root.after(0, lambda: messagebox.showerror("処理エラー", error_msg))
self.stop_processing()
def merge_audio_video(self):
"""音声トラックを保持して動画を結合"""
try:
if self.has_audio and self.input_video_path and shutil.which('ffmpeg'):
logger.info("音声トラックを結合中...")
self.status_label.config(text="音声トラックを結合中...")
# ffmpegで音声を結合
cmd = [
'ffmpeg', '-i', self.temp_video_path, '-i', self.input_video_path,
'-c:v', 'copy', '-c:a', 'copy', '-map', '0:v:0', '-map', '1:a:0',
'-y', self.output_video_path
]
result = subprocess.run(cmd, capture_output=True, text=True)
if result.returncode == 0:
logger.info("音声トラック結合完了")
os.remove(self.temp_video_path) # 一時ファイル削除
else:
logger.warning(f"音声結合失敗: {result.stderr}")
shutil.move(self.temp_video_path, self.output_video_path)
else:
# 音声なしまたはffmpeg未対応の場合
shutil.move(self.temp_video_path, self.output_video_path)
except Exception as e:
logger.error(f"音声結合エラー: {str(e)}")
if os.path.exists(self.temp_video_path):
shutil.move(self.temp_video_path, self.output_video_path)
def display_frame(self, frame):
if frame is None:
return
# フレームをリサイズ
height, width = frame.shape[:2]
aspect_ratio = width / height
# アスペクト比を保持しながらリサイズ
if aspect_ratio > VIDEO_DISPLAY_WIDTH / VIDEO_DISPLAY_HEIGHT:
new_width = VIDEO_DISPLAY_WIDTH
new_height = int(new_width / aspect_ratio)
else:
new_height = VIDEO_DISPLAY_HEIGHT
new_width = int(new_height * aspect_ratio)
resized = cv2.resize(frame, (new_width, new_height))
# BGRからRGBに変換
rgb_frame = cv2.cvtColor(resized, cv2.COLOR_BGR2RGB)
# PIL Imageに変換
img = Image.fromarray(rgb_frame)
imgtk = ImageTk.PhotoImage(image=img)
# ラベルに表示(参照を保持)
self.video_label.configure(image=imgtk)
self.video_label.image = imgtk
def start_processing(self):
try:
if self.is_running:
return
# モデル更新確認
if self.model_var.get() != self.selected_model:
self.selected_model = self.model_var.get()
self.initialize_model()
# 入力ソース設定
source = self.source_var.get()
self.input_video_path = None
self.has_audio = False
if source == "camera":
self.cap = cv2.VideoCapture(0, cv2.CAP_DSHOW)
if not self.cap.isOpened():
self.cap = cv2.VideoCapture(0)
self.cap.set(cv2.CAP_PROP_FRAME_WIDTH, CAMERA_WIDTH)
self.cap.set(cv2.CAP_PROP_FRAME_HEIGHT, CAMERA_HEIGHT)
self.cap.set(cv2.CAP_PROP_FPS, FPS)
logger.info("カメラ入力を開始")
elif source == "file":
filename = filedialog.askopenfilename(
title="動画ファイルを選択",
filetypes=[("動画ファイル", "*.mp4 *.avi *.mov *.mkv")]
)
if not filename:
return
self.input_video_path = filename
self.cap = cv2.VideoCapture(filename)
self.has_audio = self.check_audio(filename)
logger.info(f"動画ファイル入力: {filename}, 音声: {self.has_audio}")
else: # sample
if not os.path.exists(SAMPLE_VIDEO_NAME):
self.status_label.config(text="サンプル動画ダウンロード中...")
urllib.request.urlretrieve(SAMPLE_VIDEO_URL, SAMPLE_VIDEO_NAME)
self.input_video_path = SAMPLE_VIDEO_NAME
self.cap = cv2.VideoCapture(SAMPLE_VIDEO_NAME)
self.has_audio = self.check_audio(SAMPLE_VIDEO_NAME)
logger.info(f"サンプル動画入力, 音声: {self.has_audio}")
if not self.cap or not self.cap.isOpened():
error_msg = "入力ソースを開けませんでした"
self.status_label.config(text=f"エラー: {error_msg}")
logger.error(error_msg)
return
self.is_running = True
self.frame_count = 0
self.save_status_label.config(text="")
self.start_button.config(state=tk.DISABLED)
self.stop_button.config(state=tk.NORMAL)
self.progress_bar['value'] = 0
# 処理スレッド開始
self.processing_thread = threading.Thread(target=self.video_processing_thread)
self.processing_thread.daemon = True
self.processing_thread.start()
except Exception as e:
error_msg = f"処理開始エラー: {str(e)}"
logger.error(f"{error_msg}\n{traceback.format_exc()}")
messagebox.showerror("エラー", error_msg)
def stop_processing(self):
try:
self.is_running = False
if self.video_writer:
self.video_writer.release()
self.video_writer = None
# 音声トラックを結合
self.merge_audio_video()
logger.info(f"動画を保存しました: {self.output_video_path}")
print(f"動画を保存しました: {self.output_video_path}")
self.save_status_label.config(text=f"保存完了: {os.path.basename(self.output_video_path)}")
if self.cap:
self.cap.release()
self.cap = None
self.start_button.config(state=tk.NORMAL)
self.stop_button.config(state=tk.DISABLED)
self.status_label.config(text=f"停止 - 処理フレーム数: {self.frame_count}")
self.detection_count_label.config(text="検出顔数: -")
self.progress_bar['value'] = 100 if self.frame_count > 0 else 0
except Exception as e:
error_msg = f"処理停止エラー: {str(e)}"
logger.error(f"{error_msg}\n{traceback.format_exc()}")
def on_closing(self):
try:
if self.is_running:
self.stop_processing()
logger.info("アプリケーション終了")
self.root.destroy()
except Exception as e:
logger.error(f"終了処理エラー: {str(e)}")
self.root.destroy()
def main():
try:
root = tk.Tk()
app = FacePrivacyApp(root)
root.protocol("WM_DELETE_WINDOW", app.on_closing)
root.mainloop()
except Exception as e:
logger.critical(f"致命的エラー: {str(e)}\n{traceback.format_exc()}")
messagebox.showerror("致命的エラー", f"アプリケーションの起動に失敗しました:\n{str(e)}")
if __name__ == "__main__":
main()