RT-DETRv2による人物(person)検出・ByteTrackによる追跡とTTAの機能付き(ソースコードと説明と利用ガイド)
1. プログラム利用ガイド
1.1 このプログラムの利用シーン
動画内の人物(person)をリアルタイムで検出するためのプログラムである。監視カメラ映像の解析、人流計測、スポーツ映像の分析など、人物(person)の位置と動きを把握する必要がある場面で使用できる。
1.2 主な機能
- person検出専用の物体検出機能
- ByteTrack追跡: 遮蔽された人物(person)も追跡を継続し、ID管理が安定する。
- CLAHE前処理による低照度環境での検出精度向上
- TTA(Test Time Augmentation)による検出精度の向上
- リアルタイムプレビュー表示
- 検出結果のファイル保存
- 3種類のバックボーンモデルの選択機能
1.3 基本的な使い方
- プログラムを起動すると、モデル選択画面が表示される。1(ResNet-50D)、2(ResNet-101D)、3(HGNetv2-L)から選択する。
- 入力ソースを選択する。0(動画ファイル)、1(カメラ)、2(サンプル動画)から選択する。
- 処理が開始され、検出結果がリアルタイムで画面に表示される。
- キーボードのqキーを押すとプログラムが終了し、結果がresult.txtに保存される。
1.4 バックボーンモデルの選択
本プログラムでは3種類のバックボーンモデルから選択できる。それぞれの特徴と選択基準は以下の通りである。
- ResNet-50D(推奨): 最も軽量で高速。リアルタイム処理を重視する場合や、GPU性能が限られている環境に適している。一般的な用途ではこちらを推奨する。
- ResNet-101D: ResNet-50Dより高精度だが、処理速度はやや遅くなる。検出精度を重視し、ある程度の処理時間を許容できる場合に選択する。
- HGNetv2-L: 最も高精度だが、処理負荷も最大。高性能GPUを使用でき、最高の検出精度が必要な場合に選択する。リアルタイム性は犠牲になる可能性がある。
1.5 便利な機能
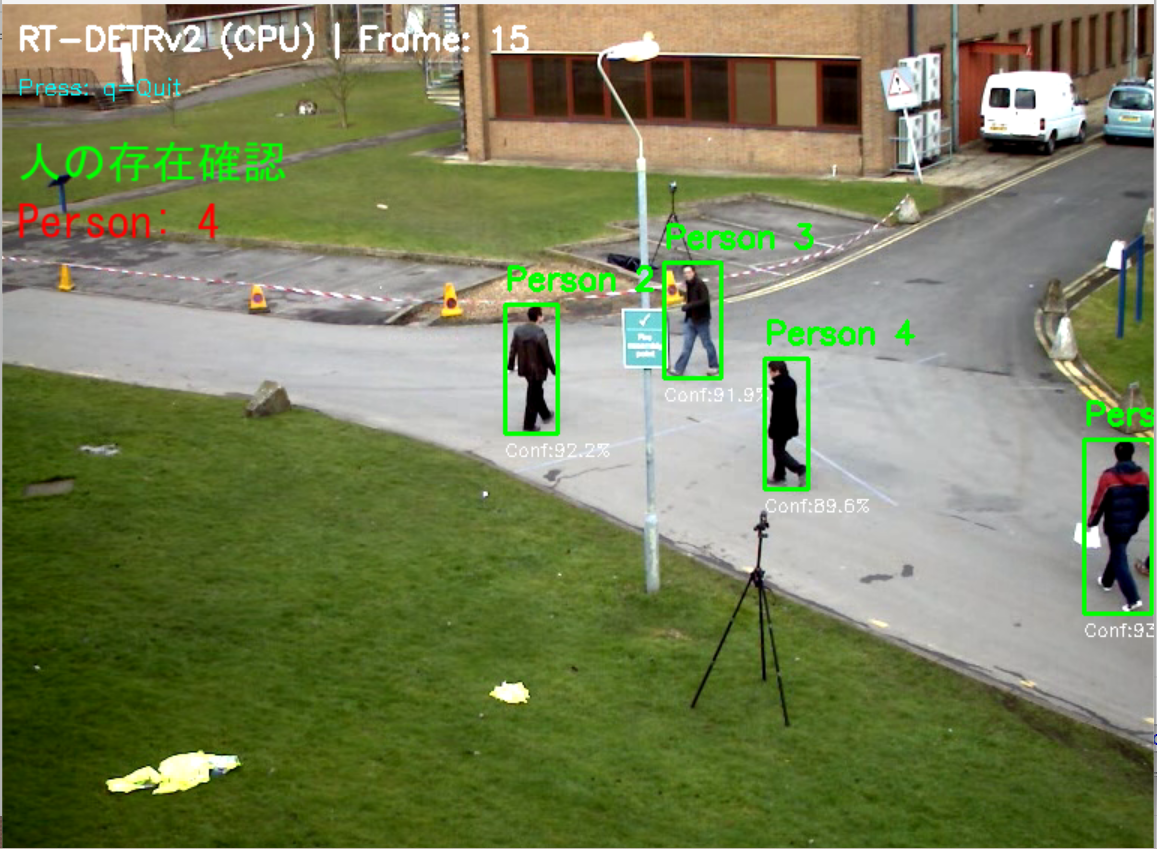
- 検出された人物(person)には緑色のバウンディングボックスとトラッキングIDが表示される。
- 画面上部に検出数、フレーム数、TTA状態、ByteTrack状態が表示される。
- 終了時にresult.txtファイルに検出統計情報と各フレームの検出結果が保存される。
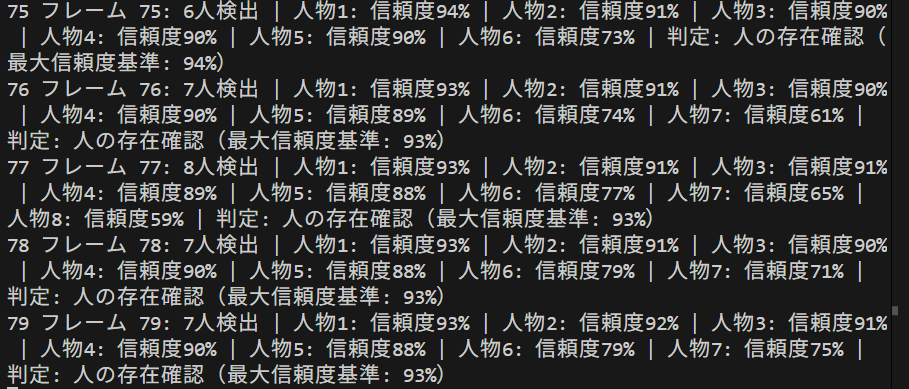
1.6 result.txtの出力形式
プログラム終了時に保存されるresult.txtファイルには、以下の形式で検出結果が記録される。
=== 検出統計 ===
総フレーム数: 450
総検出数: 1,234
平均検出数/フレーム: 2.74
最大検出数: 8
最小検出数: 0

=== フレーム別検出結果 ===
フレーム 1: 検出数 3
  ID:1 - 信頼度:0.95 - 座標:[120, 80, 250, 380]
  ID:2 - 信頼度:0.88 - 座標:[300, 100, 420, 400]
  ID:3 - 信頼度:0.76 - 座標:[500, 150, 600, 420]

フレーム 2: 検出数 3
  ID:1 - 信頼度:0.94 - 座標:[125, 82, 255, 385]
  ID:2 - 信頼度:0.89 - 座標:[305, 102, 425, 405]
  ID:3 - 信頼度:0.77 - 座標:[505, 152, 605, 425]
...
Python開発環境,ライブラリ類
ここでは、最低限の事前準備について説明する。機械学習や深層学習を行う場合は、NVIDIA CUDA、Visual Studio、Cursorなどを追加でインストールすると便利である。これらについては別ページ https://www.kkaneko.jp/cc/dev/aiassist.htmlで詳しく解説しているので、必要に応じて参照してください。
Python 3.12 のインストール(Windows 上) [クリックして展開]
以下のいずれかの方法で Python 3.12 をインストールする。Python がインストール済みの場合、この手順は不要である。
方法1:winget によるインストール
管理者権限のコマンドプロンプトで以下を実行する。管理者権限のコマンドプロンプトを起動するには、Windows キーまたはスタートメニューから「cmd」と入力し、表示された「コマンドプロンプト」を右クリックして「管理者として実行」を選択する。
winget install --id Python.Python.3.12 -e --scope machine --silent --accept-source-agreements --accept-package-agreements --override "/quiet InstallAllUsers=1 PrependPath=1 Include_test=0 Include_pip=1 Include_launcher=1 InstallLauncherAllUsers=1 TargetDir=\"C:\Program Files\Python312\""
powershell -Command "$p='C:\Program Files\Python312'; $s=\"$p\Scripts\"; $m=[Environment]::GetEnvironmentVariable('Path','Machine'); if($m -notlike \"*$s*\") { [Environment]::SetEnvironmentVariable('Path', \"$p;$s;$m\", 'Machine') }"
--scope machine を指定することで、システム全体(全ユーザー向け)にインストールされる。このオプションの実行には管理者権限が必要である。インストール完了後、コマンドプロンプトを再起動すると PATH が自動的に設定される。
方法2:インストーラーによるインストール
- Python 公式サイト(https://www.python.org/downloads/)にアクセスし、「Download Python 3.x.x」ボタンから Windows 用インストーラーをダウンロードする。
- ダウンロードしたインストーラーを実行する。
- 初期画面の下部に表示される「Add python.exe to PATH」に必ずチェックを入れてから「Customize installation」を選択する。このチェックを入れ忘れると、コマンドプロンプトから
pythonコマンドを実行できない。 - 「Install Python 3.xx for all users」にチェックを入れ、「Install」をクリックする。
インストールの確認
コマンドプロンプトで以下を実行する。
python --versionバージョン番号(例:Python 3.12.x)が表示されればインストール成功である。「'python' は、内部コマンドまたは外部コマンドとして認識されていません。」と表示される場合は、インストールが正常に完了していない。
AIエディタ Windsurf のインストール(Windows 上) [クリックして展開]
Pythonプログラムの編集・実行には、AIエディタの利用を推奨する。ここでは、Windsurfのインストールを説明する。Windsurf がインストール済みの場合、この手順は不要である。
管理者権限のコマンドプロンプトで以下を実行する。管理者権限のコマンドプロンプトを起動するには、Windows キーまたはスタートメニューから「cmd」と入力し、表示された「コマンドプロンプト」を右クリックして「管理者として実行」を選択する。
winget install --scope machine --id Codeium.Windsurf -e --silent --disable-interactivity --force --accept-source-agreements --accept-package-agreements --custom "/SP- /SUPPRESSMSGBOXES /NORESTART /CLOSEAPPLICATIONS /DIR=""C:\Program Files\Windsurf"" /MERGETASKS=!runcode,addtopath,associatewithfiles,!desktopicon"
powershell -Command "$env:Path=[System.Environment]::GetEnvironmentVariable('Path','Machine')+';'+[System.Environment]::GetEnvironmentVariable('Path','User'); windsurf --install-extension MS-CEINTL.vscode-language-pack-ja --force; windsurf --install-extension ms-python.python --force; windsurf --install-extension Codeium.windsurfPyright --force"
--scope machine を指定することで、システム全体(全ユーザー向け)にインストールされる。このオプションの実行には管理者権限が必要である。インストール完了後、コマンドプロンプトを再起動すると PATH が自動的に設定される。
【関連する外部ページ】
Windsurf の公式ページ: https://windsurf.com/
必要なライブラリをシステム領域にインストール
管理者権限のコマンドプロンプトで以下を実行する。管理者権限のコマンドプロンプトを起動するには、Windows キーまたはスタートメニューから「cmd」と入力し、表示された「コマンドプロンプト」を右クリックして「管理者として実行」を選択する。
REM PyTorch をインストール(GPU対応版)
set "CUDA_TAG=cu128"
set "PYTHON_PATH=C:\Program Files\Python312"
"%PYTHON_PATH%\Scripts\pip" install --no-user -U numpy torch torchvision torchaudio --index-url https://download.pytorch.org/whl/%CUDA_TAG%
pip install transformers opencv-python numpy pillow boxmot
3. RT-DETRv2による人物(person)検出プログラム・ByteTrackによる追跡とTTAの機能付き
3.1 概要
このプログラムは、RT-DETRv2を用いて動画からpersonカテゴリのみを検出する。CLAHE(Contrast Limited Adaptive Histogram Equalization)による前処理、TTA(Test Time Augmentation)による精度向上、ByteTrackによる物体追跡を組み合わせ、リアルタイム処理を実現する。
3.2 主要技術
RT-DETRv2 (Real-Time Detection Transformer version 2)
2024年にLvらが発表したTransformerベースの物体検出モデルである[1]。選択的マルチスケール特徴抽出とBag-of-Freebiesと呼ばれる手法により、速度を維持しながら検出精度を向上させる。deformable attentionモジュールを用いてスケールごとに異なるサンプリング点数を設定することで、柔軟な特徴抽出を実現する。
ByteTrack
2022年にZhangらが発表した多物体追跡アルゴリズムである[2]。カルマンフィルタによる動き予測とハンガリアンアルゴリズムによるデータアソシエーションを組み合わせる。低信頼度の検出結果も活用することで、追跡の頑健性を向上させる。
3.3 技術的特徴
- CLAHE前処理
YUV色空間の輝度チャンネルに対してCLAHEを適用する[3]。CLAHEは画像を小領域(タイル)に分割し、各タイルで局所的にコントラストを調整する適応的ヒストグラム均等化手法である。ヒストグラムのクリッピングにより、均一領域でのノイズ増幅を抑制する。
- TTA(Test Time Augmentation)
推論時に複数の画像変換を適用し、結果を統合する手法である[4]。本プログラムでは水平反転を用いた2つの推論結果に対してNMS(Non-Maximum Suppression)を適用し、最終的な検出結果を得る。
- person検出専用フィルタリング
RT-DETRv2の推論結果から、COCOデータセットのクラスID 0(person)のみを抽出する。TTA処理においても両方の推論結果に対してフィルタリングを実施する。
- GPU/CPU自動選択
PyTorchの機能を用いて、利用可能なハードウェアを自動検出し、処理を実行する。
3.4 実装の特色
3種類のバックボーン(ResNet-50D、ResNet-101D、HGNetv2-L)から選択可能な構成である。動画ファイル、カメラ、サンプル動画の3つの入力ソースに対応する。ByteTrackによるトラッキングIDの管理と表示機能を備え、処理結果をリアルタイムで画面表示するとともに、ファイルに保存する。
3.5 参考文献
[1] Lv, W., Zhao, Y., Chang, Q., Huang, K., Wang, G., & Liu, Y. (2024). RT-DETRv2: Improved Baseline with Bag-of-Freebies for Real-Time Detection Transformer. arXiv preprint arXiv:2407.17140. https://arxiv.org/abs/2407.17140
[2] Zhang, Y., Sun, P., Jiang, Y., Yu, D., Weng, F., Yuan, Z., Luo, P., Liu, W., & Wang, X. (2022). ByteTrack: Multi-Object Tracking by Associating Every Detection Box. In Computer Vision – ECCV 2022. https://arxiv.org/abs/2110.06864
[3] Zuiderveld, K. (1994). Contrast Limited Adaptive Histogram Equalization. In P. Heckbert (Ed.), Graphics Gems IV (pp. 474-485). Academic Press.
[4] Shanmugam, D., Blalock, D., Balakrishnan, G., & Guttag, J. (2020). Better Aggregation in Test-Time Augmentation. 2021 IEEE/CVF International Conference on Computer Vision (ICCV).
ソースコード
"""
プログラム名: RT-DETRv2による人物検出プログラム・ByteTrackによる追跡とTTAの機能付き
特徴技術名: RT-DETRv2 (Real-Time Detection Transformer version 2)
出典: W. Lv, Y. Zhao, Q. Chang, K. Huang, G. Wang, and Y. Liu, "RT-DETRv2: Improved Baseline with Bag-of-Freebies for Real-Time Detection Transformer," arXiv preprint arXiv:2407.17140, 2024.
特徴機能: Bag-of-Freebiesによる改良ベースラインと選択的マルチスケール特徴抽出による物体検出
学習済みモデル: PekingU/rtdetr_v2_r50vd/r101vd/hgnetv2_l(Hugging Face Transformers)、COCOデータセットで事前学習済み
特徴技術および学習済モデルの利用制限: Apache 2.0ライセンス(Hugging Face Transformers)。学術研究および商用利用が可能。ただし、利用者自身で最新の利用規約を確認すること。
方式設計:
  関連利用技術:
    - PyTorch: ディープラーニングフレームワーク、GPU/CPU自動選択
    - Transformers: Hugging Face Transformersライブラリ
    - OpenCV: 画像・動画処理、カメラ制御
    - CLAHE (Contrast Limited Adaptive Histogram Equalization): 低照度環境での画像品質向上
    - ByteTrack: カルマンフィルタとハンガリアンアルゴリズムによる物体追跡(boxmotパッケージ版)
    - TTA (Test Time Augmentation): 複数の画像変換で推論し結果を統合
  入力と出力: 入力: 動画(ユーザは「0:動画ファイル,1:カメラ,2:サンプル動画」のメニューで選択.0:動画ファイルの場合はtkinterでファイル選択.1の場合はOpenCVでカメラが開く.2の場合はhttps://raw.githubusercontent.com/opencv/opencv/master/samples/data/vtest.aviを使用)、出力: OpenCV画面でリアルタイム表示、検出結果をresult.txtに保存
  処理手順: 1.動画フレーム取得→2.CLAHE前処理→3.TTA適用→4.RT-DETRv2推論実行→5.バウンディングボックス抽出(personのみ)→6.ByteTrack追跡→7.結果描画
  前処理、後処理: 前処理:CLAHE適用による画像コントラスト強化、後処理:post_process_object_detection()による結果整形、ByteTrack追跡による検出結果の安定化とID管理
  追加処理: TTA - 水平反転による推論結果の統合
  調整を必要とする設定値: CONF_THRESH(信頼度閾値、デフォルト0.25)- 検出感度を制御、値が低いほど多くの物体を検出、TTA_ENABLED(TTAの有効/無効)、USE_TRACKER(ByteTrackの有効/無効)
将来方策: 信頼度閾値の自動最適化 - 検出結果の時系列分析により、シーンごとに最適な閾値を動的に学習・適用する機能
その他の重要事項: person検出専用、Windows環境での動作を想定(フォントはC:/Windows/Fonts/meiryo.ttc を使用)
前準備:
pip install transformers opencv-python numpy pillow boxmot
"""
import cv2
import numpy as np
import torch
import torchvision
from transformers import RTDetrV2ForObjectDetection, AutoImageProcessor
import tkinter as tk
from tkinter import filedialog
import urllib.request
import time
import sys
import io
from datetime import datetime
from PIL import Image, ImageDraw, ImageFont
from boxmot import ByteTrack
import warnings
import threading

warnings.filterwarnings('ignore')

# Windows文字エンコーディング設定
sys.stdout = io.TextIOWrapper(sys.stdout.buffer, encoding='utf-8', line_buffering=True)

# GPU/CPU自動選択
device = torch.device('cuda' if torch.cuda.is_available() else 'cpu')
print(f'デバイス: {str(device)}')

# GPU使用時の最適化
if device.type == 'cuda':
    torch.backends.cudnn.benchmark = True

# モデル情報の構造化
MODEL_INFO = {
    '1': {
        'name': 'PekingU/rtdetr_v2_r50vd',
        'desc': 'ResNet-50D backbone(速度と精度のバランス)',
        'backbone': 'ResNet-50D'
    },
    '2': {
        'name': 'PekingU/rtdetr_v2_r101vd',
        'desc': 'ResNet-101D backbone(精度重視)',
        'backbone': 'ResNet-101D'
    },
    '3': {
        'name': 'PekingU/rtdetr_v2_hgnetv2_l',
        'desc': 'HGNetv2-L backbone(最高精度)',
        'backbone': 'HGNetv2-L'
    }
}

# 調整可能な設定値
CONF_THRESH = 0.25      # 信頼度閾値 - 検出感度制御
NMS_THRESHOLD = 0.6     # TTA用のNMS閾値(独立管理)
CLAHE_CLIP_LIMIT = 3.0  # CLAHE制限値
CLAHE_TILE_SIZE = (8, 8)  # CLAHEタイルサイズ
WINDOW_NAME = "RT-DETRv2 COCO Detection"  # OpenCVウィンドウ名
TTA_ENABLED = False     # TTA(Test Time Augmentation)の有効/無効(デフォルト)
TTA_CONF_BOOST = 0.03   # TTA使用時の信頼度ブースト値
USE_TRACKER = False     # トラッカーの使用有無(デフォルト)

# CLAHEオブジェクトをグローバルスコープで一度だけ定義(AIモデルの入力用にCLAHEを適用)
clahe = cv2.createCLAHE(clipLimit=CLAHE_CLIP_LIMIT, tileGridSize=CLAHE_TILE_SIZE)

# ByteTrackトラッカーを初期化(後で設定に応じて初期化)
tracker = None

# BGR→RGB色変換のヘルパー関数
def bgr_to_rgb(color_bgr):
    """BGRカラーをRGBカラーに変換"""
    return (color_bgr[2], color_bgr[1], color_bgr[0])

# IDから色を生成する関数
def get_color_from_id(track_id):
    """IDをハッシュ化してHSV色空間の色を生成(視認性重視)"""
    hue = int((track_id * 37) % 180)
    hsv = np.uint8([[[hue, 255, 255]]])
    bgr = cv2.cvtColor(hsv, cv2.COLOR_HSV2BGR)[0][0]
    return (int(bgr[0]), int(bgr[1]), int(bgr[2]))

# person用の色
PERSON_COLOR = (0, 255, 0)

# 日本語フォント設定
FONT_PATH = 'C:/Windows/Fonts/meiryo.ttc'
FONT_SIZE_MAIN = 16
font_main = ImageFont.truetype(FONT_PATH, FONT_SIZE_MAIN)

# グローバル変数
frame_count = 0
results_log = []
person_count = 0
model = None
processor = None
id2label = {}


class ThreadedVideoCapture:
    """スレッド化されたVideoCapture(常に最新フレームを取得)"""
    def __init__(self, src, is_camera=False):
        if is_camera:
            self.cap = cv2.VideoCapture(src, cv2.CAP_DSHOW)
            fourcc = cv2.VideoWriter_fourcc('M', 'J', 'P', 'G')
            self.cap.set(cv2.CAP_PROP_FOURCC, fourcc)
            self.cap.set(cv2.CAP_PROP_FPS, 60)
        else:
            self.cap = cv2.VideoCapture(src)

        self.grabbed, self.frame = self.cap.read()
        self.stopped = False
        self.lock = threading.Lock()
        self.thread = threading.Thread(target=self.update, args=())
        self.thread.daemon = True
        self.thread.start()

    def update(self):
        """バックグラウンドでフレームを取得し続ける"""
        while not self.stopped:
            grabbed, frame = self.cap.read()
            with self.lock:
                self.grabbed = grabbed
                if grabbed:
                    self.frame = frame

    def read(self):
        """最新フレームを返す"""
        with self.lock:
            return self.grabbed, self.frame.copy() if self.grabbed else None

    def isOpened(self):
        return self.cap.isOpened()

    def get(self, prop):
        return self.cap.get(prop)

    def release(self):
        self.stopped = True
        self.thread.join()
        self.cap.release()


def display_program_header():
    print('=' * 60)
    print('=== RT-DETRv2オブジェクト検出プログラム ===')
    print('=' * 60)
    print('概要: CLAHEとTTAを適用し、リアルタイムでオブジェクトを検出します')
    print('機能: RT-DETRv2による物体検出(person検出専用)')
    print('技術: CLAHE (コントラスト強化) + ByteTrack による追跡 + TTA (Test Time Augmentation) + Transformers + RT-DETRv2')
    print('操作: qキーで終了')
    print('出力: 各フレームごとに処理結果を表示し、終了時にresult.txtへ保存')
    print()


# ===== 共通処理関数 =====
def prepare_image_inputs(image_bgr):
    """画像をPIL形式に変換し、processor処理を行い、デバイスに移動する共通処理"""
    img_pil = Image.fromarray(cv2.cvtColor(image_bgr, cv2.COLOR_BGR2RGB))
    inputs = processor(images=img_pil, return_tensors='pt')
    for k in inputs:
        if isinstance(inputs[k], torch.Tensor):
            inputs[k] = inputs[k].to(device)
    return inputs


# ===== TTA機能 =====
def apply_tta_inference(frame, model, processor, id2label, conf_thresh):
    """Test Time Augmentation (TTA)を適用した推論"""
    frame_width = frame.shape[1]

    # 元画像の推論
    inputs = prepare_image_inputs(frame)

    with torch.no_grad():
        outputs = model(**inputs)

    target_sizes = torch.tensor([frame.shape[:2]], device=device)
    results_orig = processor.post_process_object_detection(
        outputs,
        target_sizes=target_sizes,
        threshold=conf_thresh
    )[0]

    # 水平反転画像の推論
    flipped_frame = cv2.flip(frame, 1)
    inputs_flipped = prepare_image_inputs(flipped_frame)

    with torch.no_grad():
        outputs_flipped = model(**inputs_flipped)

    results_flipped = processor.post_process_object_detection(
        outputs_flipped,
        target_sizes=target_sizes,
        threshold=conf_thresh
    )[0]

    # 結果を結合(personのみ)
    all_boxes = []
    all_confs = []
    all_labels = []

    # 元画像の結果
    if len(results_orig['scores']) > 0:
        person_mask = results_orig['labels'] == 0
        if person_mask.any():
            all_boxes.append(results_orig['boxes'][person_mask])
            all_confs.append(results_orig['scores'][person_mask])
            all_labels.append(results_orig['labels'][person_mask])

    # 反転画像の結果(座標を元に戻す)
    if len(results_flipped['scores']) > 0:
        person_mask = results_flipped['labels'] == 0
        if person_mask.any():
            boxes_flipped = results_flipped['boxes'][person_mask].clone()
            if boxes_flipped.shape[0] > 0:
                # x1 < x2の関係を保つための修正
                x1_flipped = boxes_flipped[:, 0].clone()
                x2_flipped = boxes_flipped[:, 2].clone()
                boxes_flipped[:, 0] = frame_width - 1 - x2_flipped  # 新しいx1(左端)
                boxes_flipped[:, 2] = frame_width - 1 - x1_flipped  # 新しいx2(右端)

            all_boxes.append(boxes_flipped)
            all_confs.append(results_flipped['scores'][person_mask])
            all_labels.append(results_flipped['labels'][person_mask])

    if len(all_boxes) == 0:
        return []

    # 全ての結果を結合
    all_boxes = torch.cat(all_boxes, dim=0)
    all_confs = torch.cat(all_confs, dim=0)
    all_labels = torch.cat(all_labels, dim=0)

    # 信頼度閾値でフィルタリング(NMS前に実施)
    valid_indices = all_confs > conf_thresh
    if valid_indices.sum() > 0:
        all_boxes = all_boxes[valid_indices]
        all_confs = all_confs[valid_indices]
        all_labels = all_labels[valid_indices]

        # NMSを適用
        nms_indices = torchvision.ops.nms(all_boxes, all_confs, iou_threshold=NMS_THRESHOLD)
        final_boxes = all_boxes[nms_indices].cpu().numpy()
        final_confs = all_confs[nms_indices].cpu().numpy()
        final_labels = all_labels[nms_indices].cpu().numpy()

        # 結果をリスト形式に変換
        detections = []
        for i in range(len(final_confs)):
            conf_boost = TTA_CONF_BOOST if TTA_ENABLED else 0
            x1, y1, x2, y2 = map(int, final_boxes[i])
            cls = int(final_labels[i])
            name = id2label.get(cls, str(cls))
            detections.append({
                'x1': x1, 'y1': y1,
                'x2': x2, 'y2': y2,
                'conf': min(1.0, final_confs[i] + conf_boost),
                'class': cls,
                'name': name
            })

        return detections

    return []


def normal_inference(frame, model, processor, id2label, conf_thresh):
    """通常の推論処理"""
    inputs = prepare_image_inputs(frame)

    with torch.no_grad():
        outputs = model(**inputs)

    target_sizes = torch.tensor([frame.shape[:2]], device=device)
    results = processor.post_process_object_detection(
        outputs,
        target_sizes=target_sizes,
        threshold=conf_thresh
    )[0]

    curr_dets = []
    if len(results['scores']) > 0:
        scores = results['scores'].cpu().numpy()
        labels = results['labels'].cpu().numpy()
        boxes = results['boxes'].cpu().numpy()

        order = np.argsort(scores)[::-1]
        for i in order:
            cls = int(labels[i])
            if cls != 0:
                continue
            x1, y1, x2, y2 = map(int, boxes[i])
            conf_score = float(scores[i])
            name = id2label.get(cls, str(cls))
            curr_dets.append({
                'x1': x1, 'y1': y1,
                'x2': x2, 'y2': y2,
                'conf': conf_score,
                'class': cls,
                'name': name
            })

    return curr_dets


def apply_tta_if_enabled(frame, model, processor, id2label, conf_thresh):
    """TTA機能を条件付きで適用"""
    if not TTA_ENABLED:
        return normal_inference(frame, model, processor, id2label, conf_thresh)
    return apply_tta_inference(frame, model, processor, id2label, conf_thresh)


# ===== トラッキング機能 =====
def apply_bytetrack(detections, frame):
    """ByteTrackerを使用したトラッキング処理"""
    global tracker

    if len(detections) > 0:
        dets_array = np.array([[d['x1'], d['y1'], d['x2'], d['y2'], d['conf'], d['class']]
                               for d in detections])
    else:
        dets_array = np.empty((0, 6))

    tracks = tracker.update(dets_array, frame)

    tracked_dets = []
    if len(tracks) > 0:
        for track in tracks:
            if len(track) >= 7:
                x1, y1, x2, y2, track_id, conf, cls = track[:7]
                name = id2label.get(int(cls), str(int(cls)))
                tracked_dets.append({
                    'x1': int(x1), 'y1': int(y1),
                    'x2': int(x2), 'y2': int(y2),
                    'track_id': int(track_id),
                    'conf': float(conf),
                    'class': int(cls),
                    'name': name
                })
    return tracked_dets


def apply_tracking_if_enabled(detections, frame):
    """トラッキング機能を条件付きで適用"""
    if not USE_TRACKER:
        return detections
    return apply_bytetrack(detections, frame)


# ===== 物体検出タスク固有の処理 =====
def draw_detection_results(frame, detections):
    """物体検出の描画処理"""
    # バウンディングボックスを描画(OpenCVで)
    for det in detections:
        # トラッキング有効時はIDに基づく色、無効時は緑色を使用
        if USE_TRACKER:
            box_color = get_color_from_id(det['track_id'])
        else:
            box_color = PERSON_COLOR

        cv2.rectangle(frame, (det['x1'], det['y1']),
                      (det['x2'], det['y2']), box_color, 2)

    # 構造化されたテキスト描画を実行
    texts_to_draw = []
    for det in detections:
        track_id = det.get('track_id', 0) if USE_TRACKER else 0
        if USE_TRACKER and track_id > 0:
            label = f"ID:{track_id} 人: {det['conf']:.2f}"
        else:
            label = f"人: {det['conf']:.2f}"

        texts_to_draw.append({
            'text': label,
            'org': (det['x1'], det['y1']-20),
            'color': bgr_to_rgb(PERSON_COLOR),
            'font_type': 'main'
        })
    frame = draw_texts_with_pillow(frame, texts_to_draw)

    # 統計情報を描画
    tta_status = "TTA:ON" if TTA_ENABLED else "TTA:OFF"
    tracker_status = "ByteTrack:ON" if USE_TRACKER else "ByteTrack:OFF"
    info_text = f"Objects: {len(detections)} | Frame: {frame_count} | Classes: {len(set(d['name'] for d in detections)) if detections else 0} | {tta_status} | {tracker_status}"
    cv2.putText(frame, info_text, (10, 30),
                cv2.FONT_HERSHEY_SIMPLEX, 0.7, (255, 255, 255), 2)

    return frame


def format_detection_output(detections):
    """物体検出の出力フォーマット"""
    if len(detections) == 0:
        return 'count=0'
    else:
        parts = []
        for det in detections:
            x1, y1, x2, y2 = det['x1'], det['y1'], det['x2'], det['y2']
            class_name = det['name']
            conf = det['conf']
            parts.append(f'class={class_name},conf={conf:.3f},box=[{x1},{y1},{x2},{y2}]')
        return f'count={len(detections)}; ' + ' | '.join(parts)


# ===== 共通処理関数 =====
def draw_texts_with_pillow(bgr_frame, texts):
    """テキスト描画, texts: list of dict with keys {text, org, color, font_type}"""
    img_pil = Image.fromarray(cv2.cvtColor(bgr_frame, cv2.COLOR_BGR2RGB))
    draw = ImageDraw.Draw(img_pil)

    for item in texts:
        text = item['text']
        x, y = item['org']
        color = item['color']  # RGB
        draw.text((x, y), text, font=font_main, fill=color)

    return cv2.cvtColor(np.array(img_pil), cv2.COLOR_RGB2BGR)


def detect_objects(frame):
    """共通の検出処理(CLAHE、推論、検出を実行)"""
    global model, processor, id2label

    # AIモデルの入力用にCLAHEを適用(YUV色空間で輝度チャンネルのみ処理)
    yuv_frame = cv2.cvtColor(frame, cv2.COLOR_BGR2YUV)
    yuv_frame[:, :, 0] = clahe.apply(yuv_frame[:, :, 0])
    enh_frame = cv2.cvtColor(yuv_frame, cv2.COLOR_YUV2BGR)

    # TTA機能を条件付きで適用
    curr_dets = apply_tta_if_enabled(enh_frame, model, processor, id2label, CONF_THRESH)

    return curr_dets


def process_video_frame(frame):
    """動画用ラッパー"""
    # 共通の検出処理
    detections = detect_objects(frame)

    # トラッキングを条件付きで適用
    tracked_dets = apply_tracking_if_enabled(detections, frame)

    # person検出数を更新
    global person_count
    person_count += len(tracked_dets)

    # 物体検出固有の描画処理
    frame = draw_detection_results(frame, tracked_dets)

    # 物体検出固有の出力フォーマット
    result = format_detection_output(tracked_dets)

    return frame, result


def video_frame_processing(frame, timestamp_ms, is_camera):
    """動画フレーム処理(標準形式)"""
    global frame_count
    current_time = time.time()
    frame_count += 1

    processed_frame, result = process_video_frame(frame)
    return processed_frame, result, current_time


# プログラムヘッダー表示
display_program_header()

# モデル選択(対話的実装)
print("\n=== RT-DETRv2モデル選択 ===")
print('使用するRT-DETRv2モデルを選択してください:')
for key, info in MODEL_INFO.items():
    print(f'{key}: {info["name"]} ({info["desc"]})')
print()

model_choice = ''
while model_choice not in MODEL_INFO.keys():
    model_choice = input("選択 (1/2/3) [デフォルト: 1]: ").strip()
    if model_choice == '':
        model_choice = '1'
        break
    if model_choice not in MODEL_INFO.keys():
        print("無効な選択です。もう一度入力してください。")

# ByteTrackとTTAの設定選択
print("\n=== 機能設定 ===")
print("1: ByteTrack, TTA (Test time augmentation) 無効化")
print("2: ByteTrack, TTA (Test time augmentation) 有効化")
print()

feature_choice = input("選択 (1/2) [デフォルト: 1]: ").strip()
if feature_choice == '2':
    TTA_ENABLED = True
    USE_TRACKER = True
    print("\nByteTrackとTTAを有効化しました")
else:
    TTA_ENABLED = False
    USE_TRACKER = False
    print("\nByteTrackとTTAを無効化しました(デフォルト)")

# ByteTrackトラッカーを初期化
if USE_TRACKER:
    tracker = ByteTrack()

# モデルの初期化
print(f"\nRT-DETRv2モデルをロード中...")
try:
    model_name = MODEL_INFO[model_choice]['name']
    model = RTDetrV2ForObjectDetection.from_pretrained(model_name)
    processor = AutoImageProcessor.from_pretrained(model_name)
    model.to(device)
    model.eval()

    # ラベルマッピング
    id2label = {int(k): v for k, v in model.config.id2label.items()}

    print(f"\n検出対象: person")
    print(f"モデル情報: {MODEL_INFO[model_choice]['desc']}")
    print("モデルのロード完了")
except Exception as e:
    print(f"モデルのロードに失敗しました: {e}")
    raise SystemExit(1)

# TTA設定の表示
if TTA_ENABLED:
    print("\nTest Time Augmentation (TTA): 有効")
    print("  - 水平反転による推論結果の統合")
    print(f"  - 信頼度ブースト値: {TTA_CONF_BOOST}")
    print(f"  - NMS閾値: {NMS_THRESHOLD}")
else:
    print("\nTest Time Augmentation (TTA): 無効")

# ByteTrack設定の表示
if USE_TRACKER:
    print("\nByteTrack: 有効")
    print("  - カルマンフィルタによる動き予測")
    print("  - IDごとに異なる色でバウンディングボックスを表示")
else:
    print("\nByteTrack: 無効")

# 入力選択
print("\n=== RT-DETRv2リアルタイム物体検出(person検出専用) ===")
print("0: 動画ファイル")
print("1: カメラ")
print("2: サンプル動画")

choice = input("選択: ")

is_camera = (choice == '1')

if choice == '0':
    root = tk.Tk()
    root.withdraw()
    path = filedialog.askopenfilename()
    if not path:
        raise SystemExit(1)
    cap = cv2.VideoCapture(path)
elif choice == '1':
    cap = ThreadedVideoCapture(0, is_camera=True)
else:
    SAMPLE_URL = 'https://raw.githubusercontent.com/opencv/opencv/master/samples/data/vtest.avi'
    SAMPLE_FILE = 'vtest.avi'
    print('サンプル動画をダウンロード中...')
    urllib.request.urlretrieve(SAMPLE_URL, SAMPLE_FILE)
    cap = cv2.VideoCapture(SAMPLE_FILE)

if not cap.isOpened():
    print('動画ファイル・カメラを開けませんでした')
    raise SystemExit(1)

# フレームレートの取得とタイムスタンプ増分の計算
if is_camera:
    actual_fps = cap.get(cv2.CAP_PROP_FPS)
    print(f'カメラのfps: {actual_fps}')
    timestamp_increment = int(1000 / actual_fps) if actual_fps > 0 else 33
else:
    video_fps = cap.get(cv2.CAP_PROP_FPS)
    timestamp_increment = int(1000 / video_fps) if video_fps > 0 else 33

# メイン処理
print('\n=== 動画処理開始 ===')
print('操作方法:')
print('  q キー: プログラム終了')

start_time = time.time()
last_info_time = start_time
info_interval = 10.0  # 10秒ごとに表示
timestamp_ms = 0
total_processing_time = 0.0

try:
    while True:
        ret, frame = cap.read()
        if not ret:
            break

        timestamp_ms += timestamp_increment

        processing_start = time.time()
        processed_frame, result, current_time = video_frame_processing(frame, timestamp_ms, is_camera)
        processing_time = time.time() - processing_start
        total_processing_time += processing_time

        cv2.imshow(WINDOW_NAME, processed_frame)

        if result:
            if is_camera:
                timestamp = datetime.fromtimestamp(current_time).strftime("%Y-%m-%d %H:%M:%S.%f")[:-3]
                print(f'{timestamp}, {result}')
            else:
                print(f'Frame {frame_count}: {result}')

            results_log.append(result)

        # 情報提供(カメラモードのみ、info_interval秒ごと)
        if is_camera:
            elapsed = current_time - last_info_time
            if elapsed >= info_interval:
                total_elapsed = current_time - start_time
                actual_fps = frame_count / total_elapsed if total_elapsed > 0 else 0
                avg_processing_time = (total_processing_time / frame_count * 1000) if frame_count > 0 else 0
                print(f'[情報] 経過時間: {total_elapsed:.1f}秒, 処理フレーム数: {frame_count}, 実測fps: {actual_fps:.1f}, 平均処理時間: {avg_processing_time:.1f}ms')
                last_info_time = current_time

        if cv2.waitKey(1) & 0xFF == ord('q'):
            break

finally:
    print('\n=== プログラム終了 ===')
    cap.release()
    cv2.destroyAllWindows()

    if results_log:
        with open('result.txt', 'w', encoding='utf-8') as f:
            f.write('=== RT-DETRv2物体検出結果 ===\n')
            f.write(f'処理フレーム数: {frame_count}\n')
            f.write(f'使用モデル: {model_name}\n')
            f.write(f'モデル情報: {MODEL_INFO[model_choice]["desc"]}\n')
            f.write(f'使用デバイス: {str(device).upper()}\n')
            if device.type == 'cuda':
                f.write(f'GPU: {torch.cuda.get_device_name(0)}\n')
            f.write(f'画像処理: CLAHE適用(YUV色空間)\n')
            f.write(f'TTA (Test Time Augmentation): {"有効" if TTA_ENABLED else "無効"}\n')
            if TTA_ENABLED:
                f.write(f'  - NMS閾値: {NMS_THRESHOLD}\n')
                f.write(f'  - 信頼度ブースト: {TTA_CONF_BOOST}\n')
            f.write(f'ByteTrack: {"有効" if USE_TRACKER else "無効"}\n')
            if USE_TRACKER:
                f.write(f'  - IDごとに異なる色でバウンディングボックスを表示\n')
            f.write(f'信頼度閾値: {CONF_THRESH}\n')
            f.write(f'\n検出されたクラス:\n')
            f.write(f'  人 (person): {person_count}回\n')
            if is_camera:
                f.write('形式: タイムスタンプ, 検出結果\n')
            else:
                f.write('形式: フレーム番号, 検出結果\n')
            f.write('\n')
            f.write('\n'.join(results_log))
        print(f'\n処理結果をresult.txtに保存しました')
        print(f'検出されたperson数: {person_count}')
実験・研究スキルの基礎:Windowsで学ぶ人物検出と追跡実験
1. 実験・研究のスキル構成要素
実験や研究を行うには、以下の5つの構成要素を理解する必要がある。
1.1 実験用データ
このプログラムでは動画ファイルまたはカメラ映像が実験用データである。
1.2 実験計画
何を明らかにするために実験を行うのかを定める。
計画例:
- 信頼度閾値が人物検出数に与える影響を確認する
- TTAの有効化が検出精度と処理時間に与える影響を確認する
- ByteTrackによる追跡がID管理の安定性に与える効果を検証する
- CLAHE前処理が低照度環境での検出性能に与える影響を調べる
- 3種類のバックボーンモデル(ResNet-50D、ResNet-101D、HGNetv2-L)の精度と速度のトレードオフを比較する
- 遮蔽された人物の追跡継続性能を評価する
- TTA使用時のNMS閾値が重複検出除去に与える影響を確認する
1.3 プログラム
実験を実施するためのツールである。このプログラムはRT-DETRv2モデル、ByteTrack追跡アルゴリズム、CLAHE前処理、TTA(Test Time Augmentation)を使用している。
- プログラムの機能を理解して活用することが基本である
- 基本となるプログラムを出発点として、将来、様々な機能を自分で追加することができる
1.4 プログラムの機能
このプログラムは複数のパラメータで人物検出と追跡を制御する。
入力パラメータ:
- CONF_THRESH:検出結果を表示する最低信頼度(デフォルト0.25)
- NMS_THRESHOLD:TTA使用時の重複検出除去基準値(デフォルト0.6)
- TTA_ENABLED:Test Time Augmentationの有効/無効(デフォルト無効)
- USE_TRACKER:ByteTrack追跡機能の有効/無効(デフォルト無効)
- TTA_CONF_BOOST:TTA使用時の信頼度ブースト値(デフォルト0.03)
- CLAHE_CLIP_LIMIT:コントラスト制限値(デフォルト3.0)
出力情報:
- リアルタイム動画表示:検出された人物にバウンディングボックスとトラッキングID(ByteTrack有効時はIDごとに異なる色、無効時は緑色)
- 画面上部の統計情報:検出数、フレーム数、クラス数、TTA状態、ByteTrack状態
- コンソール出力:各フレームの検出結果(座標、信頼度、クラス名)
- result.txtファイル:処理終了時に全検出結果と統計情報を保存
処理の流れ:
- 動画フレーム取得→CLAHE前処理→RT-DETRv2推論(TTA適用可能)→person検出フィルタリング→ByteTrack追跡(有効時)→結果描画
1.5 検証(結果の確認と考察)
プログラムの実行結果を観察し、パラメータと機能の影響を考察する。
基本認識:
- パラメータを変えると結果が変わる。その変化を観察することが実験である
- 「良い結果」「悪い結果」は目的によって異なる
- 精度と処理速度はトレードオフの関係にある
観察のポイント:
- 検出数と信頼度はどう変化するか
- 誤検出(人物でないものを検出)は発生しているか
- 見逃し(検出されるべき人物が検出されない)は発生しているか
- 追跡ID(ByteTrack有効時)は安定して維持されているか
- 遮蔽された人物の追跡は継続されているか
- TTA有効化による精度向上は見られるか
- 処理速度(fps)は許容範囲内か
- 低照度環境でのCLAHE効果は確認できるか
2. 間違いの原因と対処方法
モデルのダウンロードに時間がかかる
- 原因:初回実行時にRT-DETRv2モデル(数百MB)をHugging Faceからダウンロードしている
- 対処方法:これは正常な動作である。ダウンロードが完了するまで待つ(通常5~10分)
CUDA/GPU関連のエラーが発生する
- 原因:PyTorchのCUDAバージョンとGPUドライバのバージョンが一致していない
- 対処方法:適切なCUDAバージョンのPyTorchを再インストールする。または自動的にCPUで動作する
カメラが開けない
- 原因:カメラが別のアプリケーションで使用中、またはカメラのアクセス許可がない
- 対処方法:他のカメラアプリを閉じる。Windowsのプライバシー設定でカメラアクセスを許可する
処理速度が極端に遅い
- 原因:GPUが利用できずCPUで動作している、またはTTAとHGNetv2-Lを同時に使用している
- 対処方法:コンソール出力でデバイス(cuda/cpu)を確認する。軽量なResNet-50Dモデルを選択する。TTAを無効化する
明らかに存在する人物が検出されない
- 原因:信頼度閾値(CONF_THRESH)が高すぎる、または人物が極端に小さい・遮蔽されている
- 対処方法:CONF_THRESHを0.15程度まで下げて確認する。それでも検出されない場合は、モデルの限界である可能性がある
TTA有効化で検出結果が変わらない
- 原因:元画像で既に高精度で検出されている、または水平反転で新たに検出される人物がいない
- 対処方法:これは正常な動作である。TTAは全てのケースで改善するわけではない。複数の動画で効果を比較する
ByteTrackのIDが頻繁に切り替わる
- 原因:人物同士が交差する、または検出が不安定でトラッキングが失敗している
- 対処方法:信頼度閾値を調整して検出を安定化させる。これはByteTrackの特性であり、完全な解決は困難な場合がある
同じ人物に複数のIDが割り当てられる
- 原因:人物が一時的にフレームアウトした、または遮蔽によって検出が途切れた
- 対処方法:ByteTrackのパラメータ調整が必要だが、本プログラムではデフォルト設定を使用している。これは追跡アルゴリズムの限界として理解すべきである
低照度環境で検出精度が低い
- 原因:CLAHE_CLIP_LIMITが適切でない、または元映像が極端に暗い
- 対処方法:CLAHE_CLIP_LIMITを5.0程度まで上げて試す。ただし、ノイズ増幅に注意する
3. 実験レポートのサンプル
信頼度閾値による人物検出精度の最適化
実験目的:
混雑した屋外映像において、人物を確実に検出しながら誤検出を最小化するための最適な信頼度閾値を見つける。
実験計画:
モデルはResNet-50Dを使用し、ByteTrackは有効にする。信頼度閾値を0.15から0.50まで0.05刻みで変化させ、検出性能を評価する。
実験方法:
複数の人物が登場する屋外動画(約200フレーム、実際の人物数:5人)を用意し、各信頼度閾値で処理する。目視で以下を記録する:
- 正検出数:正しく検出された人物の数
- 誤検出数:人物でないもの(看板、柱など)が人物として検出された数
- 見逃し数:検出されなかった人物の数
- トラッキングID数:割り当てられた総ID数(少ないほど追跡が安定)
実験結果:
| 信頼度閾値 | 検出総数 | 正検出数 | 誤検出数 | 見逃し数 | トラッキングID数 | 総合評価 |
|---|---|---|---|---|---|---|
| xxx | x | x | x | x | x | x |
| xxx | x | x | x | x | x | x |
| xxx | x | x | x | x | x | x |
| xxx | x | x | x | x | x | x |
| xxx | x | x | x | x | x | x |
| xxx | x | x | x | x | x | x |
| xxx | x | x | x | x | x | x |
| xxx | x | x | x | x | x | x |
考察:
- (例文)信頼度閾値xxxでは全ての人物を検出できたが、背景の看板や柱を人物と誤認識するケースが多数発生した。トラッキングID数もxxと多く、追跡が不安定であった
- (例文)信頼度閾値xxx~xxxの範囲では、全ての人物を検出しつつ誤検出が大幅に減少した。特にxxxでは誤検出がx件のみで、実用的な精度が得られた
- (例文)信頼度閾値xxxでは誤検出がほぼ解消されたが、トラッキングID数はxと依然やや多い。これは人物同士の交差や一時的な遮蔽が原因である
- (例文)信頼度閾値xxx以上では誤検出は完全になくなったが、画像の端に位置する人物や一部が隠れた人物の見逃しが発生し始めた
- (例文)信頼度閾値xxx~xxxでは見逃しがx人に増加し、実用性が低下した。追跡が安定する一方で検出率が犠牲になった
- (例文)以上から、信頼度閾値を上げるほど誤検出は減るが、同時に見逃しも増えるというトレードオフの関係が明確に確認された
結論:
(例文)本実験の混雑した屋外映像においては、信頼度閾値xxx~xxxが最もバランスの取れた設定であった。全ての人物を検出しつつ、誤検出を許容範囲内に抑えることができる。用途別の推奨設定は以下の通りである:
- (例文)人数カウント重視(見逃し厳禁):xxx(誤検出x件は手動で除外可能)
- (例文)バランス重視:xxx(誤検出x件、見逃しx件)
- (例文)誤検出回避重視:xxx~xxx(見逃しx人は許容)
(例文)この結果から、人物検出システムの実運用では、検出目的に応じて閾値を慎重に選択する必要があることが確認された。また、デフォルト値xxxが多くの状況で妥当な設定であることも実証された。
異なる照明環境での人物検出性能の比較
実験目的:
照明条件(明るい屋外、通常の室内、薄暗い室内)が人物検出精度に与える影響を定量的に評価する。
実験計画:
3種類の照明環境で撮影した動画を用意し、ResNet-50Dモデル、信頼度閾値0.25、ByteTrack有効で処理する。各環境での検出率と信頼度を比較する。
実験方法:
以下の3つの動画(各約150フレーム、実際の人物数:3人)を処理する:
- 動画A:明るい屋外(晴天、十分な自然光)
- 動画B:通常の室内(蛍光灯照明、標準的な明るさ)
- 動画C:薄暗い室内(間接照明のみ、低照度)
実験結果:
| 照明環境 | 平均検出数/フレーム | 検出成功率 | 平均信頼度 | 最低信頼度 | トラッキングID数 | 評価 |
|---|---|---|---|---|---|---|
| 明るい屋外 | x | x% | x | x | x | x |
| 通常の室内 | x | x% | x | x | x | x |
| 薄暗い室内 | x | x% | x | x | x | x |
考察:
- (例文)明るい屋外環境ではx%の検出成功率とxの高い平均信頼度を達成した。トラッキングID数も理想的なxであり、各人物が一貫して追跡された
- (例文)通常の室内環境では検出成功率がx%にやや低下し、平均信頼度もxに下がった。照明のムラや影の影響で、一部のフレームで検出が不安定になったと推測される
- (例文)薄暗い室内環境では検出成功率がx%まで大幅に低下した。平均信頼度x、最低信頼度xと、モデルの確信度が著しく低下している。トラッキングID数xは追跡の失敗と再検出が繰り返されたことを示している
- (例文)CLAHE前処理は低照度環境での検出を支援しているが、極端に暗い環境では限界がある。信頼度閾値xxxが薄暗い環境では厳しすぎる可能性がある
- (例文)以上から、照明条件が検出精度に決定的な影響を与えることが確認された。実用システムでは環境に応じた閾値調整が必要である
結論:
(例文)人物検出システムの性能は照明環境に強く依存する。明るい屋外や標準的な室内照明では高精度な検出が可能だが、薄暗い環境では検出率と追跡安定性が大幅に低下する。低照度環境での運用には以下の対策が推奨される:
- (例文)信頼度閾値をxxx程度に下げる(見逃しを減らす)
- (例文)CLAHE_CLIP_LIMITをx~x程度に上げる(コントラスト強化)
- (例文)可能であれば照明を追加する(根本的解決)
(例文)本実験により、人物検出システムの導入前に対象環境の照明条件を十分に評価する重要性が明らかになった。