SVDベースガイデッドフィルタ画像処理(入力:静止画)(ソースコードと説明と利用ガイド)
プログラム利用ガイド
1. このプログラムの利用シーン
静止画像に対してエッジ構造を保持しながらノイズを除去するソフトウェアである。画像のディテールを維持したまま、ノイズや微細な変動を抑制する処理を実行する。
2. 主な機能
- エッジ保存型スムージング処理を静止画像に適用する
- 3種類の入力ソース(画像ファイル、ウェブカメラ、サンプル画像)に対応する
- 処理結果を連番のPNGファイル(0001.png、0002.png...)として保存する
- 処理履歴(出力ファイル名、元ファイル名、パラメータ、処理日時)をresult.txtに記録する
- 処理済み画像にパラメータ情報を日本語で表示する
3. 基本的な使い方
- プログラムを起動する
- 入力ソースを選択する(0: 画像ファイル、1: カメラ、2: サンプル画像)
- 画像ファイルを選択する場合は、ファイル選択ダイアログで複数のファイルを選択可能である
- カメラを使用する場合は、スペースキーで撮影し、qキーで終了する
- 処理結果が画面に表示され、ファイルとして保存される
- 任意のキーを押してプログラムを終了する
4. パラメータ調整
プログラムのグローバル変数を変更することで、フィルタリングの強度を調整できる。
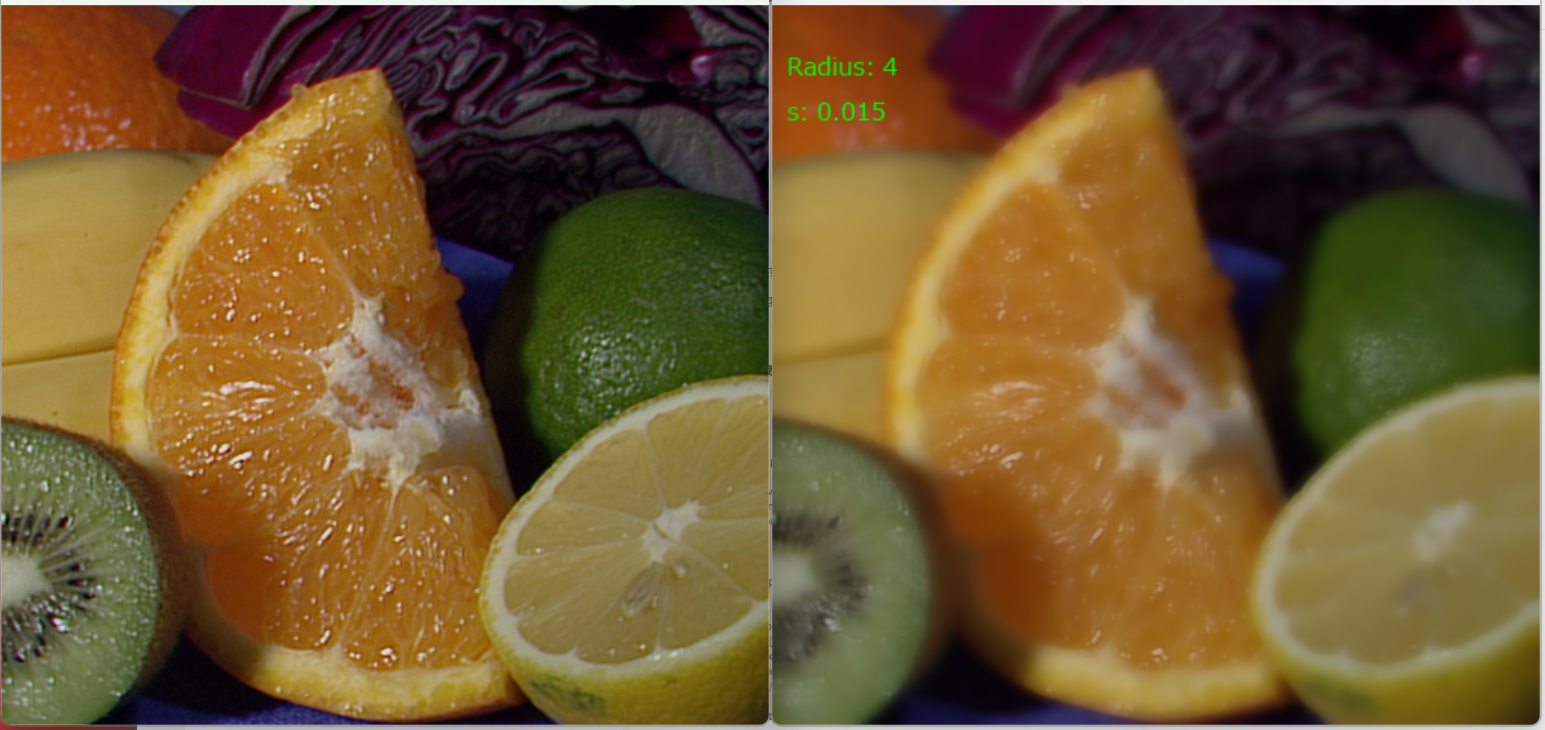
- SVD_GUIDED_FILTER_RADIUS: 局所ウィンドウの半径(デフォルト4)。値が大きいほどスムージング効果が強くなる。推奨値は2から16である
- SVD_GUIDED_FILTER_S: 正則化パラメータ(デフォルト0.015)。値が小さいほどエッジ保存性が高まる。推奨値は0.001から0.1である
5. 出力ファイル
- 処理済み画像: 0001.png、0002.png...として保存される
- 処理履歴: result.txtに出力ファイル名、元ファイル名、パラメータ、処理日時が記録される
Python開発環境,ライブラリ類
ここでは、最低限の事前準備について説明する。機械学習や深層学習を行う場合は、NVIDIA CUDA、Visual Studio、Cursorなどを追加でインストールすると便利である。これらについては別ページ https://www.kkaneko.jp/cc/dev/aiassist.htmlで詳しく解説しているので、必要に応じて参照してください。
Python 3.12 のインストール(Windows 上) [クリックして展開]
以下のいずれかの方法で Python 3.12 をインストールする。Python がインストール済みの場合、この手順は不要である。
方法1:winget によるインストール
管理者権限のコマンドプロンプトで以下を実行する。管理者権限のコマンドプロンプトを起動するには、Windows キーまたはスタートメニューから「cmd」と入力し、表示された「コマンドプロンプト」を右クリックして「管理者として実行」を選択する。
winget install --id Python.Python.3.12 -e --scope machine --silent --accept-source-agreements --accept-package-agreements --override "/quiet InstallAllUsers=1 PrependPath=1 Include_test=0 Include_pip=1 Include_launcher=1 InstallLauncherAllUsers=1 TargetDir=\"C:\Program Files\Python312\""
powershell -Command "$p='C:\Program Files\Python312'; $s=\"$p\Scripts\"; $m=[Environment]::GetEnvironmentVariable('Path','Machine'); if($m -notlike \"*$s*\") { [Environment]::SetEnvironmentVariable('Path', \"$p;$s;$m\", 'Machine') }"
--scope machine を指定することで、システム全体(全ユーザー向け)にインストールされる。このオプションの実行には管理者権限が必要である。インストール完了後、コマンドプロンプトを再起動すると PATH が自動的に設定される。
方法2:インストーラーによるインストール
- Python 公式サイト(https://www.python.org/downloads/)にアクセスし、「Download Python 3.x.x」ボタンから Windows 用インストーラーをダウンロードする。
- ダウンロードしたインストーラーを実行する。
- 初期画面の下部に表示される「Add python.exe to PATH」に必ずチェックを入れてから「Customize installation」を選択する。このチェックを入れ忘れると、コマンドプロンプトから
pythonコマンドを実行できない。 - 「Install Python 3.xx for all users」にチェックを入れ、「Install」をクリックする。
インストールの確認
コマンドプロンプトで以下を実行する。
python --versionバージョン番号(例:Python 3.12.x)が表示されればインストール成功である。「'python' は、内部コマンドまたは外部コマンドとして認識されていません。」と表示される場合は、インストールが正常に完了していない。
AIエディタ Windsurf のインストール(Windows 上) [クリックして展開]
Pythonプログラムの編集・実行には、AIエディタの利用を推奨する。ここでは、Windsurfのインストールを説明する。Windsurf がインストール済みの場合、この手順は不要である。
管理者権限のコマンドプロンプトで以下を実行する。管理者権限のコマンドプロンプトを起動するには、Windows キーまたはスタートメニューから「cmd」と入力し、表示された「コマンドプロンプト」を右クリックして「管理者として実行」を選択する。
winget install --scope machine --id Codeium.Windsurf -e --silent --disable-interactivity --force --accept-source-agreements --accept-package-agreements --custom "/SP- /SUPPRESSMSGBOXES /NORESTART /CLOSEAPPLICATIONS /DIR=""C:\Program Files\Windsurf"" /MERGETASKS=!runcode,addtopath,associatewithfiles,!desktopicon"
powershell -Command "$env:Path=[System.Environment]::GetEnvironmentVariable('Path','Machine')+';'+[System.Environment]::GetEnvironmentVariable('Path','User'); windsurf --install-extension MS-CEINTL.vscode-language-pack-ja --force; windsurf --install-extension ms-python.python --force; windsurf --install-extension Codeium.windsurfPyright --force"
--scope machine を指定することで、システム全体(全ユーザー向け)にインストールされる。このオプションの実行には管理者権限が必要である。インストール完了後、コマンドプロンプトを再起動すると PATH が自動的に設定される。
【関連する外部ページ】
Windsurf の公式ページ: https://windsurf.com/
必要なライブラリをシステム領域にインストール
管理者権限のコマンドプロンプトで以下を実行する。管理者権限のコマンドプロンプトを起動するには、Windows キーまたはスタートメニューから「cmd」と入力し、表示された「コマンドプロンプト」を右クリックして「管理者として実行」を選択する。
pip install opencv-python numpy pillow
SVDベースガイデッドフィルタ画像処理プログラム
概要
このプログラムは、特異値分解を活用した改良版ガイデッドフィルタを用いて、静止画像に対してエッジ保存型スムージング処理を実行する。入力画像の局所共分散行列に対してSVDを適用し、固有値に基づく非線形関数により、エッジ構造を保持しながらノイズを抑制する。
主要技術
SVD-based Guided Filter
Mishiba (2025)[2]が提案したエッジ保存型フィルタリング手法である。従来のガイデッドフィルタ[1]に特異値分解を組み込み、マルチチャンネル画像の局所共分散行列から固有値と固有ベクトルを抽出する。固有値に基づく非線形関数$$\phi(\lambda_i) = 1 - \exp(-\lambda_i^2 / (2s^2))$$を適用することで、大きな固有値(エッジ成分)は保存し、小さな固有値(ノイズ成分)は抑制する適応的フィルタリングを実現する。
技術的特徴
- 局所線形モデルによる適応的処理
各局所パッチで線形係数aとバイアスbを計算し、パッチ統合により最終出力を生成する。出力画像の各ピクセル値は$$z = g \cdot a + b$$で表される。ここで、gはガイド画像のピクセル値、aは線形係数ベクトル、bはバイアス項である。
- 固有値ベースの非線形関数
固有値$$\lambda_i$$に対して$$\phi(\lambda_i)$$を適用し、エッジとノイズを区別する。$$\lambda_i$$が大きい場合(エッジ)に$$\phi(\lambda_i) \approx 1$$となり、$$\lambda_i$$が小さい場合(ノイズ)に$$\phi(\lambda_i) \approx 0$$となる。この特性により、エッジ方向のフィルタリングを抑制し、ノイズ方向のフィルタリングを強化する。
- 倍精度浮動小数点演算
uint8からfloat64への型変換と0-1への正規化により数値的安定性を確保する。処理後は0-255の範囲に戻し、uint8に変換して画像として保存する。
- パッチ重複処理
各ピクセルが複数のパッチに属し、係数を平均化することで境界のアーティファクトを抑制する。パッチサイズは$$(2 \times \text{radius} + 1) \times (2 \times \text{radius} + 1)$$である。
実装の特色
- 処理履歴の自動記録
出力ファイル名、元ファイル名、パラメータ(radius、s)、処理日時をresult.txtに保存する。処理日時はミリ秒単位で記録される。
- 日本語テキスト描画
Pillowライブラリを用いて処理済み画像にパラメータ情報を日本語で表示する。フォントはメイリオ(meiryo.ttc)を使用する。
- パラメータ調整機能
局所ウィンドウ半径(radius)と正則化パラメータ(s)をグローバル変数で設定可能である。radiusは現在4に設定され、sは0.015に設定されている。
参考文献
[1] He, K., Sun, J., & Tang, X. (2013). Guided Image Filtering. IEEE Transactions on Pattern Analysis and Machine Intelligence, 35(6), 1397-1409. https://doi.org/10.1109/TPAMI.2012.213
[2] Mishiba, K. (2025). Extending Guided Filters Through Effective Utilization of Multi-Channel Guide Images Based on Singular Value Decomposition. IEEE Open Journal of Signal Processing, 2025.
[3] Golub, G. H., & Van Loan, C. F. (2013). Matrix Computations (4th ed.). Johns Hopkins University Press.
[4] Strang, G. (2016). Introduction to Linear Algebra (5th ed.). Wellesley-Cambridge Press.
[5] Tomasi, C., & Manduchi, R. (1998). Bilateral Filtering for Gray and Color Images. Proceedings of the IEEE International Conference on Computer Vision, 839-846. https://doi.org/10.1109/ICCV.1998.710815
ソースコード
# SVDベースガイデッドフィルタ画像処理プログラム
#
# 特徴技術名: SVD-based Guided Filter(SVDベースガイデッドフィルタ)
#
# 出典:
#   Mishiba, K. (2025). Extending Guided Filters Through Effective Utilization of
#   Multi-Channel Guide Images Based on Singular Value Decomposition.
#   IEEE Open Journal of Signal Processing, 2025.
#
# 特徴機能:
#   エッジ保存型スムージング
#   特異値分解を活用したマルチチャンネル対応の改良版ガイデッドフィルタ。従来のガイデッドフィルタの主成分分析による効果的なガイダンス生成により、カラー画像の高品質フィルタリングを実現する。チャンネル間の相関を活用した高精度処理が可能。
#
# 学習済みモデル: なし
#
# 特徴技術および学習済みモデルの利用制限:
#   アルゴリズムは論文に基づく自前実装。OpenCV(Apache 2ライセンス)、NumPy(BSDライセンス)の基本機能のみ使用。
#   必ず利用者自身で最新のライセンス情報を確認すること。
#   参考: https://opencv.org/license/
#   参考: https://numpy.org/license.html
#
# 方式設計:
#   - 関連利用技術:
#     * OpenCV (cv2): 画像入出力、ボックスフィルタ(積分画像による局所平均計算)
#     * tkinter: ファイル選択ダイアログ
#     * NumPy: 画像データ型変換、行列演算、特異値分解
#     * Pillow: 日本語テキスト描画
#
#   - 入力と出力:
#     入力: 複数の静止画像,カメラ(ユーザは「0:画像ファイル,1:カメラ,2:サンプル画像」のメニューで選択.0:画像ファイルの場合はtkinterで複数ファイル選択可能.1の場合はOpenCVでカメラが開き,スペースキーで撮影(複数回可能).2の場合はhttps://raw.githubusercontent.com/opencv/opencv/master/samples/data/fruits.jpg とhttps://raw.githubusercontent.com/opencv/opencv/master/samples/data/messi5.jpgとhttps://raw.githubusercontent.com/opencv/opencv/master/samples/data/aero3.jpgとhttps://upload.wikimedia.org/wikipedia/commons/3/3a/Cat03.jpgを使用)
#     出力: 処理結果画像を0001.png, 0002.png...として保存、OpenCV画面での表示、result.txtへの処理履歴保存(出力ファイル名、元ファイル名、パラメータ、処理日時)
#
#   - 処理手順:
#     1. 入力画像をuint8からfloat64(倍精度浮動小数点)へ変換し、0-1の範囲に正規化
#     2. SVD-based Guided Filterのパラメータ設定
#        - radius: 局所ウィンドウの半径(デフォルト4)
#        - s: 正則化パラメータ(デフォルト0.015)
#     3. 各パッチでSVD分解による特徴抽出
#        - マルチチャンネル画像の局所共分散行列を計算
#        - 各パッチでSVDを実行し、固有値と固有ベクトルを抽出
#        - 固有値に基づいて非線形関数φ(λi)を適用
#     4. 式(14)に基づいて局所線形モデルの係数を計算
#     5. パッチ統合により最終出力を生成
#     6. 処理結果を0-255の範囲に戻し、元のデータ型(uint8)へ変換
#
#   - 前処理、後処理:
#     前処理: uint8からfloat64への型変換と0-1への正規化により、
#            数値的安定性を確保し精度を向上
#     後処理: float64からuint8への型変換により、画像表示と保存を可能にする
#
#   - 追加処理:
#     SVD最適化: numpy.linalg.eighを各局所パッチで使用し、
#     固有値ベースの非線形関数φ(λi)により、大きな固有値(エッジ)は保存し、
#     小さな固有値(ノイズ)は抑制する
#
#   - 調整を必要とする設定値:
#     * radius(局所ウィンドウ半径): 現在4に設定
#       値が大きいほどスムージング効果が強くなるが、処理時間も増加
#       推奨値: 2~16(用途に応じて調整)
#     * s(正則化パラメータ): 現在0.015に設定
#       値が小さいほどエッジ保存性が高まる
#       推奨値: 0.001~0.1(用途に応じて調整)
#
# 将来方策:
#   並列処理技術を用いることで、さらなる高速化が可能。
#   例: マルチスレッド処理による各パッチの並列計算
#
# その他の重要事項:
#   * Windows環境での動作を前提
#   * Python 3.10以上で動作
#   * opencv-contrib-pythonは不要(標準のopencv-pythonのみで動作)
#   * SVD-based Guided Filterは従来のガイデッドフィルタと比較して以下の利点がある:
#     - 固有値ベースの非線形関数による適応的フィルタリング
#     - マルチチャンネル画像での高精度処理
#     - チャンネル間相関の活用
#     - 主成分分析による効果的なガイダンス
#
# 前準備:
#   pip install opencv-python numpy pillow

import cv2
import tkinter as tk
from tkinter import filedialog
import urllib.request
import time
from datetime import datetime
import numpy as np
from PIL import Image, ImageDraw, ImageFont
import os

# SVD-based Guided Filterパラメータ
SVD_GUIDED_FILTER_RADIUS = 4
SVD_GUIDED_FILTER_S = 0.015

# フォント設定
FONT_PATH = 'C:/Windows/Fonts/meiryo.ttc'
FONT_SIZE_MAIN = 16
FONT_SIZE_SMALL = 12

try:
    font_main = ImageFont.truetype(FONT_PATH, FONT_SIZE_MAIN)
    font_small = ImageFont.truetype(FONT_PATH, FONT_SIZE_SMALL)
except:
    font_main = None
    font_small = None

results_log = []

def draw_texts_with_pillow(bgr_frame, texts):
    if font_main is None:
        return bgr_frame
    img_pil = Image.fromarray(cv2.cvtColor(bgr_frame, cv2.COLOR_BGR2RGB))
    draw = ImageDraw.Draw(img_pil)
    for item in texts:
        text = item['text']
        x, y = item['org']
        color = item['color']
        font_type = item.get('font_type', 'main')
        font = font_main if font_type == 'main' else font_small
        draw.text((x, y), text, font=font, fill=color)
    return cv2.cvtColor(np.array(img_pil), cv2.COLOR_RGB2BGR)

def phi_edge_preserving(lambda_i, s):
    """
    論文 式(25): Edge-preserving smoothing用の関数
    φ(λi) = 1 - exp(-λi² / (2s²))
    """
    return 1.0 - np.exp(-lambda_i**2 / (2 * s**2))

def svd_guided_filter(image, guide, radius, s):
    """
    SVD-based Guided Filter実装(論文の式(14)に基づく)

    出典: Mishiba, K. (2025). Extending Guided Filters Through Effective
          Utilization of Multi-Channel Guide Images Based on Singular Value
          Decomposition. IEEE Open Journal of Signal Processing, 2025.

    image: H×W×3の入力画像(float64, 0-1範囲)
    guide: H×W×3のガイド画像(float64, 0-1範囲)
    radius: 局所ウィンドウ半径
    s: 正則化パラメータ
    """
    if guide is None:
        guide = image

    if len(image.shape) == 2:
        image = image[:, :, np.newaxis]
        guide = guide[:, :, np.newaxis]

    h, w, c = image.shape
    _, _, cg = guide.shape
    n = (2 * radius + 1) ** 2

    # パディング
    pad_img = np.pad(image, ((radius, radius), (radius, radius), (0, 0)), mode='reflect')
    pad_guide = np.pad(guide, ((radius, radius), (radius, radius), (0, 0)), mode='reflect')

    # 結果格納用
    result = np.zeros((h, w, c), dtype=np.float64)

    # 各チャンネルごとに処理
    for ch in range(c):
        # このチャンネル用の係数累積配列
        a_sum = np.zeros((h, w, cg), dtype=np.float64)
        b_sum = np.zeros((h, w), dtype=np.float64)
        count = np.zeros((h, w), dtype=np.float64)

        # 各パッチを処理
        for i in range(h):
            for j in range(w):
                # パッチ抽出
                patch_guide = pad_guide[i:i+2*radius+1, j:j+2*radius+1, :].reshape(n, cg)
                patch_img_ch = pad_img[i:i+2*radius+1, j:j+2*radius+1, ch].flatten()

                # 中心化
                mean_guide = np.mean(patch_guide, axis=0, keepdims=True)
                mean_img_ch = np.mean(patch_img_ch)

                centered_guide = patch_guide - mean_guide
                centered_img_ch = patch_img_ch - mean_img_ch

                # 共分散行列の計算とSVD(固有値分解)
                cov_matrix = (1.0 / n) * (centered_guide.T @ centered_guide)

                try:
                    # 固有値分解: cov_matrix = V * Λ² * V^T
                    eigenvalues, eigenvectors = np.linalg.eigh(cov_matrix)
                    idx = eigenvalues.argsort()[::-1]
                    eigenvalues = eigenvalues[idx]
                    eigenvectors = eigenvectors[:, idx]
                    eigenvalues = np.maximum(eigenvalues, 0)

                    # λi = √(固有値) (論文の特異値に対応)
                    lambda_i = np.sqrt(eigenvalues)

                    # G^T * M * f を事前計算
                    G_T_M_f = centered_guide.T @ centered_img_ch

                    # 式(14): a の計算(ブロードキャスト使用)
                    mask = lambda_i > 1e-10
                    a_patch = np.zeros(cg, dtype=np.float64)

                    if np.any(mask):
                        phi_values = phi_edge_preserving(lambda_i[mask], s)
                        vi_matrix = eigenvectors[:, mask]
                        scalar_values = vi_matrix.T @ G_T_M_f
                        contributions = vi_matrix @ (phi_values * scalar_values / lambda_i[mask])
                        a_patch = contributions / n
                    else:
                        a_patch = np.zeros(cg, dtype=np.float64)

                except:
                    a_patch = np.zeros(cg, dtype=np.float64)

                # 式(13): b の計算
                predicted = patch_guide @ a_patch
                b_patch = np.mean(patch_img_ch - predicted)

                # パッチ内の各ピクセルに係数を割り当て
                for pi in range(2*radius+1):
                    for pj in range(2*radius+1):
                        yi = i + pi - radius
                        yj = j + pj - radius
                        if 0 <= yi < h and 0 <= yj < w:
                            a_sum[yi, yj, :] += a_patch
                            b_sum[yi, yj] += b_patch
                            count[yi, yj] += 1

        # 平均化(式(6)のパッチ統合)
        count[count == 0] = 1
        a_sum = a_sum / count[:, :, np.newaxis]
        b_sum = b_sum / count

        # 最終出力の計算: z = g * a + b (式(12))
        for yi in range(h):
            for yj in range(w):
                result[yi, yj, ch] = np.dot(guide[yi, yj, :], a_sum[yi, yj, :]) + b_sum[yi, yj]

    return result

def image_processing(bgr_img):
    img_float64 = bgr_img.astype('float64') / 255.0

    processed_float64 = svd_guided_filter(
        image=img_float64,
        guide=img_float64,
        radius=SVD_GUIDED_FILTER_RADIUS,
        s=SVD_GUIDED_FILTER_S
    )

    processed_img = np.clip(processed_float64 * 255.0, 0, 255).astype(bgr_img.dtype)

    texts = [
        {'text': f'Radius: {SVD_GUIDED_FILTER_RADIUS}', 'org': (10, 30), 'color': (0, 255, 0), 'font_type': 'main'},
        {'text': f's: {SVD_GUIDED_FILTER_S:.3f}', 'org': (10, 60), 'color': (0, 255, 0), 'font_type': 'main'}
    ]
    processed_img_display = draw_texts_with_pillow(processed_img.copy(), texts)

    return processed_img, processed_img_display, time.time()

def process_and_display_images(image_sources, source_type):
    idx = 1
    results = []

    for source in image_sources:
        img = cv2.imread(source) if source_type == 'file' else source
        if img is None:
            continue

        processed_img, processed_img_display, current_time = image_processing(img)

        output_filename = f"{idx:04d}.png"
        cv2.imwrite(output_filename, processed_img)

        if source_type == 'file':
            source_name = os.path.basename(source)
        else:
            source_name = f"Camera_{idx}"

        results.append({
            'original': img,
            'processed': processed_img_display,
            'output_file': output_filename,
            'source_name': source_name,
            'time': current_time,
            'index': idx
        })

        timestamp = datetime.fromtimestamp(current_time).strftime("%Y-%m-%d %H:%M:%S.%f")[:-3]
        print(f"{timestamp} {output_filename} を保存しました")
        results_log.append({
            'index': idx,
            'output_file': output_filename,
            'source_name': source_name,
            'radius': SVD_GUIDED_FILTER_RADIUS,
            's': SVD_GUIDED_FILTER_S,
            'timestamp': timestamp
        })
        idx += 1

    for item in results:
        cv2.imshow(f'Image_{item["index"]}', item['original'])
        cv2.imshow(f'SVD_Guided_Filter_{item["index"]}', item['processed'])

print("=" * 60)
print("SVD-based Guided Filter画像処理プログラム(自前実装版)")
print("=" * 60)
print("\n操作方法:")
print("0: 画像ファイルを選択")
print("1: カメラを使用(スペースキーで処理、qキーで終了)")
print("2: サンプル画像を使用")
print("-" * 60)
choice = input("選択してください (0/1/2): ")

try:
    if choice == '0':
        root = tk.Tk()
        root.withdraw()
        if not (paths := filedialog.askopenfilenames(
            title="画像ファイルを選択",
            filetypes=[("画像ファイル", "*.jpg *.jpeg *.png *.bmp"), ("すべてのファイル", "*.*")]
        )):
            print("ファイルが選択されませんでした。")
            exit()
        print(f"\n{len(paths)}個のファイルを選択しました。処理を開始します...\n")
        process_and_display_images(paths, 'file')
        print("\n画像を表示中です。任意のキーを押すと終了します。")
        cv2.waitKey(0)

    elif choice == '1':
        print("\nカメラを起動しています...")
        cap = cv2.VideoCapture(0, cv2.CAP_DSHOW)
        if not cap.isOpened():
            cap = cv2.VideoCapture(0)
        cap.set(cv2.CAP_PROP_BUFFERSIZE, 1)
        print("カメラが起動しました。")
        print("  - スペースキー: 画像を処理")
        print("  - qキー: 終了\n")

        camera_idx = 1
        try:
            while True:
                ret, frame = cap.read()
                if not ret:
                    break
                cv2.imshow('Camera', frame)
                key = cv2.waitKey(1) & 0xFF
                if key == ord(' '):
                    processed_img, processed_img_display, current_time = image_processing(frame)

                    output_filename = f"{camera_idx:04d}.png"
                    cv2.imwrite(output_filename, processed_img)

                    timestamp = datetime.fromtimestamp(current_time).strftime("%Y-%m-%d %H:%M:%S.%f")[:-3]
                    print(f"{timestamp} {output_filename} を保存しました")

                    results_log.append({
                        'index': camera_idx,
                        'output_file': output_filename,
                        'source_name': f"Camera_{camera_idx}",
                        'radius': SVD_GUIDED_FILTER_RADIUS,
                        's': SVD_GUIDED_FILTER_S,
                        'timestamp': timestamp
                    })

                    cv2.imshow('SVD_Guided_Filter', processed_img_display)
                    camera_idx += 1
                elif key == ord('q'):
                    break
        finally:
            cap.release()

    else:
        print("\nサンプル画像をダウンロードしています...")
        opener = urllib.request.build_opener()
        opener.addheaders = [('User-Agent', 'Mozilla/5.0')]
        urllib.request.install_opener(opener)

        urls = [
            "https://raw.githubusercontent.com/opencv/opencv/master/samples/data/fruits.jpg?raw=true",
            "https://raw.githubusercontent.com/opencv/opencv/master/samples/data/messi5.jpg?raw=true",
            "https://raw.githubusercontent.com/opencv/opencv/master/samples/data/aero3.jpg?raw=true",
            "https://upload.wikimedia.org/wikipedia/commons/3/3a/Cat03.jpg"
        ]
        files = []
        for i, url in enumerate(urls):
            try:
                urllib.request.urlretrieve(url, f"sample_{i}.jpg")
                files.append(f"sample_{i}.jpg")
                print(f"sample_{i}.jpg をダウンロードしました")
            except Exception as e:
                print(f"画像のダウンロードに失敗しました: {url}")
                print(f"エラー: {e}")

        if files:
            print(f"\n{len(files)}個のサンプル画像の処理を開始します...\n")
            process_and_display_images(files, 'file')
            print("\n画像を表示中です。任意のキーを押すと終了します。")
            cv2.waitKey(0)
        else:
            print("\nサンプル画像のダウンロードに失敗しました。")

finally:
    print('\n' + "=" * 60)
    print('プログラムを終了します')
    print("=" * 60)
    cv2.destroyAllWindows()
    if results_log:
        with open('result.txt', 'w', encoding='utf-8') as f:
            f.write('=' * 80 + '\n')
            f.write('SVD-based Guided Filter 処理結果\n')
            f.write('=' * 80 + '\n\n')

            for item in results_log:
                f.write(f"No.{item['index']:04d}\n")
                f.write(f"  出力ファイル: {item['output_file']}\n")
                f.write(f"  元ファイル名: {item['source_name']}\n")
                f.write(f"  パラメータ  : radius={item['radius']}, s={item['s']}\n")
                f.write(f"  処理日時    : {item['timestamp']}\n")
                f.write('-' * 80 + '\n')

            f.write('\n' + '=' * 80 + '\n')
            f.write(f'合計 {len(results_log)} 件の画像を処理しました\n')
            f.write('=' * 80 + '\n')
        print(f'\n処理結果をresult.txtに保存しました({len(results_log)}件)')