![[kaneko lab.]](https://www.kkaneko.jp/info/logo_png.png)
RF-DETRによる物体検出・BoT-SORTによる追跡とTTAの機能付き(COCO 80クラス)(ソースコードと説明と利用ガイド)
【概要】RF-DETRによる物体検出システムである。動画やウェブカメラからCOCO 80クラスの物体をリアルタイムで検出する。CLAHE前処理とTTAにより暗所でも高精度な検出が可能である。BoT-SORTによる物体追跡機能を搭載し、フレーム間での継続的な追跡を実現する。Nano、Small、Medium、Largeの4つのモデルから選択可能である。日本語表示に対応し、検出結果を自動保存する。
【目次】
第1章 プログラム利用ガイド
1. このプログラムの利用シーン
動画ファイルやウェブカメラの映像から、人、車、動物などの物体をリアルタイムで自動検出するためのツールである。監視システム、交通流解析、画像解析研究、教育用デモンストレーションなどの用途に適用できる。CLAHE前処理により暗い環境でも安定した検出性能を発揮する。
2. 主な機能
- リアルタイム物体検出: COCO 80クラス(人、車、動物、日用品など)を同時検出し、バウンディングボックスで表示する。
- 多様な入力ソース対応: 動画ファイル、ウェブカメラ、サンプル動画の3つの入力方式を選択できる。
- 検出精度向上機能: CLAHE(コントラスト強化)とTTA(Test Time Augmentation)により、様々な環境条件での検出精度を向上させる。
- 物体追跡機能: BoT-SORTによりフレーム間での物体の継続的な追跡が可能である。
- モデルサイズ選択: 処理速度と精度のバランスに応じて、Nano、Small、Medium、Largeの4つのモデルから選択できる。
- 結果出力機能: 検出結果をリアルタイムで画面表示し、同時にテキストファイルに保存する。
3. 基本的な使い方
- プログラムの起動: Pythonスクリプトを実行し、使用するRF-DETRモデル(1/2/3/4)を選択する。
- 入力ソースの選択: キーボードで0(動画ファイル)、1(ウェブカメラ)、2(サンプル動画)のいずれかを入力する。
- 検出処理の実行: 映像が表示され、検出された物体が色分けされたバウンディングボックスで囲まれる。BoT-SORT有効時は追跡IDも表示される。
- プログラムの終了: 映像表示画面でqキーを押すと、処理を終了し結果がファイルに保存される。
4. 便利な機能
- 自動GPU検出: CUDA対応GPUが利用可能な場合は自動的にGPU処理に切り替わり、処理速度が向上する。
- 日本語対応表示: 検出結果の表示が日本語に対応し、操作方法も日本語で案内される。
- 詳細ログ出力: フレームごとの検出結果(物体名、信頼度、追跡ID)がリアルタイムで表示される。
- 処理統計表示: 総フレーム数、使用モデル、処理デバイス情報が画面上に表示される。
- 結果ファイル保存: 全ての検出結果がresult.txtファイルに自動保存され、後から詳細な解析が可能である。
第2章 使用する学習済みモデル
RF-DETR事前学習済みモデル:
- 学習データセット: MS COCO 2017(80クラス物体検出)
- 検出可能物体: 人、車両、動物、家具、電子機器など80種類
- 出力形式: バウンディングボックス + クラス確率 + 信頼度
- 入力解像度: モデルサイズごとに固定(Nano: 384×384、Small: 512×512、Medium: 576×576、Large: 704×704)
- モデルバリエーション: Nano、Small、Medium、Largeの4種類
- 技術特徴: DINOv2 Vision Transformerバックボーン、deformable DETR検出ヘッド、NMS不要のEnd-to-End検出
第3章 Python開発環境,ライブラリ類
ここでは、最低限の事前準備について説明する。機械学習や深層学習を行う場合は、NVIDIA CUDA、Visual Studio、Cursorなどを追加でインストールすると便利である。これらについては別ページ https://www.kkaneko.jp/cc/dev/aiassist.htmlで詳しく解説しているので、必要に応じて参照してください。
第4章 Python 3.12 のインストール
Pythonのインストールを行い、Pythonのプログラムを実行する環境を整える。扱う環境は、Windows搭載パソコンである。金子研究室では、Python 3.12.10を推奨する。
[Windows での Python 3.12 のインストール手順を見るには、ここをクリック]
Windows での Python 3.12 のインストール
以下のいずれかの方法でPython 3.12をインストールする。Pythonがインストール済みの場合、この手順は不要である。
方法 1:winget によるインストール
【インストールコマンドの実行方法】
管理者権限でコマンドプロンプトを起動する(手順:Windowsキーまたはスタートメニュー → cmd と入力 → 右クリック → 「管理者として実行」)。そして、コマンド全体をコマンドプロンプトにコピー&ペーストする。
--scope machine を指定することで、システム全体(全ユーザー向け)にインストールされる。このオプションの実行には管理者権限が必要である。インストール完了後、コマンドプロンプトを再起動するとPATHが反映される。
REM Python 3.12 をシステム領域にインストール
winget install --id Python.Python.3.12 -e --scope machine --silent --accept-source-agreements --accept-package-agreements --override "/quiet InstallAllUsers=1 PrependPath=1 Include_test=0 Include_pip=1 Include_launcher=1 InstallLauncherAllUsers=1 TargetDir=\"C:\Program Files\Python312\""
if not "%ERRORLEVEL%"=="0" ( color 0c & echo Python 3.12 のインストールに失敗しました & ping 127.0.0.1 -n 6 >nul & color )

REM Python と Scripts を PATH 先頭に追加
powershell -NoProfile -Command "$p='C:\Program Files\Python312'; $s=\"$p\Scripts\"; if(Test-Path $p){$k=[Microsoft.Win32.Registry]::LocalMachine.OpenSubKey('SYSTEM\CurrentControlSet\Control\Session Manager\Environment',$true); $c=$k.GetValue('Path','',[Microsoft.Win32.RegistryValueOptions]::DoNotExpandEnvironmentNames); $t=$k.GetValueKind('Path'); $new=$c; if((';'+$new+';') -notlike \"*;$p;*\"){$new=$p+';'+$new}; if((';'+$new+';') -notlike \"*;$s;*\"){$new=$s+';'+$new}; if($new -ne $c){$k.SetValue('Path',$new,$t)}; $k.Close()}"

REM 現在のセッションにも反映(システムPATHを再取得して連結)
for /f "usebackq tokens=2,*" %A in (`reg query "HKLM\SYSTEM\CurrentControlSet\Control\Session Manager\Environment" /v Path`) do set "PATH=%B"

REM pip / wheel の更新
python -m pip install --no-user -U pip wheel
if not "%ERRORLEVEL%"=="0" ( color 0c & echo pip / wheel の更新に失敗しました & ping 127.0.0.1 -n 6 >nul & color )
方法 2:インストーラーによるインストール
- Python公式サイト(https://www.python.org/downloads/)にアクセスし、「Download Python 3.x.x」ボタンからWindows用インストーラーをダウンロードする。
- ダウンロードしたインストーラーを実行する。
- 初期画面の下部に表示される「Add python.exe to PATH」にチェックを入れてから「Customize installation」を選択する。このチェックを入れ忘れると、コマンドプロンプトから
pythonコマンドを実行できない。 - 「Install Python 3.xx for all users」にチェックを入れ、「Install」をクリックする。
インストールの確認
コマンドプロンプトで以下を実行する。
python --versionバージョン番号(例:Python 3.12.x)が表示されればインストール成功である。「'python' は、内部コマンドまたは外部コマンドとして認識されていません。」と表示される場合は、インストールが正常に完了していない。
第5章 Python の開発環境 Visual Studio Code のインストールと Python 用の設定
Python の開発環境Visual Studio Code(プログラムを編集するソフトウェア。以下、VS Code)を整える。
[Windows での Visual Studio Code のインストールと Python 用の設定手順を見るには、ここをクリック]
Windows での Visual Studio Code のインストールと Python 用の設定手順
1. VS Code と拡張機能のインストール
以下のコマンドにより,既存の VS Code を削除し,全ユーザー共有の設定で再インストールしたうえで,拡張機能(VS Code に機能を追加するソフトウェア)をまとめて導入する.
【インストールコマンドの実行方法】
管理者権限でコマンドプロンプトを起動する(手順:Windows キーまたはスタートメニュー → cmd と入力 → 右クリック → 「管理者として実行」)。そして,コマンド全体をコマンドプロンプトにコピー&ペーストする。
インストールコマンド
REM ============================================================
REM Microsoft Visual Studio Code
REM ============================================================
REM Build Tools + Desktop development with C++(VCTools)+ 追加コンポーネント(一括)
REM 未インストール時: winget で新規インストール
REM インストール済み時: setup.exe modify でコンポーネント追加(バージョンは変更しない)
winget list --id Microsoft.VisualStudio.BuildTools 2>nul | findstr /i "BuildTools" >nul 2>&1
if %ERRORLEVEL% EQU 0 (
    for /f "usebackq delims=" %P in (`"C:\Program Files (x86)\Microsoft Visual Studio\Installer\vswhere.exe" -products Microsoft.VisualStudio.Product.BuildTools -property installationPath`) do start /wait "" "C:\Program Files (x86)\Microsoft Visual Studio\Installer\setup.exe" modify --installPath "%P" --add Microsoft.VisualStudio.Workload.VCTools --add Microsoft.VisualStudio.Workload.MSBuildTools --add Microsoft.VisualStudio.Component.VC.CMake.Project --add Microsoft.VisualStudio.Component.VC.Llvm.Clang --add Microsoft.VisualStudio.Component.VC.Llvm.ClangToolset --add Microsoft.VisualStudio.Component.Windows11SDK.26100 --add Microsoft.VisualStudio.Component.VC.v143.x86.x64 --includeRecommended --quiet --norestart --nocache
    if not "%ERRORLEVEL%"=="0" ( color 0c & echo Build Tools のコンポーネント追加に失敗しました & ping 127.0.0.1 -n 6 >nul & color )
) else (
    winget install --scope machine --id Microsoft.VisualStudio.BuildTools -e --silent --disable-interactivity --force --accept-source-agreements --accept-package-agreements --override "--quiet --wait --norestart --nocache --add Microsoft.VisualStudio.Workload.VCTools --includeRecommended --add Microsoft.VisualStudio.Workload.MSBuildTools --add Microsoft.VisualStudio.Component.VC.CMake.Project --add Microsoft.VisualStudio.Component.VC.Llvm.Clang --add Microsoft.VisualStudio.Component.VC.Llvm.ClangToolset --add Microsoft.VisualStudio.Component.Windows11SDK.26100 --add Microsoft.VisualStudio.Component.VC.v143.x86.x64"
    if not "%ERRORLEVEL%"=="0" ( color 0c & echo Build Tools のインストールに失敗しました & ping 127.0.0.1 -n 6 >nul & color )
)

REM 全ユーザー共有の拡張機能フォルダ
if not exist "C:\ProgramData\vscode-extensions" mkdir "C:\ProgramData\vscode-extensions"
icacls "C:\ProgramData\vscode-extensions" /grant "Everyone:(OI)(CI)M" /T

REM スタートメニューのショートカットを --extensions-dir 付きで再作成
if exist "C:\ProgramData\Microsoft\Windows\Start Menu\Programs\Visual Studio Code" rmdir /s /q "C:\ProgramData\Microsoft\Windows\Start Menu\Programs\Visual Studio Code"
if exist "C:\ProgramData\Microsoft\Windows\Start Menu\Programs\Visual Studio Code.lnk" del "C:\ProgramData\Microsoft\Windows\Start Menu\Programs\Visual Studio Code.lnk"
powershell -NoProfile -Command "$s=New-Object -ComObject WScript.Shell; $lnk=$s.CreateShortcut('C:\ProgramData\Microsoft\Windows\Start Menu\Programs\Visual Studio Code.lnk'); $lnk.TargetPath='C:\Program Files\Microsoft VS Code\Code.exe'; $lnk.Arguments='--extensions-dir \"C:\ProgramData\vscode-extensions\"'; $lnk.Save()"
REM ショートカットの検証
powershell -NoProfile -Command "$s=New-Object -ComObject WScript.Shell; $lnk=$s.CreateShortcut('C:\ProgramData\Microsoft\Windows\Start Menu\Programs\Visual Studio Code.lnk'); Write-Host 'TargetPath:' $lnk.TargetPath; Write-Host 'Arguments:' $lnk.Arguments"

REM ファイル / フォルダ右クリックの「Code で開く」を登録
reg add "HKLM\SOFTWARE\Classes\*\shell\VSCode\command" /ve /d "\"C:\Program Files\Microsoft VS Code\Code.exe\" --extensions-dir \"C:\ProgramData\vscode-extensions\" \"%1\"" /f
reg add "HKLM\SOFTWARE\Classes\Directory\shell\VSCode\command" /ve /d "\"C:\Program Files\Microsoft VS Code\Code.exe\" --extensions-dir \"C:\ProgramData\vscode-extensions\" \"%1\"" /f
reg add "HKLM\SOFTWARE\Classes\Directory\Background\shell\VSCode\command" /ve /d "\"C:\Program Files\Microsoft VS Code\Code.exe\" --extensions-dir \"C:\ProgramData\vscode-extensions\" \"%V\"" /f

REM --extensions-dir 付きで起動する code.cmd ラッパを作成
REM (%* を echo で書くと対話的 cmd で失われるため、PowerShell で [char]37+'*' を書き出す)
powershell -NoProfile -Command "$pct=[char]37; $q=[char]34; $c='@echo off'+[char]13+[char]10+$q+'C:\Program Files\Microsoft VS Code\bin\code.cmd'+$q+' --extensions-dir '+$q+'C:\ProgramData\vscode-extensions'+$q+' '+$pct+'*'+[char]13+[char]10; [IO.File]::WriteAllText('C:\ProgramData\vscode-extensions\vscode.cmd',$c,[Text.Encoding]::ASCII)"

REM 拡張機能のインストール
set "CODE=C:\Program Files\Microsoft VS Code\bin\code.cmd"
"%CODE%" --extensions-dir "C:\ProgramData\vscode-extensions" --uninstall-extension GitHub.copilot
"%CODE%" --extensions-dir "C:\ProgramData\vscode-extensions" --uninstall-extension GitHub.copilot-chat
"%CODE%" --extensions-dir "C:\ProgramData\vscode-extensions" --install-extension ms-python.python
"%CODE%" --extensions-dir "C:\ProgramData\vscode-extensions" --install-extension ms-python.vscode-pylance
"%CODE%" --extensions-dir "C:\ProgramData\vscode-extensions" --install-extension ms-python.debugpy
"%CODE%" --extensions-dir "C:\ProgramData\vscode-extensions" --install-extension MS-CEINTL.vscode-language-pack-ja
"%CODE%" --extensions-dir "C:\ProgramData\vscode-extensions" --install-extension saoudrizwan.claude-dev
"%CODE%" --extensions-dir "C:\ProgramData\vscode-extensions" --install-extension rust-lang.rust-analyzer
"%CODE%" --extensions-dir "C:\ProgramData\vscode-extensions" --install-extension tamasfe.even-better-toml
"%CODE%" --extensions-dir "C:\ProgramData\vscode-extensions" --install-extension anthropic.claude-code
"%CODE%" --extensions-dir "C:\ProgramData\vscode-extensions" --install-extension almenon.arepl
"%CODE%" --extensions-dir "C:\ProgramData\vscode-extensions" --list-extensions --show-versions

REM settings.json を作成(自動更新オフ、Python、Claude Code 設定)
if not exist "%APPDATA%\Code\User" mkdir "%APPDATA%\Code\User"
python -c "import json,os;data={'update.mode':'none','update.enableWindowsBackgroundUpdates':False,'extensions.autoUpdate':False,'python.defaultInterpreterPath':r'C:\Program Files\Python312\python.exe','claudeCode.environmentVariables':[{'name':'ANTHROPIC_API_KEY','value':'not-needed'},{'name':'ANTHROPIC_AUTH_TOKEN','value':'ollama'},{'name':'ANTHROPIC_BASE_URL','value':'http://localhost:11434'},{'name':'ANTHROPIC_MODEL','value':'glm-4.7-flash'},{'name':'CLAUDE_CODE_DISABLE_NONESSENTIAL_TRAFFIC','value':'1'}]};p=os.path.join(os.environ['APPDATA'],'Code','User','settings.json');open(p,'w',encoding='utf-8').write(json.dumps(data,indent=4));print('Done:',p)"

REM 自動更新の抑止ポリシー(settings.json に加えて、レジストリ側でも明示的にオフ)
reg add "HKLM\SOFTWARE\Policies\Microsoft\VSCode" /v "UpdateMode" /t REG_SZ /d "none" /f
echo === セットアップ完了 ===
2. Python インタプリタの選択
同一マシンに複数の Python がインストールされている場合,VS Code で使用する Python 本体(インタプリタ:Python プログラムを解釈・実行するソフトウェア)を選択する必要がある.
- コマンドパレット(コマンド名で機能を呼び出す VS Code の入力欄)を開く(
Ctrl+Shift+P) Python: Select Interpreterと入力する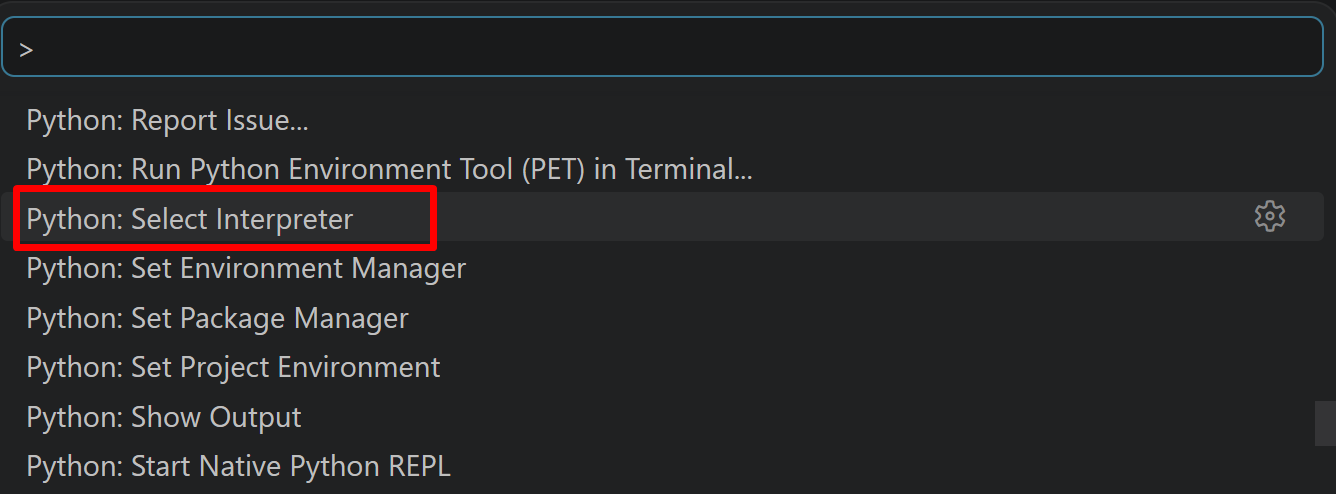
- 表示される一覧から,使用する Python(例:
C:\Program Files\Python312\python.exe)を選択する.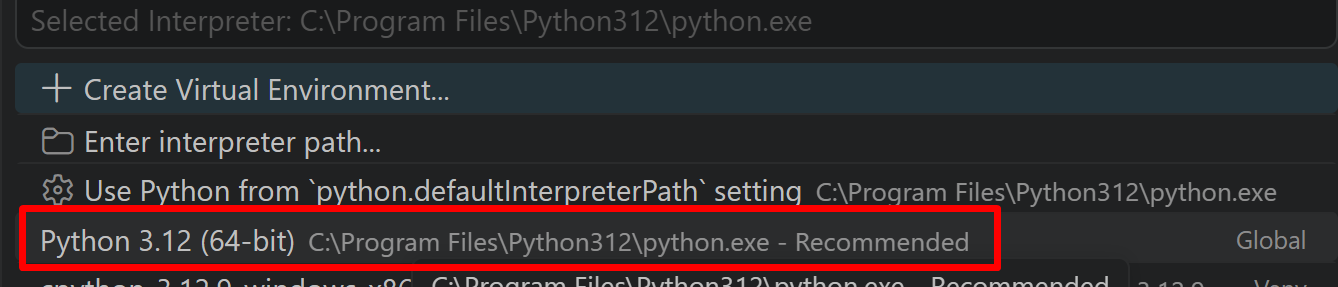
必要なライブラリをシステム領域にインストール
管理者権限でコマンドプロンプトを起動する
(手順:Windowsキーまたはスタートメニュー → cmd と入力 → 右クリック → 「管理者として実行」)。
REM PyTorch をインストール(GPU対応版)
set "CUDA_TAG=cu128"
set "PYTHON_PATH=C:\Program Files\Python312"
"%PYTHON_PATH%\Scripts\pip" install --no-user -U numpy torch torchvision torchaudio --index-url https://download.pytorch.org/whl/%CUDA_TAG%
pip install --no-user rfdetr opencv-python numpy pillow boxmot
第6章 RF-DETRによる物体検出プログラム・BoT-SORTによる追跡とTTAの機能付き(COCO 80クラス)
概要
このプログラムは、RF-DETRを用いた物体検出システムである。動画ファイル、ウェブカメラ、サンプル動画から取得した映像に対してリアルタイムで物体検出を実行し、COCOデータセット80クラスの物体をバウンディングボックスで表示する。検出精度の向上を目的として、CLAHE(コントラスト制限付き適応ヒストグラム均一化)とTTA(Test Time Augmentation)を組み合わせた前処理を実装している[1][2]。
主要技術
RF-DETR(Roboflow Detection Transformer)
Roboflowが開発したTransformerベースのリアルタイム物体検出アルゴリズムである[1]。DINOv2 Vision Transformerバックボーンとdeformable DETR検出ヘッドを組み合わせ、COCOデータセットにおいてリアルタイム物体検出モデルとして初めてmAP 60を超える精度を達成した(最上位モデルの場合)。NMS(Non-Maximum Suppression)を必要としないEnd-to-Endの検出方式を採用しており、後処理の負荷が小さい。
CLAHE(Contrast Limited Adaptive Histogram Equalization)
Zuiderveldが1994年に提案したコントラスト強化手法である[3][4]。画像を小領域(タイル)に分割し、各タイルでヒストグラム均一化を適用する。コントラスト制限機能により、ノイズの過度な増幅を防止する。
BoT-SORT
Aharon et al.が2022年に発表した物体追跡手法である[7]。ByteTrackの二段階マッチングを踏襲しつつ、カメラの動き補償(Camera Motion Compensation)とカルマンフィルタの状態ベクトル改良を加える。本プログラムでは外観特徴(ReID)を使わず、カメラ動き補償とカルマンフィルタによる動き予測、ハンガリアンアルゴリズムによるデータアソシエーションのみで、低信頼度検出も含めた2段階の関連付けにより、遮蔽環境でも安定した追跡を実現する。
技術的特徴
- Test Time Augmentation(TTA)による検出精度向上
推論時に元画像と水平反転画像の両方を処理し、Non-Maximum Suppression(NMS)で結果を統合する[5][6]。この手法により物体の向きに対する頑健性が向上し、検出漏れが減少する。
- CLAHE前処理による暗部環境対応
YUV色空間のY(輝度)チャンネルにCLAHEを適用し、暗い場所や逆光環境での検出精度を向上させる[3][4]。clipLimit=3.0、tileGridSize=(8,8)のパラメータを使用する。
- GPU/CPU自動検出システム
CUDA対応GPUの有無を自動判定し、利用可能な場合はGPU処理、そうでない場合はCPU処理に自動切り替えを行う。
- 固定信頼度閾値フィルタリング
物体検出の信頼度閾値(CONF_THRESH=0.25)とTTA用のNMS閾値(NMS_THRESHOLD=0.6)による安定したフィルタリングを実装する。
- BoT-SORT物体追跡
フレーム間での物体の継続的な追跡により、一時的な検出失敗や遮蔽に対する頑健性を提供する。カメラ動き補償を用いて、カメラが動く場面でも各物体に固有のIDを安定して割り当て、軌跡を管理する。
実装の特色
リアルタイム映像処理に特化した設計を採用し、以下の機能を備える:
- 3つの入力ソース選択(動画ファイル、ウェブカメラ、サンプル動画)
- 日本語対応のリアルタイム結果表示(Pillow + Meiryoフォント使用)
- 4つのモデルサイズ選択(Nano、Small、Medium、Large)
- BoT-SORT追跡による物体ID管理機能
- 検出結果の自動ファイル出力機能(result.txt)
- フレーム処理結果の詳細ログ出力
- 色分けされたクラス別バウンディングボックス表示
参考文献
[1] Robinson, I., Robicheaux, P., Popov, M., Ramanan, D., & Peri, N. (2026). RF-DETR: Real-Time Detection Transformer. International Conference on Learning Representations (ICLR). https://arxiv.org/abs/2511.09554
[2] Roboflow. (2026). RF-DETR: A SOTA Real-Time Object Detection Model By Roboflow. https://blog.roboflow.com/rf-detr/
[3] Zuiderveld, K. (1994). Contrast limited adaptive histogram equalization. Graphics gems IV, 474-485.
[4] OpenCV Team. (2024). Histogram Equalization Documentation. https://docs.opencv.org/4.x/d5/daf/tutorial_py_histogram_equalization.html
[5] Shanmugam, D., Blalock, D., Balakrishnan, G., & Guttag, J. (2021). When and why test-time augmentation works. arXiv preprint arXiv:2011.11156.
[6] Machine Learning Mastery. (2020). How to Use Test-Time Augmentation. https://machinelearningmastery.com/how-to-use-test-time-augmentation-to-improve-model-performance-for-image-classification/
[7] Aharon, N., Orfaig, R., & Bobrovsky, B. Z. (2022). BoT-SORT: Robust Associations Multi-Pedestrian Tracking. arXiv preprint arXiv:2206.14651. https://arxiv.org/abs/2206.14651
ソースコード
"""
プログラム名: RF-DETRによる物体検出プログラム(COCO 80クラス)・BoT-SORTによる追跡とTTAの機能付き
特徴技術名: RF-DETR (Real-Time Detection Transformer developed by Roboflow)
出典: I. Robinson, P. Robicheaux, M. Popov, D. Ramanan, and N. Peri, "RF-DETR: Real-Time Detection Transformer," International Conference on Learning Representations (ICLR), 2026. https://arxiv.org/abs/2511.09554
特徴機能: DINOv2 Vision Transformerバックボーンとdeformable DETR検出ヘッドによる、NMS不要のEnd-to-End物体検出
学習済みモデル: RFDETRNano/RFDETRSmall/RFDETRMedium/RFDETRLarge(rfdetrパッケージ)、COCOデータセットで事前学習済み
特徴技術および学習済モデルの利用制限: Apache 2.0ライセンス(rfdetrパッケージ、Nano〜Largeの各モデル)。商用利用を含め利用制限は緩やかである。boxmotパッケージ(BoT-SORT実装)はAGPL-3.0ライセンス(ネットワークサービスとして提供する場合はソースコード公開が必要)。必ず利用者自身で各ライセンスの詳細を確認すること。
方式設計:
  関連利用技術:
    - PyTorch: ディープラーニングフレームワーク、GPU/CPU自動選択
    - rfdetr: RF-DETR公式Pythonパッケージ
    - OpenCV: 画像・動画処理、カメラ制御
    - CLAHE (Contrast Limited Adaptive Histogram Equalization): 低照度環境での画像品質向上
    - BoT-SORT: カルマンフィルタとカメラ動き補償による物体追跡(boxmotパッケージ版、ReIDモデル不使用)
    - TTA (Test Time Augmentation): 複数の画像変換で推論し結果を統合
  入力と出力: 入力: 動画(ユーザは「0:動画ファイル,1:カメラ,2:サンプル動画」のメニューで選択.0:動画ファイルの場合はtkinterでファイル選択.1の場合はOpenCVでカメラが開く.2の場合はhttps://raw.githubusercontent.com/opencv/opencv/master/samples/data/vtest.aviを使用)、出力: OpenCV画面でリアルタイム表示、検出結果をresult.txtに保存
  処理手順: 1.動画フレーム取得→2.CLAHE前処理→3.TTA適用→4.RF-DETR推論実行→5.バウンディングボックス抽出→6.BoT-SORT追跡→7.結果描画
  前処理、後処理: 前処理:CLAHE適用による画像コントラスト強化、後処理:predict()による結果整形(NMSは不要)、BoT-SORT追跡による検出結果の安定化とID管理
  追加処理: TTA - 水平反転による推論結果の統合
  調整を必要とする設定値: CONF_THRESH(信頼度閾値、デフォルト0.25)- 検出感度を制御、値が低いほど多くの物体を検出、TTA_ENABLED(TTAの有効/無効、デフォルトTrue)
将来方策: 信頼度閾値の自動最適化 - 検出結果の時系列分析により、シーンごとに最適な閾値を動的に学習・適用する機能
その他の重要事項: COCOクラス検出可能、Windows環境での動作を想定(フォントはC:/Windows/Fonts/meiryo.ttc を使用)
前準備:
pip install --no-user rfdetr opencv-python numpy pillow boxmot
"""
import cv2
import numpy as np
import torch
import torchvision
from rfdetr import RFDETRNano, RFDETRSmall, RFDETRMedium, RFDETRLarge
from rfdetr.assets.coco_classes import COCO_CLASSES
import tkinter as tk
from tkinter import filedialog
import urllib.request
import time
import sys
import io
from pathlib import Path
from datetime import datetime
from PIL import Image, ImageDraw, ImageFont
from boxmot import BotSort
import warnings
import threading

warnings.filterwarnings('ignore')

# Windows文字エンコーディング設定
sys.stdout = io.TextIOWrapper(sys.stdout.buffer, encoding='utf-8', line_buffering=True)

# GPU/CPU自動選択
device = torch.device('cuda' if torch.cuda.is_available() else 'cpu')
print(f'デバイス: {str(device)}')

# GPU使用時の最適化
if device.type == 'cuda':
    torch.backends.cudnn.benchmark = True

# モデル情報の構造化
MODEL_INFO = {
    '1': {
        'name': 'RFDETRNano',
        'class': RFDETRNano,
        'desc': 'Nano(速度重視)'
    },
    '2': {
        'name': 'RFDETRSmall',
        'class': RFDETRSmall,
        'desc': 'Small(速度と精度のバランス)'
    },
    '3': {
        'name': 'RFDETRMedium',
        'class': RFDETRMedium,
        'desc': 'Medium(精度重視)'
    },
    '4': {
        'name': 'RFDETRLarge',
        'class': RFDETRLarge,
        'desc': 'Large(最高精度)'
    }
}

# 調整可能な設定値
CONF_THRESH = 0.25      # 信頼度閾値 - 検出感度制御
NMS_THRESHOLD = 0.6     # TTA用のNMS閾値(独立管理)
CLAHE_CLIP_LIMIT = 3.0  # CLAHE制限値
CLAHE_TILE_SIZE = (8, 8)  # CLAHEタイルサイズ
WINDOW_NAME = "RF-DETR COCO Detection"  # OpenCVウィンドウ名
TTA_ENABLED = True      # TTA(Test Time Augmentation)の有効/無効
TTA_CONF_BOOST = 0.03   # TTA使用時の信頼度ブースト値
USE_TRACKER = True      # トラッカーの使用有無

# CLAHEオブジェクトをグローバルスコープで一度だけ定義(AIモデルの入力用にCLAHEを適用)
clahe = cv2.createCLAHE(clipLimit=CLAHE_CLIP_LIMIT, tileGridSize=CLAHE_TILE_SIZE)

# BoT-SORTトラッカーを初期化(ReIDモデル不使用、カメラ動き補償を使用)
tracker = BotSort(
    reid_weights=Path('osnet_x0_25_msmt17.pt'),
    device=device,
    half=(device.type == 'cuda'),
    with_reid=False
) if USE_TRACKER else None

# BGR→RGB色変換のヘルパー関数
def bgr_to_rgb(color_bgr):
    """BGRカラーをRGBカラーに変換"""
    return (color_bgr[2], color_bgr[1], color_bgr[0])

# クラスごとの色生成(HSVからBGRに変換)
def generate_class_colors(num_classes):
    colors = []
    for i in range(num_classes):
        hue = int(180.0 * i / num_classes)
        hsv = np.uint8([[[hue, 255, 255]]])
        bgr = cv2.cvtColor(hsv, cv2.COLOR_HSV2BGR)[0][0]
        colors.append((int(bgr[0]), int(bgr[1]), int(bgr[2])))
    return colors

# 日本語クラス名マッピング
CLASS_NAMES_JP = {
    'person': '人', 'bicycle': '自転車', 'car': '車', 'motorcycle': 'バイク',
    'airplane': '飛行機', 'bus': 'バス', 'train': '電車', 'truck': 'トラック',
    'boat': 'ボート', 'traffic light': '信号機', 'fire hydrant': '消火栓',
    'stop sign': '停止標識', 'parking meter': 'パーキングメーター', 'bench': 'ベンチ',
    'bird': '鳥', 'cat': '猫', 'dog': '犬', 'horse': '馬', 'sheep': '羊',
    'cow': '牛', 'elephant': '象', 'bear': '熊', 'zebra': 'シマウマ', 'giraffe': 'キリン',
    'backpack': 'リュック', 'umbrella': '傘', 'handbag': 'ハンドバッグ', 'tie': 'ネクタイ',
    'suitcase': 'スーツケース', 'frisbee': 'フリスビー', 'skis': 'スキー板',
    'snowboard': 'スノーボード', 'sports ball': 'ボール', 'kite': '凧',
    'baseball bat': 'バット', 'baseball glove': 'グローブ', 'skateboard': 'スケートボード',
    'surfboard': 'サーフボード', 'tennis racket': 'テニスラケット', 'bottle': 'ボトル',
    'wine glass': 'ワイングラス', 'cup': 'カップ', 'fork': 'フォーク', 'knife': 'ナイフ',
    'spoon': 'スプーン', 'bowl': 'ボウル', 'banana': 'バナナ', 'apple': 'リンゴ',
    'sandwich': 'サンドイッチ', 'orange': 'オレンジ', 'broccoli': 'ブロッコリー',
    'carrot': 'ニンジン', 'hot dog': 'ホットドッグ', 'pizza': 'ピザ', 'donut': 'ドーナツ',
    'cake': 'ケーキ', 'chair': '椅子', 'couch': 'ソファ', 'potted plant': '鉢植え',
    'bed': 'ベッド', 'dining table': 'テーブル', 'toilet': 'トイレ', 'tv': 'テレビ',
    'laptop': 'ノートPC', 'mouse': 'マウス', 'remote': 'リモコン', 'keyboard': 'キーボード',
    'cell phone': '携帯電話', 'microwave': '電子レンジ', 'oven': 'オーブン',
    'toaster': 'トースター', 'sink': 'シンク', 'refrigerator': '冷蔵庫',
    'book': '本', 'clock': '時計', 'vase': '花瓶', 'scissors': 'ハサミ',
    'teddy bear': 'ぬいぐるみ', 'hair drier': 'ドライヤー', 'toothbrush': '歯ブラシ'
}

# 日本語フォント設定
FONT_PATH = 'C:/Windows/Fonts/meiryo.ttc'
FONT_SIZE_MAIN = 16
font_main = ImageFont.truetype(FONT_PATH, FONT_SIZE_MAIN)

# グローバル変数
frame_count = 0
results_log = []
class_counts = {}
model = None
id2label = {}
CLASS_COLORS = []


class ThreadedVideoCapture:
    """スレッド化されたVideoCapture(常に最新フレームを取得)"""
    def __init__(self, src, is_camera=False):
        if is_camera:
            self.cap = cv2.VideoCapture(src, cv2.CAP_DSHOW)
            fourcc = cv2.VideoWriter_fourcc('M', 'J', 'P', 'G')
            self.cap.set(cv2.CAP_PROP_FOURCC, fourcc)
            self.cap.set(cv2.CAP_PROP_FPS, 60)
        else:
            self.cap = cv2.VideoCapture(src)

        self.grabbed, self.frame = self.cap.read()
        self.stopped = False
        self.lock = threading.Lock()
        self.thread = threading.Thread(target=self.update, args=())
        self.thread.daemon = True
        self.thread.start()

    def update(self):
        """バックグラウンドでフレームを取得し続ける"""
        while not self.stopped:
            grabbed, frame = self.cap.read()
            with self.lock:
                self.grabbed = grabbed
                if grabbed:
                    self.frame = frame

    def read(self):
        """最新フレームを返す"""
        with self.lock:
            return self.grabbed, self.frame.copy() if self.grabbed else None

    def isOpened(self):
        return self.cap.isOpened()

    def get(self, prop):
        return self.cap.get(prop)

    def release(self):
        self.stopped = True
        self.thread.join()
        self.cap.release()


def display_program_header():
    print('=' * 60)
    print('=== RF-DETRオブジェクト検出プログラム ===')
    print('=' * 60)
    print('概要: CLAHEとTTAを適用し、リアルタイムでオブジェクトを検出します')
    print('機能: RF-DETRによる物体検出(COCOデータセット対応)')
    print('技術: CLAHE (コントラスト強化) + BoT-SORT による追跡 + TTA (Test Time Augmentation) + RF-DETR')
    print('操作: qキーで終了')
    print('出力: 各フレームごとに処理結果を表示し、終了時にresult.txtへ保存')
    print()


# ===== 共通処理関数 =====
def to_rgb(image_bgr):
    """BGR画像をRF-DETRの入力形式であるRGB画像に変換する共通処理"""
    return cv2.cvtColor(image_bgr, cv2.COLOR_BGR2RGB)


# ===== TTA機能 =====
def apply_tta_inference(frame, model, id2label, conf_thresh):
    """Test Time Augmentation (TTA)を適用した推論"""
    frame_width = frame.shape[1]

    # 元画像の推論
    results_orig = model.predict(to_rgb(frame), threshold=conf_thresh)

    # 水平反転画像の推論
    flipped_frame = cv2.flip(frame, 1)
    results_flipped = model.predict(to_rgb(flipped_frame), threshold=conf_thresh)

    all_boxes = []
    all_confs = []
    all_labels = []

    # 元画像の結果
    if len(results_orig.class_id) > 0:
        all_boxes.append(torch.as_tensor(results_orig.xyxy, dtype=torch.float32))
        all_confs.append(torch.as_tensor(results_orig.confidence, dtype=torch.float32))
        all_labels.append(torch.as_tensor(results_orig.class_id, dtype=torch.int64))

    # 反転画像の結果(座標を元に戻す)
    if len(results_flipped.class_id) > 0:
        boxes_flipped = torch.as_tensor(results_flipped.xyxy, dtype=torch.float32).clone()
        if boxes_flipped.shape[0] > 0:
            # x1 < x2の関係を保つための修正
            x1_flipped = boxes_flipped[:, 0].clone()
            x2_flipped = boxes_flipped[:, 2].clone()
            boxes_flipped[:, 0] = frame_width - 1 - x2_flipped  # 新しいx1(左端)
            boxes_flipped[:, 2] = frame_width - 1 - x1_flipped  # 新しいx2(右端)

        all_boxes.append(boxes_flipped)
        all_confs.append(torch.as_tensor(results_flipped.confidence, dtype=torch.float32))
        all_labels.append(torch.as_tensor(results_flipped.class_id, dtype=torch.int64))

    if len(all_boxes) == 0:
        return []

    # 全ての結果を結合
    all_boxes = torch.cat(all_boxes, dim=0)
    all_confs = torch.cat(all_confs, dim=0)
    all_labels = torch.cat(all_labels, dim=0)

    # 信頼度閾値でフィルタリング(NMS前に実施)
    valid_indices = all_confs > conf_thresh
    if valid_indices.sum() > 0:
        all_boxes = all_boxes[valid_indices]
        all_confs = all_confs[valid_indices]
        all_labels = all_labels[valid_indices]

        # NMSを適用
        nms_indices = torchvision.ops.nms(all_boxes, all_confs, iou_threshold=NMS_THRESHOLD)
        final_boxes = all_boxes[nms_indices].cpu().numpy()
        final_confs = all_confs[nms_indices].cpu().numpy()
        final_labels = all_labels[nms_indices].cpu().numpy()

        # 結果をリスト形式に変換
        detections = []
        for i in range(len(final_confs)):
            conf_boost = TTA_CONF_BOOST if TTA_ENABLED else 0
            x1, y1, x2, y2 = map(int, final_boxes[i])
            cls = int(final_labels[i])
            name = id2label.get(cls, str(cls))
            detections.append({
                'x1': x1, 'y1': y1,
                'x2': x2, 'y2': y2,
                'conf': min(1.0, final_confs[i] + conf_boost),
                'class': cls,
                'name': name
            })

        return detections

    return []


def normal_inference(frame, model, id2label, conf_thresh):
    """通常の推論処理"""
    results = model.predict(to_rgb(frame), threshold=conf_thresh)

    curr_dets = []
    if len(results.class_id) > 0:
        scores = results.confidence
        labels = results.class_id
        boxes = results.xyxy

        order = np.argsort(scores)[::-1]
        for i in order:
            x1, y1, x2, y2 = map(int, boxes[i])
            conf_score = float(scores[i])
            cls = int(labels[i])
            name = id2label.get(cls, str(cls))
            curr_dets.append({
                'x1': x1, 'y1': y1,
                'x2': x2, 'y2': y2,
                'conf': conf_score,
                'class': cls,
                'name': name
            })

    return curr_dets


def apply_tta_if_enabled(frame, model, id2label, conf_thresh):
    """TTA機能を条件付きで適用"""
    if not TTA_ENABLED:
        return normal_inference(frame, model, id2label, conf_thresh)
    return apply_tta_inference(frame, model, id2label, conf_thresh)


# ===== トラッキング機能 =====
def apply_botsort(detections, frame):
    """BoT-SORTを使用したトラッキング処理"""
    global tracker

    # 検出結果が0件でもトラッカーの状態更新と予測結果取得を行う
    if len(detections) > 0:
        dets_array = np.array([[d['x1'], d['y1'], d['x2'], d['y2'], d['conf'], d['class']]
                               for d in detections])
    else:
        # 検出がない場合は空の配列を渡す
        dets_array = np.empty((0, 6))

    # 常にトラッカーを更新し、現在のフレームでの追跡結果(または予測結果)を取得する
    tracks = tracker.update(dets_array, frame)

    tracked_dets = []
    # tracker.updateが返す結果を処理する(検出0件でも予測結果が返る可能性がある)
    if len(tracks) > 0:
        for track in tracks:
            if len(track) >= 7:
                x1, y1, x2, y2, track_id, conf, cls = track[:7]
                name = id2label.get(int(cls), str(int(cls)))
                tracked_dets.append({
                    'x1': int(x1), 'y1': int(y1),
                    'x2': int(x2), 'y2': int(y2),
                    'track_id': int(track_id),
                    'conf': float(conf),
                    'class': int(cls),
                    'name': name
                })
    return tracked_dets


def apply_tracking_if_enabled(detections, frame):
    """トラッキング機能を条件付きで適用"""
    if not USE_TRACKER:
        return detections
    return apply_botsort(detections, frame)


def draw_detection_results(frame, detections):
    """物体検出の描画処理"""
    for det in detections:
        color_seed = det['class']
        color = CLASS_COLORS[color_seed % len(CLASS_COLORS)]
        cv2.rectangle(frame, (det['x1'], det['y1']),
                      (det['x2'], det['y2']), color, 2)

    texts_to_draw = []
    for det in detections:
        color_seed = det['class']
        color = CLASS_COLORS[color_seed % len(CLASS_COLORS)]
        track_id = det.get('track_id', 0) if USE_TRACKER else 0
        jp_name = CLASS_NAMES_JP.get(det['name'], det['name'])
        if USE_TRACKER and track_id > 0:
            label = f"ID:{track_id} {jp_name}: {det['conf']:.2f}"
        else:
            label = f"{jp_name}: {det['conf']:.2f}"

        texts_to_draw.append({
            'text': label,
            'org': (det['x1'], det['y1']-20),
            'color': bgr_to_rgb(color),
            'font_type': 'main'
        })
    frame = draw_texts_with_pillow(frame, texts_to_draw)

    tta_status = "TTA:ON" if TTA_ENABLED else "TTA:OFF"
    tracker_status = "BoT-SORT:ON" if USE_TRACKER else "BoT-SORT:OFF"
    info_text = f"Objects: {len(detections)} | Frame: {frame_count} | Classes: {len(set(d['name'] for d in detections)) if detections else 0} | {tta_status} | {tracker_status}"
    cv2.putText(frame, info_text, (10, 30),
                cv2.FONT_HERSHEY_SIMPLEX, 0.7, (255, 255, 255), 2)

    return frame


def format_detection_output(detections):
    """物体検出の出力フォーマット"""
    if len(detections) == 0:
        return 'count=0'
    else:
        parts = []
        for det in detections:
            x1, y1, x2, y2 = det['x1'], det['y1'], det['x2'], det['y2']
            class_name = det['name']
            conf = det['conf']
            if USE_TRACKER and 'track_id' in det:
                track_id = det['track_id']
                parts.append(f'class={class_name},ID={track_id},conf={conf:.3f},box=[{x1},{y1},{x2},{y2}]')
            else:
                parts.append(f'class={class_name},conf={conf:.3f},box=[{x1},{y1},{x2},{y2}]')
        return f'count={len(detections)}; ' + ' | '.join(parts)


def draw_texts_with_pillow(bgr_frame, texts):
    """テキスト描画, texts: list of dict with keys {text, org, color, font_type}"""
    img_pil = Image.fromarray(cv2.cvtColor(bgr_frame, cv2.COLOR_BGR2RGB))
    draw = ImageDraw.Draw(img_pil)

    for item in texts:
        text = item['text']
        x, y = item['org']
        color = item['color']  # RGB
        draw.text((x, y), text, font=font_main, fill=color)

    return cv2.cvtColor(np.array(img_pil), cv2.COLOR_RGB2BGR)


def detect_objects(frame):
    """共通の検出処理(CLAHE、推論、検出を実行)"""
    global model, id2label

    # AIモデルの入力用にCLAHEを適用(YUV色空間で輝度チャンネルのみ処理)
    yuv_frame = cv2.cvtColor(frame, cv2.COLOR_BGR2YUV)
    yuv_frame[:, :, 0] = clahe.apply(yuv_frame[:, :, 0])
    enh_frame = cv2.cvtColor(yuv_frame, cv2.COLOR_YUV2BGR)

    # TTA機能を条件付きで適用
    curr_dets = apply_tta_if_enabled(enh_frame, model, id2label, CONF_THRESH)

    return curr_dets


def process_video_frame(frame):
    """動画用ラッパー"""
    detections = detect_objects(frame)

    tracked_dets = apply_tracking_if_enabled(detections, frame)

    global class_counts
    for det in tracked_dets:
        name = det['name']
        if name not in class_counts:
            class_counts[name] = 0
        class_counts[name] += 1

    frame = draw_detection_results(frame, tracked_dets)

    result = format_detection_output(tracked_dets)

    return frame, result


def video_frame_processing(frame, timestamp_ms, is_camera):
    """動画フレーム処理(標準形式)"""
    global frame_count
    current_time = time.time()
    frame_count += 1

    processed_frame, result = process_video_frame(frame)
    return processed_frame, result, current_time


display_program_header()

print("\n=== RF-DETRモデル選択 ===")
print('使用するRF-DETRモデルを選択してください:')
for key, info in MODEL_INFO.items():
    print(f'{key}: {info["name"]} ({info["desc"]})')
print()

model_choice = ''
while model_choice not in MODEL_INFO.keys():
    model_choice = input("選択 (1/2/3/4) [デフォルト: 2]: ").strip()
    if model_choice == '':
        model_choice = '2'
        break
    if model_choice not in MODEL_INFO.keys():
        print("無効な選択です。もう一度入力してください。")

print(f"\nRF-DETRモデルをロード中...")
try:
    model_name = MODEL_INFO[model_choice]['name']
    model_class = MODEL_INFO[model_choice]['class']
    model = model_class(device=str(device))

    # ラベルマッピングとクラス色の設定
    id2label = COCO_CLASSES
    NUM_CLASSES = max(id2label.keys()) + 1
    CLASS_COLORS = generate_class_colors(NUM_CLASSES)

    print(f"\n検出可能なクラス数: {len(id2label)}")
    print(f"クラス一覧: {', '.join(id2label.values())}")
    print(f"モデル情報: {MODEL_INFO[model_choice]['desc']}")
    print("モデルのロード完了")
except Exception as e:
    print(f"モデルのロードに失敗しました: {e}")
    raise SystemExit(1)

if TTA_ENABLED:
    print("\nTest Time Augmentation (TTA): 有効")
    print("  - 水平反転による推論結果の統合")
    print(f"  - 信頼度ブースト値: {TTA_CONF_BOOST}")
    print(f"  - NMS閾値: {NMS_THRESHOLD}")
else:
    print("\nTest Time Augmentation (TTA): 無効")

if USE_TRACKER:
    print("\nBoT-SORT: 有効")
    print("  - カルマンフィルタによる動き予測とカメラ動き補償")

print("\n=== RF-DETRリアルタイム物体検出(COCO対応) ===")
print("0: 動画ファイル")
print("1: カメラ")
print("2: サンプル動画")

choice = input("選択: ")

is_camera = (choice == '1')

if choice == '0':
    root = tk.Tk()
    root.withdraw()
    path = filedialog.askopenfilename()
    if not path:
        raise SystemExit(1)
    cap = cv2.VideoCapture(path)
elif choice == '1':
    cap = ThreadedVideoCapture(0, is_camera=True)
else:
    print("サンプル動画をダウンロード中...")
    url = "https://raw.githubusercontent.com/opencv/opencv/master/samples/data/vtest.avi"
    filename = "vtest.avi"
    urllib.request.urlretrieve(url, filename)
    cap = cv2.VideoCapture(filename)

if not cap.isOpened():
    print('動画ファイル・カメラを開けませんでした')
    raise SystemExit(1)

if is_camera:
    actual_fps = cap.get(cv2.CAP_PROP_FPS)
    print(f'カメラのfps: {actual_fps}')
    timestamp_increment = int(1000 / actual_fps) if actual_fps > 0 else 33
else:
    video_fps = cap.get(cv2.CAP_PROP_FPS)
    timestamp_increment = int(1000 / video_fps) if video_fps > 0 else 33

print('\n=== 動画処理開始 ===')
print('操作方法:')
print('  q キー: プログラム終了')

start_time = time.time()
last_info_time = start_time
info_interval = 10.0
timestamp_ms = 0
total_processing_time = 0.0

try:
    while True:
        ret, frame = cap.read()
        if not ret:
            break

        timestamp_ms += timestamp_increment

        processing_start = time.time()
        processed_frame, result, current_time = video_frame_processing(frame, timestamp_ms, is_camera)
        processing_time = time.time() - processing_start
        total_processing_time += processing_time

        cv2.imshow(WINDOW_NAME, processed_frame)

        if result:
            if is_camera:
                timestamp = datetime.fromtimestamp(current_time).strftime("%Y-%m-%d %H:%M:%S.%f")[:-3]
                print(f'{timestamp}, {result}')
            else:
                print(f'Frame {frame_count}: {result}')

            results_log.append(result)

        if is_camera:
            elapsed = current_time - last_info_time
            if elapsed >= info_interval:
                total_elapsed = current_time - start_time
                actual_fps = frame_count / total_elapsed if total_elapsed > 0 else 0
                avg_processing_time = (total_processing_time / frame_count * 1000) if frame_count > 0 else 0
                print(f'[情報] 経過時間: {total_elapsed:.1f}秒, 処理フレーム数: {frame_count}, 実測fps: {actual_fps:.1f}, 平均処理時間: {avg_processing_time:.1f}ms')
                last_info_time = current_time

        if cv2.waitKey(1) & 0xFF == ord('q'):
            break

finally:
    print('\n=== プログラム終了 ===')
    cap.release()
    cv2.destroyAllWindows()

    if results_log:
        with open('result.txt', 'w', encoding='utf-8') as f:
            f.write('=== RF-DETR物体検出結果 ===\n')
            f.write(f'処理フレーム数: {frame_count}\n')
            f.write(f'使用モデル: {model_name}\n')
            f.write(f'モデル情報: {MODEL_INFO[model_choice]["desc"]}\n')
            f.write(f'使用デバイス: {str(device).upper()}\n')
            if device.type == 'cuda':
                f.write(f'GPU: {torch.cuda.get_device_name(0)}\n')
            f.write(f'画像処理: CLAHE適用(YUV色空間)\n')
            f.write(f'TTA (Test Time Augmentation): {"有効" if TTA_ENABLED else "無効"}\n')
            if TTA_ENABLED:
                f.write(f'  - NMS閾値: {NMS_THRESHOLD}\n')
                f.write(f'  - 信頼度ブースト: {TTA_CONF_BOOST}\n')
            f.write(f'BoT-SORT: {"有効" if USE_TRACKER else "無効"}\n')
            f.write(f'信頼度閾値: {CONF_THRESH}(固定値)\n')
            f.write(f'\n検出されたクラス一覧:\n')
            for class_name, count in sorted(class_counts.items()):
                jp_name = CLASS_NAMES_JP.get(class_name, class_name)
                f.write(f'  {jp_name} ({class_name}): {count}回\n')
            f.write('\n')
            f.write('\n'.join(results_log))
        print(f'\n処理結果をresult.txtに保存しました')
        print(f'検出されたクラス数: {len(class_counts)}')