InstructBLIP による Visual Question Answering(ソースコードと実行結果)
Python開発環境,ライブラリ類
ここでは、最低限の事前準備について説明する。機械学習や深層学習を行う場合は、NVIDIA CUDA、Visual Studio、Cursorなどを追加でインストールすると便利である。これらについては別ページ https://www.kkaneko.jp/cc/dev/aiassist.htmlで詳しく解説しているので、必要に応じて参照してください。
Python 3.12 のインストール(Windows 上) [クリックして展開]
以下のいずれかの方法で Python 3.12 をインストールする。Python がインストール済みの場合、この手順は不要である。
方法1:winget によるインストール
管理者権限のコマンドプロンプトで以下を実行する。管理者権限のコマンドプロンプトを起動するには、Windows キーまたはスタートメニューから「cmd」と入力し、表示された「コマンドプロンプト」を右クリックして「管理者として実行」を選択する。
winget install --id Python.Python.3.12 -e --scope machine --silent --accept-source-agreements --accept-package-agreements --override "/quiet InstallAllUsers=1 PrependPath=1 Include_test=0 Include_pip=1 Include_launcher=1 InstallLauncherAllUsers=1 TargetDir=\"C:\Program Files\Python312\""
powershell -Command "$p='C:\Program Files\Python312'; $s=\"$p\Scripts\"; $m=[Environment]::GetEnvironmentVariable('Path','Machine'); if($m -notlike \"*$s*\") { [Environment]::SetEnvironmentVariable('Path', \"$p;$s;$m\", 'Machine') }"
--scope machine を指定することで、システム全体(全ユーザー向け)にインストールされる。このオプションの実行には管理者権限が必要である。インストール完了後、コマンドプロンプトを再起動すると PATH が自動的に設定される。
方法2:インストーラーによるインストール
- Python 公式サイト(https://www.python.org/downloads/)にアクセスし、「Download Python 3.x.x」ボタンから Windows 用インストーラーをダウンロードする。
- ダウンロードしたインストーラーを実行する。
- 初期画面の下部に表示される「Add python.exe to PATH」に必ずチェックを入れてから「Customize installation」を選択する。このチェックを入れ忘れると、コマンドプロンプトから
pythonコマンドを実行できない。 - 「Install Python 3.xx for all users」にチェックを入れ、「Install」をクリックする。
インストールの確認
コマンドプロンプトで以下を実行する。
python --versionバージョン番号(例:Python 3.12.x)が表示されればインストール成功である。「'python' は、内部コマンドまたは外部コマンドとして認識されていません。」と表示される場合は、インストールが正常に完了していない。
AIエディタ Windsurf のインストール(Windows 上) [クリックして展開]
Pythonプログラムの編集・実行には、AIエディタの利用を推奨する。ここでは、Windsurfのインストールを説明する。Windsurf がインストール済みの場合、この手順は不要である。
管理者権限のコマンドプロンプトで以下を実行する。管理者権限のコマンドプロンプトを起動するには、Windows キーまたはスタートメニューから「cmd」と入力し、表示された「コマンドプロンプト」を右クリックして「管理者として実行」を選択する。
winget install --scope machine --id Codeium.Windsurf -e --silent --disable-interactivity --force --accept-source-agreements --accept-package-agreements --custom "/SP- /SUPPRESSMSGBOXES /NORESTART /CLOSEAPPLICATIONS /DIR=""C:\Program Files\Windsurf"" /MERGETASKS=!runcode,addtopath,associatewithfiles,!desktopicon"
powershell -Command "$env:Path=[System.Environment]::GetEnvironmentVariable('Path','Machine')+';'+[System.Environment]::GetEnvironmentVariable('Path','User'); windsurf --install-extension MS-CEINTL.vscode-language-pack-ja --force; windsurf --install-extension ms-python.python --force; windsurf --install-extension Codeium.windsurfPyright --force"
--scope machine を指定することで、システム全体(全ユーザー向け)にインストールされる。このオプションの実行には管理者権限が必要である。インストール完了後、コマンドプロンプトを再起動すると PATH が自動的に設定される。
【関連する外部ページ】
Windsurf の公式ページ: https://windsurf.com/
必要なライブラリをシステム領域にインストール
管理者権限のコマンドプロンプトで以下を実行する。管理者権限のコマンドプロンプトを起動するには、Windows キーまたはスタートメニューから「cmd」と入力し、表示された「コマンドプロンプト」を右クリックして「管理者として実行」を選択する。
REM PyTorch をインストール(GPU対応版)
set "CUDA_TAG=cu128"
set "PYTHON_PATH=C:\Program Files\Python312"
"%PYTHON_PATH%\Scripts\pip" install --no-user -U numpy torch torchvision torchaudio --index-url https://download.pytorch.org/whl/%CUDA_TAG%
pip install transformers torch pillow opencv-python
InstructBLIP による Visual Question Answering プログラム
概要
このプログラムは、画像の内容を理解し、自然言語による質問に対して回答する能力を示す。画像中の物体、場面、関係性を認識し、質問の意図を理解した上で、適切な回答を生成する。
主要技術
- InstructBLIP(Instruction-aware BLIP)
視覚言語モデル。Q-Former(Querying Transformer)を用いて視覚特徴を抽出し、大規模言語モデルに適した表現に変換する[1]。
- Q-Former(Querying Transformer)
32個の学習可能なクエリトークンを用いて、凍結された画像エンコーダから視覚特徴を抽出する機構[2]。視覚情報と言語情報の橋渡しを行う。
主要技術
- [1] Dai, W., Li, J., Li, D., Tiong, A. M. H., Zhao, J., Wang, W., Li, B., Fung, P., & Hoi, S. (2023). InstructBLIP: Towards General-purpose Vision-Language Models with Instruction Tuning. Advances in Neural Information Processing Systems (NeurIPS 2023).
- [2] Li, J., Li, D., Savarese, S., & Hoi, S. (2023). BLIP-2: Bootstrapping Language-Image Pre-training with Frozen Image Encoders and Large Language Models. Proceedings of the 40th International Conference on Machine Learning (ICML 2023).
ソースコード
# プログラム名: InstructBLIP による Visual Question Answering プログラム
# 特徴技術名: InstructBLIP (Instructional Bootstrapping Language-Image Pre-training)
# 出典: Dai, W., Li, J., Li, D., Tiong, A. M. H., Zhao, J., Wang, W., ... & Hoi, S. C. H. (2023). InstructBLIP: Towards General-purpose Vision-Language Models with Instruction Tuning. arXiv preprint arXiv:2305.06500.
# 特徴機能: Vision-Language Understanding - 画像とテキストを同時に理解し、画像に関する質問に自然言語で回答
# 学習済みモデル:
# - instructblip-vicuna-7b (Vicunaベース、7Bパラメータ)
# - instructblip-vicuna-13b (Vicunaベース、13Bパラメータ)
# - instructblip-flan-t5-xl (Flan-T5-XLベース、3Bパラメータ)
# URL: https://huggingface.co/Salesforce/instructblip-vicuna-7b
# 方式設計:
# - 関連利用技術:
# - Transformers: Hugging Faceのマルチモーダル処理フレームワーク
# - PIL: 画像処理ライブラリ
# - PyTorch: 深層学習フレームワーク
# - 入力と出力:
# 入力: 1つの静止画像,カメラ(ユーザは「0:画像ファイル,1:カメラ,2:サンプル画像」のメニューで選択.0:動画ファイルの場合はtkinterでファイル選択可能.1の場合はOpenCVでカメラが開き,スペースキーで撮影.2の場合はサンプル画像URLから選択)
# 出力: 処理結果をprint()で表示.プログラム終了時にprint()で表示した処理結果をresult.txtファイルに保存
# - 処理手順:
# 1. InstructBLIPモデルの選択とダウンロード
# 2. 画像の取得(ファイル/カメラ/サンプル)
# 3. 画像の前処理(リサイズ・正規化)
# 4. モデルへのプロンプトと画像の送信
# 5. 生成された回答の表示と保存
# - 前処理、後処理:
# 前処理: 画像をモデル用にリサイズ・正規化
# 後処理: なし
# - 追加処理: 大きな画像のリサイズ処理(処理速度向上)
# - 調整を必要とする設定値:
# - MAX_LENGTH: 生成の最大長(20-256推奨、質問の複雑さに応じて調整)
# - GENERATION_MODE: 0=beam search(確定的), 1=sampling(創造的)
# - NUM_BEAMS: beam searchのビーム数(2-5推奨)
# - TEMPERATURE: 生成の創造性(0.5-1.0推奨)
# 将来方策: なし
# その他の重要事項: GPU推奨(CPUでも動作可能だが処理時間が長い)
# 前準備: pip install transformers torch pillow opencv-python
import torch
from transformers import InstructBlipProcessor, InstructBlipForConditionalGeneration
import cv2
import tkinter as tk
from tkinter import filedialog
import urllib.request
from PIL import Image
import os
# 定数定義
MODELS = [
("Salesforce/instructblip-vicuna-7b", "InstructBLIP with Vicuna-7B | LAION画像-テキストペア+指示データ | 英語中心"),
("Salesforce/instructblip-vicuna-13b", "InstructBLIP with Vicuna-13B | LAION画像-テキストペア+指示データ | 英語中心"),
("Salesforce/instructblip-flan-t5-xl", "InstructBLIP with Flan-T5-XL | Flan-T5多言語指示データ+画像-テキストペア | 多言語対応")
]
DEFAULT_MODEL = "Salesforce/instructblip-vicuna-7b"
MAX_SIZE = 384
# 生成パラメータ設定
MAX_LENGTH = 256 # 回答生成の最大長(推奨: 20-256、単純な質問:50、詳細説明:200-256)
GENERATION_MODE = 0 # 0: beam search(確定的), 1: sampling(創造的)
NUM_BEAMS = 3 # beam searchのビーム数(推奨: 2-5、精度重視なら5)
TEMPERATURE = 0.8 # 生成の創造性(推奨: 0.5-1.0、低いほど確定的)
TOP_P = 0.9 # nucleus samplingの閾値(推奨: 0.8-0.95)
SAMPLE_URLS = [
"https://raw.githubusercontent.com/opencv/opencv/master/samples/data/fruits.jpg",
"https://raw.githubusercontent.com/opencv/opencv/master/samples/data/messi5.jpg",
"https://raw.githubusercontent.com/opencv/opencv/master/samples/data/aero3.jpg",
"https://upload.wikimedia.org/wikipedia/commons/3/3a/Cat03.jpg"
]
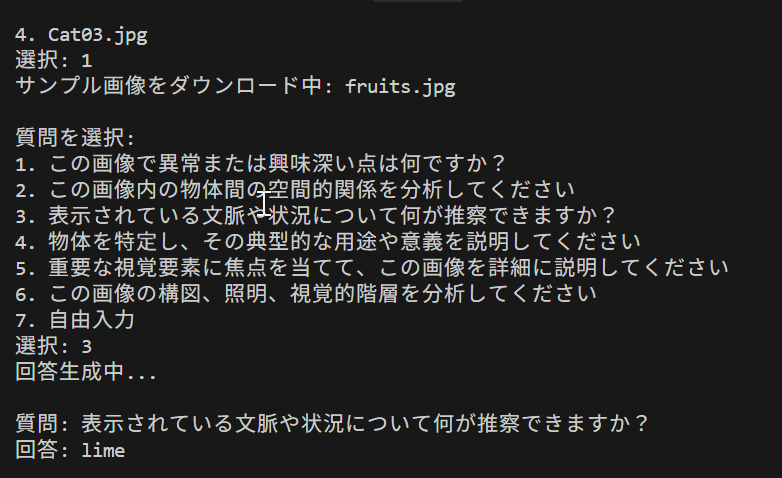
QUESTIONS_JA = [
"この画像で異常または興味深い点は何ですか?",
"この画像内の物体間の空間的関係を分析してください",
"表示されている文脈や状況について何が推察できますか?",
"物体を特定し、その典型的な用途や意義を説明してください",
"重要な視覚要素に焦点を当てて、この画像を詳細に説明してください",
"この画像の構図、照明、視覚的階層を分析してください"
]
QUESTIONS_EN = [
"What is unusual or interesting about this image?",
"Analyze the spatial relationships between objects in this image",
"What can you infer about the context or situation shown?",
"Identify the objects and explain their typical uses or significance",
"Describe this image in detail, focusing on important visual elements",
"Analyze the composition, lighting, and visual hierarchy in this image"
]
print("InstructBLIP VQA システム")
print("概要: 画像に関する質問に対してAIが詳細な回答を生成します")
print("操作方法:")
print(" - 画像選択後、質問を入力してください")
print(" - 複数の質問が可能です")
print(" - カメラモード: スペースキーで撮影、qキーで終了")
print("注意事項: GPU推奨(初回実行時は大容量モデルのダウンロードが発生)")
print()
# デバイス確認
device = "cuda" if torch.cuda.is_available() else "cpu"
print(f"使用デバイス: {device}")
# モデル選択
print("\n利用可能なInstructBLIPモデル:")
for i, (model_name, description) in enumerate(MODELS, 1):
print(f"{i}. {description}")
print("Enter: デフォルト(InstructBLIP with Vicuna-7B)を使用")
choice = input("\nモデル番号 (Enterでデフォルト): ")
if choice == "":
model_name = DEFAULT_MODEL
model_description = "InstructBLIP with Vicuna-7B"
model_idx = 0
else:
model_idx = int(choice) - 1
model_name = MODELS[model_idx][0]
model_description = MODELS[model_idx][1].split(" | ")[0]
# モデルに応じた言語設定
if model_idx == 2: # Flan-T5-XL(多言語対応)
questions = QUESTIONS_JA
language_note = "(日本語プロンプト使用)"
else: # Vicuna系(英語中心)
questions = QUESTIONS_EN
language_note = "(英語プロンプト使用)"
print(f"\n選択されたモデル: {model_description} {language_note}")
print("モデルを読み込み中...")
# GPU最適化とメモリ管理の改善
processor = InstructBlipProcessor.from_pretrained(model_name)
model = InstructBlipForConditionalGeneration.from_pretrained(
model_name,
torch_dtype=torch.float16 if device == 'cuda' else torch.float32,
device_map='auto' if device == 'cuda' else None
)
model.to(device)
model.eval()
print("モデルの読み込み完了\n")
results = []
def preprocess_image(image_input):
"""画像の前処理:PIL形式への変換とリサイズ
大きい画像は処理速度向上のためMAX_SIZE以下に縮小"""
if isinstance(image_input, str):
image = Image.open(image_input).convert('RGB')
else:
image = Image.fromarray(cv2.cvtColor(image_input, cv2.COLOR_BGR2RGB))
if max(image.size) > MAX_SIZE:
image.thumbnail((MAX_SIZE, MAX_SIZE), Image.Resampling.LANCZOS)
return image
def generate_answer(image, question):
"""InstructBLIPを使用して回答生成
beam search(確定的)またはsampling(創造的)を選択可能"""
inputs = processor(images=image, text=question, return_tensors="pt").to(device)
with torch.no_grad():
if GENERATION_MODE == 0:
# Beam search: 確定的で一貫性のある回答
outputs = model.generate(**inputs,
do_sample=False,
num_beams=NUM_BEAMS,
max_length=MAX_LENGTH,
min_length=1,
repetition_penalty=1.5,
length_penalty=1.0)
else:
# Sampling: より創造的で多様な回答
outputs = model.generate(**inputs,
do_sample=True,
max_length=MAX_LENGTH,
temperature=TEMPERATURE,
top_p=TOP_P,
min_length=1,
repetition_penalty=1.5,
length_penalty=1.0)
generated_text = processor.batch_decode(outputs, skip_special_tokens=True)[0].strip()
return generated_text
def process_image(img_input, img_path=None):
"""画像処理メイン:質問選択→回答生成→結果表示・保存"""
image = preprocess_image(img_path or img_input)
# 質問選択
print("\n質問を選択:")
for i, q in enumerate(questions, 1):
print(f"{i}. {q}")
print("7. 自由入力")
q_choice = int(input("選択: "))
if q_choice <= 6:
question = questions[q_choice-1]
else:
if model_idx == 2: # Flan-T5-XL(日本語)
question = input("質問: ")
else: # Vicuna系(英語)
question = input("Question: ")
# 回答生成と表示
print("回答生成中...")
answer = generate_answer(image, question)
result = f"\n質問: {question}\n回答: {answer}\n"
print(result)
results.append(result)
# 画像表示
display_img = cv2.imread(img_path) if img_path else img_input
cv2.imshow('Image', display_img)
cv2.waitKey(0)
def main():
print("0: 画像ファイル")
print("1: カメラ")
print("2: サンプル画像")
choice = input("選択: ")
if choice == '0':
root = tk.Tk()
root.withdraw()
file_paths = filedialog.askopenfilenames(
title="画像ファイルを選択",
filetypes=[("画像ファイル", "*.jpg *.jpeg *.png *.bmp *.tiff")]
)
root.destroy()
for file_path in file_paths:
print(f"\n処理中: {os.path.basename(file_path)}")
process_image(None, file_path)
elif choice == '1':
cap = cv2.VideoCapture(0)
try:
print("\nスペースキー: 撮影して分析")
print("Qキー: 終了")
while True:
ret, frame = cap.read()
cv2.imshow('Camera - Press SPACE to capture, Q to quit', frame)
key = cv2.waitKey(1) & 0xFF
if key == ord(' '):
print("\n画像を撮影しました")
process_image(frame.copy())
elif key == ord('q'):
break
finally:
cap.release()
elif choice == '2':
print("\nサンプル画像:")
sample_names = ["fruits.jpg", "messi5.jpg", "aero3.jpg", "Cat03.jpg"]
for i, name in enumerate(sample_names, 1):
print(f"{i}. {name}")
sample_choice = int(input("選択: ")) - 1
url = SAMPLE_URLS[sample_choice]
filename = f"sample_{sample_choice}.jpg"
print(f"サンプル画像をダウンロード中: {sample_names[sample_choice]}")
urllib.request.urlretrieve(url, filename)
process_image(None, filename)
# 一時ファイルの自動削除
try:
if os.path.exists(filename):
os.remove(filename)
except OSError as e:
print(f"一時ファイルの削除に失敗: {filename} - {e}")
cv2.destroyAllWindows()
if __name__ == "__main__":
main()
# 結果保存
if results:
with open('result.txt', 'w', encoding='utf-8') as f:
f.write("=== InstructBLIP VQA 結果 ===\n")
f.write(f"使用モデル: {model_name}\n")
f.write(f"デバイス: {device}\n")
f.write("=" * 50 + "\n")
for result in results:
f.write(result)
print(f"\n結果をresult.txtに保存しました ({len(results)}件)")
print("\nプログラムを終了します")