テーブル定義と一貫性制約
【概要】
ドメインは,属性が取りうる値の集合であり,リレーションは,複数のドメインの直積集合の有限部分集合である.リレーショナルデータベースでは,データベースをテーブルの集まりとして記述する.テーブルの本体にはリレーションを格納できるほか,重複値を持つ多重集合も格納できる.データベースが実世界を正確に反映するためには,一貫性制約が必要である.リレーショナルデータモデルでの一貫性制約には,キー制約,外部キー制約,一意制約,非空制約,ドメイン制約,参照整合性制約などがあり,例えば誕生年に「3009」などの実現不可能な値を禁止することでデータの整合性を確保する.リレーショナルデータベース言語の国際標準がSQLであり,データ操作だけでなく,データベーススキーマの定義やトランザクション管理などの機能も提供する.
【目次】
- 用語
- 演習で行うこと
- 演習で必要となるSQLの基礎知識
- SQLite バージョン 3 の起動と終了
- SQLite 3 データベースの新規作成と SQL によるテーブル定義・制約の設定
- SQL を用いたテーブルへの行の挿入
- SQL問い合わせの実行と結果の検証
- SQLによるテーブル定義と制約の設定(orders)
- SQLを用いたテーブルへのデータ挿入(orders)
- SQL問い合わせの実行と結果の検証(orders)
- 制約に違反するデータベース更新が許可されないことの確認
- 演習問題と解答例
用語
- 直積集合(「直積」とも呼ぶ)
n 個の集合 S1, S2, … , Sn が与えられたとき, {(X1, X2, … ,Xn) | X1∈S1, X2∈S2, …, Xn∈Sn} を S1, S2, …, Sn の直積集合と呼び, S1 × S2 × … × Sn と記す.例えば,S1 = {1, 2}, S2 = {a, b, c} とするとき,S1 × S2 = {(1, a), (1, b), (1, c), (2, a), (2, b), (2, c)}となる.
* S2 × S1 = {(a, 1), (b, 1), (c, 1), (a, 2), (b, 2), (c, 2)} となり,S1×S2 とは異なる集合となることに注意が必要である.
- ドメイン (domain)
ドメインとは,属性が取りえる値の集合 (a set of permitted value)のことである.例えば,属性「年齢」のドメインは,整数値の集合 {0, 1, 2, … , 120} のように定義される.
- リレーション (relation) (「関係」とも呼ぶ)
D1, D2, … , Dn をドメインとするとき,D1, D2, …, Dn 上のリレーションとは,直積集合「D1×D2× … ×Dn」の任意の有限部分集合のことである.
具体例として,8つの属性 id, year, month, day, customer_name, product_id, unit_price, qty があり,それぞれのドメインが次のように定義されているとする.
- id のドメイン: 整数
- year のドメイン: {2008, 2009, 2010, ...}
- month のドメイン: {1, 2, ..., 12}
- day のドメイン: {1, 2, ..., 31}
- customer_name のドメイン: 文字列
- product_id のドメイン: 文字列
- unit_price のドメイン: 0 よりも大きい実数
- qty のドメイン: 0 よりも大きい整数
このとき,次の図で表される集合は,1つのリレーションとなる.ここでは,ドメインの直積集合の要素を1つの行として表現している.

- タプル
「タプル」というときは,次の2つの意味を持つ.
- 直積集合の各要素のこと.
- リレーションの各要素のこと.
- 多重集合 (multi-set)
要素の重複を許すような集合のことを多重集合という.リレーショナルデータベースにおいて多重集合という概念が導入されている理由を,具体例で説明すると下記のとおりである.
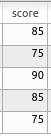
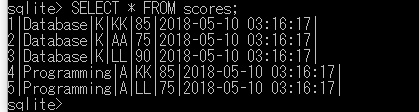
id | name        | teacher_name | student_name | score
----------------------------------------------------
1  | Database    | K            | KK           | 85
2  | Database    | K            | AA           | 75
3  | Database    | K            | LL           | 90
4  | Programming | A            | KK           | 85
5  | Programming | A            | LL           | 75
score(得点)は {85, 75, 90, 85, 75} という多重集合として扱われる. この多重集合から,平均点83点を計算できる.
対して,多重集合という概念がない場合, score(得点)は {85, 75, 90} という集合となり, 正確な平均点を算出できなくなる.
- テーブル (table)
リレーショナルデータベースでは,データベースをテーブルの集まり (collection of tables) として記述する. リレーショナルデータベースのテーブルは,ヘッダと本体から構成される.
- ヘッダ: 属性名が配置される部分.
- 本体: 属性のドメインの直積集合の要素からなる多重集合
【テーブルの例(本体に重複値がない)】

【テーブルの例(本体に重複値がある)】
以上のように,テーブルの本体にはリレーションを格納できる(リレーショナルデータベースに「リレーショナル」という用語が付いているのはこのためである)ほか, 重複値を持つ多重集合を格納することもできる.
- テーブル名 (table name)
テーブル名とは,個々のテーブルに付与された固有の識別子のことである.
- 属性 (attribute)
リレーショナルデータベースのテーブルでは,テーブルの各列が1つの属性を構成する. 属性名は各列に付けられた名前であり,テーブルのヘッダに記述される. 例えば,下記のテーブルには,id, year, month, day, customer_name, product_id, unit_price, qty という属性名が設定されている.
* テーブルのタプルが更新(例えば,テーブルへの新規タプルの挿入,テーブルからのタプルの削除,タプルの値の変更など)されても,属性名は不変である(変化しない).
- 行 (row)
リレーショナルデータベースで「行」というときは,テーブルの本体の各行のことを指す.「レコード」という呼び方もある.
- 列 (column)
リレーショナルデータベースで「列」というときは,テーブルの本体の各列のことを指す.「カラム」という呼び方もある.
- リレーショナルデータモデル
リレーショナルデータモデルとは,次の特徴を持ったデータモデルである.
- リレーショナルデータベース
リレーショナルデータモデルに基づいて設計されたデータベースのこと.
- リレーショナルデータベース管理システム
リレーショナルデータモデルの機能を実装したデータベース管理システムのこと.
- データ型 (data type)
データベースにおいて「データ型」というときは,通常,データベースが扱う属性のデータ型を指す.
- 空値 (「NULL」とも呼ぶ)
空値は以下のような様々な意味で使用される.
- 値が存在しない (does not exist) ・・・ 例えば,自由席の場合の「予約座席番号」や,「送付を希望しない」場合の住所など.
- 未定 (not yet decided) ・・・ 例えば,「データベース」の授業の担当者が未定の場合など.
- 値が未知 (unknown) ・・・ 例えば,住所が存在するが,まだ把握できていない場合など.
- リレーションスキーマ (relation schema)
リレーションには,リレーション名と属性名が付与される. (「リレーション」とは,直積集合「D1×D2× … ×Dn」の任意の有限部分集合のことである). Rをリレーション名,A1, A2, …, An を属性名とするとき, リレーションスキーマは「R(A1, A2, …, An)」のように表記される.
リレーションスキーマは,個々のテーブルの枠組みを定義している.リレーションのタプルが更新(リレーションへの新規タプルの挿入,リレーションからのタプルの削除,リレーションの値の変更など)されても,リレーション名と属性名は不変であるため,リレーションスキーマも不変である.
- リレーションスキーマのインスタンス
(「リレーションスキーマのインスタンス」は,「リレーション」や「関係」とも呼ばれる)
リレーションスキーマ R(A1, A2, … , An)(リレーション名はR,属性名はA1, A2, … An)について,これらの属性のドメインをD1, D2, … , Dn とする. D1, D2, … , Dn上のリレーションは,直積集合「D1×D2× … ×Dn」の任意の有限部分集合である.このリレーションを,「リレーションスキーマ R(A1, A2, … , An) のインスタンス」と呼ぶ(または「リレーション」や「関係」とも呼ぶ).
- 「ドメイン」とは,属性が取りうる値の集合を指す.
- リレーションスキーマ R(A1, A2, … , An) のインスタンスは,一般的に「リレーションR(A1, A2, … , An)」あるいは「リレーションR」と表記される.同じ記号「R(A1, A2, … , An)」と「R」が,リレーションスキーマの意味でも,リレーションの意味でも使用されることがあるため,注意が必要である.リレーションスキーマとリレーションの違いを理解していれば,混乱を避けることができる.
- 前述のように,属性名とリレーション名は不変であるため,リレーションスキーマ R(A1, A2, … , An) は不変である.一方で,リレーションR(A1, A2, … , An) は変化する可能性がある.
- 単純値 (単純のことを「シンプル」とも呼ぶ)
分解不可能な値のことを指す.一般的に「数値,文字,文字列,時刻,日付,論理値などの値」を意味する.直積集合の要素や,べき集合の要素は通常,単純値とはみなされない.
- 直積集合の例: 属性名「family name」のドメインと,属性名「given name」のドメインの直積集合
- べき集合の例: ドメイン {みかん,りんご,バナナ}から構成されるべき集合は,{φ, {みかん}, {りんご}, {バナナ}, {みかん, りんご}, {りんご, バナナ}, {バナナ, みかん}, {みかん, りんご, バナナ}}
- 第一正規形
ドメインとして,分解不可能な「単純値」のみを対象とすること.
- キー(「候補キー」とも呼ぶ)
リレーショナルデータモデルで「キー」というときは,次の意味である.
テーブルのタプルを唯一に識別するために使用できる属性,あるいは属性の組のうち,極小なものをキーという.キーである属性,あるいは属性の組については,テーブルの2つ以上のタプルが,いかなる場合でも,同一の属性値を持つことはありえない. 例えば,職員のデータベースでは,住所と氏名のペアがキーとなる(住所,氏名の片方だけではキーとはならない).あるいは,職員に固有のIDが付与されている場合には,そのIDがキーとなる.
- 主キー
リレーショナルデータモデルにおいて,ある1個のリレーションスキーマに対して,キーは複数種類存在しうる.その中で,データベース管理者が,データベースの管理上最も適切と判断し,かつ,空値をとることがありえないものを,リレーションスキーマの設計時に選定したものが主キーである.あるリレーションスキーマに対して「キー」が1種類しか存在しない場合は,それが必然的に主キーとなる.
* 主キーとして選定されたキーの属性あるいは属性の組には,空値を格納できないという規則が存在する.
- 外部キー
リレーションスキーマ R(…, Ai, …), S(…, Bj, …)について,属性BjがリレーションSの主キーであるとする.RとSのインスタンスrおよびsについて,以下の条件が成立するとき,属性AiをリレーションR の外部キーと呼ぶ.
r中の任意のタプルが持つ Ai の値が,
- Sのインスタンスs中のタプルが持つBjの値に一致する.あるいは
- 空値である.
* 上の定義では,キーや主キーとなっている属性の個数が1個であると仮定しているが,実際には,キーや主キーは複数の属性の組であってもよい.
- リレーショナルデータモデルでの一貫性制約
一貫性制約とは,データベースが実世界を正確に反映しているときに満たすべき制約条件のことである. 例えば,誕生年として「3009」が記録されているようなデータベースは,実世界を正確に反映しているとは言えず,信頼性に欠ける. 誕生年には,例えば「1889以上2014以下」のような一貫性制約が設定されるべきである.ただし, 一貫性制約の内容は,データベースの用途によっても変化することに注意が必要である.今後10年間データベースを使用し続けることが確定している場合,「1889以上2024以下」のような制約となる.
リレーショナルデータモデルでの一貫性制約とは,リレーションスキーマのインスタンスの任意のタプル(言い換えると,リレーションスキーマのインスタンスの各要素)の各成分の値が満たすべき制約条件のことである. リレーショナルデータベース管理システムには,通常,一貫性制約を記述できる機能,および記述された一貫性制約に違反するような更新を拒否する機能が実装されている. リレーショナルデータモデルでの一貫性制約には様々な種類が存在する.主な例は以下のとおりである.
- キー制約
主キーとして指定された属性(あるいは属性の組)が,主キーとしての条件を満たさなければならないという制約
- 外部キー制約
外部キーとして指定された属性(あるいは属性の組)が,外部キーとしての条件を満たさなければならないという制約
- 一意制約
一意であると指定された属性(あるいは属性の組)について,同じ値が2回以上出現しないという制約.
- 非空制約
非空であると指定された属性は,空値(NULL)を持つことができないという制約
- ドメイン制約
テーブルのタプルの各成分の値は,対応する属性のドメインの要素でなければならないという制約. (例)「試験の点数」という属性のドメインが「{x|xは0以上100以下の整数}」と定義されているとき,試験の点数の値は,この範囲外の値を取ることができない.
- 参照整合性制約 (referential integrity)
外部キーとして指定された属性(あるいは属性の組)が,外部キーとしての条件を満たさなければならないという制約
- キー制約
- SQL
SQLは,リレーショナルデータベース言語の国際標準である. 平易な英文として読み下すことができるように設計されている.
- 単純にリレーショナル代数やリレーショナル論理を忠実にデータベース言語化したものではなく,平易な英文として理解しやすい形式を採用している.
- リレーショナル代数やリレーショナル論理には存在しない演算として,集約演算などが実装されている.
- リレーショナル代数やリレーショナル論理がリレーショナルデータベースの操作を体系化しているのに対して,SQLは,リレーショナルデータベースのデータ操作に加えて,データベーススキーマの定義やトランザクション管理などの機能も提供する.
* SQLでは「リレーション」ではなく「テーブル」を扱うことに注意が必要である.「リレーション」と「テーブル」は,ともに2次元の表形式として表現されるという点では類似している.「リレーション」はドメインの直積の有限部分集合であるため,同一のタプルが重複して出現することはない.一方で,「テーブル」では,同一の値を持つ行が複数回出現することが許可される.
- SQLite
SQLiteは,実習で使用するデータベース管理システムの名称である.
- SQL テーブル定義文 (create-table-statement) の例
create table <table-name> (<column-name> <type-name> [<column constraint> ...], ...);* 「[<column constraint> ...]」は省略可能であることに注意
- SQL 列制約 (column-constraint) の例
create-table-statementの中に含める制約などの指定.代表的な制約を以下に列挙する.
- primary key ・・・ 主キー
- not null ・・・ 非空
- unique ・・・ 一意
- references ・・・ 参照整合性制約
- check (<expression>) ・・・ 更新時にチェックされる式 (expression)
- SQL テーブル制約 (table-constraint) の例
create-table-statementの中に含める制約のうち,複数の属性に関わるものはtable-constraintの形式で記述する.代表的な制約を以下に列挙する.
- primary key(<indexed-column>, ...)
- unique(<indexed-column>, ...)
- check(<expression>)
- foreign key (<column-name>) references <foreign-table> (<column-name>, ...) ・・・ 参照整合性制約(つまり外部キー)
演習で行うこと
- SQLite 3 データベースの新規作成
本演習で使用するデータベース名は,環境ごとに以下のように設定される.
- SQL を用いたテーブル定義と制約の記述
リレーショナル・スキーマ (relational schema): scores(id, name, teacher_name, student_name, score, created_at, updated_at)
SQL プログラム:
create table scores ( id integer primary key autoincrement not null, name text not null, teacher_name text not null, student_name text not null, score integer not null check ( score >= 0 AND score <=100 ), created_at datetime not null, updated_at datetime, unique (name, student_name) ); - SQL を用いたテーブルへの行の挿入
begin transaction;
insert into scores values( 1, 'Database',    'K', 'KK', 85, datetime('now', 'localtime'), NULL );
insert into scores values( 2, 'Database',    'K', 'AA', 75, datetime('now', 'localtime'), NULL );
insert into scores values( 3, 'Database',    'K', 'LL', 90, datetime('now', 'localtime'), NULL );
insert into scores values( 4, 'Programming', 'A', 'KK', 85, datetime('now', 'localtime'), NULL );
insert into scores values( 5, 'Programming', 'A', 'LL', 75, datetime('now', 'localtime'), NULL );
commit;
datetime('now', 'localtime')関数は現在の日時を取得し,YYYY-MM-DD HH:MM:SS形式のdatetime型として返却する.
- SQL 問い合わせの発行と評価結果の確認
SELECT * FROM scores; SELECT * FROM scores WHERE name = 'Database'; SELECT score FROM scores WHERE name = 'Database'; - SQL を用いたテーブル定義と制約の記述
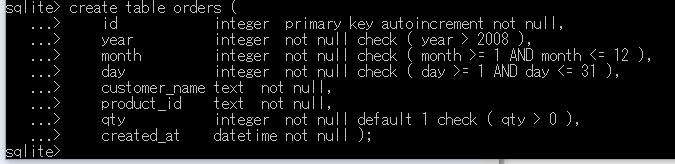
リレーショナル・スキーマ (relational schema): orders(id, year, month, day, customer_name, product_id, qty, created_at)
SQL プログラム:
create table orders ( id integer primary key autoincrement not null, year integer not null check ( year > 2008 ), month integer not null check ( month >= 1 AND month <= 12 ), day integer not null check ( day >= 1 AND day <= 31 ), customer_name text not null, product_id text not null, qty integer not null default 1 check ( qty > 0 ), created_at datetime not null ); - SQL を用いたテーブルへの行の挿入
begin transaction; insert into orders values( 1, 2022, 1, 26, 'kaneko', 1, 10, datetime('now', 'localtime') ); insert into orders values( 2, 2022, 1, 26, 'miyamoto', 2, 2, datetime('now', 'localtime') ); insert into orders values( 3, 2022, 1, 27, 'kaneko', 3, 8, datetime('now', 'localtime') ); insert into orders values( 4, 2022, 1, 27, 'kaneko', 3, 8, datetime('now', 'localtime') ); commit; - SQL 問い合わせの発行と評価結果の確認
SELECT * FROM orders; SELECT * FROM orders WHERE day = 26; SELECT * FROM orders WHERE customer_name = 'kaneko'; SELECT * FROM orders WHERE qty > 8; - 制約に違反する更新ができないことの確認
演習で必要となるSQLの基礎知識
SQLは,リレーショナルデータベースの操作を行うための標準言語である. 本章では,SQLiteが実装するSQL の機能のうち,本演習の実施に必要となる要素について解説する.
SQLite 3におけるSQL言語の詳細な仕様については,http://www.hwaci.com/sw/sqlite/lang.html (英語)を参照されたい.
- SQLite 3のデータ型システム
データベース管理システムごとに独自のデータ型システムが定義されている. SQLiteには,NULL, integer, real, text, BLOBの5つのストレージクラスがある.char,datetime,boolなどの型名も宣言でき,型親和性に基づいて格納される. 詳細な仕様はhttps://www.sqlite.org/datatype3.htmlに記載されている.各データ型の概要は以下のとおりである.
- NULL: 空値を表現するデータ型 (a NULL value)
- integer: 符号付き整数型 (signed integer) ※ SQLiteでは値の大きさに応じて1〜8バイトの可変長で格納され,BIGINT,INTなど「INT」を含む型名はすべて同じINTEGER型として扱われる
- real: 浮動小数点数型 (floating point value)
- char, text: 文字列型 (text string) ※ char(n)のように括弧内に数値を付けて宣言することはできるが,SQLiteはこの数値による長さ制限を強制しない
- datetime: 日時データ型
* datetime型について:SQLiteの型システムでは,宣言された型名に基づいて「型親和性(type affinity)」が決定される.datetimeという型名は,INTEGERやTEXTなど特定の型を示す文字列を含まないため,NUMERIC型親和性が割り当てられる.ただし,日付時刻の文字列(例:'2024-01-01 12:00:00')を挿入した場合,整数や実数として解釈できないため,実際にはTEXTとして格納される.日時データの意味論的な区別のため,適切な型指定が推奨される.
- bool: 論理値型
- BLOB: バイナリデータ型 (Binary Large Object).入力データが変換されずそのまま格納される
* SQLite 3のデータ型システムは,SQL標準仕様と比較してより広範なデータ表現ができる.
- SQL文字列リテラルの表記法
SQL標準仕様では,文字列リテラルはシングルクオーテーション「'」による囲みが規定されている.
- SQLテーブル定義文 (create-table-statement) の文法
create table <table-name> (<column-name> <type-name> [<column constraint> ...], ...);
* 「[<column constraint> ...]」は省略可能な制約指定を表す
- SQL列制約 (column-constraint) の体系
create-table-statement内で指定可能なデータの一貫性制約とデフォルト値の定義
- データの一貫性制約
- primary key: 主キー制約の指定
- not null: NULL値の禁止
- unique: 値の一意性保証
- references <foreign-table> (<column-name>, ...): 外部キー参照の定義
- check (<expression>): 値の検証式の指定
- 既定値と自動採番
- default (<expression>): 既定値の設定
- autoincrement: 自動採番機能の有効化
- データの一貫性制約
- SQLテーブル制約 (table-constraint) の体系
create-table-statement内で指定する複数列にまたがる制約は,table-constraintとして記述する.
- primary key(<indexed-column>, ...)
- unique(<indexed-column>, ...)
- check(<expression>)
- SQL挿入文 (insert statement) の文法
テーブルへのレコード挿入操作
- insert into <table-name> values (<expression>, ...);
- insert into <table-name> (<column-name>, ...) values ( <expression>, ...);
- トランザクション制御文:begin transaction, commit, ROLLBACK
データベース更新操作(SQL挿入文等)の実行時には,「begin transaction;」による開始宣言が必要である. 更新操作の完了後,「commit;」または「ROLLBACK;」による終了処理を行う.
- commit: 「begin transaction;」以降の全更新操作を確定する
- ROLLBACK: 「begin transaction;」以降の全更新操作を取り消す
- SQL問合せ文における基本句:SELECT, FROM, WHERE
SQL問合せでは,SELECT, FROM, WHERE句が基本的な構成要素となる.
- SELECT * FROM <table-name>;
指定されたテーブルの全レコードを取得する
- SELECT * FROM <table-name> WHERE <expression>;
指定されたテーブルから条件式を満たすレコードを選択的に抽出する
- SELECT * FROM <table-name>;
SQLite バージョン 3 の起動と終了
Windows の場合
Windows 環境での操作手順について説明する.
- まず,Windows にて SQLite 3 用のデータベース・ディレクトリ C:\SQLite を作成する.

- SQLite 3を起動する.
* sqlite3.exe が見つからない場合は,SQLite 3 のダウンロードと sqlite3.exe のセットアップを実施する.
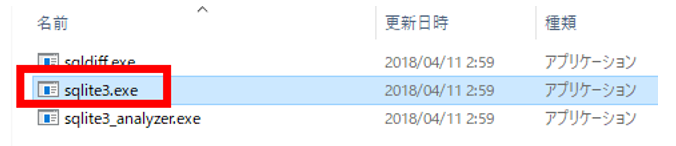
- SQLite 3の起動画面が表示される.
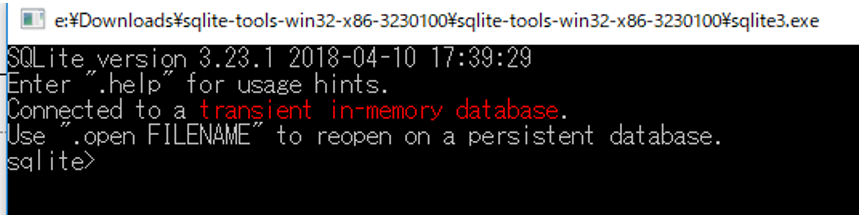
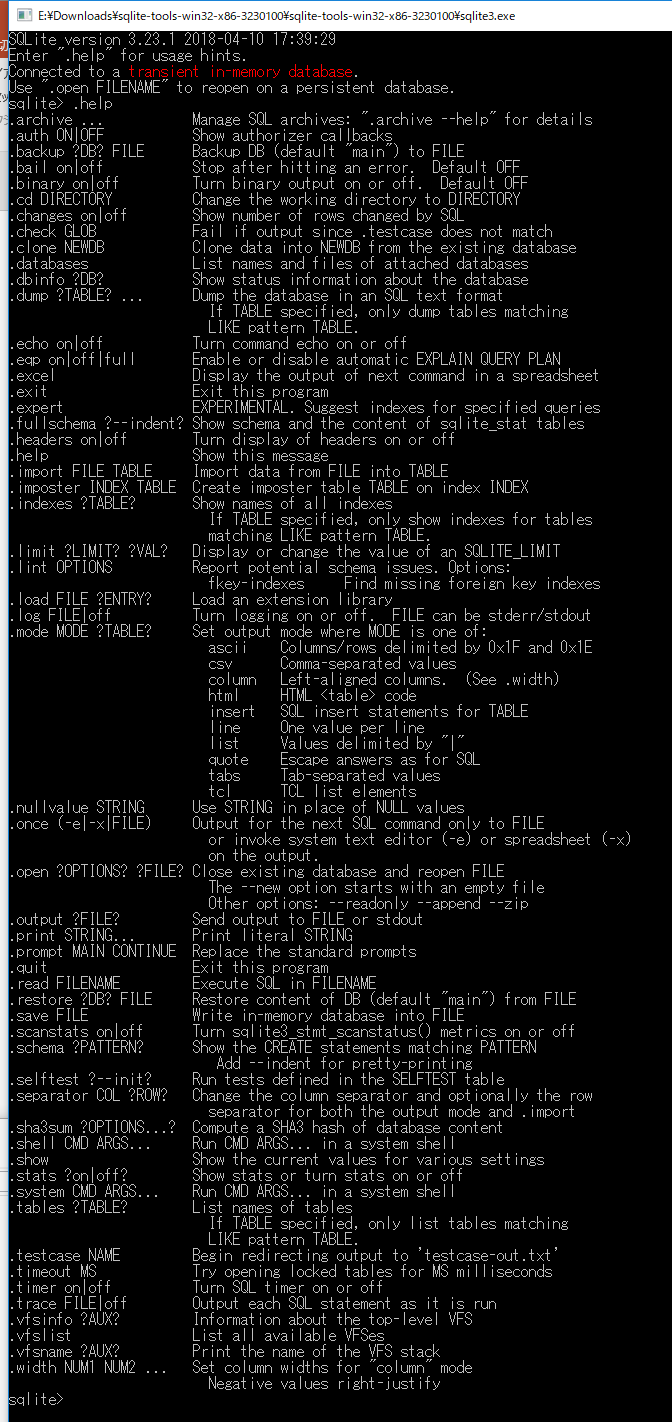
- ヘルプを表示する.
「.help」コマンドでヘルプ画面が表示される.
- SQLite 3を終了する.
「.exit」コマンドで終了する.

Ubuntu の場合
Ubuntu 環境での操作手順について説明する.
- Ubuntu でターミナルを起動する.
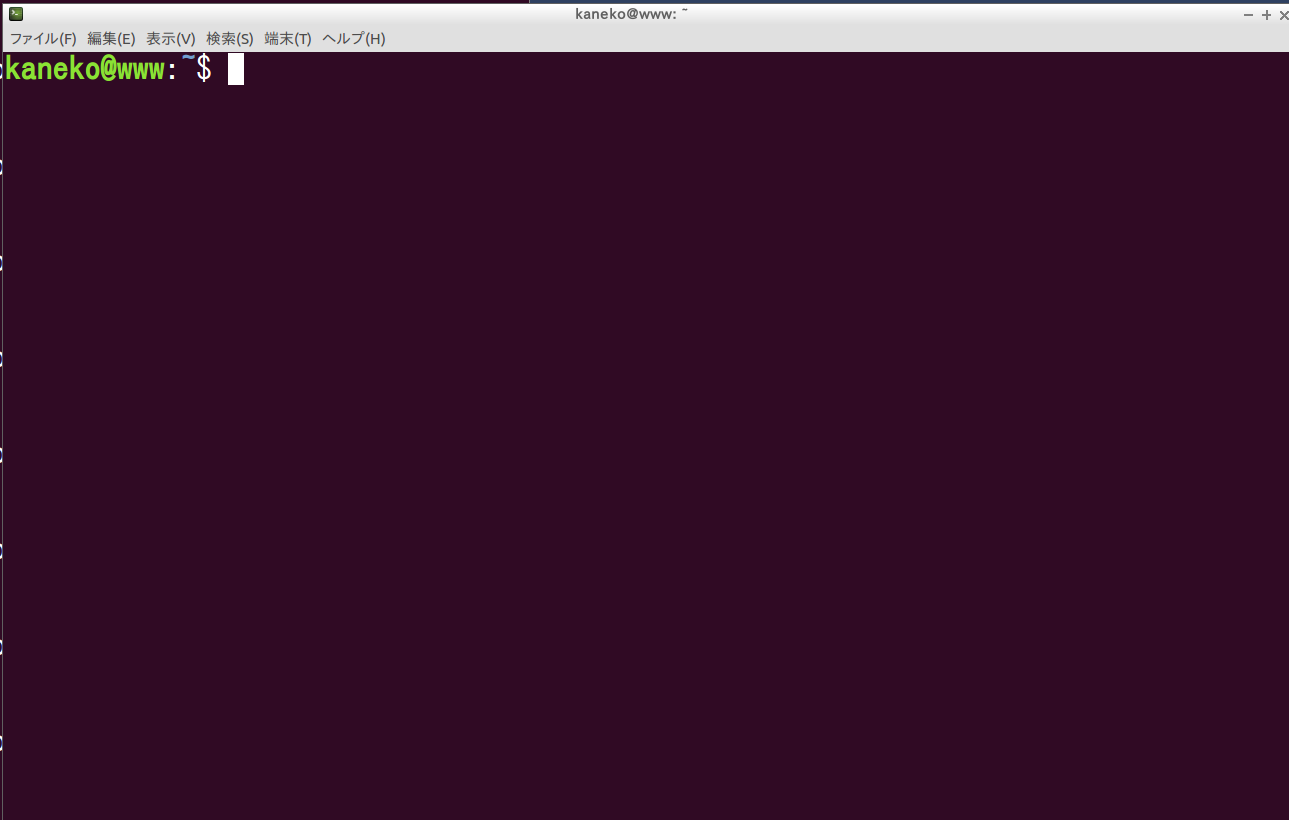
- SQLite 3 データベース・ディレクトリに移動する.
* ホームディレクトリを SQLite 3 データベース・ディレクトリとして使用する場合は, 移動の必要はありません.
- SQLite 3を起動する.
データベース名として mydb を指定する.
* データベース名は任意ですが,アルファベットのみの使用を推奨する.
sqlite3 mydb
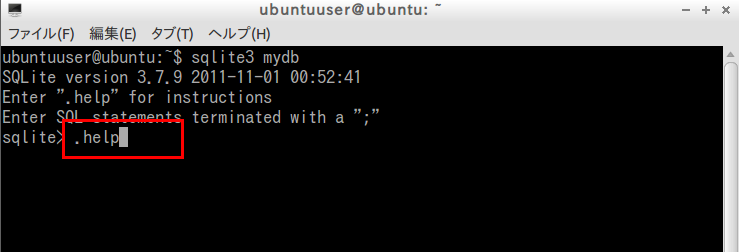
- ヘルプを表示する.
「.help」コマンドでヘルプ画面が表示される.
- SQLite 3を終了する.
「.exit」コマンドで終了する.

SQLite 3 データベースの新規作成と SQL によるテーブル定義・制約の設定
前提条件:SQLite 3 のインストール完了
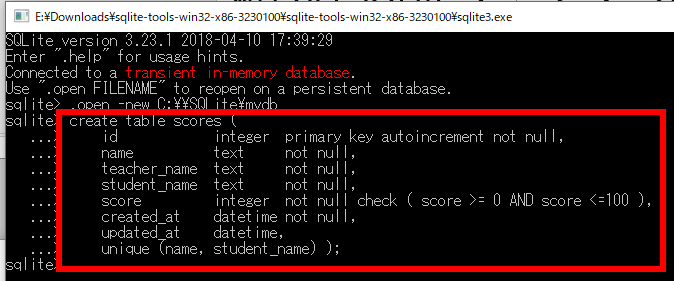
SQL を使用して,scores テーブルの定義と制約の設定を行う.
リレーショナル・スキーマ:scores(id, name, teacher_name, student_name, score, created_at, updated_at)
create table scores (
    id            integer  primary key autoincrement not null,
    name          text     not null,
    teacher_name  text     not null,
    student_name  text     not null,
    score         integer  not null check ( score >= 0 AND score <=100 ),
    created_at    datetime not null,
    updated_at    datetime,
    unique (name, student_name) );
テーブル名や列名も大文字・小文字を区別しません.
テーブル名や列名には空白文字を使用できないため,単語間の区切りには「_」を使用する.
text型は文字列型であり,数値演算は実行できません.
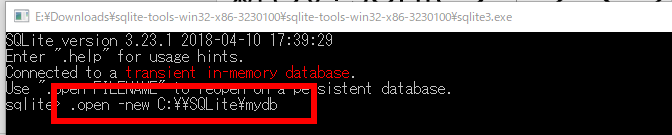
Windows の場合
Windows 環境での操作手順について説明する.
- SQLite 3を起動する.
* sqlite3.exe が見つからない場合は,SQLite 3 のダウンロードと sqlite3.exe のセットアップを実施する.
- 「.open --new」コマンドで SQLite 3 データベースを新規作成する.
- 「create table ...」コマンドでテーブルを定義する.
- 空白文字は半角スペースを使用する(全角スペースは使用しない).
- 可読性のため複数の空白を使用できる(1個以上の任意の数が使用可能である).
- SQLite 3 データベースファイル mydb が作成されたことを確認する.
 ◆ 「create table ...」コマンド入力時のエラー対処方法について説明する.
- 例:「text」を誤って「TEST」と入力した場合.
この状態ではEnter キーを押しても入力モードが継続する(応答がないため焦る場合がある).

- セミコロン(;)を入力して Enter キーを押すと,「syntax error」が表示され,入力した「create table scores ( name TEST not null,」はキャンセルされる.

- 上下カーソルキーで過去のコマンドを呼び出すことができる.
使用したいコマンドが表示されたら Enter キーを押す.
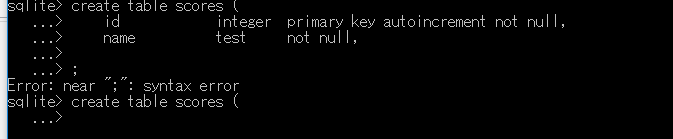
- 上下カーソルキーで誤りのある行(「name TEST not null,」)を表示する.この時点では Enter キーは押さない.
- 左右カーソルキーでカーソルを移動し,Delete キーや Backspace キーで修正する.
修正完了後に Enter キーを押す.
- 例:「text」を誤って「TEST」と入力した場合.

Ubuntu の場合
- 端末で,sqlite3 mydbを実行する.「3」や「mydb」は入力ミスが発生しやすいため,注意が必要である.
sqlite3 mydb
- 次に 「create table ...」を入力して,テーブル定義を実施する.
- スペースは半角の空白文字を使用する(全角スペースは使用しない)
- 可読性を向上させるため,空白を複数個入れることができる.個数に制限はない
- 新しい端末ウィンドウを起動する
- データベースファイル mydb が正常に生成されていることを確認する.
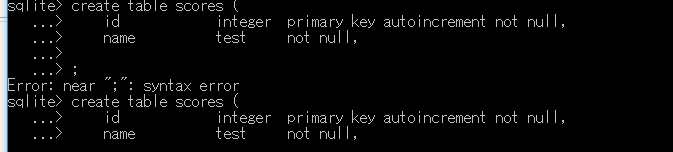
ls -al ◆ 「create table ...」コマンドの入力時にエラーが発生した場合,以下の手順で対処できる.
- 例えば,「text」を誤って「TEST」と入力してしまった場合(入力エラー),Enterキーを複数回押しても入力モードから復帰できず,システムからの応答がない状態となり,混乱しやすい状況となる.

- 半角のセミコロン「;」を入力し,続けてEnterキーを押すと,「syntax error」というエラーメッセージが表示される.
直前に入力した「create table scores ( name TEST not null,」は無効となる.

- 正しい内容で再入力する.カーソルキーの「↑」「↓」を使用すると,過去に入力したコマンドを呼び出すことができる.
再利用したいコマンドが表示されたらEnterキーを押す

- カーソルキーの「↑」「↓」で,エラーのあった行(「name TEST not null,」)を表示する.この時点ではまだEnterキーは押さない

- カーソルキーの「←」「→」でカーソルをエラー箇所まで移動し,
DeleteキーやBackspaceキーを使用して修正する.
修正完了後,Enterキーを押す.

- 例えば,「text」を誤って「TEST」と入力してしまった場合(入力エラー),Enterキーを複数回押しても入力モードから復帰できず,システムからの応答がない状態となり,混乱しやすい状況となる.

* SQLiteでは,データベースの初回使用時にデータベースファイルが自動的に生成される.生成されるファイル名は,指定したデータベース名と同一となる.
* データベースファイルはテーブル定義などのデータベース更新操作を実行した時点で生成されるため,sqlite3の起動直後にファイルが存在しなくても問題ありません.
SQL を用いたテーブルへの行の挿入
以下のような scores テーブルを作成する.
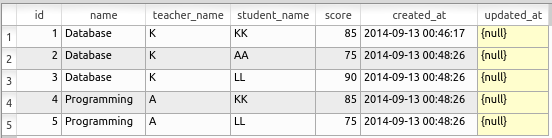
次のSQLコマンドを使用してscoresテーブルにデータを挿入する.
datetime('now', 'localtime')は現在の日時を取得する.datetime型はYYYY-MM-DD HH:MM:SS形式で表現される.
begin transaction;
insert into scores values( 1, 'Database', 'K', 'KK', 85, datetime('now', 'localtime'), NULL );
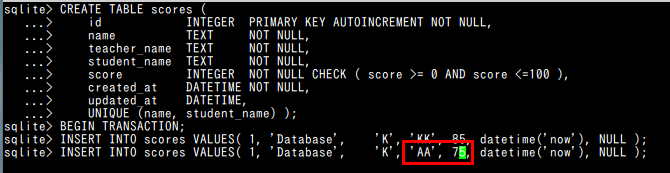
insert into scores values( 2, 'Database', 'K', 'AA', 75, datetime('now', 'localtime'), NULL );
insert into scores values( 3, 'Database', 'K', 'LL', 90, datetime('now', 'localtime'), NULL );
insert into scores values( 4, 'Programming', 'A', 'KK', 85, datetime('now', 'localtime'), NULL );
insert into scores values( 5, 'Programming', 'A', 'LL', 75, datetime('now', 'localtime'), NULL );
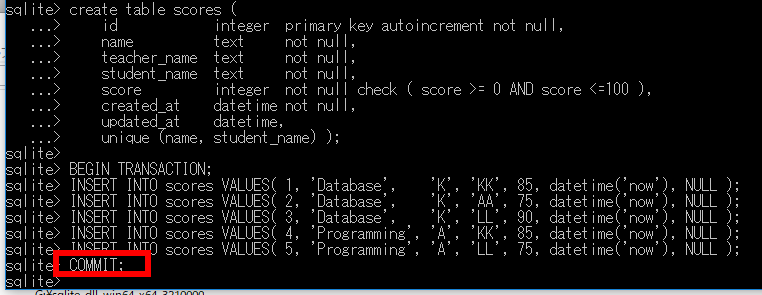
commit;
◆ 具体的な操作手順
- はじめにbegin transaction;を実行する.
セミコロン「;」の入力を忘れないように注意する.
begin transaction; * セミコロン「;」を入力し忘れた場合,Enterキーを複数回押しても入力モードから復帰できず,システムからの応答がない状態となり,混乱しやすい状況となる.
半角のセミコロン「;」を入力し,続けてEnterキーを押すと,「begin transaction」コマンドが処理される.

- データの挿入
このデータ挿入では,テーブル定義で指定した順序に従って,全ての属性値を記述する.
insert into scores values( 1, 'Database', 'K', 'KK', 85, datetime('now', 'localtime'), NULL ); insert into scores values( 2, 'Database', 'K', 'AA', 75, datetime('now', 'localtime'), NULL ); insert into scores values( 3, 'Database', 'K', 'LL', 90, datetime('now', 'localtime'), NULL ); insert into scores values( 4, 'Programming', 'A', 'KK', 85, datetime('now', 'localtime'), NULL ); insert into scores values( 5, 'Programming', 'A', 'LL', 75, datetime('now', 'localtime'), NULL );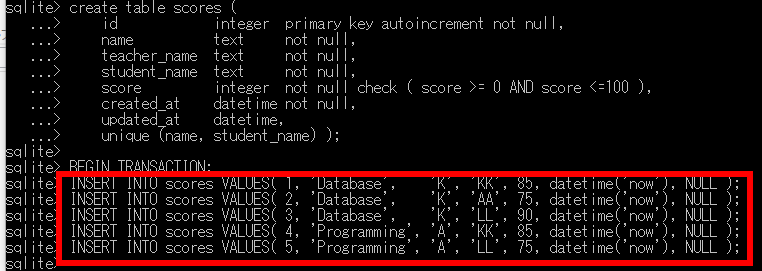 * 類似したコマンドを複数回入力する場合の効率的な方法がある. カーソルキーの「↑」「↓」を使用すると,過去に入力したコマンドを呼び出すことができる.
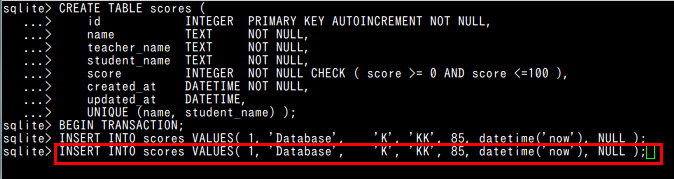
カーソルキーの「←」「→」, DeleteキーやBackspaceキーで必要な修正を行える. 修正完了後,Enterキーを押す.

全体をやり直す必要はなく,エラーが発生した行のみを再実行する.

セミコロン「;」の入力を忘れないように注意する.
commit;
SQL問い合わせの実行と結果の検証
SQL問い合わせの詳細な解説は,別のWebページで行う.ここでは,テーブルの内容を確認することに焦点を当てる.
テーブルの全行を表示する方法
SELECT * FROM scores;
特定の条件を満たす行のみを表示する方法
SELECT * FROM scores WHERE name = 'Database';

SELECT score FROM scores WHERE name = 'Database';

SQLによるテーブル定義と制約の設定(orders)
SQLを使用して,ordersテーブルの定義と制約の設定を行う.
リレーショナル・スキーマ: orders(id, year, month, day, customer_name, product_id, qty, created_at)
create table orders (
    id            integer  primary key autoincrement not null,
    year          integer  not null check ( year > 2008 ),
    month         integer  not null check ( month >= 1 AND month <= 12 ),
    day           integer  not null check ( day >= 1 AND day <= 31 ),
    customer_name text  not null,
    product_id    text  not null,
    qty           integer  not null default 1 check ( qty > 0 ),
    created_at    datetime not null );
SQLを用いたテーブルへのデータ挿入(orders)
以下のようなordersテーブルを作成する.
次のSQLを使用してordersテーブルへのデータ挿入を実行する.
datetime('now', 'localtime')は現在の日時を取得する関数で,datetime型はYYYY-MM-DD HH:MM:SS形式で表現される.
begin transaction;
insert into orders values( 1, 2022, 1, 26,  'kaneko',   1, 10, datetime('now', 'localtime') );
insert into orders values( 2, 2022, 1, 26,  'miyamoto', 2, 2, datetime('now', 'localtime') );
insert into orders values( 3, 2022, 1, 27,  'kaneko',   3, 8, datetime('now', 'localtime') );
insert into orders values( 4, 2022, 1, 27,  'kaneko',   3, 8, datetime('now', 'localtime') );
commit;
◆ 具体的な操作手順
- トランザクションを開始するため,begin transaction;を実行する
末尾のセミコロン「;」の入力を忘れないように注意する
begin transaction;
- データの挿入を実行する
insert into orders values( 1, 2022, 1, 26,  'kaneko',   1, 10, datetime('now', 'localtime') );
insert into orders values( 2, 2022, 1, 26,  'miyamoto', 2, 2, datetime('now', 'localtime') );
insert into orders values( 3, 2022, 1, 27,  'kaneko',   3, 8, datetime('now', 'localtime') );
insert into orders values( 4, 2022, 1, 27,  'kaneko',   3, 8, datetime('now', 'localtime') );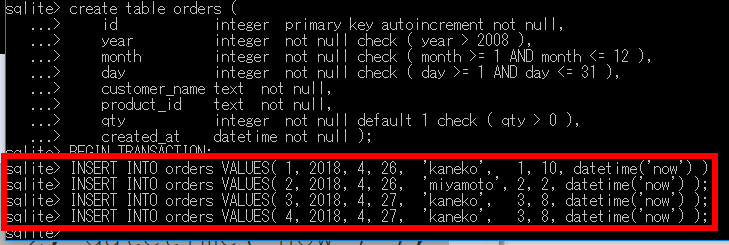
- すべての挿入操作が完了したら,commit;を実行してトランザクションを確定する.
末尾のセミコロン「;」の入力を忘れないように注意する
commit;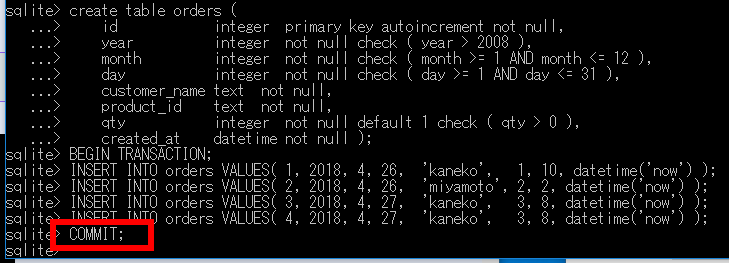
補足説明
insert into文には2つの記述方法がある.
* テーブル定義の順序に従って,すべての属性値を指定する方法
insert into orders values( 1, 2022, 1, 26, 'kaneko', 1, 10, datetime('now', 'localtime') );
* 属性名リストを使用して,属性値の順序を明示的に指定する方法
この方法では,属性値を省略した場合,テーブル定義時に設定されたデフォルト値が適用される
- テーブル定義時にdefaultキーワードで指定した値がデフォルト値となる
- autoincrementが指定されている場合は,自動的に連番が割り当てられる
insert into orders(id, year, month, day, customer_name, product_id, qty, created_at)
values( 1, 2022, 1, 26,  'kaneko',   1, 10, datetime('now', 'localtime') );
SQL問い合わせの実行と結果の検証(orders)
SQL問い合わせの詳細な解説は,別のWebページで行う.ここでは,テーブルの内容を確認することに焦点を当てる.
テーブルの全行を表示する方法
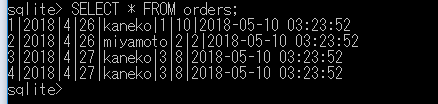
SELECT * FROM orders;
特定の条件を満たす行のみを表示する方法
SELECT * FROM orders WHERE day = 26;

SELECT * FROM orders WHERE customer_name = 'kaneko';

SELECT * FROM orders WHERE qty > 8;

制約に違反するデータベース更新が許可されないことの確認
本節では,データベースの制約に違反する更新操作を試行し,データベース管理システムによる一貫性維持機能を確認する.
一意制約の確認
begin transaction;
insert into scores values( 6, 'Database', 'K', 'KK', 75, datetime('now', 'localtime'), NULL );
ROLLBACK;
* データベース内に既存の行「'Database', 'KK'」が存在するため,一意制約「unique(name, student_name)」に抵触する.

上記の例では,insert文が拒否されているため,ROLLBACK;またはcommit;のいずれを実行しても結果は同一となる.ただし,以下の点に注意が必要である.
- begin transaction;の後,データベース操作完了時には,必ずcommit;またはROLLBACK;でトランザクションを終了する
主キー制約の確認
begin transaction;
insert into orders values( 3, 2022, 1, 28,  'miyamoto', 4, 1, datetime('now', 'localtime') );
ROLLBACK;
* id属性に値3が既に存在するため,主キー制約「primary key」に違反する.

非NULL制約の確認
begin transaction;
insert into orders values( 5, 2022, 1, 28, NULL, 4, 1, datetime('now', 'localtime') );
ROLLBACK;
* customer_name属性には非NULL制約「not null」が設定されているため,NULL値を挿入できない.

その他の一貫性制約
チェック制約違反の例
begin transaction;
insert into orders values( 5, 1014, 10, 28,  'miyamoto', 4, 1, datetime('now', 'localtime') );
ROLLBACK;
* 制約「check ( year > 2008 )」に違反する.

演習問題と解答例
以下の問題に回答し,その後に示される解答例を確認すること.
問題
- SQLiteを使用して,以下のSQL文を実行せよ
続いて,SQLite 3のSQLを使用して,以下のテーブルを作成せよcreate table SS ( name text not null, score integer not null check ( score >= 0 AND score <=100 ), student_name text not null, unique(name, student_name) );table-name: SS name | score | student_name ------------------------------------------------------ Database | 80 | KK Database | 95 | AA Database | 80 | LL Programming | 85 | KK Programming | 75 | LL - 以下のSQL文を実行すると,エラーが発生することを確認せよ
(1) create table AA ( id integer primary key, amount integer not null check ( amount > 1000 ) ); begin transaction; insert into AA values ( 1, 100 ); ROLLBACK; (2) create table BB ( id integer primary key, name text not null, course text not null ); begin transaction; insert into BB values ( 1, 'A', NULL ); ROLLBACK; - SQLite 3のSQLを使用して,以下のリレーションスキーマに基づくテーブルを定義せよ
(1) employees(id, employeename, street, city)
(2) companies(id, companyname, city)
(3) works(employeename, companyname)
解答例
-
insert into SS values('Database', 80, 'KK'); insert into SS values('Database', 95, 'AA'); insert into SS values('Database', 80, 'LL'); insert into SS values('Programming', 85, 'KK'); insert into SS values('Programming', 75, 'LL'); - 「insert into AA values ( 1, 100 );」の実行時に Error: constraint failedが発生する
-
- employees(id, employeename, street, city)
create table employees ( id integer primary key not null, employeename text, street text, city text ); - companies(id, companyname, city)
create table companies ( id integer primary key not null, companyname text, city text ); - works(employeename, companyname)
create table works (
  employeename text,
  companyname text );
- employees(id, employeename, street, city)