mpatacchiola/DeepGaze のインストールと動作確認(頭部の姿勢推定)(Python 3.7, TensorFlow 1.15.5 を使用)(Windows 上)
手順の要点: 前準備として,NVIDIA CUDA 10.0, NVIDIA cuDNN 7.6.5, Python 3.7, TensorFlow 1.15.5 等をインストール.
ソフトウェア等の利用条件等は,利用者で確認すること.
謝辞:ソフトウェアの作者に感謝します
前準備
Python 3.7 のインストール(Windows 上) [クリックして展開]
以下のいずれかの方法で Python 3.7 をインストールする。Python がインストール済みの場合、この手順は不要である。
方法1:winget によるインストール
管理者権限のコマンドプロンプトで以下を実行する。管理者権限のコマンドプロンプトを起動するには、Windows キーまたはスタートメニューから「cmd」と入力し、表示された「コマンドプロンプト」を右クリックして「管理者として実行」を選択する。
winget install -e --id Python.Python.3.7 --scope machine --silent --accept-source-agreements --accept-package-agreements --override "/quiet InstallAllUsers=1 PrependPath=1 AssociateFiles=1 InstallLauncherAllUsers=1"--scope machine を指定することで、システム全体(全ユーザー向け)にインストールされる。このオプションの実行には管理者権限が必要である。インストール完了後、コマンドプロンプトを再起動すると PATH が自動的に設定される。
方法2:インストーラーによるインストール
- Python 公式サイト(https://www.python.org/downloads/)にアクセスし、「Download Python 3.x.x」ボタンから Windows 用インストーラーをダウンロードする。
- ダウンロードしたインストーラーを実行する。
- 初期画面の下部に表示される「Add python.exe to PATH」に必ずチェックを入れてから「Customize installation」を選択する。このチェックを入れ忘れると、コマンドプロンプトから
pythonコマンドを実行できない。 - 「Install Python 3.xx for all users」にチェックを入れ、「Install」をクリックする。
インストールの確認
コマンドプロンプトで以下を実行する。
python --versionバージョン番号(例:Python 3.7.x)が表示されればインストール成功である。「'python' は、内部コマンドまたは外部コマンドとして認識されていません。」と表示される場合は、インストールが正常に完了していない。
Git のインストール(Windows 上) [クリックして展開]
管理者権限のコマンドプロンプトで以下を実行する.管理者権限は,winget の --scope machine オプションでシステム全体にインストールするために必要となる.
REM Git をシステム領域にインストール
winget install --scope machine --id Git.Git -e --silent --disable-interactivity --force --accept-source-agreements --accept-package-agreements --override "/VERYSILENT /NORESTART /NOCANCEL /SP- /CLOSEAPPLICATIONS /RESTARTAPPLICATIONS /COMPONENTS=""icons,ext\reg\shellhere,assoc,assoc_sh"" /o:PathOption=Cmd /o:CRLFOption=CRLFCommitAsIs /o:BashTerminalOption=MinTTY /o:DefaultBranchOption=main /o:EditorOption=VIM /o:SSHOption=OpenSSH /o:UseCredentialManager=Enabled /o:PerformanceTweaksFSCache=Enabled /o:EnableSymlinks=Disabled /o:EnableFSMonitor=Disabled"
TensorFlow 1.15.5, Keras 2.3.1 のインストール
py -3.7 -m pip uninstall -y tensorflow tensorflow-cpu tensorflow-gpu tensorflow-intel tensorflow-text tensorflow-estimator tf-models-official tf_slim tensorflow_datasets tensorflow-hub keras keras-tuner keras-visualizer scipy pandas matplotlib
# TensorFlow 1.15.5 のため numpy, protobuf の古いバージョンを使用.エラーが出にくいと考えられる numpy 1.16.2, protobuf 3.19.4 を使用
py -3.7 -m pip install -U numpy==1.16.2 protobuf==3.19.4 tensorflow-gpu==1.15.5 keras==2.3.1 scipy==1.5.4
py -3.7 -m pip install git+https://github.com/tensorflow/docs
py -3.7 -m pip install git+https://github.com/tensorflow/examples.git
py -3.7 -m pip install git+https://www.github.com/keras-team/keras-contrib.git
mpatacchiola/DeepGaze のインストール
Windows での手順を下に示す.Ubuntu でも同様の手順になる.
- Windows で,コマンドプロンプトを管理者として実行.
- DeepGaze のインストールディレクトリを空にしておく
cd /d c:%HOMEPATH%
rmdir /s /q deepgaze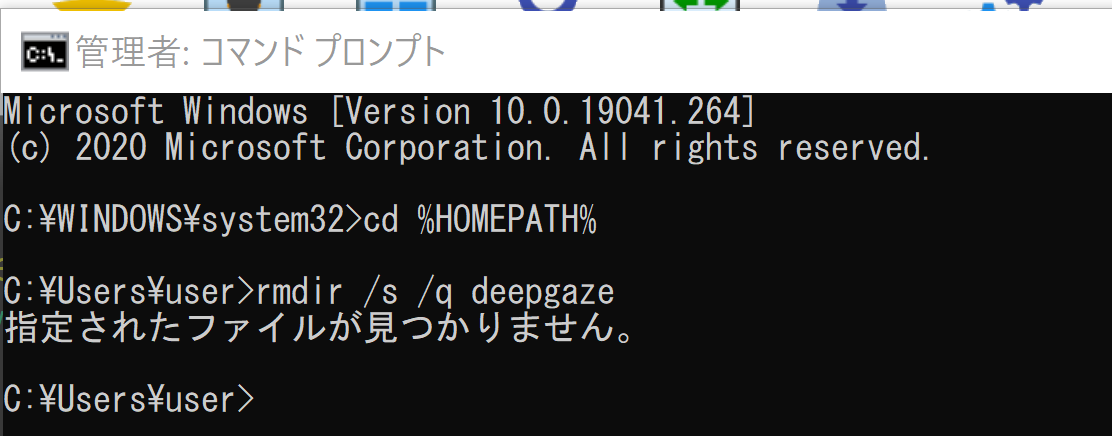
- DeepGaze のインストール
cd /d c:%HOMEPATH%
git clone https://github.com/mpatacchiola/deepgaze
cd deepgaze
py -3.7 setup.py build
py -3.7 setup.py install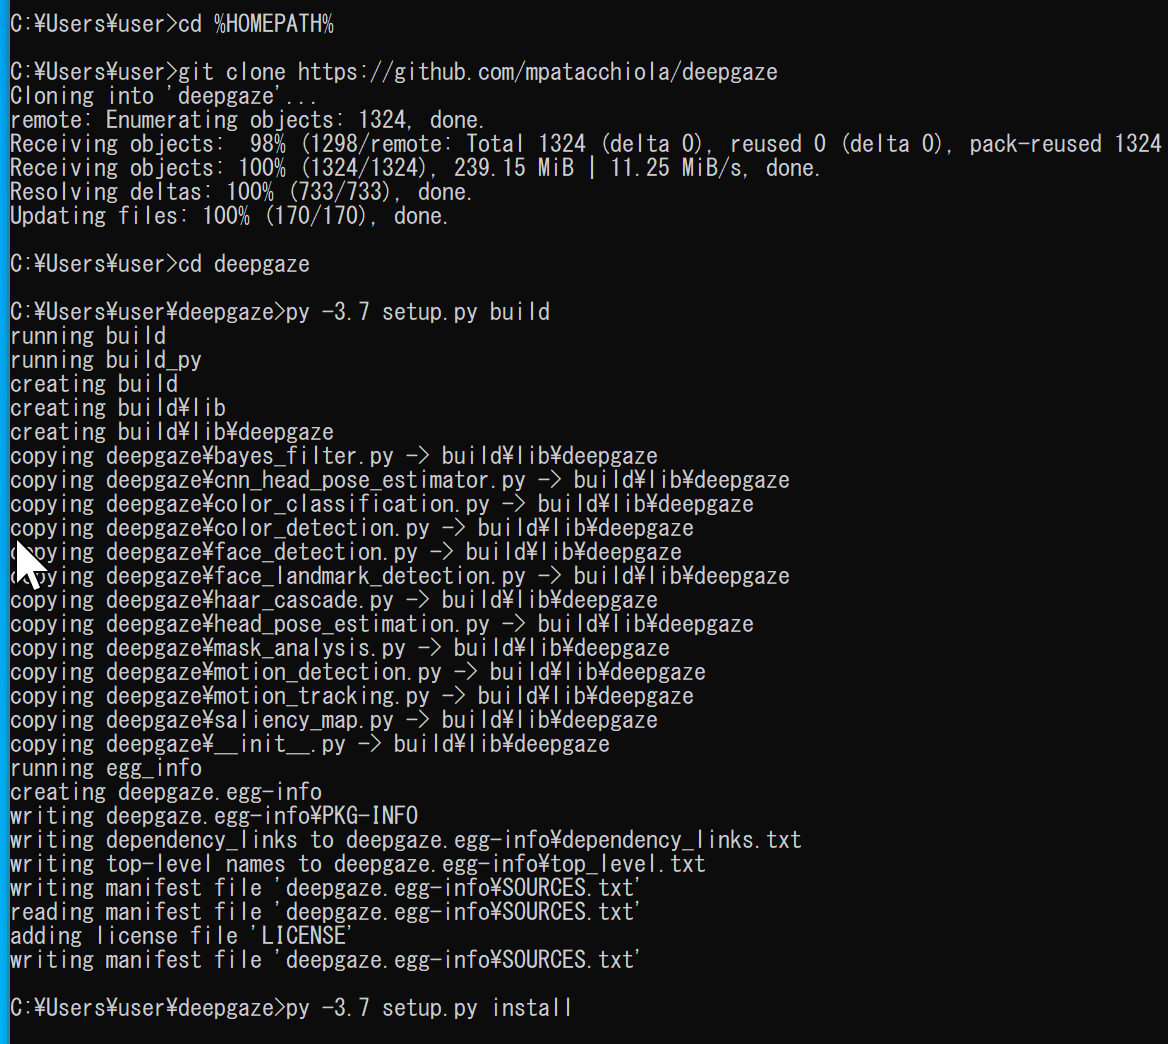
- 終了の確認
エラーメッセージが出ていないこと.
mpatacchiola/DeepGaze を用いて頭部の姿勢推定を行ってみる
Windows での手順を下に示す.Ubuntu でも同様の手順になる.
サンプルプログラムを動かしてみる
- Windows では,コマンドプロンプトを実行.
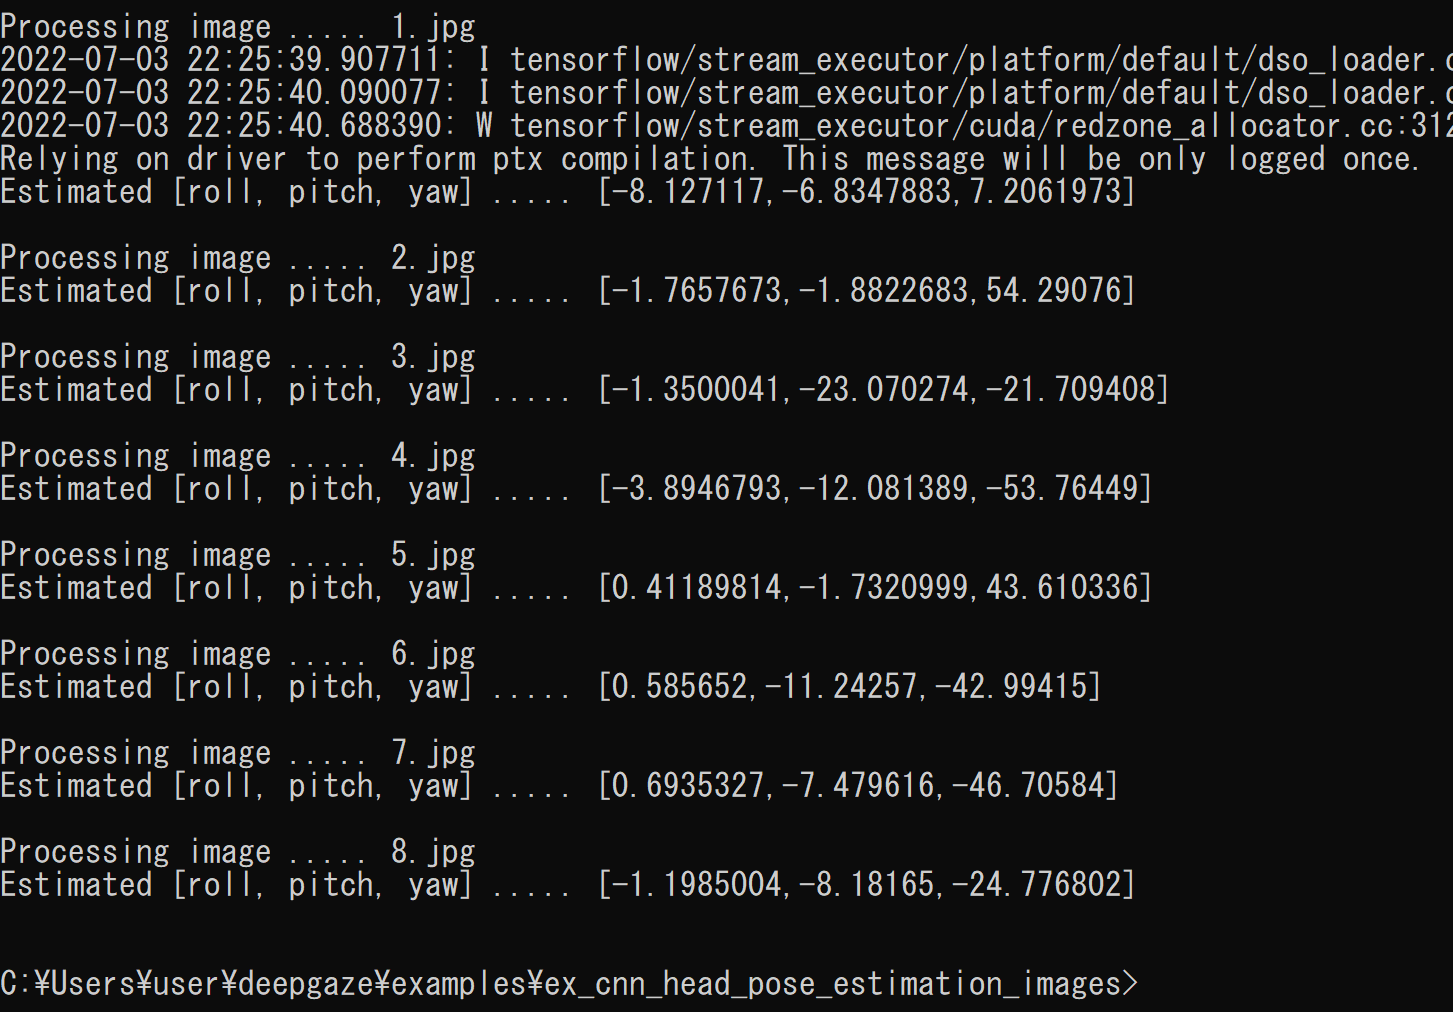
- 次のコマンドを実行
cd /d c:%HOMEPATH%
cd deepgaze\examples\ex_cnn_head_pose_estimation_images
py -3.7 ex_cnn_head_pose_estimation_images.py
- 結果を確認
動画ファイルで動かす
- Windows では,コマンドプロンプトを実行.
- 作業用のディレクトリ(フォルダ)として,c:\imageを作り,
sample1.mp4 を,c:\image の下にダウンロード
mkdir c:\image
cd c:\image
curl -O https://www.kkaneko.jp/sample/face/sample1.mp4
- %HOMEPATH%\deepgaze の下の examples の下の
ex_cnn_head_pose_estimation_images の下にあるファイルを使いたい
ファイルのコピー
cd /d c:%HOMEPATH%
cd deepgaze\examples\ex_cnn_head_pose_estimation_images
copy ex_cnn_head_pose_estimation_images.py a.py
- いまコピーしてできた新しいファイル a.py をエディタで開く
notepad a.py
-
OpenCV による動画表示を行うために,
このプログラムファイルの後半部分を次のように書き換え
v = cv2.VideoCapture("c:/image/sample1.mp4")
while(v.isOpened()):
    r, img = v.read()
    if ( r == False ):
        break
    img = cv2.resize(img, (480, 480))
    roll = my_head_pose_estimator.return_roll(img)  # Evaluate the roll angle using a CNN
    pitch = my_head_pose_estimator.return_pitch(img)  # Evaluate the pitch angle using a CNN
    yaw = my_head_pose_estimator.return_yaw(img)  # Evaluate the yaw angle using a CNN
    print("roll %s, pitch %s, yaw %s" % ( str(roll[0,0,0]), str(pitch[0,0,0]), str(yaw[0,0,0]) ) )

    cv2.imshow("", img)
    # Press Q to exit
    if cv2.waitKey(1) & 0xFF == ord('q'):
        break

v.release()
cv2.destroyAllWindows()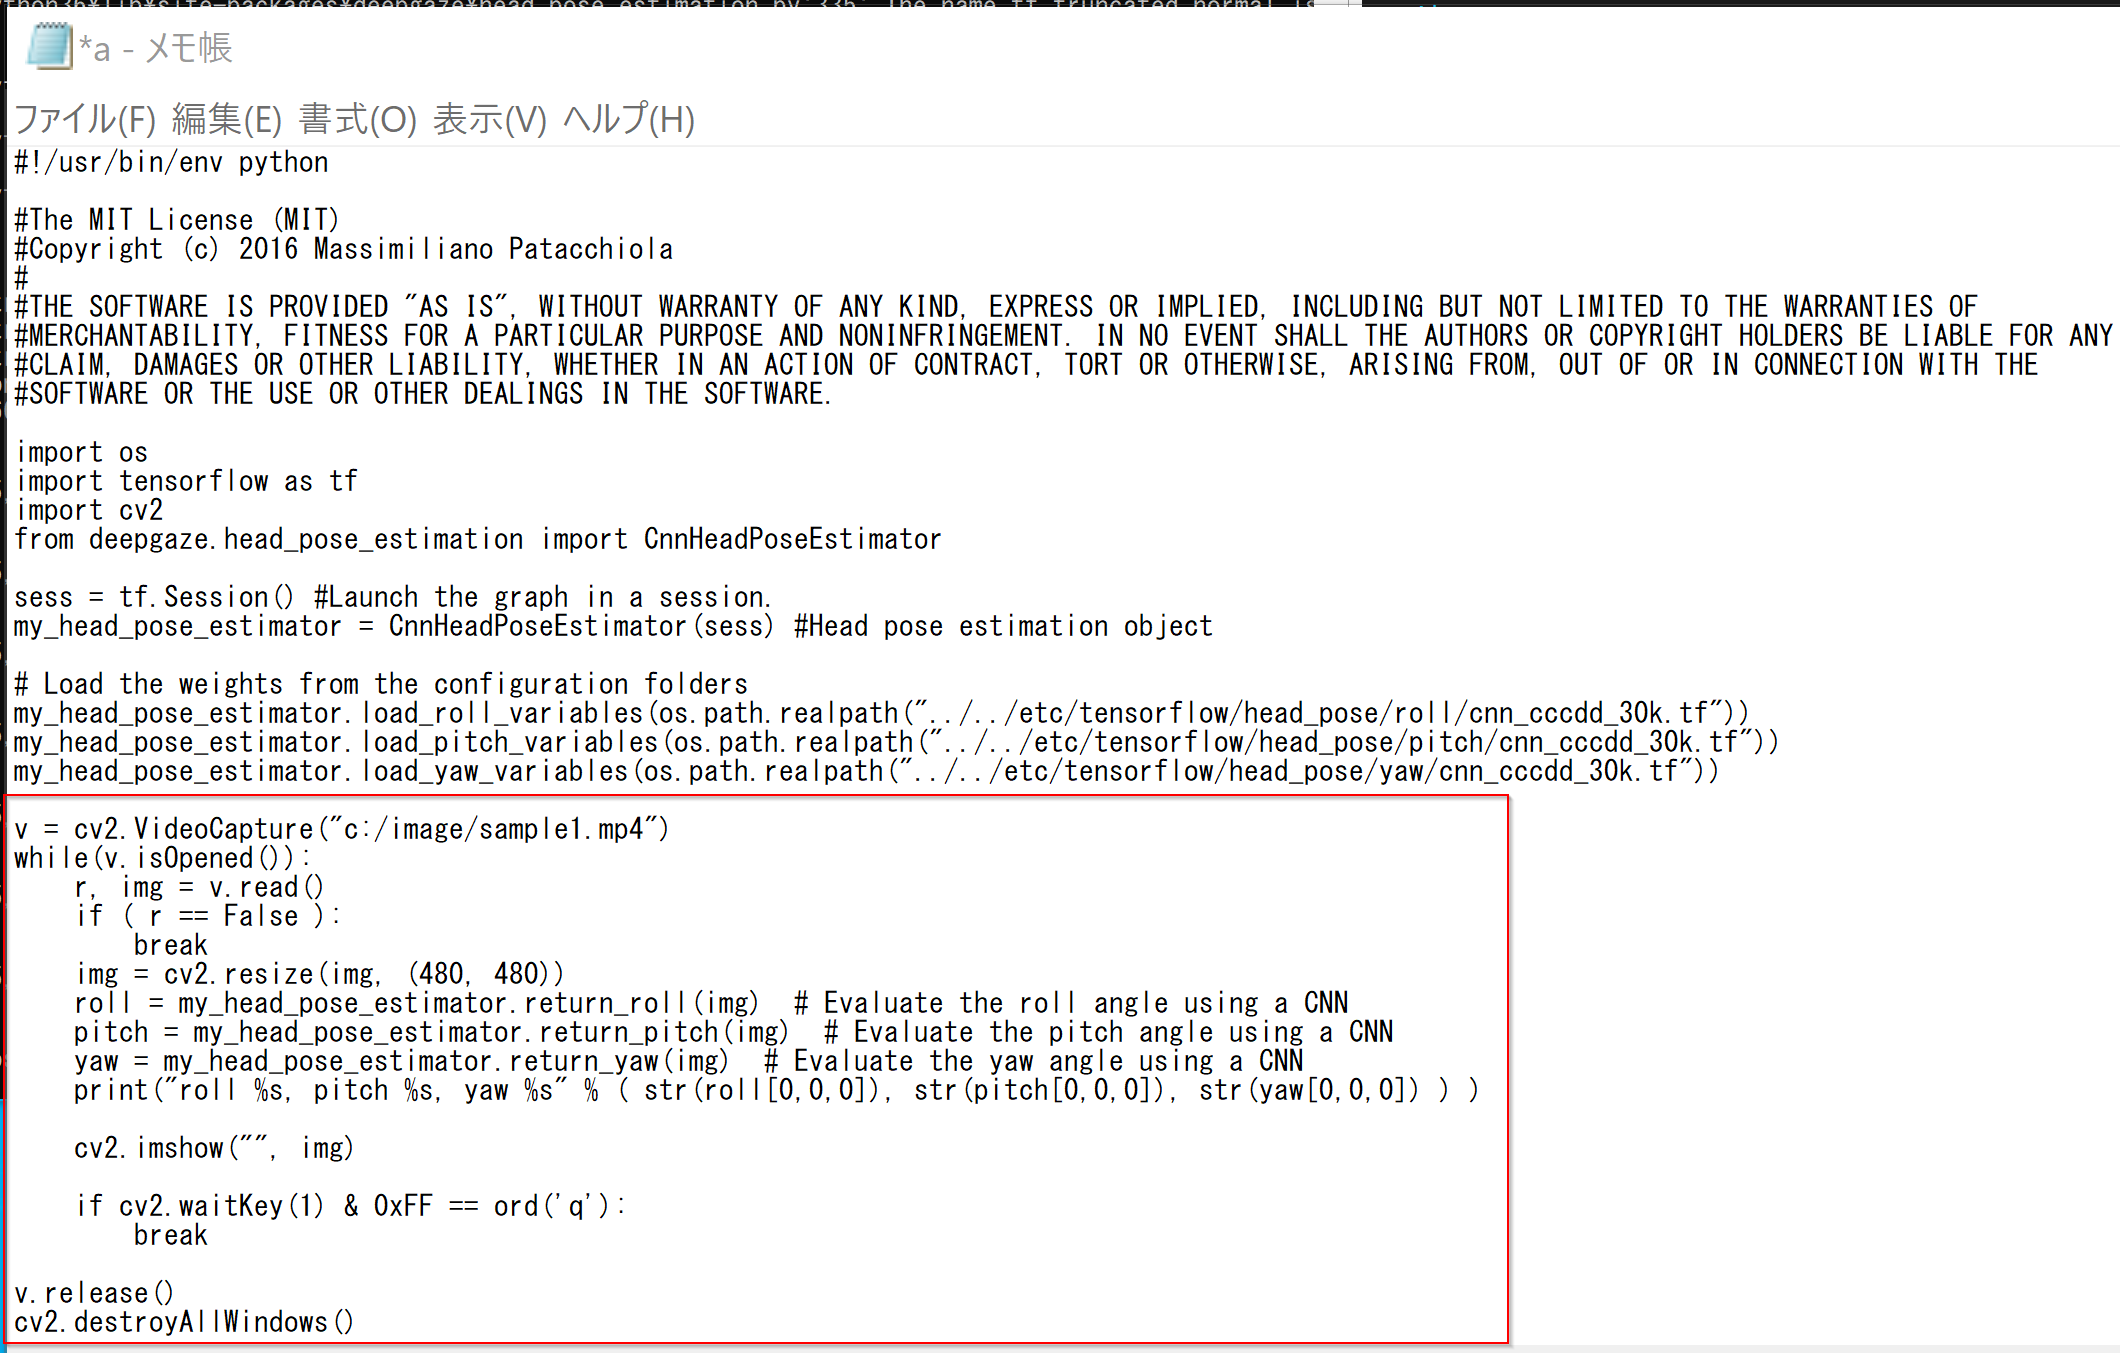
編集したら,ファイルを「上書き保存」する
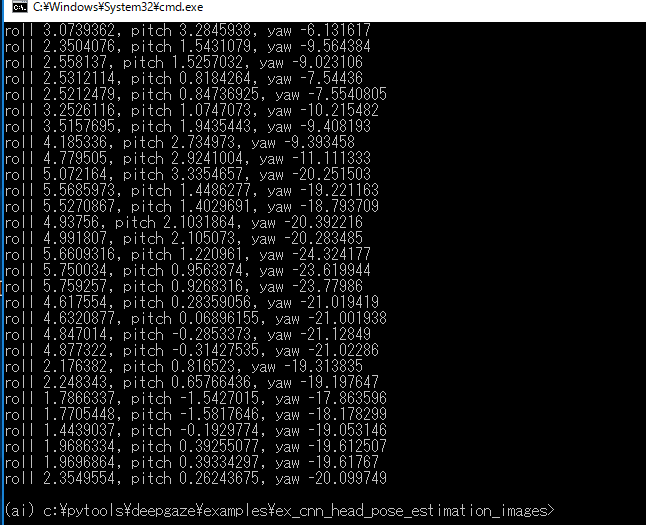
- Python プログラムの実行
py -3.7 a.py
- 結果の確認
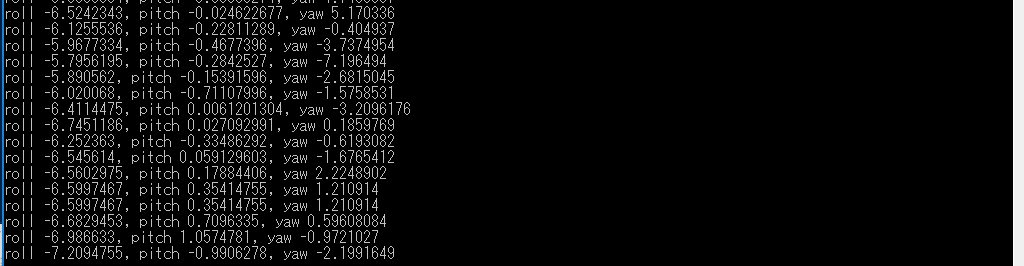
ビデオカメラで確認
-
OpenCV による動画表示を行うために,
次のように書き換える.書き換えたら保存する
v = cv2.VideoCapture(0)
while(v.isOpened()):
    r, img = v.read()
    if ( r == False ):
        break
    img = cv2.resize(img, (480, 480))
    roll = my_head_pose_estimator.return_roll(img)  # Evaluate the roll angle using a CNN
    pitch = my_head_pose_estimator.return_pitch(img)  # Evaluate the pitch angle using a CNN
    yaw = my_head_pose_estimator.return_yaw(img)  # Evaluate the yaw angle using a CNN
    print("roll %s, pitch %s, yaw %s" % ( str(roll[0,0,0]), str(pitch[0,0,0]), str(yaw[0,0,0]) ) )

    cv2.imshow("", img)
    # Press Q to exit
    if cv2.waitKey(1) & 0xFF == ord('q'):
        break

v.release()
cv2.destroyAllWindows()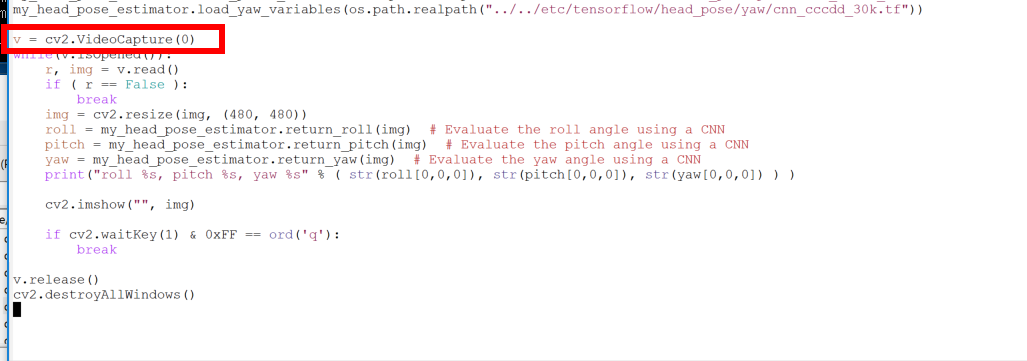
- ファイルを「上書き保存」する
-
Python プログラムの実行
py -3.7 a.py - 結果の確認