チャットボットアプリケーションのプログラム(Python,LangChain,OpenAI API を使用)(Windows 上)
【目次】
【関連する外部ページ】
- LangChain の 公式のページ: https://www.langchain.com/
- LangChain の ChatBot ユースケースのページ: https://python.langchain.com/v0.1/docs/use_cases/chatbots/
チャットボットのアプリ
前準備
Python 3.12 のインストール(Windows 上) [クリックして展開]
以下のいずれかの方法で Python 3.12 をインストールする。Python がインストール済みの場合、この手順は不要である。
方法1:winget によるインストール
管理者権限のコマンドプロンプトで以下を実行する。管理者権限のコマンドプロンプトを起動するには、Windows キーまたはスタートメニューから「cmd」と入力し、表示された「コマンドプロンプト」を右クリックして「管理者として実行」を選択する。
winget install --id Python.Python.3.12 -e --scope machine --silent --accept-source-agreements --accept-package-agreements --override "/quiet InstallAllUsers=1 PrependPath=1 Include_test=0 Include_pip=1 Include_launcher=1 InstallLauncherAllUsers=1 TargetDir=\"C:\Program Files\Python312\""
powershell -Command "$p='C:\Program Files\Python312'; $s=\"$p\Scripts\"; $m=[Environment]::GetEnvironmentVariable('Path','Machine'); if($m -notlike \"*$s*\") { [Environment]::SetEnvironmentVariable('Path', \"$p;$s;$m\", 'Machine') }"
--scope machine を指定することで、システム全体(全ユーザー向け)にインストールされる。このオプションの実行には管理者権限が必要である。インストール完了後、コマンドプロンプトを再起動すると PATH が自動的に設定される。
方法2:インストーラーによるインストール
- Python 公式サイト(https://www.python.org/downloads/)にアクセスし、「Download Python 3.x.x」ボタンから Windows 用インストーラーをダウンロードする。
- ダウンロードしたインストーラーを実行する。
- 初期画面の下部に表示される「Add python.exe to PATH」に必ずチェックを入れてから「Customize installation」を選択する。このチェックを入れ忘れると、コマンドプロンプトから
pythonコマンドを実行できない。 - 「Install Python 3.xx for all users」にチェックを入れ、「Install」をクリックする。
インストールの確認
コマンドプロンプトで以下を実行する。
python --versionバージョン番号(例:Python 3.12.x)が表示されればインストール成功である。「'python' は、内部コマンドまたは外部コマンドとして認識されていません。」と表示される場合は、インストールが正常に完了していない。
LangChain を使用したチャットボットの Python プログラム(Python,LangChain,OpenAI API を使用)(Windows 上)
OpenAPI の API キーの取得
OpenAI の APIキーを準備する
【関連する外部ページ】
- OpenAI の API キーのページ
- 料金の条件や利用履歴はこちらで確認.
OpenAPI の API キーを .env ファイルに保存
- OpenAI の APIキーを準備する
OpenAI の APIキーのページ
https://platform.openai.com/api-keys
料金の条件や利用履歴はこちらで確認.
- Windows で,コマンドプロンプトを実行
- エディタを起動
cd /d c:%HOMEPATH% rmdir /s /q langchain mkdir langchain cd langchain type nul > .env notepad .env - エディタで 「export OPENAI_API_KEY=sk-...」のように書く.
「sk-...」の部分は,OpenAI の APIキー を設定する.

dotenv, LangChain, openai のインストール
- 以下の手順を管理者権限のコマンドプロンプトで実行する
(手順:Windowsキーまたはスタートメニュー →
cmdと入力 → 右クリック → 「管理者として実行」)。 - 次のコマンドを実行.
python -m pip install -U --ignore-installed pip
python -m pip install -U python-dotenv
python -m pip install -U langchain openai
プログラム1.LangChain を使用したチャットボットを動かしてみる
【関連する外部ページ】
- LangChain の 公式のページ: https://www.langchain.com/
- LangChain の ChatBot ユースケースのページ: https://python.langchain.com/v0.1/docs/use_cases/chatbots/
- Windows で,コマンドプロンプトを実行
- エディタを起動
cd /d c:%HOMEPATH%
cd langchain
notepad chatbot1.py
- エディタで,次のプログラムを保存
このプログラムは, LangChain の ChatBot ユースケースのページ: https://python.langchain.com/v0.1/docs/use_cases/chatbots/ の「QuickStart」で公開されていたものを書き換えて使用している.
import dotenv
dotenv.load_dotenv()

from langchain.schema import AIMessage, HumanMessage, SystemMessage
from langchain.chat_models import ChatOpenAI

chat = ChatOpenAI()

messages = [
    SystemMessage(content="You are a helpful assistant that translates English to Japanese."),
    HumanMessage(content="I love programming.")
]
print(chat(messages))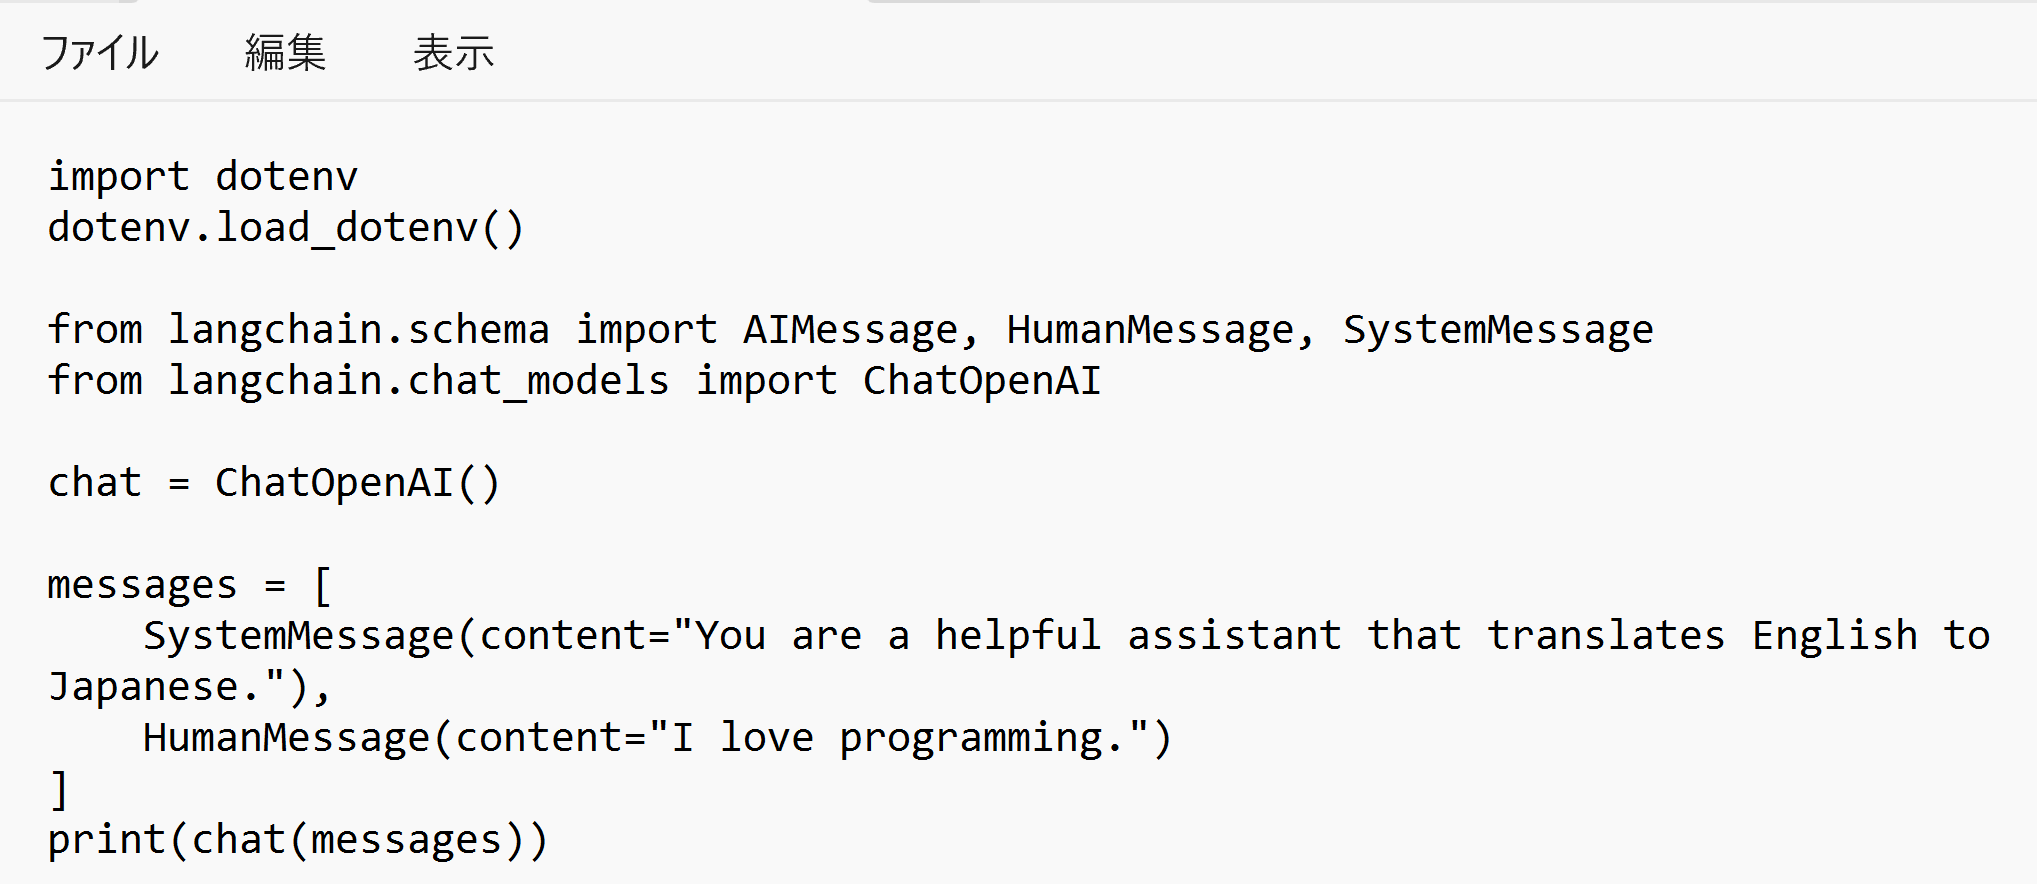
- Python プログラムの実行
プログラムを chatbot1.pyのようなファイル名で保存したので, 「python chatbot1.py」のようなコマンドで行う.
python chatbot1.py
- 実行の結果,OpenAI API 経由でチャットが実行され,結果が表示される.

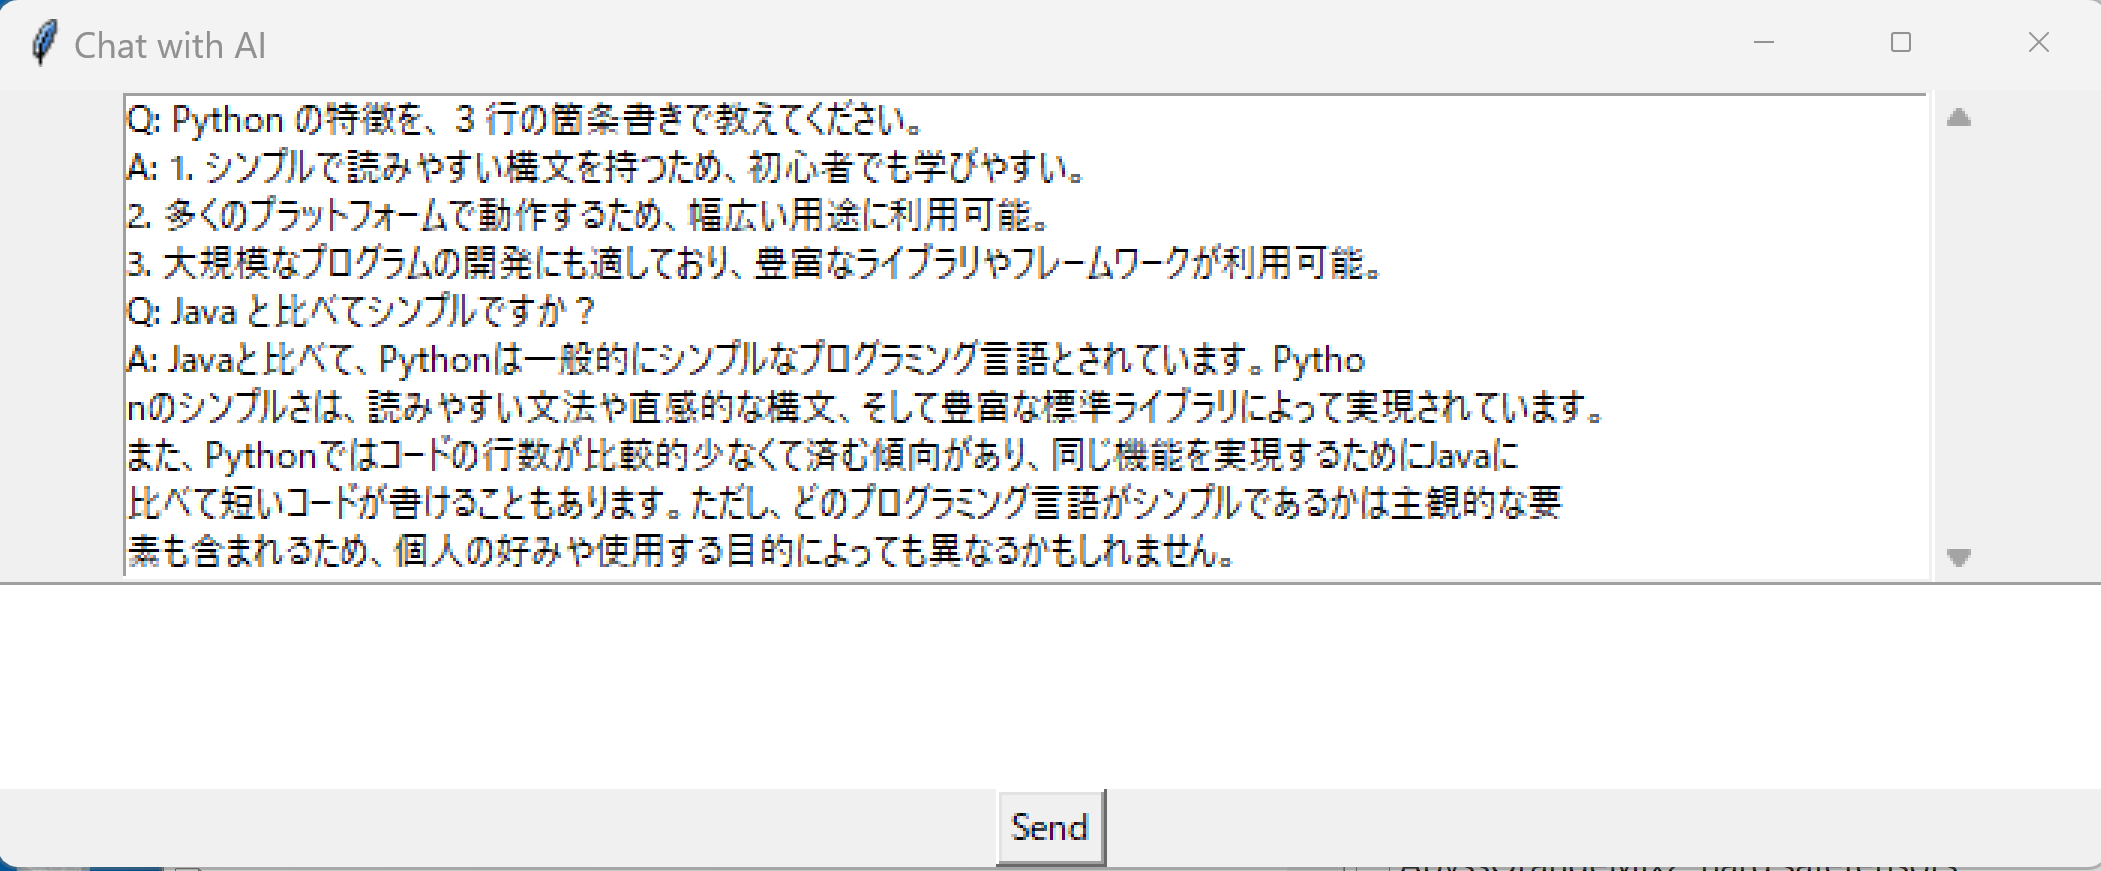
プログラム2.LangChain を使用したチャットボットのプログラム(画面で対話)
このプログラムは,ユーザーからのメッセージを受け取り,それを OpenAI の ChatGPT に送信して応答を得て,画面に表示する. ユーザーとAIの対話履歴は保存され,画面で過去の対話も閲覧可能である.
環境変数OPENAI_API_KEYは,dotenvモジュールを使用して読み込んでいる. GUIの構築には,Tkinterライブラリを用いている. 履歴の表示にはリストボックスとスクロールバーを用い,ユーザーからのメッセージ入力はテキストフィールドで受け付け,そのメッセージの送信のために「Send」ボタンを配置している.
- Windows で,コマンドプロンプトを実行
- エディタを起動
cd /d c:%HOMEPATH% cd langchain notepad chatbot2.py - エディタで,次のプログラムを保存
import dotenv dotenv.load_dotenv() from langchain.schema import ( AIMessage, HumanMessage, SystemMessage ) from langchain.chat_models import ChatOpenAI import tkinter as tk import textwrap #TEMPERATURE = 0 #MODEL_NAME = 'gpt-3.5-turbo' #chat = ChatOpenAI(temperature=TEMPERATURE, model_name=MODEL_NAME) chat = ChatOpenAI() WIDTH = 50 def do_chat(user_message): messages = [ SystemMessage(content="You are a helpful assistant. Do not include offensive, discriminatory or emotional language in your answers. You are always calm. You can answer all kinds of questions You can also give advice of all kinds. You can create Python programs, and develop programming ideas. You are as vivacious, idea-rich, and creative. Please answer in Formal Japanese. Thank you."), HumanMessage(content=user_message) ] ai_message = chat(messages) return ai_message.content def send_message(): user_message = entry_field.get("1.0", tk.END) first_line = True for part in user_message.split('\n'): wrapped_message = textwrap.wrap(part, width=50) for line in wrapped_message: if first_line: chat_history.insert(tk.END, "Q: " + line) first_line = False else: chat_history.insert(tk.END, line) entry_field.delete("1.0", tk.END) user_message = user_message.replace("\t", "").replace("\r", "").replace("\n", "") ai_message = do_chat(user_message) first_line = True for part in ai_message.split('\n'): wrapped_ai_message = textwrap.wrap(part, width=50) for line in wrapped_ai_message: if first_line: chat_history.insert(tk.END, "A: " + line) first_line = False else: chat_history.insert(tk.END, line) root = tk.Tk() root.title("Chat with AI") frame = tk.Frame(root) scroll = tk.Scrollbar(frame) chat_history = tk.Listbox(frame, yscrollcommand=scroll.set, width=2 * WIDTH) scroll.pack(side=tk.RIGHT, fill=tk.Y) chat_history.pack(side=tk.LEFT, fill=tk.BOTH, expand=True) frame.pack() entry_field = tk.Text(root, width=2 * WIDTH, height=5) entry_field.pack() send_button = tk.Button(root, text="Send", command=send_message) send_button.pack() root.mainloop() - Python プログラムの実行
プログラムを chatbot2.pyのようなファイル名で保存したので, 「python chatbot2.py」のようなコマンドで行う.
python chatbot2.py - 実行の結果,チャットボットの画面が開き,対話ができる.