Unified Scene Text Detection のインストールとテスト実行(テキスト検出)(Python,TensorFlow を使用)(Windows 上)
【目次】
Unified Scene Text Detection
Unified Scene Text Detection は,テキスト検出(text detection),ドキュメントのレイアウト解析(layout analysis)を統合することにより,精度の改善を行っている. 2022年発表.
【文献】
Towards End-to-End Unified Scene Text Detection and Layout Analysis, Long, Shangbang and Qin, Siyang and Panteleev, Dmitry and Bissacco, Alessandro and Fujii, Yasuhisa and Raptis, Michalis, Proceedings of the IEEE/CVF Conference on Computer Vision and Pattern Recognition, 2022.
https://arxiv.org/abs/2203.15143
【関連する外部ページ】
- Unified Scene Text Detection の GitHub の公式ページ: https://github.com/tensorflow/models/tree/master/official/projects/unified_detector
- Paper with Code のページ: https://paperswithcode.com/paper/towards-end-to-end-unified-scene-text
前準備
Build Tools for Visual Studio 2026(ビルドツール)のインストール
Build Tools for Visual Studio 2026(ビルドツール)のインストールを行い、C/C++ コードの微づろ環境を整える。
Build Tools for Visual Studio は,Visual Studio の IDE を含まない C/C++ コンパイラ,ライブラリ,ビルドツール等のコマンドライン向け開発ツールセットである。インストール済みの場合,この手順は不要である。 以下のコマンドは、Build Tools が未インストールの場合は winget で新規インストールし、インストール済みの場合は 【インストールコマンドの実行方法】 管理者権限でコマンドプロンプトを起動する(手順:Windows キーまたはスタートメニュー → 上記のコマンドでは、Build Tools 本体と Visual C++ 再頒布可能パッケージをインストールし、続いて以下のコンポーネントを追加している。 上記以外の追加のコンポーネントが必要になった場合は Visual Studio Installer で個別にインストールできる。 インストール完了の確認 Visual Studio を必要とするとき Visual Studio の機能を必要とする場合は,追加インストールできる。[Build Tools for Visual Studio 2026(ビルドツール)のインストール手順を見るには、ここをクリック]
Windows での Build Tools for Visual Studio 2026 のインストール
setup.exe modify でコンポーネントを追加する(バージョンは変更しない)。cmd と入力 → 右クリック → 「管理者として実行」)。そして、コマンド全体をコマンドプロンプトにコピー&ペーストする。REM VC++ ランタイム
winget install --scope machine --id Microsoft.VCRedist.2015+.x64 -e --silent --disable-interactivity --force --accept-source-agreements --accept-package-agreements --override "/quiet /norestart"
REM ============================================================
REM Visual Studio Build Tools + Desktop development with C++
REM (VCTools、MSBuildTools、CMake連携、Clang、Windows 11 SDK)
REM ============================================================
REM 進行中のインストーラーを停止(ロック競合回避)
taskkill /F /IM vs_setup.exe /T >nul 2>&1
taskkill /F /IM vs_installer.exe /T >nul 2>&1
taskkill /F /IM vs_installerservice.exe /T >nul 2>&1
REM 未インストール時: winget で新規インストール
REM インストール済み時: setup.exe modify でコンポーネント追加(バージョンは変更しない)
winget list --id Microsoft.VisualStudio.BuildTools 2>nul | findstr /i "BuildTools" >nul 2>&1
if %ERRORLEVEL% EQU 0 (
for /f "usebackq delims=" %P in (`"C:\Program Files (x86)\Microsoft Visual Studio\Installer\vswhere.exe" -products Microsoft.VisualStudio.Product.BuildTools -property installationPath`) do start /wait "" "C:\Program Files (x86)\Microsoft Visual Studio\Installer\setup.exe" modify --installPath "%P" --add Microsoft.VisualStudio.Workload.VCTools --add Microsoft.VisualStudio.Workload.MSBuildTools --add Microsoft.VisualStudio.Component.VC.CMake.Project --add Microsoft.VisualStudio.Component.VC.Llvm.Clang --add Microsoft.VisualStudio.Component.VC.Llvm.ClangToolset --add Microsoft.VisualStudio.Component.Windows11SDK.26100 --includeRecommended --quiet --norestart --nocache
) else (
winget install --scope machine --id Microsoft.VisualStudio.BuildTools -e --silent --disable-interactivity --force --accept-source-agreements --accept-package-agreements --override "--quiet --wait --norestart --nocache --add Microsoft.VisualStudio.Workload.VCTools --includeRecommended --add Microsoft.VisualStudio.Workload.MSBuildTools --add Microsoft.VisualStudio.Component.VC.CMake.Project --add Microsoft.VisualStudio.Component.VC.Llvm.Clang --add Microsoft.VisualStudio.Component.VC.Llvm.ClangToolset --add Microsoft.VisualStudio.Component.Windows11SDK.26100"
)
REM 破損時の修復(任意、動作がおかしくなった場合)
REM "C:\Program Files (x86)\Microsoft Visual Studio\Installer\setup.exe" repair --installPath "C:\Program Files (x86)\Microsoft Visual Studio\18\BuildTools" --quiet --norestart
REM 導入確認(インストールパスが表示されれば正常)
"C:\Program Files (x86)\Microsoft Visual Studio\Installer\vswhere.exe" -products * -requires Microsoft.VisualStudio.Workload.VCTools -property installationPath
--includeRecommended により、MSVC コンパイラ、C++ AddressSanitizer、vcpkg、CMake ツール、Windows 11 SDK 等の推奨コンポーネントが含まれる)winget list Microsoft.VisualStudio.BuildTools
Python 3.12 のインストール
Pythonのインストールを行い、Pythonのプログラムを実行する環境を整える。扱う環境は、Windows搭載パソコンである。金子研究室では、Python 3.12.10を推奨する。
[Windows での Python 3.12 のインストール手順を見るには、ここをクリック]
Windows での Python 3.12 のインストール
以下のいずれかの方法でPython 3.12をインストールする。Pythonがインストール済みの場合、この手順は不要である。
方法 1:winget によるインストール
【インストールコマンドの実行方法】
管理者権限でコマンドプロンプトを起動する(手順:Windowsキーまたはスタートメニュー → cmd と入力 → 右クリック → 「管理者として実行」)。そして、コマンド全体をコマンドプロンプトにコピー&ペーストする。
--scope machine を指定することで、システム全体(全ユーザー向け)にインストールされる。このオプションの実行には管理者権限が必要である。インストール完了後、コマンドプロンプトを再起動するとPATHが反映される。
REM Python 3.12 をシステム領域にインストール
winget install --id Python.Python.3.12 -e --scope machine --silent --accept-source-agreements --accept-package-agreements --override "/quiet InstallAllUsers=1 PrependPath=1 Include_test=0 Include_pip=1 Include_launcher=1 InstallLauncherAllUsers=1 TargetDir=\"C:\Program Files\Python312\""

REM Python と Scripts を PATH 先頭に追加
powershell -NoProfile -Command "$p='C:\Program Files\Python312'; $s=\"$p\Scripts\"; $c=[Environment]::GetEnvironmentVariable('Path','Machine'); if((Test-Path $p) -and (';'+$c+';' -notlike \"*;$p;*\") -and (';'+$c+';' -notlike \"*;$s;*\")){[Environment]::SetEnvironmentVariable('Path',\"$p;$s;$c\",'Machine')}"
方法 2:インストーラーによるインストール
- Python公式サイト(https://www.python.org/downloads/)にアクセスし、「Download Python 3.x.x」ボタンからWindows用インストーラーをダウンロードする。
- ダウンロードしたインストーラーを実行する。
- 初期画面の下部に表示される「Add python.exe to PATH」にチェックを入れてから「Customize installation」を選択する。このチェックを入れ忘れると、コマンドプロンプトから
pythonコマンドを実行できない。 - 「Install Python 3.xx for all users」にチェックを入れ、「Install」をクリックする。
インストールの確認
コマンドプロンプトで以下を実行する。
python --versionバージョン番号(例:Python 3.12.x)が表示されればインストール成功である。「'python' は、内部コマンドまたは外部コマンドとして認識されていません。」と表示される場合は、インストールが正常に完了していない。
Git のインストール(Windows 上) [クリックして展開]
管理者権限のコマンドプロンプトで以下を実行する.管理者権限は,winget の --scope machine オプションでシステム全体にインストールするために必要となる.
REM Git をシステム領域にインストール
winget install --scope machine --id Git.Git -e --silent --disable-interactivity --force --accept-source-agreements --accept-package-agreements --override "/VERYSILENT /NORESTART /NOCANCEL /SP- /CLOSEAPPLICATIONS /RESTARTAPPLICATIONS /COMPONENTS=""icons,ext\reg\shellhere,assoc,assoc_sh"" /o:PathOption=Cmd /o:CRLFOption=CRLFCommitAsIs /o:BashTerminalOption=MinTTY /o:DefaultBranchOption=main /o:EditorOption=VIM /o:SSHOption=OpenSSH /o:UseCredentialManager=Enabled /o:PerformanceTweaksFSCache=Enabled /o:EnableSymlinks=Disabled /o:EnableFSMonitor=Disabled"
7-Zip のインストール(Windows 上) [クリックして展開]
管理者権限のコマンドプロンプトで以下を実行する。管理者権限のコマンドプロンプトを起動するには、Windows キーまたはスタートメニューから「cmd」と入力し、表示された「コマンドプロンプト」を右クリックして「管理者として実行」を選択する。
REM 7-Zip をシステム領域にインストール
winget install --scope machine --id 7zip.7zip -e --silent --disable-interactivity --force --accept-source-agreements --accept-package-agreements
REM 7-Zip のパス設定
powershell -NoProfile -Command "$p='C:\Program Files\7-Zip'; $c=[Environment]::GetEnvironmentVariable('Path','Machine'); if((Test-Path $p) -and $c -notlike \"*$p*\"){[Environment]::SetEnvironmentVariable('Path',\"$p;$c\",'Machine')}"
NVIDIA ドライバのインストール(Windows 上)
NVIDIA ドライバとは
NVIDIA ドライバは,NVIDIA製GPUをWindowsシステム上で適切に動作させるための基盤となるソフトウェアです.このドライバをインストールすることにより,GPUの性能を最大限に引き出し,グラフィックス処理はもちろん,CUDAを利用したAI関連アプリケーションなどの計算速度を向上させることが期待できます.
ドライバは通常、NVIDIA公式サイトからダウンロードするか、NVIDIA GeForce Experienceソフトウェアを通じてインストール・更新します。
公式サイト: https://www.nvidia.co.jp/Download/index.aspx?lang=jp
【サイト内の関連ページ】
- (再掲) NVIDIA グラフィックス・ボードの確認
インストールするドライバを選択するために、まずご使用のPCに搭載されているNVIDIAグラフィックス・ボードの種類を確認します。(確認済みであれば、この手順は不要です。) Windows のコマンドプロンプトで次のコマンドを実行します。
wmic path win32_VideoController get name - NVIDIA ドライバのダウンロード
確認したグラフィックス・ボードのモデル名と、お使いのWindowsのバージョン(例: Windows 11, Windows 10 64-bit)に対応するドライバを、以下のNVIDIA公式サイトからダウンロードします.
https://www.nvidia.co.jp/Download/index.aspx?lang=jp
サイトの指示に従い、製品タイプ、製品シリーズ、製品ファミリー、OS、言語などを選択して検索し、適切なドライバ(通常は最新のGame Ready ドライバまたはStudio ドライバ)をダウンロードします。
- ドライバのインストール
ダウンロードしたインストーラー(.exeファイル)を実行し、画面の指示に従ってインストールを進めます。「カスタムインストール」を選択すると、インストールするコンポーネント(ドライバ本体、GeForce Experience、PhysXなど)を選ぶことができます。通常は「高速(推奨)」で問題ありません。
インストール完了後、システムの再起動を求められる場合があります。
- CUDA対応のNVIDIA GPU。
- 対応するNVIDIA ドライバ。
- サポートされているバージョンのC++コンパイラ (Visual StudioまたはBuild Toolsをインストール済み)。
- Windows では,NVIDIA CUDA ツールキットのインストール中は,予期せぬ問題を避けるため、なるべく他のアプリケーションは終了しておくことが推奨されます。
- インストール後に環境変数が正しく設定されているか確認することが重要です。
- NVIDIA CUDA ツールキットのアーカイブの公式ページ: https://developer.nvidia.com/cuda-toolkit-archive (他のバージョンが必要な場合)
- NVIDIA CUDA ツールキット の公式ドキュメント: https://docs.nvidia.com/cuda/index.html
- NVIDIA CUDA ツールキットのインストールに関する,NVIDIA CUDA Installation Guide for Windows: https://docs.nvidia.com/cuda/cuda-installation-guide-windows/index.html
- (再掲) 他のウィンドウを閉じる:インストール中のコンフリクトを避けるため、可能な限り他のアプリケーションを終了します。
- Windows で,コマンドプロンプトを管理者権限で起動します。
-
wingetコマンドで CUDA 11.8 をインストールします。以下のコマンドは、(必要であれば)NVIDIA GeForce Experienceと、指定したバージョンのNVIDIA CUDA ツールキット (11.8) をインストールします。また、
CUDA_HOME環境変数を設定します(一部のツールで参照されることがあります)。rem グラフィックボードの確認 (参考) wmic path win32_VideoController get name rem CUDA Toolkit 11.8 のインストール winget install --scope machine Nvidia.CUDA --version 11.8 rem CUDA_HOME 環境変数の設定 (システム環境変数として設定) powershell -command "[System.Environment]::SetEnvironmentVariable(\"CUDA_HOME\", \"C:\Program Files\NVIDIA GPU Computing Toolkit\CUDA\v11.8\", \"Machine\")"注釈: これは特定のバージョン(11.8)をインストールする例です。他のバージョンをインストールする場合は
--versionオプションを適宜変更してください(例:--version 11.2)。利用可能なバージョンはwinget search Nvidia.CUDAで確認できます。 - (重要) ユーザ環境変数 TEMP の設定(日本語ユーザ名の場合)
Windows のユーザ名に日本語(マルチバイト文字)が含まれている場合、CUDAコンパイラ
nvccが一時ファイルの作成に失敗し、コンパイルが正常に動作しないことがあります(エラーメッセージが表示されない場合もあるため注意が必要です)。この問題を回避するために、ユーザ環境変数TEMPおよびTMPを、ASCII文字のみのパス(例:C:\TEMP)に変更します。管理者権限のコマンドプロンプトで,次のコマンドを実行して
C:\TEMPディレクトリを作成し、ユーザ環境変数TEMPとTMPを設定します。mkdir C:\TEMP powershell -command "[System.Environment]::SetEnvironmentVariable(\"TEMP\", \"C:\TEMP\", \"User\")" powershell -command "[System.Environment]::SetEnvironmentVariable(\"TMP\", \"C:\TEMP\", \"User\")"この設定は、コマンドプロンプトを再起動するか、Windowsに再サインインした後に有効になります。
- NVIDIA cuDNN の公式ページ(ダウンロードにはDeveloper Programへの登録が必要): https://developer.nvidia.com/cudnn
- NVIDIA Developer Program メンバーシップへの加入: cuDNNのダウンロードには無料のメンバーシップ登録が必要です。
NVIDIA Developer Program の公式ページ: https://developer.nvidia.com/developer-program
- 互換バージョンの選択とダウンロード: インストール済みのCUDAツールキットのバージョン (今回は11.x) に適合するcuDNNのバージョン (今回はv8.9.7) を選択し、Windows用のzipファイルをダウンロードします。
- ファイルの展開と配置: ダウンロードしたzipファイルを展開(解凍)し、中のファイル(
bin,include,libフォルダ内)を、CUDAツールキットのインストールディレクトリにコピーします。 - (オプション) 環境変数の設定: 必要に応じてシステム環境変数
CUDNN_PATHを設定します。 - (必要に応じて) ZLIB DLL のインストール:
zlibwapi.dllが見つからないエラーが発生する場合にインストールします。 - 動作確認: cuDNNライブラリ (
cudnn64_*.dll) にパスが通っているか確認します。 - 次のコマンドを管理者権限のコマンドプロンプトで実行する
(手順:Windowsキーまたはスタートメニュー →
cmdと入力 → 右クリック → 「管理者として実行」)。 - zlib の公式ページ: https://www.zlib.net/
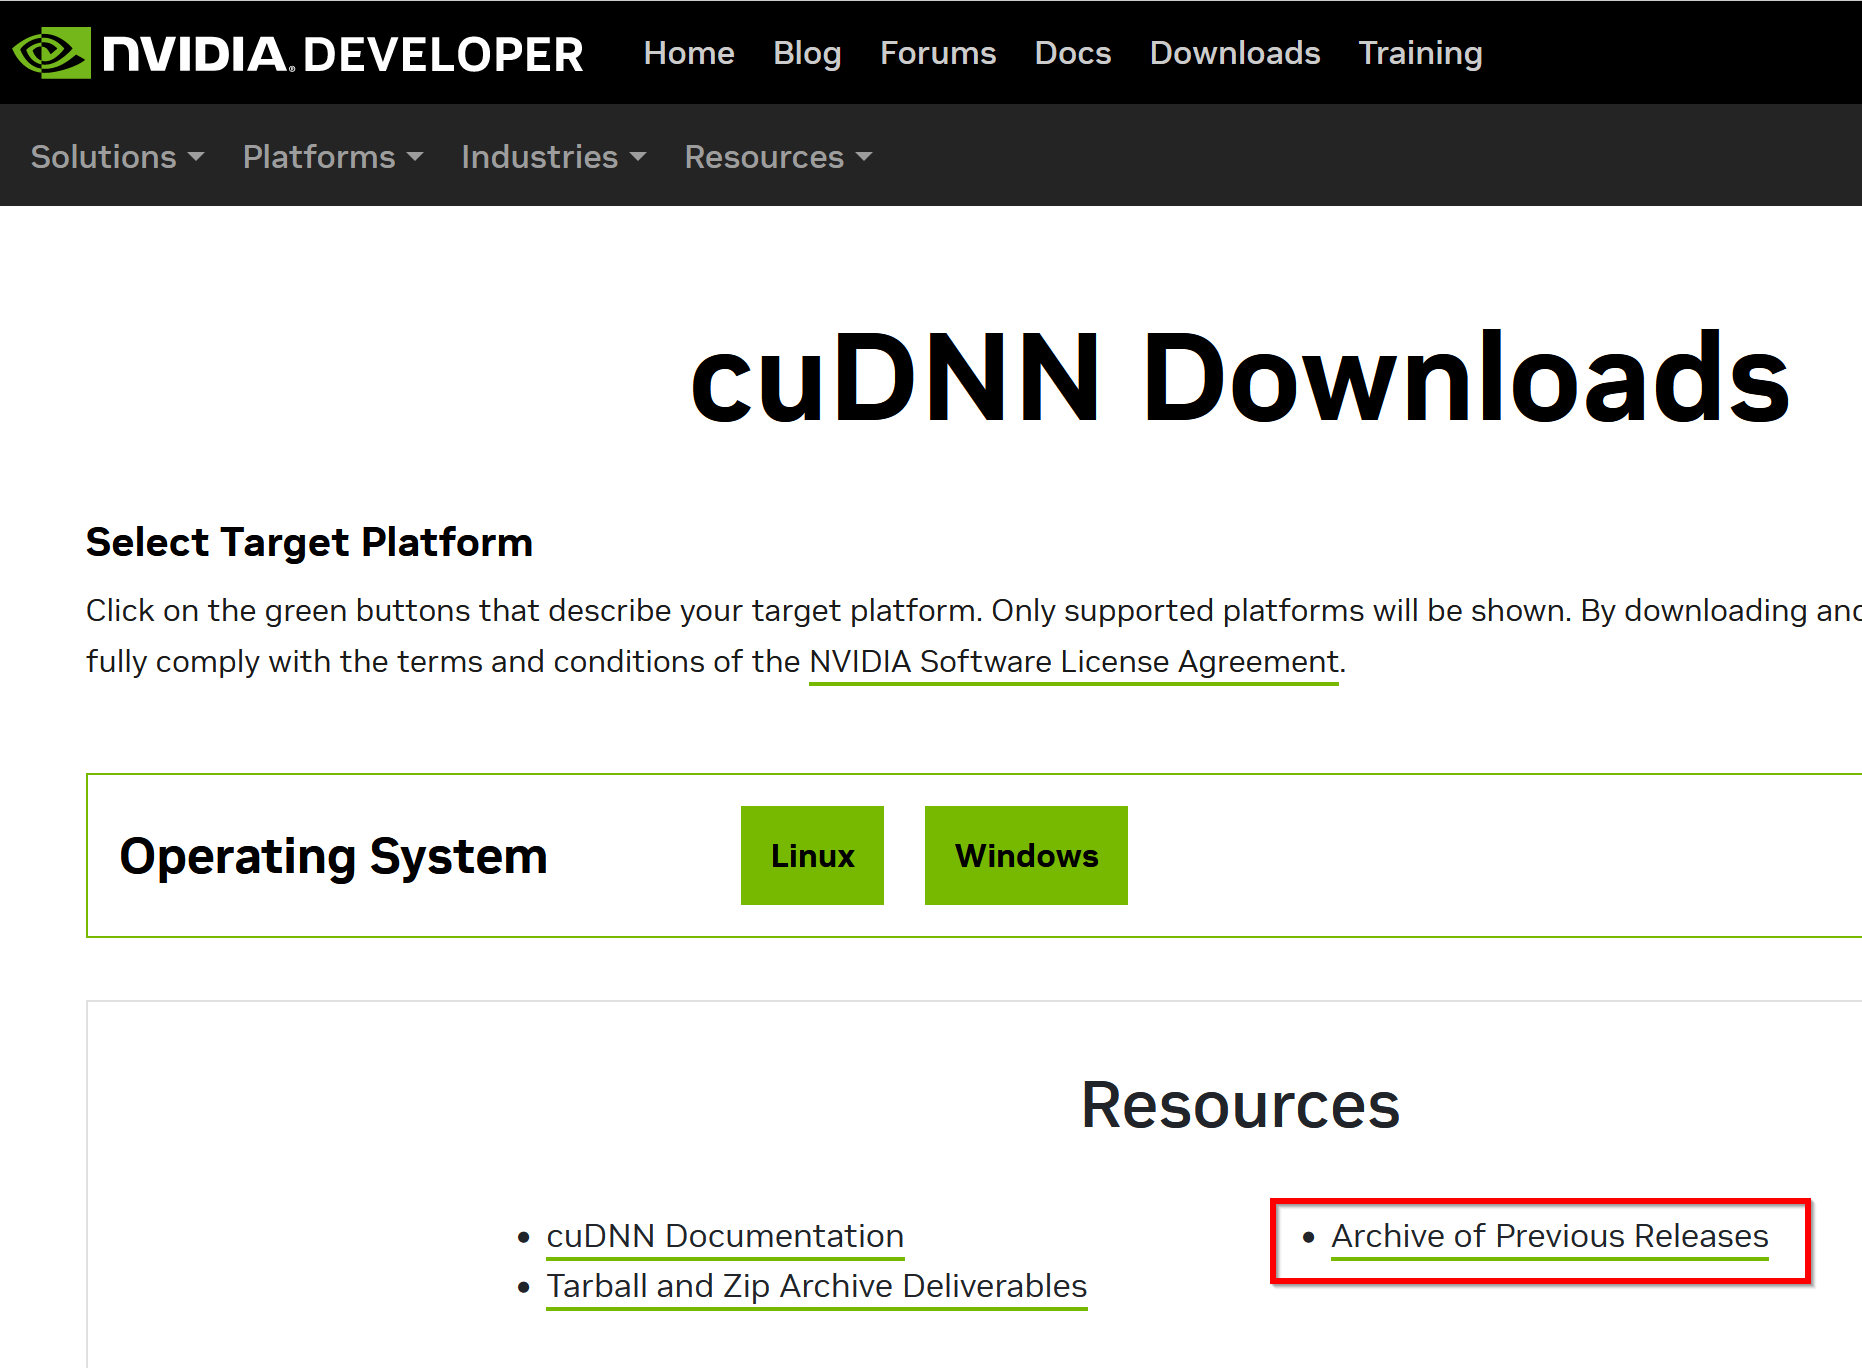
- NVIDIA cuDNN のウェブページを開く
- ダウンロードしたいので,cuDNNのところにある「Download cuDNN」をクリック.

- cuDNN Downloads のページで「Archive of Previous Releases」をクリック
- 「cuDNN 8.x - 1.x」をクリック
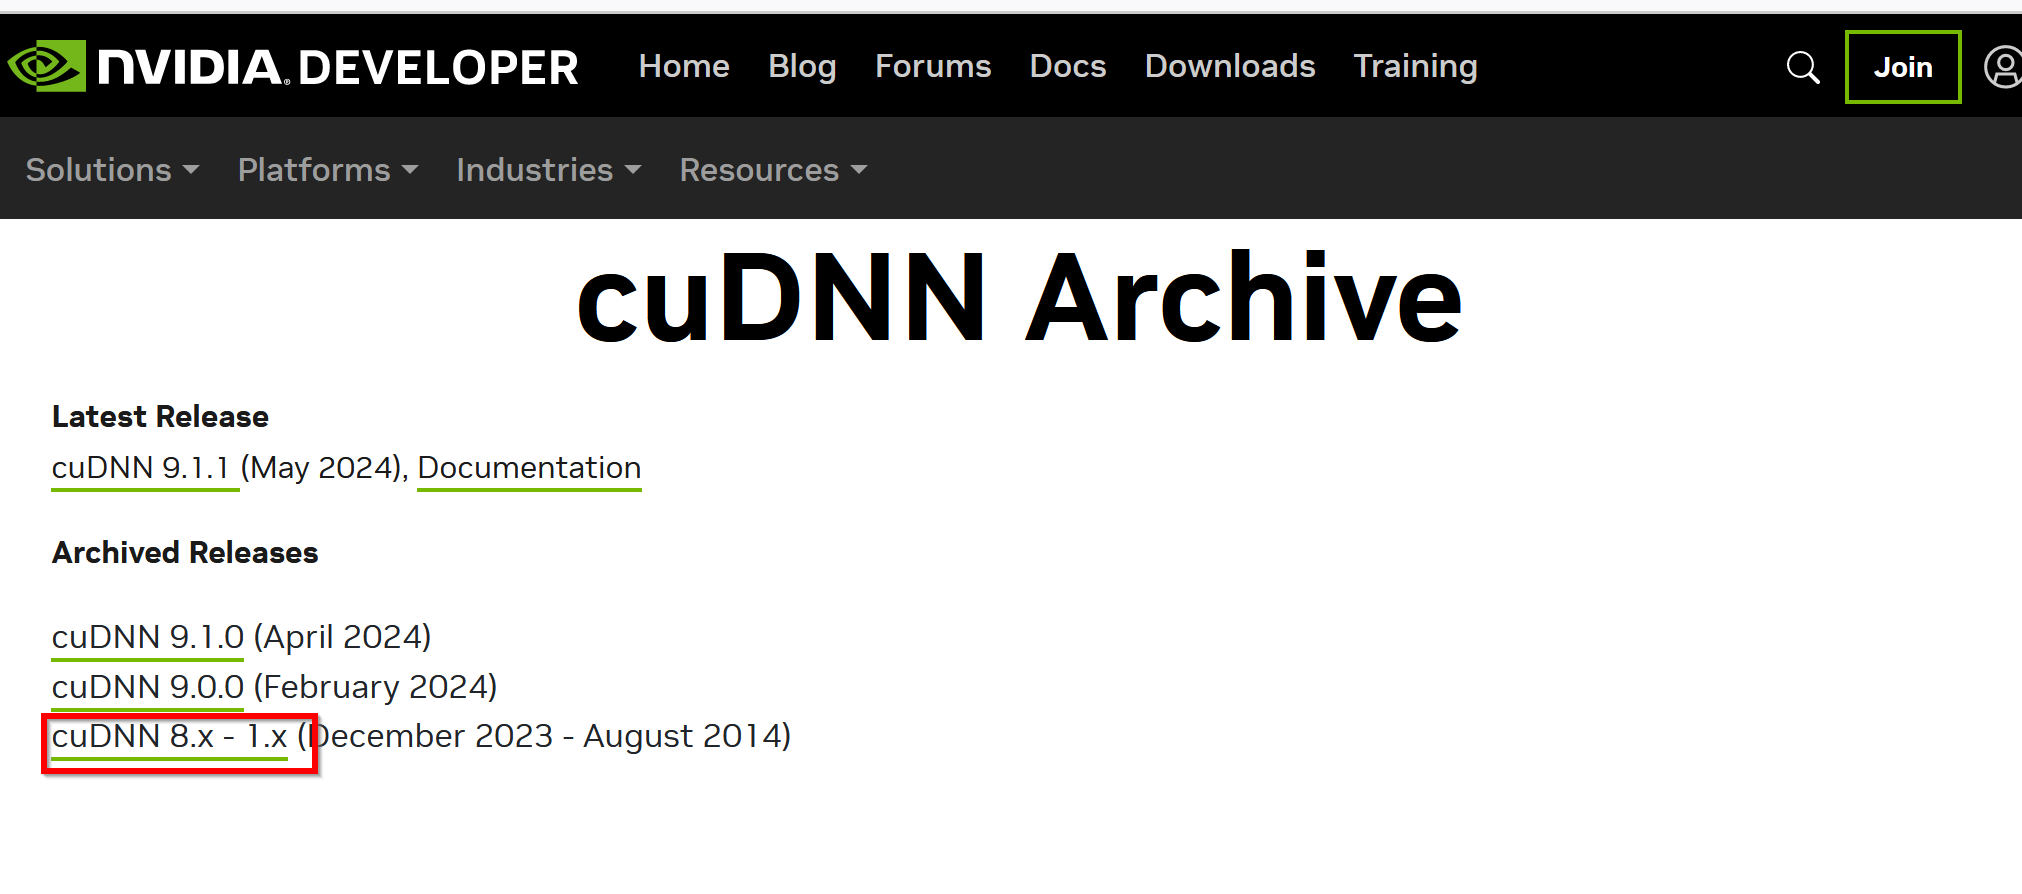
- ダウンロードしたいバージョンを選ぶ
ここでは「NVIDIA cuDNN v8.9.7 for CUDA 11.x」を選んでいる.
このとき,画面の「for CUDA ...」のところを確認し,使用するNVIDIA CUDA のバージョンに合うものを選ぶこと.
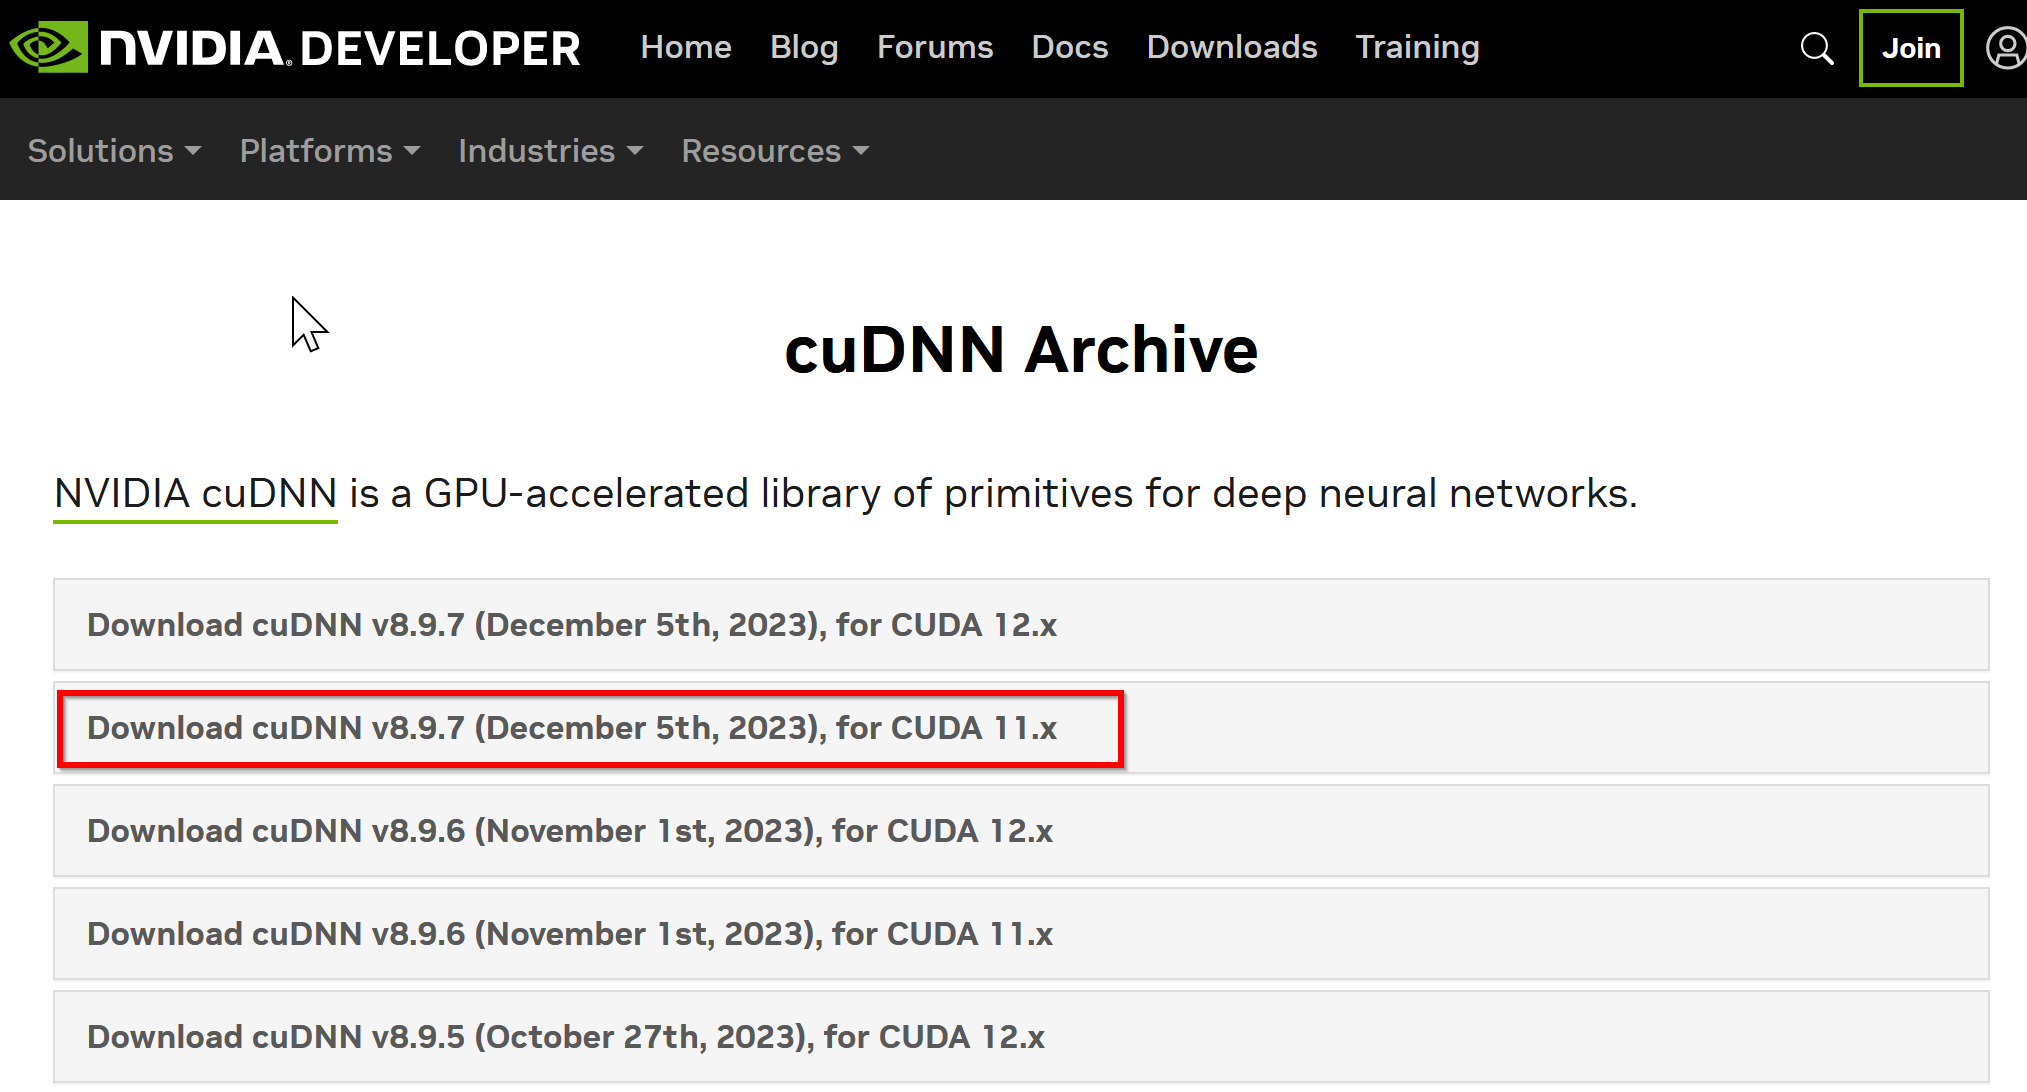
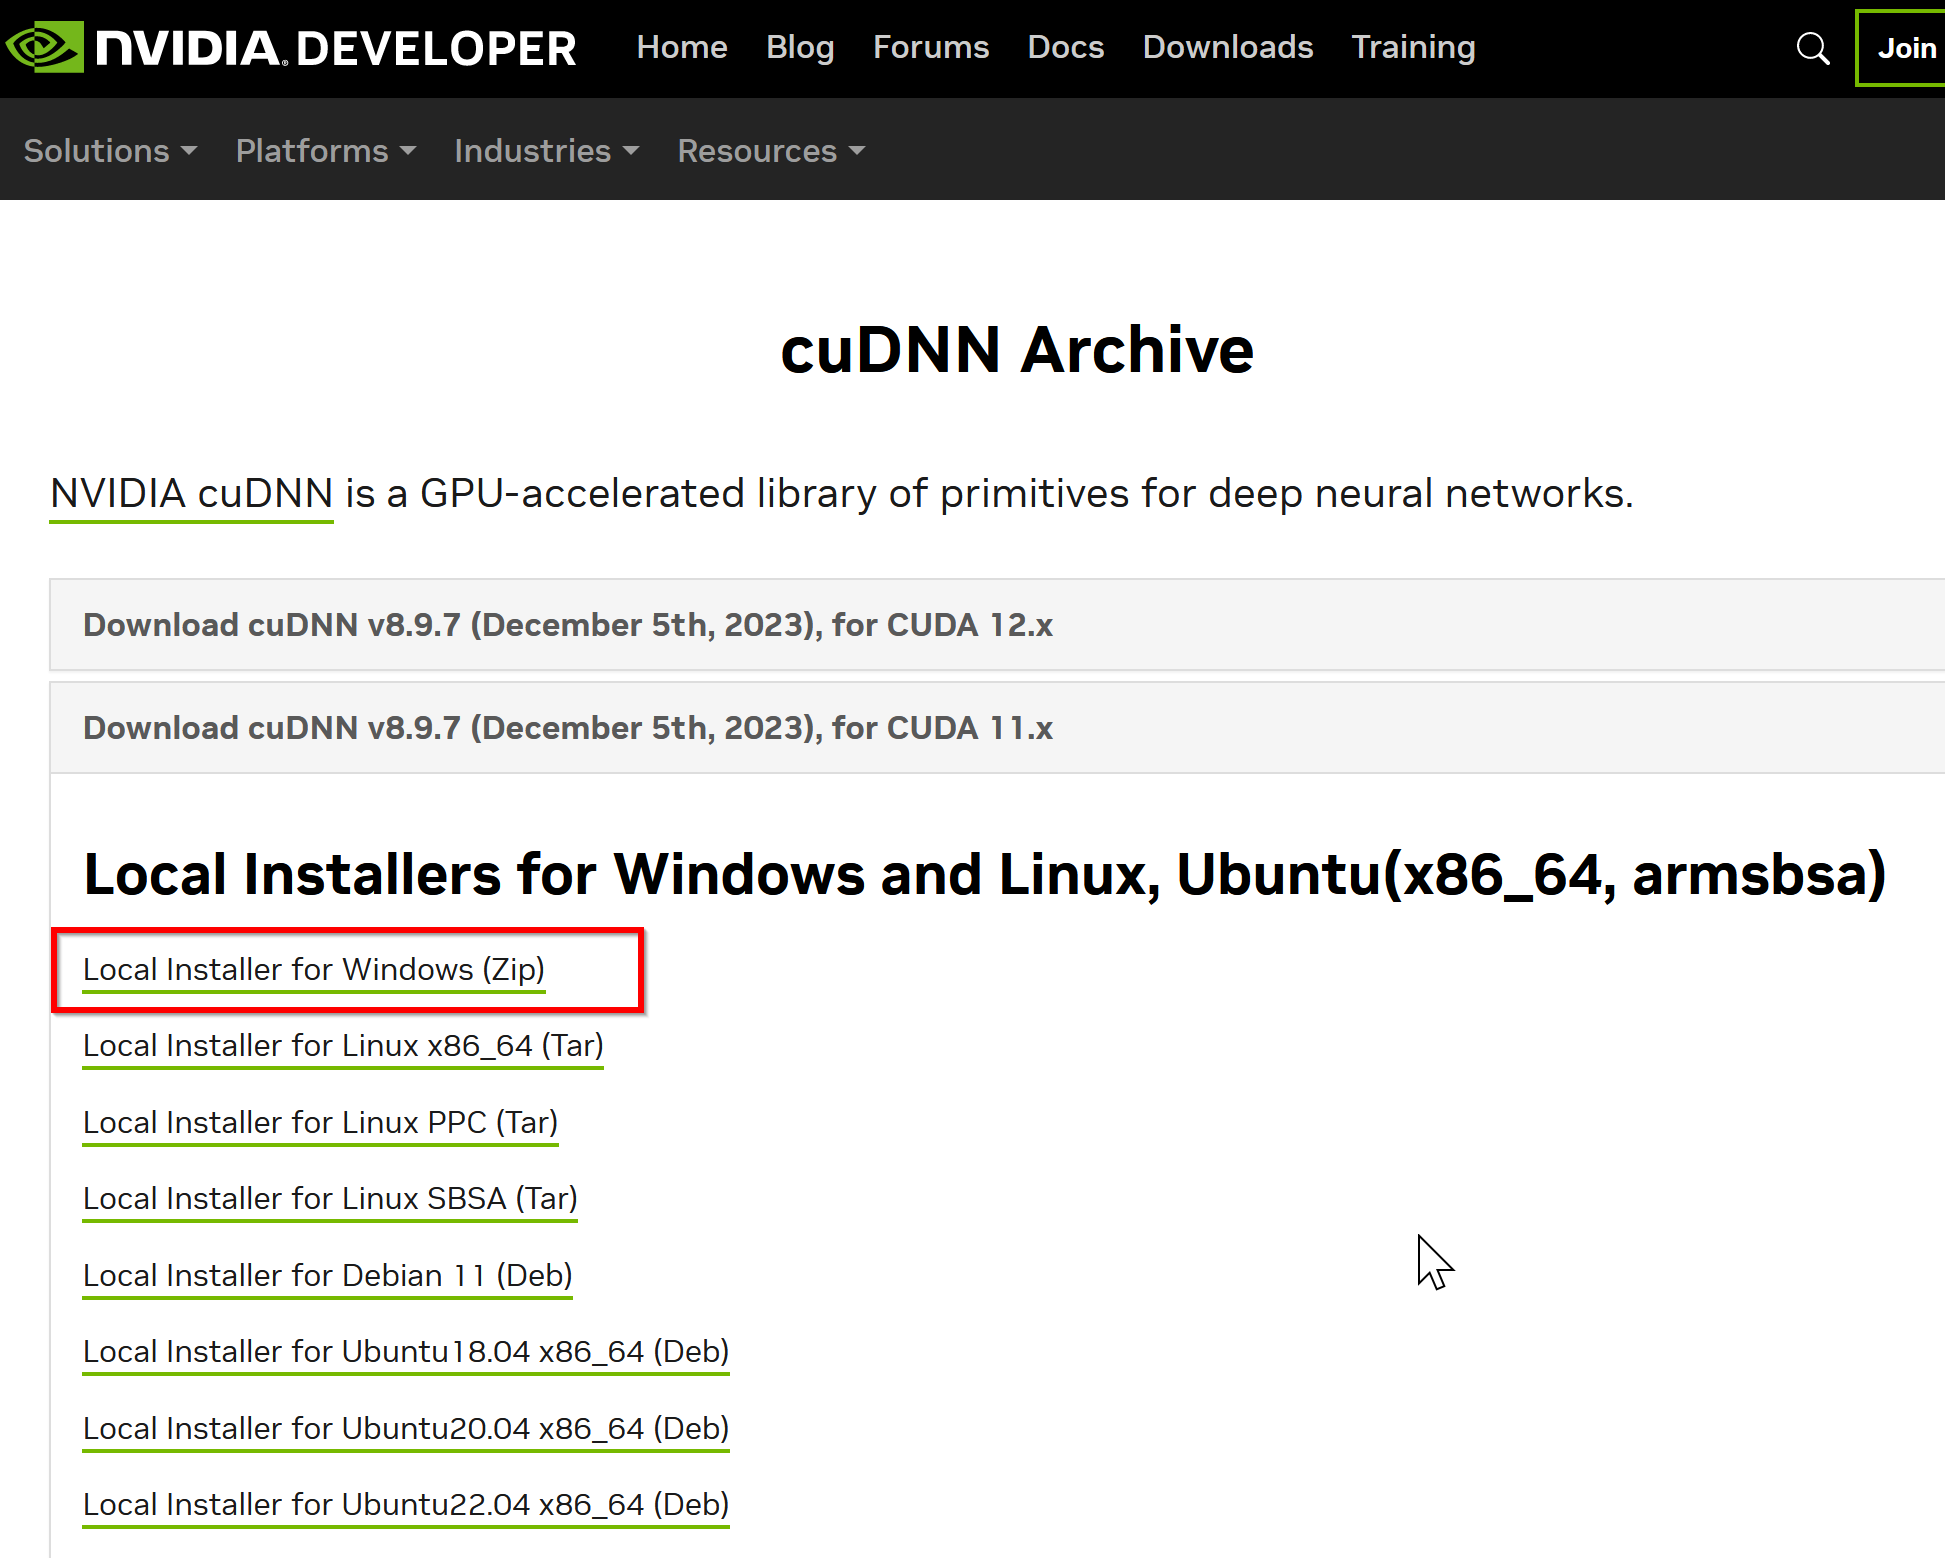
- Windows にインストールするので Windows 版を選ぶ
- NVIDIA Developer Program メンバーシップに入る
NVIDIA cuDNN のダウンロードのため.
「Join now」をクリック.その後,画面の指示に従う. 利用者本人が,電子メールアドレス,表示名,パスワード,生年月日を登録.利用条件等に合意.
- ログインする

- 調査の画面が出たときは,調査に応じる
- ライセンス条項の確認
- ダウンロードが始まる.

- ダウンロードした .zip ファイルを展開(解凍)する.
その中のサブディレクトリを確認しておく.
- NVIDIA CUDA ツールキットをインストールしたディレクトリを確認する.「C:\Program Files\NVIDIA GPU Computing Toolkit\CUDA\v11.8」のようになっている.
- 確認したら,
さきほど展開してできたすべてのファイルとディレクトリを,NVIDIA CUDA ツールキットをインストールしたディレクトリにコピーする
- パスが通っていることを確認.
次の操作により,cudnn64_8.dll にパスが通っていることを確認する.
Windows のコマンドプロンプトを開き,次のコマンドを実行する.エラーメッセージが出ないことを確認.
where cudnn64_8.dll
- Windows の システム環境変数 CUDNN_PATH の設定を行う.
Windows では,
コマンドプロンプトを管理者として開き,
次のコマンドを実行することにより,
システム環境変数 CUDNN_PATH の設定を行うことができる.
コマンドプロンプトを管理者として実行: 別ページ »で説明
powershell -command "[System.Environment]::SetEnvironmentVariable(\"CUDNN_PATH\", \"C:\Program Files\NVIDIA GPU Computing Toolkit\CUDA\v11.8\", \"Machine\")"
- 以下の手順を管理者権限のコマンドプロンプトで実行する
(手順:Windowsキーまたはスタートメニュー →
cmdと入力 → 右クリック → 「管理者として実行」)。 - TensorFlow 2.10.1 のインストール(Windows 上)
次のコマンドを実行することにより,TensorFlow 2.10.1 および関連パッケージ(tf_slim,tensorflow_datasets,tensorflow-hub,Keras,keras-tuner,keras-visualizer)がインストール(インストール済みのときは最新版に更新)される. そして,Pythonライブラリ(Pillow, pydot, matplotlib, seaborn, pandas, scipy, scikit-learn, scikit-learn-intelex, opencv-python, opencv-contrib-python)がインストール(インストール済みのときは最新版に更新)される.
python -m pip uninstall -y protobuf tensorflow tensorflow-cpu tensorflow-gpu tensorflow-intel tensorflow-text tensorflow-estimator tf-models-official tf_slim tensorflow_datasets tensorflow-hub keras keras-tuner keras-visualizer python -m pip install -U protobuf tensorflow==2.10.1 tf_slim tensorflow_datasets==4.8.3 tensorflow-hub tf-keras keras keras_cv keras-tuner keras-visualizer python -m pip install git+https://github.com/tensorflow/docs python -m pip install git+https://github.com/tensorflow/examples.git python -m pip install git+https://www.github.com/keras-team/keras-contrib.git python -m pip install -U pillow pydot matplotlib seaborn pandas scipy scikit-learn scikit-learn-intelex opencv-python opencv-contrib-python - コマンドプロンプトを管理者として開く.
コマンドプロンプトを管理者として実行: 別ページ »で説明
- protoc のダウンロードと展開(解凍)
「3.19.4」のところにはバージョンを指定すること.
python -m pip install -U protobuf==3.19.6c:\protoc cd c:\protoc curl -L -O https://github.com/protocolbuffers/protobuf/releases/download/v23.2/protoc-23.2-win64.zip powershell -command "Expand-Archive -DestinationPath . -Path protoc-23.2-win64.zip"
- Windows の システム環境変数 Pathに,c:\protoc\bin を追加することにより,パスを通す.
Windows で,管理者権限でコマンドプロンプトを起動(手順:Windowsキーまたはスタートメニュー >
cmdと入力 > 右クリック > 「管理者として実行」)。powershell -command "$oldpath = [System.Environment]::GetEnvironmentVariable(\"Path\", \"Machine\"); $oldpath += \";c:\protoc\bin\"; [System.Environment]::SetEnvironmentVariable(\"Path\", $oldpath, \"Machine\")"
- 以下の手順を管理者権限のコマンドプロンプトで実行する
(手順:Windowsキーまたはスタートメニュー →
cmdと入力 → 右クリック → 「管理者として実行」)。 - pycocotools, COCO 2018 Panoptic Segmentation Task API のインストール
COCOデータセットをPythonで扱うためには,pycocotools を使う. pycocotools を使うことで,COCOデータセットのアノテーションを扱いやすくなる.
次のコマンドを実行
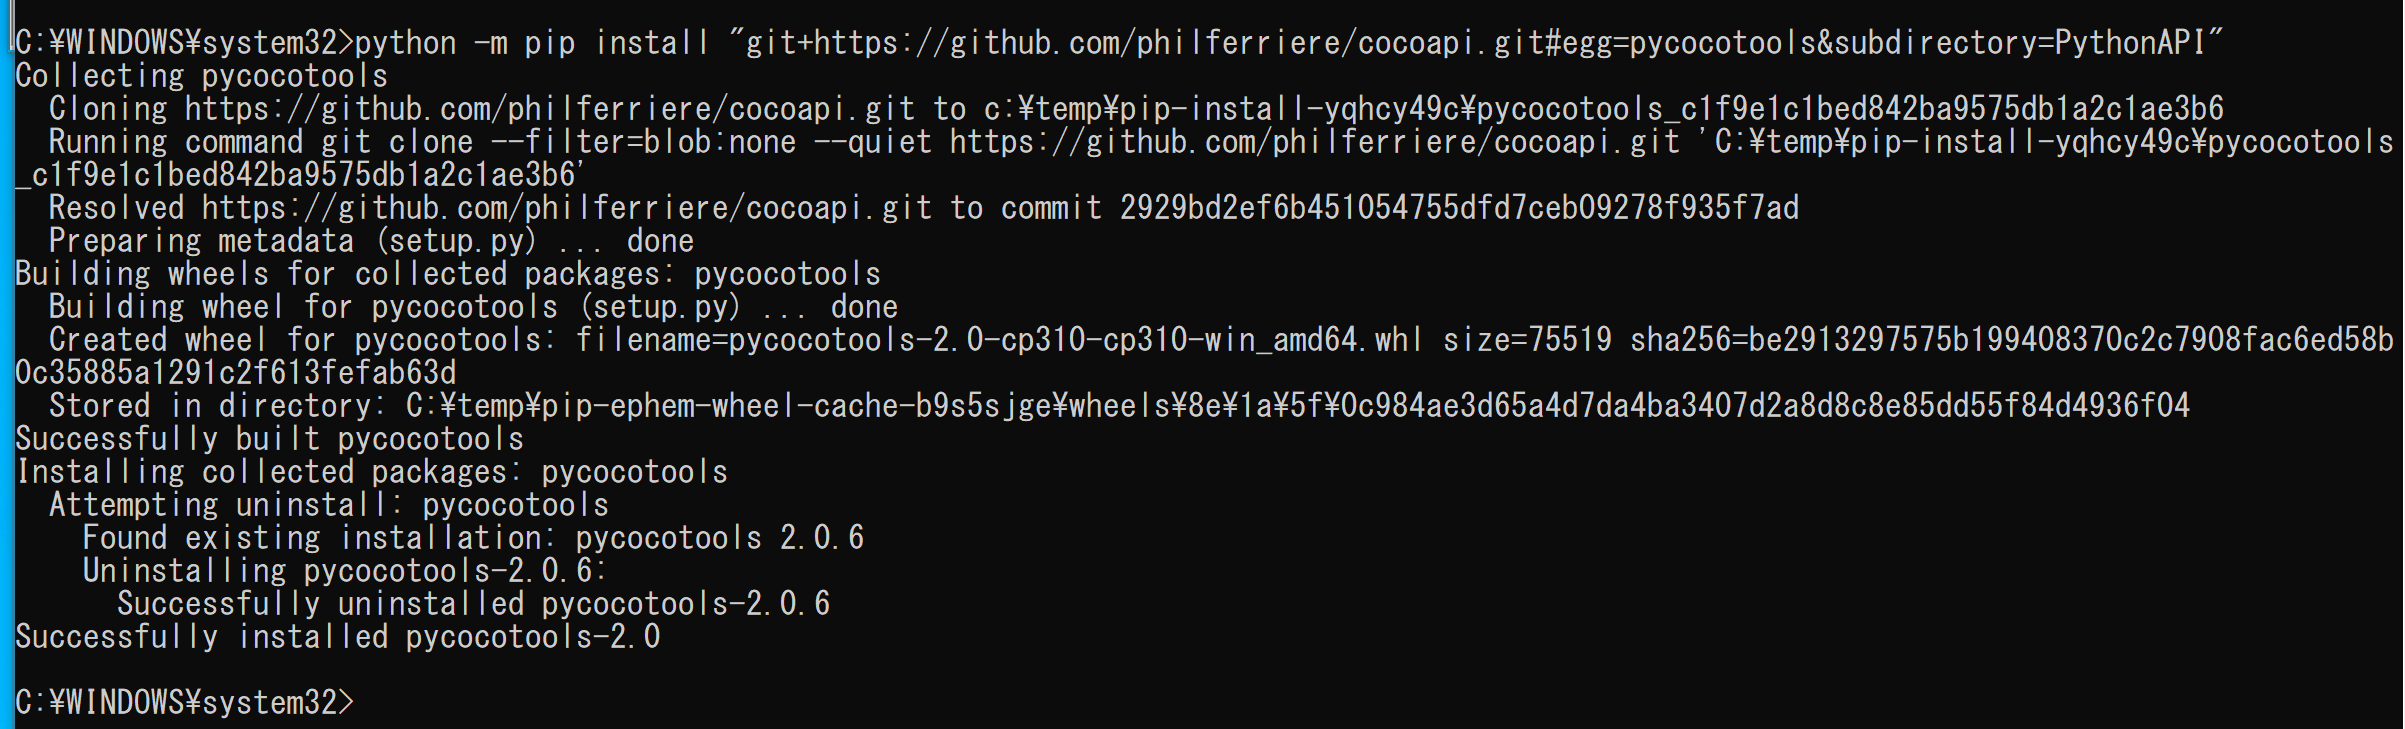
python -m pip install -U --ignore-installed pip python -m pip install -U cython wheel python -m pip install "git+https://github.com/philferriere/cocoapi.git#egg=pycocotools&subdirectory=PythonAPI" python -m pip install git+https://github.com/cocodataset/panopticapi.git - コマンドプロンプトを管理者として開く.
- Deeplab2 のダウンロード
rmdir /s /q c:\deeplab2 mkdir c:\deeplab2 cd c:\deeplab2 git clone https://github.com/google-research/deeplab2.git - protoc を用いてコンパイル
cd c:\deeplab2 protoc deeplab2\*.proto --python_out=.
- Windows の システム環境変数 PYTHONPATHに,c:\deeplab2 を追加することにより,パスを通す.
Windows で,管理者権限でコマンドプロンプトを起動(手順:Windowsキーまたはスタートメニュー >
cmdと入力 > 右クリック > 「管理者として実行」)。powershell -command "$oldpath = [System.Environment]::GetEnvironmentVariable(\"PYTHONPATH\", \"Machine\"); $oldpath += \";c:\deeplab2\"; [System.Environment]::SetEnvironmentVariable(\"PYTHONPATH\", $oldpath, \"Machine\")"
- 以下の手順を管理者権限のコマンドプロンプトで実行する
(手順:Windowsキーまたはスタートメニュー →
cmdと入力 → 右クリック → 「管理者として実行」)。 - TensorFlow モデルのダウンロード,プロトコル・バッファ・コンパイラ (protocol buffer compiler) によるコンパイル
cd /d c:%HOMEPATH% rmdir /s /q models git clone https://github.com/tensorflow/models.git cd models python -m pip install -r official/requirements.txt python -m pip install -U opencv-python cd /d c:%HOMEPATH%\models\research protoc object_detection\protos\*.proto --python_out=. protoc lstm_object_detection\protos\*.proto --python_out=. cd /d c:%HOMEPATH%\models\research\delf protoc delf\protos\*.proto --python_out=. - TensorFlow モデルの unified_detector のインストール
cd /d c:%HOMEPATH%\models python -m pip install -r official\projects\unified_detector\requirements.txt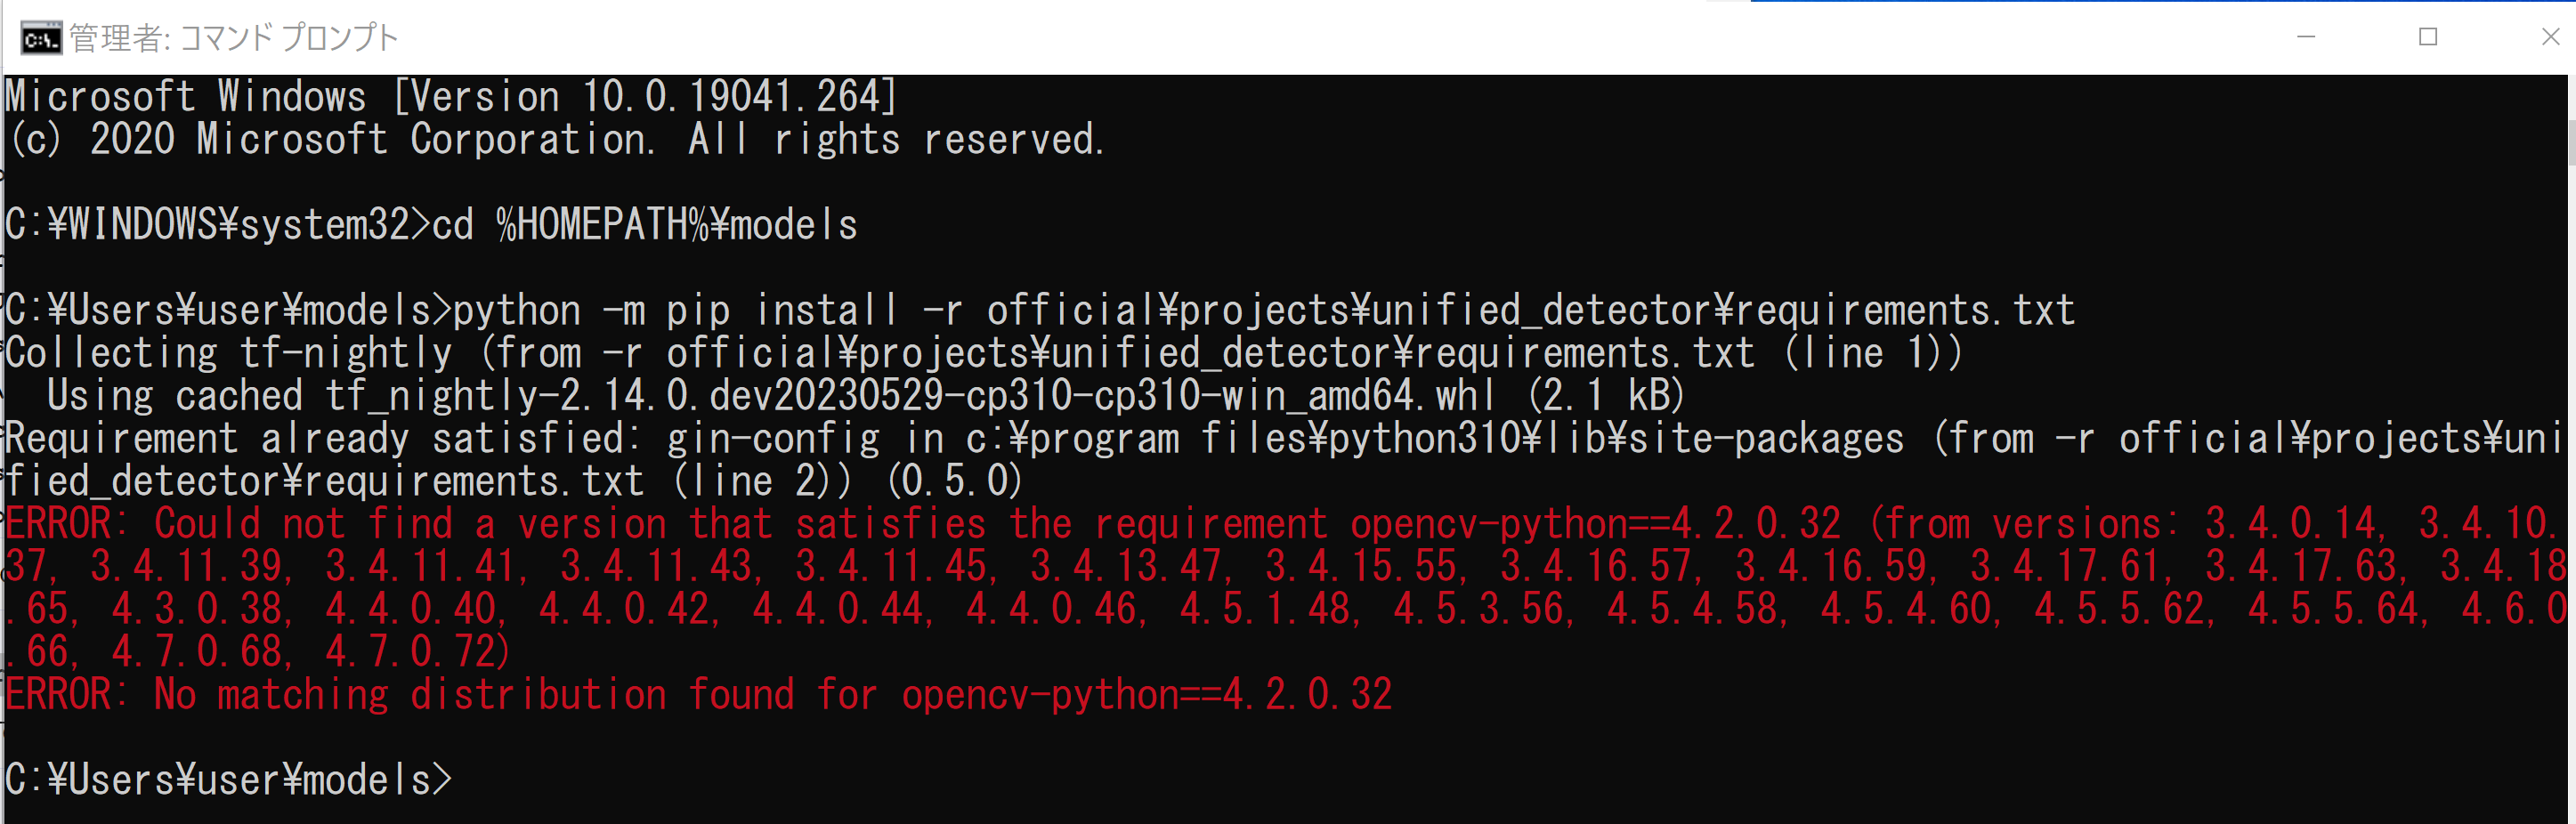
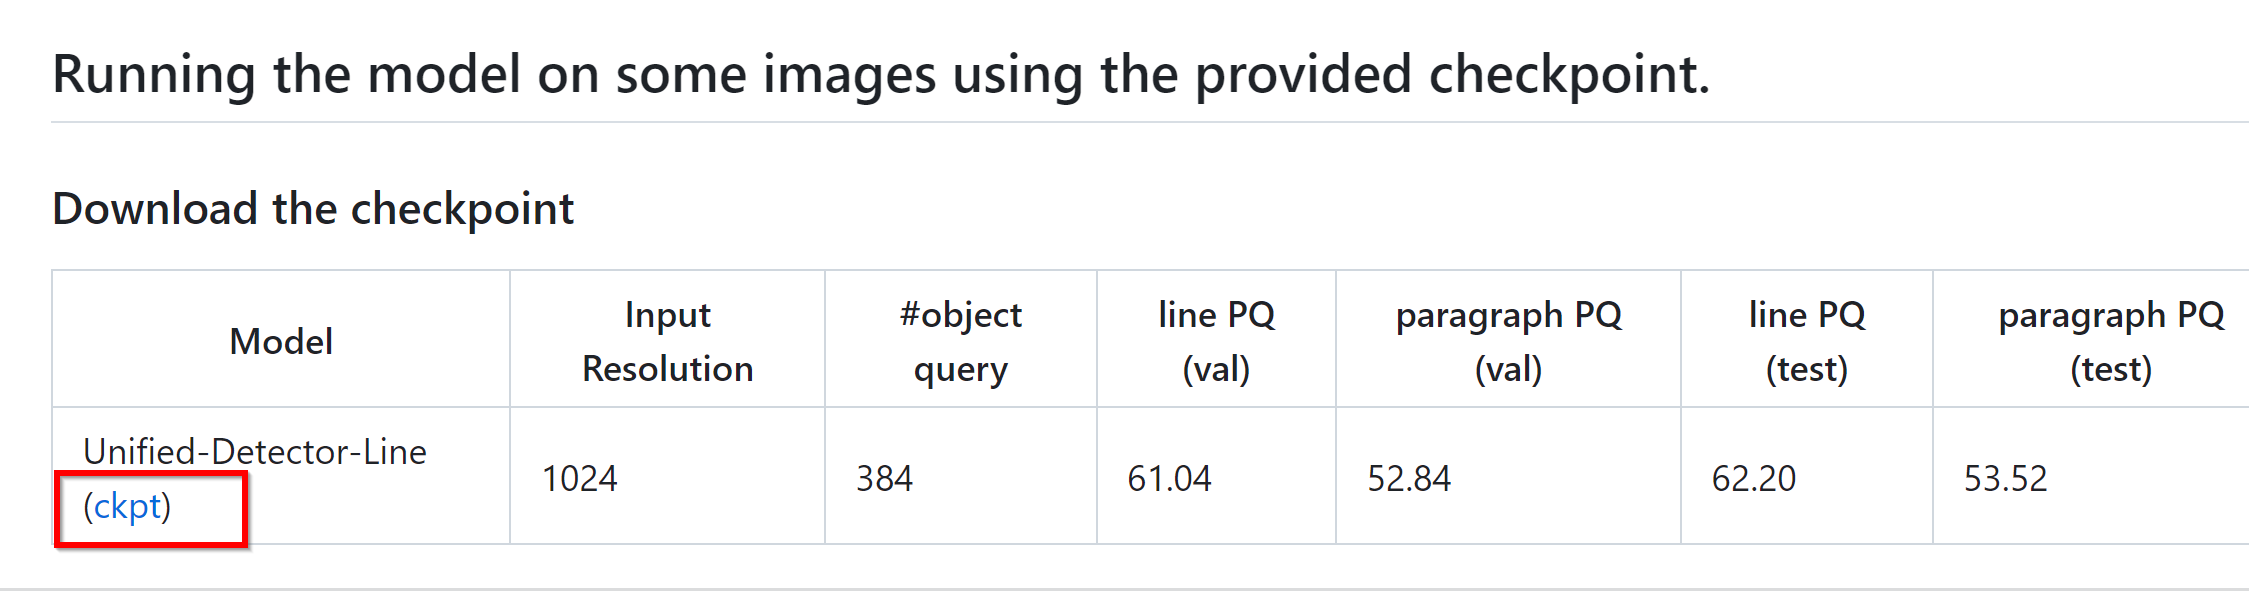
- 学習済みモデルのダウンロード
- 次のページで「Download the checkpoint」のところで「ckpt」をクリック
https://github.com/tensorflow/models/tree/master/official/projects/unified_detector
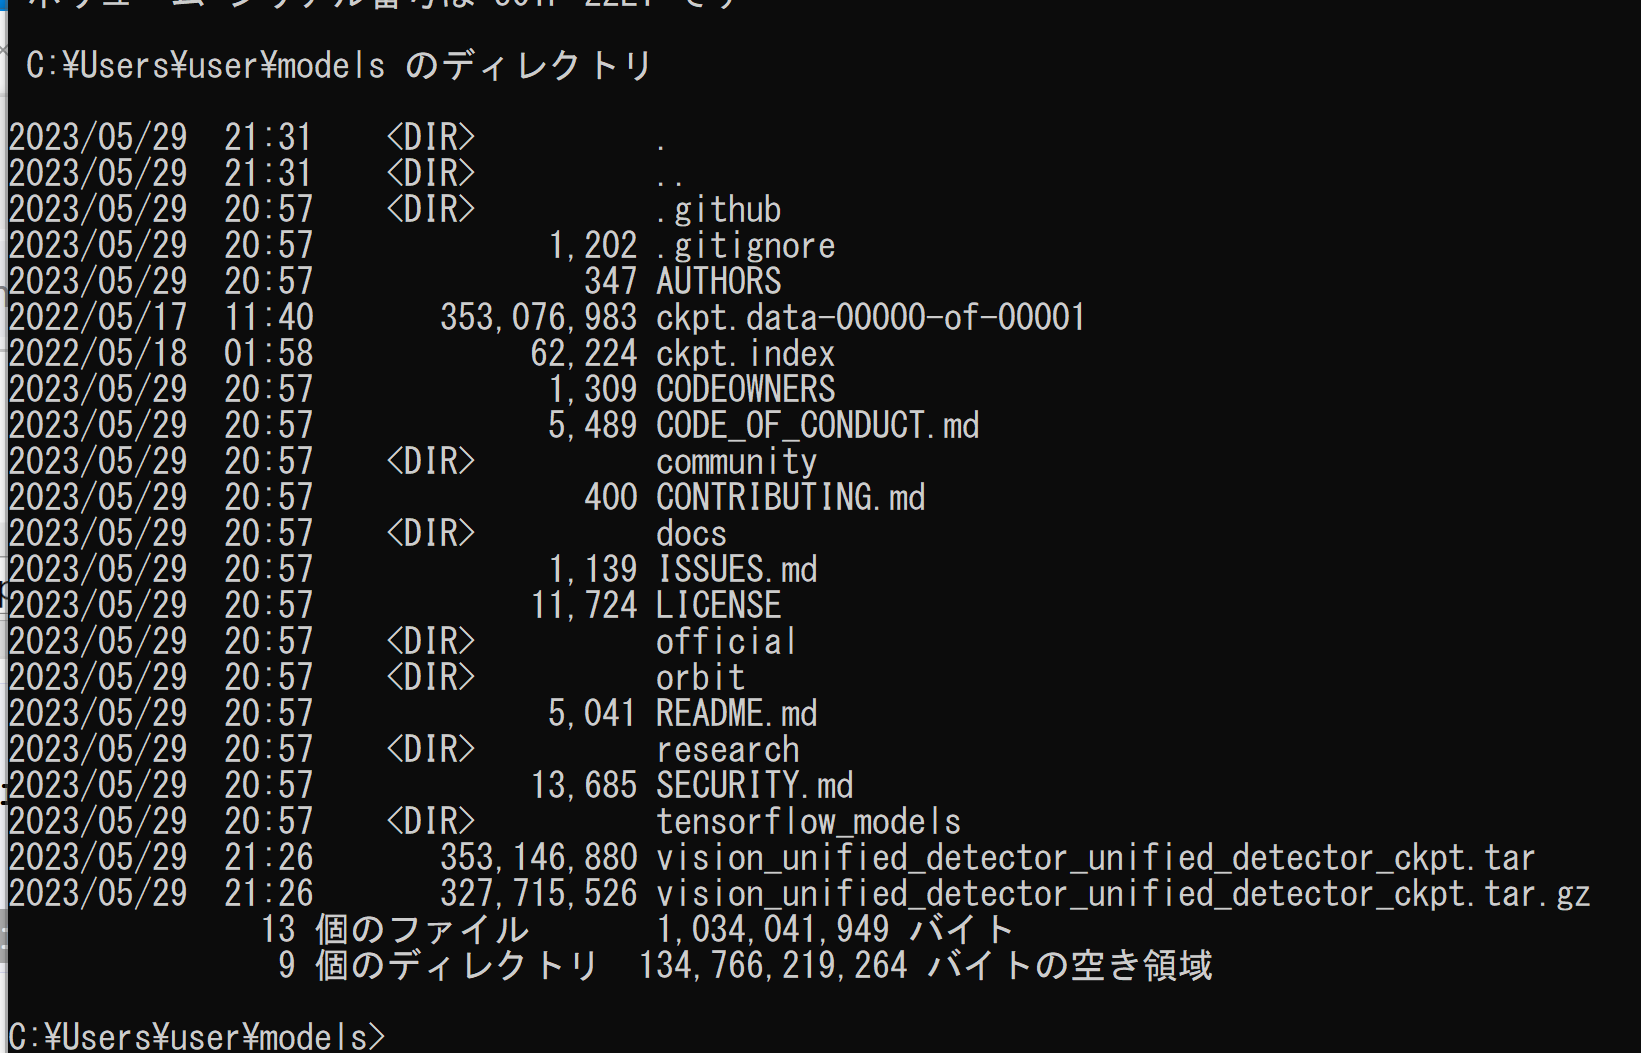
- ダウンロードしたファイルは,%HOMEPATH%\models に置く

- 次のコマンドを実行することにより,展開(解凍)する.
cd /d c:%HOMEPATH%\models move vision_unified_detector_unified_detector_ckpt.gz vision_unified_detector_unified_detector_ckpt.tar.gz "c:\Program Files\7-Zip\7z.exe" x vision_unified_detector_unified_detector_ckpt.tar.gz "c:\Program Files\7-Zip\7z.exe" x vision_unified_detector_unified_detector_ckpt.tar dir - ckpt.data-00000-of-00001, ckpt.index ができるので確認
- 次のページで「Download the checkpoint」のところで「ckpt」をクリック
https://github.com/tensorflow/models/tree/master/official/projects/unified_detector
- 画像ファイルを準備
画像ファイル名は demo.png であるとする
- 動作確認のため,テキスト検出を行ってみる
cd /d c:%HOMEPATH% cd models mkdir vis python -m official.projects.unified_detector.run_inference ^ --gin_file=official/projects/unified_detector/configs/gin_files/unified_detector_model.gin ^ --ckpt_path=.\ckpt ^ --img_file=demo.png ^ --output_path=./demo.json ^ --vis_dir=vis
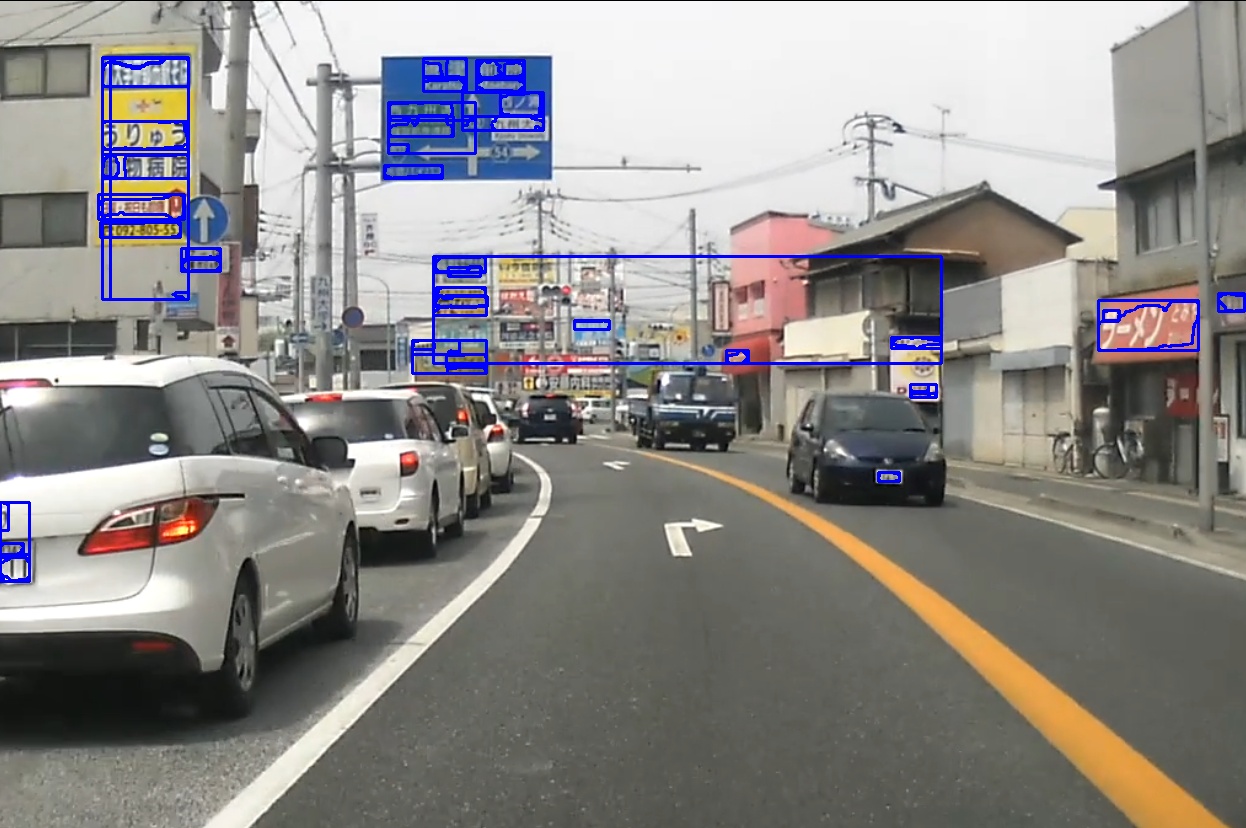
- 結果を表示
cd vis demo-line.jpg demo-paragraph.jpg demo-word.jpg単語単位のテキスト検出
行単位のテキスト検出
段落単位のテキスト検出
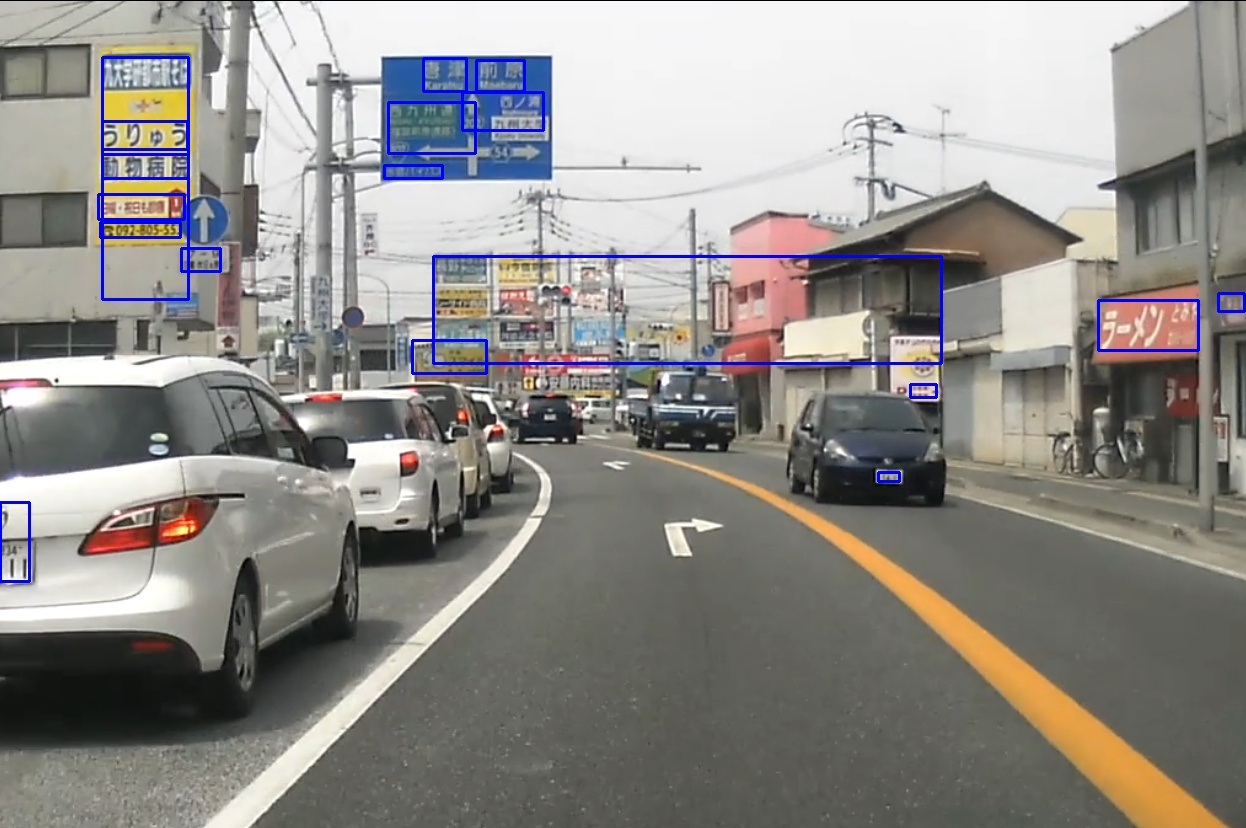
- 別の画像で試した場合
単語単位のテキスト検出
行単位のテキスト検出

段落単位のテキスト検出
- 公式のプログラムを書き換えた次のプログラムを使用.run.py のようなファイル名で,
%HOMEPATH%\models に保存
# Copyright 2023 The TensorFlow Authors. All Rights Reserved. # # Licensed under the Apache License, Version 2.0 (the "License"); # you may not use this file except in compliance with the License. # You may obtain a copy of the License at # # http://www.apache.org/licenses/LICENSE-2.0 # # Unless required by applicable law or agreed to in writing, software # distributed under the License is distributed on an "AS IS" BASIS, # WITHOUT WARRANTIES OR CONDITIONS OF ANY KIND, either express or implied. # See the License for the specific language governing permissions and # limitations under the License. r"""A binary to run unified detector.""" import json import os from typing import Any, Dict, Sequence, Union from absl import app from absl import flags from absl import logging import cv2 import gin import numpy as np import tensorflow as tf import tqdm from official.projects.unified_detector import external_configurables # pylint: disable=unused-import from official.projects.unified_detector.modeling import universal_detector from official.projects.unified_detector.utils import utilities # group two lines into a paragraph if affinity score higher than this _PARA_GROUP_THR = 0.5 # MODEL spec _GIN_FILE = flags.DEFINE_string( 'gin_file', None, 'Path to the Gin file that defines the model.') _CKPT_PATH = flags.DEFINE_string( 'ckpt_path', None, 'Path to the checkpoint directory.') _IMG_SIZE = flags.DEFINE_integer( 'img_size', 1024, 'Size of the image fed to the model.') # Output _OUTPUT_PATH = flags.DEFINE_string('output_path', None, 'Path for the output.') def _preprocess(raw_image: np.ndarray) -> Union[np.ndarray, float]: """Convert a raw image to properly resized, padded, and normalized ndarray.""" # (1) convert to tf.Tensor and float32. img_tensor = tf.convert_to_tensor(raw_image, dtype=tf.float32) # (2) pad to square. height, width = img_tensor.shape[:2] maximum_side = tf.maximum(height, width) height_pad = maximum_side - height width_pad = maximum_side - width img_tensor = tf.pad( img_tensor, [[0, height_pad], [0, width_pad], [0, 0]], constant_values=127) ratio = maximum_side / _IMG_SIZE.value # (3) resize long side to the maximum length. img_tensor = tf.image.resize( img_tensor, (_IMG_SIZE.value, _IMG_SIZE.value)) img_tensor = tf.cast(img_tensor, tf.uint8) # (4) normalize img_tensor = utilities.normalize_image_to_range(img_tensor) # (5) Add batch dimension and return as numpy array. return tf.expand_dims(img_tensor, 0).numpy(), float(ratio) def load_model() -> tf.keras.layers.Layer: gin.parse_config_file(_GIN_FILE.value) model = universal_detector.UniversalDetector() ckpt = tf.train.Checkpoint(model=model) ckpt_path = _CKPT_PATH.value logging.info('Load ckpt from: %s', ckpt_path) ckpt.restore(ckpt_path).expect_partial() return model def inference(img, model: tf.keras.layers.Layer) -> Dict[str, Any]: """Inference step.""" img_ndarray, ratio = _preprocess(img) output_dict = model.serve(img_ndarray) class_tensor = output_dict['classes'].numpy() mask_tensor = output_dict['masks'].numpy() group_tensor = output_dict['groups'].numpy() indices = np.where(class_tensor[0])[0].tolist() # indices of positive slots. mask_list = [ mask_tensor[0, :, :, index] for index in indices] # List of mask ndarray. # Form lines and words lines = [] line_indices = [] for index, mask in tqdm.tqdm(zip(indices, mask_list)): line = { 'words': [], 'text': '', } contours, _ = cv2.findContours( (mask > 0.).astype(np.uint8), cv2.RETR_TREE, cv2.CHAIN_APPROX_SIMPLE)[-2:] for contour in contours: if (isinstance(contour, np.ndarray) and len(contour.shape) == 3 and contour.shape[0] > 2 and contour.shape[1] == 1 and contour.shape[2] == 2): cnt_list = (contour[:, 0] * ratio).astype(np.int32).tolist() line['words'].append({'text': '', 'vertices': cnt_list}) else: logging.error('Invalid contour: %s, discarded', str(contour)) if line['words']: lines.append(line) line_indices.append(index) # Form paragraphs line_grouping = utilities.DisjointSet(len(line_indices)) affinity = group_tensor[0][line_indices][:, line_indices] for i1, i2 in zip(*np.where(affinity > _PARA_GROUP_THR)): line_grouping.union(i1, i2) line_groups = line_grouping.to_group() paragraphs = [] for line_group in line_groups: paragraph = {'lines': []} for id_ in line_group: paragraph['lines'].append(lines[id_]) if paragraph: paragraphs.append(paragraph) return paragraphs def main(argv: Sequence[str]) -> None: if len(argv) > 1: raise app.UsageError('Too many command-line arguments.') model = load_model() output = {'annotations': []} v = cv2.VideoCapture(0) while(v.isOpened()): r, f = v.read() if ( r == False ): break cv2.imshow("", f) img = cv2.cvtColor(f, cv2.COLOR_BGR2RGB) output['annotations'].append({ 'image_id': 'videocam', 'paragraphs': inference(img, model), }) key = output['annotations'][-1]['image_id'] paragraphs = output['annotations'][-1]['paragraphs'] word_bnds = [] line_bnds = [] para_bnds = [] for paragraph in paragraphs: paragraph_points_list = [] for line in paragraph['lines']: line_points_list = [] for word in line['words']: word_bnds.append( np.array(word['vertices'], np.int32).reshape((-1, 1, 2))) line_points_list.extend(word['vertices']) paragraph_points_list.extend(line_points_list) line_points = np.array(line_points_list, np.int32) # (N,2) left = int(np.min(line_points[:, 0])) top = int(np.min(line_points[:, 1])) right = int(np.max(line_points[:, 0])) bottom = int(np.max(line_points[:, 1])) line_bnds.append( np.array([[[left, top]], [[right, top]], [[right, bottom]], [[left, bottom]]], np.int32)) para_points = np.array(paragraph_points_list, np.int32) # (N,2) left = int(np.min(para_points[:, 0])) top = int(np.min(para_points[:, 1])) right = int(np.max(para_points[:, 0])) bottom = int(np.max(para_points[:, 1])) para_bnds.append( np.array([[[left, top]], [[right, top]], [[right, bottom]], [[left, bottom]]], np.int32)) for name, bnds in zip(['paragraph', 'line', 'word'], [para_bnds, line_bnds, word_bnds]): vis = cv2.polylines(img, bnds, True, (0, 0, 255), 2) cv2.imshow("", cv2.cvtColor(vis, cv2.COLOR_RGB2BGR)) # Press Q to exit if cv2.waitKey(1) & 0xFF == ord('q'): break v.release() cv2.destroyAllWindows() with tf.io.gfile.GFile(_OUTPUT_PATH.value, mode='w') as f: f.write(json.dumps(output, ensure_ascii=False, indent=2)) if __name__ == '__main__': flags.mark_flags_as_required(['gin_file', 'ckpt_path', 'output_path']) app.run(main) - 次のコマンドを実行
cd /d c:%HOMEPATH% cd models python run.py ^ --gin_file=official/projects/unified_detector/configs/gin_files/unified_detector_model.gin ^ --ckpt_path=.\ckpt ^ --output_path=./demo.json
NVIDIA CUDA ツールキット 11.8 のインストール(Windows 上)
CUDAツールキットには、GPUでプログラムを実行するためのライブラリ、`nvcc`コンパイラ、開発ツールなどが含まれています。ここでは`winget`を使ってCUDA 11.8をインストールする手順を示します。
NVIDIA CUDA ツールキットの概要と注意点
NVIDIAのGPUを使用して並列計算を行うための開発・実行環境です。
主な機能: GPU を利用した並列処理のコンパイルと実行、GPU のメモリ管理、C++をベースとした拡張言語(CUDA C/C++)とAPI、ライブラリ(cuBLAS, cuFFTなど)を提供します。
【NVIDIA CUDA ツールキットの動作に必要なもの】
【Windows でインストールするときの一般的な注意点】
【関連する外部ページ】
【関連項目】 NVIDIA CUDA ツールキットの概要, NVIDIA CUDA ツールキットの他バージョンのインストール
NVIDIA cuDNN 8.9.7 のインストール(Windows 上)
NVIDIA cuDNN
NVIDIA cuDNN は,NVIDIA CUDA ツールキット上で動作する、高性能なディープラーニング用ライブラリです.畳み込みニューラルネットワーク (CNN) やリカレントニューラルネットワーク (RNN) など,さまざまなディープラーニングモデルのトレーニングと推論を高速化します.
【cuDNN利用時の注意点: zlibwapi.dll エラー】
Windows環境でcuDNNを利用するアプリケーションを実行した際に、「Could not locate zlibwapi.dll. Please make sure it is in your library path!」というエラーが表示されることがあります。これは、cuDNNの一部の機能が圧縮ライブラリである zlib に依存しているためです。このエラーが発生した場合は、後述する手順で ZLIB DLL をインストールする必要があります。
【関連する外部ページ】
NVIDIA cuDNN のインストール(Windows 上)の概要
zlib のインストール(Windows 上)
次のコマンドは,zlibをインストールし,パスを通すものである.
cd /d c:%HOMEPATH%
rmdir /s /q zlib
git clone https://github.com/madler/zlib
cd zlib
del CMakeCache.txt
rmdir /s /q CMakeFiles
cmake . -A x64 -T host=x64 -DCMAKE_INSTALL_PREFIX=c:/zlib
cmake --build . --config Release --target INSTALL
powershell -command "$oldpath = [System.Environment]::GetEnvironmentVariable(\"Path\", \"Machine\"); $oldpath += \";c:\zlib\bin\"; [System.Environment]::SetEnvironmentVariable(\"Path\", $oldpath, \"Machine\")"
powershell -command "[System.Environment]::SetEnvironmentVariable(\"ZLIB_HOME\", \"C:\zlib\", \"Machine\")"
【関連する外部ページ】
【関連項目】 zlib
NVIDIA cuDNN 8.9.7 のインストール(Windows 上)
TensorFlow 2.10.1 のインストール(Windows 上)
Unified Scene Text Detection のインストールとテスト実行(Windows 上)
プロトコル・バッファ・コンパイラ (protocol buffer compiler) のインストール(Windows 上)
プロトコル・バッファ・コンパイラ (protocol buffer compiler) のインストールを行う.
pycocotools のインストール(Windows 上)
pycocotools のインストールを行う.
Deeplab2 のインストール(Windows 上)
DeepLab2 のインストールを行う.