Ubuntu, Fedora で Octave バージョン 3.6.2 のビルドとインストールとテスト実行
◆ このページでは,Octave のソースコードをダウンロードし, Ubuntu や Fedora 上でビルドしてインストールする手順を図解などで説明する.
◆ なぜ,ソースコードからビルドするのか?
- Octave に ATLAS を組み込みたい
- Octave に Intel Math Kernel Library (インテル・マス・カーネル・ライブラリ) を組み込みたい
- 最新版を追いかけたみたい
などの場合には,この Web ページの手順が参考になるでしょう.
* Octave をパッケージ (yum) を使ってインストールしたい(わざわざソースコードからビルドしない) 場合は,別の Web ページを見てください.
* Cygwin での Octave のビルドとインストールについては,別ページで説明
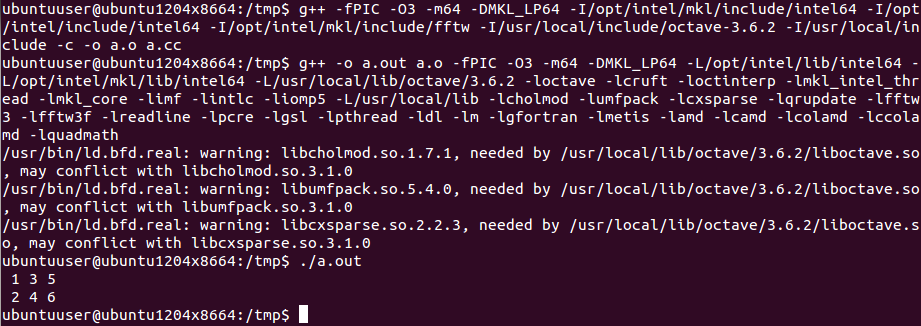
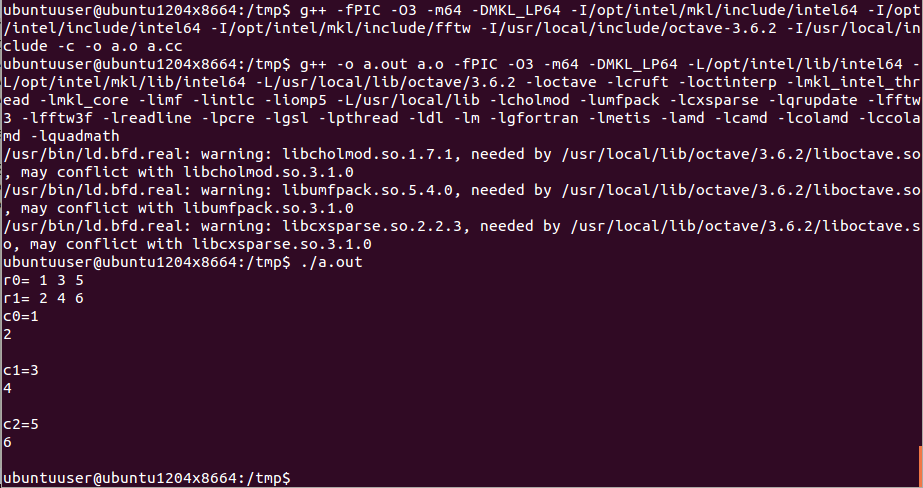
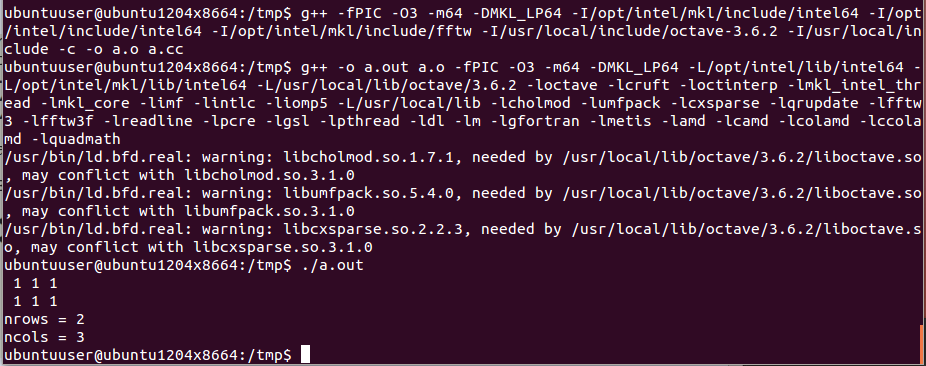
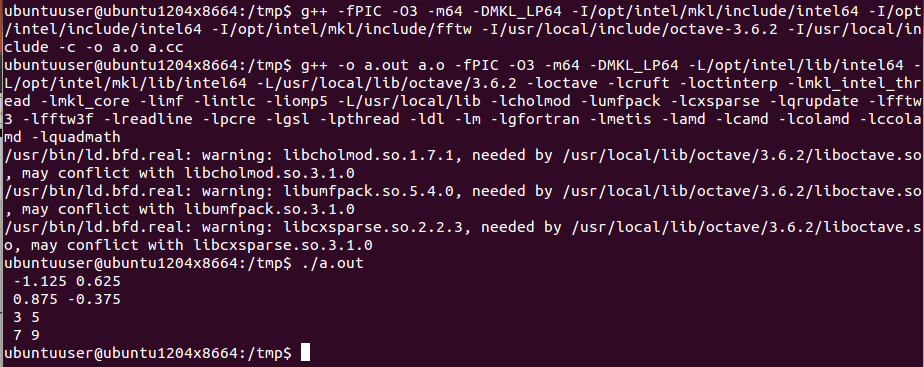
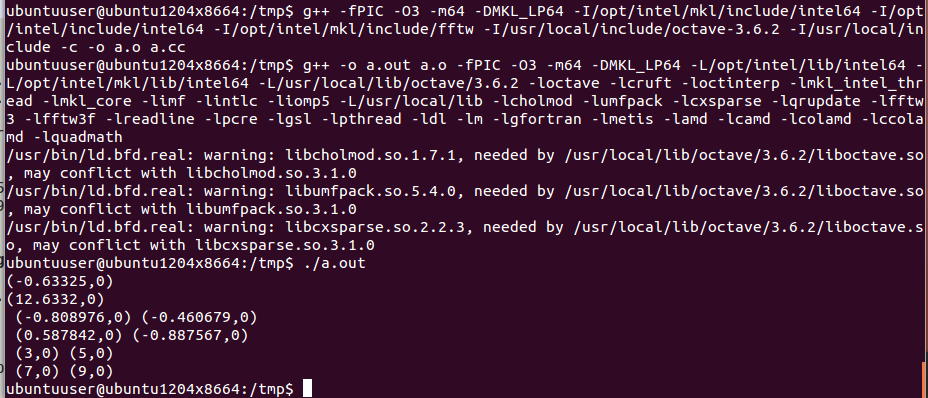
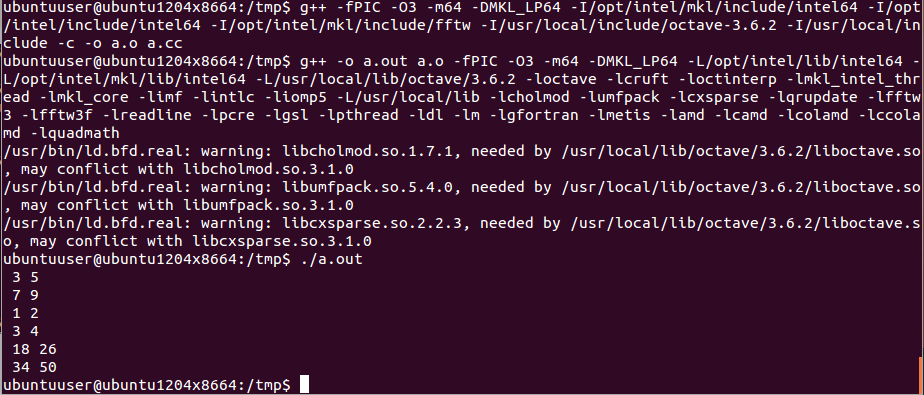
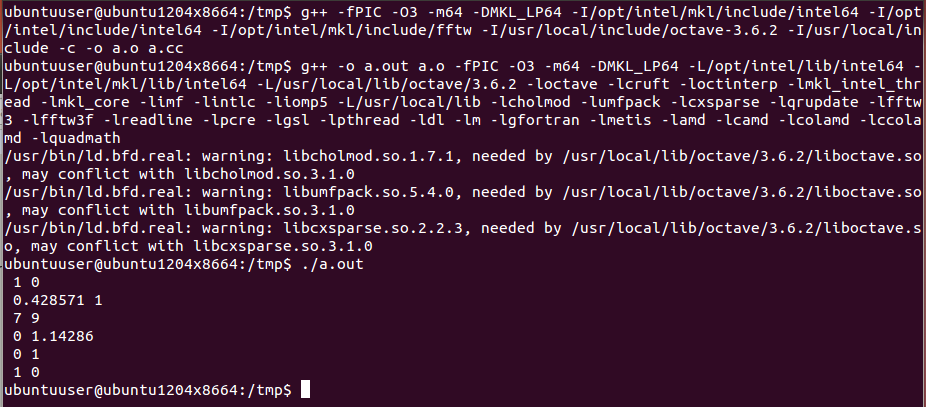
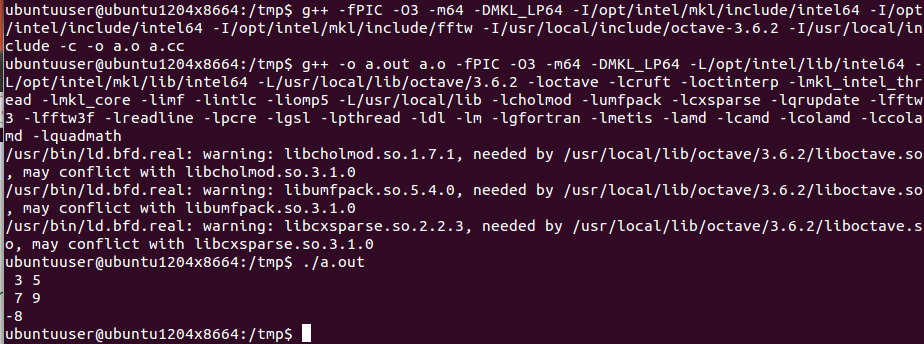
* liboctave の使い方については,別のページで説明している.liboctave を使って,Octave の行列関係の機能を呼び出すような C++ のプログラムを簡単に作ることができる.
* 貴重な情報源: http://www40.atwiki.jp/gnuoctavejp (Octave for Windows メモの著者様による Wiki)
* 関連Webページ: Octave の活用
【要点】
- Octave に GotoBLAS あるいは ATLAS(いずれも BLAS の実装)を組み込みたい. あるいは Intel Math Kernel Library (インテル・マス・カーネル・ライブラリ) とリンクさせたい.
- BLAS とは?
BLAS(Basic Linear Algebra Subprograms)とは,行列演算,ベクトル演算の機能をもったプログラム群です. GotoBLAS や ATLAS は,無料で使えるソフトウェアの中では,BLAS 実装の決定版といってよいでしょう.※ 他にも,優れた実装が複数あります.
<BLAS の主な機能(ごく一部を紹介)>
- Level 1 ベクトルとベクトルの演算
- DOT : 内積
- AXPY : AXPY 演算 ( y <- ax + y の形など)
- NORM : ノルム など
- Level 2 行列とベクトルと計算
- 行列とベクトルの積 ( y <- Ax )
- 行列の rank-1 更新 ( A <- A + xy' )
- Level 3 行列同士の演算
- 行列と行列の積 ( Z <- XY )
- Level 1 ベクトルとベクトルの演算
- LAPACK とは?
LAPACK とは,行列に関する種々の計算(連立1次方程式,固有値問題,などなど多数)のソフトウェア. LAPACK は Octave に必要.
- BLAS (GotoBLAS あるいは ATLAS) を組み込むには,
Octave をソースコードからビルドするのが簡単です.
* GotoBLAS は素晴らしいプログラムで,しかも,無料で使える.但し,GotoBLAS はフリーソフトウェアではない.「再配布や,商用・業務利用は原則不可」と明記されている. 再配布不可ですから,ソースコードやビルドしたバイナリを人にあげることはできません(パソコンを借りてインストールしてあげる,ということも難しい,という意味です).
* GotoBLAS のライセンス条項に「不安」がある場合は,ATLAS を使うことも検討してください.(決して違法なことはしないように).
* ATLAS も素晴らしいプログラムで,無料で使える. ATLAS は BSD ライセンスとなっているようです.ライセンスは,各自でよく確認してください. ライセンスからいうと,GotoBLAS より使い勝手が良さそうです.
- Octave をソースコードからビルドすると, Intel Math Kernel Library (インテル・マス・カーネル・ライブラリ) とリンクさせることも簡単にできる.
【この Web ページで行うこと】
- Linux を使う.
- Octaveは,ソースコードを使ってビルドします.
https://www.gnu.org/software/octave/ Octave の本家 からソースコードをダウンロード.
- ソースコードからビルドするので C, C++, Fortran コンパイラなどが必要.
- このページでは,SuiteSparse や Metis をソースコードからビルドする手順も補足的に書いています.
【関連する外部ページ】
- Octave オンラインマニュアル: https://www.gnu.org/software/octave/
謝辞
本 Web ページは,Linux での Octave のビルドとインストール法に焦点をあてていますが, 本 Web ページの作成にあたっては, まず, 「octave for windowsメモの筆者」様(http://www.tatsuromatsuoka.com/octave/jpn/OctaveWinMemo.html (当時の URL,現存しない))に, 2ちゃんねる (http://2ch.net/) の「データ解析ツールoctaveを語ろう」掲示板での議論を通して,数々の貴重なご教示,コメント頂きました. ありがとうございました.
- Metis の取り扱いについて
Metis は再配布不可.ビルドしたバイナリであっても再配布不可
- GotoBLAS の取り扱いについて
GotoBLAS は再配布不可.ビルドしたバイナリであっても再配布不可
< LI> 「SuiteSparse のビルドでは,BLAS (GotoBLAS など) があった方がよいかも」というご示唆
あった方が SuiteSparse の実行形式プログラムのビルドなどもできて便利.
などなど.
敬意を込めて, 「octave for windowsメモの筆者」様の URL を記しておきます. http://www.tatsuromatsuoka.com/octave/jpn/OctaveWinMemo.html (当時の URL,現存しない)
⇒ この Web ページは,分かりやすく,また,Octave に関係する種々の有益な情報が載ったページです. 情報の宝庫,オンリーワンの Web ページと言ってよいでしょう.
Ubuntu で Octave のソースコードのインストール(ソースコードを使用)を行うシェルスクリプト
楽をしたいのでシェルスクリプトを作りました。 1つ1つコマンドを入力したい(シェルスクリプトにしたくない)場合については、この Web ページの下で説明している. Octave バージョン 3.6.2 のインストール(ソースコードを使用)が行われます.前提ソフトウェアとして用いる graphicsmagick, curl, gsl, fftw3, glpk, qrupdate, suitesparce, lapack, atlas のインストールも行う. Ubuntu 12.04 を用いて動作確認済みです.
* 前準備
Intel Math Kernel Library を使う場合には、.bashrc で 「export LD_LIBRARY_PATH=$LD_LIBRARY_PATH:/opt/intel/mkl/lib/intel64:/opt/intel/lib/ia32」 あるいは 「export LD_LIBRARY_PATH=$LD_LIBRARY_PATH:/opt/intel/mkl/lib/intel64:/opt/intel/lib/intel64」 のように設定しておくこと。
* シェルスクリプト
#!/bin/bash
sudo apt -y install build-essential
# GNU gcc, g++, gfortran を使う場合: gcc, g++, gfortran
# Intel Compiler を使う場合: CC=icc, icpc, ifort
if [ -x /opt/intel/bin/icc ]; then
if [ -x /opt/intel/bin/ifort ]; then
echo USE Intel Compiler
export USEINTEL=YES
fi
fi
if [ -x /opt/intel/bin/compilervars.sh ]; then
echo USE Intel MKL
export USEMKL=YES
fi
if [ "$USEMKL" = "YES" ]; then
if [ `arch` = 'i686' ]; then
source /opt/intel/bin/compilervars.sh ia32
fi
if [ `arch` = 'x86_64' ]; then
source /opt/intel/bin/compilervars.sh intel64
fi
fi
# octave 前提ソフトウェア (Octave build dependency softwares)
cd /tmp; sudo apt-get source octave3.2
cd /tmp; sudo apt-get build-dep octave3.2
# /etc/ld.so.conf
sudo cp /etc/ld.so.conf /etc/ld.so.conf.$$
echo "/usr/local/lib" | sudo tee -a >> /etc/ld.so.conf
echo "/usr/local/lib/octave/3.6.2" | sudo tee -a >> /etc/ld.so.conf
sudo /sbin/ldconfig
# graphicsmagick
sudo apt -y install graphicsmagick-dbg
sudo apt -y install graphicsmagick
sudo apt -y install graphicsmagick-imagemagick-compat
sudo apt -y install graphicsmagick-libmagick-dev-compat
sudo apt -y install libgraphics-magick-perl
sudo apt -y install libgraphicsmagick++1-dev
sudo apt -y install libgraphicsmagick++3
sudo apt -y install libgraphicsmagick1-dev
sudo apt -y install libgraphicsmagick3
# curl
sudo apt -y install curl
sudo apt -y install libcurl3-dbg
sudo apt -y install libcurl3-gnutls
sudo apt -y install libcurl3
sudo apt -y install libcurl4-gnutls-dev
# gsl
if [ "$USEINTEL" = "YES" ]; then
# Intel Compiler
mkdir /tmp/gsl
cd /tmp/gsl
apt-get source gsl
sudo apt-get -yV build-dep gsl
cd gsl-*
CC=icc CXX=icpc F77=ifort dpkg-buildpackage -rfakeroot
cd ..
sudo dpkg -i *.deb
else
# package install
sudo apt -y install gsl-bin
sudo apt -y install libgsl0-dbg
sudo apt -y install libgsl0-dev
sudo apt -y install libgsl0ldbl
fi
# fftw3
if [ "$USEINTEL" = "YES" ]; then
# Intel Compiler
mkdir /tmp/fftw3
cd /tmp/fftw3
apt-get source fftw3
sudo apt-get -yV build-dep fftw3
cd fftw3-*
CC=icc CXX=icpc F77=ifort dpkg-buildpackage -rfakeroot
cd ..
sudo dpkg -i *.deb
else
# package install
sudo apt -y install libfftw3-3
sudo apt -y install libfftw3-dev
sudo apt -y install libfftw3-doc
fi
# glpk
if [ "$USEINTEL" = "YES" ]; then
# Intel Compiler
mkdir /tmp/glpk
cd /tmp/glpk
apt-get source glpk
sudo apt -y install libiodbc2-dev
sudo apt-get -yV build-dep glpk
cd glpk-*
CC=icc CXX=icpc F77=ifort dpkg-buildpackage -rfakeroot
cd ..
sudo dpkg -i *.deb
else
# package install
sudo apt -y install glpk-doc
sudo apt -y install glpk-utils
sudo apt -y install libglpk-dev
sudo apt -y install libglpk0-dbg
sudo apt -y install libglpk0
sudo apt -y install glpk
fi
# qrupdte
if [ "$USEINTEL" = "YES" ]; then
# Intel Compiler
mkdir /tmp/qrupdate
cd /tmp/qrupdate
apt-get source qrupdate
sudo apt-get -yV build-dep qrupdate
cd qrupdate-*
CC=icc CXX=icpc F77=ifort dpkg-buildpackage -rfakeroot
cd ..
sudo dpkg -i *.deb
else
# package install
sudo apt -y install libqrupdate-dev
sudo apt -y install libqrupdate1
fi
# arpack
if [ "$USEINTEL" = "YES" ]; then
# Intel Compiler
mkdir /tmp/arpack
cd /tmp/arpack
apt-get source arpack
sudo apt-get -yV build-dep arpack
cd arpack-*
CC=icc CXX=icpc F77=ifort dpkg-buildpackage -rfakeroot
cd ..
sudo dpkg -i *.deb
else
# package install
sudo apt -y install libarpack2-dbg
sudo apt -y install libarpack2-dev
sudo apt -y install libarpack2
fi
# suitesparse-metis
if [ "$USEINTEL" = "YES" ]; then
# Intel Compiler
mkdir /tmp/suitesparse-metis
cd /tmp/suitesparse-metis
apt-get source suitesparse-metis
sudo apt-get -yV build-dep suitesparse-metis
cd suitesparse-metis-*
CC=icc CXX=icpc F77=ifort dpkg-buildpackage -rfakeroot
cd ..
sudo dpkg -i *.deb
else
# package install
sudo apt -y install libsuitesparse-metis-3.1.0
sudo apt -y install libsuitesparse-metis-dbg
sudo apt -y install libsuitesparse-metis-dev
fi
# LAPACK をパッケージを用いてインストール (install the LAPACK softwares using package)
sudo apt -y install liblapack-dev
sudo apt -y install liblapack-test
sudo apt -y install liblapack-doc
sudo apt -y install liblapack3gf
sudo apt -y install liblapack-pic
# ATLAS をソースパッケージを用いてインストール (install the ATLAS softwares using source package)
sudo cpufreq-selector -g performance
mkdir /tmp/atlas
cd /tmp/atlas
apt-get source libatlas-dev
sudo apt-get -yV build-dep libatlas-dev
cd atlas-3.8.4
LANG=C sudo dpkg-buildpackage -uc -us -rfakeroot
cd ..
sudo dpkg -i *.deb
# BLAS 参照実装のダウンロードとビルド (Download BLAS reference implementarion and build it and install it)
cd /tmp
if [ ! -f blas.tgz ]; then
wget http://netlib.org/blas/blas.tgz
fi
rm -rf BLAS
tar -xvzof blas.tgz
cd /tmp/BLAS
if [ "$USEINTEL" = "YES" ]; then
# Intel Compiler
if [ `arch` = 'i686' ]; then
make LOADER="ifort -fPIC" FORTRAN="ifort -m32 -fPIC"
elif [ `arch` = 'x86_64' ]; then
make LOADER="ifort -fPIC" FORTRAN="ifort -m64 -fPIC"
fi
else
# GNU Compiler
if [ `arch` = 'i686' ]; then
make LOADER="gfortran -fPIC" FORTRAN="gfortran -m32 -fPIC"
elif [ `arch` = 'x86_64' ]; then
make LOADER="gfortran -fPIC" FORTRAN="gfortran -m64 -fPIC"
fi
fi
cp /tmp/BLAS/blas_LINUX.a /usr/local/lib/libblas_LINUX.a
# Octave のインストール(ソースコードを使用)
cd /tmp
if [ ! -f octave-3.6.2.tar.gz ]; then
wget ftp://ftp.gnu.org/gnu/octave/octave-3.6.2.tar.gz
fi
sudo rm -rf octave-3.6.2
tar -xvzof octave-3.6.2.tar.gz
cd octave-3.6.2
if [ "$USEINTEL" = "YES" ]; then
# Intel Compiler (インテル C++ Composer XE Linux 版, インテル Fortran Composer XE Linux 版を使う場合)
if [ `arch` = 'i686' ]; then
echo "source /opt/intel/bin/compilervars.sh ia32" >> ~/.bashrc
elif [ `arch` = 'x86_64' ]; then
echo "source /opt/intel/bin/compilervars.sh intel64" >> ~/.bashrc
fi
#
# コンパイル時のエラー回避のため
cat libgnu/malloca.c | fgrep -v verify > /tmp/malloca.c.$$
cp /tmp/malloca.c.$$ libgnu/malloca.c
# cat libcruft/arpack/util/second.f | sed 's/INTRINSIC/EXTERNAL/g' > /tmp/second.f.$$
# cp /tmp/second.f.$$ libcruft/arpack/util/second.f
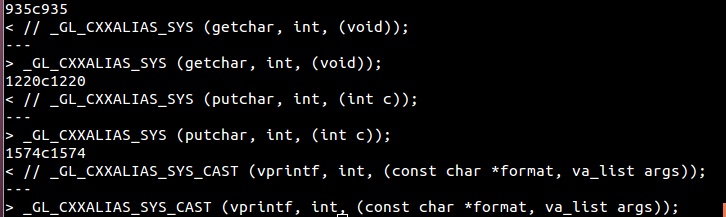
cat libgnu/stdio.h | sed "s/_GL_CXXALIAS_SYS (getchar, int, (void));/\/\/_GL_CXXALIAS_SYS (getchar, int, (void));/g" | sed "s/_GL_CXXALIAS_SYS (putchar, int, (int c));/\/\/_GL_CXXALIAS_SYS (putchar, int, (int c));/g" | sed "s/_GL_CXXALIAS_SYS_CAST (vprintf, int, (const char *format, va_list args));/\/\/_GL_CXXALIAS_SYS_CAST (vprintf, int, (const char *format, va_list args));/g" > /tmp/stdio.h.$$
cp /tmp/stdio.h.$$ libgnu/stdio.h
if [ `arch` = 'i686' ]; then
# Ubuntu 32 bit version (かきかけ. このままでは動かない)
CC=icc CXX=icpc F77=ifort F1="-fPIC -DPIC -O2 -I/opt/include/mkl/include/ia32 -I/opt/include/mkl/include -I/opt/include/include/ia32 -I/opt/include/include -I/usr/local/include" LDFLAGS="-L/opt/intel/lib/ia32 -L/opt/intel/mkl/lib/ia32" LIBS="-lmetis -lquadmath" CFLAGS="$F1" CPPFLAGS="$F1" FFLAGS="$F1" ./configure --enable-static --enable-shared --enable-dl --with-blas="-lmkl_intel_thread -lmkl_core -limf -lintlc -liomp5 -lpthread -lquadmath -lm" --with-lapack="-lmkl_lapack95 -lmkl_intel -lmkl_intel_thread -lmkl_core -limf -lintlc -liomp5 -lpthread -lquadmath -lm" PTHREAD_LIBS="-lpthread"
elif [ `arch` = 'x86_64' ]; then
# Ubuntu 64 bit version (かきかけ. このままでは動かない)
CC=icc CXX=icpc F77=ifort F1="-fPIC -DPIC -O2 -I/opt/include/mkl/include/intel64 -I/opt/include/mkl/include -I/opt/include/include/intel64 -I/opt/include/include -I/usr/local/include" LDFLAGS="-L/opt/intel/lib/intel64 -L/opt/intel/mkl/lib/intel64" LIBS="-lmetis -lquadmath" CFLAGS="$F1" CPPFLAGS="$F1" FFLAGS="$F1" ./configure --enable-static --enable-shared --enable-dl --with-blas="-lmkl_intel_thread -lmkl_core -limf -lintlc -liomp5 -lpthread -lquadmath -lm" --with-lapack="-lmkl_intel_lp64 -lmkl_intel_thread -lmkl_core -limf -lintlc -liomp5 -lpthread -km -lquadmath" PTHREAD_LIBS="-lpthread"
fi
else
# GNU Compiler (GNU のコンパイラを使う場合)
if [ `arch` = 'i686' ]; then
if [-d /opt/intel/mkl/lib/ia32 ]; then
# try to use Intel MKL 32bit (GNU のコンパイラ + インテル マス・カーネル・ライブラリー Linux 版)
F1="-fPIC -DPIC -fomit-frame-pointer -O2 -I/opt/include/mkl/include/ia32 -I/opt/include/mkl/include -I/opt/include/include/ia32 -I/opt/include/include -I/usr/local/include" LDFLAGS="-L/opt/intel/lib/ia32 -L/opt/intel/mkl/lib/ia32" LIBS="-lmetis -lquadmath" CFLAGS="$F1" CPPFLAGS="$F1" FFLAGS="$F1" ./configure --enable-static --enable-shared --enable-dl --with-blas="-lmkl_gf -lmkl_intel_thread -lmkl_core -limf -lintlc -liomp5 -lpthread -lquadmath -lm" --with-lapack="-lmkl_gf -lmkl_intel_thread -lmkl_core -limf -lintlc -liomp5 -lpthread -lquadmath -lm" PTHREAD_LIBS="-lpthread"
fi
elif [ `arch` = 'x86_64' && ]; then
if [ -d /opt/intel/mkl/lib/intel64 ]; then
# try to use Intel MKL 64bit
F1="-fPIC -DPIC -fomit-frame-pointer -O2 -I/opt/include/mkl/include/intel64 -I/opt/include/mkl/include -I/opt/include/include/intel64 -I/opt/include/include -I/usr/local/include" LDFLAGS="-L/opt/intel/lib/intel64 -L/opt/intel/mkl/lib/intel64" LIBS="-lmetis -lquadmath" CFLAGS="$F1" CPPFLAGS="$F1" FFLAGS="$F1" ./configure --enable-static --enable-shared --enable-dl --with-blas="-lmkl_gf_lp64 -lmkl_intel_thread -lmkl_core -limf -lintlc -liomp5 -lpthread -lquadmath -lm" --with-lapack="-lmkl_gf_lp64 -lmkl_intel_thread -lmkl_core -limf -lintlc -liomp5 -lpthread -lquadmath -lm" PTHREAD_LIBS="-lpthread"
fi
elif [ -f /usr/lib/atlas-base/libptf77blas.a ]; then
# Ubuntu package LAPACK and ATLAS (GNU のコンパイラ + Ubuntu のパッケージでインストールされた ATLAS と LAPACK)
F1="-fPIC -DPIC -fomit-frame-pointer -O2 -I/usr/include/atlas -I/usr/local/include" LDFLAGS="-L/usr/lib/atlas-base -L/usr/local/lib" LIBS="-lmetis -lgfortran -lgomp -lpthread -ldl -lquadmath" CFLAGS="$F1" CPPFLAGS="$F1" FFLAGS="$F1" ./configure --enable-static --enable-shared --enable-dl --with-blas="-lptcblas -lptf77blas -latlas -lgfortran -lgomp -lpthread -ldl -lquadmath" --with-lapack="-llapack_atlas -llapack -lptcblas -lptf77blas -latlas -lgfortran -lgomp -lpthread -ldl -lquadmath" PTHREAD_LIBS="-lpthread"
elif [ -f /usr/local/atlas/lib/libptf77blas.a ]; then
# LAPACK and ATLAS build from source
F1="-fPIC -DPIC -fomit-frame-pointer -O2 -I/usr/local/include -I/usr/local/atlas/include" LDFLAGS="-L/usr/local/lib -L/usr/local/atlas/lib" LIBS="-lmetis -lgfortran -lgomp -lpthread -ldl -lquadmath" CFLAGS="$F1" CPPFLAGS="$F1" FFLAGS="$F1" ./configure --enable-static --enable-shared --enable-dl --with-blas="-lptcblas -lptf77blas -latlas -lgfortran -lgomp -lpthread -ldl -lquadmath" --with-lapack="-ltmglib -llapack -lptcblas -lptf77blas -latlas -lgfortran -lgomp -lpthread -ldl -lquadmath" PTHREAD_LIBS="-lpthread"
elif [ -f /usr/lib/ibgoto2.a ]; then
# GotoBLAS
F1="-fPIC -DPIC -fomit-frame-pointer -O2 -I/usr/local/include" LDFLAGS="-L/usr/local/lib" LIBS="-lmetis -lgfortran -lgomp -lpthread -ldl -lquadmath" CFLAGS="$F1" CPPFLAGS="$F1" FFLAGS="$F1" ./configure --enable-static --enable-shared --enable-dl --with-blas="-lcblas -lgoto2 -lgfortran -lgomp -lpthread -ldl -lquadmath" --with-lapack="-llapack -ltmglib -lcblas -lgoto2 -lgfortran -lgomp -lpthread -ldl -lquadmath" PTHREAD_LIBS="-lpthread"
else
# 「-llapack -lblas 」でコンパイル
F1="-fPIC -DPIC -fomit-frame-pointer -O2 -I/usr/local/include" LDFLAGS="-L/usr/local/lib" LIBS="-lmetis -lgfortran -lgomp -lpthread -ldl -lquadmath" CFLAGS="$F1" CPPFLAGS="$F1" FFLAGS="$F1" ./configure --enable-static --enable-shared --enable-dl --with-blas="-lblas -lgfortran -lgomp -lpthread -ldl -lquadmath" --with-lapack="-llapack -lblas -lgfortran -lgomp -lpthread -ldl -lquadmath" PTHREAD_LIBS="-lpthread"
fi
fi
# memo
# LIBS="-lmetis" CFLAGS="-I/usr/local/include -I/usr/local/atlas/include -mieee-fp -DH5_USE_16_API -fomit-frame-pointer -mfpmath=sse -msse3 -fno-schedule-insns2 -fopenmp -fno-tree-loop-optimize -fno-tree-vectorize -fexceptions -march=native -O3 -fopenmp" CPPFLAGS="-I/usr/local/include -I/usr/local/atlas/include -mieee-fp -DH5_USE_16_API -fomit-frame-pointer -mfpmath=sse -msse3 -fno-schedule-insns2 -fopenmp -fno-tree-loop-optimize -fno-tree-vectorize -fexceptions -march=native -O3 -fopenmp" FFLAGS="-DH5_USE_16_API -fomit-frame-pointer -mfpmath=sse -msse3 -fno-schedule-insns2 -fopenmp -fno-tree-loop-optimize -fno-tree-vectorize -fexceptions -march=native -O3 -fopenmp" ./configure --enable-static --enable-shared --enable-dl --with-blas="-L/usr/local/atlas/lib -lptf77blas /usr/local/atlas/lib/libatlas.a -lgfortran -lpthread -lgomp" --with-lapack="-llapack_LINUX -ltmglib_LINUX -L/usr/local/atlas/lib -lptf77blas /usr/local/atlas/lib/libatlas.a -lgfortran -lpthread -lgomp"
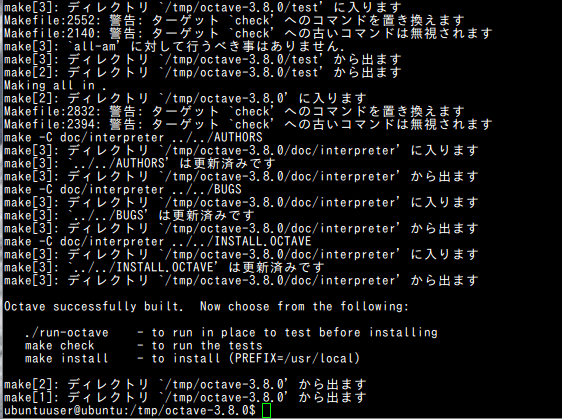
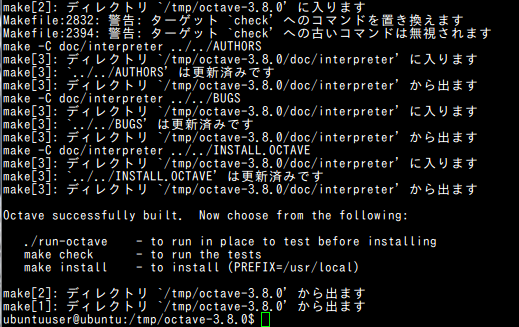
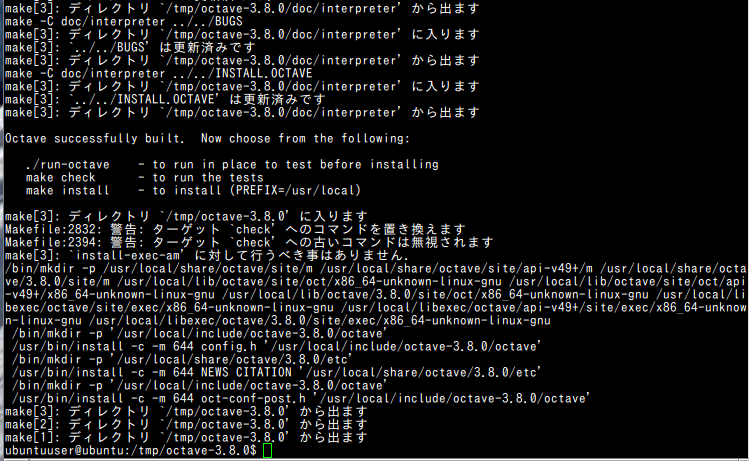
make -j4
make check
sudo make install
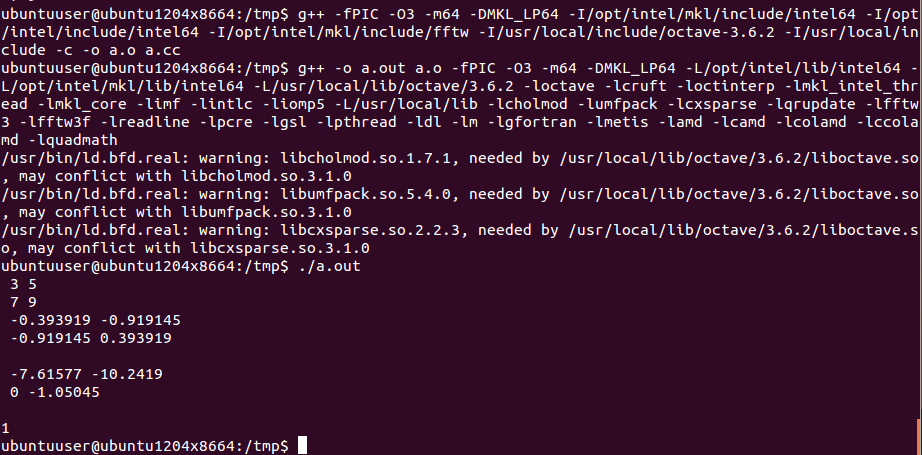
Ubuntu で, コマンドを手入力して,Octave のソースコードのインストール(ソースコードを使用)を行う
前もって決めておく事項
- 作業用ディレクトリ: /tmp (このページでは /tmp と書く)
1. 前提となるソフトウェアのインストール
Ubuntu バージョン 12.04 の場合の操作手順例
Ubuntu の他のバージョンでも同様の手順になります
- アップデート操作
sudo apt-get -yV update sudo apt-get -yV upgrade sudo reboot - Octaveのビルドで用いる前提ソフトウェアのインストール
# 前提ソフトウェア
cd /tmp; sudo apt-get source octave3.2
cd /tmp; sudo apt-get build-dep octave3.2
# 開発環境等
sudo apt -y install make
sudo apt -y install patch
sudo apt -y install build-essential
sudo apt -y install autoconf
sudo apt -y install automake
sudo apt -y install autogen
sudo apt -y install flex
sudo apt -y install bison
sudo apt -y install gawk
sudo apt -y install libtool
sudo apt -y install ccache
sudo apt -y install binutils
sudo apt -y install openssl
sudo apt -y install libgmp3-devel
sudo apt -y install libmpfr-dev
sudo apt -y install libppl-dev
sudo apt -y install libmpc-dev
sudo apt -y install glpk
sudo apt -y install libfltk1.1-dev
sudo apt -y install cpp-4.4
sudo apt -y install gcc-4.4
sudo apt -y install g++-4.4
sudo apt -y install gfortran
sudo apt -y install gfortran-4.4
sudo apt -y install libreadline-dev
# pcre
sudo apt -y install libpcre3
#
sudo apt -y install gperf
sudo apt -y install libqhull-dev
sudo apt -y install libftgl-dev
sudo apt -y install libgomp1
# gsl
sudo apt -y install gsl-bin
sudo apt -y install libgsl0-dev
sudo apt -y install libgsl0-dbg
sudo apt -y install libgsl0ldbl
# fftw3
sudo apt -y install libfftw3-3
sudo apt -y install libfftw3-dev
sudo apt -y install libfftw3-doc
# graphicsmagick
sudo apt -y install graphicsmagick-dbg
sudo apt -y install graphicsmagick
sudo apt -y install libgraphics-magick-perl
sudo apt -y install libgraphicsmagick++1-dev
sudo apt -y install libgraphicsmagick++3
sudo apt -y install libgraphicsmagick1-dev
sudo apt -y install libgraphicsmagick3
# curl
sudo apt -y install curl
sudo apt -y install libcurl3-dbg
sudo apt -y install libcurl3-gnutls
sudo apt -y install libcurl3
sudo apt -y install libcurl4-gnutls-dev
sudo apt -y install gnuplot
# lapack
sudo apt -y install liblapack-dev
sudo apt -y install liblapack-doc
sudo apt -y install liblapack-pic
sudo apt -y install liblapack-test
sudo apt -y install liblapack3gf
# atlas
sudo apt -y install libatlas-base-dev
sudo apt -y install libatlas-dev
sudo apt -y install libatlas-doc
sudo apt -y install libatlas-test
sudo apt -y install libatlas3gf-base
# qrupdate
sudo apt -y install libqrupdate-dev
sudo apt -y install libqrupdate1
# arpack
sudo apt -y install libarpack2-dbg
sudo apt -y install libarpack2-dev
sudo apt -y install libarpack2
# SuiteSparse
sudo apt -y install libamd2
sudo apt -y install libbtf1
sudo apt -y install libcamd2
sudo apt -y install libccolamd2
sudo apt -y install libcholmod1
sudo apt -y install libcolamd2
sudo apt -y install libcsparse2
sudo apt -y install libcxsparse2
sudo apt -y install libklu1
sudo apt -y install libldl2
sudo apt -y install libsuitesparse-dbg
sudo apt -y install libsuitesparse-dev
sudo apt -y install libsuitesparse-doc
sudo apt -y install libumfpack5
sudo apt -y install libsuitesparse-metis
sudo apt -y install libsuitesparse-metis-dev
Fedora の場合の実行例
- パッケージの更新
インストール前に「yum check-update; sudo yum update」を実行しておくとトラブルが減るでしょう. これは更新可能な全パッケージを更新するという操作です.
yum check-update sudo yum update - 必須ソフトウェアのインストール
Octave のビルドとインストールに必要になる次のソフトウェアをインストール済みであること.
【関連する外部ページ】: http://www.rpmfind.net//linux/RPM/fedora/devel/src/octave-3.2.2-5.fc12.src.html
- metis のインストール
cd /tmp
wget http://glaros.dtc.umn.edu/gkhome/fetch/sw/metis/metis-5.0.2.tar.gz
tar -xvzof metis-5.0.2.tar.gz
cd metis-5.0.2
make config
make
sudo make install
2. (オプション)ATLAS をソースパッケージを用いてインストール
- わざわざ、ATLAS をソースパッケージを用いてインストールする理由。
コンピュータの CPU に合わせて ATLAS をチューニングするには、 ソースコードからビルドする必要がある(あとで、環境変数などで同時実行スレッド数を変えるような機能がない)
- デメリット
インストールに数時間以上かかります.その手間に見合わない場合には、ATLAS をソースパッケージでなく、普通のパッケージからインストールするのが賢明だと思います.
sudo cpufreq-selector -g performance
mkdir /tmp/atlas
cd /tmp/atlas
apt-get source libatlas-dev
sudo apt-get -yV build-dep libatlas-dev
cd atlas-3.8.4
LANG=C sudo dpkg-buildpackage -uc -us -rfakeroot
cd ..
sudo dpkg -i *.deb
3. (オプション)前提ソフトウェアをソースコードからビルドしてインストール
あとで Octave のビルド時に configure を実行しますが,configure でエラーが出る場合,あるいは、octave のテスト時にエラーが出る場合など、 ソースコードからビルドし,インストールすることでエラーが回避できる可能性がある.
* かなり手間と時間がかかりますので、エラーが出たときのみに試すのがいいと考えます.
<それぞれのインストール手順の Web ページへのリンク>
- GSL のインストール
- FFTW のインストール
- GLPK のインストール
- curl のインストール
- LAPACK のインストール
- ATLAS のインストール
- qrupdate のインストール
- arpack のインストール
- Metis と SuiteSparse のインストール
4. Octave のソースコードのダウンロード
ここで行うことは, Octave ソースコードをダウンロードすること.
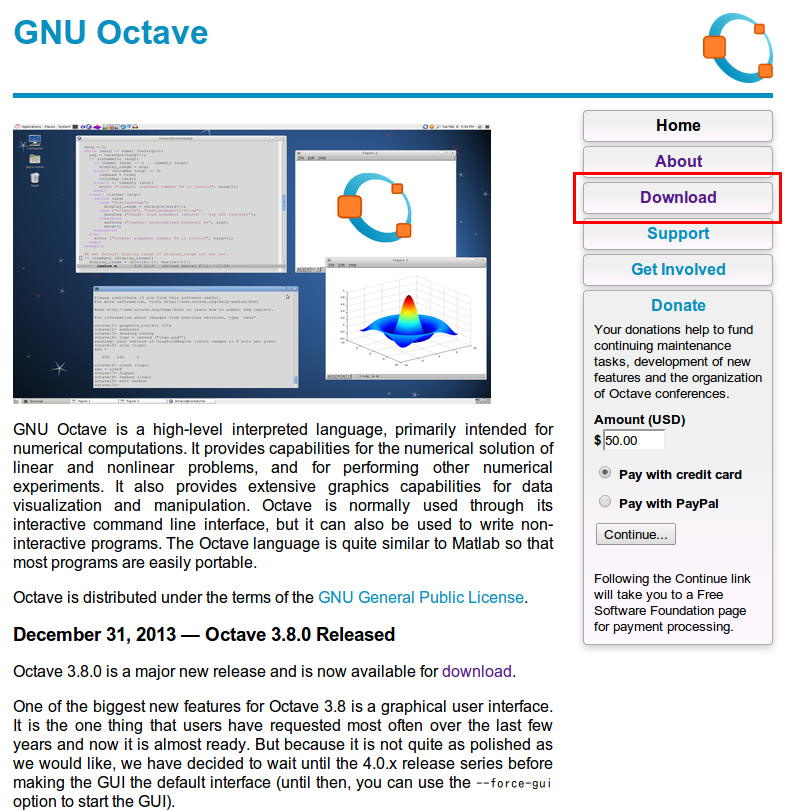
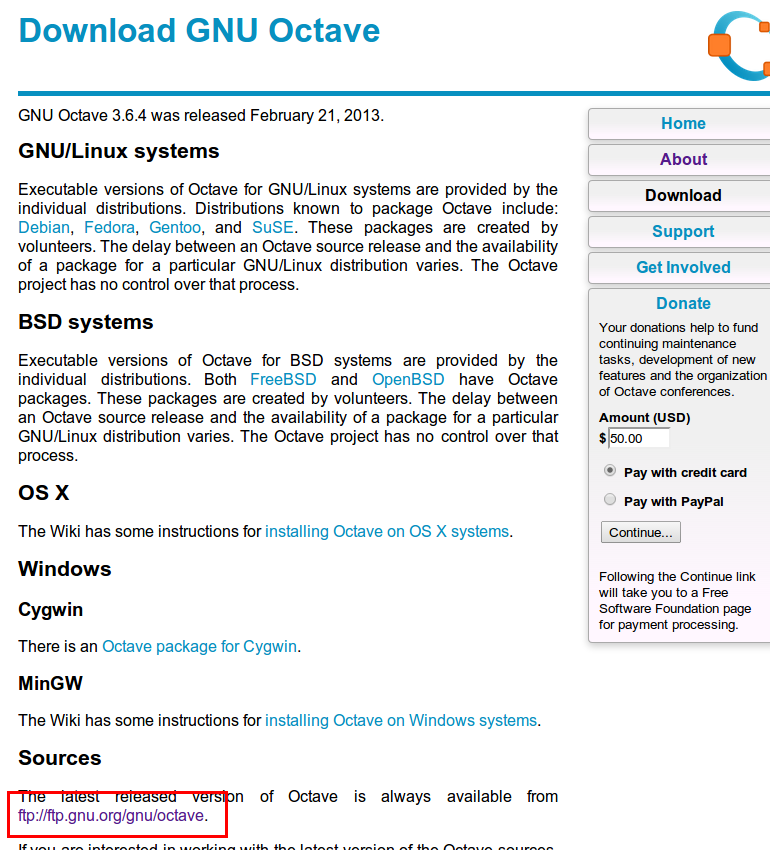
- https://www.gnu.org/software/octave/ を開く
- 「Download」をクリック
- 「Stable」をクリック
- 「octave-3.6.2.tar.gz」をクリック
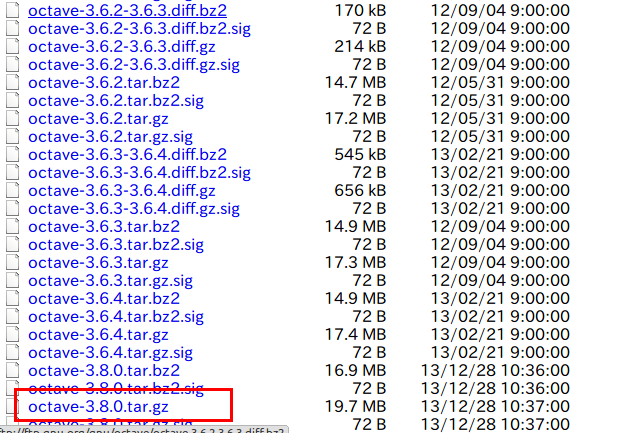
ダウンロードが始まる.
- ダウンロードしたファイルを /tmp に移す
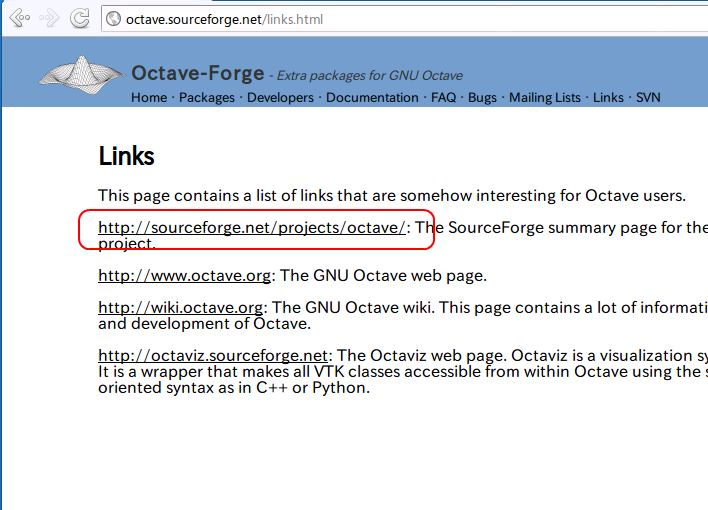
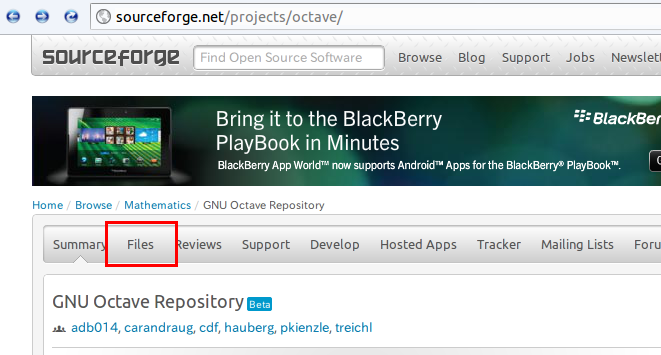
5. Octave-Forge のソースコードのダウンロード
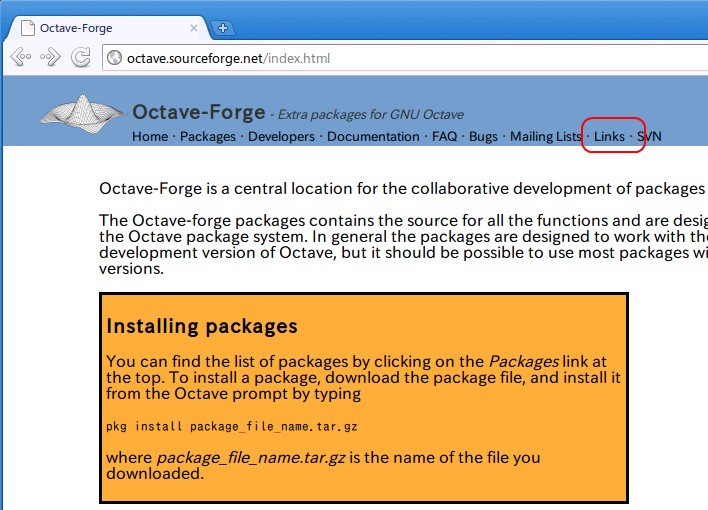
- 今度は, https://octave.sourceforge.io/ を開く
- 「Links」をクリック
- 「http://sourceforge.net/projects/octave/」をクリック
- 「Files」をクリック
- 「Octave Forge」をクリック
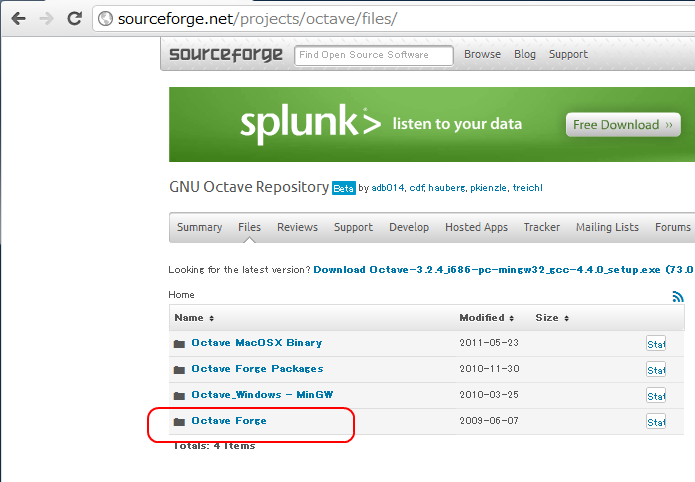
- 最新版をクリック
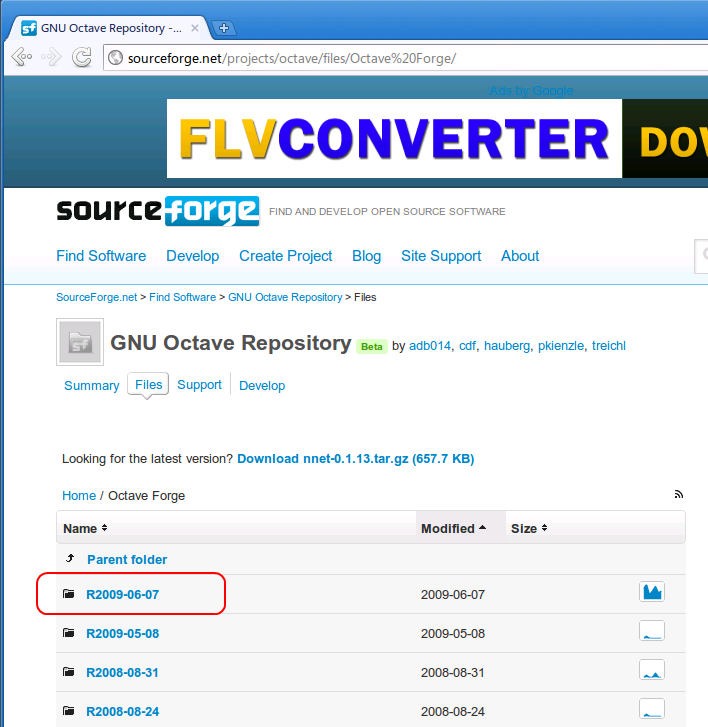
- ファイルをクリック
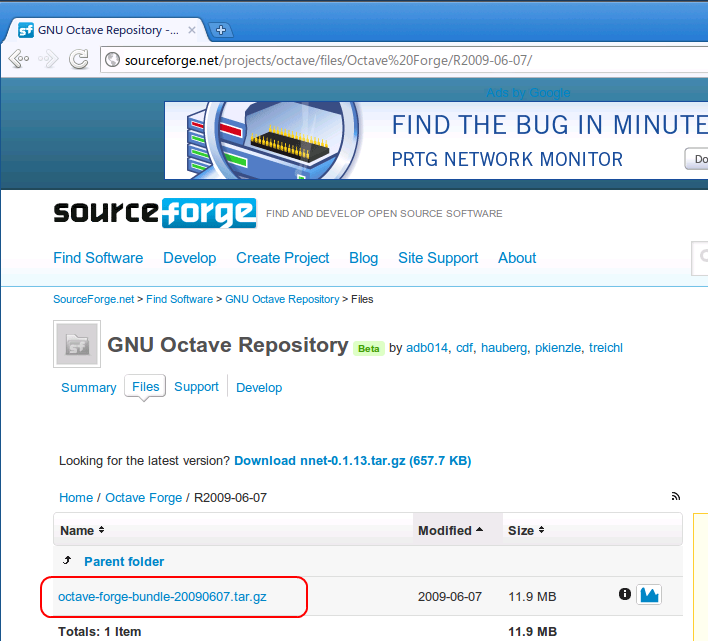
- ダウンロードしたファイル (octave-forge-bundle-20090607.tar.gz ) を /tmp に移す
あとで役に立つことが多いので、ダウンロードしておく.
6. Octave のビルドとインストールの手順
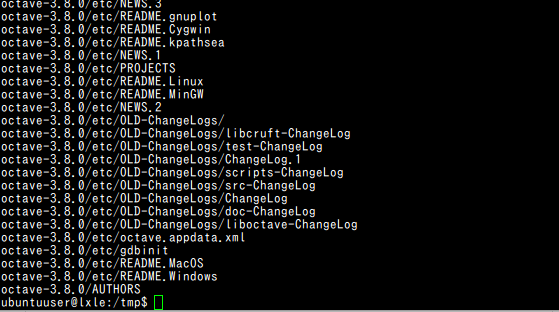
- 先ほどダウンロードした octave-3.6.2.tar.gz を解凍
cd /tmp
sudo rm -rf octave-3.6.2
tar -xvjof octave-3.6.2.tar.gz
結果の確認(実行結果の例をここに示す).
- /etc/ld.so.conf の調整
設定例は次の通り
* Octave バージョン 3.6.2 の場合
/usr/local/lib
/usr/local/lib/octave/3.6.2
◆ Ubuntu 12.04 での設定例

- sudo /sbin/ldconfig の実行

- cd octave-3.6.2 の実行

- configure の実行
configure の実行については,いくつかの場合を説明する.
* Ubuntu の場合 *
- Ubuntu で,ATLAS をソースコードからビルドしてインストール済みで,それを使いたい場合
- Octave 3.6.2
- ATLAS 3.9.53 (ソースコードからビルドしてインストール)
- GNU コンパイラ
- Ubuntu 12.04, 64 ビット版
ATLAS のインストールの後, コンソールで次の操作を行う.
◆ configure の操作例
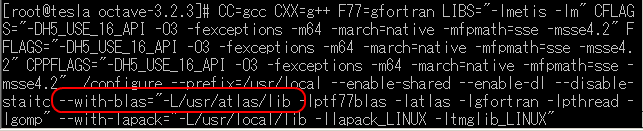
F1="-fPIC -DPIC -fomit-frame-pointer -O2 -I/usr/local/include -I/usr/local/atlas/include" LDFLAGS="-L/usr/local/lib -L/usr/local/atlas/lib" LIBS="-lmetis -lgfortran -lgomp -lpthread -ldl -lquadmath" CFLAGS="$F1" CPPFLAGS="$F1" FFLAGS="$F1" ./configure --enable-static --enable-shared --enable-dl --with-blas="-lptcblas -lptf77blas -latlas -lgfortran -lgomp -lpthread -ldl -lquadmath" --with-lapack="-ltmglib -llapack -lptcblas -lptf77blas -latlas -lgfortran -lgomp -lpthread -ldl -lquadmath" PTHREAD_LIBS="-lpthread" - Ubuntu で,GotoBLASを使いたい場合
- Octave 3.6.2
- GotoBLAS
- GNU コンパイラ
- Ubuntu 12.04, 64 ビット版
GotoBLAS のビルドとインストールの後, コンソールで次の操作を行う.
◆ configure の操作例
F1="-fPIC -DPIC -fomit-frame-pointer -O2 -I/usr/local/include" LDFLAGS="-L/usr/local/lib" LIBS="-lmetis -lgfortran -lgomp -lpthread -ldl -lquadmath" CFLAGS="$F1" CPPFLAGS="$F1" FFLAGS="$F1" ./configure --enable-static --enable-shared --enable-dl --with-blas="-lcblas -lgoto2 -lgfortran -lgomp -lpthread -ldl -lquadmath" --with-lapack="-llapack -ltmglib -lcblas -lgoto2 -lgfortran -lgomp -lpthread -ldl -lquadmath" PTHREAD_LIBS="-lpthread"
* Fedora の場合 *
- Fedora で ATLAS をリンクして使いたい場合
- ATLAS (Ubuntu のパッケージ)
- GNU コンパイラ
- Fedora
◆ configure の操作例 1:
ATLAS は yum を使ってすでにインストール済みで,それを使いたい場合は,コンソールで次の操作を行う.
cd octave-3.6.2
CC=gcc CXX=g++ F77=gfortran LIBS="-lquadmath -lm" CFLAGS="-O3 -fexceptions" CPPFLAGS="-O3 -fexceptions" FFLAGS="-O3 -fexceptions" ./configure --prefix=/usr/local --enable-static --enable-shared --enable-dl --disable-static --with-blas="-L/usr/lib64/atlas -lptf77blas -latlas -lgfortran -lpthread -lquadmath" --with-lapack="-L/usr/lib64/atlas -llapack -lquadmath" --with-qrupdate-libdir=/usr/local/lib PTHREAD_LIBS="-lpthread"
* なお,metis をリンクしたい場合には「LIBS="-lmetis -lm"」を付ける.
* OpenMP も使いたい場合は,CFLAGS と CPPFLAGS に「-fopenmp」を付ける
* Core2 プロセッサであり,かつ,64 ビット Linux を使っている場合.- 64 ビット Linux なので「-m64」を付ける.
- Core2 プロセッサなので「-mfpmath=sse -msse4.2 -march=native」を付ける.(gcc 等のバージョンによっては,「-mfpmath=sse -mssse3 -march=core2」に変えることもある)
* -mnative は Pentium 系のマシンにおいて「そのマシンの CPU に特化したコードを生成する」という意味.詳しくは「gcc -E -v -march=native -」
つまり,以下の通り
cd octave-3.6.2
CC=gcc CXX=g++ F77=gfortran LIBS="-lquadmath -lm" CFLAGS="-O3 -fexceptions -m64 -march=native -mfpmath=sse -msse4.2" CPPFLAGS="-O3 -fexceptions -m64 -march=native -mfpmath=sse -msse4.2" FFLAGS="-O3 -fexceptions -m64 -march=native -mfpmath=sse -msse4.2" ./configure --prefix=/usr/local --enable-static --enable-shared --enable-dl --disable-static --with-blas="-L/usr/lib64/atlas -lptf77blas -latlas -lgfortran -lpthread -lquadmath" --with-lapack="-L/usr/lib64/atlas -llapack -lquadmath" --with-qrupdate-libdir=/usr/local/lib PTHREAD_LIBS="-lpthread"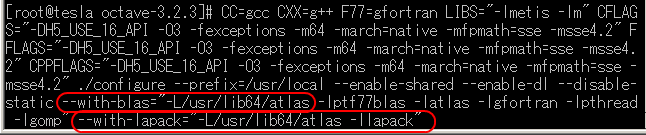
◆ configure の操作例 2:
ATLAS を自前でビルドした場合で,それを使いたい場合は,コンソールで次の操作を行う.
ATLAS を自前でビルドした場合には「-L/usr/lib64/atlas」の部分は「-L/usr/local/atlas/lib」のように変える.例えば,次のようになる.
p * ATLAS は自前でビルドするよりも,yum atlas-devel でインストールした方が楽だと思います.
- Fedora で GotoBLAS をリンクして使いたい場合
- Octave 3.6.2
- GotoBLAS
- GNU コンパイラ
- Fedora
GotoBLAS のビルドとインストールの後, コンソールで次の操作を行う.
cd octave-3.6.2
CC=gcc CXX=g++ F77=gfortran LIBS="-lquadmath -lm" CFLAGS="-O3 -fexceptions" CPPFLAGS="-fexceptions" FFLAGS="-O3 -fexceptions" ./configure --prefix=/usr/local --enable-static --enable-shared --enable-dl --disable-static --with-blas="-lgoto -lgfortran -lpthread -lquadmath" --with-lapack="-llapack_LINUX -ltmglib_LINUX -lquadmath" --with-qrupdate-libdir=/usr/local/lib PTHREAD_LIBS="-lpthread"
* なお,metis をリンクしたい場合には「LIBS="-lmetis -lm"」を付ける.
- Ubuntu で,ATLAS をソースコードからビルドしてインストール済みで,それを使いたい場合
- configure の結果の確認
* エラーメッセージが出ていないこと を確認してください
- (インテルのコンパイラを使うときに限る)インテルのコンパイラを使ってビルドしたいときは,ソースコードの調整を行う
libgnu/stdio.h を次のように変更
libgnu/verify.h の 「#define _GL_HAVE_STATIC_ASSERT 1」の行をコメントアウト
- make の実行
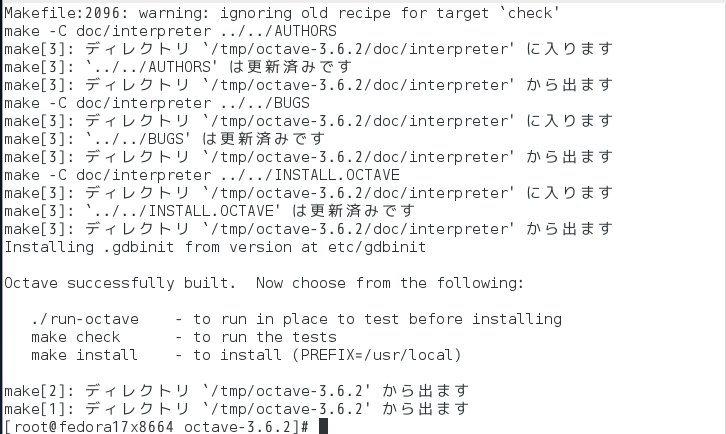
make -j4
- make の結果の確認
* Ubuntu の場合 *
- Ubuntu で Intel Math Kernel Library(インテル マス・カーネル・ライブラリー) をインストール済みで,それを使いたい場合
- Octave 3.6.1
- インテル マス・カーネル・ライブラリー Linux 版
- GNU コンパイラ
- Ubuntu 12.04, 64 ビット版
◆ make の実行結果例
- Ubuntu で,ATLAS をパッケージを用いてインストール済みで,それを使いたい場合
- Octave 3.6.2
- ATLAS (Ubuntu のパッケージ)
- GNU コンパイラ
- Ubuntu 12.04, 64 ビット版
◆ make の実行結果例
* Fedora の場合 *
Fedora 17 での make の実行結果例
(octave バージョン 3.6.2 の場合)
- Ubuntu で Intel Math Kernel Library(インテル マス・カーネル・ライブラリー) をインストール済みで,それを使いたい場合
- make check の実行
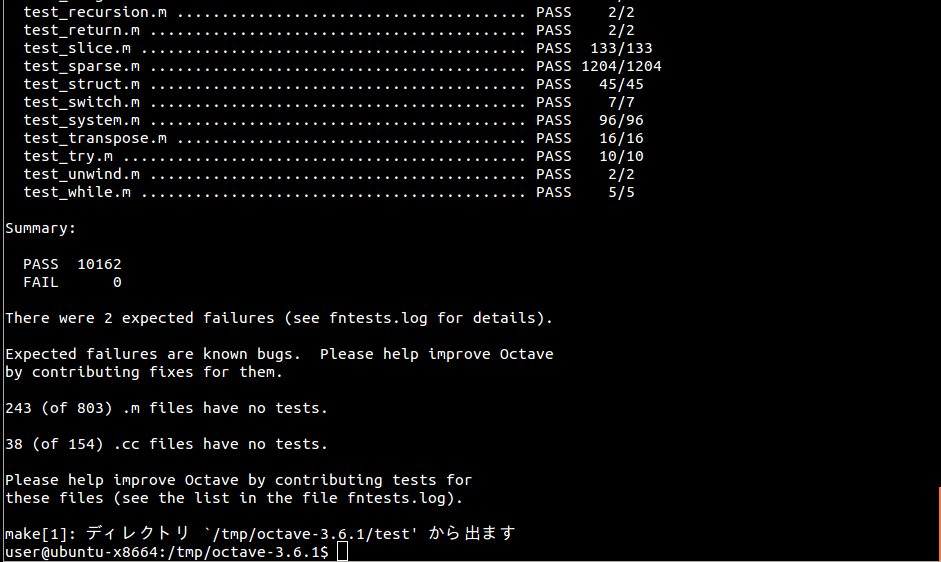
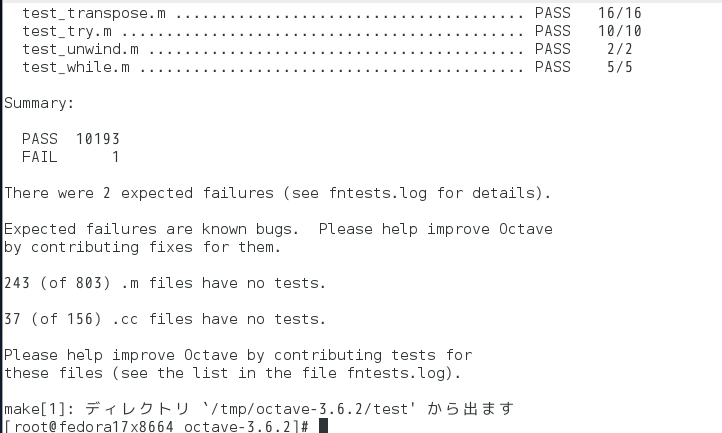
make check
- make check の結果の確認
* Ubuntu の場合 *
- Ubuntu で,ATLAS をパッケージを用いてインストール済みで,それを使いたい場合
- Octave 3.6.2
- ATLAS (Ubuntu のパッケージ)
- GNU コンパイラ
- Ubuntu 12.04, 64 ビット版
◆ make check の実行結果例
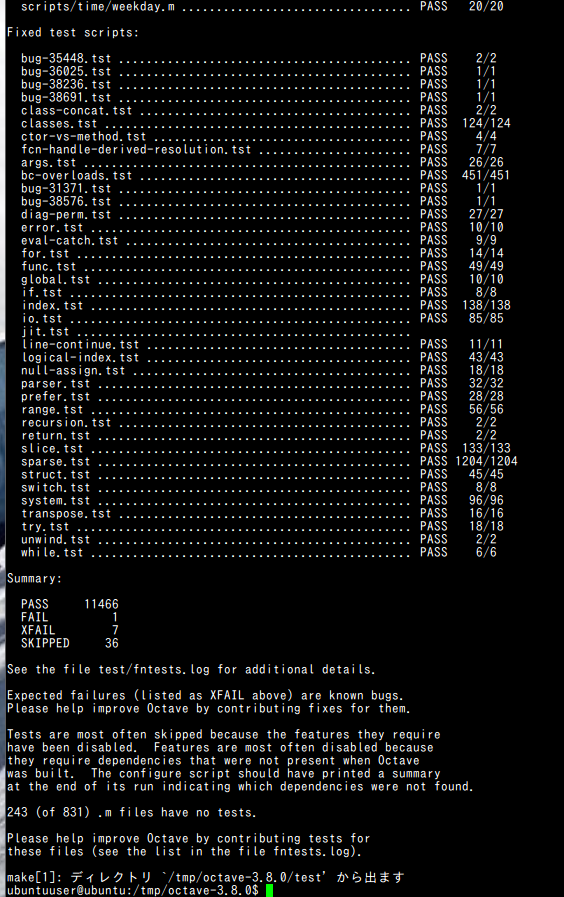
◆ make check の実行結果例
* Octave バージョン 3.2.4 の場合, 次のようなエラーが出る場合がある.scripts/image/imread.m ... octave: magick/semaphore.c:525: LockSemaphoreInfo: Assertion `semaphore_info != (SemaphoreInfo *) ((void *)0)' failed. panic: Aborted -- stopping myself...
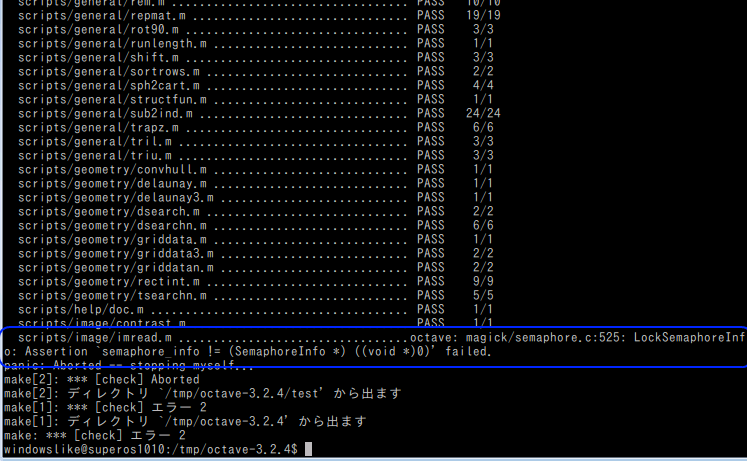
これは,GraphicsMagick の新しいバージョンに,Octave バージョン 3.2.4 が対応していないことに起因するエラーである. GraphicsMagick の古いバージョンをインストールすることで解決する場合がある.
- GraphicsMagick-1.2.7.tar.gzのダウンロード→解凍
- .configure または .configure --without-perl
- make
- make install
* Fedora の場合 *
Fedora 17 での make check の実行結果例
Octave バージョン 3.6.2 の場合
- Ubuntu で,ATLAS をパッケージを用いてインストール済みで,それを使いたい場合
- sudo make install の実行
sudo make install
- make install の結果の確認
□ Ubuntu での実行結果例
Octave-forge のインストール
- Octave-forge ソースコードの入手を済ませておくこと
http://sourceforge.net/projects/octave
詳しい手順は,この Web ページの上の方に記述している.
- Octave-forge ソースコード octave-forge-bundle-200900607.tar.gz を /tmp に解凍
cd /tmp tar -xvzof octave-forge-bundle-200900607.tar.gz - .octaverc の設定
ホームディレクトリに,ファイル「.octaverc」を作成しておく. 下記の「pkg install ...」の実行時に 「UINT_64_C was not declared in this scope」のようなエラーが出ることを防ぐために、下記の設定を行う.
setenv("CFLAGS", "-D__STDC_CONSTANT_MACROS"); setenv("CXXFLAGS", "-D__STDC_CONSTANT_MACROS"); - インストール
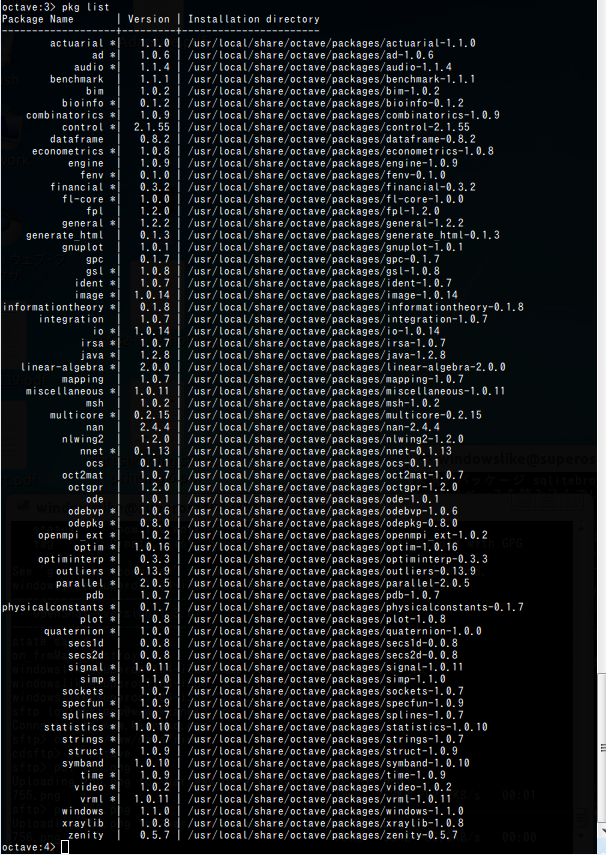
octave を起動し,「pkg install ...」でインストールする.
for i in /tmp/octave-forge-bundle-20090607/main/*.tar.gz; do echo $i; echo "pkg install -global -forge `basename $i .tar.gz | sed 's/\-[0-9\.]*//g'`" | sudo octave; done - (オプション) パッケージの追加
「pkg install -global -forge ...」を使って簡単に追加できる.
for i in NaN-2.0.4 actuarial-1.1.0 bim-1.0.1 control-2.1.53 dataframe-0.8.2 econometrics-1.0.8 es-0.0.4 fenv-0.1.0 fits-1.0.1 fl-core-1.0.0 fpl-1.2.0 ga-0.9.8 general-1.2.2 generate_html-0.1.3 gnuplot-1.0.1 gpc-0.1.7 image-1.0.14 io-1.0.14 java-1.2.7 linear-algebra-2.0.0 miscellaneous-1.0.11 msh-1.0.2 nan-2.4.1 nlwing2-1.2.0 nnet-0.1.13 nurbs-1.3.3 ocs-0.1.1 octcdf-1.1.2 octgpr-1.2.0 octproj-1.0.2 ode-1.0.1 odepkg-0.6.12 openmpi_ext-1.0.2 optim-1.0.16 optiminterp-0.3.3 parallel-2.0.5 plot-1.0.8 pt_br-1.0.9 signal-1.0.11 sockets-1.0.7 specfun-1.0.9 statistics-1.0.10 struct-1.0.9 tsa-4.1.0 vrml-1.0.11 fuzzy-logic-toolkit-0.2.3; do echo $i; echo "pkg install -global -forge `echo $i | sed 's/\-[0-9\.]*//g'`" | sudo octave; done - (オプション) 最新版に更新
「pkg install -global -forge ...」を使って簡単に更新できる.
for i in /tmp/octave-forge-bundle-20090607/main/*.tar.gz; do echo $i; echo "pkg install -global -forge `basename $i .tar.gz | sed 's/\-[0-9\.]*//g'`" | sudo octave; done for i in /tmp/octave-forge-bundle-20090607/extra/*.tar.gz; do echo $i; echo "pkg install -global -forge `basename $i .tar.gz | sed 's/\-[0-9\.]*//g'`" | sudo octave; done - インストールされたパッケージの確認
- テスト実行
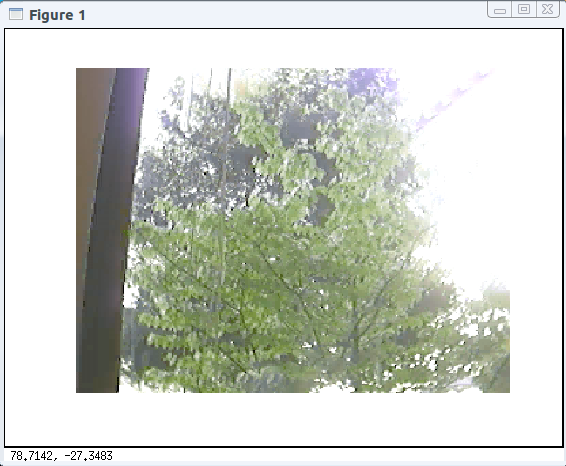
ためしに、video パッケージの機能を使って,avi 形式の動画ファイルの読み込みと、フレーム100番の表示を行ってみる. (OpenCV に付属の avi ファイルを使っています)
pkg load video
img = aviread("/usr/local/share/opencv/samples/c/tree.avi", 100);
imshow(img);
なお,octave の「pkg install」だとエラーメッセージが分かりにくいので, エラーが出るけど原因が分からないという場合, 下記のようなコマンドを実行して,エラーの有無を確認するという方法もあります.
cd main
tar -xvzof image-1.0.10.tar.gz
cd image-1.0.10
cd src
sh autogen.sh
CFLAGS="-I/usr/local/include/octave-3.6.2 -I/usr/local/include" LDFLAGS="-L/usr/local/lib/octave-3.6.2 -L/usr/local/lib" LIBS="-lavcodec -lavdevice -lavutil -lavformat -lswscale -lpng12 -lm" ./configure
make LIBS="-lavcodec -lavdevice -lavutil -lavformat -lswscale -lpng12 -lm"
make install
性能測定の例
- パッケージを用いてインストール: Octave 3.2.4 をパッケージを用いてインストール
- ATLAS 3.8.4 のパッケージ: ATLAS 3.8.4 をパッケージを用いてインストール. Octave 3.6.2 をビルド(本ページの手順)
- ATLAS 3.8.4 のソース・パッケージ: ATLAS 3.8.4 をソース・パッケージを用いてビルド・インストール. Octave 3.6.2 をビルド・インストール(本ページの手順)
- Intel MKL: Intel MKL をインストール. Octave 3.6.2 をビルド・インストール(本ページの手順)
| 1. パッケージを用いてインストール | 2. ATLAS 3.8.4 のパッケージ | Intel MKL | |||
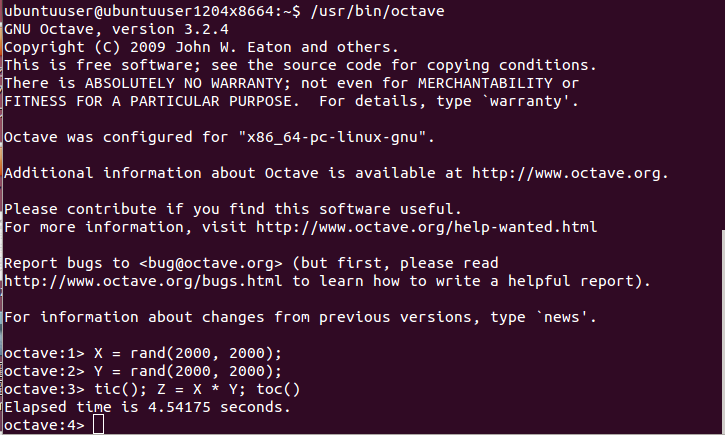
| (a) | 行列と行列の積 | X = rand(2000,2000); Y = rand(2000,2000); Z = X * Y | 1.25 sec | ||
| (b) | LU 分解 (LU decomposition) | X = rand(2000,2000); [L, U, P] = lu(X) | 0.67 sec | ||
| (c) | 正方行列の逆行列 | X = rand(2000,2000); [Z, RCOND] = inv(X) | 1.72 sec | ||
| (d) | 行列式 (determinant) | X = rand(2000,2000); [D, RCOND] = det(X) | 0.63 sec | ||
| (e) | Singular Value Decomposition (SVD), X = U*S*V | X = rand(2000,2000); [U, S, V] = svd(X) | 72 sec | ||
| (f) | QR factorization | X = rand(2000,2000); [Q, R, P] = qr(X) | 4.2 sec | ||
| (g) | 分散共分散行列 | X = rand(2000,2000), Y = rand(2000,2000); Z = cov(X, Y) | 1.34 sec | ||
| (h) | 分散共分散行列の固有値と固有ベクトル(主成分分析) | X = rand(2000,2000); [v, L] = eig( cov(X) ) | 13.3 sec | ||
| (i) | 2次元の畳み込み(コンボリューション) | X = rand(2000,2000); B = rand(21); Z = conv2(X, B, 'full') | 4.1 sec | ||
| (j) | 2次元の高速フーリエ変換 (FFT) | X = rand(2000,2000); Z = fft2(X, 2000, 2000) | 0.105 sec | ||
| (k) | convex hull | x = rand(1000000,1); y = rand(1000000,1); H = convhull(x, y) | 0.51 sec |
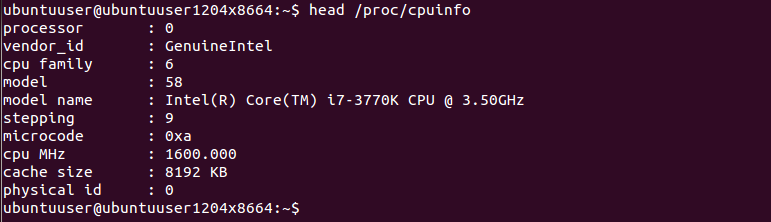
- ハードウェア
- CPU: Intel(R) Core(TM) i7-3770K CPU @ 3.50GHz
- ソフトウェア
- OS: Ubuntu 12.04 64 bit
- Octave バージョン 3.2.4 (1. パッケージを用いてインストール) または Octave バージョン 3.6.2 (「1. パッケージを用いてインストール」以外全て)
【お断り】プログラムのテストを行っていない.他のプロセスを止めるなどしていない(従って,比較ではなく,傾向を見るための参考値だと思ってください).※ 単位は秒で,3桁目を四捨五入.
「2. ATLAS 3.8.4 のパッケージ」の実測値の例
ATLAS 3.8.4 をパッケージを用いてインストール. Octave 3.6.2 をビルド(本ページの手順)

(a) 行列と行列の積: X = rand(2000,2000); Y = rand(2000,2000); Z = X * Y

(b) LU 分解 (LU decomposition): X = rand(2000,2000); [L, U, P] = lu(X)

(c) 正方行列の逆行列: X = rand(2000,2000); [Z, RCOND] = inv(X)

(d) 行列式 (determinant): X = rand(2000,2000); [D, RCOND] = det(X)

(e) Singular Value Decomposition (SVD), X = U*S*V: X = rand(2000,2000); [U, S, V] = svd(X)

(f) QR factorization (QR decomposition ともいう): X = rand(2000,2000); [Q, R, P] = qr(X)

(g) 分散共分散行列: X = rand(2000,2000); Y = rand(2000,2000); Z = cov(X, Y)

(h) 分散共分散行列の固有値と固有ベクトル(主成分分析): X = rand(2000,2000); [v, L] = eig( cov(X) )

(i) 2次元の畳み込み(コンボリューション): X = rand(2000,2000); B = rand(21); Z = conv2(X, B, 'full')

(j) 2次元の高速フーリエ変換 (FFT): X = rand(2000,2000); Z = fft2(X, 2000, 2000)

(k) convex hull: x = rand(1000000,1); y = rand(1000000,1); H = convhull(x, y)
「3. ATLAS 3.8.4 ソース・パッケージ」の実測値
ATLAS 3.8.4 をソース・パッケージを用いてビルド・インストール. Octave 3.6.2 をビルド・インストール(本ページの手順)
【実測値の例】

(a) 行列と行列の積: X = rand(2000,2000); Y = rand(2000,2000); Z = X * Y
(b) LU 分解 (LU decomposition): X = rand(2000,2000); [L, U, P] = lu(X)
(c) 正方行列の逆行列: X = rand(2000,2000); [Z, RCOND] = inv(X)
(d) 行列式 (determinant): X = rand(2000,2000); [D, RCOND] = det(X)
(e) Singular Value Decomposition (SVD), X = U*S*V: X = rand(2000,2000); [U, S, V] = svd(X)
(f) QR factorization (QR decomposition ともいう): X = rand(2000,2000); [Q, R, P] = qr(X)
(g) 分散共分散行列: X = rand(2000,2000); Y = rand(2000,2000); Z = cov(X, Y)
(h) 分散共分散行列の固有値と固有ベクトル(主成分分析): X = rand(2000,2000); [v, L] = eig( cov(X) )
(i) 2次元の畳み込み(コンボリューション): X = rand(2000,2000); B = rand(21); Z = conv2(X, B, 'full')
(j) 2次元の高速フーリエ変換 (FFT): X = rand(2000,2000); Z = fft2(X, 2000, 2000)
(k) convex hull: x = rand(1000000,1); y = rand(1000000,1); H = convhull(x, y)
4.Intel MKL
Intel MKL をインストール. Octave 3.6.2 をビルド・インストール(本ページの手順)
【実測値の例】

(a) 行列と行列の積: X = rand(2000,2000); Y = rand(2000,2000); Z = X * Y

(b) LU 分解 (LU decomposition): X = rand(2000,2000); [L, U, P] = lu(X)

(c) 正方行列の逆行列: X = rand(2000,2000); [Z, RCOND] = inv(X)

(d) 行列式 (determinant): X = rand(2000,2000); [D, RCOND] = det(X)

(e) Singular Value Decomposition (SVD), X = U*S*V: X = rand(2000,2000); [U, S, V] = svd(X)

(f) QR factorization (QR decomposition ともいう): X = rand(2000,2000); [Q, R, P] = qr(X)

(g) 分散共分散行列: X = rand(2000,2000); Y = rand(2000,2000); Z = cov(X, Y)

(h) 分散共分散行列の固有値と固有ベクトル(主成分分析): X = rand(2000,2000); [v, L] = eig( cov(X) )

(i) 2次元の畳み込み(コンボリューション): X = rand(2000,2000); B = rand(21); Z = conv2(X, B, 'full')
(j) 2次元の高速フーリエ変換 (FFT): X = rand(2000,2000); Z = fft2(X, 2000, 2000)
(k) convex hull: x = rand(1000000,1); y = rand(1000000,1); H = convhull(x, y)