MMDetection,MMFewShot のインストールと動作確認(画像分類,物体検出)(PyTorch,Python を使用)(Windows 上)
MMClassification は, OpenMMLab の構成物で, Few Shot Classification, Few Shot Detection の機能を提供する.
【目次】
【文献】
mmfewshot Contributors, OpenMMLab Few Shot Learning Toolbox and Benchmark, https://github.com/open-mmlab/mmfewshot, 2021.
【関連する外部ページ】
- MMFewShot の公式ドキュメント: https://mmfewshot.readthedocs.io
- MMFewShot のデモの公式ドキュメント: https://github.com/open-mmlab/mmfewshot/blob/main/demo/README.md MMFewShot の公式の学習済みモデル: https://github.com/open-mmlab/mmfewshot/blob/main/docs/en/model_zoo.md
前準備
Visual Studio 2022 Build Toolsとランタイムのインストール
管理者権限でコマンドプロンプトを起動(手順:Windowsキーまたはスタートメニュー > cmd と入力 > 右クリック > 「管理者として実行」)し、以下を実行する。管理者権限は、wingetの--scope machineオプションでシステム全体にソフトウェアをインストールするために必要である。
REM Visual Studio 2022 Build Toolsとランタイムをシステム領域にインストール
winget install --scope machine --wait --accept-source-agreements --accept-package-agreements Microsoft.VisualStudio.2022.BuildTools Microsoft.VCRedist.2015+.x64

REM インストーラーとインストールパスの設定
set "VS_INSTALLER=C:\Program Files (x86)\Microsoft Visual Studio\Installer\vs_installer.exe"
set VS_PATH="C:\Program Files (x86)\Microsoft Visual Studio\2022\BuildTools"

REM C++開発ワークロードのインストール
"%VS_INSTALLER%" modify --installPath "%VS_PATH%" --add Microsoft.VisualStudio.Workload.VCTools --includeRecommended --quiet --norestart
"%VS_INSTALLER%" modify --installPath "%VS_PATH%" --add Microsoft.VisualStudio.Component.VC.Tools.x86.x64 --includeRecommended --quiet --norestart
Python 3.7 のインストール(Windows 上)
Pythonは,プログラミング言語の1つ.
【手順】
- Windows で,管理者権限でコマンドプロンプトを起動(手順:Windowsキーまたはスタートメニュー >
cmdと入力 > 右クリック > 「管理者として実行」)。次のコマンドを実行
winget install --scope machine Python.Python.3.7
AI エディタ Windsurf のインストール
Pythonプログラムの編集・実行には、AI エディタの利用を推奨する。ここでは,Windsurfのインストールを説明する。
管理者権限でコマンドプロンプトを起動(手順:Windowsキーまたはスタートメニュー > cmd と入力 > 右クリック > 「管理者として実行」)し、以下を実行して、Windsurfをシステム全体にインストールする。管理者権限は、wingetの--scope machineオプションでシステム全体にソフトウェアをインストールするために必要となる。
winget install --scope machine --id Codeium.Windsurf -e --silent --accept-source-agreements --accept-package-agreements【関連する外部ページ】
Windsurf の公式ページ: https://windsurf.com/
Gitのインストール
管理者権限でコマンドプロンプトを起動(手順:Windowsキーまたはスタートメニュー > cmd と入力 > 右クリック > 「管理者として実行」)し、以下を実行する。管理者権限は、wingetの--scope machineオプションでシステム全体にソフトウェアをインストールするために必要となる。
REM Git をシステム領域にインストール
winget install --scope machine --id Git.Git -e --silent --accept-source-agreements --accept-package-agreements
REM Git のパス設定
set "GIT_PATH=C:\Program Files\Git\cmd"
for /f "skip=2 tokens=2*" %a in ('reg query "HKLM\SYSTEM\CurrentControlSet\Control\Session Manager\Environment" /v Path') do set "SYSTEM_PATH=%b"
if exist "%GIT_PATH%" (
    echo "%SYSTEM_PATH%" | find /i "%GIT_PATH%" >nul
    if errorlevel 1 setx PATH "%GIT_PATH%;%SYSTEM_PATH%" /M >nul
)
Build Tools for Visual Studio 2022,NVIDIA ドライバ,NVIDIA CUDA ツールキット 11.8,NVIDIA cuDNN 8.9.7 のインストール(Windows 上)
【サイト内の関連ページ】 NVIDIA グラフィックスボードを搭載しているパソコンの場合には, NVIDIA ドライバ, NVIDIA CUDA ツールキット, NVIDIA cuDNN のインストールを行う.
- Windows での Build Tools for Visual Studio 2022 のインストール: 別ページ »で説明
- Windows での NVIDIA ドライバ,NVIDIA CUDA ツールキット 11.8,NVIDIA cuDNN v8.9.7 のインストール手順: 別ページ »で説明
【関連する外部ページ】
- Build Tools for Visual Studio 2022 (ビルドツール for Visual Studio 2022)の公式ダウンロードページ: https://visualstudio.microsoft.com/ja/visual-cpp-build-tools/
- NVIDIA ドライバのダウンロードの公式ページ: https://www.nvidia.co.jp/Download/index.aspx?lang=jp
- NVIDIA CUDA ツールキットのアーカイブの公式ページ: https://developer.nvidia.com/cuda-toolkit-archive
- NVIDIA cuDNN のダウンロードの公式ページ: https://developer.nvidia.com/cudnn
PyTorch のインストール(Windows 上)
- Windows で,管理者権限でコマンドプロンプトを起動(手順:Windowsキーまたはスタートメニュー >
cmdと入力 > 右クリック > 「管理者として実行」)。 - PyTorch のページを確認
- 次のようなコマンドを実行(実行するコマンドは,PyTorch のページの表示されるコマンドを使う).
次のコマンドを実行することにより, PyTorch 2.3 (NVIDIA CUDA 11.8 用)がインストールされる. 但し,Anaconda3を使いたい場合には別手順になる.
事前に NVIDIA CUDA のバージョンを確認しておくこと(ここでは,NVIDIA CUDA ツールキット 11.8 が前もってインストール済みであるとする).
PyTorch で,GPU が動作している場合には,「torch.cuda.is_available()」により,True が表示される.
python -m pip install -U --ignore-installed pip
python -m pip uninstall -y torch torchvision torchaudio torchtext xformers
python -m pip install -U torch torchvision torchaudio numpy --index-url https://download.pytorch.org/whl/cu118

python -c "import torch; print(torch.__version__, torch.cuda.is_available())"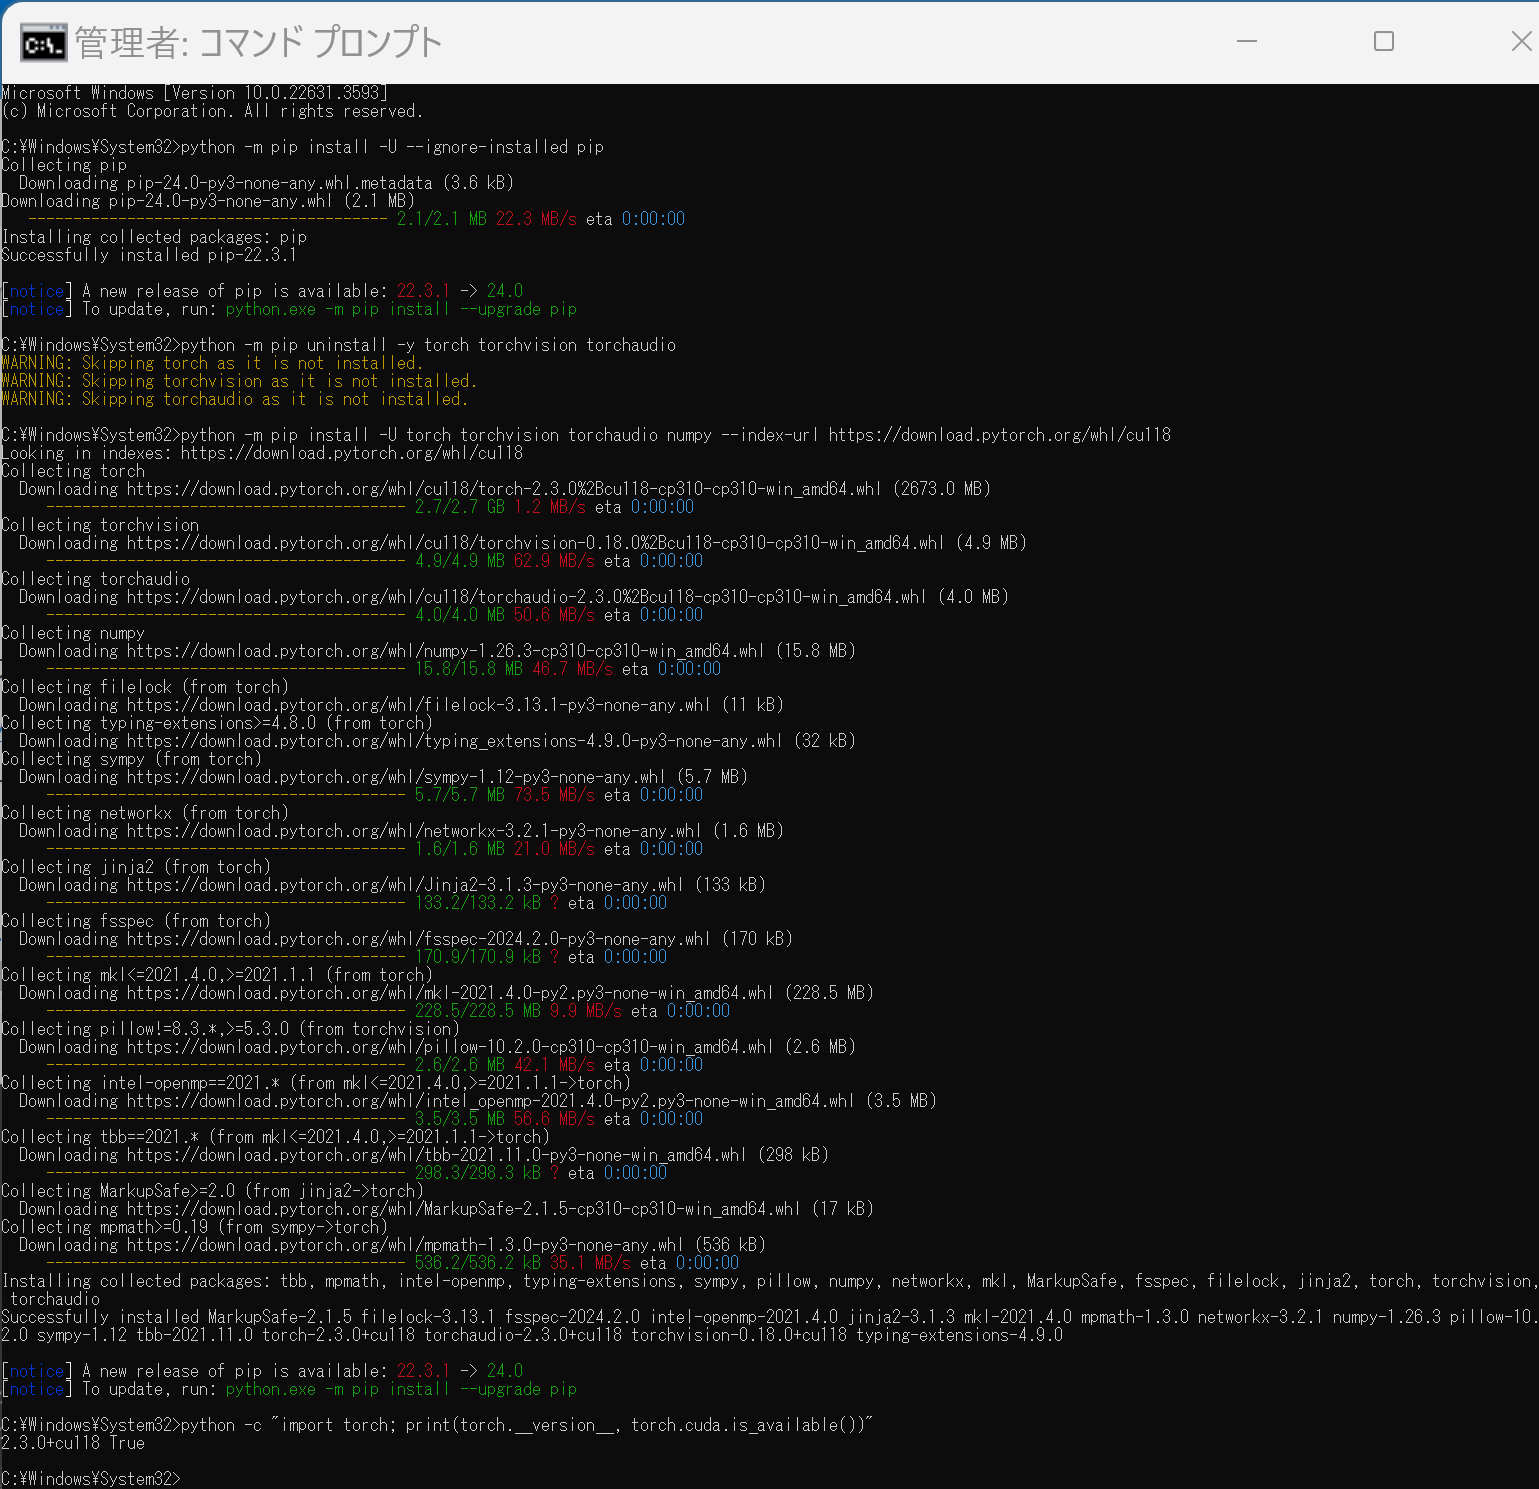
Anaconda3を使いたい場合には, Anaconda プロンプト (Anaconda Prompt) を管理者として実行し, 次のコマンドを実行する. (PyTorch と NVIDIA CUDA との連携がうまくいかない可能性があるため,Anaconda3を使わないことも検討して欲しい).
conda install -y pytorch torchvision torchaudio pytorch-cuda=11.8 cudnn -c pytorch -c nvidia py -c "import torch; print(torch.__version__, torch.cuda.is_available())"【サイト内の関連ページ】
【関連する外部ページ】
MMDetection, MMFewShot のインストール(Windows 上)
インストールの方法は複数ある. ここでは, NVIDIA CUDA ツールキットを使うことも考え, インストールしやすい方法として,ソースコードからビルドしてインストールする方法を案内している.
- Windows で,管理者権限でコマンドプロンプトを起動(手順:Windowsキーまたはスタートメニュー >
cmdと入力 > 右クリック > 「管理者として実行」)。 - PyTorch がインストールできていることを確認するために,PyTorch のバージョンを表示
python -c "import torch; TORCH_VERSION = '.'.join(torch.__version__.split('.')[:2]); print(TORCH_VERSION)"
- PyTorch が NVIDIA CUDA ツールキットを認識できていることを確認するために,
PyTorch が認識しているNVIDIA CUDA ツールキット のバージョンを表示
このとき,実際には 11.8 をインストールしているのに,「cu117」のように古いバージョンが表示されることがある.このような場合は,気にせずに続行する.
python -c "import torch; CUDA_VERSION = torch.__version__.split('+')[-1]; print(CUDA_VERSION)"
- MIM,MMDetection のインストール
インストール手順は, https://mmdetection.readthedocs.io/en/latest/get_started.html による.
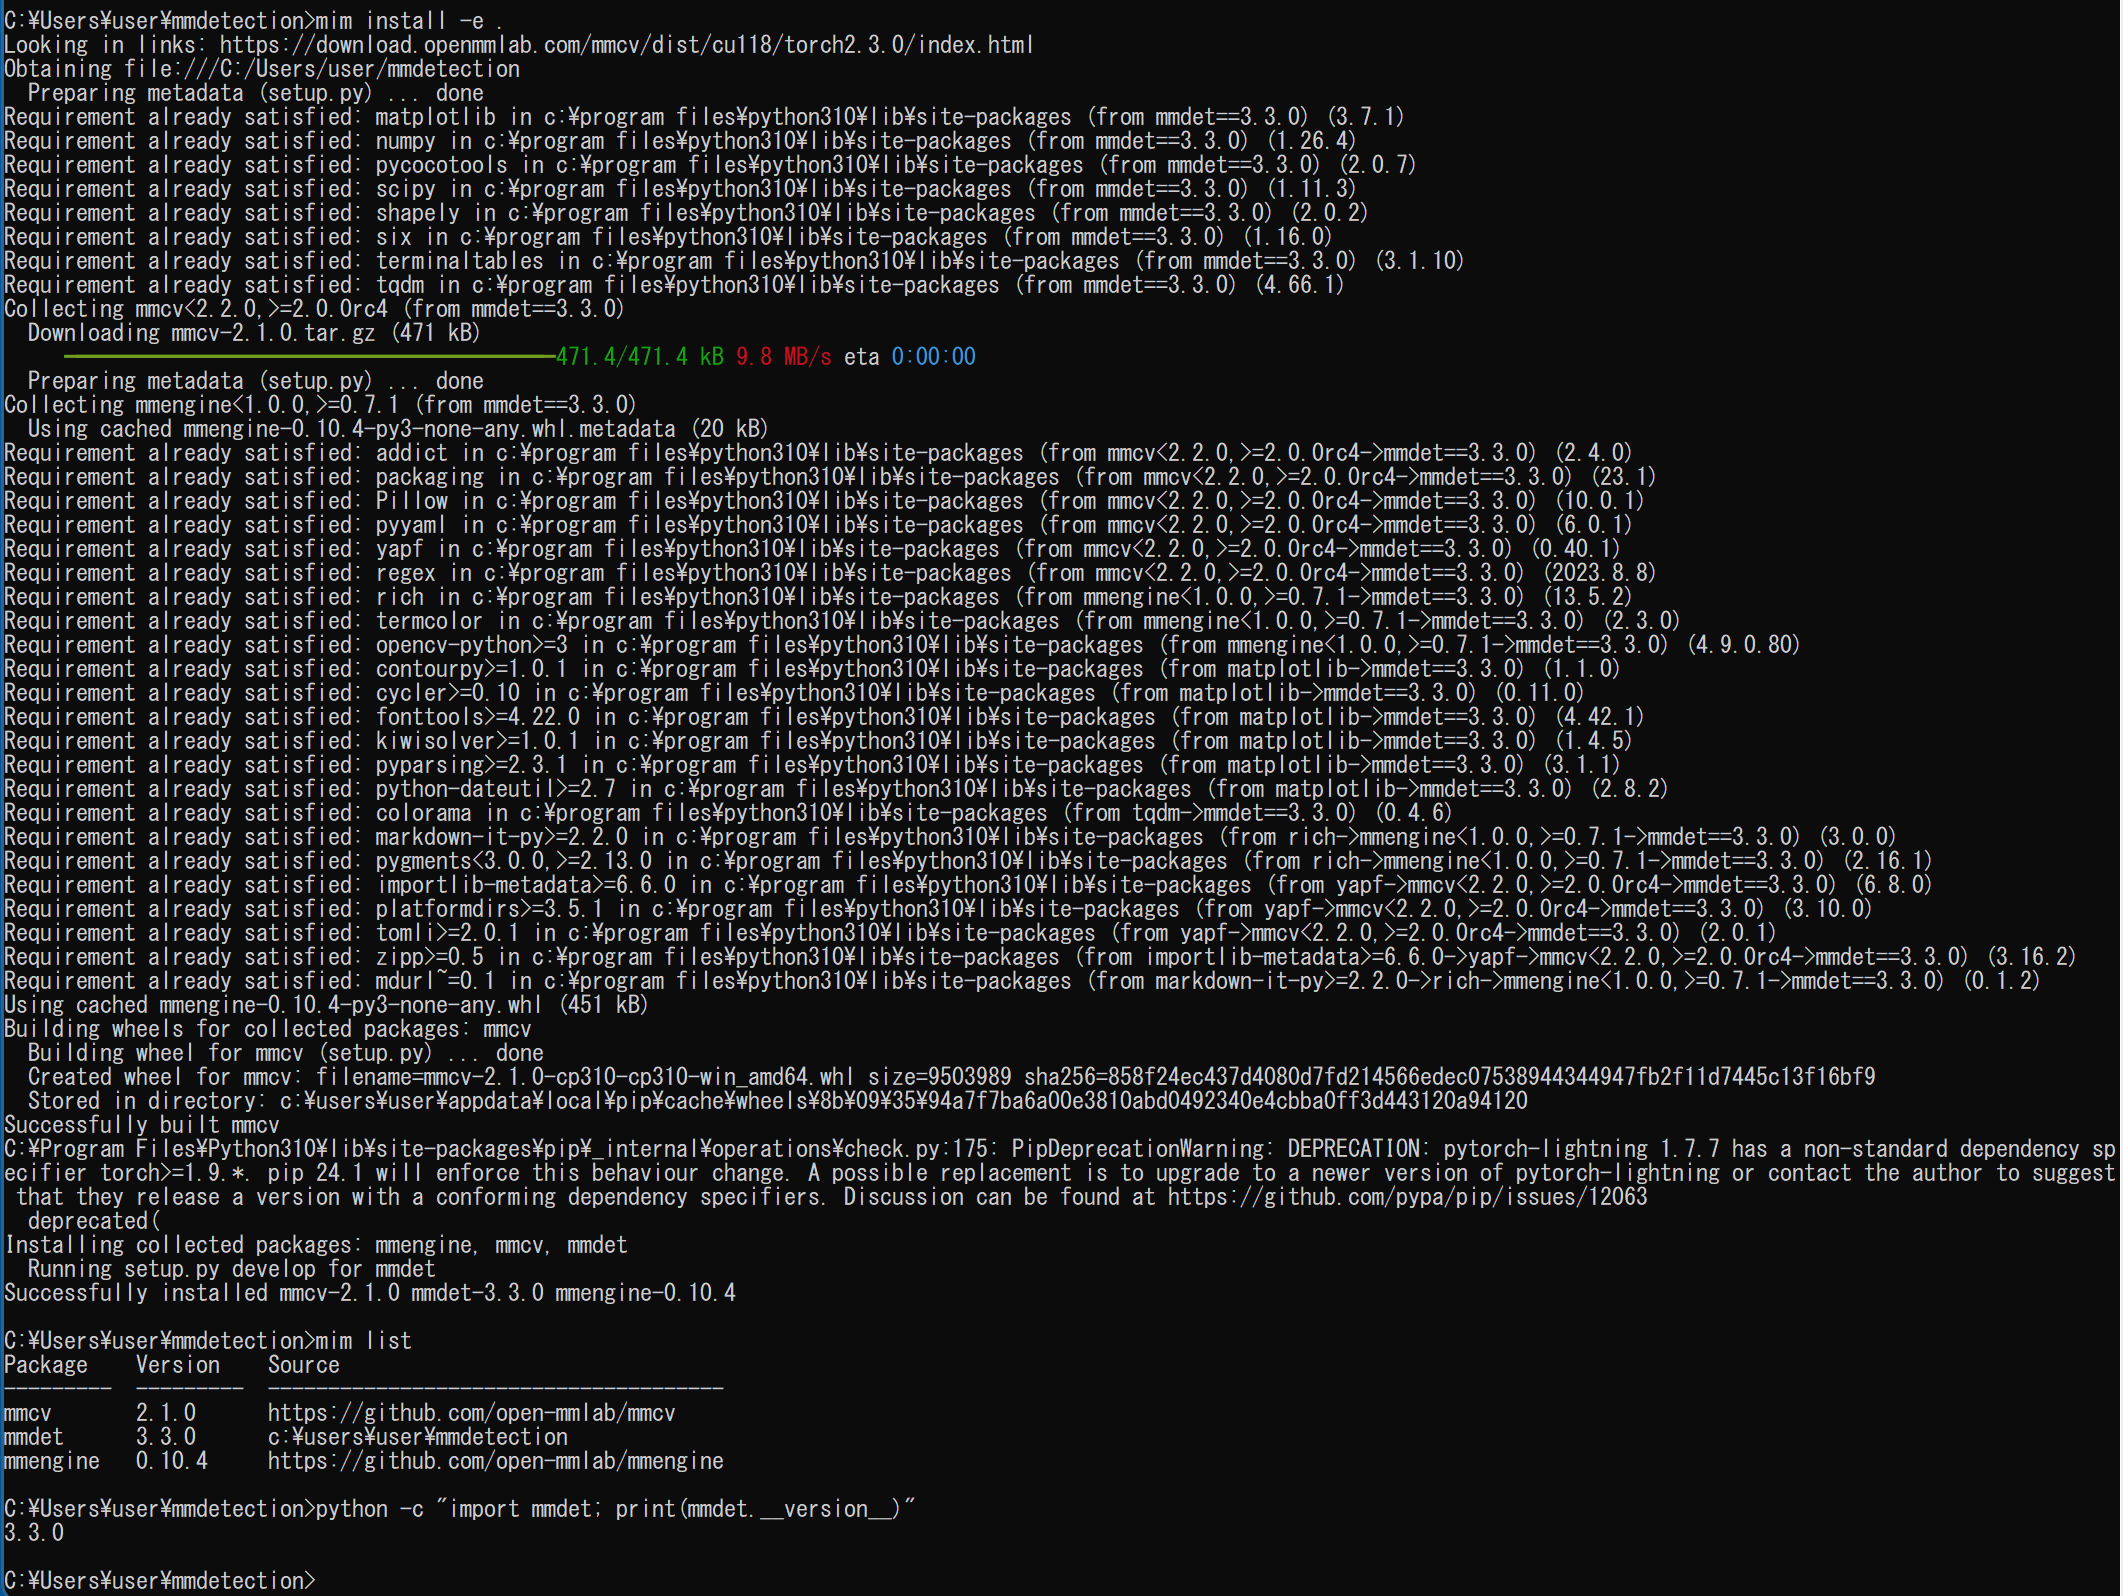
python -m pip install -U --ignore-installed pip
python -m pip uninstall -y openmim mmcv mmcv-full opencv-python opencv-python-headless
python -m pip install -U openmim opencv-python
cd /d c:%HOMEPATH%
rmdir /s /q mmdetection
git clone https://github.com/open-mmlab/mmdetection.git
cd mmdetection
mim uninstall -y mmdet
pip install -r requirements.txt
mim install -e .
mim list
(途中省略)
- MMFewShot のインストール
Python 3.7 もしくは 3.8 が必要である(2023年4月時点)
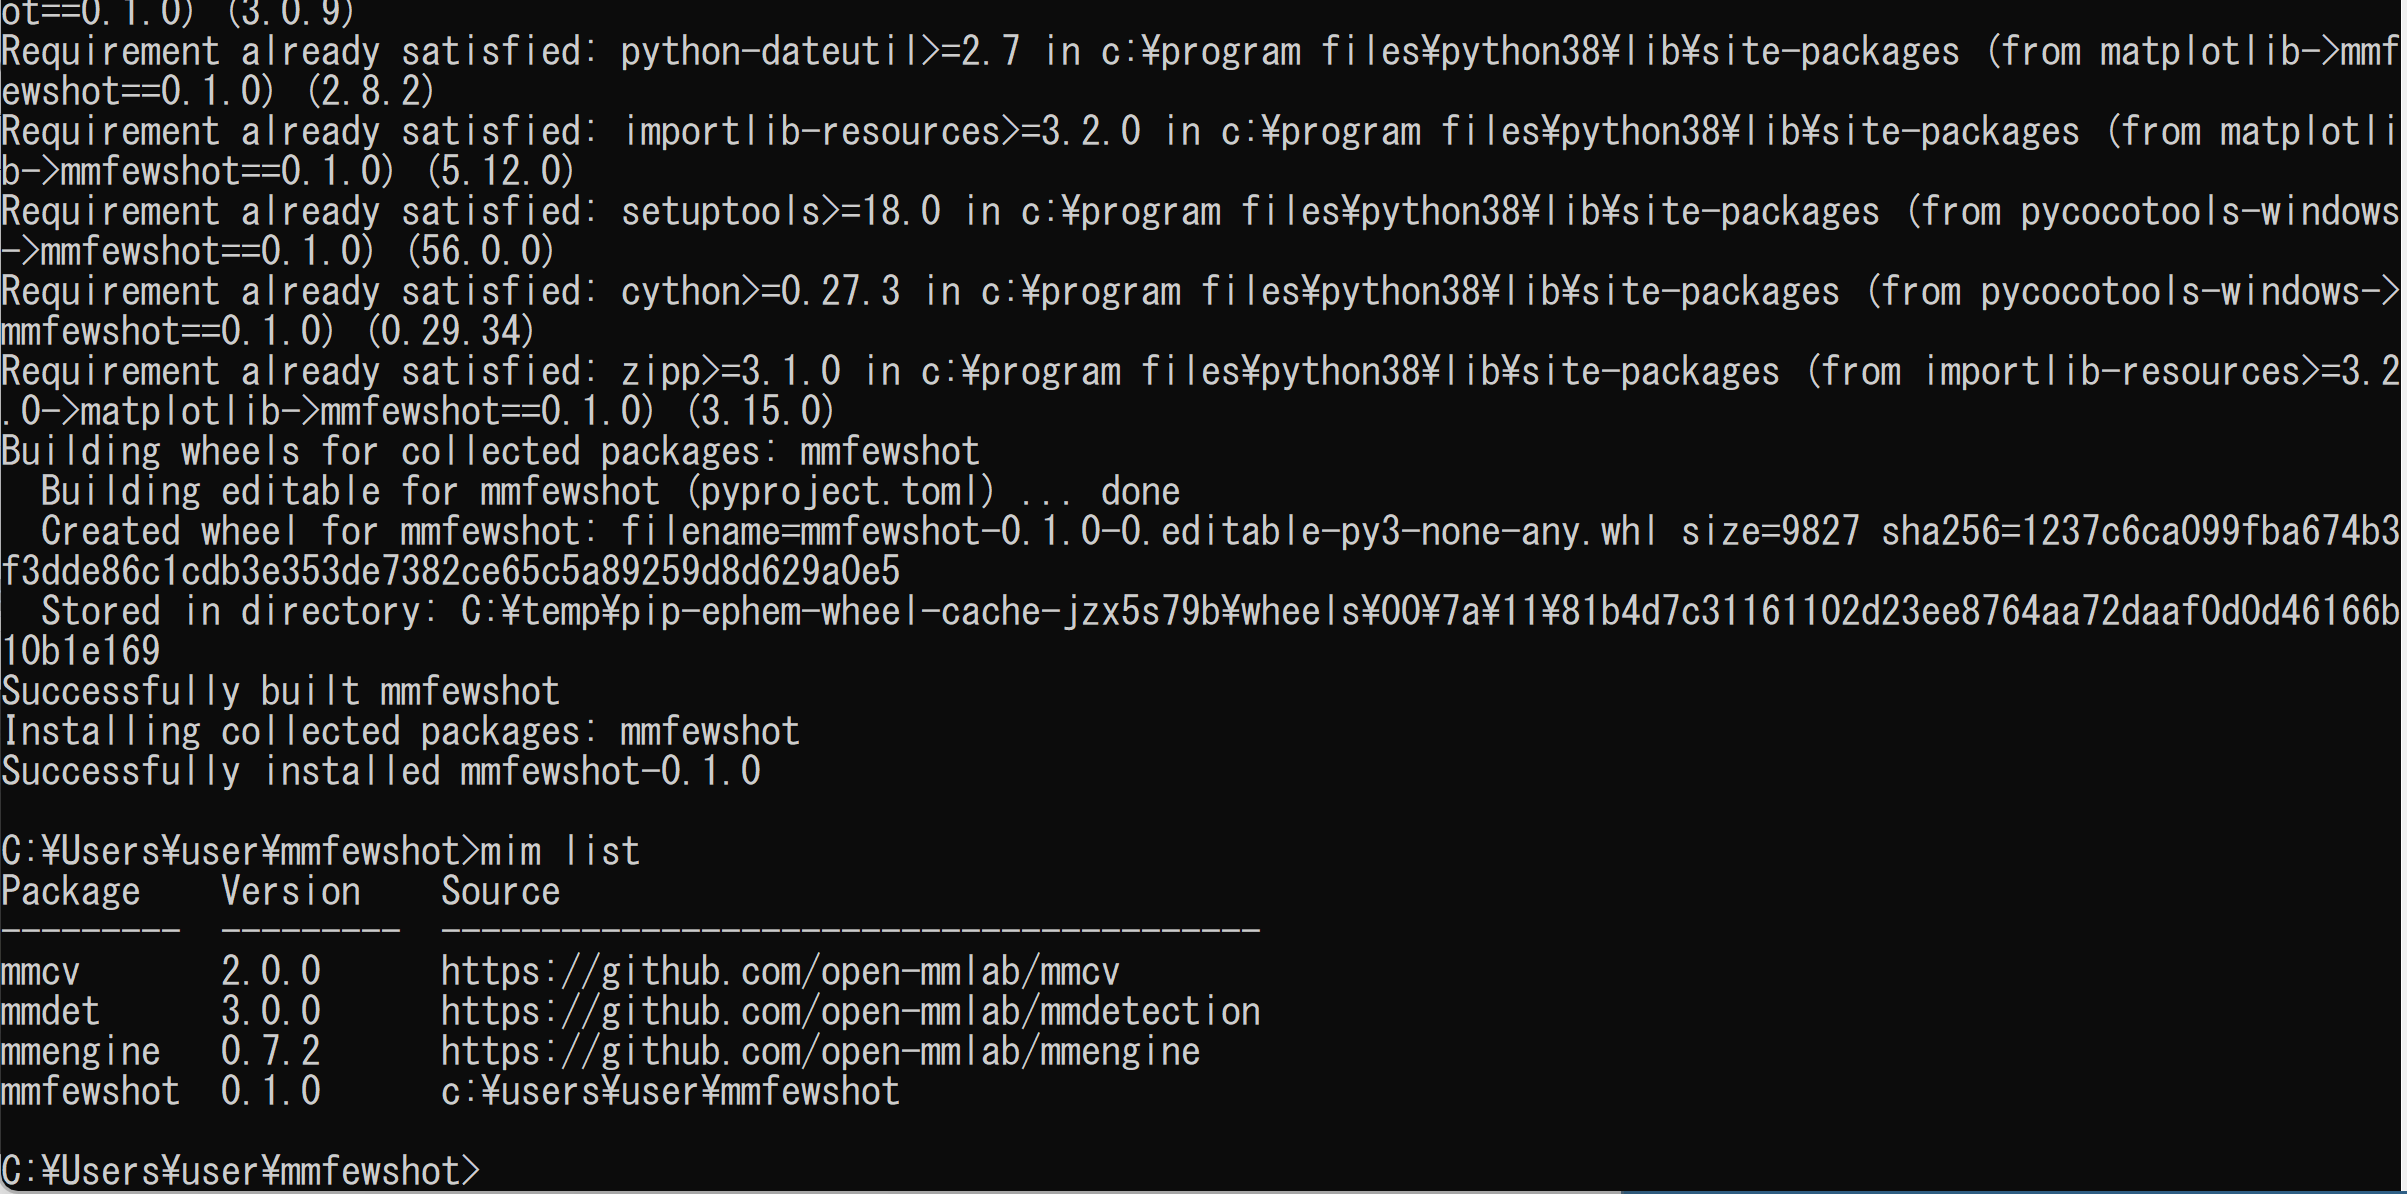
cd /d c:%HOMEPATH%
rmdir /s /q mmfewshot
git clone https://github.com/open-mmlab/mmfewshot.git
cd mmfewshot
mim uninstall -y mmfewshot
pip install -r requirements.txt
mim install -e .
mim list
(省略)
MMFewShot を用いた物体検出の実行(Windows 上)
セマンティック・セグメンテーション(ImageNet-1k, ResNet50 を使用)
- Windows で,管理者権限でコマンドプロンプトを起動(手順:Windowsキーまたはスタートメニュー >
cmdと入力 > 右クリック > 「管理者として実行」)。 - 事前学習済みモデルのダウンロード
次のコマンドを実行する.
cd /d c:%HOMEPATH%\mmfewshot
mkdir checkpoints
cd checkpoints
curl -O https://download.openmmlab.com/mmfewshot/detection/attention_rpn/coco/attention-rpn_r50_c4_4xb2_coco_base-training_20211102_003348-da28cdfd.pth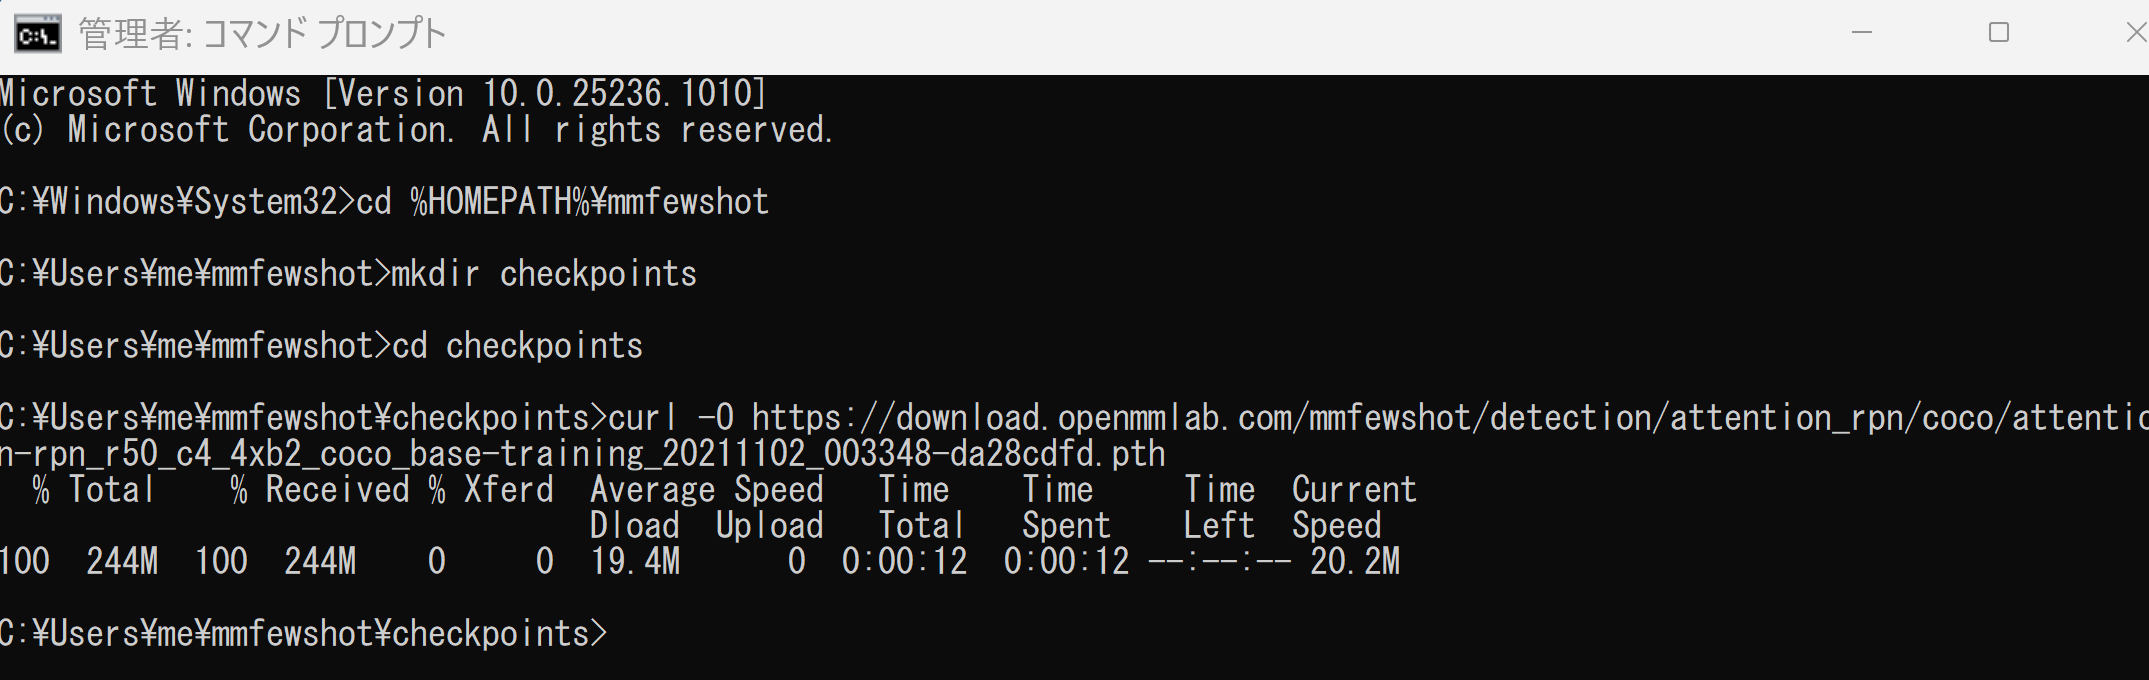
- セマンティック・セグメンテーションを行う Python プログラム
次の Python プログラムを実行する.Matplotlib を使うので,Jupyter QtConsole や Jupyter ノートブック (Jupyter Notebook) の利用が便利である.
下のプログラムは作成途中(動作未確認)
import os
from mmfewshot.detection.apis import (inference_detector, init_detector, process_support_images)

os.chdir((os.getenv('HOMEPATH') + '\\' + 'mmfewshow'))
config_file = 'configs/detection/attention_rpn/coco/attention-rpn_r50_c4_4xb2_coco_base-training.py'
checkpoint_file = 'checkpoints/attention-rpn_r50_c4_4xb2_coco_base-training_20211102_003348-da28cdfd.pth'
device = torch.device('cuda' if torch.cuda.is_available() else 'cpu')
model = init_detector(config_file,checkpoint_file, device=device)

fsupport_images_dir = 'demo/demo_detection_images/support_images'
files = os.listdir(fsupport_images_dir)
support_images = [
    os.path.join(fsupport_images_dir, file) for file in files
]
classes = [file.split('.')[0] for file in files]
support_labels = [[file.split('.')[0]] for file in files]
print("support_images")
display(support_images)
print("classes")
display(classes)
print("support_labels")
display(support_labels)
process_support_images(model, support_images, support_labels, classes=classes)

# single image
img = 'demo/demo_detection_images/query_images/demo_query.jpg'
fscore_thr = 0.3

# https://mmdetection.readthedocs.io/en/v3.0.0/user_guides/inference.html
from mmdet.registry import VISUALIZERS
visualizer = VISUALIZERS.build(model.cfg.visualizer)
visualizer.dataset_meta = model.dataset_meta

result = inference_detector(model, img)
image = mmcv.imconvert(mmcv.imread(img), 'bgr', 'rgb')
visualizer.add_datasample('result', image, data_sample=result, show=False, draw_gt=False)
mmcv.imshow(visualizer.get_image())
- Windows で,管理者権限でコマンドプロンプトを起動(手順:Windowsキーまたはスタートメニュー >