OpenBLAS のインストール(ソースコードを使用)(clang, flang を利用)(Windows 上)
BLAS(Basic Linear Algebra Subprograms)は,行列演算,ベクトル演算の機能をもったプログラム群である.
【目次】
- 前準備
- perl, nijna, clang, flang および関連パッケージのインストール(conda3 を使用)
- Windows で OpenBLAS をソースコードからビルドして,インストールする
- OpenBLAS の動作確認
OpenBLAS
OpenBLAS はオープンソースの BLAS(Basic Linear Algebra Subprograms)ライブラリである.行列演算や線形代数計算のための関数を提供する.
主な機能:行列乗算(DGEMM)などの関数,マルチスレッド対応,自動的にCPUを検出してコンパイル,
BLAS を用いたプログラムは, https://gist.github.com/xianyi/6930656 などで公開されている.
【BLAS の主な関数】
- Level 1 ベクトルとベクトルの演算
- DOT : 内積
- AXPY : AXPY 演算 ( y <- ax + y の形など)
- NORM : ノルム など
- Level 2 行列とベクトルと計算
- 行列とベクトルの積 ( y <- Ax )
- 行列の rank-1 更新 ( A <- A + xy' )
- Level 3 行列同士の演算
- 行列と行列の積 ( Z <- XY )
【関連する外部ページ】
- OpenBLAS の Web ページ: https://www.openblas.net/
前準備
Build Tools for Visual Studio 2022 (ビルドツール for Visual Studio 2022)または Visual Studio 2022 のインストール(Windows 上)
【インストールの判断】 Build Tools for Visual Studio は,開発ツールセットである. Visual Studio は統合開発環境であり,いくつかの種類があり,Build Tools for Visual Studioの機能を含むか連携して使用するものである.インストールは以下の基準で判断してください:
- Build Tools for Visual Studio の機能のみが必要な場合
- Visual Studio の機能が必要である,あるいは,よく分からない場合
Visual Studio 2022 をインストールする際に,「C++ によるデスクトップ開発」を選択することで, Build Tools for Visual Studio 2022 の機能も一緒にインストールされる.
不明な点がある場合は,Visual Studio 全体をインストール を行う方が良い.
Build Tools for Visual Studio 2022 のインストール(Windows 上)
- Windows で,管理者権限でコマンドプロンプトを起動(手順:Windowsキーまたはスタートメニュー >
cmdと入力 > 右クリック > 「管理者として実行」)。次のコマンドを実行
次のコマンドは,Build Tools for Visual Studio 2022と VC2015 再配布可能パッケージをインストールするものである.
winget install --scope machine Microsoft.VisualStudio.2022.BuildTools winget install --scope machine Microsoft.VCRedist.2015+.x64 - Build Tools for Visual Studio 2022 での C++ によるデスクトップ開発,CLI,ATL,MFC のインストール(Windows 上)
- Visual Studio Installer の起動
起動方法: スタートメニューの「Visual Studio Installer」を選ぶ.
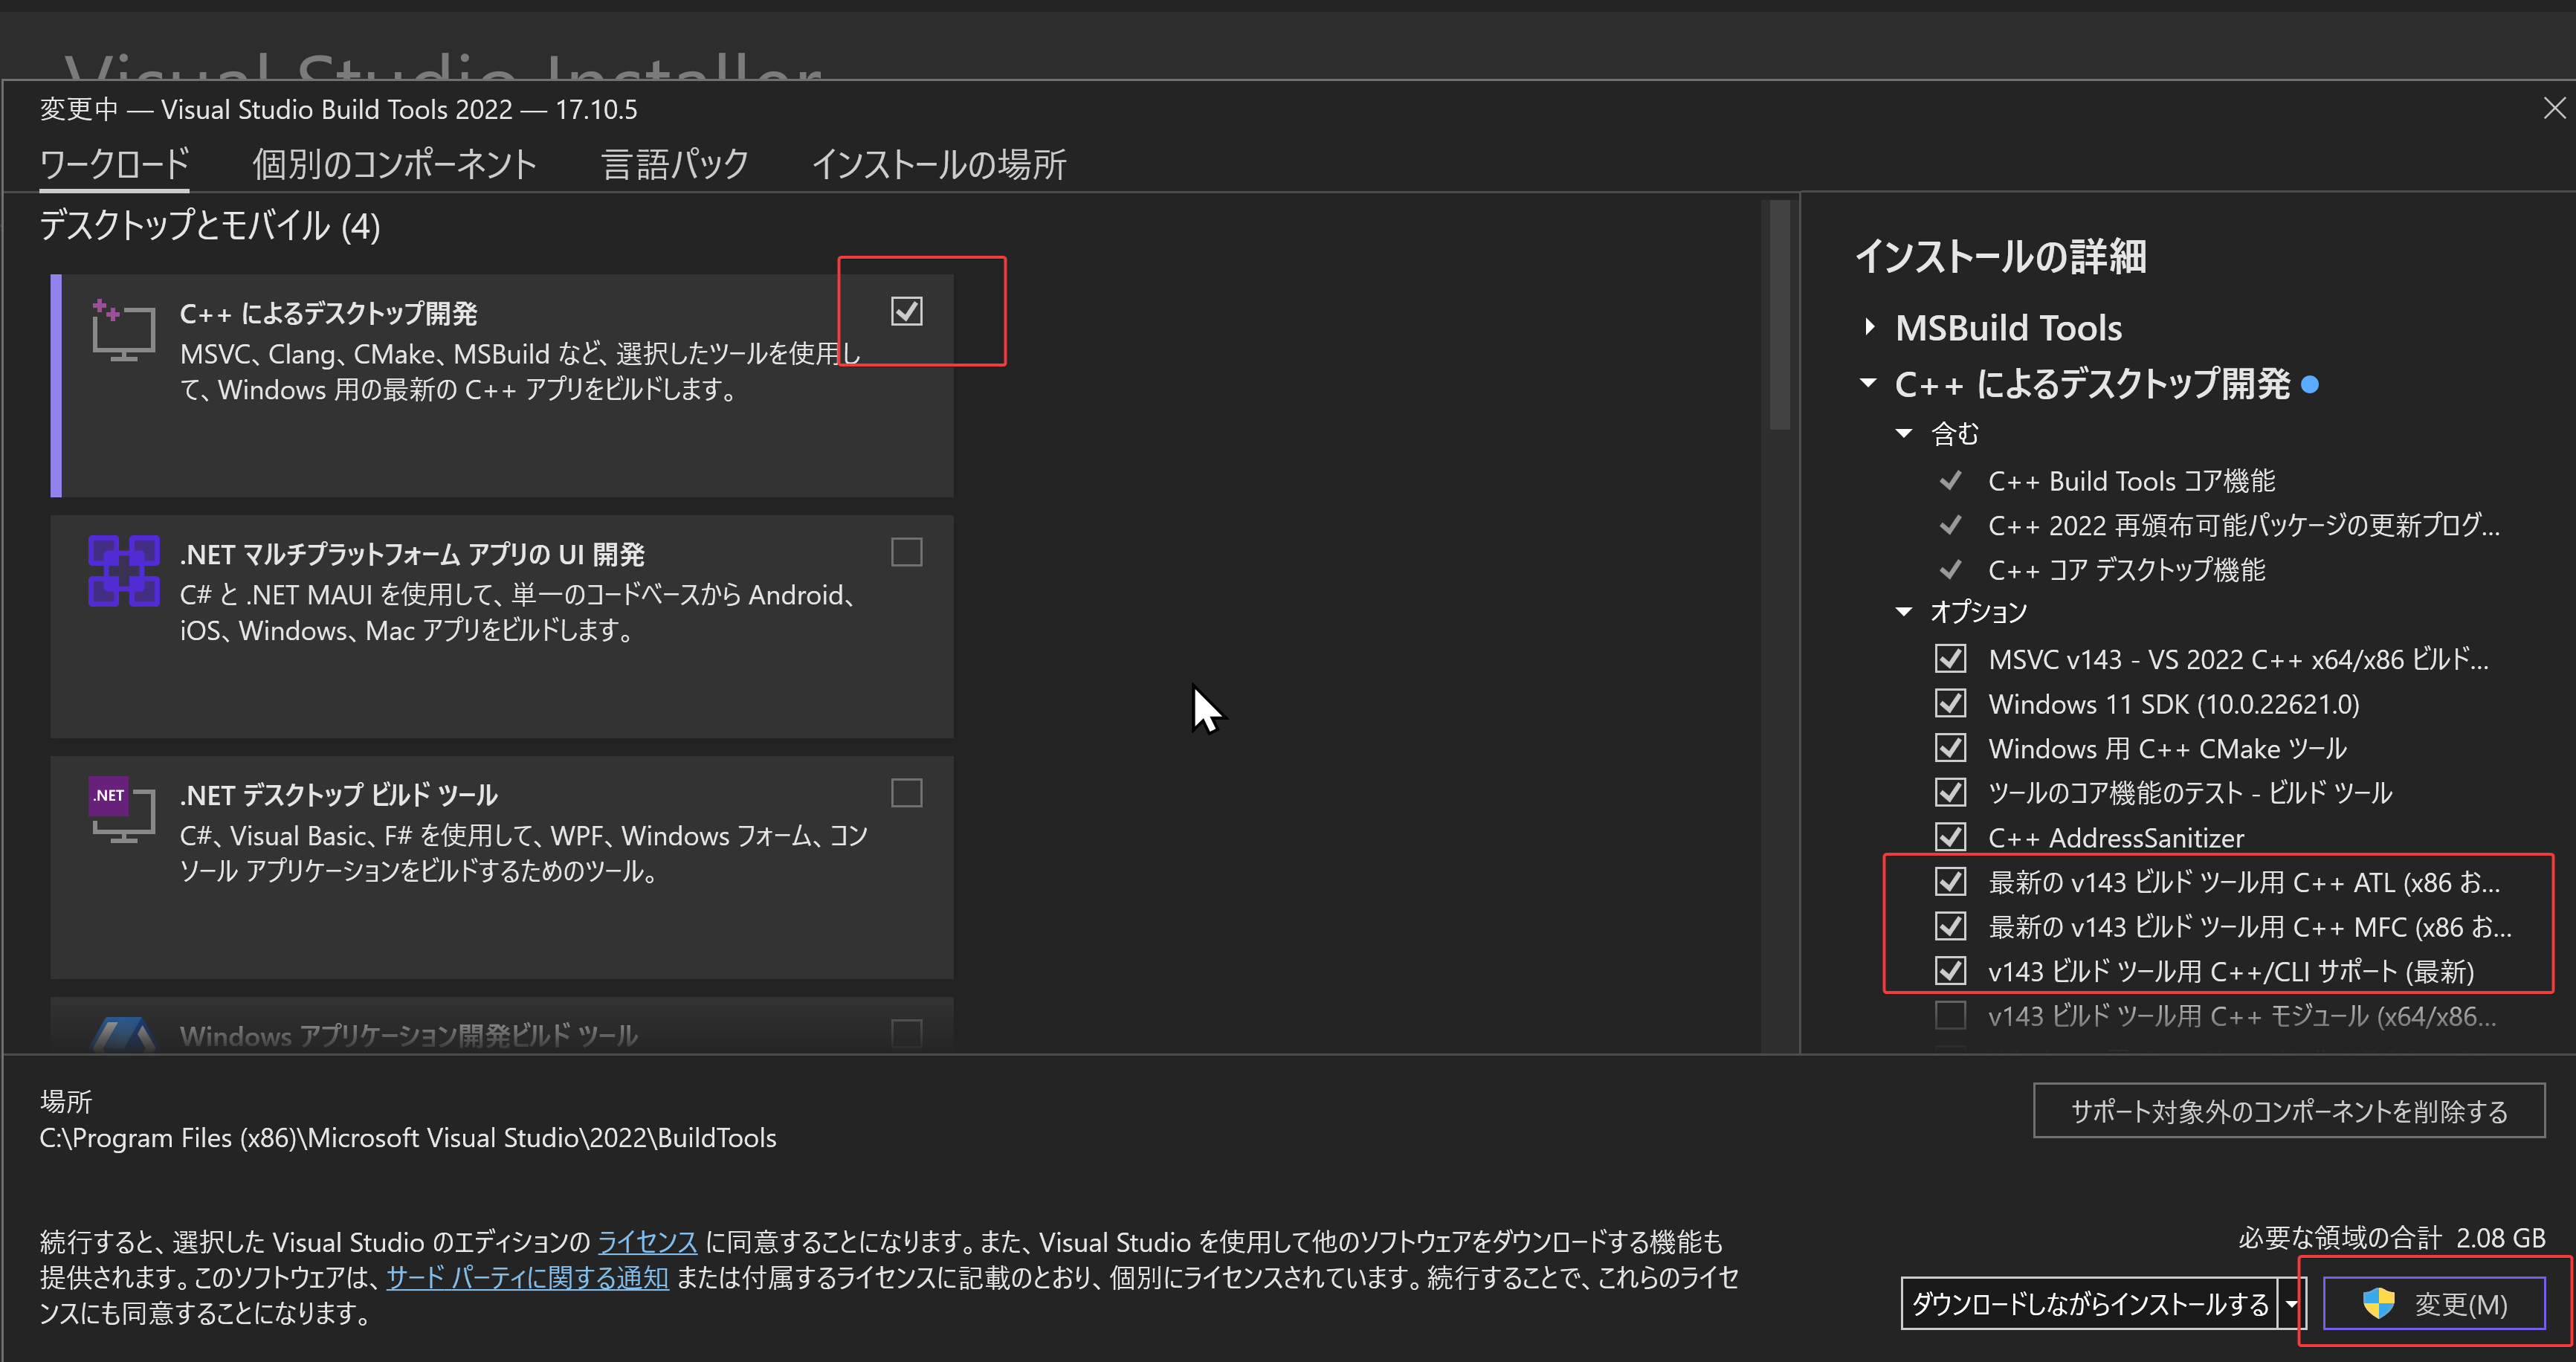
- Visual Studio Build Tools 2022 で「変更」を選ぶ.
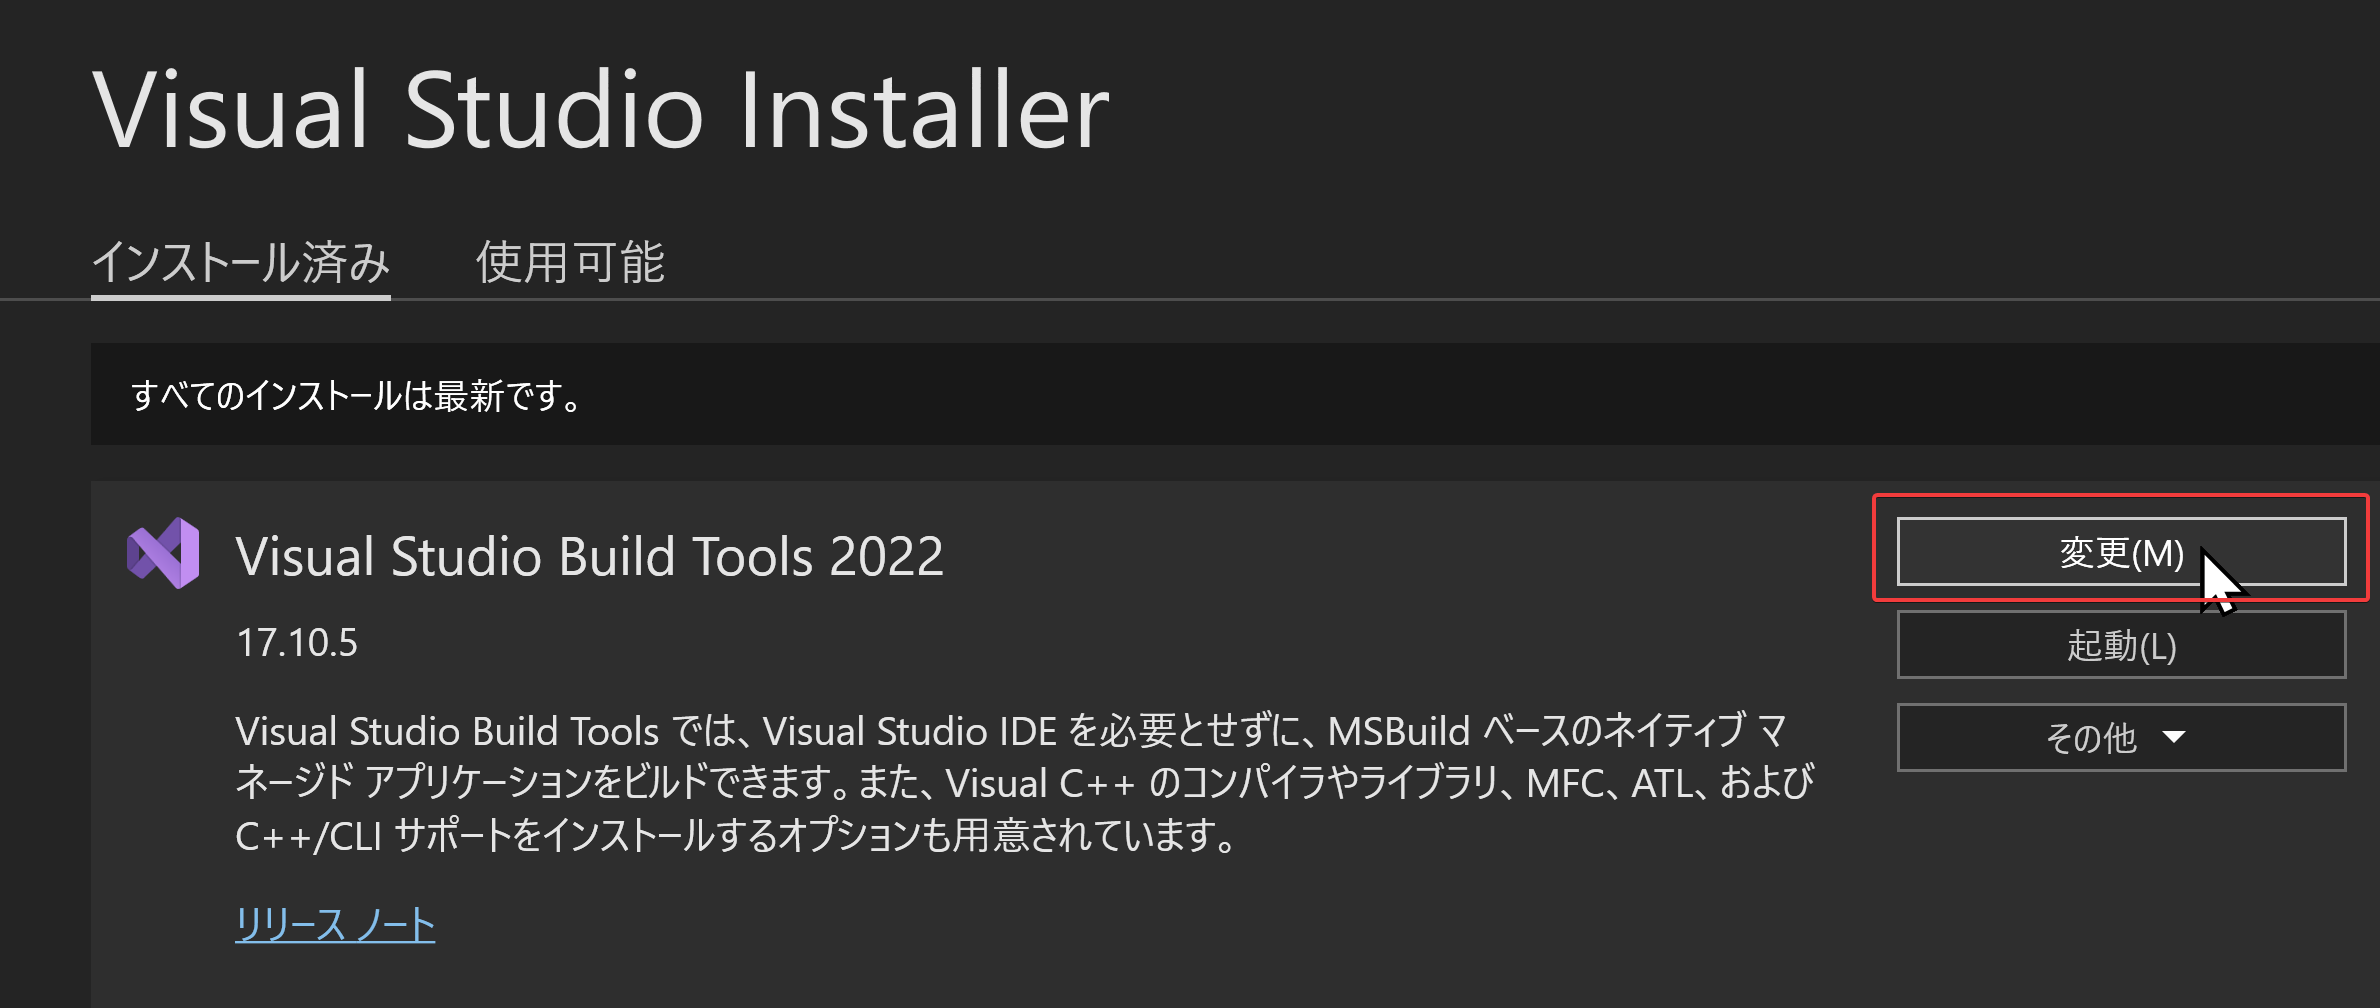
- 「C++ によるデスクトップ開発」をクリック.そして,画面右側の「インストール」の詳細で「v143 ビルドツール用 C++/CLI サポート(最新)」,「ATL」,「MFC」をチェックする.その後,「変更」をクリック.
- Visual Studio Installer の起動
Visual Studio のインストール(Windows 上)
- Windows で,管理者権限でコマンドプロンプトを起動(手順:Windowsキーまたはスタートメニュー >
cmdと入力 > 右クリック > 「管理者として実行」)。次のコマンドを実行
- 管理者権限でコマンドプロンプトを起動(手順:Windowsキーまたはスタートメニュー >
cmdと入力 > 右クリック > 「管理者として実行」)。 - インストールコマンドの実行
winget install Microsoft.VisualStudio.2022.Community --scope machine --override "--add Microsoft.VisualStudio.Workload.NativeDesktop Microsoft.VisualStudio.ComponentGroup.NativeDesktop.Core Microsoft.VisualStudio.Component.VC.CLI.Support Microsoft.VisualStudio.Component.CoreEditor Microsoft.VisualStudio.Component.NuGet Microsoft.VisualStudio.Component.Roslyn.Compiler Microsoft.VisualStudio.Component.TextTemplating Microsoft.VisualStudio.Component.Windows.SDK.Latest Microsoft.VisualStudio.Component.VC.Tools.x86.x64 Microsoft.VisualStudio.Component.VC.ATL Microsoft.VisualStudio.Component.VC.ATLMFC"
winget install Microsoft.VisualStudio.2022.Community --scope machine Microsoft.VCRedist.2015+.x64
インストールされるコンポーネントの説明:
NativeDesktop:C++によるデスクトップアプリケーション開発のためのワークロード一式NativeDesktop.Core:C++デスクトップ開発に必要な基本コンポーネント群VC.CLI.Support:マネージドコードとネイティブコードの統合開発を可能にするC++/CLIサポートCoreEditor:コード編集,デバッグ,検索などの基本機能を提供するVisual StudioのコアエディタNuGet:.NETライブラリの依存関係を管理するパッケージ管理システムWindows.SDK.Latest:Windows 向けアプリケーション開発用SDK(Software Development Kit)VC.Tools.x86.x64:32ビット及び64ビット向けC++コンパイラとビルドツールVC.ATL:Windowsコンポーネント開発用のActive Template LibraryVC.ATLMFC:デスクトップアプリケーション開発用のMicrosoft Foundation Class Library
システム要件と注意事項:
- 管理者権限でのインストールが必須
- 必要ディスク容量:10GB以上
- 推奨メモリ:8GB以上のRAM
- インストール過程でシステムの再起動が要求される可能性がある
- 安定したインターネット接続環境が必要
追加のコンポーネントが必要な場合は,Visual Studio Installerを使用して個別にインストールすることが可能である.
- インストール完了の確認
winget list Microsoft.VisualStudio.2022.Communityトラブルシューティング:
インストール失敗時は,以下のログファイルを確認:
%TEMP%\dd_setup_<timestamp>.log
%TEMP%\dd_bootstrapper_<timestamp>.log
- 管理者権限でコマンドプロンプトを起動(手順:Windowsキーまたはスタートメニュー >
- Visual Studio での C++ によるデスクトップ開発,CLI のインストール(Windows 上)
- Visual Studio Installer の起動
起動方法: スタートメニューの「Visual Studio Installer」を選ぶ.
- Visual Studio Community 2022 で「変更」を選ぶ.
- 「C++ によるデスクトップ開発」をチェック.そして,画面右側の「インストール」の詳細で「v143 ビルドツール用 C++/CLI サポート(最新)」をチェックする.その後,「インストール」をクリック.
- Visual Studio Installer の起動
Gitのインストール
管理者権限でコマンドプロンプトを起動(手順:Windowsキーまたはスタートメニュー > cmd と入力 > 右クリック > 「管理者として実行」)し、以下を実行する。管理者権限は、wingetの--scope machineオプションでシステム全体にソフトウェアをインストールするために必要となる。
REM Git をシステム領域にインストール
winget install --scope machine --id Git.Git -e --silent --accept-source-agreements --accept-package-agreements
REM Git のパス設定
set "GIT_PATH=C:\Program Files\Git\cmd"
for /f "skip=2 tokens=2*" %a in ('reg query "HKLM\SYSTEM\CurrentControlSet\Control\Session Manager\Environment" /v Path') do set "SYSTEM_PATH=%b"
if exist "%GIT_PATH%" (
    echo "%SYSTEM_PATH%" | find /i "%GIT_PATH%" >nul
    if errorlevel 1 setx PATH "%GIT_PATH%;%SYSTEM_PATH%" /M >nul
)
CMakeのインストール
管理者権限でコマンドプロンプトを起動(手順:Windowsキーまたはスタートメニュー > cmd と入力 > 右クリック > 「管理者として実行」)し、以下を実行する。管理者権限は、wingetの--scope machineオプションでシステム全体にソフトウェアをインストールするために必要となる。
REM CMake をシステム領域にインストール
winget install --scope machine --id machine Kitware.CMake -e --silent
REM CMake のパス設定
set "GMAKE_PATH=C:\Program Files\CMake\bin"
if exist "%GMAKE_PATH%" (
    echo "%PATH%" | find /i "%GMAKE_PATH%" >nul
    if errorlevel 1 setx PATH "%PATH%;%GMAKE_PATH%" /M >nul
)
perl, nijna, clang, flang および関連パッケージのインストール(conda を使用)
miniconda3 のインストール(Windows 上)
Anaconda をすでにインストール済みのときは,miniconda をインストールしないこと(Anaconda3 の中の conda を使うことにする)
Windows での miniconda3 のインストール手順は, 別ページ »で説明
perl, nijna, clang, flang および関連パッケージのインストール(conda を使用)
- Windows で,管理者権限でコマンドプロンプトを起動(手順:Windowsキーまたはスタートメニュー >
cmdと入力 > 右クリック > 「管理者として実行」)。 - perl, nijna, clang, flang および関連パッケージのインストール
https://github.com/xianyi/OpenBLAS/wiki/Installation-Guide の記述による
kitware/nijna の説明は https://github.com/Kitware/ninja
miniconda3 をインストールしたときに,パスを通していなかった場合は,「conda」と書く代わりに,「c:\tools\miniconda3\Library\bin\conda.bat」あるいは「C:\ProgramData\miniconda3\scripts\conda」のようにフルパスで指定する.
conda install -y perl
conda install -y -c conda-forge flang clangdev libflang
conda config --remove channels conda-forge
conda install -y -c isuruf kitware-ninja
conda config --remove channels isuruf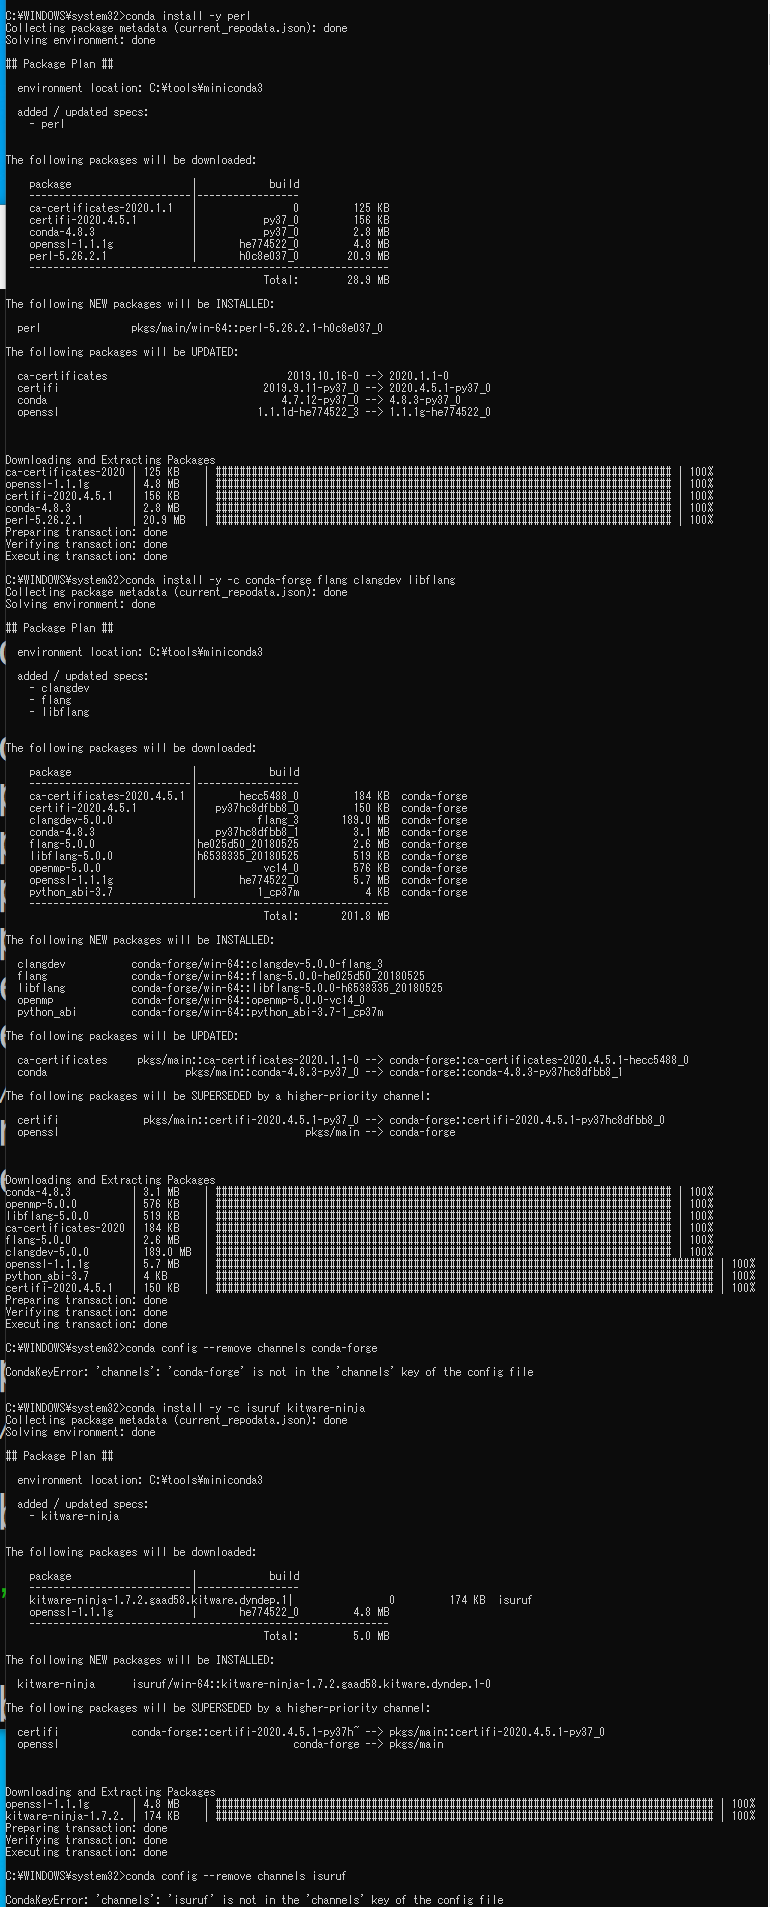
- 新しく、 Windows のコマンドプロンプトを開く
- OpenBLAS のインストールの前に、perl, cmake の確認
エラーメッセージが出なければ OK.
where perl
where cmake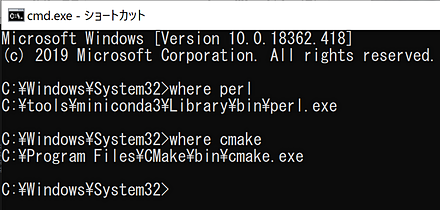
- clang, flang のバージョン、インストールディレクトリ等の確認
clang --version
flang --version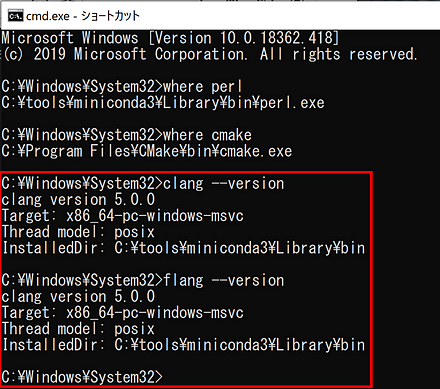
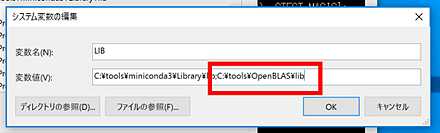
- システム環境変数 LIB の先頭に次を追加
miniconda3 の配下にインストールされたライブラリ等を有効にするため
「c:\tools\miniconda3」は実際のインストールディレクトリに置き換えること
c:\tools\miniconda3\Library\lib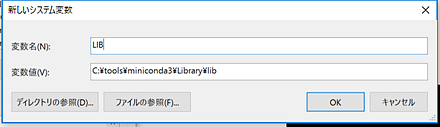
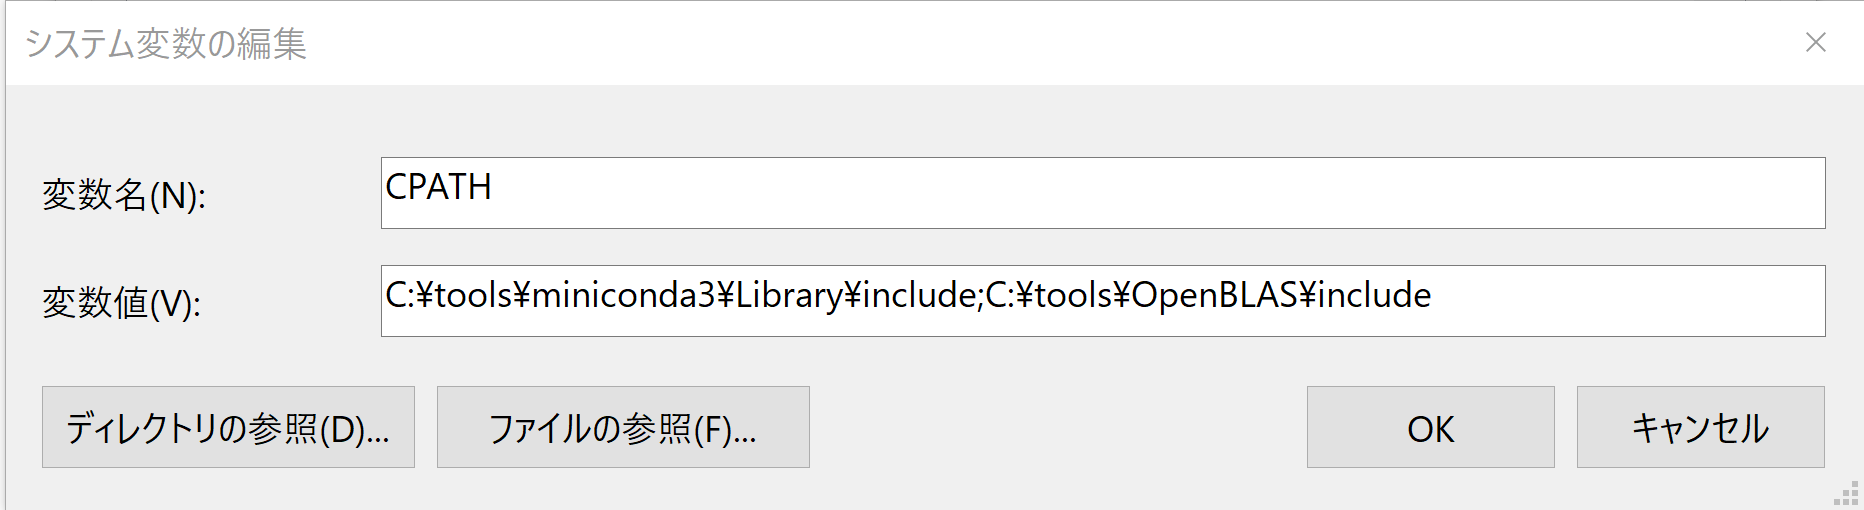
- システム環境変数 CPATH の先頭に次を追加
Anaconda3 の配下にインストールされたインクルードファイル等を有効にするため
「c:\tools\miniconda3」は実際のインストールディレクトリに置き換えること
c:\tools\miniconda3\Library\include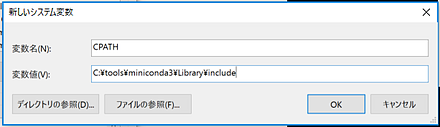
OpenBLAS のインストール(Windows 上)
【関連する外部ページ】 https://github.com/xianyi/OpenBLAS/wiki/Installation-Guide
- OpenBLAS のウェブページを開く
- このウェブページで利用条件などを確認
必ず、最新情報を確認すること
- Visual Studio の x64 Native Tools コマンドプロンプトを起動.
起動は,Windows のメニューで「Visual Studio 20..」の下の「x64 Native Tools コマンドプロンプト (x64 Native Tools Command Prompt)」を選ぶ.「x64」は,64ビット版の意味である.
「x64 Native Tools コマンドプロンプト (x64 Native Tools Command Prompt)」がないとき:
C++ ビルドツール (Build Tools) のインストールを行うことで, 「x64 Native Tools コマンドプロンプト (x64 Native Tools Command Prompt)」がインストールされる.その手順は,別ページ »で説明
- OpenBLAS のインストールディレクトリを空にする
mkdir c:\tools
cd c:\tools
rmdir /s /q OpenBLAS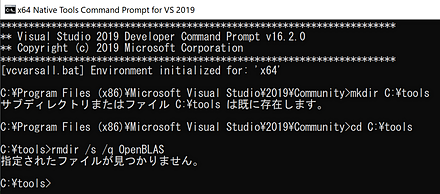
- ソースコードのダウンロード
cd c:\tools
git clone https://github.com/xianyi/OpenBLAS.git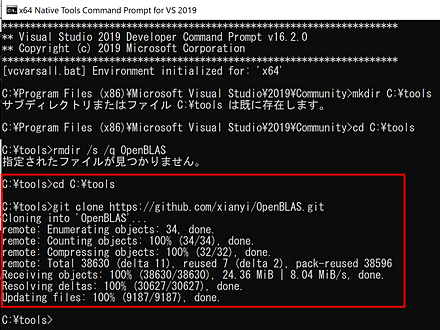
- cmake の実行
https://github.com/xianyi/OpenBLAS/wiki/Installation-Guide の記述による
cd c:\tools
cd OpenBLAS
rmdir /s /q build
mkdir build
cd build
del CMakeCache.txt
rmdir /s /q CMakeFiles\
cmake .. -G "Ninja" ^
    -DCMAKE_C_COMPILER=clang-cl ^
    -DCMAKE_Fortran_COMPILER=flang ^
    -DNOFORTRAN=0 -DDYNAMIC_ARCH=OFF ^
    -DCMAKE_INSTALL_PREFIX="c:\tools\OpenBLAS" ^
    -DCMAKE_BUILD_TYPE=Release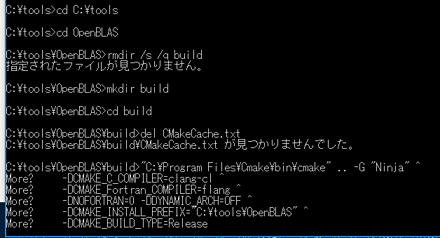
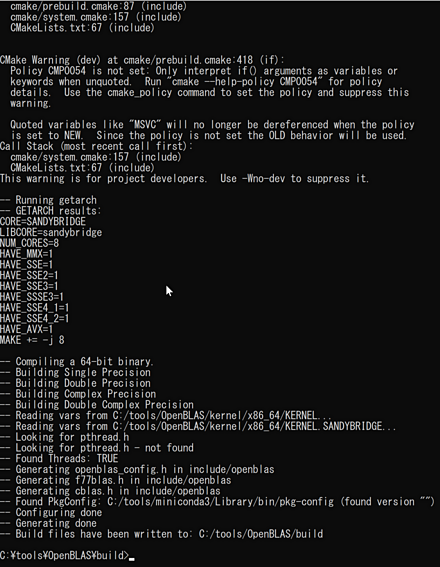
- cmake の結果の確認
エラーメッセージが出ていないこと
* ここでエラーが出た場合には、 「x64 Native Tools コマンドプロンプト」を使っていることを確認する * ここでエラーが出て、 「x64 Native Tools コマンドプロンプト」を使っている場合は、 システム環境変数 LIB、システム環境変数 CPATHを確認する
- ビルド
cmake --build . --config Release --target install
- ビルド結果の確認

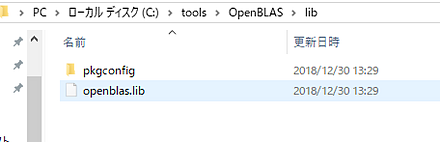
- c:\tools\OpenBLAS の下にファイルができるので確認する
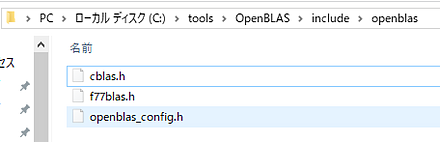
- Windows のシステム環境変数CPATH に c:\tools\OpenBLAS\include を追加
Windows での環境変数の設定は,マイコンピュータを右クリック → プロパティ→ 詳細設定 → 環境変数をクリック
Windows の画面の表示では、「\」(円マーク)が表示される
- システムの環境変数 CPATH
- 追加する値: c:\tools\OpenBLAS\include
- Windows のシステム環境変数 LIB に c:\tools\OpenBLAS\lib を追加
- システムの環境変数 LIB
- 追加する値: c:\tools\OpenBLAS\lib
- Windows の システム環境変数 Pathに,c:\tools\OpenBLAS\bin を追加することにより,パスを通す.
Windows で,管理者権限でコマンドプロンプトを起動(手順:Windowsキーまたはスタートメニュー >
cmdと入力 > 右クリック > 「管理者として実行」)。次のコマンドを実行
powershell -command "$oldpath = [System.Environment]::GetEnvironmentVariable(\"Path\", \"Machine\"); $oldpath += \";c:\tools\OpenBLAS\bin\"; [System.Environment]::SetEnvironmentVariable(\"Path\", $oldpath, \"Machine\")"
- Windows のシステム環境変数 OpenBLAS, OpenBLAS_HOME に c:\tools\OpenBLAS を設定
これは OpenCV のビルドのときに利用される環境変数
- システムの環境変数 OpenBLAS_HOME
- 値: c:\tools\OpenBLAS
OpenBLAS の動作確認
https://gist.github.com/xianyi/6930656 に掲載の プログラムを利用
Windows での確認手順と結果は次の通り
- Visual Studio の x64 Native Tools コマンドプロンプトを起動.
起動は,Windows のメニューで「Visual Studio 20..」の下の「x64 Native Tools コマンドプロンプト (x64 Native Tools Command Prompt)」を選ぶ.「x64」は,64ビット版の意味である.
「x64 Native Tools コマンドプロンプト (x64 Native Tools Command Prompt)」がないとき:
C++ ビルドツール (Build Tools) のインストールを行うことで, 「x64 Native Tools コマンドプロンプト (x64 Native Tools Command Prompt)」がインストールされる.その手順は,別ページ »で説明
- プログラムの準備
https://gist.github.com/xianyi/6930656 に掲載の プログラムを利用. hoge.cのようなファイル名で保存.
- ビルドして実行
ビルド時にエラーが出たときは、システム環境変数 LIB を確認すること
cl hoge.c /I "c:\tools\OpenBLAS\include\openblas" openblas.lib
.\hoge.exe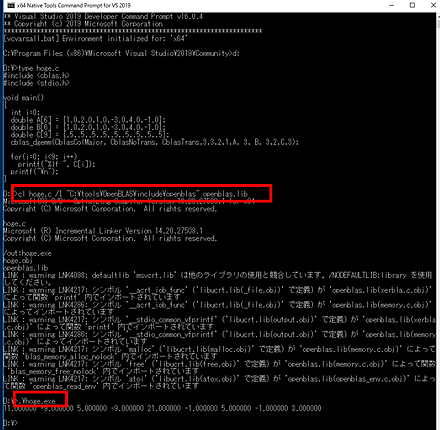
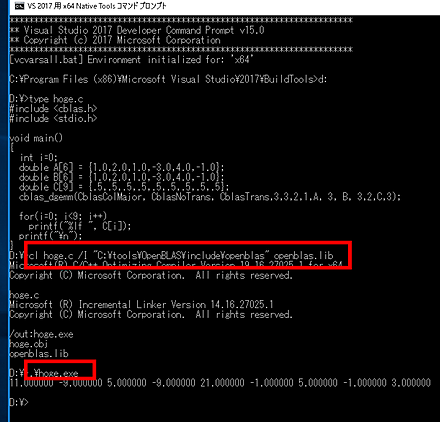
サンプルプログラム
OpenBLAS を用いて行列の積を求める.実行結果は何も表示されない.
#include "stdafx.h"
#include<stdlib.h>
#include<cblas.h>
#define N 2000

int main()
{
	// C = AB
	int i;
	double *A, *B, *C;

	A = (double *)malloc(sizeof(double) * N * N);
	B = (double *)malloc(sizeof(double) * N * N);
	C = (double *)malloc(sizeof(double) * N * N);

	for (i = 0; i < N * N; i++) {
		A[i] = (double)rand() / RAND_MAX;
		B[i] = (double)rand() / RAND_MAX;
	}
	cblas_dgemm(CblasRowMajor, CblasNoTrans, CblasNoTrans, N, N, N, 1.0, A, N, B, N, 0.0, C, N);

	free(A);
	free(B);
	free(C);

	return 0;
}