COLMAP 3.8 のインストールと3次元再構成の実行(COLMAP 3.8 を使用)(Windows 上)
【目次】
COLMAP
COLMAP は 3次元再構成の機能を持ったソフトウェア.
【文献】
Johannes L. Schonberger, Jan-Michael Frahm, Structure-From-Motion Revisited, CVPR 2016, 2016
【サイト内の関連ページ】
- COLMAP のインストールと3次元再構成の実行(COLMAP のソースコード,vcpkgm, Visual Studio Community 2019 を使用)(Windows 上): 別ページ »で説明
【関連する外部ページ】
- Papers with Code の colmap のページ: https://paperswithcode.com/paper/structure-from-motion-revisited
- COLMAP の公式ページ(公式リリース,Vocabulary tree, データセットへのリンクなど): https://demuc.de/colmap
- COLMAP の公式の説明: https://colmap.github.io
- COLMAP を公開している公式ページ: https://github.com/colmap/colmap/releases
- Gerrard Hall, Craham Hall, Person Hall, South Building データセット: https://colmap.github.io/datasets.html
前準備
Build Tools for Visual Studio 2022 のインストール(Windows 上)
Build Tools for Visual Studio は,Visual Studio の IDE を含まない C/C++ コンパイラ,ライブラリ,ビルドツール等のコマンドライン向け開発ツールセットである。
以下のコマンドを管理者権限のコマンドプロンプトで実行する
(手順:Windowsキーまたはスタートメニュー → cmd と入力 → 右クリック → 「管理者として実行」)。
REM VC++ ランタイム
winget install --scope machine --id Microsoft.VCRedist.2015+.x64 -e --silent --disable-interactivity --force --accept-source-agreements --accept-package-agreements --override "/quiet /norestart"

REM Build Tools + Desktop development with C++(VCTools)+ 追加コンポーネント(一括)
winget install --id Microsoft.VisualStudio.2022.BuildTools --accept-source-agreements --accept-package-agreements ^
    --override "--passive --wait --norestart --add Microsoft.VisualStudio.Workload.VCTools --includeRecommended --add Microsoft.VisualStudio.Component.VC.Llvm.Clang --add Microsoft.VisualStudio.ComponentGroup.ClangCL --add Microsoft.VisualStudio.Component.VC.CMake.Project --add Microsoft.VisualStudio.Component.Windows11SDK.26100"
--add で追加されるコンポーネント
上記のコマンドでは,まず Build Tools 本体と Visual C++ 再頒布可能パッケージをインストールし,次に setup.exe を用いて以下のコンポーネントを追加している。
VCTools:C++ デスクトップ開発ワークロード(--includeRecommendedにより、MSVC コンパイラ、C++ AddressSanitizer、vcpkg、CMake ツール、Windows 11 SDK 等の推奨コンポーネントが含まれる)VC.Llvm.Clang:Windows 向け C++ Clang コンパイラClangCL:clang-cl ツールセットを含むコンポーネントグループ(MSBuild から Clang を使用するために必要)VC.CMake.Project:Windows 向け C++ CMake ツールWindows11SDK.26100:Windows 11 SDK(ビルド 10.0.26100)
インストール完了の確認
winget list Microsoft.VisualStudio.2022.BuildTools上記以外の追加のコンポーネントが必要になった場合は Visual Studio Installer で個別にインストールできる。
Visual Studio の機能を必要とする場合は、追加インストールできる。
Git のインストール(Windows 上) [クリックして展開]
管理者権限のコマンドプロンプトで以下を実行する.管理者権限は,winget の --scope machine オプションでシステム全体にインストールするために必要となる.
REM Git をシステム領域にインストール
winget install --scope machine --id Git.Git -e --silent --disable-interactivity --force --accept-source-agreements --accept-package-agreements --override "/VERYSILENT /NORESTART /NOCANCEL /SP- /CLOSEAPPLICATIONS /RESTARTAPPLICATIONS /COMPONENTS=""icons,ext\reg\shellhere,assoc,assoc_sh"" /o:PathOption=Cmd /o:CRLFOption=CRLFCommitAsIs /o:BashTerminalOption=MinTTY /o:DefaultBranchOption=main /o:EditorOption=VIM /o:SSHOption=OpenSSH /o:UseCredentialManager=Enabled /o:PerformanceTweaksFSCache=Enabled /o:EnableSymlinks=Disabled /o:EnableFSMonitor=Disabled"
Build Tools for Visual Studio 2022,NVIDIA ドライバ,NVIDIA CUDA ツールキット 11.8,NVIDIA cuDNN 8.9.7 のインストール(Windows 上)
【サイト内の関連ページ】 NVIDIA グラフィックスボードを搭載しているパソコンの場合には, NVIDIA ドライバ, NVIDIA CUDA ツールキット, NVIDIA cuDNN のインストールを行う.
- Windows での Build Tools for Visual Studio 2022 のインストール: 別ページ »で説明
- Windows での NVIDIA ドライバ,NVIDIA CUDA ツールキット 11.8,NVIDIA cuDNN v8.9.7 のインストール手順: 別ページ »で説明
【関連する外部ページ】
- Build Tools for Visual Studio 2022 (ビルドツール for Visual Studio 2022)の公式ダウンロードページ: https://visualstudio.microsoft.com/ja/visual-cpp-build-tools/
- NVIDIA ドライバのダウンロードの公式ページ: https://www.nvidia.co.jp/Download/index.aspx?lang=jp
- NVIDIA CUDA ツールキットのアーカイブの公式ページ: https://developer.nvidia.com/cuda-toolkit-archive
- NVIDIA cuDNN のダウンロードの公式ページ: https://developer.nvidia.com/cudnn
COLMAP 3.8 のインストールと3次元再構成の実行
COLMAP 3.8 のインストール
- 以下の操作を管理者権限のコマンドプロンプトで実行する
(手順:Windowsキーまたはスタートメニュー →
cmdと入力 → 右クリック → 「管理者として実行」)。 - ダウンロードとインストール
次のコマンドを実行
cd C:\
mkdir COLMAP-3.8-windows-cuda
cd COLMAP-3.8-windows-cuda
curl -L -O https://github.com/colmap/colmap/releases/download/3.8/COLMAP-3.8-windows-cuda.zip
powershell -command "Expand-Archive -DestinationPath .. -Path COLMAP-3.8-windows-cuda.zip"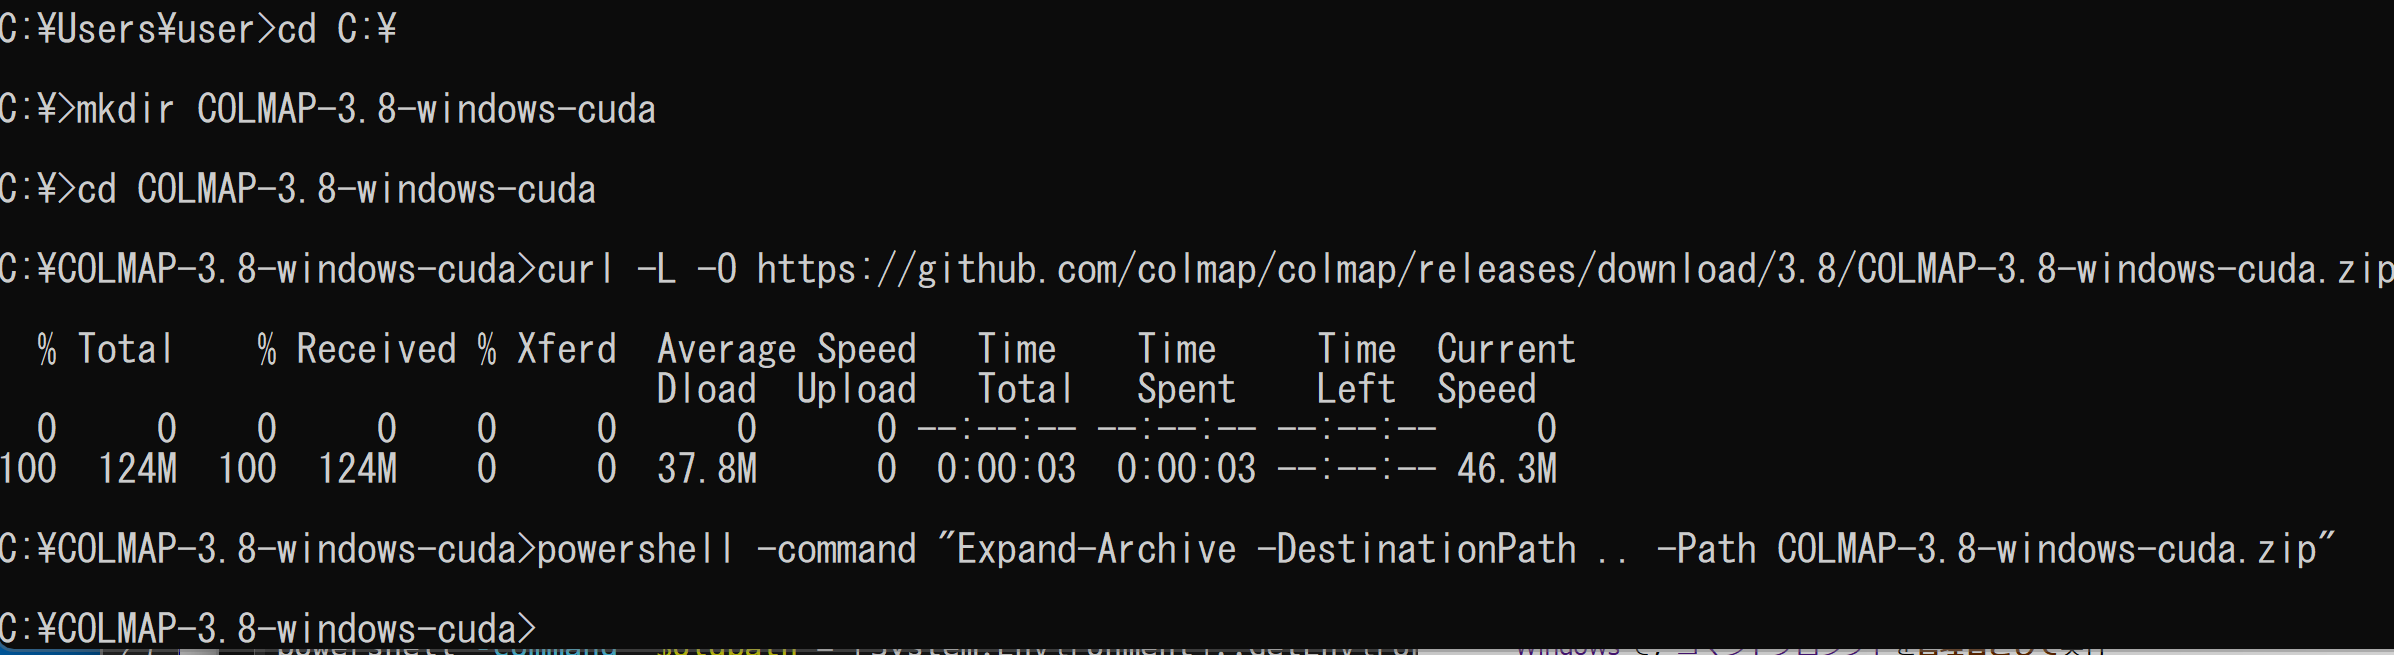
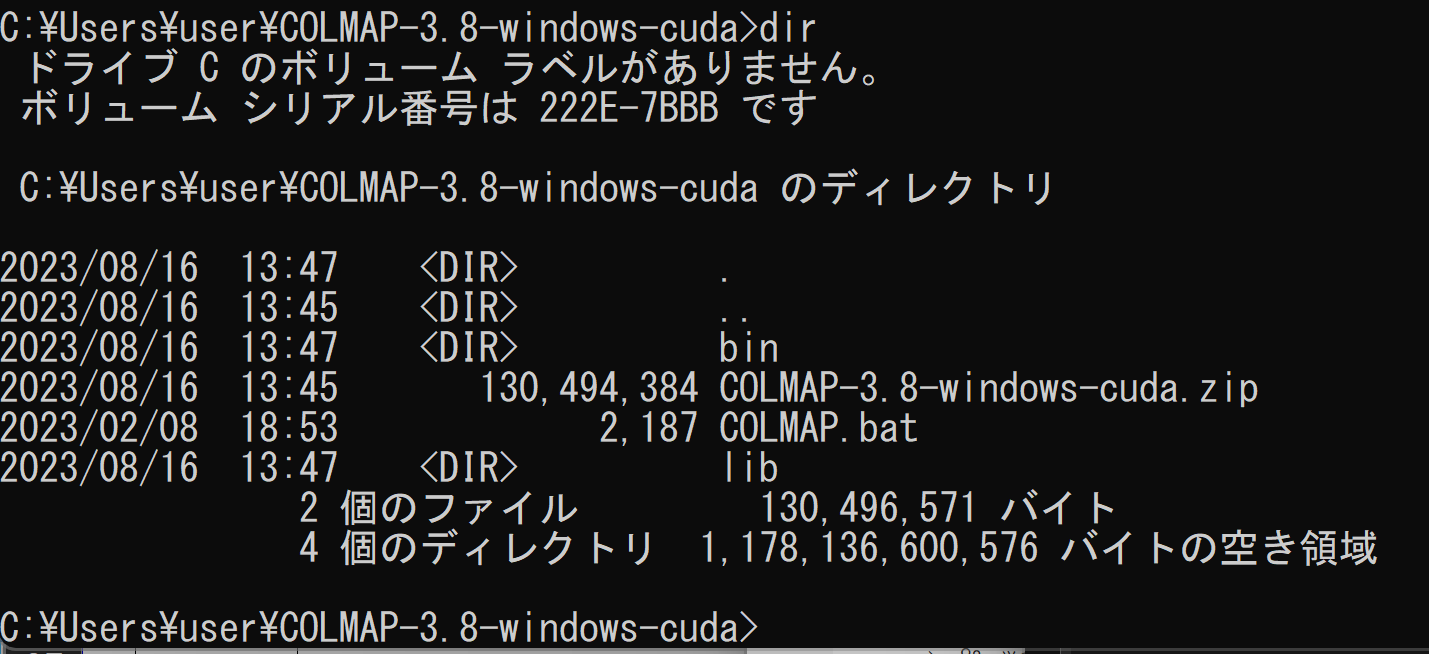
- ファイルの確認
dir コマンドを実行.bin,COLMAP.bat,lib ができていることを確認.
- https://demuc.de/colmapから,Vocabulary Trees をダウンロード
次のコマンドを実行
cd C:\ cd COLMAP-3.8-windows-cuda curl -L -O https://demuc.de/colmap/vocab_tree_flickr100K_words32K.bin - 必要であれば,次のページから,付属のデータセットをダウンロードできる.
- Windows のシステム環境変数 Path に c:\COLMAP-3.8-windows-cuda\bin,c:\COLMAP-3.8-windows-cuda\lib を追加することにより,パスを通す.
Windows で,管理者権限でコマンドプロンプトを起動(手順:Windowsキーまたはスタートメニュー >
cmdと入力 > 右クリック > 「管理者として実行」)。次のコマンドを実行
powershell -command "$oldpath = [System.Environment]::GetEnvironmentVariable(\"Path\", \"Machine\"); $oldpath += \";c:\COLMAP-3.8-windows-cuda\bin\"; [System.Environment]::SetEnvironmentVariable(\"Path\", $oldpath, \"Machine\")"
powershell -command "$oldpath = [System.Environment]::GetEnvironmentVariable(\"Path\", \"Machine\"); $oldpath += \";c:\COLMAP-3.8-windows-cuda\lib\"; [System.Environment]::SetEnvironmentVariable(\"Path\", $oldpath, \"Machine\")"
3次元再構成の実行
動作確認のため COLMAP を実行してみる
- Windows で,コマンドプロンプトを実行.
- 画像データの準備
ここでは, https://www.kkaneko.jp/sample/potato/potato_image.zip をダウンロードし,その中の画像ファイルを images ディレクトリに置いている.
cd C:\
cd COLMAP-3.8-windows-cuda
curl -O https://www.kkaneko.jp/sample/potato/potato_image.zip
powershell -command "Expand-Archive -DestinationPath . -Path potato_image.zip"
mkdir images
cd images
move ..\potato_image\*.JPG .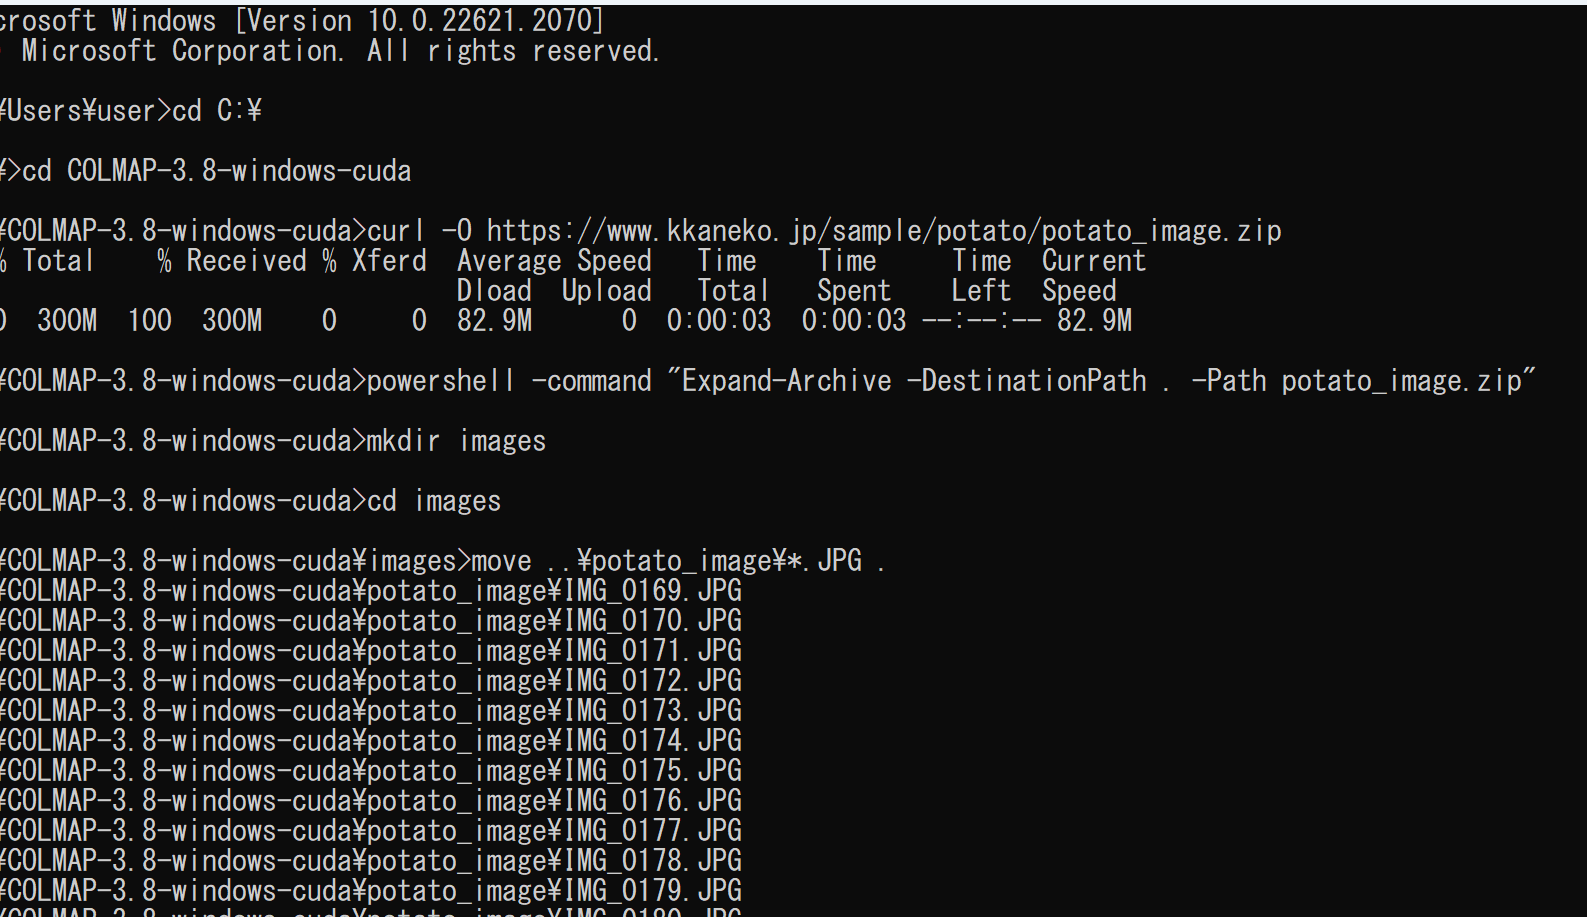
- COLMAP による3次元再構成
cd C:\ cd COLMAP-3.8-windows-cuda colmap automatic_reconstructor --workspace_path . --image_path ./images - 終了の確認
エラーメッセージが出ていないこと.
主なファイルの配置は次のようになる
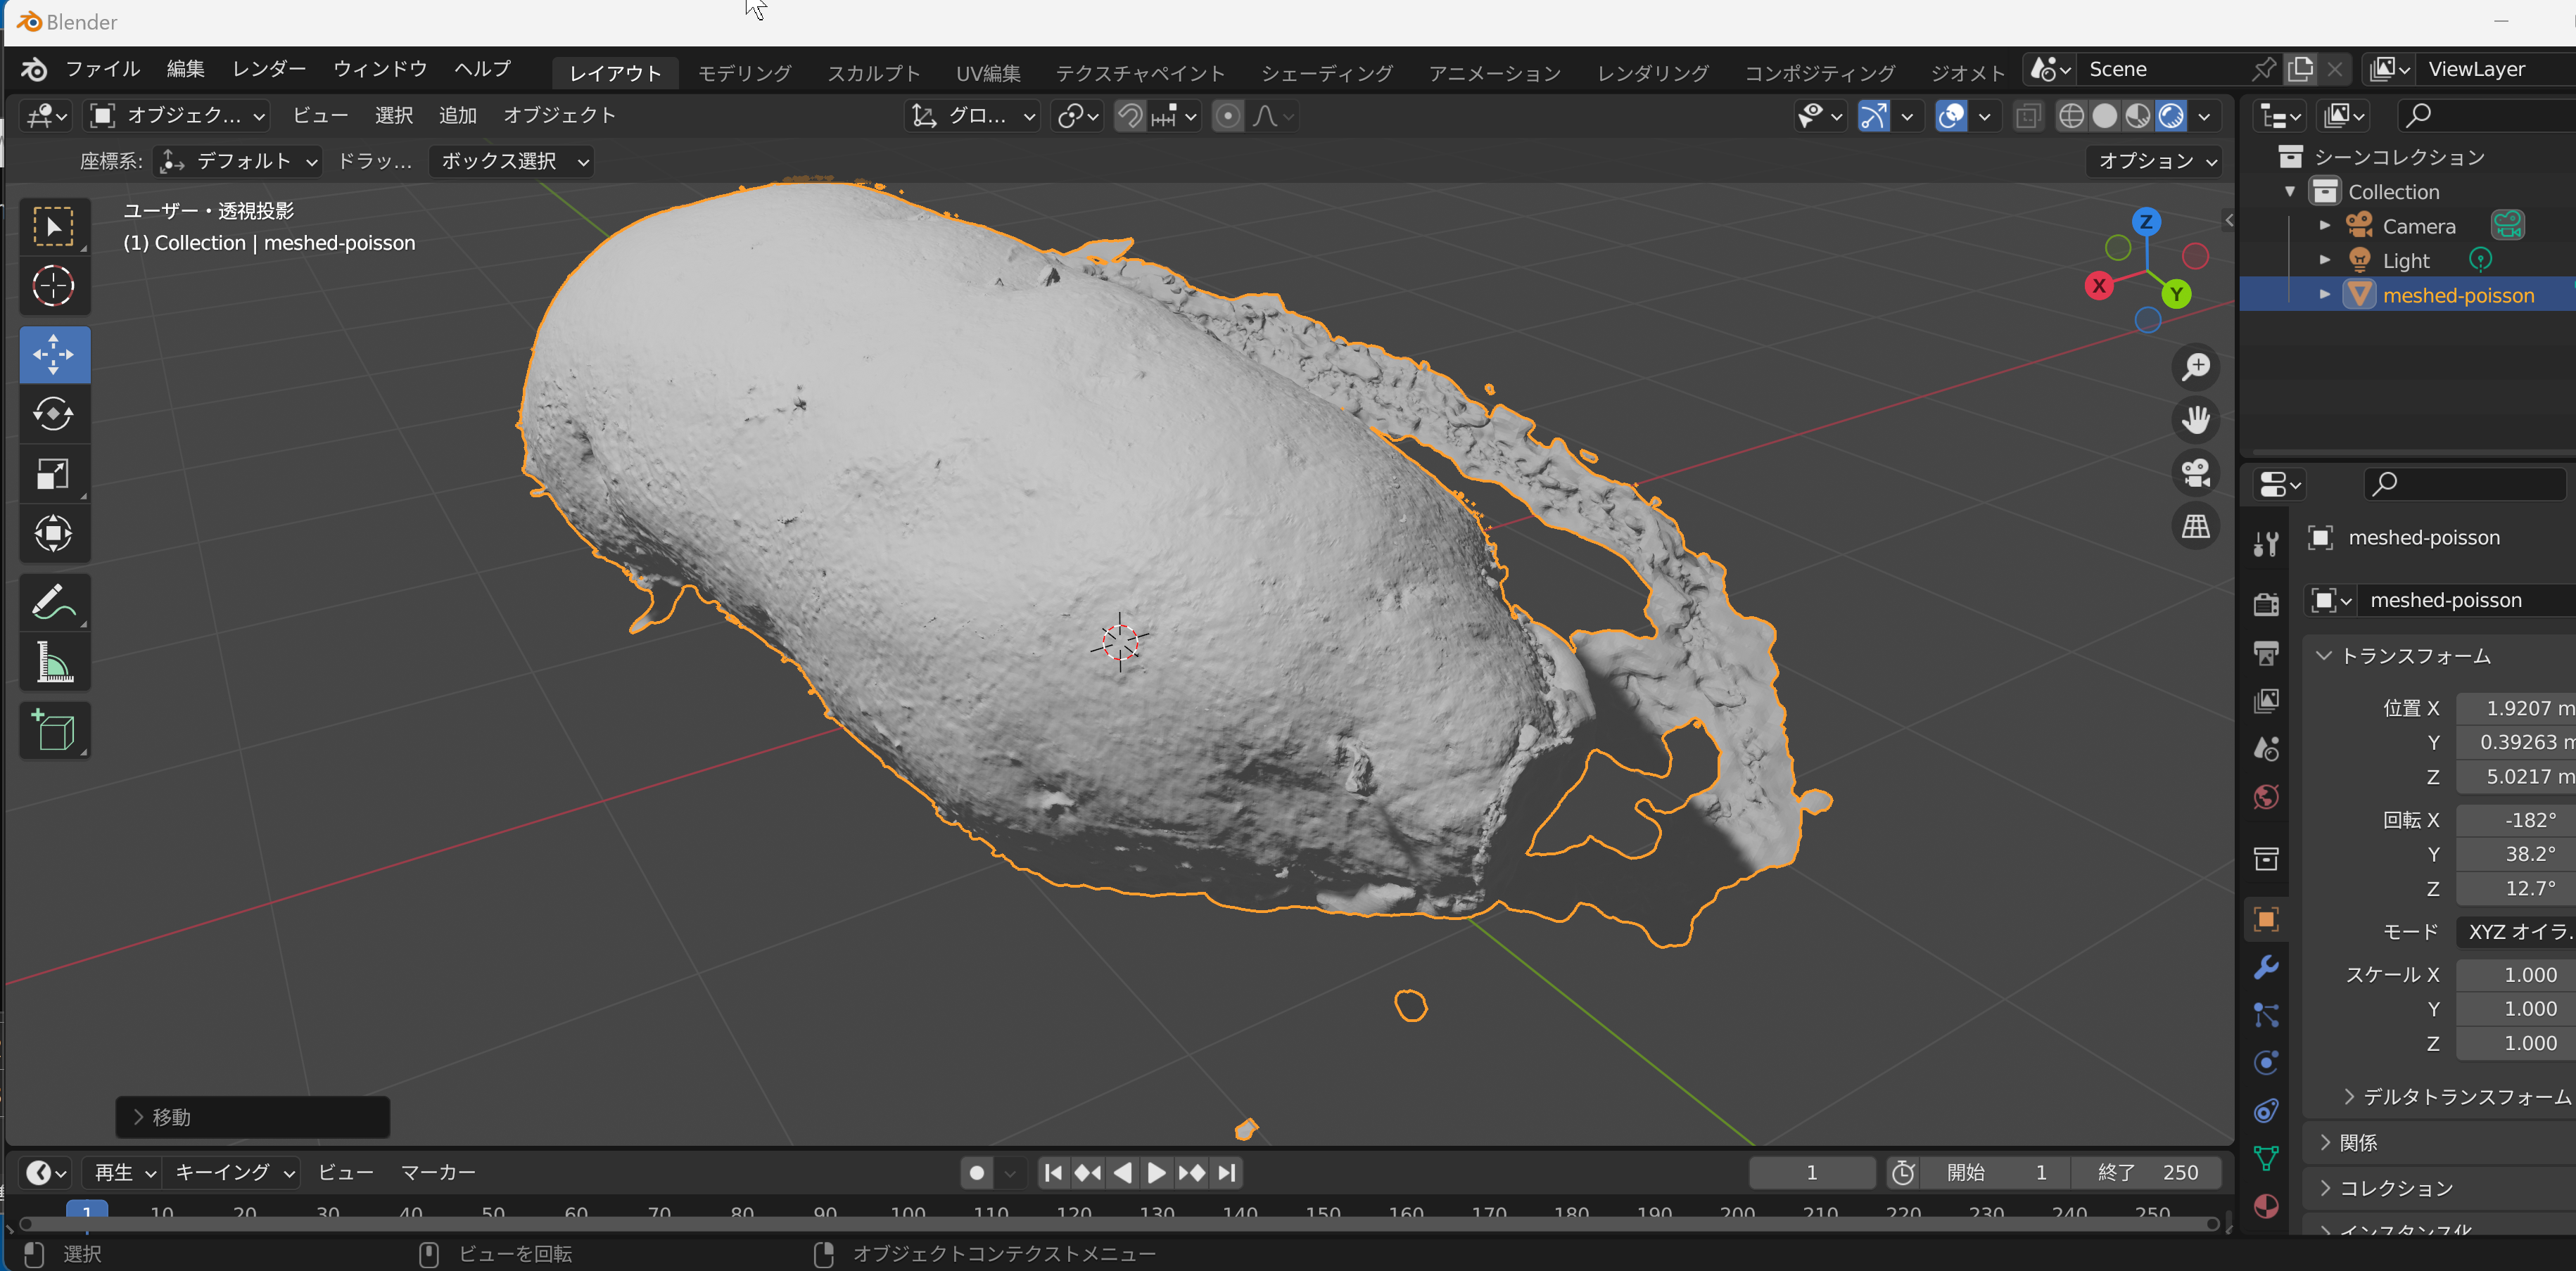
├─database.db ├─dense ├─0 ├─fused.ply ├─images ├─sparse ├─stereo - Blender で .ply ファイルを開き確認する
GUI での利用
次のコマンドで起動
colmap gui
メニューの「Reconstruction」. Image foloder は3次元再構成した画像のあるディレクトリを指定. Vocabulary tree は先ほどダウンロードしたVocabulary treeを指定. Workspace folder, Mask folder は,すでに存在するディレクトリを指定する(処理で使用される)
こまなく段階を分けて処理したい場合
colmap image_undistorter --image_path images --input_path sparse/0 --output_path dense --output_type COLMAP
colmap patch_match_stereo --workspace_path dense --workspace_format COLMAP --PatchMatchStereo.geom_consistency true
colmap stereo_fusion --workspace_path dense --workspace_format COLMAP --input_type geometric --output_path dense/fused.ply
colmap poisson_mesher --input_path dense/fused.ply --output_path dense/meshed-poisson.ply
colmap delaunay_mesher --input_path dense --output_path dense/meshed-delaunay.ply