教師なし学習による物体検出とインスタンスセグメンテーション(CutLER,VideoCutLER,Detectron2, PyTorch, Python を使用)(Windows 上)
MaskCut は,画像から,複数のセグメンテーション・マスク (segmentation mask)を得る.ViT を使用
CutLER は,MaskCut の結果に対して物体検出を実行.教師なし学習と自己学習 (self-training) を使用.

【目次】
【文献】
Wang, Xudong and Girdhar, Rohit and Yu, Stella X and Misra, Ishan, Cut and Learn for Unsupervised Object Detection and Instance Segmentation, arXiv preprint arXiv:2301.11320, 2023.
【関連する外部ページ】
- GitHub のページ: https://github.com/facebookresearch/CutLER
- MaskCut の非公式のデモページ(HuggingFace 上)https://huggingface.co/spaces/facebook/MaskCut
前準備
Python 3.12 のインストール
Pythonのインストールを行い、Pythonのプログラムを実行する環境を整える。扱う環境は、Windows搭載パソコンである。金子研究室では、Python 3.12.10を推奨する。
[Windows での Python 3.12 のインストール手順を見るには、ここをクリック]
Windows での Python 3.12 のインストール
以下のいずれかの方法でPython 3.12をインストールする。Pythonがインストール済みの場合、この手順は不要である。
方法 1:winget によるインストール
【インストールコマンドの実行方法】
管理者権限でコマンドプロンプトを起動する(手順:Windowsキーまたはスタートメニュー → cmd と入力 → 右クリック → 「管理者として実行」)。そして、コマンド全体をコマンドプロンプトにコピー&ペーストする。
--scope machine を指定することで、システム全体(全ユーザー向け)にインストールされる。このオプションの実行には管理者権限が必要である。インストール完了後、コマンドプロンプトを再起動するとPATHが反映される。
REM Python 3.12 をシステム領域にインストール
winget install --id Python.Python.3.12 -e --scope machine --silent --accept-source-agreements --accept-package-agreements --override "/quiet InstallAllUsers=1 PrependPath=1 Include_test=0 Include_pip=1 Include_launcher=1 InstallLauncherAllUsers=1 TargetDir=\"C:\Program Files\Python312\""

REM Python と Scripts を PATH 先頭に追加
powershell -NoProfile -Command "$p='C:\Program Files\Python312'; $s=\"$p\Scripts\"; $c=[Environment]::GetEnvironmentVariable('Path','Machine'); if((Test-Path $p) -and (';'+$c+';' -notlike \"*;$p;*\") -and (';'+$c+';' -notlike \"*;$s;*\")){[Environment]::SetEnvironmentVariable('Path',\"$p;$s;$c\",'Machine')}"
方法 2:インストーラーによるインストール
- Python公式サイト(https://www.python.org/downloads/)にアクセスし、「Download Python 3.x.x」ボタンからWindows用インストーラーをダウンロードする。
- ダウンロードしたインストーラーを実行する。
- 初期画面の下部に表示される「Add python.exe to PATH」にチェックを入れてから「Customize installation」を選択する。このチェックを入れ忘れると、コマンドプロンプトから
pythonコマンドを実行できない。 - 「Install Python 3.xx for all users」にチェックを入れ、「Install」をクリックする。
インストールの確認
コマンドプロンプトで以下を実行する。
python --versionバージョン番号(例:Python 3.12.x)が表示されればインストール成功である。「'python' は、内部コマンドまたは外部コマンドとして認識されていません。」と表示される場合は、インストールが正常に完了していない。
Git のインストール(Windows 上) [クリックして展開]
管理者権限のコマンドプロンプトで以下を実行する.管理者権限は,winget の --scope machine オプションでシステム全体にインストールするために必要となる.
REM Git をシステム領域にインストール
winget install --scope machine --id Git.Git -e --silent --disable-interactivity --force --accept-source-agreements --accept-package-agreements --override "/VERYSILENT /NORESTART /NOCANCEL /SP- /CLOSEAPPLICATIONS /RESTARTAPPLICATIONS /COMPONENTS=""icons,ext\reg\shellhere,assoc,assoc_sh"" /o:PathOption=Cmd /o:CRLFOption=CRLFCommitAsIs /o:BashTerminalOption=MinTTY /o:DefaultBranchOption=main /o:EditorOption=VIM /o:SSHOption=OpenSSH /o:UseCredentialManager=Enabled /o:PerformanceTweaksFSCache=Enabled /o:EnableSymlinks=Disabled /o:EnableFSMonitor=Disabled"
CMakeのインストール(Windows 上) [クリックして展開]
管理者権限のコマンドプロンプトで以下を実行する。管理者権限のコマンドプロンプトを起動するには、Windows キーまたはスタートメニューから「cmd」と入力し、表示された「コマンドプロンプト」を右クリックして「管理者として実行」を選択する。
REM CMake をシステム領域にインストール
winget install --scope machine --id Kitware.CMake -e --silent --disable-interactivity --force --accept-source-agreements --accept-package-agreements --override "/qn /norestart ADD_CMAKE_TO_PATH=System"
Build Tools for Visual Studio 2022,NVIDIA ドライバ,NVIDIA CUDA ツールキット 11.8,NVIDIA cuDNN 8.9.7 のインストール(Windows 上)
【サイト内の関連ページ】 NVIDIA グラフィックスボードを搭載しているパソコンの場合には, NVIDIA ドライバ, NVIDIA CUDA ツールキット, NVIDIA cuDNN のインストールを行う.
- Windows での Build Tools for Visual Studio 2022 のインストール: 別ページ »で説明
- Windows での NVIDIA ドライバ,NVIDIA CUDA ツールキット 11.8,NVIDIA cuDNN v8.9.7 のインストール手順: 別ページ »で説明
【関連する外部ページ】
- Build Tools for Visual Studio 2022 (ビルドツール for Visual Studio 2022)の公式ダウンロードページ: https://visualstudio.microsoft.com/ja/visual-cpp-build-tools/
- NVIDIA ドライバのダウンロードの公式ページ: https://www.nvidia.co.jp/Download/index.aspx?lang=jp
- NVIDIA CUDA ツールキットのアーカイブの公式ページ: https://developer.nvidia.com/cuda-toolkit-archive
- NVIDIA cuDNN のダウンロードの公式ページ: https://developer.nvidia.com/cudnn
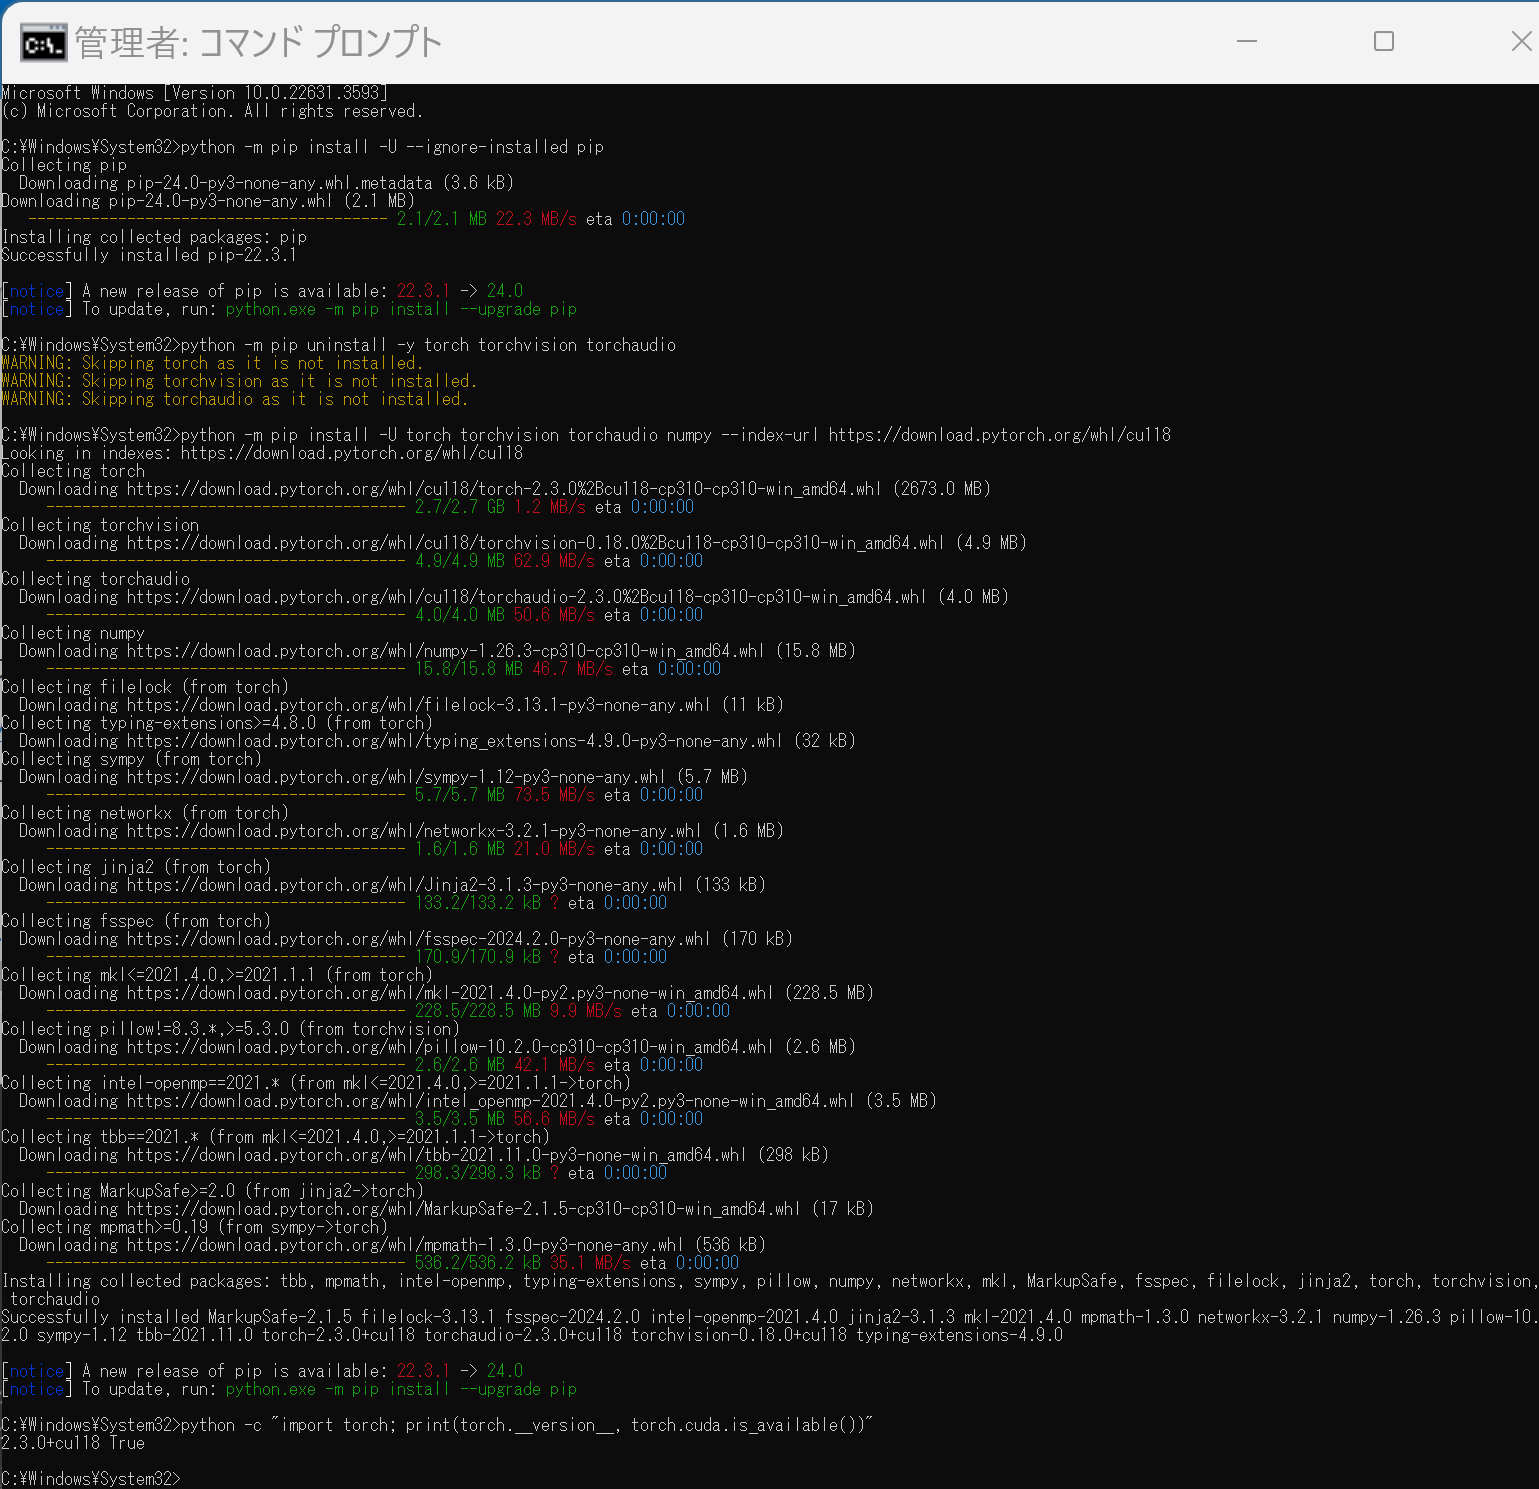
PyTorch のインストール(Windows 上)
Windows 環境に PyTorch をインストールする手順を解説します.主に pip を使用する方法と Miniconda (conda) を使用する方法を紹介します.
1. 実行前の準備
インストール作業を行う前に,以下の準備と確認を行ってください.
- 管理者権限でのコマンドプロンプト/Miniconda Prompt 起動:
インストールコマンドは管理者権限で実行することを推奨します.Windows キーを押し「cmd」または「Miniconda Prompt」と入力し,「管理者として実行」を選択して起動してください. - Python 環境:
システムに Python がインストールされ,pip または Miniconda (conda) が利用可能な状態であることを確認してください. - NVIDIA CUDA Toolkit (GPU版を利用する場合):
PyTorch で NVIDIA GPU を利用する場合は,対応する GPU と,適切なバージョンの NVIDIA CUDA Toolkit が事前にインストールされている必要があります.- CUDA バージョンの確認: コマンドプロンプト等で
nvcc --versionを実行し,バージョンを確認します.この例では CUDA 11.8 がインストール済みであると仮定します. - 互換性の確認: インストールする PyTorch と互換性のある CUDA バージョンを PyTorch 公式サイトで確認してください.
- CUDA バージョンの確認: コマンドプロンプト等で
2. PyTorch 公式サイトでのコマンド確認
【重要】 PyTorch のインストールコマンドは,OS,パッケージ管理ツール (pip/conda),Python バージョン,CUDA バージョンによって異なります.必ず以下の PyTorch 公式サイトで,ご自身の環境に合った最新のインストールコマンドを確認・実行してください.
- PyTorch 公式サイト (インストールページ): https://pytorch.org/get-started/locally/
以下の手順で示すコマンドは,特定の環境(例: CUDA 11.8)における一例です.
3. pip を使用したインストール
Python 標準のパッケージ管理ツール pip を使用する方法です.
(1) pip の更新 (任意)
python -m pip install --upgrade pip
(2) 既存の PyTorch 関連パッケージのアンインストール (推奨)
古いバージョン等がインストールされている場合に実行します.
python -m pip uninstall torch torchvision torchaudio
# 必要に応じて torchtext, xformers などもアンインストール
# python -m pip uninstall torchtext xformers
(3) PyTorch のインストール
【注意】 必ず公式サイトで生成したコマンドを使用してください.以下は CUDA 11.8 環境向けの 一例 です.
# 公式サイトで取得した pip install コマンドを実行
# 例 (CUDA 11.8):
python -m pip install torch torchvision torchaudio --index-url https://download.pytorch.org/whl/cu118
(4) インストールの確認
python -c "import torch; print(f'PyTorch Version: {torch.__version__}'); print(f'CUDA Available: {torch.cuda.is_available()}')"
CUDA Available: True と表示されれば,GPU が正しく認識されています (GPU 環境の場合).
4. Miniconda (conda) を使用したインストール
データサイエンス環境構築によく使われる Miniconda (または Anaconda) を使用している場合は,conda コマンドでもインストールできます.
conda 環境では,PyTorch のような複雑な依存関係を持つライブラリの場合,pip よりも依存関係の問題が発生することがあります.問題が発生した場合は,pip を使用したインストール(セクション3)を試すことを検討してください.
(1) Miniconda Prompt (または Anaconda Prompt) の起動
管理者として実行で Miniconda Prompt を起動します.
(2) PyTorch のインストール
【注意】 必ず公式サイトで Package に Conda を選択し,生成されたコマンドを使用してください.以下は CUDA 11.8 環境向けの 一例 です.
# 公式サイトで取得した conda install コマンドを実行
# 例 (CUDA 11.8):
conda install pytorch torchvision torchaudio pytorch-cuda=11.8 -c pytorch -c nvidia
-c pytorch -c nvidia は,PyTorch と NVIDIA の公式 conda チャネルを指定しています.
(3) インストールの確認
python -c "import torch; print(f'PyTorch Version: {torch.__version__}'); print(f'CUDA Available: {torch.cuda.is_available()}')"
関連情報
【サイト内の関連ページ】
【関連する外部ページ】
- PyTorch 公式サイト (インストール): https://pytorch.org/get-started/locally/
- PyTorch 公式サイト (トップ): https://pytorch.org/
Python の opencv-python ライブラリのインストール
- 以下の手順を管理者権限のコマンドプロンプトで実行する
(手順:Windowsキーまたはスタートメニュー →
cmdと入力 → 右クリック → 「管理者として実行」)。 - opencv-python のインストール
* 「pip install ...」は,Pythonのライブラリをインストールするための操作
python -m pip install -U opencv-python opencv-contrib-python
Detectron2 のインストール(Windows 上)
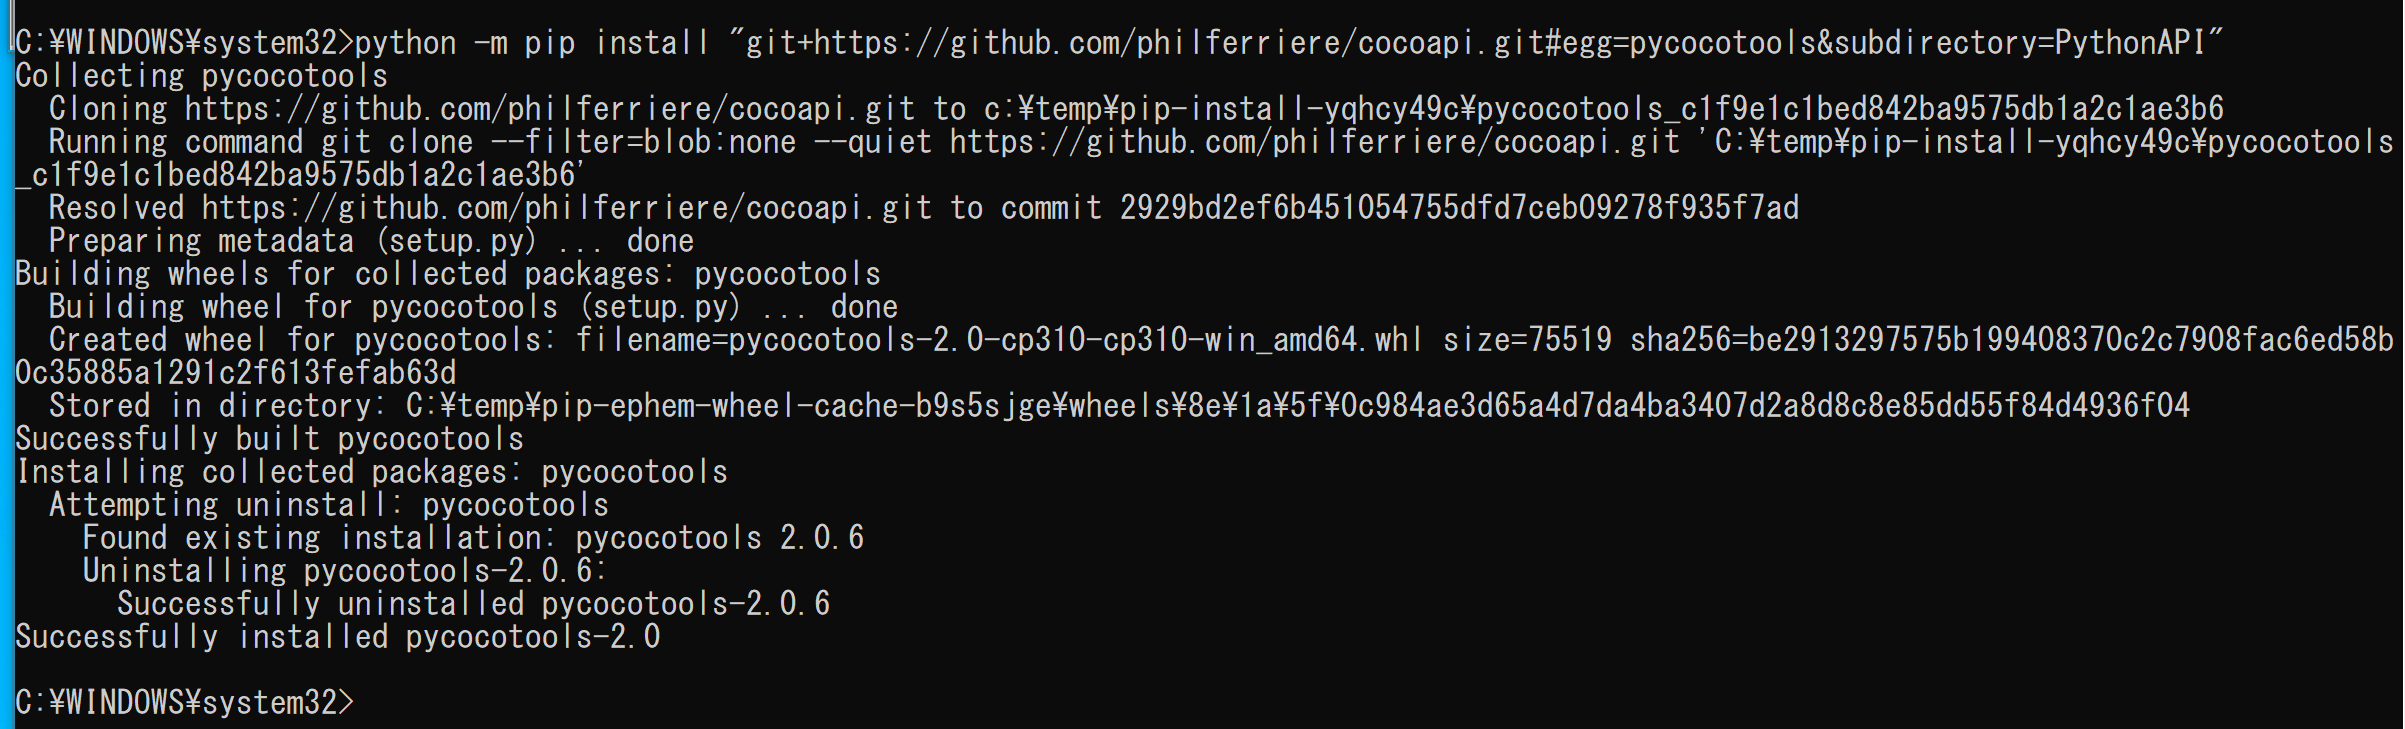
pycocotools のインストール(Windows 上)
pycocotools のインストールを行う.
- 以下の手順を管理者権限のコマンドプロンプトで実行する
(手順:Windowsキーまたはスタートメニュー →
cmdと入力 → 右クリック → 「管理者として実行」)。 - pycocotools, COCO 2018 Panoptic Segmentation Task API のインストール
COCOデータセットをPythonで扱うためには,pycocotools を使う. pycocotools を使うことで,COCOデータセットのアノテーションを扱いやすくなる.
次のコマンドを実行
python -m pip install -U --ignore-installed pip
python -m pip install -U cython wheel
python -m pip install "git+https://github.com/philferriere/cocoapi.git#egg=pycocotools&subdirectory=PythonAPI"
python -m pip install git+https://github.com/cocodataset/panopticapi.git
Detectron2 のインストール(Windows 上)
https://dgmaxime.medium.com/how-to-easily-install-detectron2-on-windows-10-39186139101c
- 以下の手順を管理者権限のコマンドプロンプトで実行する
(手順:Windowsキーまたはスタートメニュー →
cmdと入力 → 右クリック → 「管理者として実行」)。 - Detectron2 のダウンロード
python -m pip uninstall -y detectron2
cd /d c:%HOMEPATH%
rmdir /s /q detectron2
git clone --recursive https://github.com/facebookresearch/detectron2
cd detectron2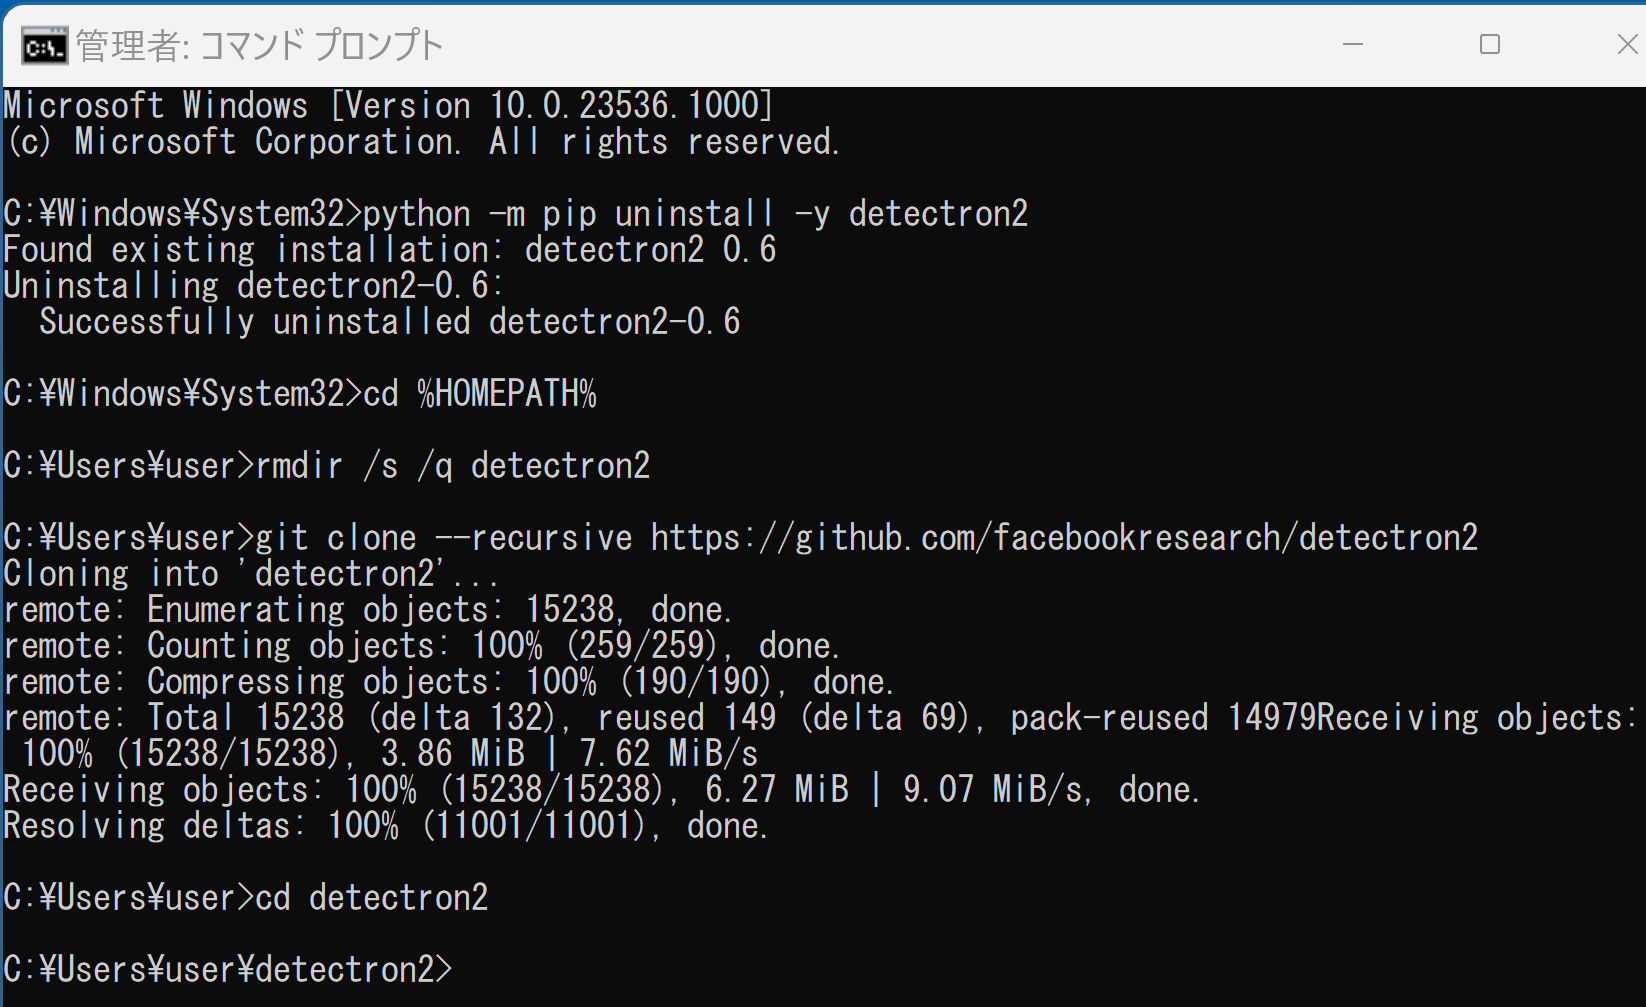
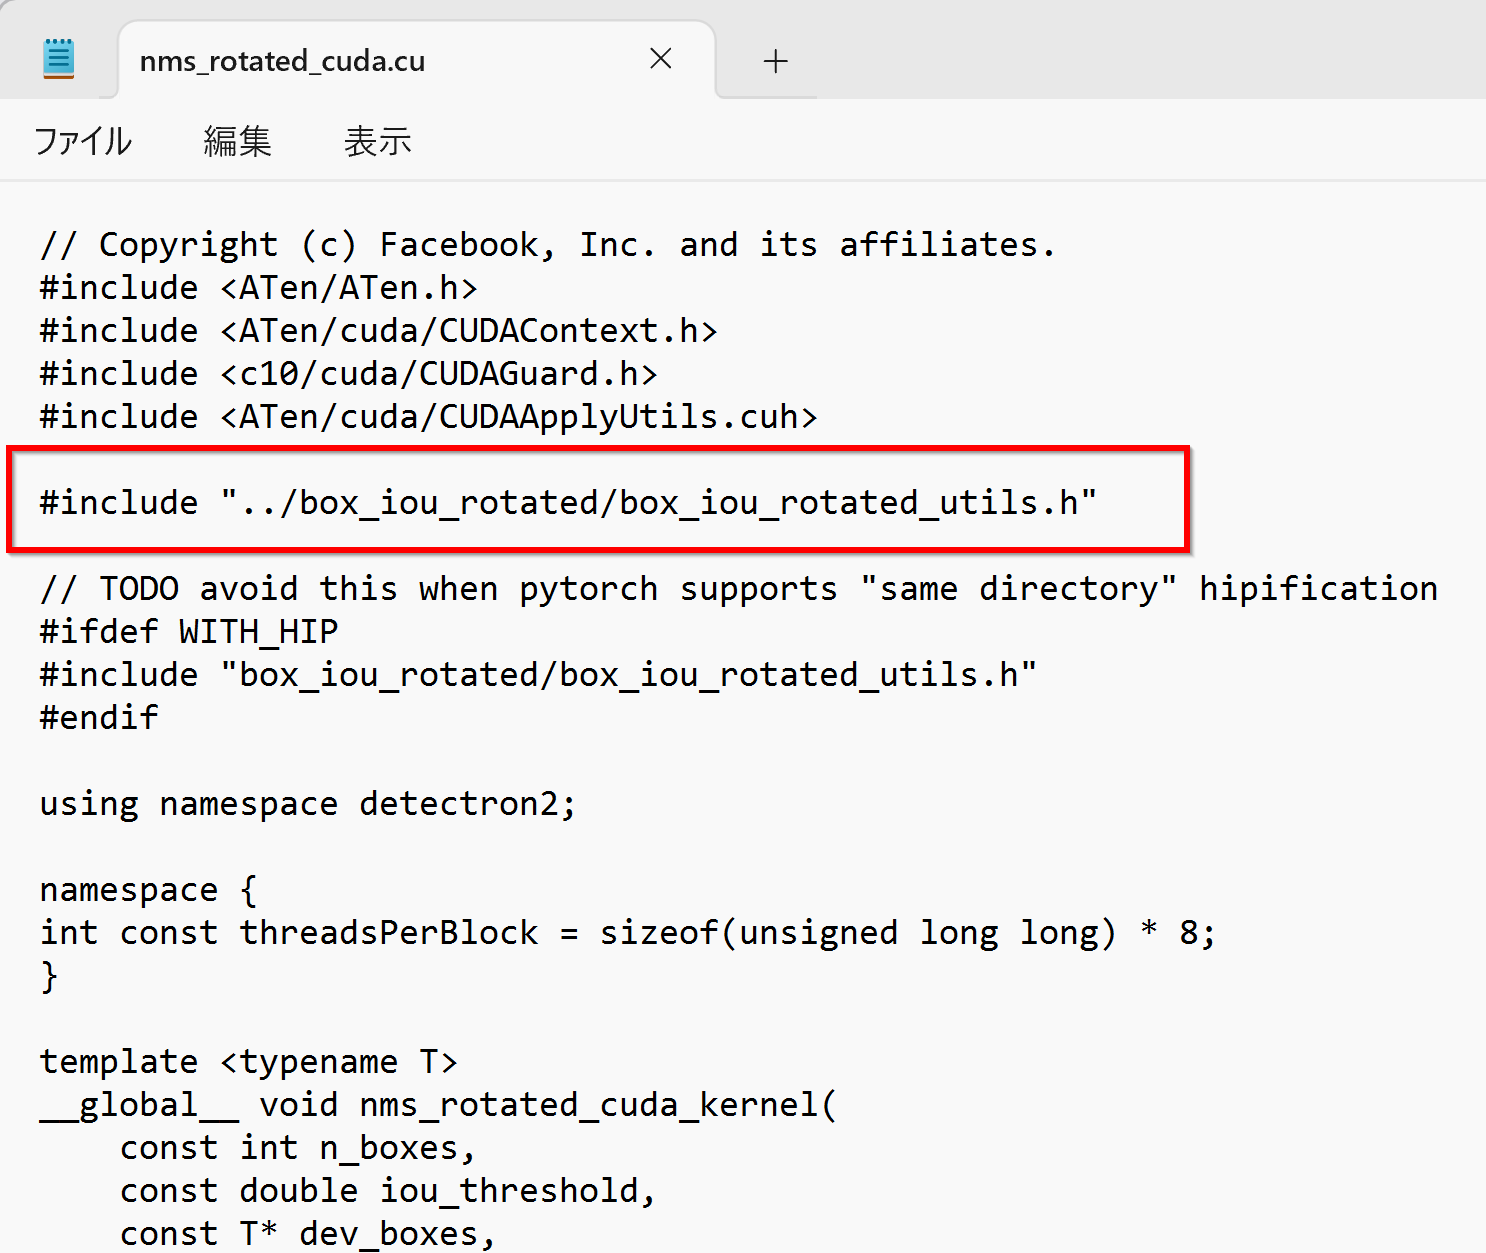
- ソースコードの書き換え
notepad detectron2\layers\csrc\nms_rotated\nms_rotated_cuda.cu
次のように書き換える
- インストール
cd /d c:%HOMEPATH%\detectron2
python -m pip install -e .
(以下省略) - 引き続き,COCO 2018 Panoptic Segmentation Task API,
The Cityscapes Dataset 用スクリプトのインストール
pip install git+https://github.com/cocodataset/panopticapi.git
pip install git+https://github.com/mcordts/cityscapesScripts.git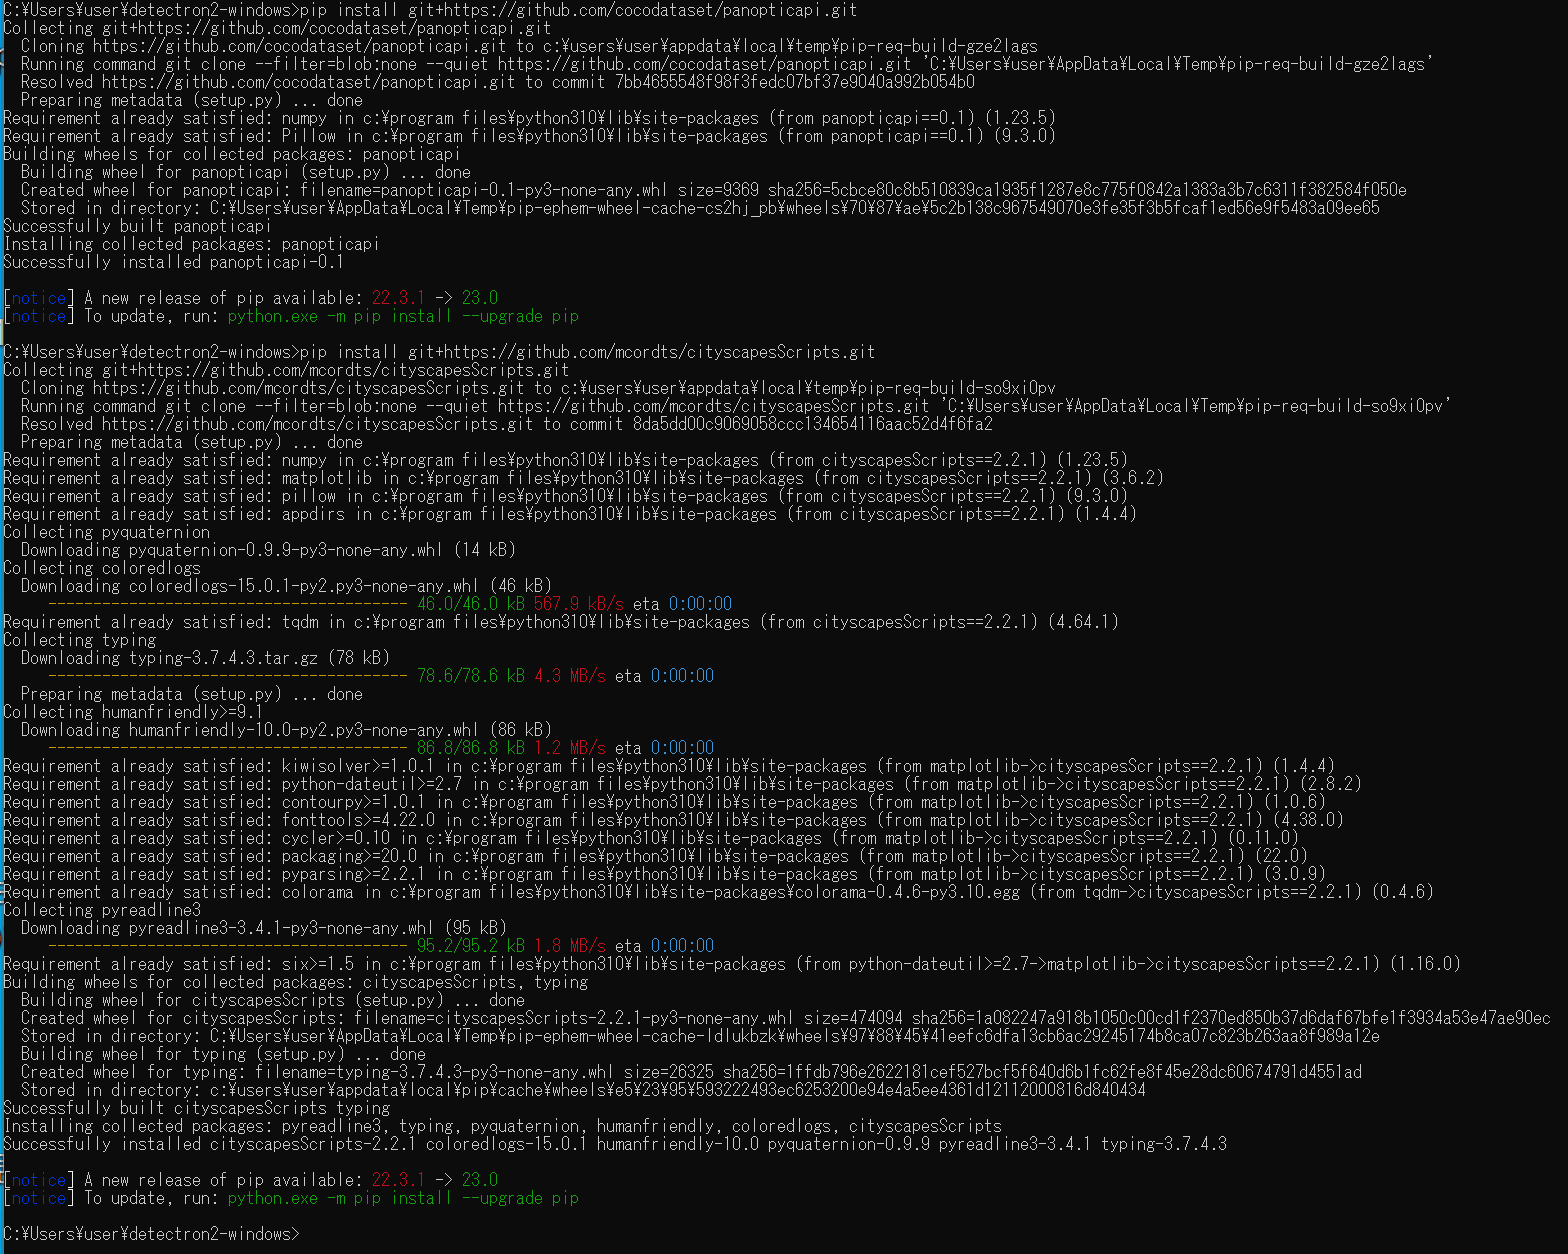
CutLER のインストール(Windows 上)
PyDenseCRF のインストール
【文献】 Efficient Inference in Fully Connected CRFs with Gaussian Edge Potentials Philipp Krähenbühl and Vladlen Koltun NIPS 2011
【関連する外部ページ】
- GitHub の公式のページ: https://github.com/lucasb-eyer/pydensecrf
- 以下の手順を管理者権限のコマンドプロンプトで実行する
(手順:Windowsキーまたはスタートメニュー →
cmdと入力 → 右クリック → 「管理者として実行」)。 - インストール
次のコマンドを実行.
「Error compiling Cython file: from eigen cimport * pydensecrf\densecrf.pxd:1:0: 'eigen.pxd' not found」の エラーメッセージの回避のため「copy pydensecrf\eigen.pxd .」を実行している.
python -m pip install -U eigen cython
cd /d c:%HOMEPATH%
rmdir /s /q pydensecrf
git clone https://github.com/lucasb-eyer/pydensecrf.git
cd pydensecrf
copy pydensecrf\eigen.pxd .
python setup.py build
python setup.py develop
python setup.py install
PyDenseCRF のインストールで, 上のコマンドでエラーメッセージが出る場合には,次を実行- 「Geospatial library wheels for Python on Windows」のページを開く
- Python のバージョンにあう「win_amd64.whl」のファイルをダウンロード.Python 3.10 を使っている場合には,pydensecrf‑1.0rc2‑cp310‑cp310‑win_amd64.whl をダウンロード
- 次のコマンドでインストール.「pydensecrf-1.0rc2-cp310-cp310-win_amd64.whl」のところは,実際にダウンロードしたファイル名に置き換える.
python -m pip install pydensecrf-1.0rc2-cp310-cp310-win_amd64.whl
- 動作確認
次の Python プログラムを実行.エラーメッセージは出ないことを確認.
import numpy as np
import pydensecrf.densecrf as dcrf
d = dcrf.DenseCRF2D(640, 480, 5)
print(d)
CutLER のインストール(Windows 上)
- 以下の手順を管理者権限のコマンドプロンプトで実行する
(手順:Windowsキーまたはスタートメニュー →
cmdと入力 → 右クリック → 「管理者として実行」)。 - CutLER のインストール
次のコマンドを実行.
cd /d c:%HOMEPATH%
rmdir /s /q CutLER
git clone --recursive https://github.com/facebookresearch/CutLER.git
cd CutLER
python -m pip install -U faiss_cpu
python -m pip install -U opencv-python scikit-image scikit-learn shapely timm pyyaml colored fvcore gdown
MaskCut による画像セグメンテーション
公式ページの https://github.com/facebookresearch/CutLER の手順により行う.
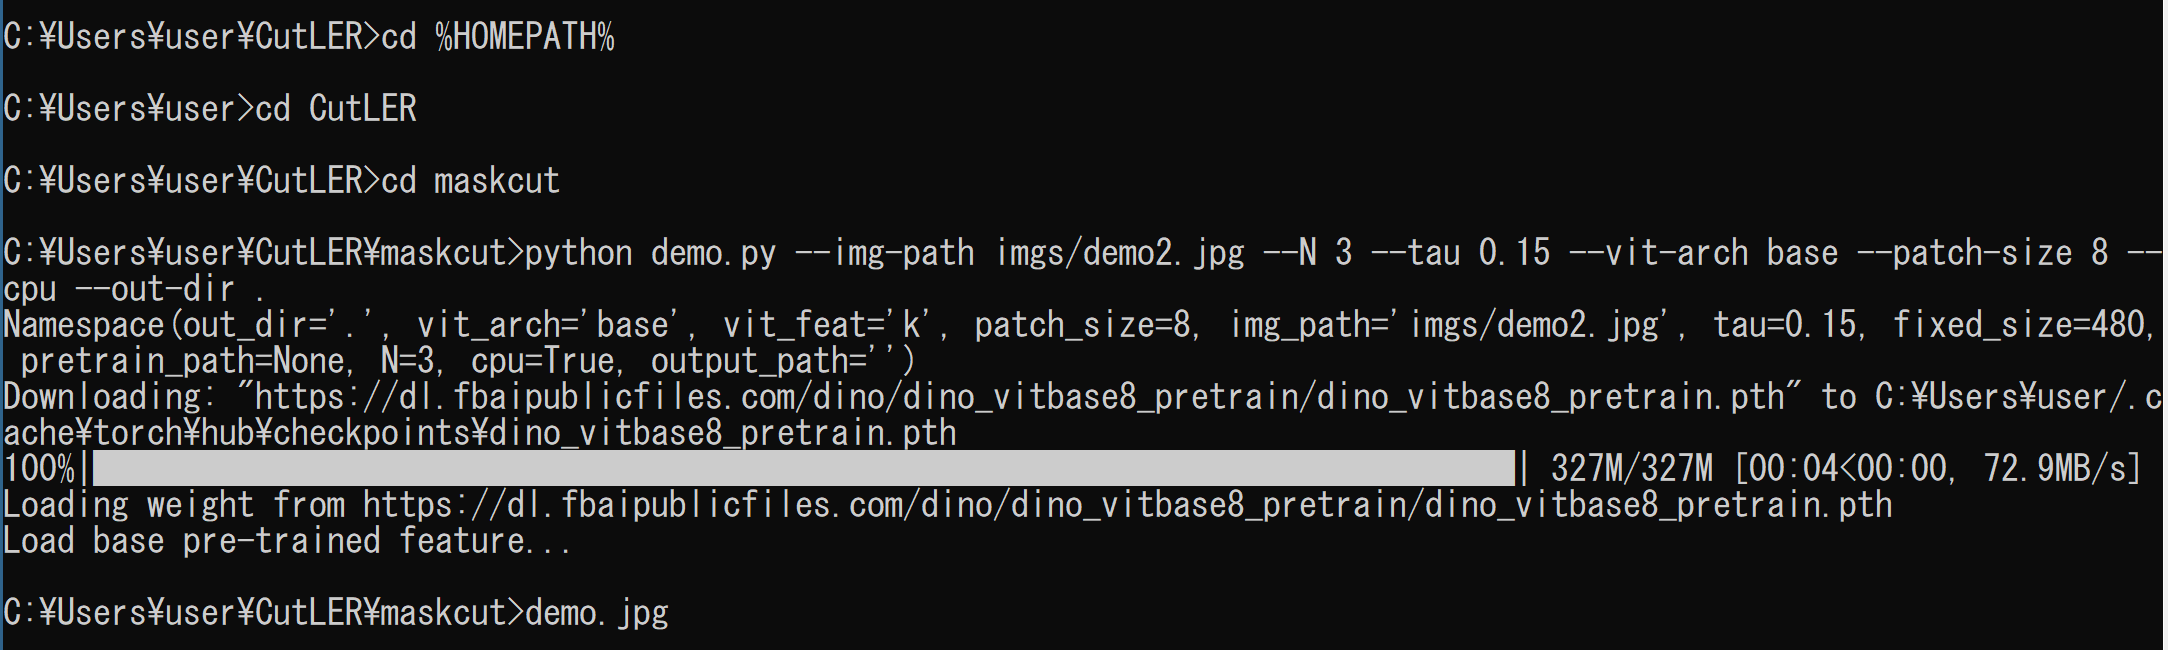
次のコマンドの実行により,demo.jpg ができる.
cd /d c:%HOMEPATH%
cd CutLER
cd maskcut
python demo.py --img-path imgs/demo2.jpg --N 3 --tau 0.15 --vit-arch base --patch-size 8 --cpu --out-dir .
demo.jpg
実行結果
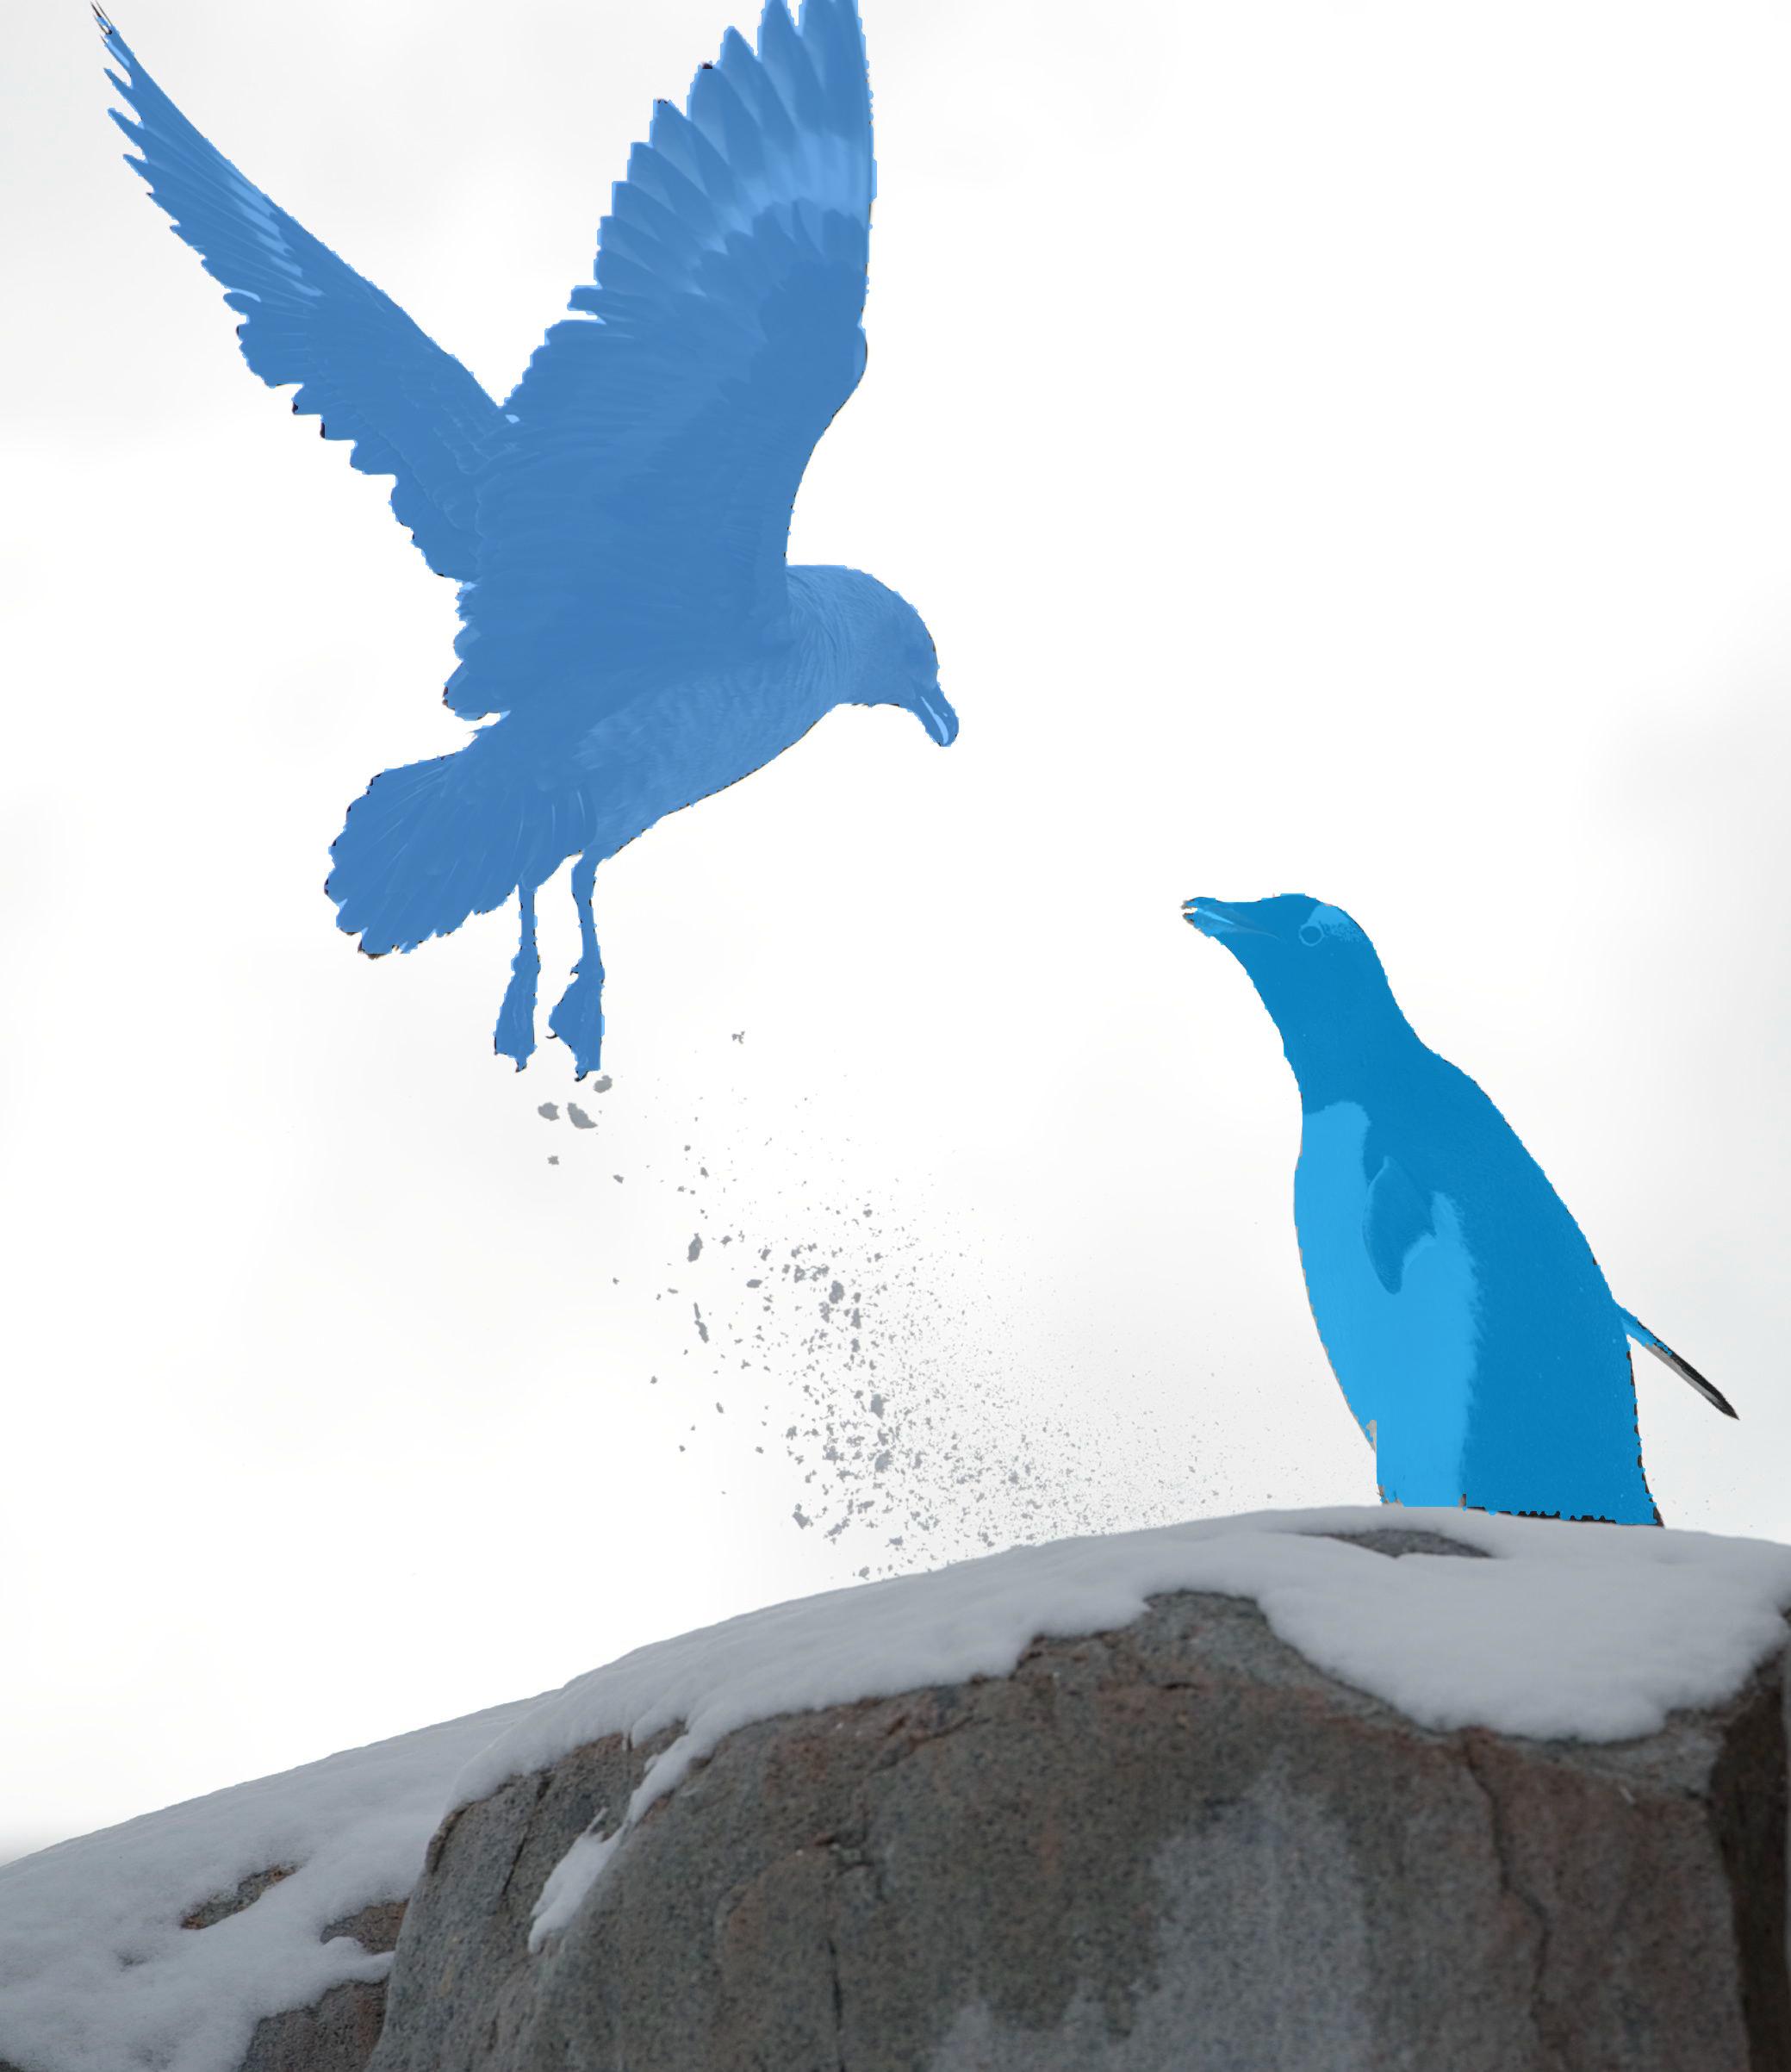
元画像

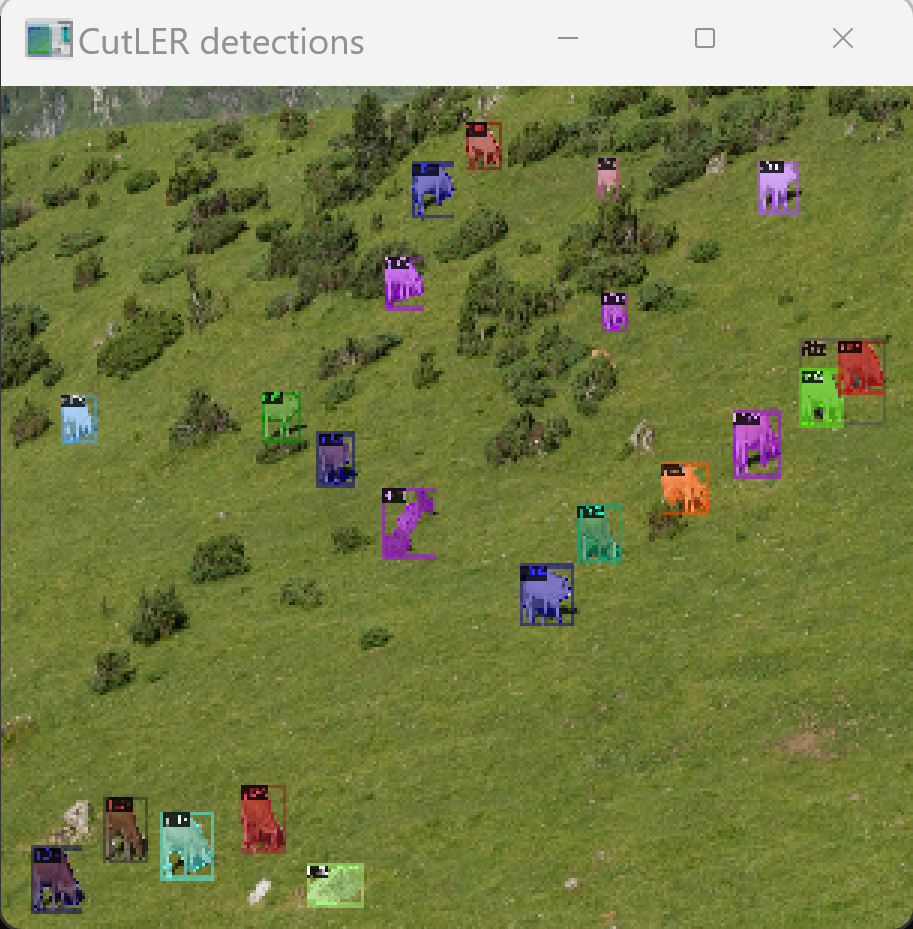
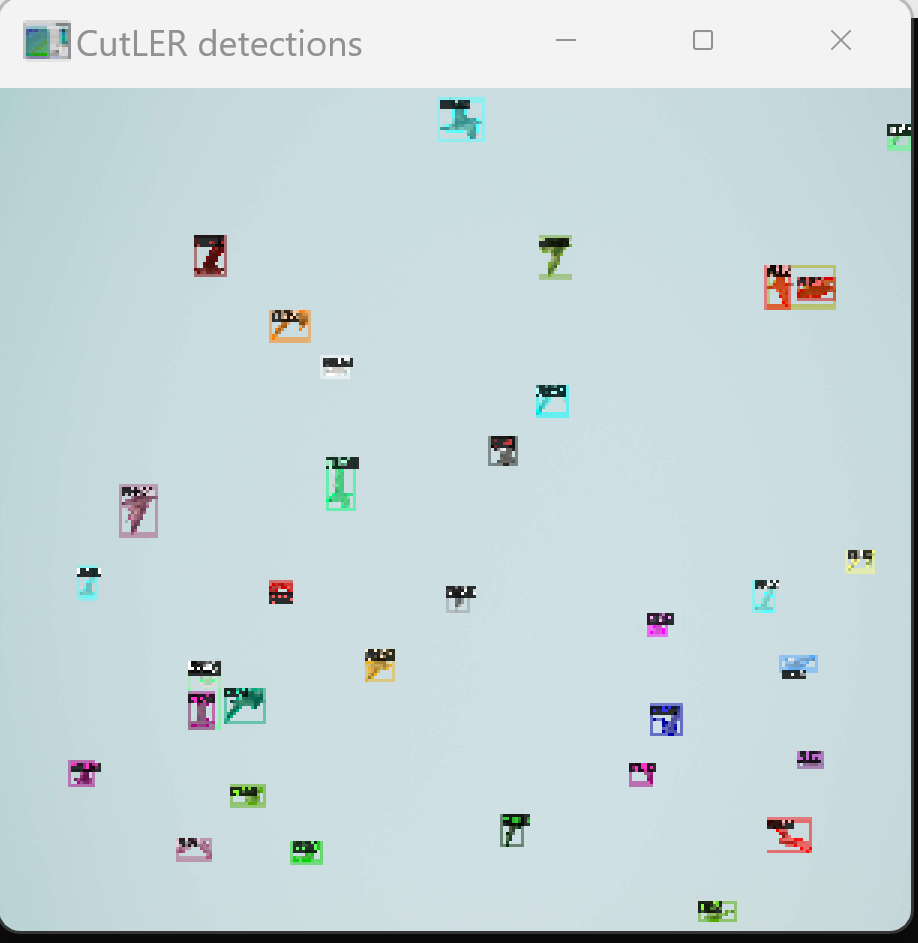
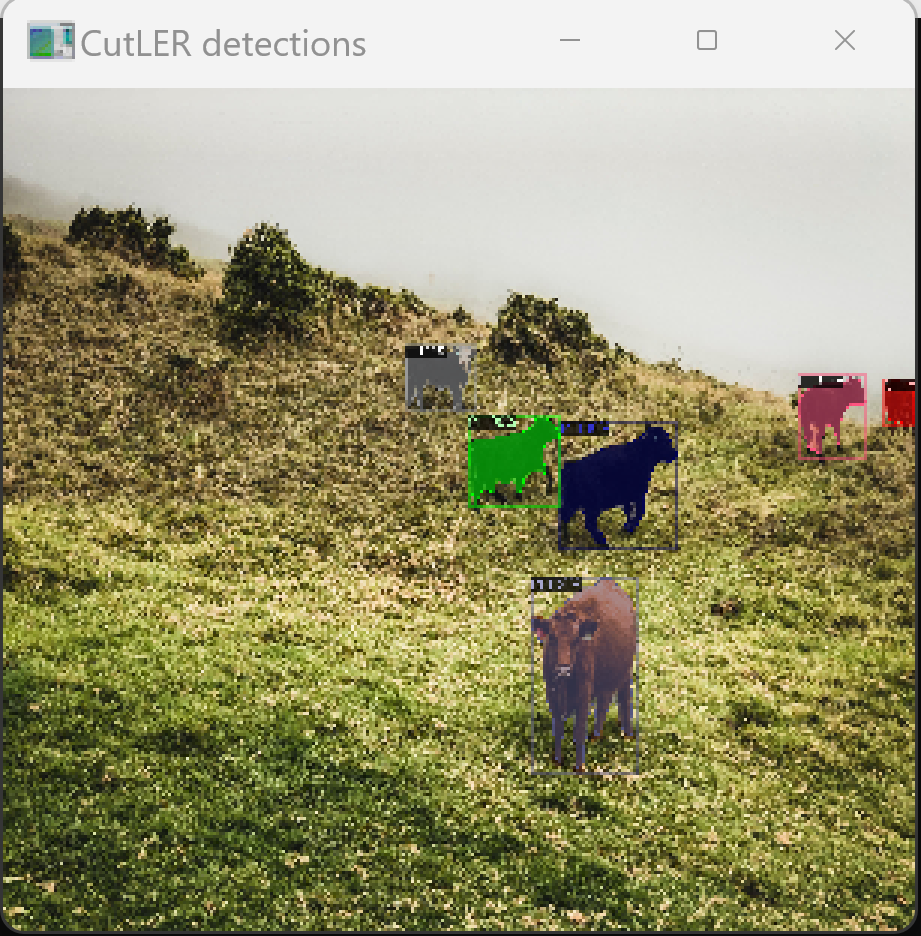
CutLER を用いた教師無し学習のゼロショットの物体検出とインスタンスセグメンテーション
公式ページの https://github.com/facebookresearch/CutLER の手順により行う.
前準備として学習済みモデルのダウンロード,ソースコードの修正を行う
- 次のコマンドの実行により,学習済みモデルのダウンロードを行う.
cd /d c:%HOMEPATH% cd CutLER cd cutler curl -L -O http://dl.fbaipublicfiles.com/cutler/checkpoints/cutler_cascade_final.pth - 次に,data\transforms\transform.py の中の「LINEAR」を「BILINEAR」に書き換える
cd /d c:%HOMEPATH%
cd CutLER
cd cutler
notepad data\transforms\transform.py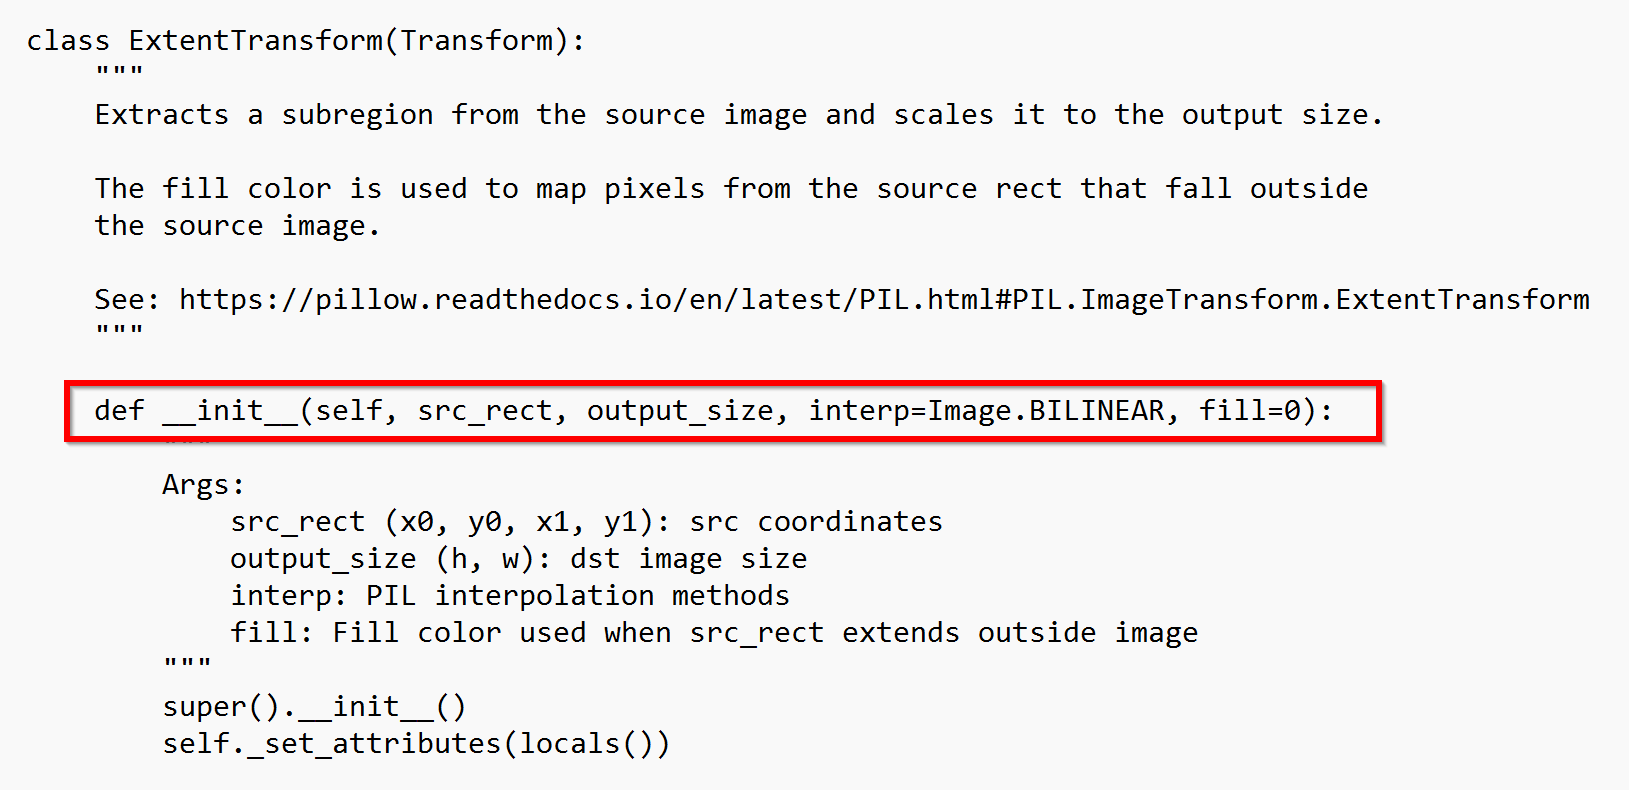
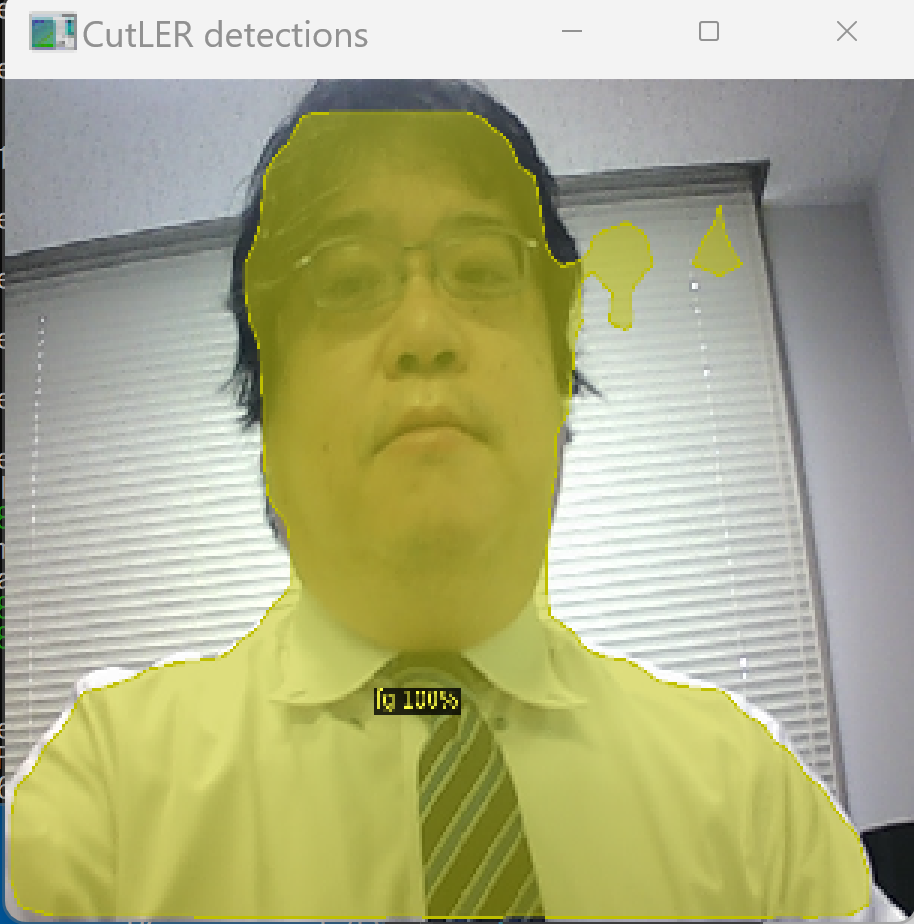
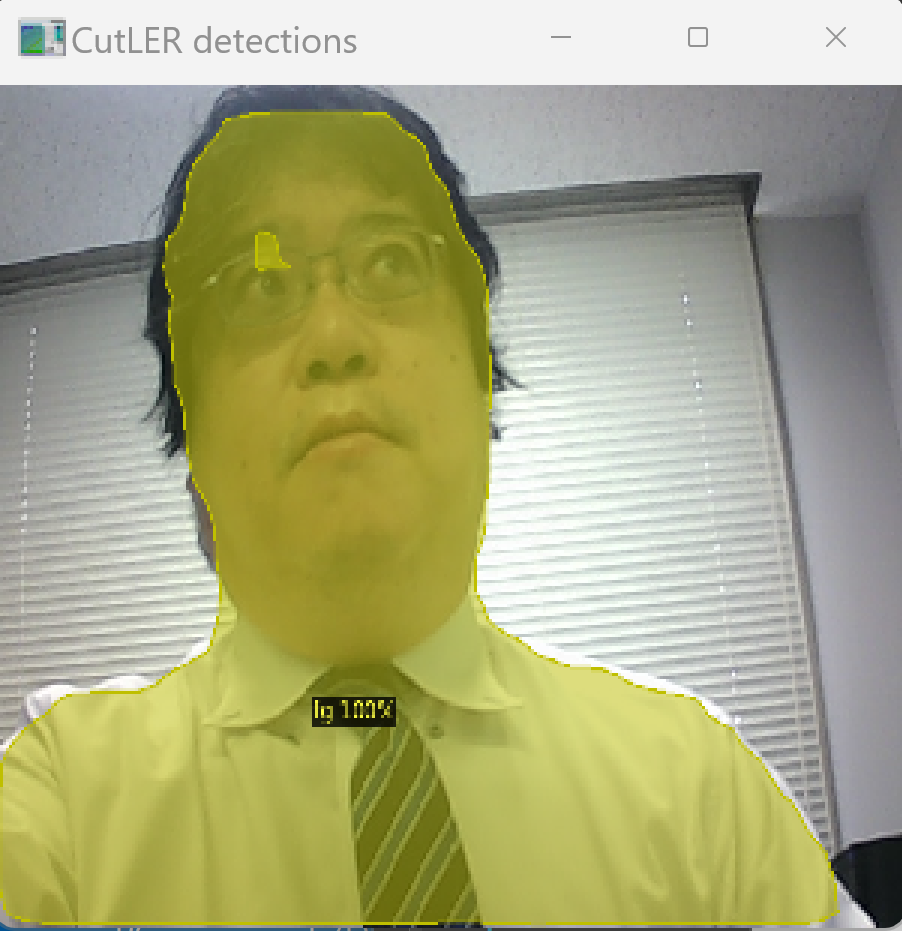
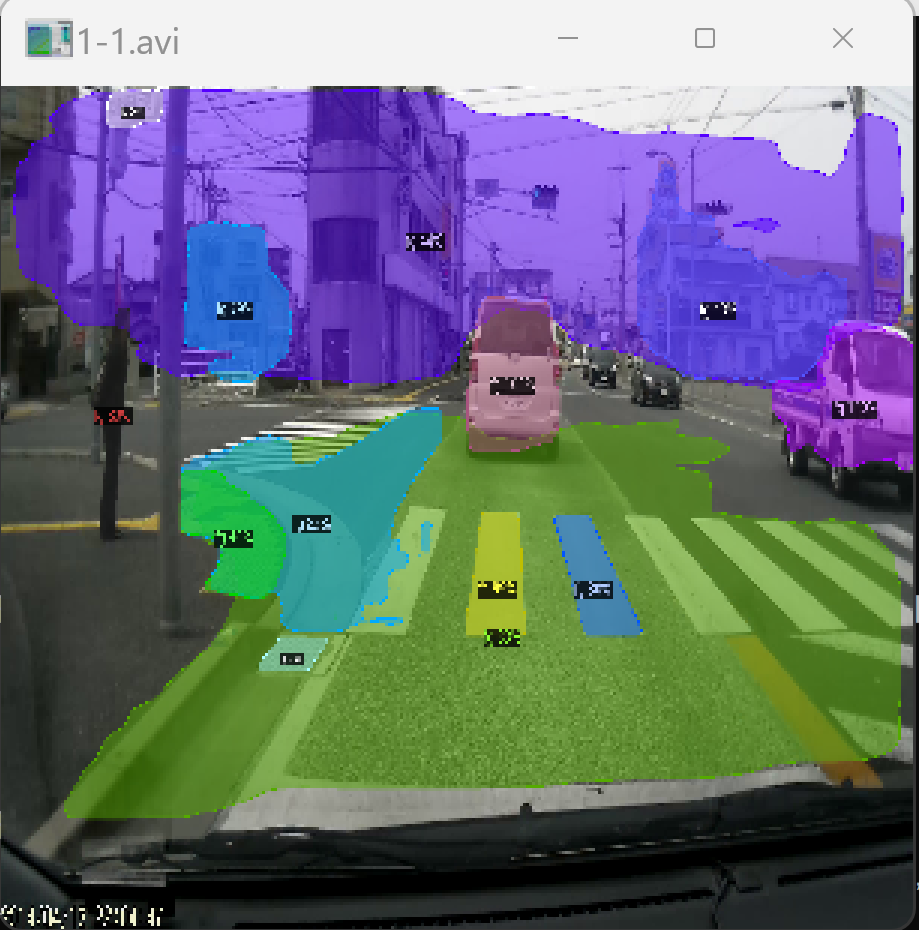
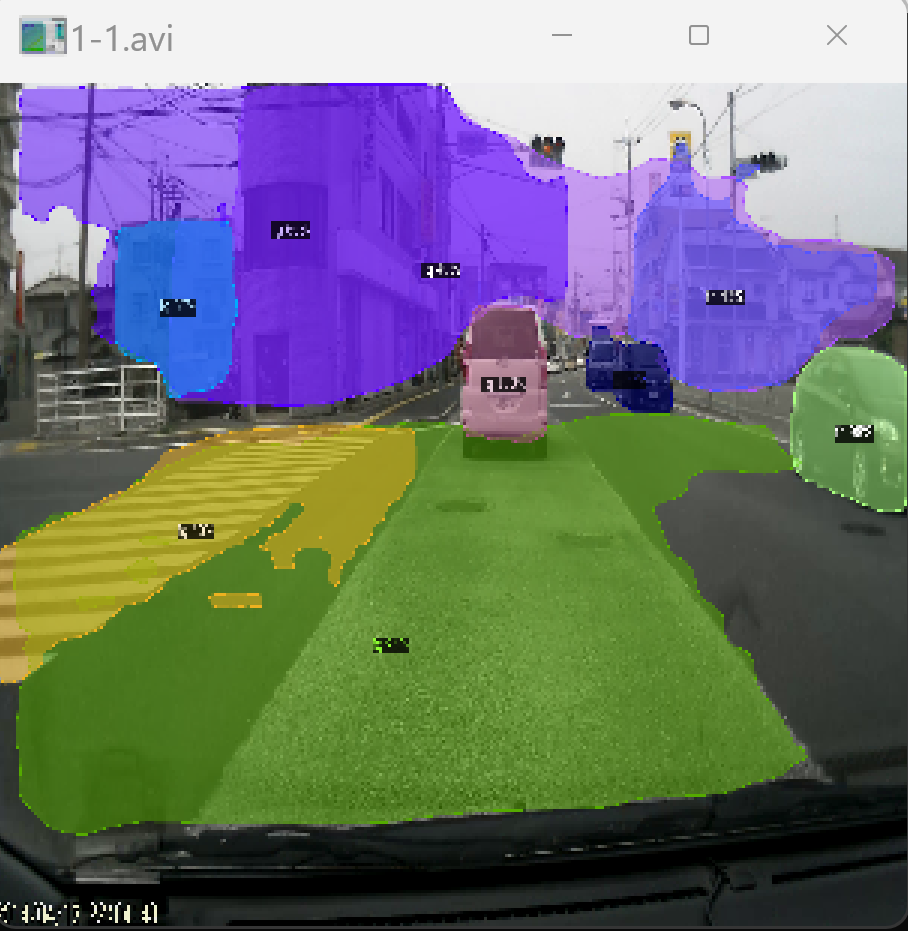
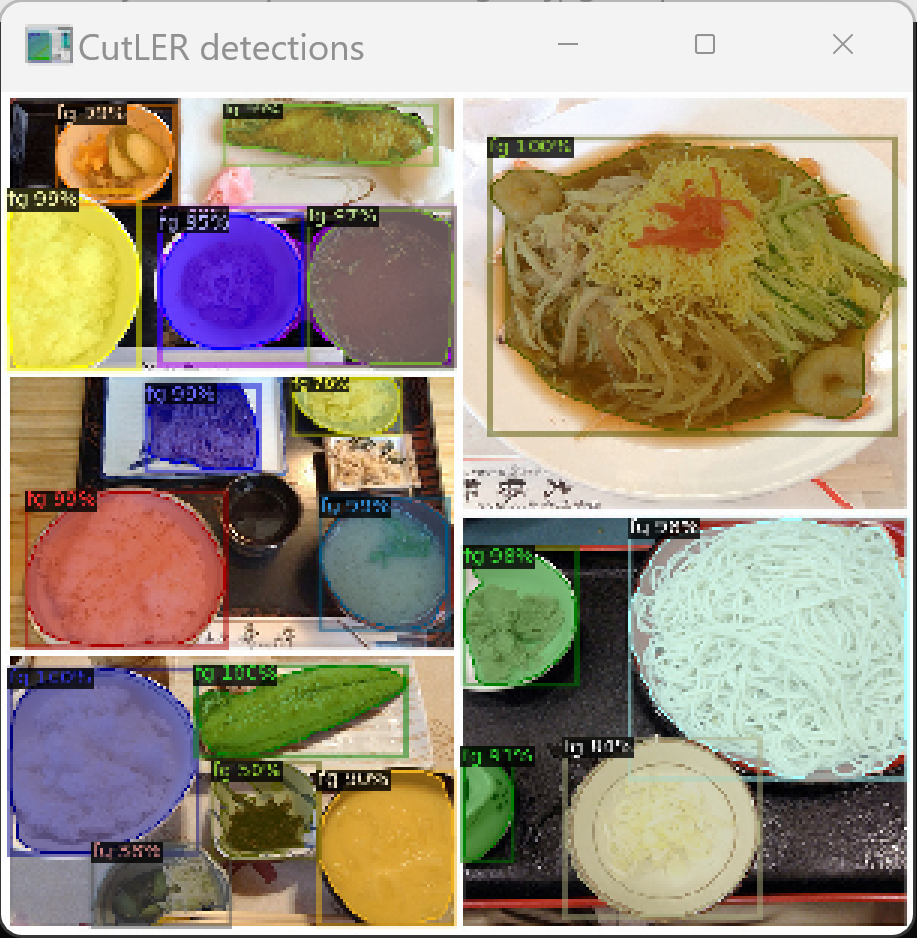
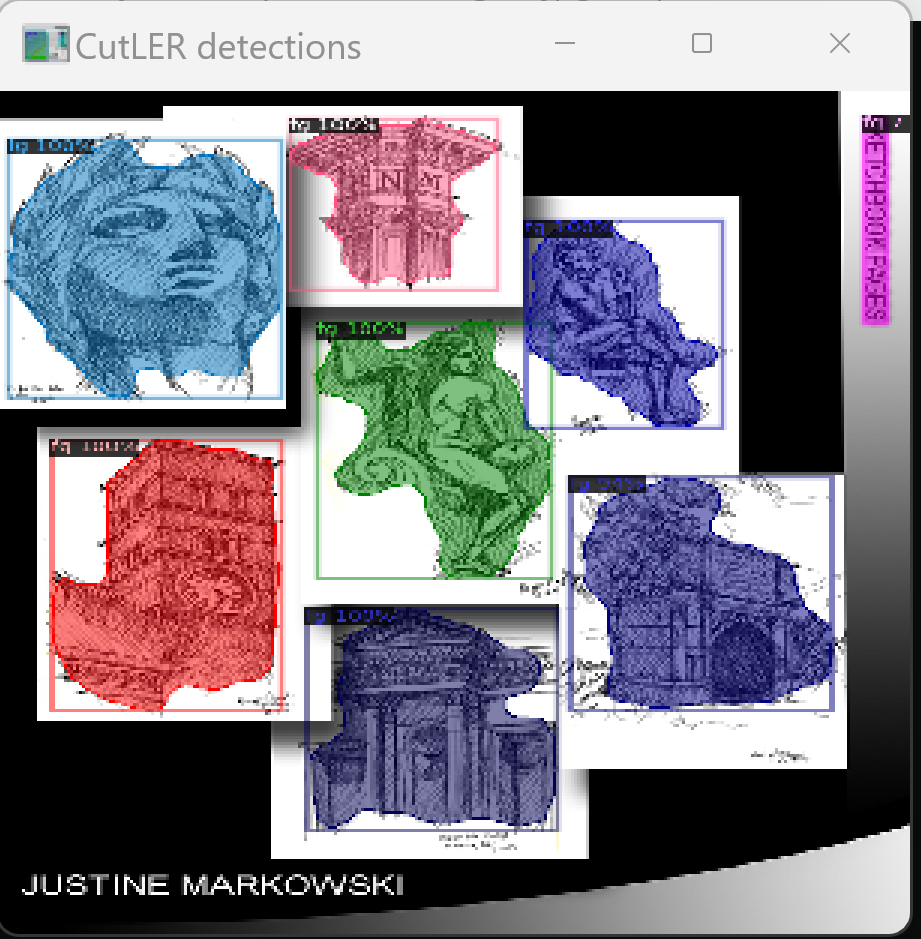
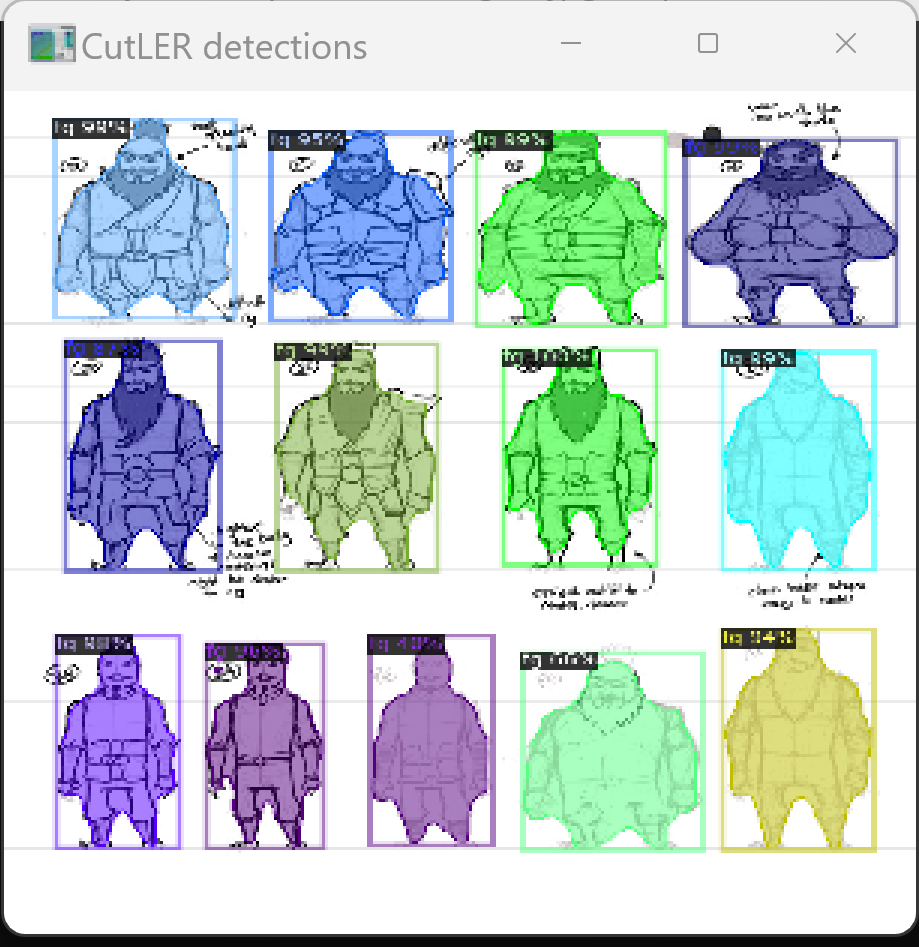
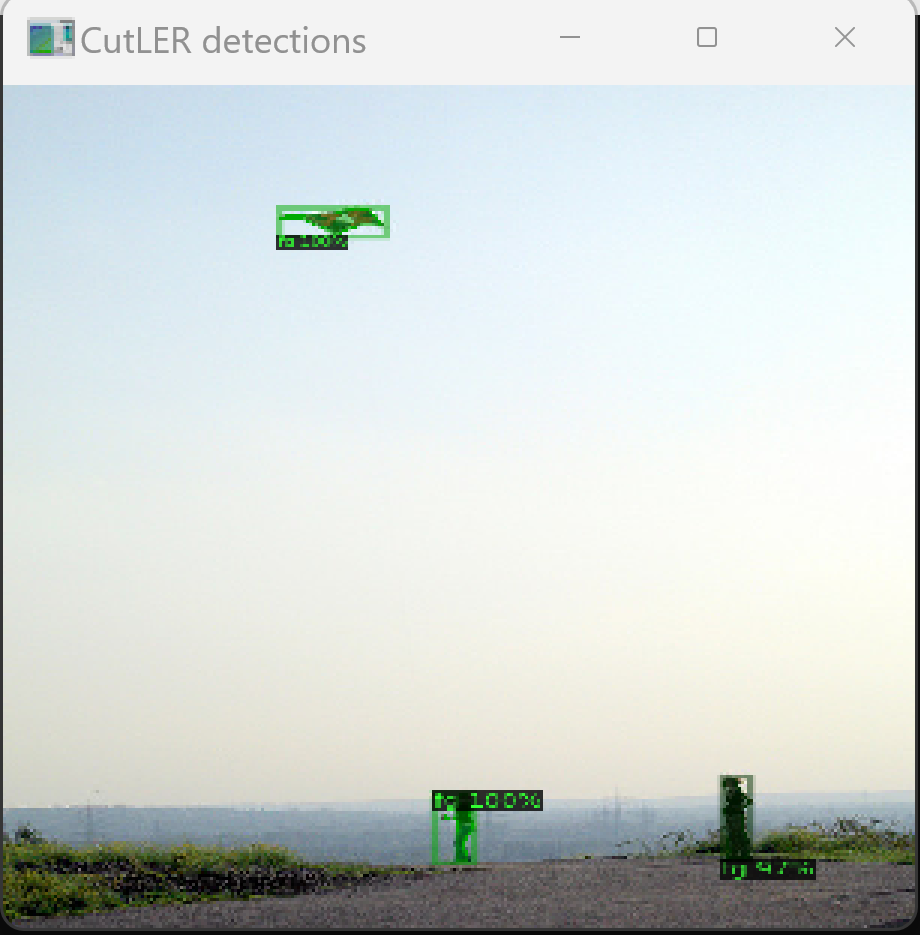
ゼロショットの物体検出とインスタンスセグメンテーション
- 画像について,ゼロショットの物体検出とインスタンスセグメンテーションを行う
cd /d c:%HOMEPATH%
cd CutLER
cd cutler
python demo/demo.py --config-file model_zoo/configs/CutLER-ImageNet/cascade_mask_rcnn_R_50_FPN_demo.yaml --input demo/imgs/*.jpg --opts MODEL.WEIGHTS cutler_cascade_final.pth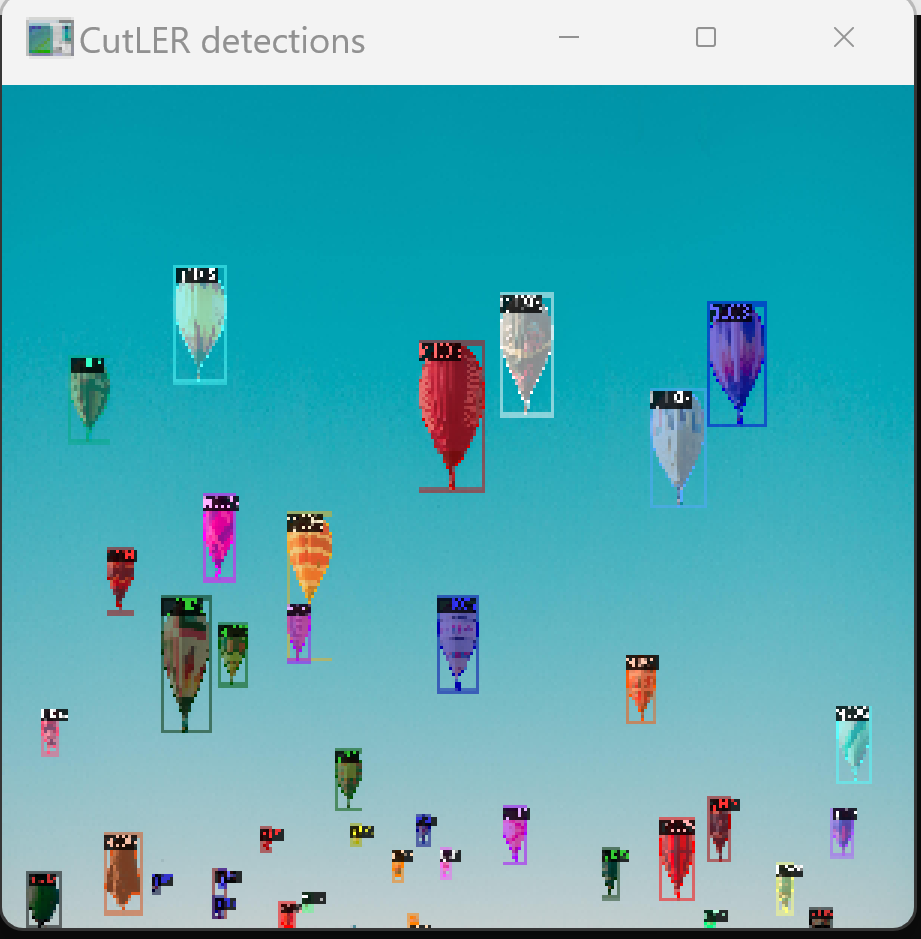
- ビデオについて,ゼロショットの物体検出とインスタンスセグメンテーションを行う
1-1.avi のとこどにはビデオファイル名を指定すること.
cd /d c:%HOMEPATH%
cd CutLER
cd cutler
python demo/demo.py --config-file model_zoo/configs/CutLER-ImageNet/cascade_mask_rcnn_R_50_FPN_demo.yaml --video-input 1-1.avi --opts MODEL.WEIGHTS cutler_cascade_final.pth
- webcam
cd /d c:%HOMEPATH%
cd CutLER
cd cutler
python demo/demo.py --config-file model_zoo/configs/CutLER-ImageNet/cascade_mask_rcnn_R_50_FPN_demo.yaml --webcam --opts MODEL.WEIGHTS cutler_cascade_final.pth