![[kaneko lab.]](https://www.kkaneko.jp/info/logo_png.png)
lapack 最新版のインストール(ソースコードを用いたインストール)(Windows 上)
以下,Windows で,lapack をソースコードからビルドして,インストールする手順をスクリーンショット等で説明する.ビルドには マイクロソフト C++ ビルドツールを使用.
【目次】
【サイト内の関連ページ】
前準備
Build Tools for Visual Studio 2026(ビルドツール)のインストール
Build Tools for Visual Studio 2026(ビルドツール)のインストールを行い、C/C++ コードのビルド環境を整える。
Build Tools for Visual Studio は,Visual Studio の IDE を含まない C/C++ コンパイラ,ライブラリ,ビルドツール等のコマンドライン向け開発ツールセットである。インストール済みの場合,この手順は不要である。 以下のコマンドは、Build Tools が未インストールの場合は winget で新規インストールし、インストール済みの場合は 【インストールコマンドの実行方法】 管理者権限でコマンドプロンプトを起動する(手順:Windows キーまたはスタートメニュー → 上記のコマンドでは、Build Tools 本体と Visual C++ 再頒布可能パッケージをインストールし、続いて以下のコンポーネントを追加している。 追加のコンポーネントが必要になった場合は Visual Studio Installer で個別にインストールできる。 インストール完了の確認 Visual Studio を必要とするとき Visual Studio の機能を必要とする場合は,追加インストールできる。
管理者権限のコマンドプロンプトで以下を実行する.管理者権限は,winget の --scope machine オプションでシステム全体にインストールするために必要となる.
管理者権限のコマンドプロンプトで以下を実行する。管理者権限のコマンドプロンプトを起動するには、Windows キーまたはスタートメニューから「[Build Tools for Visual Studio 2026(ビルドツール)のインストール手順を見るには、ここをクリック]
Windows での Build Tools for Visual Studio 2026 のインストール
setup.exe modify でコンポーネントを追加する(バージョンは変更しない)。cmd と入力 → 右クリック → 「管理者として実行」)。そして、コマンド全体をコマンドプロンプトにコピー&ペーストする。REM ============================================================
REM Visual C++ 再頒布可能パッケージ (VCRedist 2015-)
REM ============================================================
winget install --scope machine --id Microsoft.VCRedist.2015+.x64 -e --silent --disable-interactivity --force --accept-source-agreements --accept-package-agreements --override "/quiet /norestart"
if not "%ERRORLEVEL%"=="0" ( color 0c & echo VCRedist のインストールに失敗しました & ping 127.0.0.1 -n 6 >nul & color )
REM ============================================================
REM Visual Studio Build Tools + Desktop development with C++
REM (VCTools、MSBuildTools、CMake連携、Clang、Windows 11 SDK)
REM ============================================================
REM 進行中のインストーラーを停止(ロック競合回避。対象プロセスが存在しない場合は
REM taskkillがエラーを返すが、これは想定内であるため出力のみ抑制する)
taskkill /F /IM vs_setup.exe /T >nul 2>&1
taskkill /F /IM vs_installer.exe /T >nul 2>&1
taskkill /F /IM vs_installerservice.exe /T >nul 2>&1
taskkill /F /IM msiexec.exe /T >nul 2>&1
REM Build Tools + Desktop development with C++(VCTools)+ 追加コンポーネント(一括)
REM 未インストール時: winget で新規インストール
REM インストール済み時: setup.exe modify でコンポーネント追加(バージョンは変更しない)
winget list --id Microsoft.VisualStudio.BuildTools 2>nul | findstr /i "BuildTools" >nul 2>&1
if %ERRORLEVEL% EQU 0 (
for /f "usebackq delims=" %P in (`"C:\Program Files (x86)\Microsoft Visual Studio\Installer\vswhere.exe" -products Microsoft.VisualStudio.Product.BuildTools -property installationPath`) do start /wait "" "C:\Program Files (x86)\Microsoft Visual Studio\Installer\setup.exe" modify --installPath "%P" --add Microsoft.VisualStudio.Workload.VCTools --add Microsoft.VisualStudio.Workload.MSBuildTools --add Microsoft.VisualStudio.Component.VC.CMake.Project --add Microsoft.VisualStudio.Component.VC.Llvm.Clang --add Microsoft.VisualStudio.Component.VC.Llvm.ClangToolset --add Microsoft.VisualStudio.Component.Windows11SDK.26100 --add Microsoft.VisualStudio.Component.VC.v143.x86.x64 --includeRecommended --quiet --norestart --nocache
if not "%ERRORLEVEL%"=="0" ( color 0c & echo Build Tools のコンポーネント追加に失敗しました & ping 127.0.0.1 -n 6 >nul & color )
) else (
winget install --scope machine --id Microsoft.VisualStudio.BuildTools -e --silent --disable-interactivity --force --accept-source-agreements --accept-package-agreements --override "--quiet --wait --norestart --nocache --add Microsoft.VisualStudio.Workload.VCTools --includeRecommended --add Microsoft.VisualStudio.Workload.MSBuildTools --add Microsoft.VisualStudio.Component.VC.CMake.Project --add Microsoft.VisualStudio.Component.VC.Llvm.Clang --add Microsoft.VisualStudio.Component.VC.Llvm.ClangToolset --add Microsoft.VisualStudio.Component.Windows11SDK.26100 --add Microsoft.VisualStudio.Component.VC.v143.x86.x64"
if not "%ERRORLEVEL%"=="0" ( color 0c & echo Build Tools のインストールに失敗しました & ping 127.0.0.1 -n 6 >nul & color )
)
REM
REM BuildTools のインストールパスを vswhere.exe で取得(メジャーバージョンに依存しない)
set "VSWHERE=C:\Program Files (x86)\Microsoft Visual Studio\Installer\vswhere.exe"
set "BT_PATH="
for /f "usebackq delims=" %P in (`"%VSWHERE%" -products Microsoft.VisualStudio.Product.BuildTools -property installationPath`) do set "BT_PATH=%P"
if not defined BT_PATH ( color 0c & echo Build Tools のインストールパスを取得できませんでした & ping 127.0.0.1 -n 6 >nul & color )
REM 破損時の修復(任意、動作がおかしくなった場合)
REM if defined BT_PATH "C:\Program Files (x86)\Microsoft Visual Studio\Installer\setup.exe" repair --installPath "%BT_PATH%" --quiet --norestart
REM 導入確認(インストールパスが表示されれば正常)
"%VSWHERE%" -products * -requires Microsoft.VisualStudio.Workload.VCTools -property installationPath
--includeRecommended により、MSVC コンパイラ、C++ AddressSanitizer、vcpkg、CMake ツール、Windows 11 SDK 等の推奨コンポーネントが含まれる)winget list Microsoft.VisualStudio.BuildToolsGit のインストール(Windows 上) [クリックして展開]
REM Git をシステム領域にインストール
winget install --scope machine --id Git.Git -e --silent --disable-interactivity --force --accept-source-agreements --accept-package-agreements --override "/VERYSILENT /NORESTART /NOCANCEL /SP- /CLOSEAPPLICATIONS /RESTARTAPPLICATIONS /COMPONENTS=""icons,ext\reg\shellhere,assoc,assoc_sh"" /o:PathOption=Cmd /o:CRLFOption=CRLFCommitAsIs /o:BashTerminalOption=MinTTY /o:DefaultBranchOption=main /o:EditorOption=VIM /o:SSHOption=OpenSSH /o:UseCredentialManager=Enabled /o:PerformanceTweaksFSCache=Enabled /o:EnableSymlinks=Disabled /o:EnableFSMonitor=Disabled"
CMakeのインストール(Windows 上) [クリックして展開]
cmd」と入力し、表示された「コマンドプロンプト」を右クリックして「管理者として実行」を選択する。REM CMake をシステム領域にインストール
winget install --scope machine --id Kitware.CMake -e --silent --disable-interactivity --force --accept-source-agreements --accept-package-agreements --override "/qn /norestart ADD_CMAKE_TO_PATH=System"
lapack のインストール(ソースコードを使用)(Windows 上)
clang, flang, ninja のインストール(Windows 上)
Windows でのインストール手順は、 「Windows で clang, flang, ninja のインストール」で説明している.
(オプション)数値演算ライブラリ等のインストール(vcpkg を使用)
必要な場合には,次のように操作する.
- 事前にvcpkg のインストールを行っておく.
- コマンドプロンプトを管理者として開き次のコマンドを実行する.
c:\vcpkg\vcpkg --triplet x64-windows install blas openblas[threads] pthread - Windows の システム環境変数 PATHに,c:\vcpkg\installed\x64-windows\bin を追加して,パスを通す.
Windows で,管理者権限でコマンドプロンプトを起動(手順:Windowsキーまたはスタートメニュー >
cmdと入力 > 右クリック > 「管理者として実行」)。次のコマンドを実行
powershell -command "$oldpath = [System.Environment]::GetEnvironmentVariable(\"Path\", \"Machine\"); $oldpath += \";c:\vcpkg\installed\x64-windows\bin\"; [System.Environment]::SetEnvironmentVariable(\"Path\", $oldpath, \"Machine\")"
powershell -command "[System.Environment]::SetEnvironmentVariable(\"LAPACK_ROOT\", \"C:\vcpkg\installed\x64-windows\", \"Machine\")"
lapack のインストール(ソースコードを使用)(Windows 上)
- lapack のウェブページを開く
- このウェブページで最新情報を確認
- 以下の操作をx64 Native Tools コマンドプロンプト (x64 Native Tools Command Prompt)で実行する
(手順:スタートメニュー →「Visual C++ Build Tools」の下の「x64 Native Tools コマンドプロンプト (x64 Native Tools Command Prompt)」を選ぶ)。
「x64 Native Tools コマンドプロンプト」がないときは,ビルドツール (Build Tools) をインストールすると,x64 Native Tools コマンドプロンプトもインストールされる.その手順は,別ページ »で説明している.
- LAPACK のソースコードのダウンロード
cd /d c:%HOMEPATH% rmdir /s /q lapack-release git clone --recursive https://github.com/Reference-LAPACK/lapack-release.git - cmake の実行
次のコマンドを実行.
cd /d c:%HOMEPATH% cd lapack-release rmdir /s /q build mkdir build cd build del CMakeCache.txt rmdir /s /q CMakeFiles cmake -G "Ninja" ^ -DCMAKE_C_COMPILER=clang-cl ^ -DCMAKE_Fortran_COMPILER=flang ^ -DUSE_OPTIMIZED_BLAS=ON ^ -DUSE_OPTIMIZED_LAPACK=ON ^ -DCMAKE_INSTALL_PREFIX="c:\lapack-release" ^ -DCMAKE_TOOLCHAIN_FILE=C:/vcpkg/scripts/buildsystems/vcpkg.cmake ^ -DVCPKG_TARGET_TRIPLET=x64-windows ^ .. - cmake の実行結果の確認
エラーメッセージが出なければ OK.
- ビルドとインストール
cmake --build . --config Release --target install - ビルドとインストール終了の確認
エラーメッセージが出なければ OK.
- コンパイルして実行する(動作確認)
LAPACK を使うプログラム(ファイル名は,eig_lapack.c としている)を作る。
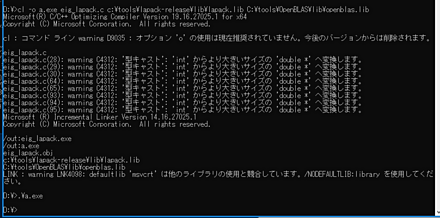
次の操作でコンパイルして実行する
cl eig_lapack.c c:\lapack-release\lib\lapack.lib %OpenBLAS_ROOT%\lib\openblas.lib
.\eig_lapack.exe
LAPACK を使うプログラムの実行結果例