画像復元(DiffBIR,Python,PyTorch を使用)(Windows 上)
元画像と処理結果

【目次】
DiffBIR
DiffBIRは画像復元の手法の一つである。 画像復元は、低品質または劣化した画像を元の高品質な状態に修復するタスクである。 このタスクでは、ノイズや歪みなどの複雑な問題に対処する必要がある。 DiffBIRは、2つの主要なステージから成り立っている。 最初のステージでは、画像復元が行われ、低品質な画像が高品質に修復される。 そして、2番目のステージでは、事前に訓練されたStable Diffusionを使用して、高品質な画像が生成される。 DiffBIRは他の既存の手法よりも優れた結果を得ることができることが実験によって示されている。【文献】
Xinqi Lin, Jingwen He, Ziyan Chen, Zhaoyang Lyu, Ben Fei, Bo Dai, Wanli Ouyang, Yu Qiao, Chao Dong, DiffBIR: Towards Blind Image Restoration with Generative Diffusion Prior, arXiv:2308.15070v1, 2023.
https://arxiv.org/pdf/2308.15070v1.pdf
【関連する外部ページ】
- 公式のデモページ(Google Colaboratory 上): https://colab.research.google.com/github/camenduru/DiffBIR-colab/blob/main/DiffBIR_colab.ipynb
- DiffBIR の公式の GitHub のページ: https://github.com/XPixelGroup/DiffBIR
- Paper with Code のページ: https://paperswithcode.com/paper/diffbir-towards-blind-image-restoration-with
前準備
Build Tools for Visual Studio 2026(ビルドツール)のインストール
Build Tools for Visual Studio 2026(ビルドツール)のインストールを行い、C/C++ コードのビルド環境を整える。
Build Tools for Visual Studio は,Visual Studio の IDE を含まない C/C++ コンパイラ,ライブラリ,ビルドツール等のコマンドライン向け開発ツールセットである。インストール済みの場合,この手順は不要である。 以下のコマンドは、Build Tools が未インストールの場合は winget で新規インストールし、インストール済みの場合は 【インストールコマンドの実行方法】 管理者権限でコマンドプロンプトを起動する(手順:Windows キーまたはスタートメニュー → 上記のコマンドでは、Build Tools 本体と Visual C++ 再頒布可能パッケージをインストールし、続いて以下のコンポーネントを追加している。 上記以外の追加のコンポーネントが必要になった場合は Visual Studio Installer で個別にインストールできる。 インストール完了の確認 Visual Studio を必要とするとき Visual Studio の機能を必要とする場合は,追加インストールできる。[Build Tools for Visual Studio 2026(ビルドツール)のインストール手順を見るには、ここをクリック]
Windows での Build Tools for Visual Studio 2026 のインストール
setup.exe modify でコンポーネントを追加する(バージョンは変更しない)。cmd と入力 → 右クリック → 「管理者として実行」)。そして、コマンド全体をコマンドプロンプトにコピー&ペーストする。REM VC++ ランタイム
winget install --scope machine --id Microsoft.VCRedist.2015+.x64 -e --silent --disable-interactivity --force --accept-source-agreements --accept-package-agreements --override "/quiet /norestart"
REM ============================================================
REM Visual Studio Build Tools + Desktop development with C++
REM (VCTools、MSBuildTools、CMake連携、Clang、Windows 11 SDK)
REM ============================================================
REM 進行中のインストーラーを停止(ロック競合回避)
taskkill /F /IM vs_setup.exe /T >nul 2>&1
taskkill /F /IM vs_installer.exe /T >nul 2>&1
taskkill /F /IM vs_installerservice.exe /T >nul 2>&1
REM 未インストール時: winget で新規インストール
REM インストール済み時: setup.exe modify でコンポーネント追加(バージョンは変更しない)
winget list --id Microsoft.VisualStudio.BuildTools 2>nul | findstr /i "BuildTools" >nul 2>&1
if %ERRORLEVEL% EQU 0 (
for /f "usebackq delims=" %P in (`"C:\Program Files (x86)\Microsoft Visual Studio\Installer\vswhere.exe" -products Microsoft.VisualStudio.Product.BuildTools -property installationPath`) do start /wait "" "C:\Program Files (x86)\Microsoft Visual Studio\Installer\setup.exe" modify --installPath "%P" --add Microsoft.VisualStudio.Workload.VCTools --add Microsoft.VisualStudio.Workload.MSBuildTools --add Microsoft.VisualStudio.Component.VC.CMake.Project --add Microsoft.VisualStudio.Component.VC.Llvm.Clang --add Microsoft.VisualStudio.Component.VC.Llvm.ClangToolset --add Microsoft.VisualStudio.Component.Windows11SDK.26100 --includeRecommended --quiet --norestart --nocache
) else (
winget install --scope machine --id Microsoft.VisualStudio.BuildTools -e --silent --disable-interactivity --force --accept-source-agreements --accept-package-agreements --override "--quiet --wait --norestart --nocache --add Microsoft.VisualStudio.Workload.VCTools --includeRecommended --add Microsoft.VisualStudio.Workload.MSBuildTools --add Microsoft.VisualStudio.Component.VC.CMake.Project --add Microsoft.VisualStudio.Component.VC.Llvm.Clang --add Microsoft.VisualStudio.Component.VC.Llvm.ClangToolset --add Microsoft.VisualStudio.Component.Windows11SDK.26100"
)
REM 破損時の修復(任意、動作がおかしくなった場合)
REM "C:\Program Files (x86)\Microsoft Visual Studio\Installer\setup.exe" repair --installPath "C:\Program Files (x86)\Microsoft Visual Studio\18\BuildTools" --quiet --norestart
REM 導入確認(インストールパスが表示されれば正常)
"C:\Program Files (x86)\Microsoft Visual Studio\Installer\vswhere.exe" -products * -requires Microsoft.VisualStudio.Workload.VCTools -property installationPath
--includeRecommended により、MSVC コンパイラ、C++ AddressSanitizer、vcpkg、CMake ツール、Windows 11 SDK 等の推奨コンポーネントが含まれる)winget list Microsoft.VisualStudio.BuildTools
Python 3.12 のインストール
Pythonのインストールを行い、Pythonのプログラムを実行する環境を整える。扱う環境は、Windows搭載パソコンである。金子研究室では、Python 3.12.10を推奨する。
[Windows での Python 3.12 のインストール手順を見るには、ここをクリック]
Windows での Python 3.12 のインストール
以下のいずれかの方法でPython 3.12をインストールする。Pythonがインストール済みの場合、この手順は不要である。
方法 1:winget によるインストール
【インストールコマンドの実行方法】
管理者権限でコマンドプロンプトを起動する(手順:Windowsキーまたはスタートメニュー → cmd と入力 → 右クリック → 「管理者として実行」)。そして、コマンド全体をコマンドプロンプトにコピー&ペーストする。
--scope machine を指定することで、システム全体(全ユーザー向け)にインストールされる。このオプションの実行には管理者権限が必要である。インストール完了後、コマンドプロンプトを再起動するとPATHが反映される。
REM Python 3.12 をシステム領域にインストール
winget install --id Python.Python.3.12 -e --scope machine --silent --accept-source-agreements --accept-package-agreements --override "/quiet InstallAllUsers=1 PrependPath=1 Include_test=0 Include_pip=1 Include_launcher=1 InstallLauncherAllUsers=1 TargetDir=\"C:\Program Files\Python312\""

REM Python と Scripts を PATH 先頭に追加
powershell -NoProfile -Command "$p='C:\Program Files\Python312'; $s=\"$p\Scripts\"; $c=[Environment]::GetEnvironmentVariable('Path','Machine'); if((Test-Path $p) -and (';'+$c+';' -notlike \"*;$p;*\") -and (';'+$c+';' -notlike \"*;$s;*\")){[Environment]::SetEnvironmentVariable('Path',\"$p;$s;$c\",'Machine')}"
方法 2:インストーラーによるインストール
- Python公式サイト(https://www.python.org/downloads/)にアクセスし、「Download Python 3.x.x」ボタンからWindows用インストーラーをダウンロードする。
- ダウンロードしたインストーラーを実行する。
- 初期画面の下部に表示される「Add python.exe to PATH」にチェックを入れてから「Customize installation」を選択する。このチェックを入れ忘れると、コマンドプロンプトから
pythonコマンドを実行できない。 - 「Install Python 3.xx for all users」にチェックを入れ、「Install」をクリックする。
インストールの確認
コマンドプロンプトで以下を実行する。
python --versionバージョン番号(例:Python 3.12.x)が表示されればインストール成功である。「'python' は、内部コマンドまたは外部コマンドとして認識されていません。」と表示される場合は、インストールが正常に完了していない。
Git のインストール
管理者権限のコマンドプロンプトで以下を実行する。管理者権限のコマンドプロンプトを起動するには、Windows キーまたはスタートメニューから「cmd」と入力し、表示された「コマンドプロンプト」を右クリックして「管理者として実行」を選択する。
REM Git をシステム領域にインストール
winget install --scope machine --id Git.Git -e --silent --disable-interactivity --force --accept-source-agreements --accept-package-agreements --override "/VERYSILENT /NORESTART /NOCANCEL /SP- /CLOSEAPPLICATIONS /RESTARTAPPLICATIONS /COMPONENTS=""icons,ext\reg\shellhere,assoc,assoc_sh"" /o:PathOption=Cmd /o:CRLFOption=CRLFCommitAsIs /o:BashTerminalOption=MinTTY /o:DefaultBranchOption=main /o:EditorOption=VIM /o:SSHOption=OpenSSH /o:UseCredentialManager=Enabled /o:PerformanceTweaksFSCache=Enabled /o:EnableSymlinks=Disabled /o:EnableFSMonitor=Disabled"
【関連する外部ページ】
- Git の公式ページ: https://git-scm.com/
Build Tools for Visual Studio 2022,NVIDIA ドライバ,NVIDIA CUDA ツールキット 11.8,NVIDIA cuDNN 8.9.7 のインストール(Windows 上)
【サイト内の関連ページ】 NVIDIA グラフィックスボードを搭載しているパソコンの場合には, NVIDIA ドライバ, NVIDIA CUDA ツールキット, NVIDIA cuDNN のインストールを行う.
- Windows での Build Tools for Visual Studio 2022 のインストール: 別ページ »で説明
- Windows での NVIDIA ドライバ,NVIDIA CUDA ツールキット 11.8,NVIDIA cuDNN v8.9.7 のインストール手順: 別ページ »で説明
【関連する外部ページ】
- Build Tools for Visual Studio 2022 (ビルドツール for Visual Studio 2022)の公式ダウンロードページ: https://visualstudio.microsoft.com/ja/visual-cpp-build-tools/
- NVIDIA ドライバのダウンロードの公式ページ: https://www.nvidia.co.jp/Download/index.aspx?lang=jp
- NVIDIA CUDA ツールキットのアーカイブの公式ページ: https://developer.nvidia.com/cuda-toolkit-archive
- NVIDIA cuDNN のダウンロードの公式ページ: https://developer.nvidia.com/cudnn
PyTorch のインストール(Windows 上)
- 以下の手順を管理者権限のコマンドプロンプトで実行する
(手順:Windowsキーまたはスタートメニュー →
cmdと入力 → 右クリック → 「管理者として実行」)。 - PyTorch のページを確認
- 次のようなコマンドを実行(実行するコマンドは,PyTorch のページの表示されるコマンドを使う).
次のコマンドを実行することにより, PyTorch 2.3 (NVIDIA CUDA 11.8 用)がインストールされる. 但し,Anaconda3を使いたい場合には別手順になる.
事前に NVIDIA CUDA のバージョンを確認しておくこと(ここでは,NVIDIA CUDA ツールキット 11.8 が前もってインストール済みであるとする).
PyTorch で,GPU が動作している場合には,「torch.cuda.is_available()」により,True が表示される.
python -m pip install -U --ignore-installed pip python -m pip uninstall -y torch torchvision torchaudio torchtext xformers python -m pip install -U torch torchvision torchaudio numpy --index-url https://download.pytorch.org/whl/cu118 python -c "import torch; print(torch.__version__, torch.cuda.is_available())"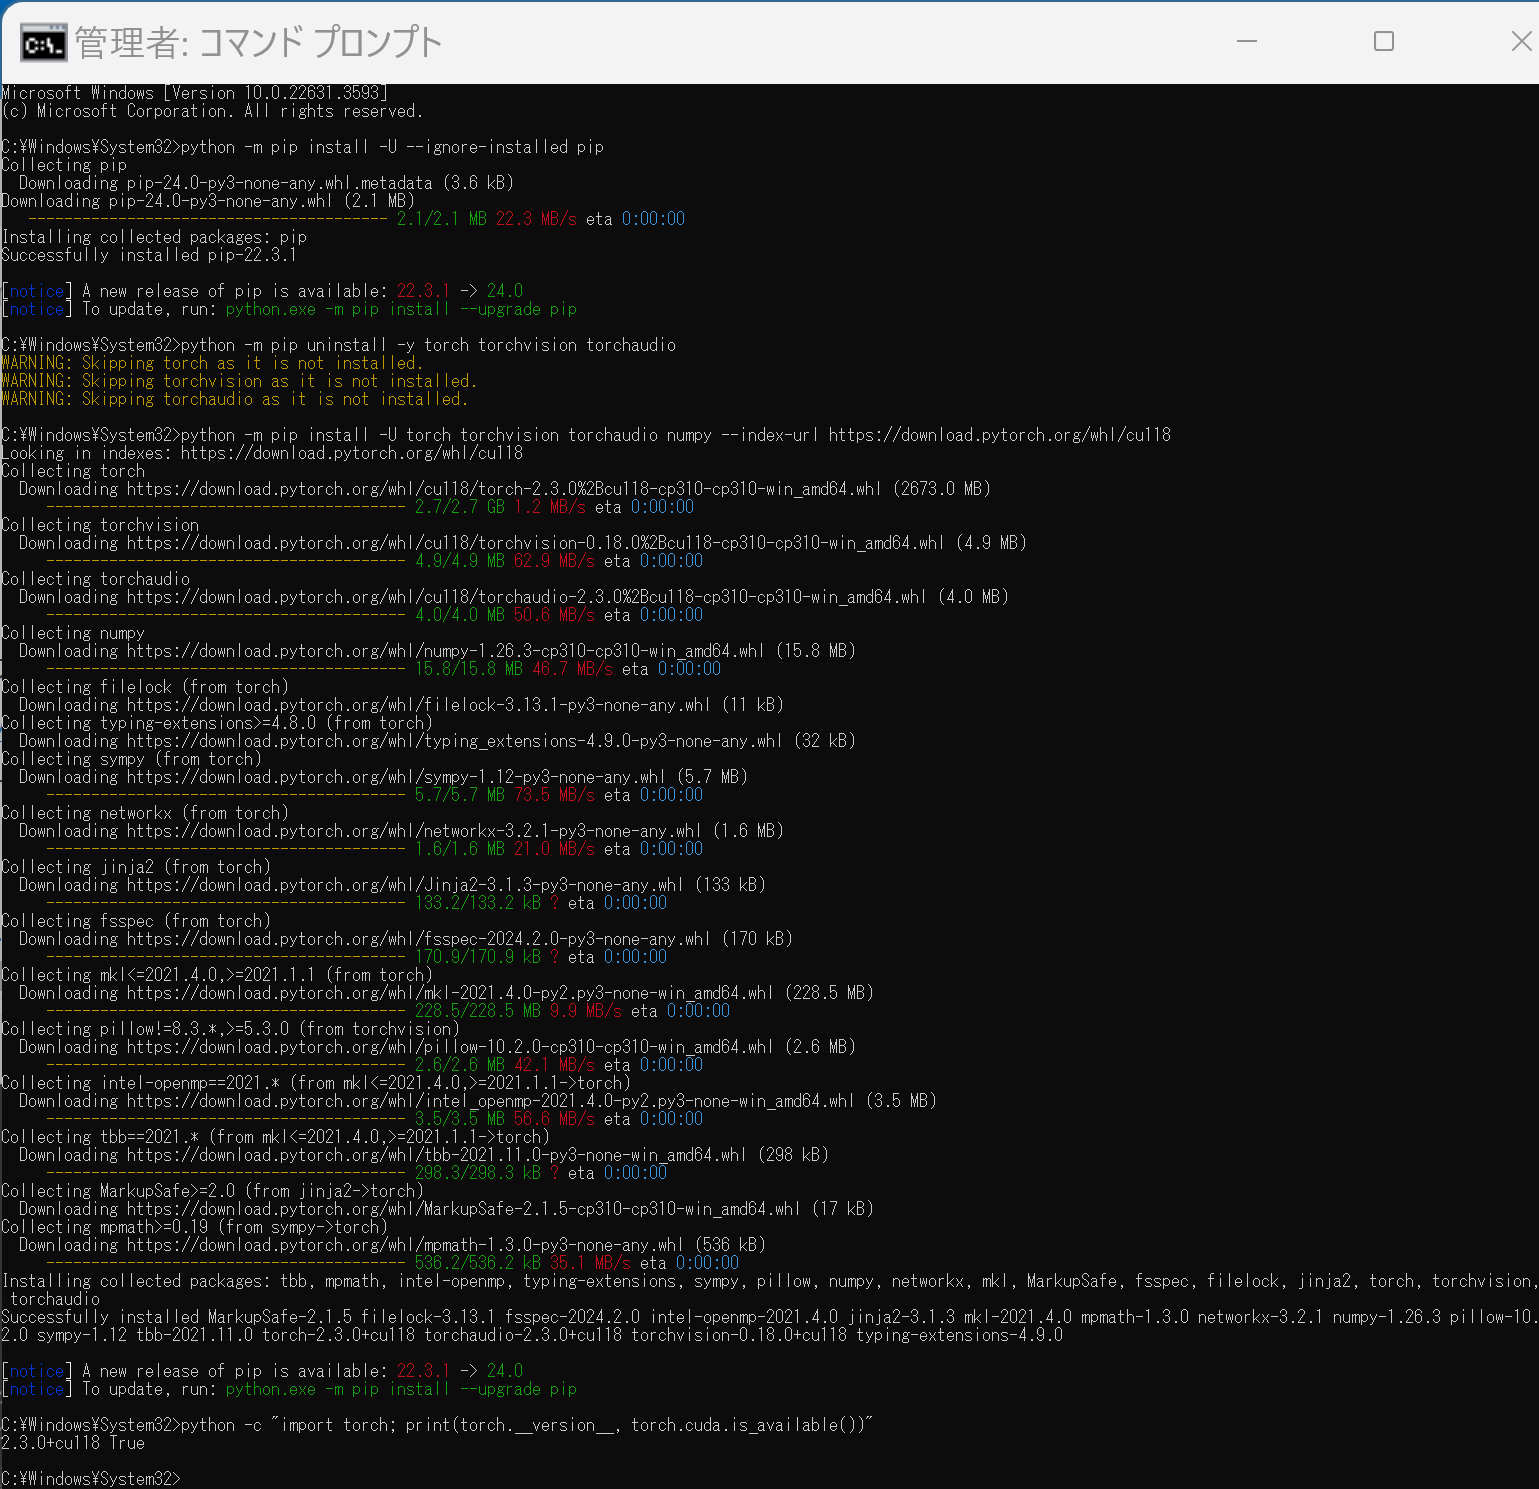 Anaconda3を使いたい場合には, Anaconda プロンプト (Anaconda Prompt) を管理者として実行し, 次のコマンドを実行する. (PyTorch と NVIDIA CUDA との連携がうまくいかない可能性があるため,Anaconda3を使わないことも検討して欲しい).
conda install -y pytorch torchvision torchaudio pytorch-cuda=11.8 cudnn -c pytorch -c nvidia py -c "import torch; print(torch.__version__, torch.cuda.is_available())"【サイト内の関連ページ】
【関連する外部ページ】
DiffBIR のインストール(Windows 上)
FFmpeg のインストール(Windows 上)
Windows での FFmpeg のインストール(Windows 上): 別ページ »で説明
triton のインストール(Windows 上)
- 以下の手順を管理者権限のコマンドプロンプトで実行する
(手順:Windowsキーまたはスタートメニュー →
cmdと入力 → 右クリック → 「管理者として実行」)。 - triton のインストール
pip install https://huggingface.co/r4ziel/xformers_pre_built/resolve/main/triton-2.0.0-cp310-cp310-win_amd64.whl
DiffBIR のインストール(Windows 上)
- 以下の手順を管理者権限のコマンドプロンプトで実行する
(手順:Windowsキーまたはスタートメニュー →
cmdと入力 → 右クリック → 「管理者として実行」)。 - インストール,学習済みモデルのダウンロード
cd /d c:%HOMEPATH% rmdir /s /q DiffBIR python -m pip install xformers git clone https://github.com/XPixelGroup/DiffBIR.git cd DiffBIR python -m pip install -U numpy torch torchvision torchaudio xformers pytorch_lightning==1.7.7 torchmetrics==0.11.4 torchdata torchtext einops open-clip-torch omegaconf triton opencv-python-headless scipy matplotlib lpips gradio chardet transformers facexlib --extra-index-url https://download.pytorch.org/whl/cu118 mkdir weights cd weights curl -L -O https://huggingface.co/lxq007/DiffBIR/resolve/main/face_full_v1.ckpt curl -L -O https://huggingface.co/lxq007/DiffBIR/resolve/main/face_swinir_v1.ckpt curl -L -O https://huggingface.co/lxq007/DiffBIR/resolve/main/general_full_v1.ckpt curl -L -O https://huggingface.co/lxq007/DiffBIR/resolve/main/general_swinir_v1.ckpt - 終了の確認
エラーメッセージが出ないこと
DiffBIR の動作確認(Windows 上)
DiffBIR の公式の GitHub のページ: https://github.com/XPixelGroup/DiffBIR に従う
- Windows で,コマンドプロンプトを実行
- 画像復元の実行
公開されている学習済みモデルを用いて実行する. 画像復元したい画像ファイルは,inputs/demo/general に置く. 画像復元の結果は,out に置かれる.
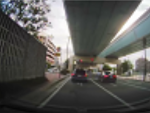
set PYTHONPATH=%PYTHONPATH%;.
cd /d c:%HOMEPATH%
cd DiffBIR
python inference.py ^
--input inputs/demo/general ^
--config configs/model/cldm.yaml ^
--ckpt weights/general_full_v1.ckpt ^
--reload_swinir --swinir_ckpt weights/general_swinir_v1.ckpt ^
--steps 50 ^
--sr_scale 4 ^
--image_size 512 ^
--color_fix_type wavelet --resize_back ^
--output out ^
--device cuda
元画像

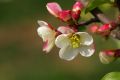
処理結果

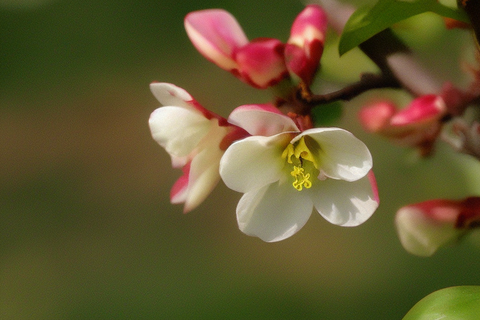
- 別の画像で試してみた結果
元画像
処理結果
.mp4 ファイルを処理するプログラム
- Windows で,コマンドプロンプトを実行
- エディタを起動
cd /d c:%HOMEPATH%\DiffBIR mkdir invideo notepad diffbirvideo.py - エディタで,次のプログラムを保存
このプログラムは, 公式の GitHub のレポジトリで公開されていたものを変更している.
from typing import List, Tuple, Optional import os import math from argparse import ArgumentParser, Namespace import numpy as np import torch import einops import pytorch_lightning as pl from PIL import Image from omegaconf import OmegaConf from ldm.xformers_state import disable_xformers from model.spaced_sampler import SpacedSampler from model.cldm import ControlLDM from model.cond_fn import MSEGuidance from utils.image import auto_resize, pad from utils.common import instantiate_from_config, load_state_dict from utils.file import list_image_files, get_file_name_parts @torch.no_grad() def process( model: ControlLDM, control_imgs: List[np.ndarray], steps: int, strength: float, color_fix_type: str, disable_preprocess_model: bool, cond_fn: Optional[MSEGuidance], tiled: bool, tile_size: int, tile_stride: int ) -> Tuple[List[np.ndarray], List[np.ndarray]]: """ Apply DiffBIR model on a list of low-quality images. Args: model (ControlLDM): Model. control_imgs (List[np.ndarray]): A list of low-quality images (HWC, RGB, range in [0, 255]). steps (int): Sampling steps. strength (float): Control strength. Set to 1.0 during training. color_fix_type (str): Type of color correction for samples. disable_preprocess_model (bool): If specified, preprocess model (SwinIR) will not be used. cond_fn (Guidance | None): Guidance function that returns gradient to guide the predicted x_0. tiled (bool): If specified, a patch-based sampling strategy will be used for sampling. tile_size (int): Size of patch. tile_stride (int): Stride of sliding patch. Returns: preds (List[np.ndarray]): Restoration results (HWC, RGB, range in [0, 255]). stage1_preds (List[np.ndarray]): Outputs of preprocess model (HWC, RGB, range in [0, 255]). If `disable_preprocess_model` is specified, then preprocess model's outputs is the same as low-quality inputs. """ n_samples = len(control_imgs) sampler = SpacedSampler(model, var_type="fixed_small") control = torch.tensor(np.stack(control_imgs) / 255.0, dtype=torch.float32, device=model.device).clamp_(0, 1) control = einops.rearrange(control, "n h w c -> n c h w").contiguous() if not disable_preprocess_model: control = model.preprocess_model(control) model.control_scales = [strength] * 13 if cond_fn is not None: cond_fn.load_target(2 * control - 1) height, width = control.size(-2), control.size(-1) shape = (n_samples, 4, height // 8, width // 8) x_T = torch.randn(shape, device=model.device, dtype=torch.float32) if not tiled: samples = sampler.sample( steps=steps, shape=shape, cond_img=control, positive_prompt="", negative_prompt="", x_T=x_T, cfg_scale=1.0, cond_fn=cond_fn, color_fix_type=color_fix_type ) else: samples = sampler.sample_with_mixdiff( tile_size=tile_size, tile_stride=tile_stride, steps=steps, shape=shape, cond_img=control, positive_prompt="", negative_prompt="", x_T=x_T, cfg_scale=1.0, cond_fn=cond_fn, color_fix_type=color_fix_type ) x_samples = samples.clamp(0, 1) x_samples = (einops.rearrange(x_samples, "b c h w -> b h w c") * 255).cpu().numpy().clip(0, 255).astype(np.uint8) control = (einops.rearrange(control, "b c h w -> b h w c") * 255).cpu().numpy().clip(0, 255).astype(np.uint8) preds = [x_samples[i] for i in range(n_samples)] stage1_preds = [control[i] for i in range(n_samples)] return preds, stage1_preds def parse_args() -> Namespace: parser = ArgumentParser() # TODO: add help info for these options parser.add_argument("--ckpt", required=True, type=str, help="full checkpoint path") parser.add_argument("--config", required=True, type=str, help="model config path") parser.add_argument("--reload_swinir", action="store_true") parser.add_argument("--swinir_ckpt", type=str, default="") parser.add_argument("--input", type=str, required=True) parser.add_argument("--steps", required=True, type=int) parser.add_argument("--sr_scale", type=float, default=1) parser.add_argument("--image_size", type=int, default=512) parser.add_argument("--disable_preprocess_model", action="store_true") # patch-based sampling parser.add_argument("--tiled", action="store_true") parser.add_argument("--tile_size", type=int, default=512) parser.add_argument("--tile_stride", type=int, default=256) # latent image guidance parser.add_argument("--use_guidance", action="store_true") parser.add_argument("--g_scale", type=float, default=0.0) parser.add_argument("--g_t_start", type=int, default=1001) parser.add_argument("--g_t_stop", type=int, default=-1) parser.add_argument("--g_space", type=str, default="latent") parser.add_argument("--g_repeat", type=int, default=5) parser.add_argument("--color_fix_type", type=str, default="wavelet", choices=["wavelet", "adain", "none"]) parser.add_argument("--resize_back", action="store_true") parser.add_argument("--output", type=str, required=True) parser.add_argument("--show_lq", action="store_true") parser.add_argument("--skip_if_exist", action="store_true") parser.add_argument("--seed", type=int, default=231) parser.add_argument("--device", type=str, default="cuda", choices=["cpu", "cuda"]) return parser.parse_args() import cv2 def list_mp4_files(datadir): return [os.path.join(datadir, f) for f in os.listdir(datadir) if f.endswith('.mp4')] def main() -> None: args = parse_args() pl.seed_everything(args.seed) if args.device == "cpu": disable_xformers() model: ControlLDM = instantiate_from_config(OmegaConf.load(args.config)) load_state_dict(model, torch.load(args.ckpt, map_location="cpu"), strict=True) # reload preprocess model if specified if args.reload_swinir: if not hasattr(model, "preprocess_model"): raise ValueError(f"model don't have a preprocess model.") print(f"reload swinir model from {args.swinir_ckpt}") load_state_dict(model.preprocess_model, torch.load(args.swinir_ckpt, map_location="cpu"), strict=True) model.freeze() model.to(args.device) assert os.path.isdir(args.input) for file_path in list_mp4_files(args.input): print(file_path) cap = cv2.VideoCapture(file_path) frame_num = 0 while cap.isOpened(): ret, frame = cap.read() if not ret: break cv2.imwrite('a.png', frame) print(f"Saved frame {frame_num} as 'a.png'") lq = Image.open('a.png').convert("RGB") if args.sr_scale != 1: lq = lq.resize( tuple(math.ceil(x * args.sr_scale) for x in lq.size), Image.BICUBIC ) if not args.tiled: lq_resized = auto_resize(lq, 512) else: lq_resized = auto_resize(lq, args.tile_size) x = pad(np.array(lq_resized), scale=64) # initialize latent image guidance if args.use_guidance: cond_fn = MSEGuidance( scale=args.g_scale, t_start=args.g_t_start, t_stop=args.g_t_stop, space=args.g_space, repeat=args.g_repeat ) else: cond_fn = None preds, stage1_preds = process( model, [x], steps=args.steps, strength=1, color_fix_type=args.color_fix_type, disable_preprocess_model=args.disable_preprocess_model, cond_fn=cond_fn, tiled=args.tiled, tile_size=args.tile_size, tile_stride=args.tile_stride ) pred, stage1_pred = preds[0], stage1_preds[0] # remove padding pred = pred[:lq_resized.height, :lq_resized.width, :] stage1_pred = stage1_pred[:lq_resized.height, :lq_resized.width, :] save_path = f'a{str(frame_num).zfill(7)}.png' Image.fromarray(pred).resize(lq.size, Image.LANCZOS).save(save_path) print(f"save to {save_path}") frame_num += 1 cap.release() if __name__ == "__main__": main() - .mp4 動画ファイルを準備する
ここでは,次のコマンドを実行する, 動画像ファイルをダウンロードし, 「-b:v 100k -vf "boxblur=luma_radius=5:luma_power=1,eq=contrast=1.5」を指定することにより,わざと動画像を劣化させている. また、-vf scale=1024:-1 は、動画の幅を1024画素に変換し,高さをアスペクト比に基づいて算出している.
もちろん,自前の動画ファイルを準備してもよい.
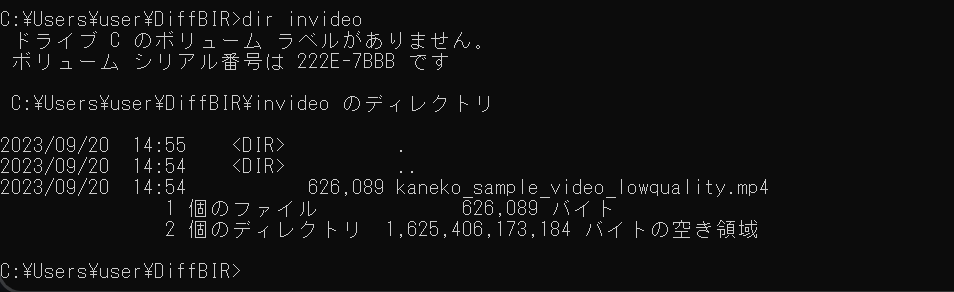
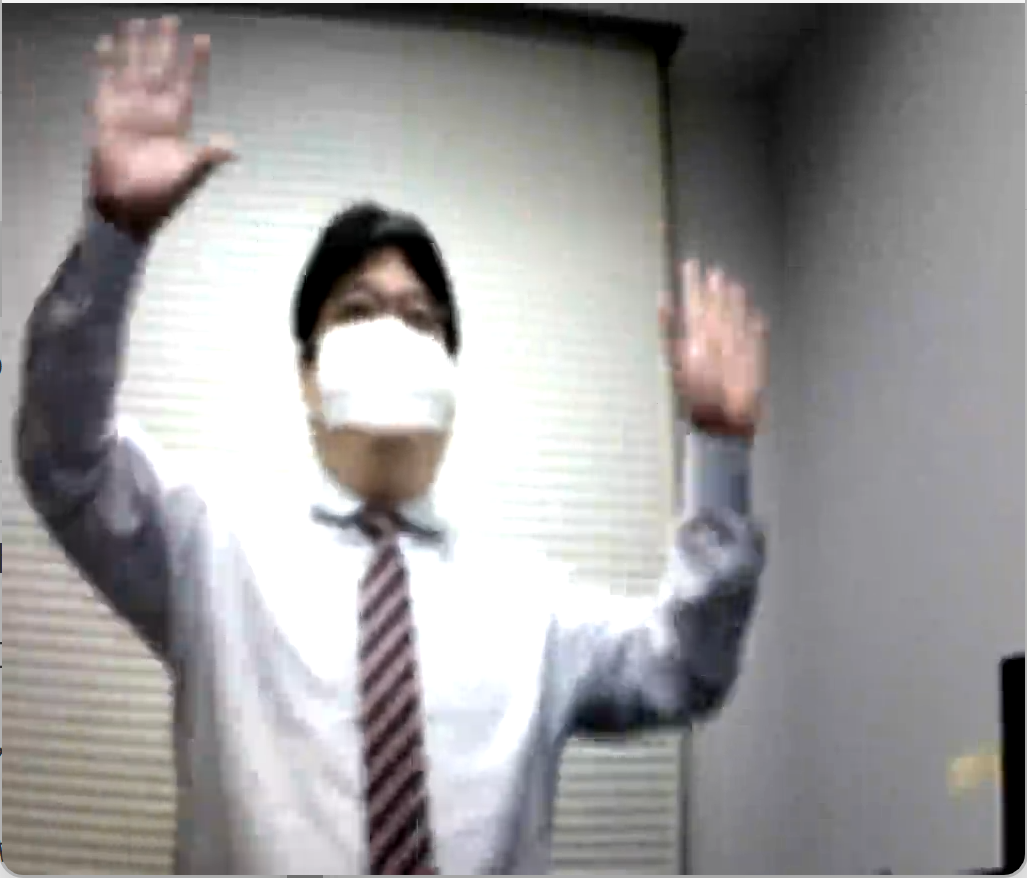
cd /d c:%HOMEPATH%\DiffBIR
mkdir invideo
curl -O https://www.kkaneko.jp/sample/pose/kaneko_sample_video.mp4
del kaneko_sample_video_lowquality.mp4
ffmpeg -i kaneko_sample_video.mp4 -vf "scale=1024:-1,boxblur=luma_radius=5:luma_power=1,eq=contrast=1.5" -b:v 100k -r 30 kaneko_sample_video_lowquality.mp4

copy kaneko_sample_video_lowquality.mp4 invideo
ここで準備した動画ファイル kaneko_sample_video_lowquality.mp4 は次のような 動画である.
準備した動画ファイルは,invideo のようなディレクトリを作り,そこに置くことにする.
- プログラムの実行
Python プログラムの実行
- Windows では python (Python ランチャーは py)
- Ubuntu では python3
Python 開発環境(Jupyter Qt Console, Jupyter ノートブック (Jupyter Notebook), Jupyter Lab, Nteract, Spyder, PyCharm, PyScripterなど)も便利である.
Python のまとめ: 別ページ »にまとめ
set PYTHONPATH=%PYTHONPATH%;.
cd /d c:%HOMEPATH%
cd DiffBIR
python diffbirvideo.py ^
--input invideo ^
--config configs/model/cldm.yaml ^
--ckpt weights/general_full_v1.ckpt ^
--reload_swinir --swinir_ckpt weights/general_swinir_v1.ckpt ^
--steps 50 ^
--sr_scale 1 ^
--image_size 512 ^
--color_fix_type wavelet --resize_back ^
--output out ^
--device cuda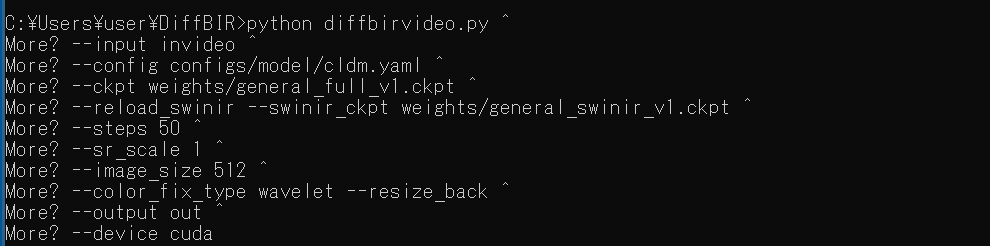
- 連番画像ができるので確認
- 連番画像から .mp4 動画ファイルを作成
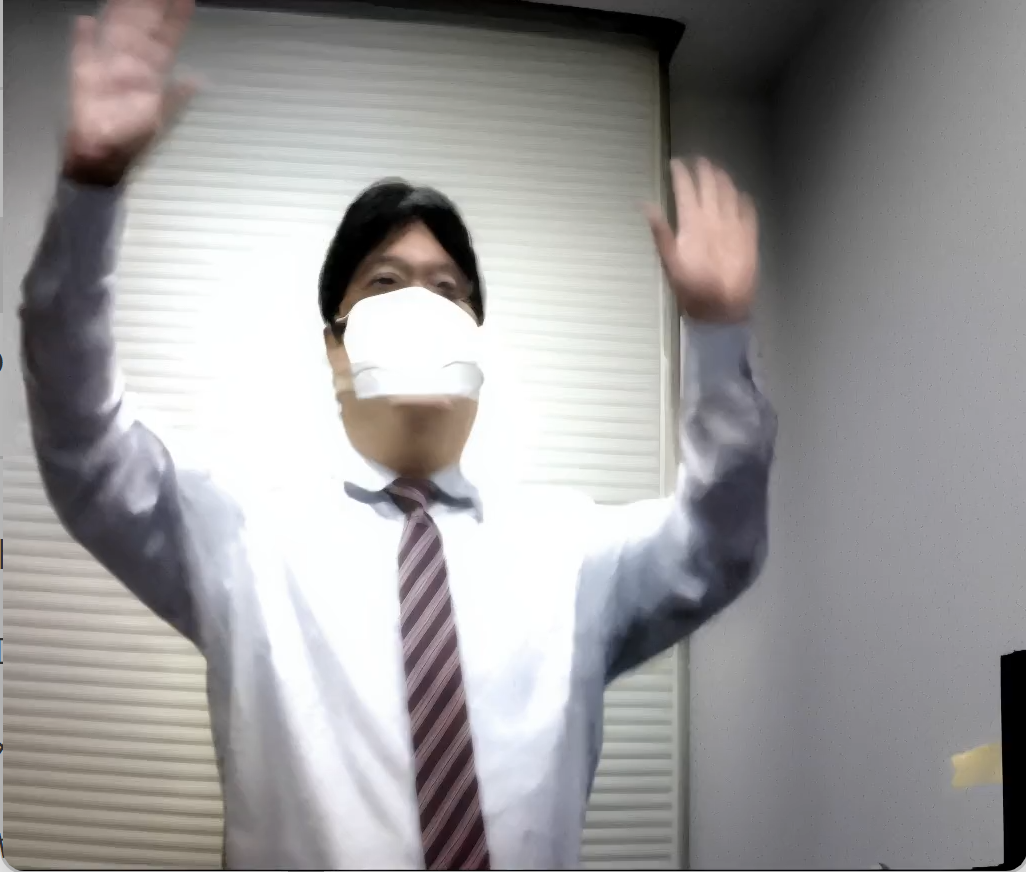
ffmpeg -framerate 30 -i a%07d.png -c:v libx264 -pix_fmt yuv420p output.mp4結果は次の通り
使用した動画ファイル: kaneko_sample_video_lowquality.mp4
DiffBIR での処理結果: output.mp4
- 以下の手順を管理者権限のコマンドプロンプトで実行する
(手順:Windowsキーまたはスタートメニュー →