MMEditing のインストールと動作確認(超解像,画像のノイズ除去,イメージ・インペインティング,イメージ・マッティング)(PyTorch,Python を使用)(Windows 上)
MMEditing は, OpenMMLab の構成物で, イメージ・インペインティング(image inpainting),画像のノイズ除去 (画像のノイズ除去 (image restoration)), イメージ・マッティング (image matting), 超解像 (super resolution), 画像生成の機能を持つ.
- 文献
MMEditing Contributors, OpenMMLab Editing Estimation Toolbox and Benchmark, https://github.com/open-mmlab/mmediting, 2020.
- MMEditing の GitHub のページ: https://github.com/open-mmlab/mmediting
- MMEditing の公式ドキュメント: https://mmdetection.readthedocs.io
- MMEditing の image matting の公式チュートリアル: https://github.com/open-mmlab/mmediting/blob/master/demo/matting_tutorial.ipynb
- MMEditing の 画像のノイズ除去 (image restoration) の公式チュートリアル: https://github.com/open-mmlab/mmediting/blob/master/demo/restorer_basic_tutorial.ipynb
【目次】
前準備
Build Tools for Visual Studio 2022 (ビルドツール for Visual Studio 2022)または Visual Studio 2022 のインストール(Windows 上)
【インストールの判断】 Build Tools for Visual Studio は,開発ツールセットである. Visual Studio は統合開発環境であり,いくつかの種類があり,Build Tools for Visual Studioの機能を含むか連携して使用するものである.インストールは以下の基準で判断してください:
- Build Tools for Visual Studio の機能のみが必要な場合
- Visual Studio の機能が必要である,あるいは,よく分からない場合
Visual Studio 2022 をインストールする際に,「C++ によるデスクトップ開発」を選択することで, Build Tools for Visual Studio 2022 の機能も一緒にインストールされる.
不明な点がある場合は,Visual Studio 全体をインストール を行う方が良い.
Build Tools for Visual Studio 2022 のインストール(Windows 上)
- Windows で,管理者権限でコマンドプロンプトを起動(手順:Windowsキーまたはスタートメニュー >
cmdと入力 > 右クリック > 「管理者として実行」)。次のコマンドを実行
次のコマンドは,Build Tools for Visual Studio 2022と VC2015 再配布可能パッケージをインストールするものである.
winget install --scope machine Microsoft.VisualStudio.2022.BuildTools winget install --scope machine Microsoft.VCRedist.2015+.x64 - Build Tools for Visual Studio 2022 での C++ によるデスクトップ開発,CLI,ATL,MFC のインストール(Windows 上)
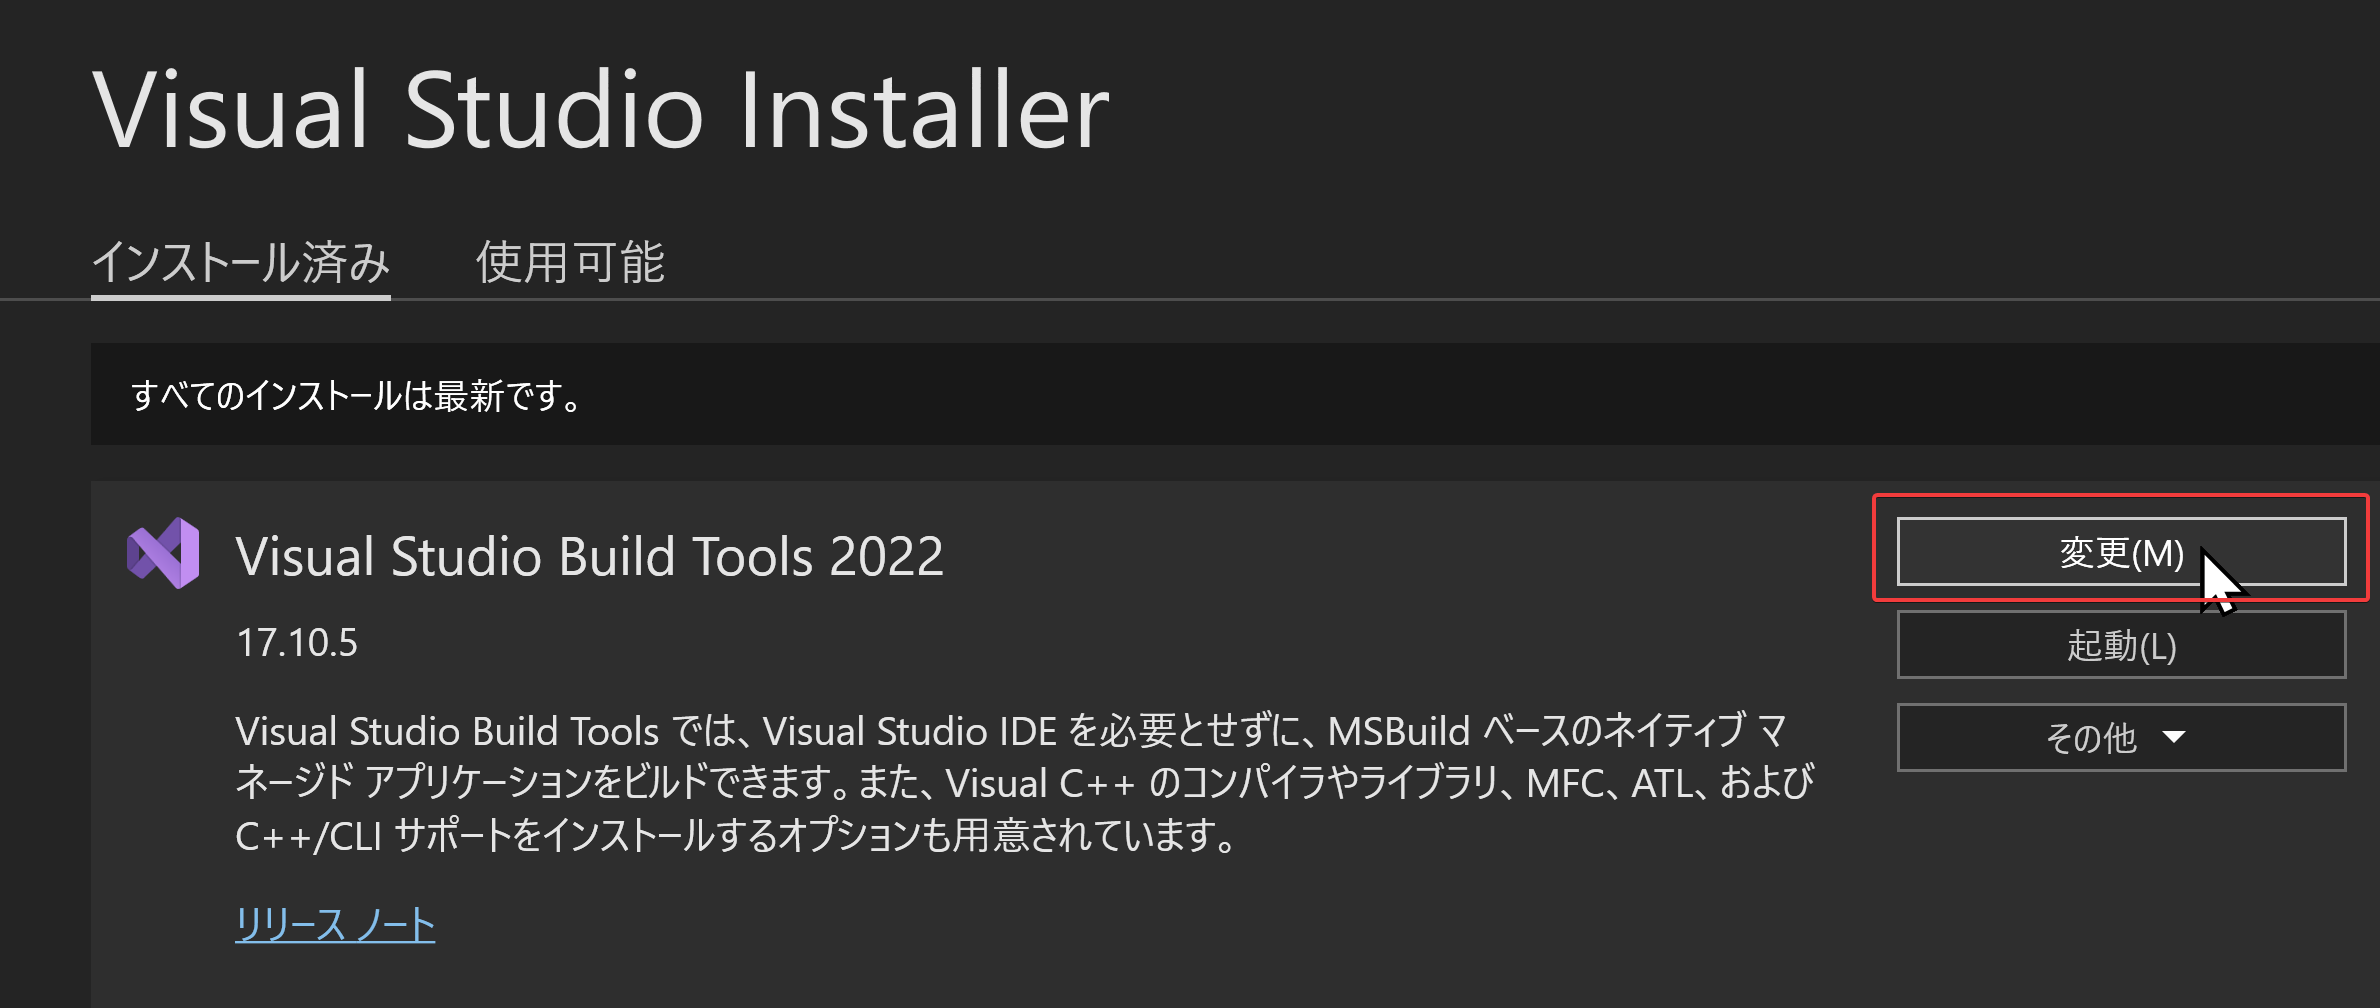
- Visual Studio Installer の起動
起動方法: スタートメニューの「Visual Studio Installer」を選ぶ.
- Visual Studio Build Tools 2022 で「変更」を選ぶ.
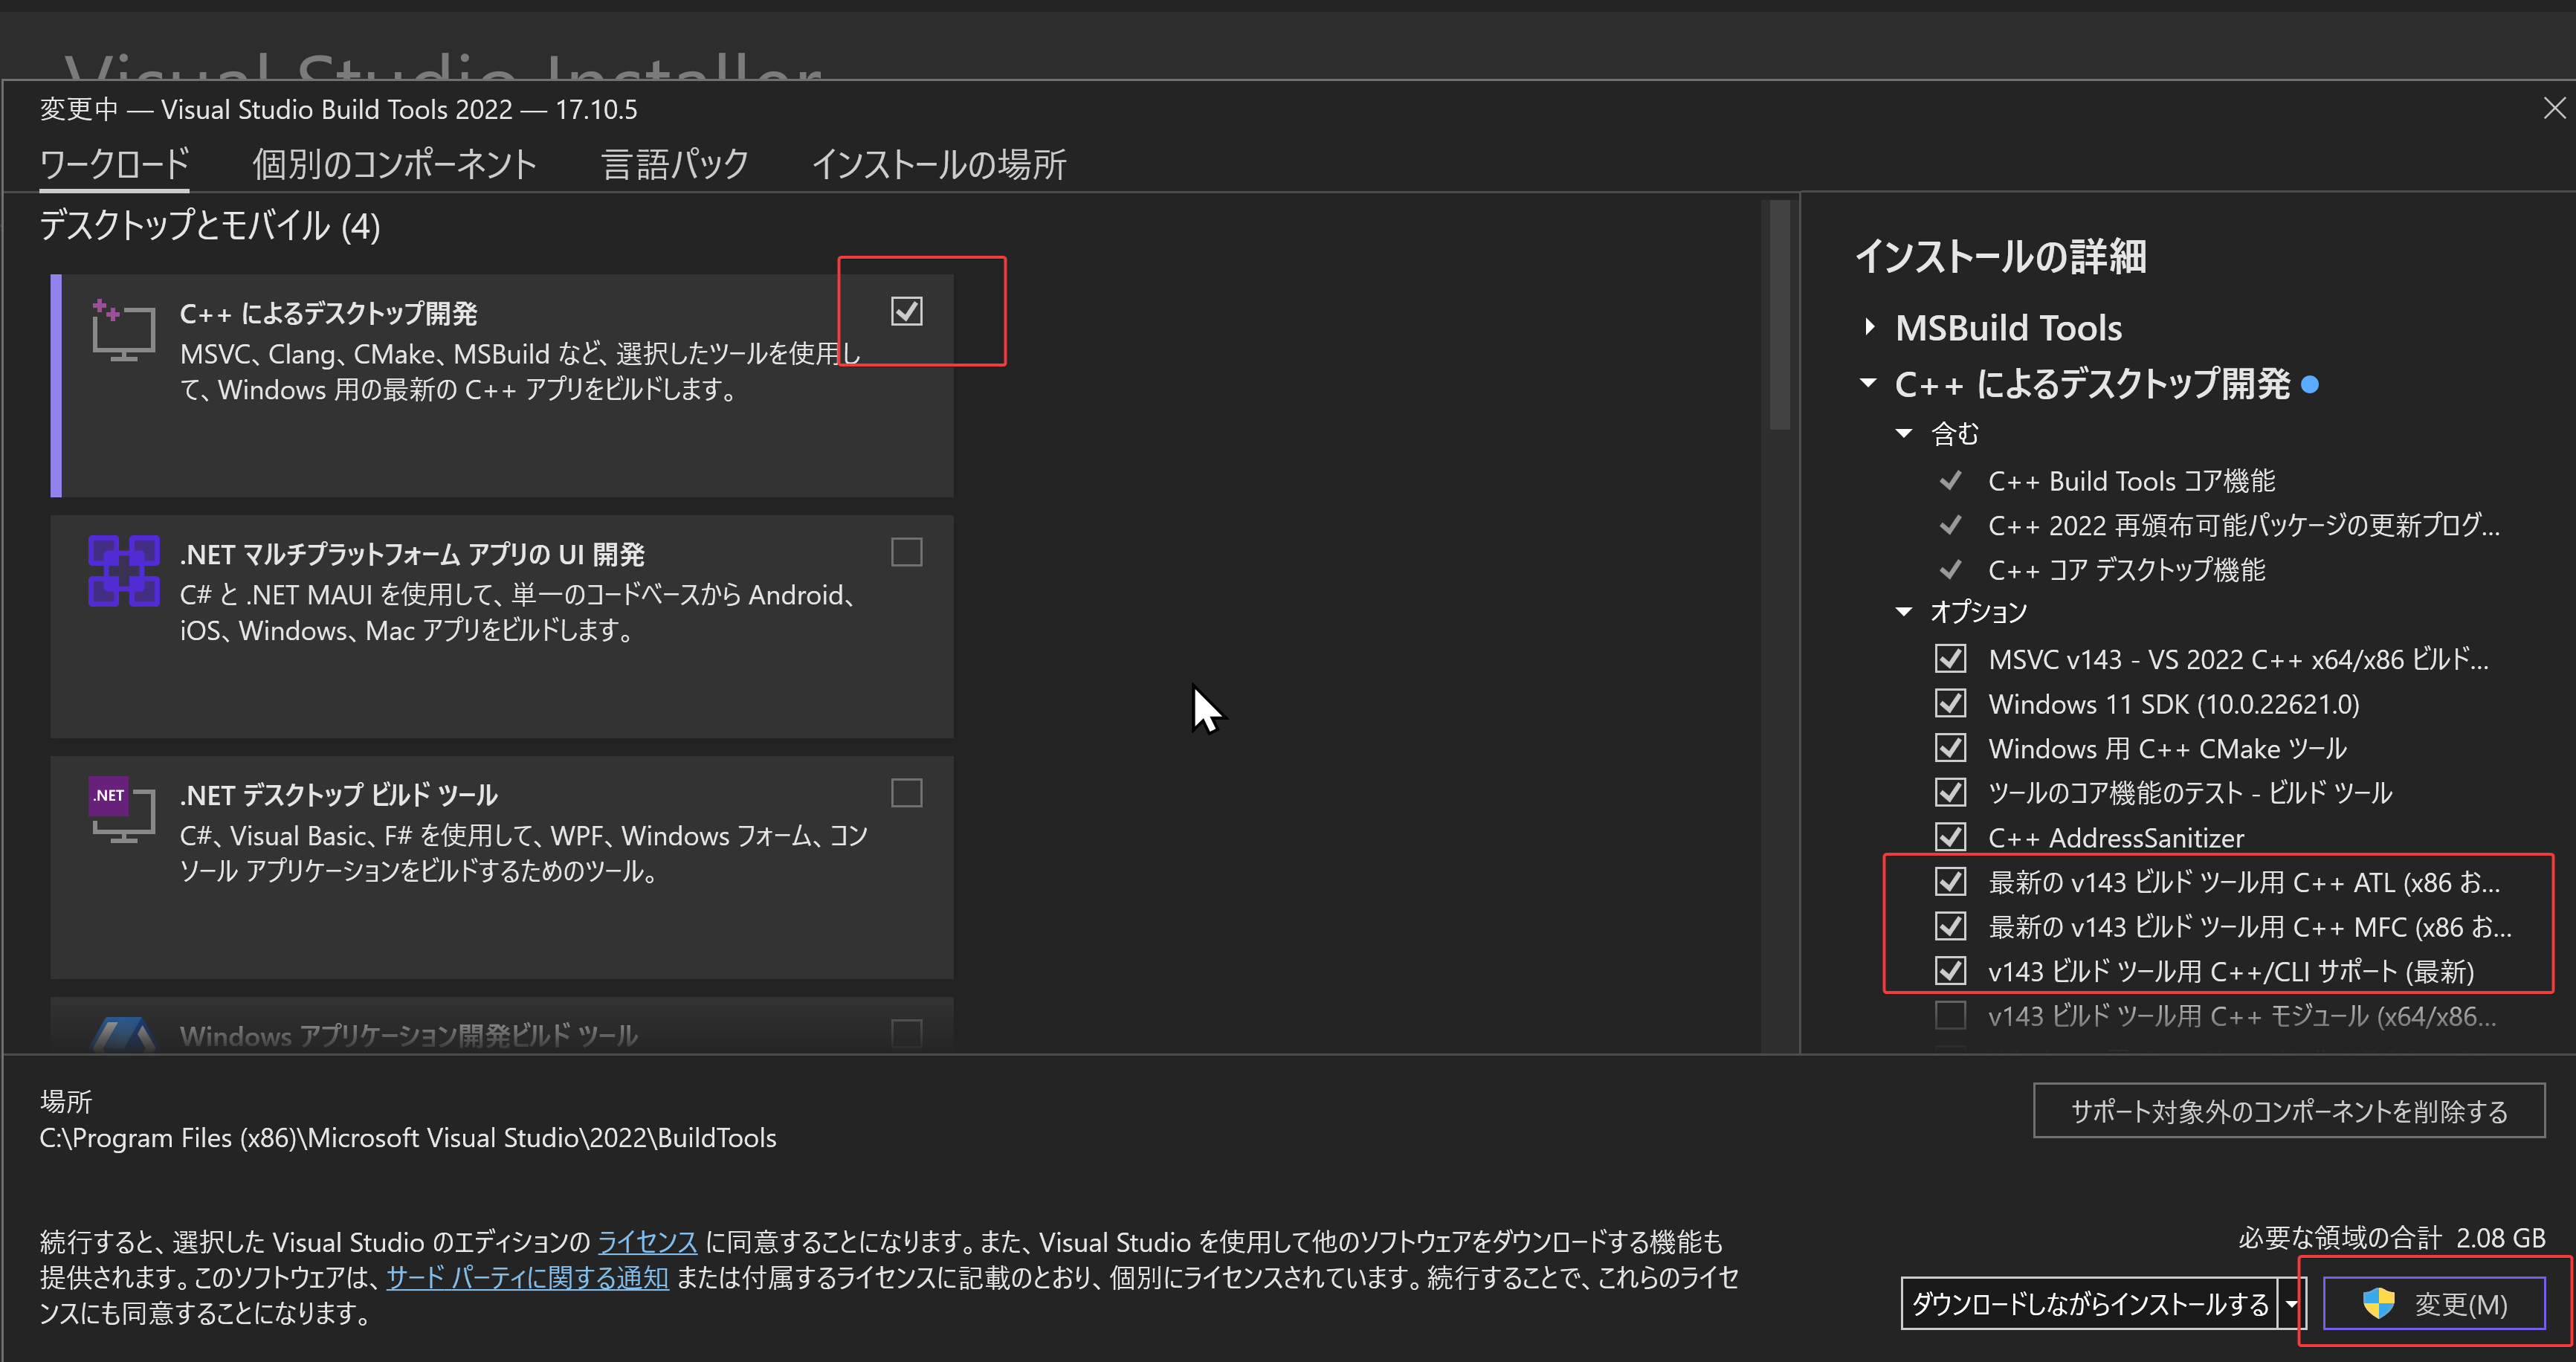
- 「C++ によるデスクトップ開発」をクリック.そして,画面右側の「インストール」の詳細で「v143 ビルドツール用 C++/CLI サポート(最新)」,「ATL」,「MFC」をチェックする.その後,「変更」をクリック.
- Visual Studio Installer の起動
Visual Studio のインストール(Windows 上)
- Windows で,管理者権限でコマンドプロンプトを起動(手順:Windowsキーまたはスタートメニュー >
cmdと入力 > 右クリック > 「管理者として実行」)。次のコマンドを実行
- 管理者権限でコマンドプロンプトを起動(手順:Windowsキーまたはスタートメニュー >
cmdと入力 > 右クリック > 「管理者として実行」)。 - インストールコマンドの実行
winget install Microsoft.VisualStudio.2022.Community --scope machine --override "--add Microsoft.VisualStudio.Workload.NativeDesktop Microsoft.VisualStudio.ComponentGroup.NativeDesktop.Core Microsoft.VisualStudio.Component.VC.CLI.Support Microsoft.VisualStudio.Component.CoreEditor Microsoft.VisualStudio.Component.NuGet Microsoft.VisualStudio.Component.Roslyn.Compiler Microsoft.VisualStudio.Component.TextTemplating Microsoft.VisualStudio.Component.Windows.SDK.Latest Microsoft.VisualStudio.Component.VC.Tools.x86.x64 Microsoft.VisualStudio.Component.VC.ATL Microsoft.VisualStudio.Component.VC.ATLMFC"
winget install Microsoft.VisualStudio.2022.Community --scope machine Microsoft.VCRedist.2015+.x64
インストールされるコンポーネントの説明:
NativeDesktop:C++によるデスクトップアプリケーション開発のためのワークロード一式NativeDesktop.Core:C++デスクトップ開発に必要な基本コンポーネント群VC.CLI.Support:マネージドコードとネイティブコードの統合開発を可能にするC++/CLIサポートCoreEditor:コード編集,デバッグ,検索などの基本機能を提供するVisual StudioのコアエディタNuGet:.NETライブラリの依存関係を管理するパッケージ管理システムWindows.SDK.Latest:Windows 向けアプリケーション開発用SDK(Software Development Kit)VC.Tools.x86.x64:32ビット及び64ビット向けC++コンパイラとビルドツールVC.ATL:Windowsコンポーネント開発用のActive Template LibraryVC.ATLMFC:デスクトップアプリケーション開発用のMicrosoft Foundation Class Library
システム要件と注意事項:
- 管理者権限でのインストールが必須
- 必要ディスク容量:10GB以上
- 推奨メモリ:8GB以上のRAM
- インストール過程でシステムの再起動が要求される可能性がある
- 安定したインターネット接続環境が必要
追加のコンポーネントが必要な場合は,Visual Studio Installerを使用して個別にインストールすることが可能である.
- インストール完了の確認
winget list Microsoft.VisualStudio.2022.Communityトラブルシューティング:
インストール失敗時は,以下のログファイルを確認:
%TEMP%\dd_setup_<timestamp>.log
%TEMP%\dd_bootstrapper_<timestamp>.log
- 管理者権限でコマンドプロンプトを起動(手順:Windowsキーまたはスタートメニュー >
- Visual Studio での C++ によるデスクトップ開発,CLI のインストール(Windows 上)
- Visual Studio Installer の起動
起動方法: スタートメニューの「Visual Studio Installer」を選ぶ.
- Visual Studio Community 2022 で「変更」を選ぶ.
- 「C++ によるデスクトップ開発」をチェック.そして,画面右側の「インストール」の詳細で「v143 ビルドツール用 C++/CLI サポート(最新)」をチェックする.その後,「インストール」をクリック.
- Visual Studio Installer の起動
Python 3.12,Git のインストール(Windows 上)
Pythonは,プログラミング言語の1つ. Gitは,分散型のバージョン管理システム.
【手順】
- Windows で,管理者権限でコマンドプロンプトを起動(手順:Windowsキーまたはスタートメニュー >
cmdと入力 > 右クリック > 「管理者として実行」)。次のコマンドを実行
次のコマンドは,Python ランチャーとPython 3.12とGitをインストールし,Gitにパスを通すものである.
次のコマンドでインストールされるGitは 「git for Windows」と呼ばれるものであり, Git,MinGW などから構成されている.
reg add "HKLM\SYSTEM\CurrentControlSet\Control\FileSystem" /v LongPathsEnabled /t REG_DWORD /d 1 /f
REM Python, Git をシステム領域にインストール
winget install --scope machine --id Python.Python.3.12 --id Python.Launcher --id Git.Git -e --silent
REM Python のパス
set "INSTALL_PATH=C:\Program Files\Python312"
echo "%PATH%" | find /i "%INSTALL_PATH%" >nul
if errorlevel 1 setx PATH "%PATH%;%INSTALL_PATH%" /M >nul
echo "%PATH%" | find /i "%INSTALL_PATH%\Scripts" >nul
if errorlevel 1 setx PATH "%PATH%;%INSTALL_PATH%\Scripts" /M >nul
REM Git のパス
set "NEW_PATH=C:\Program Files\Git\cmd"
if exist "%NEW_PATH%" echo "%PATH%" | find /i "%NEW_PATH%" >nul
if exist "%NEW_PATH%" if errorlevel 1 setx PATH "%PATH%;%NEW_PATH%" /M >nul
【関連する外部ページ】
- Python の公式ページ: https://www.python.org/
- Git の公式ページ: https://git-scm.com/
【サイト内の関連ページ】
【関連項目】 Python, Git バージョン管理システム, Git の利用
Build Tools for Visual Studio 2022,NVIDIA ドライバ,NVIDIA CUDA ツールキット 11.8,NVIDIA cuDNN 8.9.7 のインストール(Windows 上)
【サイト内の関連ページ】 NVIDIA グラフィックスボードを搭載しているパソコンの場合には, NVIDIA ドライバ, NVIDIA CUDA ツールキット, NVIDIA cuDNN のインストールを行う.
- Windows での Build Tools for Visual Studio 2022 のインストール: 別ページ »で説明
- Windows での NVIDIA ドライバ,NVIDIA CUDA ツールキット 11.8,NVIDIA cuDNN v8.9.7 のインストール手順: 別ページ »で説明
【関連する外部ページ】
- Build Tools for Visual Studio 2022 (ビルドツール for Visual Studio 2022)の公式ダウンロードページ: https://visualstudio.microsoft.com/ja/visual-cpp-build-tools/
- NVIDIA ドライバのダウンロードの公式ページ: https://www.nvidia.co.jp/Download/index.aspx?lang=jp
- NVIDIA CUDA ツールキットのアーカイブの公式ページ: https://developer.nvidia.com/cuda-toolkit-archive
- NVIDIA cuDNN のダウンロードの公式ページ: https://developer.nvidia.com/cudnn
PyTorch のインストール(Windows 上)
- Windows で,管理者権限でコマンドプロンプトを起動(手順:Windowsキーまたはスタートメニュー >
cmdと入力 > 右クリック > 「管理者として実行」)。 - PyTorch のページを確認
- 次のようなコマンドを実行(実行するコマンドは,PyTorch のページの表示されるコマンドを使う).
次のコマンドを実行することにより, PyTorch 2.3 (NVIDIA CUDA 11.8 用)がインストールされる. 但し,Anaconda3を使いたい場合には別手順になる.
事前に NVIDIA CUDA のバージョンを確認しておくこと(ここでは,NVIDIA CUDA ツールキット 11.8 が前もってインストール済みであるとする).
PyTorch で,GPU が動作している場合には,「torch.cuda.is_available()」により,True が表示される.
python -m pip install -U --ignore-installed pip
python -m pip uninstall -y torch torchvision torchaudio torchtext xformers
python -m pip install -U torch torchvision torchaudio numpy --index-url https://download.pytorch.org/whl/cu118

python -c "import torch; print(torch.__version__, torch.cuda.is_available())"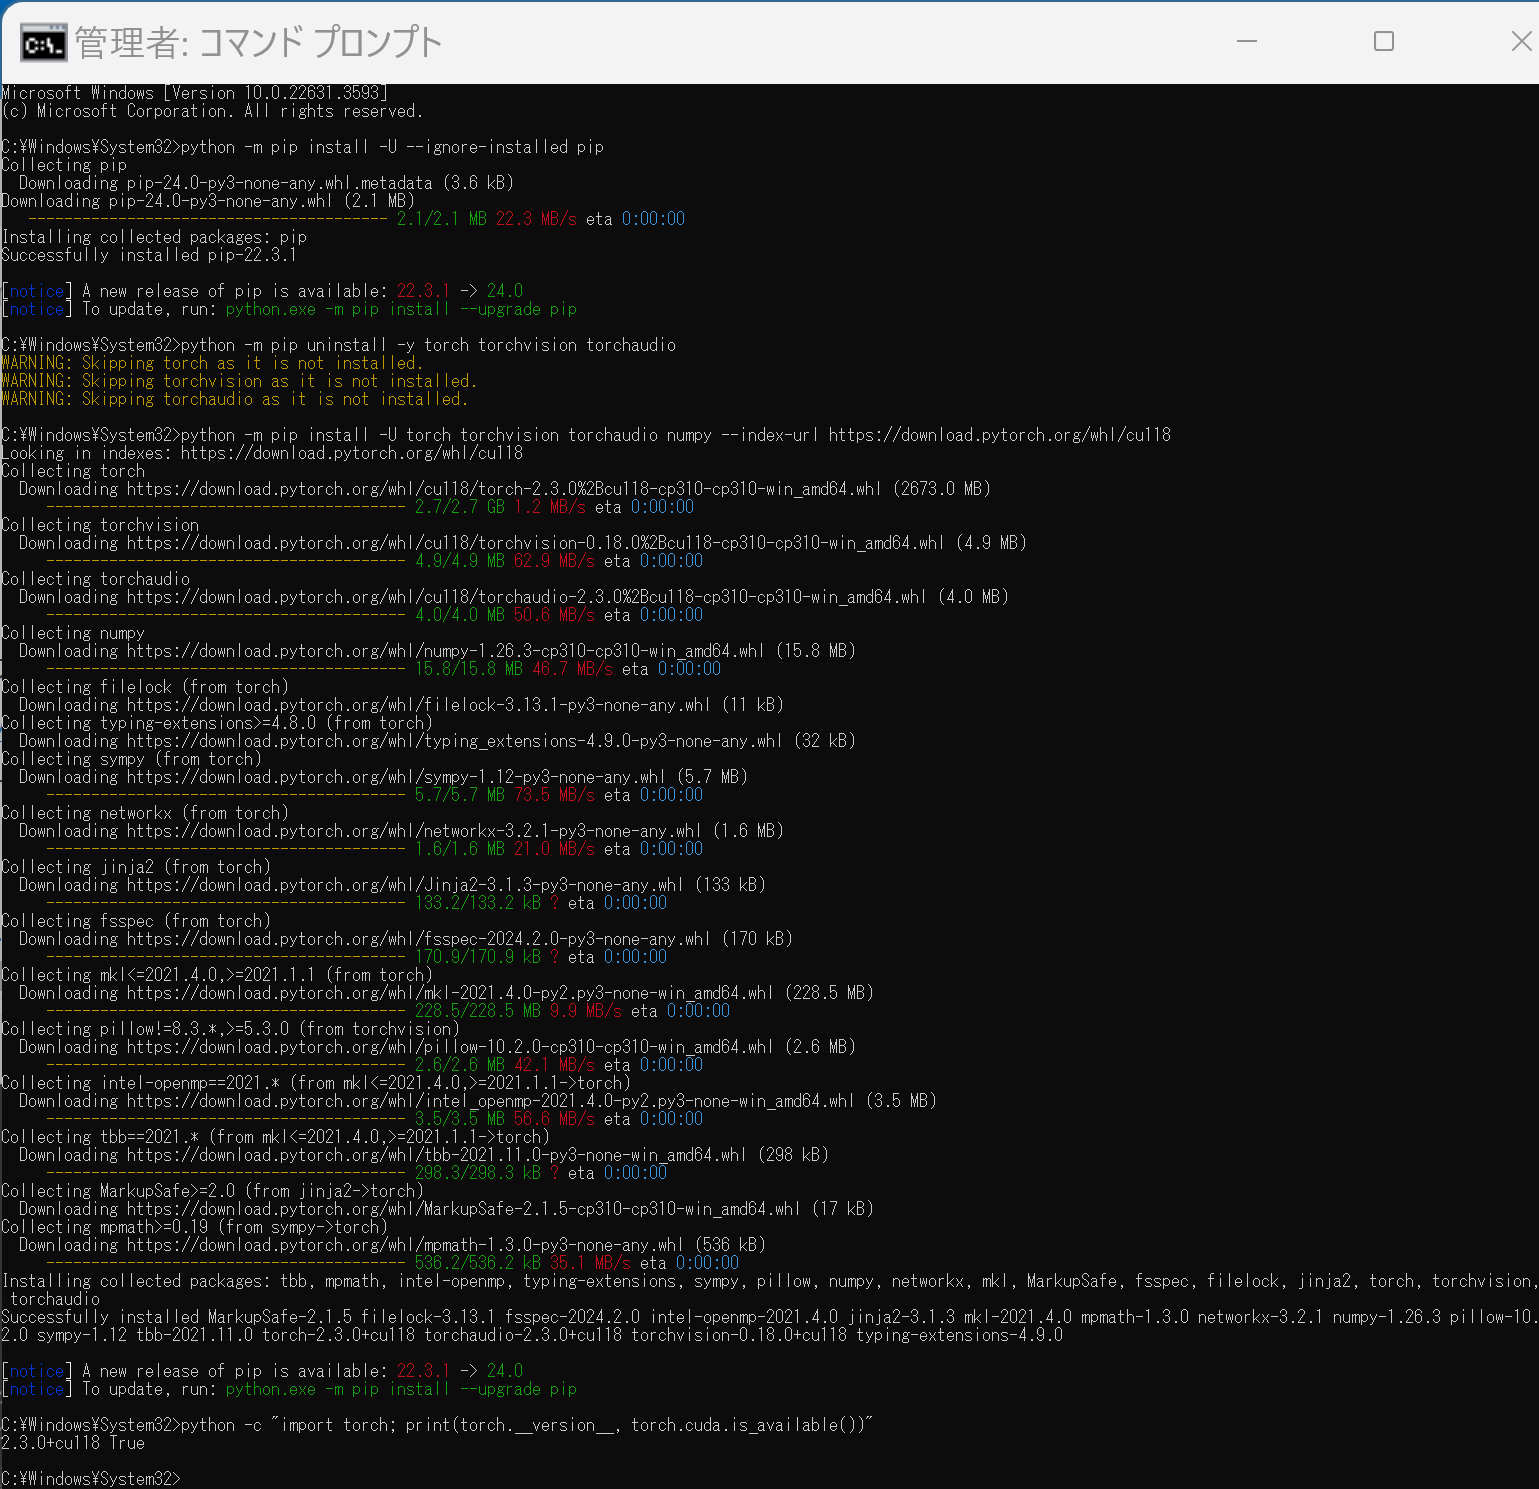
Anaconda3を使いたい場合には, Anaconda プロンプト (Anaconda Prompt) を管理者として実行し, 次のコマンドを実行する. (PyTorch と NVIDIA CUDA との連携がうまくいかない可能性があるため,Anaconda3を使わないことも検討して欲しい).
conda install -y pytorch torchvision torchaudio pytorch-cuda=11.8 cudnn -c pytorch -c nvidia py -c "import torch; print(torch.__version__, torch.cuda.is_available())"【サイト内の関連ページ】
【関連する外部ページ】
MMEditing のインストール(Windows 上)
インストールの方法は複数ある. ここでは, NVIDIA CUDA ツールキットを使うことも考え, インストールしやすい方法として,ソースコードからビルドしてインストールする方法を案内している.
- Windows で,管理者権限でコマンドプロンプトを起動(手順:Windowsキーまたはスタートメニュー >
cmdと入力 > 右クリック > 「管理者として実行」)。 - PyTorch がインストールできていることを確認するために,PyTorch のバージョンを表示
python -c "import torch; TORCH_VERSION = '.'.join(torch.__version__.split('.')[:2]); print(TORCH_VERSION)"
- PyTorch が NVIDIA CUDA ツールキットを認識できていることを確認するために,
PyTorch が認識しているNVIDIA CUDA ツールキット のバージョンを表示
このとき,実際には 11.8 をインストールしているのに,「cu117」のように古いバージョンが表示されることがある.このような場合は,気にせずに続行する.
python -c "import torch; CUDA_VERSION = torch.__version__.split('+')[-1]; print(CUDA_VERSION)"
- MIM,MMPose のインストール
インストール手順は, https://mmcv.readthedocs.io/en/latest/get_started/installation.html に記載の手順による
python -m pip install -U --ignore-installed pip
python -m pip uninstall -y openmim mmcv mmcv-full opencv-python opencv-python-headless
python -m pip install -U openmim opencv-python
cd /d c:%HOMEPATH%
rmdir /s /q mmediting
git clone https://github.com/open-mmlab/mmediting.git
cd mmediting
mim uninstall -y mmediting
pip install -r requirements.txt
mim install -e .
mim list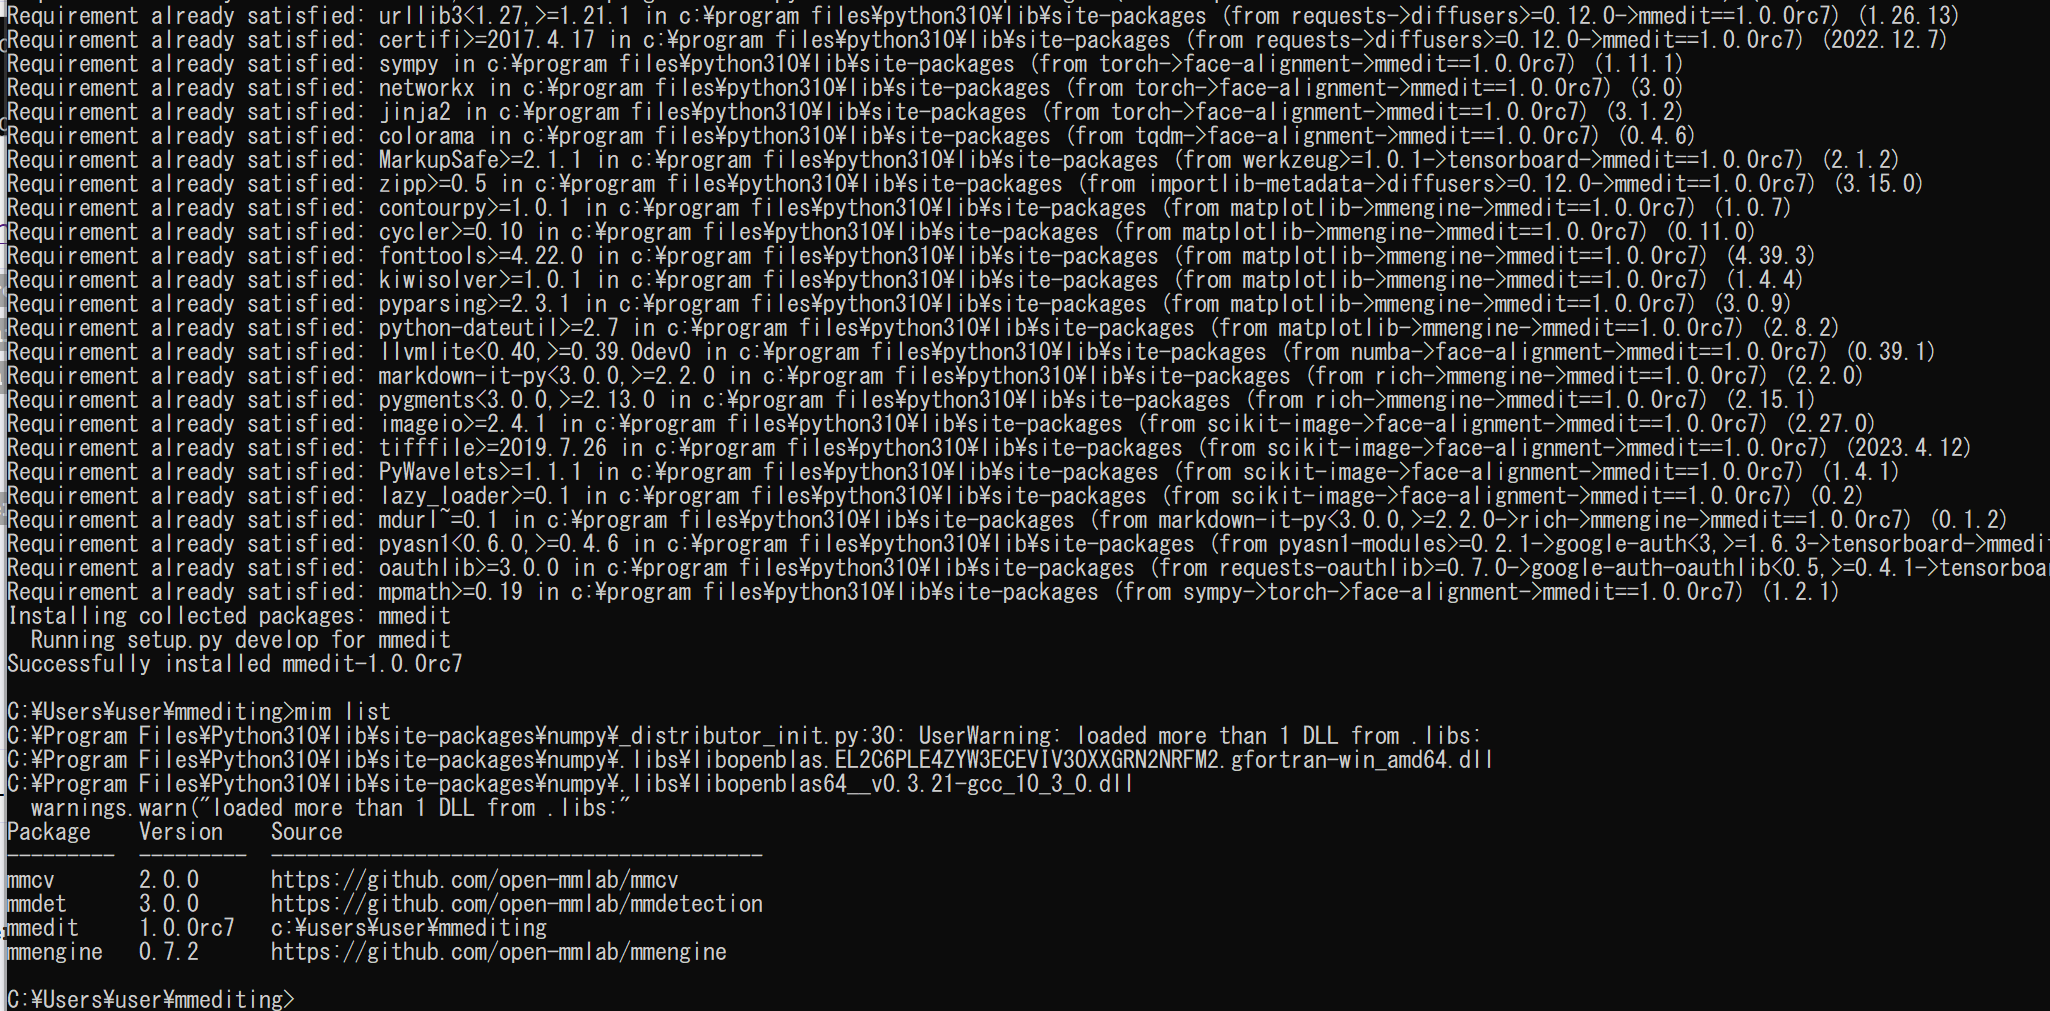
- MMEditing のデモファイルのダウンロード
cd /d c:%HOMEPATH%
cd mmediting
curl -O https://download.openmmlab.com/mmediting/demo_files.zip
powershell -command "Expand-Archive -DestinationPath . -Path demo_files.zip"
MMEditing の動作確認(Windows 上)
超解像 (super resolution) の実行
- 次のコマンドを実行
SRCNN による画像の超解像 (super resolution) の実行
学習済みモデルを使用.
MMEditing の SRCNN の説明ページ: https://github.com/open-mmlab/mmediting/blob/master/configs/srcnn/README.md
コマンドの説明: https://github.com/open-mmlab/mmediting/blob/master/docs/en/getting_started.md
cd /d c:%HOMEPATH% cd mmediting python demo/restoration_demo.py ./configs/srcnn/srcnn_x4k915_1xb16-1000k_div2k.py https://download.openmmlab.com/mmediting/restorers/srcnn/srcnn_x4k915_1x16_1000k_div2k_20200608-4186f232.pth ./demo_files/lq_images/bird.png ./outputs/bird_SRCNN.png python -c "import mmcv; mmcv.imshow('./demo_files/lq_images/bird.png')" python -c "import mmcv; mmcv.imshow('./outputs/bird_SRCNN.png')"(ここでは,2つの画像を同じ大きさで表示)
処理前

処理後

- ESRGAN による画像の超解像 (super resolution) の実行
学習済みモデルを使用.
MMEditing の ESRGAN の説明ページ: https://github.com/open-mmlab/mmediting/blob/master/configs/esrgan/README.md
コマンドの説明: https://github.com/open-mmlab/mmediting/blob/master/docs/en/getting_started.md
cd /d c:%HOMEPATH% cd mmediting python demo/restoration_demo.py ./configs/esrgan/esrgan_x4c64b23g32_1xb16-400k_div2k.py https://download.openmmlab.com/mmediting/restorers/esrgan/esrgan_x4c64b23g32_1x16_400k_div2k_20200508-f8ccaf3b.pth ./demo_files/lq_images/bird.png ./outputs/bird_ESRGAN.png python -c "import mmcv; mmcv.imshow('./demo_files/lq_images/bird.png')" python -c "import mmcv; mmcv.imshow('./outputs/bird_ESRGAN.png')"(ここでは,2つの画像を同じ大きさで表示)
処理前

処理後

- EDVR による連続画像の超解像 (super resolution) の実行
学習済みモデルを使用.
MMEditing の EDVR の説明ページ: https://github.com/open-mmlab/mmediting/blob/master/configs/edvr/README.md
コマンドの説明: https://github.com/open-mmlab/mmediting/blob/master/docs/en/getting_started.md
python demo/restoration_video_demo.py ./configs/edvr/edvrm_wotsa_8xb4-600k_reds.py https://download.openmmlab.com/mmediting/restorers/edvr/edvrm_wotsa_x4_8x4_600k_reds_20200522-0570e567.pth demo_files/lq_sequences/city/ ./outputs/city_EDVR --window_size=5

python -c "import mmcv; mmcv.imshow('./demo_files/lq_sequences/city/00000000.png')"
python -c "import mmcv; mmcv.imshow('./outputs/city_EDVR/00000000.png')"
python -c "import mmcv; mmcv.imshow('./demo_files/lq_sequences/city/00000001.png')"
python -c "import mmcv; mmcv.imshow('./outputs/city_EDVR/00000001.png')"
python -c "import mmcv; mmcv.imshow('./demo_files/lq_sequences/city/00000002.png')"
python -c "import mmcv; mmcv.imshow('./outputs/city_EDVR/00000002.png')"
python -c "import mmcv; mmcv.imshow('./demo_files/lq_sequences/city/00000003.png')"
python -c "import mmcv; mmcv.imshow('./outputs/city_EDVR/00000003.png')"
python -c "import mmcv; mmcv.imshow('./demo_files/lq_sequences/city/00000004.png')"
python -c "import mmcv; mmcv.imshow('./outputs/city_EDVR/00000004.png')"
python -c "import mmcv; mmcv.imshow('./demo_files/lq_sequences/city/00000005.png')"
python -c "import mmcv; mmcv.imshow('./outputs/city_EDVR/00000005.png')"
処理前
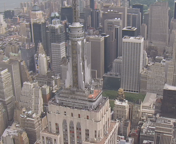


処理後


- BasicVSR (Recurrent framework) の実行
学習済みモデルを使用.
MMEditing の EDVR の説明ページ: https://github.com/open-mmlab/mmediting/blob/master/configs/edvr/README.md
コマンドの説明: https://github.com/open-mmlab/mmediting/blob/master/docs/en/getting_started.md
python demo/restoration_video_demo.py ./configs/basicvsr/basicvsr_2xb4_reds4.py https://download.openmmlab.com/mmediting/restorers/basicvsr/basicvsr_reds4_20120409-0e599677.pth demo_files/lq_sequences/city/ ./outputs/city_BasicVSR

python -c "import mmcv; mmcv.imshow('./demo_files/lq_sequences/city/00000000.png')"
python -c "import mmcv; mmcv.imshow('./outputs/city_BasicVSR/00000000.png')"
python -c "import mmcv; mmcv.imshow('./demo_files/lq_sequences/city/00000001.png')"
python -c "import mmcv; mmcv.imshow('./outputs/city_BasicVSR/00000001.png')"
python -c "import mmcv; mmcv.imshow('./demo_files/lq_sequences/city/00000002.png')"
python -c "import mmcv; mmcv.imshow('./outputs/city_BasicVSR/00000002.png')"
python -c "import mmcv; mmcv.imshow('./demo_files/lq_sequences/city/00000003.png')"
python -c "import mmcv; mmcv.imshow('./outputs/city_BasicVSR/00000003.png')"
python -c "import mmcv; mmcv.imshow('./demo_files/lq_sequences/city/00000004.png')"
python -c "import mmcv; mmcv.imshow('./outputs/city_BasicVSR/00000004.png')"
python -c "import mmcv; mmcv.imshow('./demo_files/lq_sequences/city/00000005.png')"
python -c "import mmcv; mmcv.imshow('./outputs/city_BasicVSR/00000005.png')"
処理前


処理後


- image inpainting の実行
- DeepFillv2 による image impainting の実行
学習済みモデルを使用.
MMEditing の DeepFillv2 の説明ページ: https://github.com/open-mmlab/mmediting/blob/master/configs/inpainting/deepfillv2/README.md
コマンドの説明: https://github.com/open-mmlab/mmediting/blob/master/docs/en/getting_started.md
python demo/inpainting_demo.py configs/deepfillv2/deepfillv2_8xb2_celeba-256x256.py https://download.openmmlab.com/mmediting/inpainting/deepfillv2/deepfillv2_256x256_8x2_celeba_20200619-c96e5f12.pth tests/data/inpainting/celeba_test.png tests/data/inpainting/bbox_mask.png outputs/inpainting_celeba.png

python -c "import mmcv; mmcv.imshow('./tests/data/inpainting/celeba_test.png')"
python -c "import mmcv; mmcv.imshow('./outputs/inpainting_celeba.png')"
処理前

処理後

- Global&Local による image impainting の実行
学習済みモデルを使用.
MMEditing の Global&Local の説明ページ: https://github.com/open-mmlab/mmediting/blob/master/configs/inpainting/global_local/README.md
コマンドの説明: https://github.com/open-mmlab/mmediting/blob/master/docs/en/getting_started.md
python demo/inpainting_demo.py configs/inpainting/global_local/gl_256x256_8x12_celeba.py https://download.openmmlab.com/mmediting/inpainting/global_local/gl_256x256_8x12_celeba_20200619-5af0493f.pth tests/data/image/celeba_test.png tests/data/image/bbox_mask.png tests/data/pred/inpainting_celeba.png

python -c "import mmcv; mmcv.imshow('./tests/data/image/celeba_test.png')"
python -c "import mmcv; mmcv.imshow('./tests/data/pred/inpainting_celeba.png')"
- DeepFillv2 による image impainting の実行
- image matting の実行
- GCA による image matting の実行
学習済みモデルを使用.
MMEditing の GCA の説明ページ: https://github.com/open-mmlab/mmediting/blob/master/configs/mattors/gca/README.md
コマンドの説明: https://github.com/open-mmlab/mmediting/blob/master/docs/en/getting_started.md
python demo/matting_demo.py configs/mattors/gca/gca_r34_4x10_200k_comp1k.py https://download.openmmlab.com/mmediting/mattors/gca/gca_r34_4x10_200k_comp1k_SAD-34.77_20200604_213848-4369bea0.pth tests/data/merged/GT05.jpg tests/data/trimap/GT05.png tests/data/pred/GT05.png python -c "import mmcv; mmcv.imshow('./tests/data/merged/GT05.jpg')" python -c "import mmcv; mmcv.imshow('./tests/data/trimap/GT05.png')" python -c "import mmcv; mmcv.imshow('./tests/data/pred/GT05.png')" - IndexNet による image matting の実行
学習済みモデルを使用.
MMEditing の IndexNet の説明ページ: https://github.com/open-mmlab/mmediting/blob/master/configs/mattors/indexnet/README.md
コマンドの説明: https://github.com/open-mmlab/mmediting/blob/master/docs/en/getting_started.md
python demo/matting_demo.py configs/mattors/indexnet/indexnet_mobv2_1x16_78k_comp1k.py https://download.openmmlab.com/mmediting/mattors/indexnet/indexnet_mobv2_1x16_78k_comp1k_SAD-45.6_20200618_173817-26dd258d.pth tests/data/merged/GT05.jpg tests/data/trimap/GT05.png tests/data/pred/GT05.png python -c "import mmcv; mmcv.imshow('./tests/data/merged/GT05.jpg')" python -c "import mmcv; mmcv.imshow('./tests/data/trimap/GT05.png')" python -c "import mmcv; mmcv.imshow('./tests/data/pred/GT05.png')" - DIM による image matting の実行
学習済みモデルを使用.
MMEditing の DIM の説明ページ: https://github.com/open-mmlab/mmediting/blob/master/configs/mattors/dim/README.md
コマンドの説明: https://github.com/open-mmlab/mmediting/blob/master/docs/en/getting_started.md
python demo/matting_demo.py configs/mattors/dim/dim_stage3_v16_pln_1x1_1000k_comp1k.py https://download.openmmlab.com/mmediting/mattors/dim/dim_stage3_v16_pln_1x1_1000k_comp1k_SAD-50.6_20200609_111851-647f24b6.pth tests/data/merged/GT05.jpg tests/data/trimap/GT05.png tests/data/pred/GT05.png

python -c "import mmcv; mmcv.imshow('./tests/data/merged/GT05.jpg')"
python -c "import mmcv; mmcv.imshow('./tests/data/trimap/GT05.png')"
python -c "import mmcv; mmcv.imshow('./tests/data/pred/GT05.png')"
- GCA による image matting の実行
demos URL: https://github.com/open-mmlab/mmediting/blob/master/docs/en/getting_started.md
python demo/generation_demo.py configs/example_config.py work_dirs/example_exp/example_model_20200202.pth demo/demo.jpg demo/demo_out.jpg
python demo/generation_demo.py configs/example_config.py work_dirs/example_exp/example_model_20200202.pth demo/demo.jpg demo/demo_out.jpg --unpaired_path demo/demo_unpaired.jpg
- Windows で,管理者権限でコマンドプロンプトを起動(手順:Windowsキーまたはスタートメニュー >
![[kaneko lab.]](https://www.kkaneko.jp/info/logo_png.png)