neurvps のインストールと動作確認(消失点推定)(Python,PyTorch を使用)(Windows 上)
【目次】
【文献】 Zhou, Yichao and Qi, Haozhi and Huang, Jingwei and Ma, Yi, NeurVPS: Neural Vanishing Point Scanning via Conic Convolution, NeurIPS, 2019.
前準備
Build Tools for Visual Studio 2026 のインストール(Windows 上) [クリックして展開]
Build Tools for Visual Studio は,Visual Studio の IDE を含まない C/C++ コンパイラ,ライブラリ,ビルドツール等のコマンドライン向け開発ツールセットである。インストール済みの場合、この手順は不要である。
管理者権限のコマンドプロンプトで以下を実行する。管理者権限のコマンドプロンプトを起動するには、Windows キーまたはスタートメニューから「cmd」と入力し、表示された「コマンドプロンプト」を右クリックして「管理者として実行」を選択する。
REM VC++ ランタイム
winget install --scope machine --id Microsoft.VCRedist.2015+.x64 -e --silent --disable-interactivity --force --accept-source-agreements --accept-package-agreements --override "/quiet /norestart"

REM Build Tools + Desktop development with C++(VCTools)+ 追加コンポーネント(一括)
winget list --id Microsoft.VisualStudio.BuildTools 2>nul | findstr /i "BuildTools" >nul 2>&1
if %ERRORLEVEL% EQU 0 (
    for /f "delims=" %P in ('"C:\Program Files (x86)\Microsoft Visual Studio\Installer\vswhere.exe" -products * -property installationPath') do start /wait "" "C:\Program Files (x86)\Microsoft Visual Studio\Installer\setup.exe" modify --installPath "%P" --add Microsoft.VisualStudio.Workload.VCTools --add Microsoft.VisualStudio.Workload.MSBuildTools --add Microsoft.VisualStudio.Component.VC.CMake.Project --add Microsoft.VisualStudio.Component.VC.Llvm.Clang --add Microsoft.VisualStudio.Component.VC.Llvm.ClangToolset --add Microsoft.VisualStudio.Component.Windows11SDK.26100 --includeRecommended --quiet --norestart
) else (
    winget install --scope machine --id Microsoft.VisualStudio.BuildTools -e --silent --disable-interactivity --force --accept-source-agreements --accept-package-agreements --override "--quiet --wait --norestart --nocache --add Microsoft.VisualStudio.Workload.VCTools --includeRecommended --add Microsoft.VisualStudio.Workload.MSBuildTools --add Microsoft.VisualStudio.Component.VC.CMake.Project --add Microsoft.VisualStudio.Component.VC.Llvm.Clang --add Microsoft.VisualStudio.Component.VC.Llvm.ClangToolset --add Microsoft.VisualStudio.Component.Windows11SDK.26100"
)
REM  何らかの理由で BuildTools の動作がおかしくなった場合は,以下を実行すると,既存のインストールのファイル破損・欠損を修復し正常な状態に復元する効果がある.
REM "C:\Program Files (x86)\Microsoft Visual Studio\Installer\setup.exe" repair --installPath "C:\Program Files (x86)\Microsoft Visual Studio\18\BuildTools" --quiet --norestart
REM 以下で正常であることを確認する.パスが表示されれば正常である.
REM "C:\Program Files (x86)\Microsoft Visual Studio\Installer\vswhere.exe" -products * -requires Microsoft.VisualStudio.Workload.VCTools -property installationPath
--add で追加されるコンポーネント
上記のコマンドでは,まず Build Tools 本体と Visual C++ 再頒布可能パッケージをインストールし,次に setup.exe を用いて以下のコンポーネントを追加している。
VCTools:C++ デスクトップ開発ワークロード(--includeRecommendedにより、MSVC コンパイラ、C++ AddressSanitizer、vcpkg、CMake ツール、Windows 11 SDK 等の推奨コンポーネントが含まれる)VC.Llvm.Clang:Windows 向け C++ Clang コンパイラClangCL:clang-cl ツールセットを含むコンポーネントグループ(MSBuild から Clang を使用するために必要)VC.CMake.Project:Windows 向け C++ CMake ツールWindows11SDK.26100:Windows 11 SDK(ビルド 10.0.26100)
インストール完了の確認
winget list Microsoft.VisualStudio.BuildTools上記以外の追加のコンポーネントが必要になった場合は Visual Studio Installer で個別にインストールできる。
Visual Studio の機能を必要とする場合は、追加インストールできる。
Python 3.12 のインストール(Windows 上) [クリックして展開]
以下のいずれかの方法で Python 3.12 をインストールする。Python がインストール済みの場合、この手順は不要である。
方法1:winget によるインストール
管理者権限のコマンドプロンプトで以下を実行する。管理者権限のコマンドプロンプトを起動するには、Windows キーまたはスタートメニューから「cmd」と入力し、表示された「コマンドプロンプト」を右クリックして「管理者として実行」を選択する。
winget install --id Python.Python.3.12 -e --scope machine --silent --accept-source-agreements --accept-package-agreements --override "/quiet InstallAllUsers=1 PrependPath=1 Include_test=0 Include_pip=1 Include_launcher=1 InstallLauncherAllUsers=1 TargetDir=\"C:\Program Files\Python312\""
powershell -Command "$p='C:\Program Files\Python312'; $s=\"$p\Scripts\"; $m=[Environment]::GetEnvironmentVariable('Path','Machine'); if($m -notlike \"*$s*\") { [Environment]::SetEnvironmentVariable('Path', \"$p;$s;$m\", 'Machine') }"
--scope machine を指定することで、システム全体(全ユーザー向け)にインストールされる。このオプションの実行には管理者権限が必要である。インストール完了後、コマンドプロンプトを再起動すると PATH が自動的に設定される。
方法2:インストーラーによるインストール
- Python 公式サイト(https://www.python.org/downloads/)にアクセスし、「Download Python 3.x.x」ボタンから Windows 用インストーラーをダウンロードする。
- ダウンロードしたインストーラーを実行する。
- 初期画面の下部に表示される「Add python.exe to PATH」に必ずチェックを入れてから「Customize installation」を選択する。このチェックを入れ忘れると、コマンドプロンプトから
pythonコマンドを実行できない。 - 「Install Python 3.xx for all users」にチェックを入れ、「Install」をクリックする。
インストールの確認
コマンドプロンプトで以下を実行する。
python --versionバージョン番号(例:Python 3.12.x)が表示されればインストール成功である。「'python' は、内部コマンドまたは外部コマンドとして認識されていません。」と表示される場合は、インストールが正常に完了していない。
Git のインストール
管理者権限のコマンドプロンプトで以下を実行する。管理者権限のコマンドプロンプトを起動するには、Windows キーまたはスタートメニューから「cmd」と入力し、表示された「コマンドプロンプト」を右クリックして「管理者として実行」を選択する。
REM Git をシステム領域にインストール
winget install --scope machine --id Git.Git -e --silent --disable-interactivity --force --accept-source-agreements --accept-package-agreements --override "/VERYSILENT /NORESTART /NOCANCEL /SP- /CLOSEAPPLICATIONS /RESTARTAPPLICATIONS /COMPONENTS=""icons,ext\reg\shellhere,assoc,assoc_sh"" /o:PathOption=Cmd /o:CRLFOption=CRLFCommitAsIs /o:BashTerminalOption=MinTTY /o:DefaultBranchOption=main /o:EditorOption=VIM /o:SSHOption=OpenSSH /o:UseCredentialManager=Enabled /o:PerformanceTweaksFSCache=Enabled /o:EnableSymlinks=Disabled /o:EnableFSMonitor=Disabled"
【関連する外部ページ】
- Git の公式ページ: https://git-scm.com/
Build Tools for Visual Studio 2022,NVIDIA ドライバ,NVIDIA CUDA ツールキット 11.8,NVIDIA cuDNN 8.9.7 のインストール(Windows 上)
【サイト内の関連ページ】 NVIDIA グラフィックスボードを搭載しているパソコンの場合には, NVIDIA ドライバ, NVIDIA CUDA ツールキット, NVIDIA cuDNN のインストールを行う.
- Windows での Build Tools for Visual Studio 2022 のインストール: 別ページ »で説明
- Windows での NVIDIA ドライバ,NVIDIA CUDA ツールキット 11.8,NVIDIA cuDNN v8.9.7 のインストール手順: 別ページ »で説明
【関連する外部ページ】
- Build Tools for Visual Studio 2022 (ビルドツール for Visual Studio 2022)の公式ダウンロードページ: https://visualstudio.microsoft.com/ja/visual-cpp-build-tools/
- NVIDIA ドライバのダウンロードの公式ページ: https://www.nvidia.co.jp/Download/index.aspx?lang=jp
- NVIDIA CUDA ツールキットのアーカイブの公式ページ: https://developer.nvidia.com/cuda-toolkit-archive
- NVIDIA cuDNN のダウンロードの公式ページ: https://developer.nvidia.com/cudnn
PyTorch のインストール(Windows 上)
- 以下の手順を管理者権限のコマンドプロンプトで実行する
(手順:Windowsキーまたはスタートメニュー →
cmdと入力 → 右クリック → 「管理者として実行」)。 - PyTorch のページを確認
- 次のようなコマンドを実行(実行するコマンドは,PyTorch のページの表示されるコマンドを使う).
次のコマンドを実行することにより, PyTorch 2.3 (NVIDIA CUDA 11.8 用)がインストールされる. 但し,Anaconda3を使いたい場合には別手順になる.
事前に NVIDIA CUDA のバージョンを確認しておくこと(ここでは,NVIDIA CUDA ツールキット 11.8 が前もってインストール済みであるとする).
PyTorch で,GPU が動作している場合には,「torch.cuda.is_available()」により,True が表示される.
python -m pip install -U --ignore-installed pip python -m pip uninstall -y torch torchvision torchaudio torchtext xformers python -m pip install -U torch torchvision torchaudio numpy --index-url https://download.pytorch.org/whl/cu118 python -c "import torch; print(torch.__version__, torch.cuda.is_available())" Anaconda3を使いたい場合には, Anaconda プロンプト (Anaconda Prompt) を管理者として実行し, 次のコマンドを実行する. (PyTorch と NVIDIA CUDA との連携がうまくいかない可能性があるため,Anaconda3を使わないことも検討して欲しい).
conda install -y pytorch torchvision torchaudio pytorch-cuda=11.8 cudnn -c pytorch -c nvidia py -c "import torch; print(torch.__version__, torch.cuda.is_available())"【サイト内の関連ページ】
【関連する外部ページ】
FFmpeg のインストール(Windows 上)
Windows での FFmpeg のインストール(Windows 上): 別ページ »で説明
neurvps のインストールと動作確認(Windows 上)
<7-Zip のインストール(Windows 上) [クリックして展開]
管理者権限のコマンドプロンプトで以下を実行する。管理者権限のコマンドプロンプトを起動するには、Windows キーまたはスタートメニューから「
cmd」と入力し、表示された「コマンドプロンプト」を右クリックして「管理者として実行」を選択する。REM 7-Zip をシステム領域にインストール winget install --scope machine --id 7zip.7zip -e --silent --disable-interactivity --force --accept-source-agreements --accept-package-agreements REM 7-Zip のパス設定 powershell -NoProfile -Command "$p='C:\Program Files\7-Zip'; $c=[Environment]::GetEnvironmentVariable('Path','Machine'); if((Test-Path $p) -and $c -notlike \"*$p*\"){[Environment]::SetEnvironmentVariable('Path',\"$p;$c\",'Machine')}"neurvps のインストール(Windows 上)
- 以下の手順を管理者権限のコマンドプロンプトで実行する
(手順:Windowsキーまたはスタートメニュー →
cmdと入力 → 右クリック → 「管理者として実行」)。 - ダウンロードとインストール,関連ファイルのダウンロード
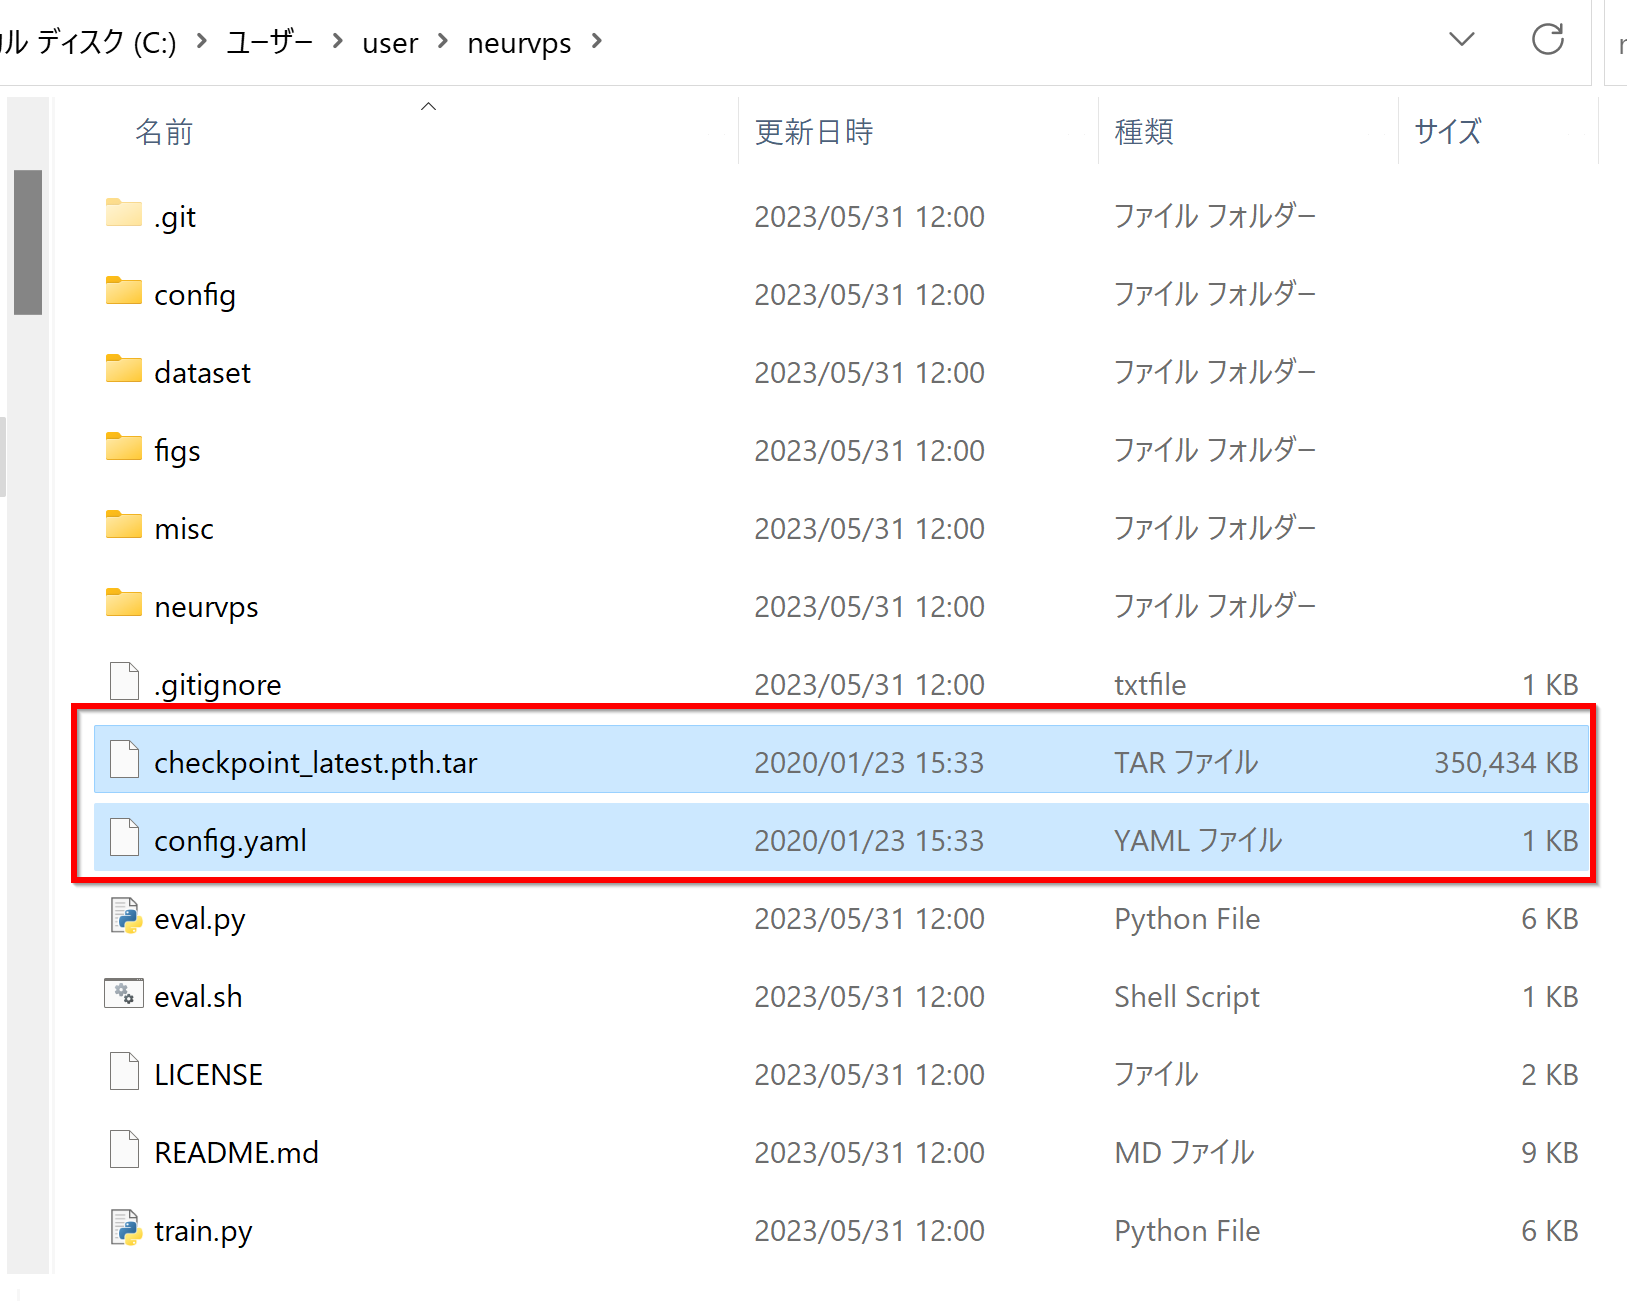
cd /d c:%HOMEPATH% rmdir /s /q neurvps git clone https://github.com/zhou13/neurvps python -m pip install -U tensorboardx pyyaml docopt matplotlib scikit-image opencv-python tqdm gdown ninja mkdir data logs cd data gdown 1yRwLv28ozRvjsf9wGwAqzya1xFZ5wYET -O su3.tar.xz gdown 1rpQNbZQEUff2j2rxr3mBl6xohGFl6sLv -O tmm17.tar.xz gdown 1y_O9PxZhJ_Ml297FgoWMBLvjC1BvTs9A -O scannet.tar.xz "c:\Program Files\7-Zip\7z.exe" x su3.tar.xz "c:\Program Files\7-Zip\7z.exe" x tmm17.tar.xz "c:\Program Files\7-Zip\7z.exe" x scannet.tar.xz "c:\Program Files\7-Zip\7z.exe" x su3.tar "c:\Program Files\7-Zip\7z.exe" x tmm17.tar "c:\Program Files\7-Zip\7z.exe" x scannet.tar - 学習済みモデルを %HOMEPATH%\neurvps に置く.
次のページの「Pre-trained Models」のところから学習済みモデルをダウンロード
https://github.com/zhou13/neurvps
3種類あるので,使いたいもの1つをダウンロードする.
zip ファイルがダウンロードされるので,展開(解凍)し,%HOMEPATH%\neurvps に置く.
- 動作確認
公式ページ https://github.com/zhou13/neurvps の記載に従い,eval.py を実行
- 以下のコマンドを管理者権限のx64 Native Tools コマンドプロンプト (x64 Native Tools Command Prompt)で実行する
(手順:スタートメニュー →Visual Studio 20xx」の下の「x64 Native Tools コマンドプロンプト (x64 Native Tools Command Prompt)」 → 「管理者として実行」)。
「x64 Native Tools コマンドプロンプト」がないときは,ビルドツール (Build Tools) をインストールすると,x64 Native Tools コマンドプロンプトもインストールされる.その手順は,別ページ »で説明している.
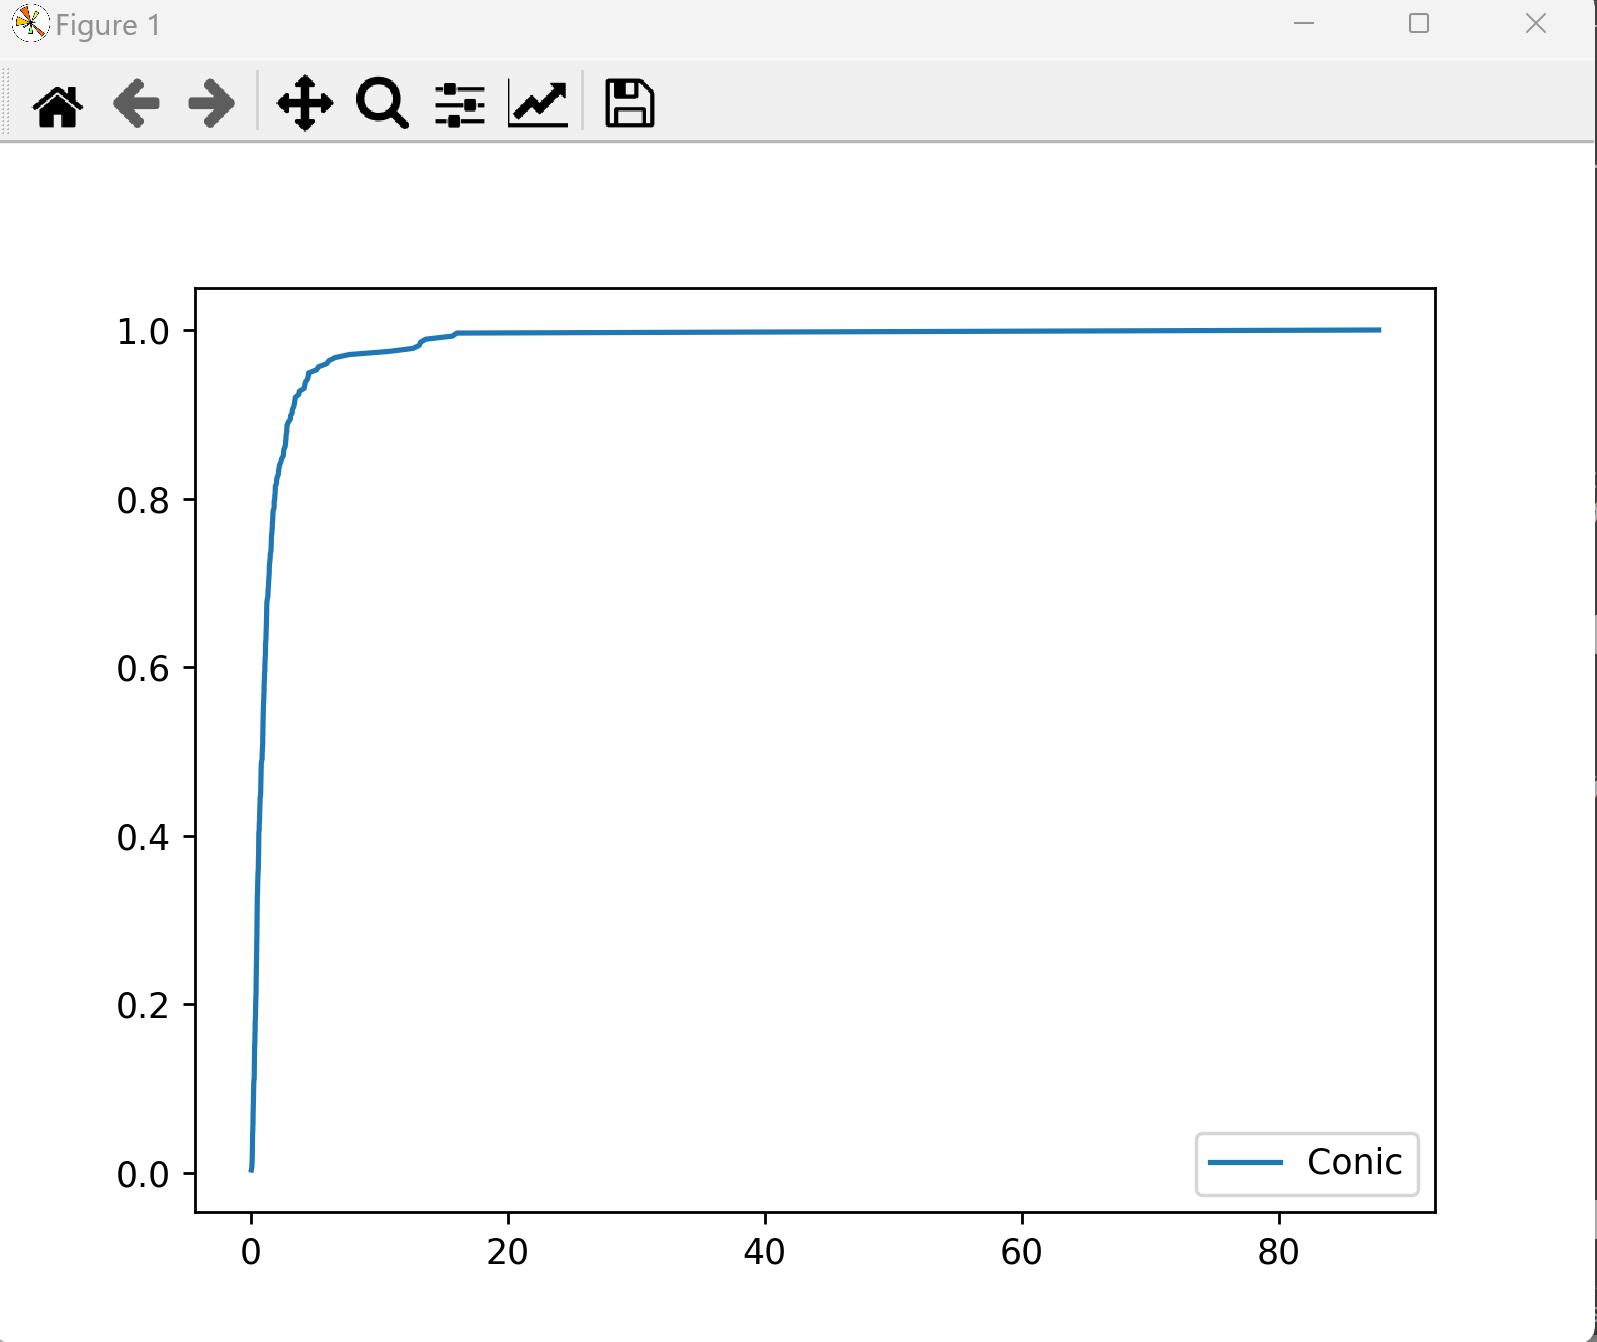
cd /d c:%HOMEPATH%
cd neurvps
python eval.py -d 0 config.yaml checkpoint_latest.pth.tar
- angular accuracy (AA) 曲線のグラフが表示されるので確認
- 以下のコマンドを管理者権限のx64 Native Tools コマンドプロンプト (x64 Native Tools Command Prompt)で実行する
(手順:スタートメニュー →Visual Studio 20xx」の下の「x64 Native Tools コマンドプロンプト (x64 Native Tools Command Prompt)」 → 「管理者として実行」)。
消失点推定を実行してみる
- 画像を準備する.
画像ファイルは,%HOMEPATH%\neurvps に「sample.png」というファイル名で保存すること.あとで使用する.
- Python プログラムファイルを準備する.
https://github.com/zhou13/neurvps で公開されている公式のプログラム eval.py を書き換えたものを使用.
#!/usr/bin/env python3 """Compute vanishing points using corase-to-fine method Usage: eval.py [options]Arguments: Path to the yaml hyper-parameter file Path to the checkpoint """ import os import sys import math import shlex import pprint import random import os.path as osp import threading import subprocess import numpy as np import torch from torchvision import transforms import matplotlib as mpl import skimage.io from PIL import Image import numpy.linalg as LA import matplotlib.pyplot as plt import mpl_toolkits.mplot3d from tqdm import tqdm from docopt import docopt import neurvps import neurvps.models.vanishing_net as vn from neurvps.config import C, M from neurvps.datasets import Tmm17Dataset, ScanNetDataset, WireframeDataset IMAGENAME="sample.png" def AA(x, y, threshold): index = np.searchsorted(x, threshold) x = np.concatenate([x[:index], [threshold]]) y = np.concatenate([y[:index], [threshold]]) return ((x[1:] - x[:-1]) * y[:-1]).sum() / threshold transform = transforms.Compose( [ transforms.ToTensor(), ] ) def main(): args = docopt(__doc__) config_file = args[" "] C.update(C.from_yaml(filename=config_file)) C.model.im2col_step = 32 # override im2col_step for evaluation M.update(C.model) pprint.pprint(C, indent=4) random.seed(0) np.random.seed(0) torch.manual_seed(0) device_name = "cpu" os.environ["CUDA_VISIBLE_DEVICES"] = args["--devices"] if torch.cuda.is_available(): device_name = "cuda" torch.backends.cudnn.deterministic = True torch.cuda.manual_seed(0) print("Let's use", torch.cuda.device_count(), "GPU(s)!") else: print("CUDA is not available") device = torch.device(device_name) if M.backbone == "stacked_hourglass": model = neurvps.models.hg( planes=64, depth=M.depth, num_stacks=M.num_stacks, num_blocks=M.num_blocks ) else: raise NotImplementedError checkpoint = torch.load(args[" "]) model = neurvps.models.VanishingNet( model, C.model.output_stride, C.model.upsample_scale ) model = model.to(device) model = torch.nn.DataParallel( model, device_ids=list(range(args["--devices"].count(",") + 1)) ) model.load_state_dict(checkpoint["model_state_dict"]) # model.eval() if C.io.dataset.upper() == "WIREFRAME": Dataset = WireframeDataset elif C.io.dataset.upper() == "TMM17": Dataset = Tmm17Dataset elif C.io.dataset.upper() == "SCANNET": Dataset = ScanNetDataset else: raise NotImplementedError loader = torch.utils.data.DataLoader( Dataset(C.io.datadir, split="valid"), batch_size=1, shuffle=False, num_workers=C.io.num_workers if os.name != "nt" else 0, pin_memory=True, ) if args["--dump"] is not None: os.makedirs(args["--dump"], exist_ok=True) err = [] n = C.io.num_vpts im = Image.open(IMAGENAME).resize((512,512)) image = transform(im).unsqueeze(0).to(device) input_dict = {"image": image, "test": True} vpts = sample_sphere(np.array([0, 0, 1]), np.pi / 2, 64) input_dict["vpts"] = vpts with torch.no_grad(): score = model(input_dict)[:, -1].cpu().numpy() index = np.argsort(-score) candidate = [index[0]] for i in index[1:]: if len(candidate) == n: break dst = np.min(np.arccos(np.abs(vpts[candidate] @ vpts[i]))) if dst < np.pi / n: continue candidate.append(i) vpts_pd = vpts[candidate] for res in range(1, len(M.multires)): vpts = [sample_sphere(vpts_pd[vp], M.multires[-res], 64) for vp in range(n)] input_dict["vpts"] = np.vstack(vpts) with torch.no_grad(): score = model(input_dict)[:, -res - 1].cpu().numpy().reshape(n, -1) for i, s in enumerate(score): vpts_pd[i] = vpts[i][np.argmax(s)] plt.imshow(im) cc = ["blue", "cyan", "orange"] for c, w in zip(cc, vpts_pd): x = w[0] / w[2] * C.io.focal_length * 256 + 256 y = -w[1] / w[2] * C.io.focal_length * 256 + 256 print(x,y) plt.scatter(x, y, color=c) for xy in np.linspace(0, 512, 10): plt.plot( [x, xy, x, xy, x, 0, x, 511], [y, 0, y, 511, y, xy, y, xy], color=c, ) plt.show() err = np.sort(np.array(err)) np.savez(args["--output"], err=err) y = (1 + np.arange(len(err))) / len(loader) / n def sample_sphere(v, alpha, num_pts): v1 = orth(v) v2 = np.cross(v, v1) v, v1, v2 = v[:, None], v1[:, None], v2[:, None] indices = np.linspace(1, num_pts, num_pts) phi = np.arccos(1 + (math.cos(alpha) - 1) * indices / num_pts) theta = np.pi * (1 + 5 ** 0.5) * indices r = np.sin(phi) return (v * np.cos(phi) + r * (v1 * np.cos(theta) + v2 * np.sin(theta))).T def orth(v): x, y, z = v o = np.array([0.0, -z, y] if abs(x) < abs(y) else [-z, 0.0, x]) o /= LA.norm(o) return o if __name__ == "__main__": main() -
Python プログラムの実行
コマンドプロンプトで次を実行
cd /d c:%HOMEPATH%\neurvps
python run.py -d 0 config.yaml checkpoint_latest.pth.tar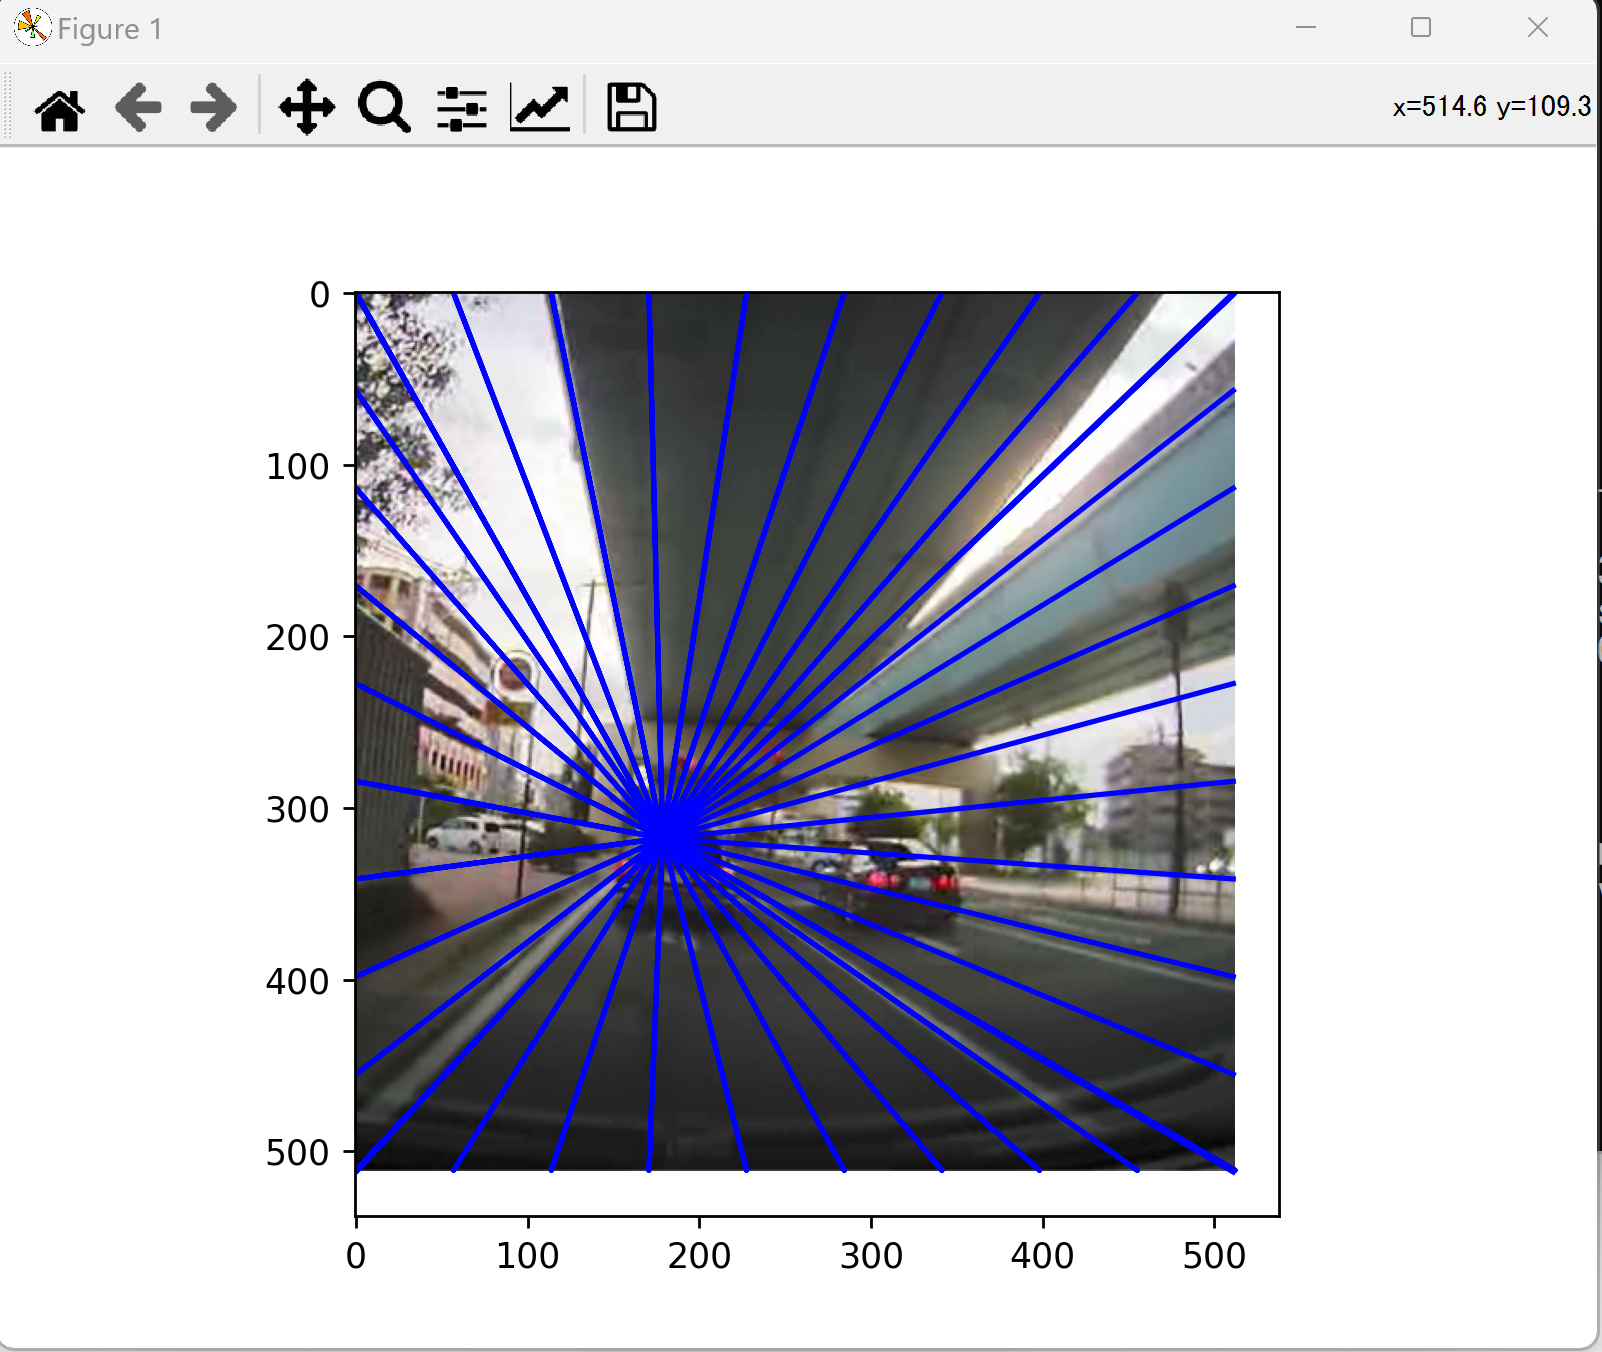
- 以下の手順を管理者権限のコマンドプロンプトで実行する
(手順:Windowsキーまたはスタートメニュー →