![[kaneko lab.]](https://www.kkaneko.jp/info/logo_png.png)
AIを用いた単一画像の3次元化(カメラ対応版)
この資料は、AIによる単眼深度推定(1枚の画像から各画素の奥行きを推定する技術)を題材に、 2次元のカメラ画像から3次元の点群(ポイントクラウド:色付きの点の集まりで立体形状を表すデータ)を復元する流れを学ぶ演習集である。 2つの深度推定モデルを順に試し、結果を見比べることで、モデルの違いが3次元復元の品質にどう影響するかを確かめる。
なお、単眼深度推定で得られる奥行きは、距離センサ(LiDARなど、対象までの距離を実測する装置)で得られるような実メートル単位の距離ではなく、 画像内の相対的な前後関係を表す深度である。 そのため、本演習で生成する点群は、実寸法を正確に測定するための点群ではなく、 画像の見かけから推定された相対的な立体構造を観察するための点群である。
【目次】
演習1: MiDaS による単眼深度推定
プログラム概要
このプログラムは、AIモデル「MiDaS」を使って、PCカメラの1枚の画像から各画素の奥行き(深度)を推定する演習である。 人間が片目でもおおよその遠近感をつかめるのと同様に、MiDaSは大量の画像で学習した知識をもとに、画像の見た目だけから手前と奥を予測する。 モデルは初回実行時にインターネットから自動でダウンロードされる。GPU(画像処理向けの演算装置で、AIの計算を高速化する)があれば自動で使い、無ければCPUで動く。
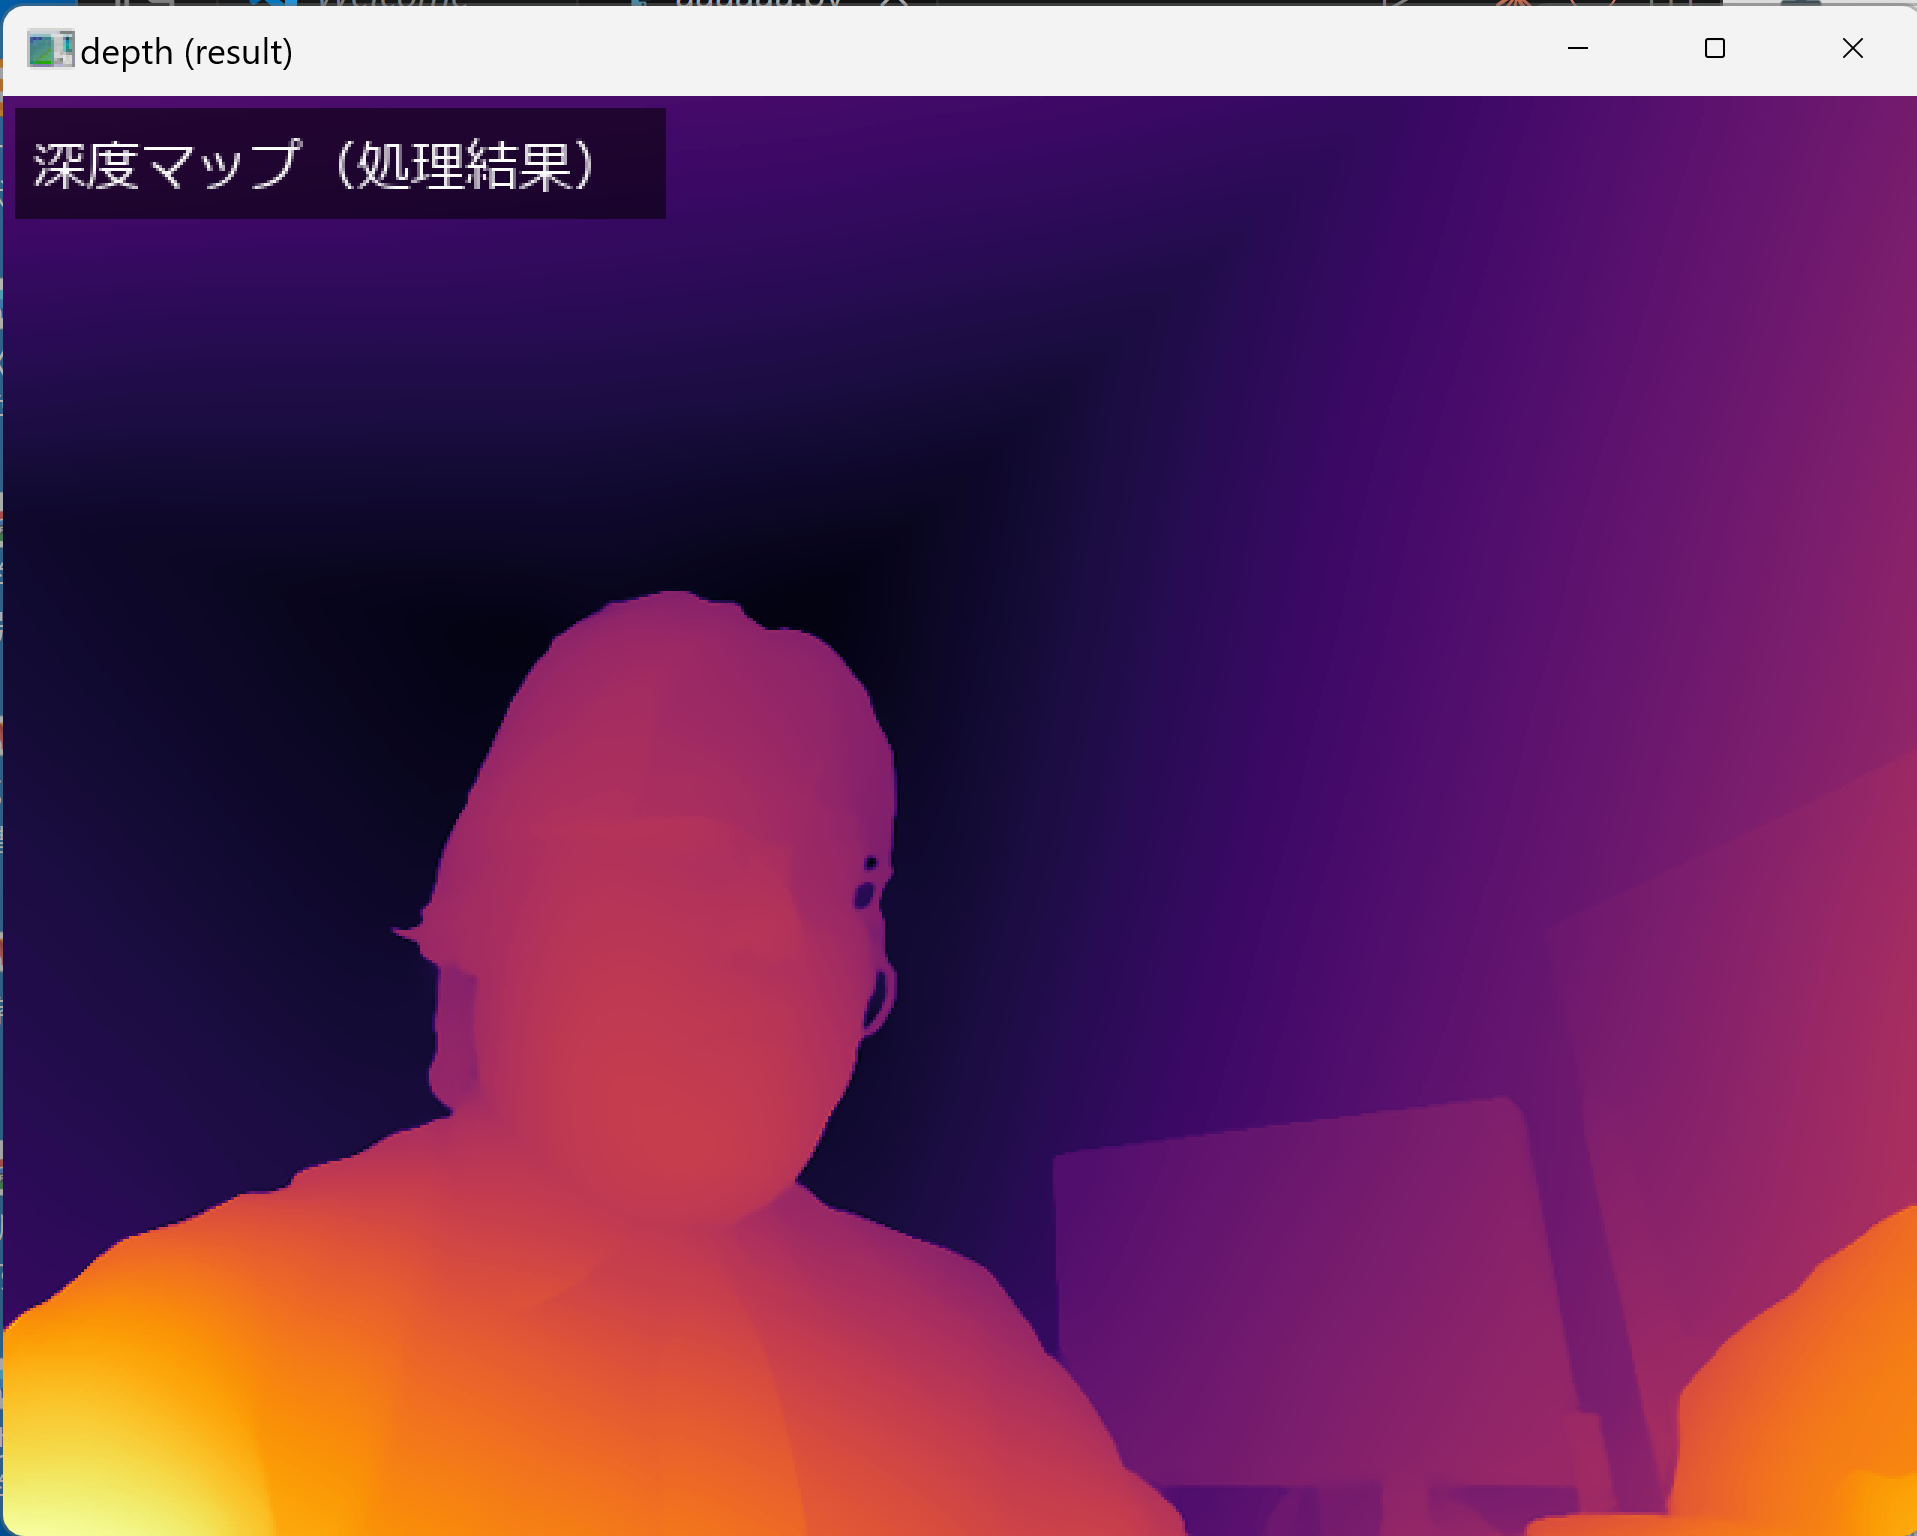
画面にはカメラ映像と操作説明が表示され、深度マップ(奥行きを色の明暗で表した画像。暗い色ほど遠く、明るい色ほど近い)は別ウィンドウに表示される。 CPU環境でも操作不能になりにくいように、深度マップは毎フレームではなく一定のフレーム間隔(既定では2フレームに1回)で更新する。 また、dキーで深度推定処理と深度マップ更新を一時停止できる。 sキーを押すと、その時点の画像と推定深度から3次元の点群を生成し、ファイルに保存して立体表示する。 点群は全画素を使うと点数が多くなり表示が重くなるため、既定では縦横とも2画素ごとに間引いて生成する。
演習の進め方
演習番号:演習1
テーマ名:MiDaS による単眼深度推定と点群復元
手順:
- 下記のインストールコマンドで必要なライブラリを準備する。
- PCにカメラが接続されていることを確認する。
- 下記のコードを実行(メモ帳を用いる場合は a.py のようなファイル名で保存して実行)する。初回はモデルが自動でダウンロードされる。
- カメラ映像と深度マップの2つのウィンドウが出ることを確認する。
- 奥行きの異なる被写体(手前に手をかざす等)を映し、深度マップの明暗の変化を観察する。
- sキーを押して点群を生成し、別ウィンドウでマウス操作(ドラッグで回転、ホイールで拡大縮小)しながら立体構造を確認する。
ヒント:
- MiDaSの出力は逆深度(視差:距離の逆数に比例する量)で、値が大きいほど手前を表す。深度マップでは明るい部分ほど近い。
- 初回のモデルダウンロードには時間がかかるため、表示が出るまで待つ。
- dキーを押すと、深度推定処理と深度マップ更新を一時停止する。もう一度dキーを押すと再開する。
- sキーを押すと、その時点の映像から深度推定を行い、点群を生成する。dキーで一時停止中でも、sキーを押した時点では点群生成のための深度推定を行う。
- 点群の密度はコード中の
POINT_STRIDEで調整できる。1にすると高密度、3以上にすると軽量になる。 - 点群のウィンドウを閉じると、カメラ映像の画面に戻る。再度sキーを押せば、その時点の映像から改めて点群を生成できる。
考察ポイント:
- 深度マップの明暗が、実際の被写体の遠近とどの程度一致しているかを確かめる。
- 生成した点群を回転させ、平らな壁や曲面がどのような立体として復元されているかを読み取る。
- 推定される奥行きが相対的な値であり、さらにカメラ校正(焦点距離や画像中心などのカメラ内部パラメータを実測して求める作業)も行っていないため、点群の距離は実距離ではなく相対的な奥行きである点に注意する。
必要なライブラリのインストール
管理者権限でコマンドプロンプトを起動する
(手順:Windowsキーまたはスタートメニュー → cmd と入力 → 右クリック → 「管理者として実行」)。
そして、以下のコマンドを実行し、関連ライブラリをインストールする。
MiDaSはPyTorch(深層学習の代表的なフレームワーク)とtimm(PyTorch向けの画像認識モデル集ライブラリ)に依存するため、torch、torchvision、timmも併せてインストールする。点群の生成と表示にはopen3d(3次元データを扱うライブラリ)を用いる。
pip install --no-user --upgrade torch torchvision timm opencv-python numpy open3d pillowimport torch
import cv2
import numpy as np
import open3d as o3d
from PIL import Image, ImageDraw, ImageFont
import os
device = torch.device("cuda" if torch.cuda.is_available() else "cpu")
print(f"使用デバイス: {device}")
# ---- 実行設定 ----
CAMERA_ID = 0
CAMERA_WIDTH = 640
CAMERA_HEIGHT = 480
# CPU環境でも操作不能になりにくいよう、深度マップ更新を間引く
DEPTH_UPDATE_INTERVAL = 2
# 点群を軽量化するため、2画素ごとに点を作る
POINT_STRIDE = 2
# 相対深度を点群表示用の奥行きスケールへ変換する範囲
NEAR_DEPTH = 1.0
FAR_DEPTH = 4.0
# カメラ未校正のため、一般的なWebカメラに近い画角(カメラが写せる範囲の角度)を仮定する
FOV_DEG = 60.0
# ---- 日本語フォントの取得 ----
def get_japanese_font(size=24):
candidates = [
"/usr/share/fonts/truetype/fonts-japanese-gothic.ttf",
"/usr/share/fonts/opentype/noto/NotoSansCJK-Regular.ttc",
"/usr/share/fonts/truetype/noto/NotoSansCJK-Regular.ttc",
"C:/Windows/Fonts/meiryo.ttc",
"C:/Windows/Fonts/msgothic.ttc",
"C:/Windows/Fonts/YuGothM.ttc",
"C:/Windows/Fonts/YuGothR.ttc",
"/System/Library/Fonts/ヒラギノ角ゴシック W3.ttc",
"/System/Library/Fonts/Hiragino Sans GB.ttc",
]
for path in candidates:
if os.path.exists(path):
return ImageFont.truetype(path, size), True
return ImageFont.load_default(), False
jp_font, has_japanese_font = get_japanese_font(22)
jp_font_small, _ = get_japanese_font(18)
if has_japanese_font:
HELP_LINES = [
"MiDaS 単眼深度推定 デモ",
"[s] キー : 3D点群を生成・保存・表示",
"[d] キー : 深度推定・深度マップを一時停止/再開",
"[Esc] キー : 終了",
]
DEPTH_TITLE = "深度マップ(処理結果)"
DEPTH_WAIT_TITLE = "深度マップ準備中"
DEPTH_OFF_TITLE = "深度推定は一時停止中(dキーで再開)"
else:
HELP_LINES = [
"MiDaS monocular depth demo",
"[s] key : save and show 3D point cloud",
"[d] key : pause/resume depth estimation",
"[Esc] key : quit",
]
DEPTH_TITLE = "Depth map"
DEPTH_WAIT_TITLE = "Preparing depth map"
DEPTH_OFF_TITLE = "Depth estimation paused: press d to resume"
def draw_japanese_text(img_bgr, lines, org=(10, 10), font=jp_font,
color=(255, 255, 255), bg=(0, 0, 0)):
# OpenCV(BGR:青・緑・赤の順に色が並ぶ形式)画像にPILで文字を重畳する
img_pil = Image.fromarray(cv2.cvtColor(img_bgr, cv2.COLOR_BGR2RGB))
draw = ImageDraw.Draw(img_pil)
x, y = org
max_w = 0
max_h = 0
for line in lines:
bbox = draw.textbbox((0, 0), line, font=font)
max_w = max(max_w, bbox[2] - bbox[0])
max_h = max(max_h, bbox[3] - bbox[1])
line_h = max_h + 8
panel = Image.new("RGBA", img_pil.size, (0, 0, 0, 0))
pdraw = ImageDraw.Draw(panel)
pdraw.rectangle(
[x - 6, y - 6, x + max_w + 12, y + line_h * len(lines) + 4],
fill=(bg[0], bg[1], bg[2], 140),
)
img_pil = Image.alpha_composite(img_pil.convert("RGBA"), panel).convert("RGB")
draw = ImageDraw.Draw(img_pil)
for i, line in enumerate(lines):
draw.text((x, y + i * line_h), line, font=font, fill=color[::-1])
return cv2.cvtColor(np.array(img_pil), cv2.COLOR_RGB2BGR)
def make_message_view(message, width=CAMERA_WIDTH, height=120):
img = np.zeros((height, width, 3), dtype=np.uint8)
return draw_japanese_text(
img,
[message],
org=(10, 10),
font=jp_font_small,
color=(255, 255, 255),
bg=(0, 0, 0),
)
# ---- 学習済みMiDaSモデルをtorch.hub(学習済みモデルの配布・取得の仕組み)から自動ダウンロード ----
model_type = "MiDaS_small" # カメラ用に軽量版(DPT_Large/DPT_Hybridも選択可)
midas = torch.hub.load("intel-isl/MiDaS", model_type, trust_repo=True)
midas.to(device)
midas.eval()
midas_transforms = torch.hub.load("intel-isl/MiDaS", "transforms", trust_repo=True)
if model_type in ("DPT_Large", "DPT_Hybrid"):
transform = midas_transforms.dpt_transform
else:
transform = midas_transforms.small_transform
def estimate_depth(img_rgb):
H, W = img_rgb.shape[:2]
input_batch = transform(img_rgb).to(device)
with torch.no_grad():
prediction = midas(input_batch)
prediction = torch.nn.functional.interpolate(
prediction.unsqueeze(1),
size=(H, W),
mode="bicubic",
align_corners=False,
).squeeze()
return prediction.cpu().numpy().astype(np.float32)
def normalize01_by_percentile(values, low=2, high=98):
# 外れ値の影響を抑えるため、下位low%〜上位high%の範囲に値を切り詰めてから0〜1へ正規化する
v = np.nan_to_num(values.astype(np.float32), nan=0.0, posinf=0.0, neginf=0.0)
lo, hi = np.percentile(v, [low, high])
v = np.clip(v, lo, hi)
return (v - v.min()) / (v.max() - v.min() + 1e-8)
def make_depth_view(depth):
depth_norm = normalize01_by_percentile(depth)
depth_vis = (depth_norm * 255).astype(np.uint8)
depth_color = cv2.applyColorMap(depth_vis, cv2.COLORMAP_INFERNO)
return draw_japanese_text(
depth_color,
[DEPTH_TITLE],
org=(10, 10),
font=jp_font_small,
color=(255, 255, 255),
)
def make_point_cloud(img_rgb, depth, stride=POINT_STRIDE):
# MiDaSの出力は「逆深度(視差)」=距離の逆数に比例する量。値が大きいほど近い。
H, W = img_rgb.shape[:2]
# 点群を軽量化するため、画像と深度を同じ間隔で間引く
img_s = img_rgb[::stride, ::stride, :]
depth_s = depth[::stride, ::stride]
# 視差を安定化してから距離へ変換する
disp_norm = normalize01_by_percentile(depth_s)
disp_norm = disp_norm * 0.9 + 0.1
z_raw = 1.0 / disp_norm
# 表示用の相対奥行きスケールへ変換する
z_norm = normalize01_by_percentile(z_raw)
z = z_norm * (FAR_DEPTH - NEAR_DEPTH) + NEAR_DEPTH
# 間引き後の点にも元画像上の画素座標を対応させる
ys, xs = np.mgrid[0:H:stride, 0:W:stride]
# ピンホールカメラ(レンズを1点の穴とみなす単純なカメラモデル)を仮定した逆投影
# (画素の位置と奥行きから3次元座標を求める計算)
# fx, fy は焦点距離を画素数で表した値、cx, cy は画像中心(主点)の画素座標
fx = 0.5 * W / np.tan(np.deg2rad(FOV_DEG) / 2.0)
fy = fx
cx = (W - 1) / 2.0
cy = (H - 1) / 2.0
X = (xs - cx) * z / fx
Y = -(ys - cy) * z / fy
Z = -z
points = np.stack([X, Y, Z], axis=-1).reshape(-1, 3)
colors = img_s.reshape(-1, 3).astype(np.float32) / 255.0
pcd = o3d.geometry.PointCloud()
pcd.points = o3d.utility.Vector3dVector(points)
pcd.colors = o3d.utility.Vector3dVector(colors)
pcd.translate(-pcd.get_center())
return pcd
def show_point_cloud(pcd, window_name):
vis = o3d.visualization.Visualizer()
vis.create_window(window_name=window_name, width=1024, height=768)
vis.add_geometry(pcd)
opt = vis.get_render_option()
opt.point_size = 2.0
opt.background_color = np.array([0.1, 0.1, 0.1])
vis.reset_view_point(True)
vis.run()
vis.destroy_window()
camera_api = cv2.CAP_DSHOW if os.name == "nt" else cv2.CAP_ANY
cap = cv2.VideoCapture(CAMERA_ID, camera_api)
cap.set(cv2.CAP_PROP_FRAME_WIDTH, CAMERA_WIDTH)
cap.set(cv2.CAP_PROP_FRAME_HEIGHT, CAMERA_HEIGHT)
cap.set(cv2.CAP_PROP_BUFFERSIZE, 1)
show_depth = True
force_depth_update = True
frame_index = 0
last_depth_color = make_message_view(DEPTH_WAIT_TITLE)
depth_off_view = make_message_view(DEPTH_OFF_TITLE)
print("カメラ起動中... 操作方法は画面内に表示されます。")
while True:
ret, frame = cap.read()
if not ret:
break
img_rgb = cv2.cvtColor(frame, cv2.COLOR_BGR2RGB)
display = draw_japanese_text(frame.copy(), HELP_LINES, org=(10, 10))
cv2.imshow("camera", display)
if show_depth:
cv2.imshow("depth (result)", last_depth_color)
else:
cv2.imshow("depth (result)", depth_off_view)
key = cv2.waitKey(1) & 0xFF
if key == 27:
break
elif key == ord("d"):
show_depth = not show_depth
force_depth_update = show_depth
elif key == ord("s"):
depth_for_cloud = estimate_depth(img_rgb)
last_depth_color = make_depth_view(depth_for_cloud)
pcd = make_point_cloud(img_rgb, depth_for_cloud)
# PLY形式(点群を保存する標準的なファイル形式)で保存する
o3d.io.write_point_cloud("pointcloud_midas.ply", pcd)
print(f"3D点群を保存: pointcloud_midas.ply(点数: {len(pcd.points)})")
show_point_cloud(pcd, "MiDaS 3D Point Cloud")
force_depth_update = True
frame_index += 1
continue
if show_depth and (force_depth_update or frame_index % DEPTH_UPDATE_INTERVAL == 0):
depth_for_view = estimate_depth(img_rgb)
last_depth_color = make_depth_view(depth_for_view)
force_depth_update = False
frame_index += 1
cap.release()
cv2.destroyAllWindows()
実行結果例
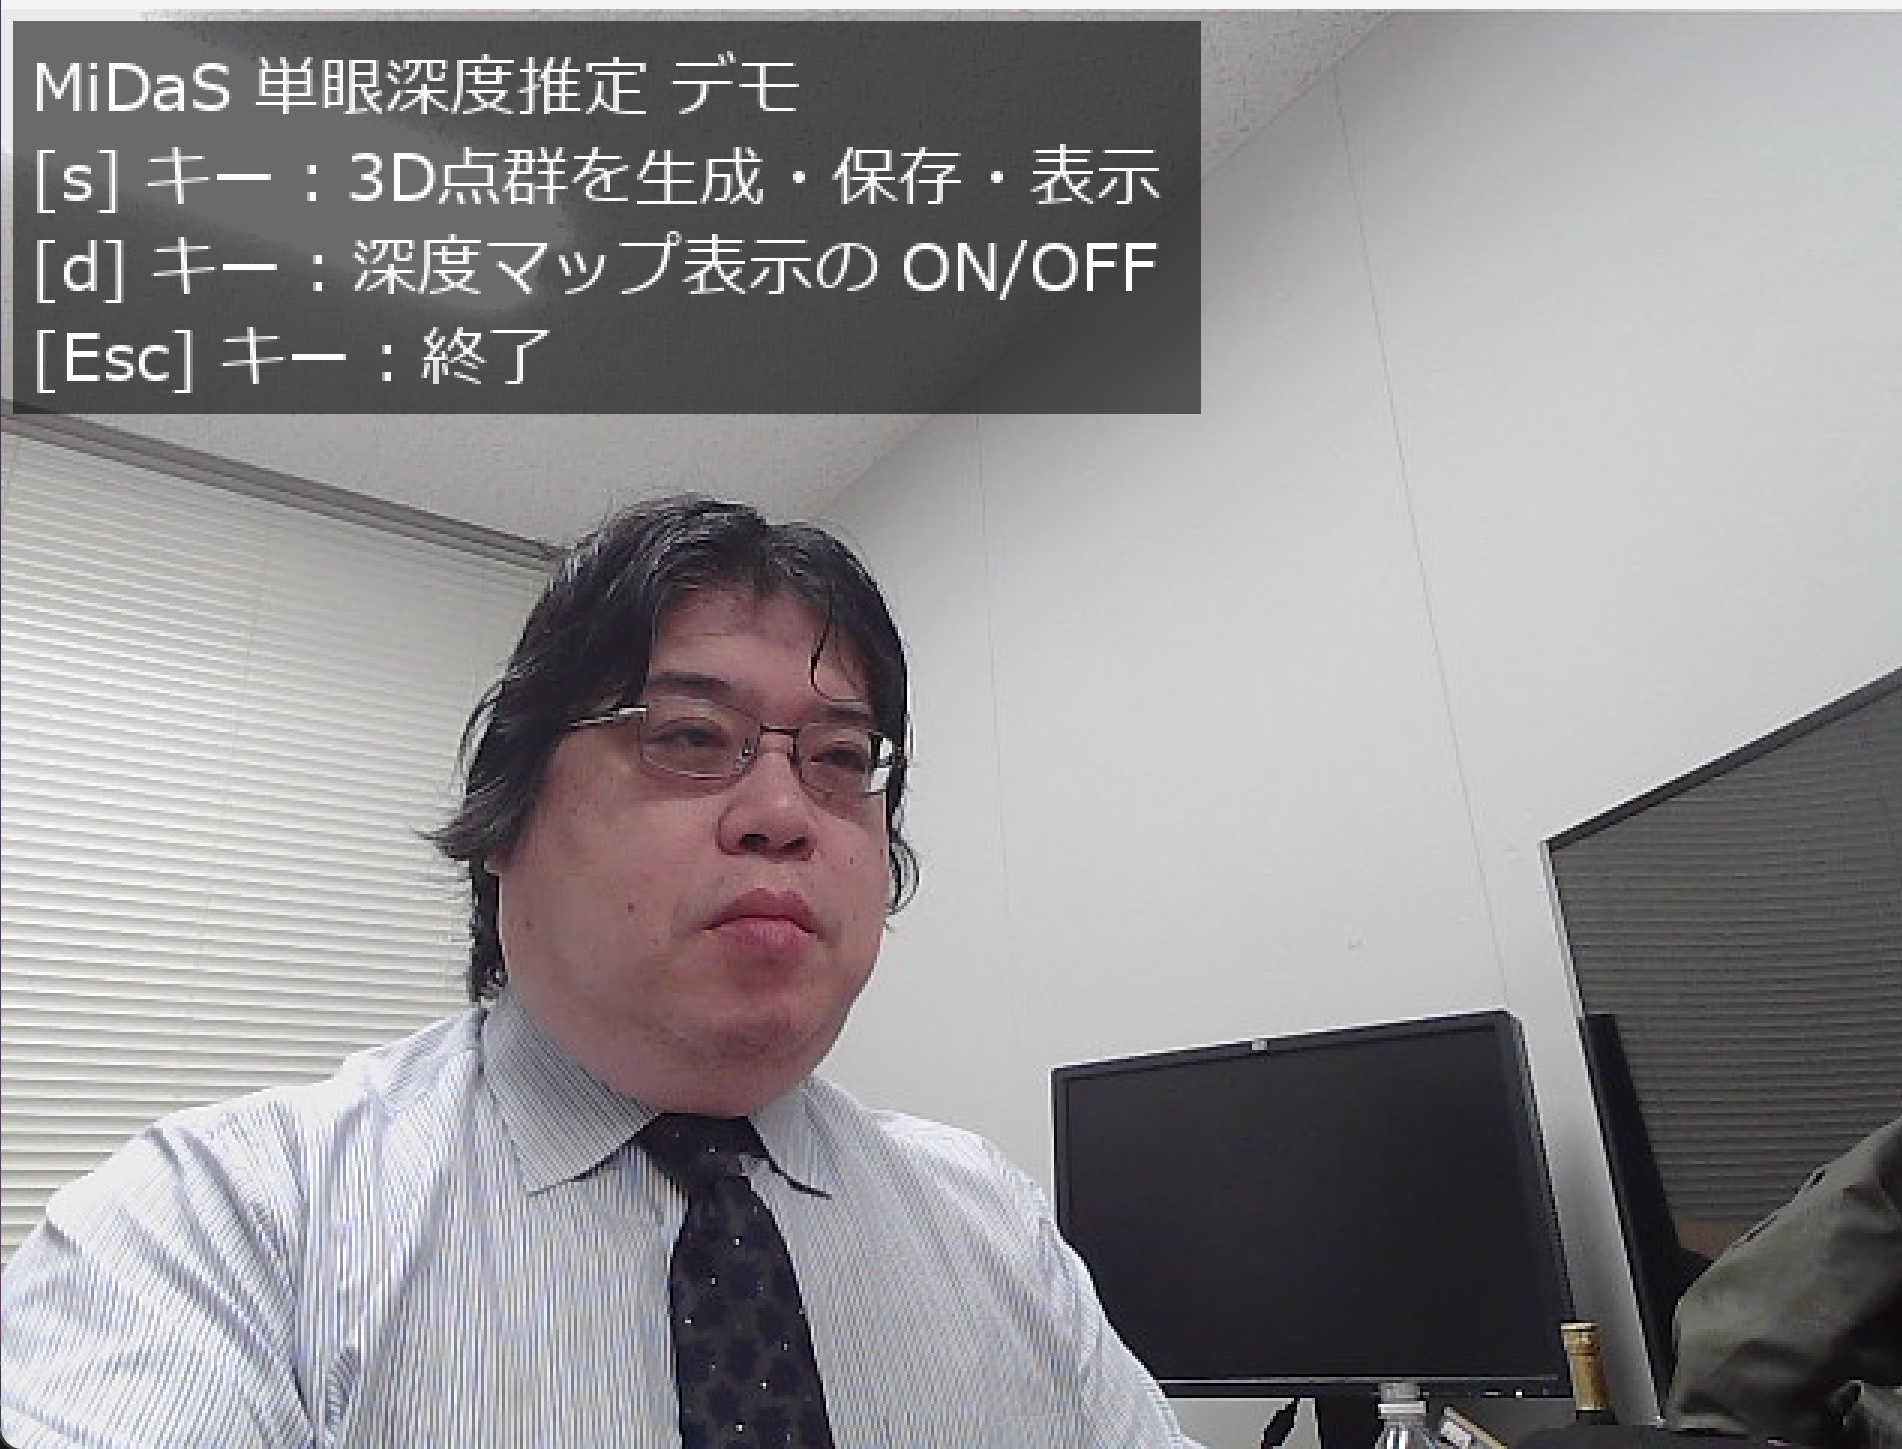
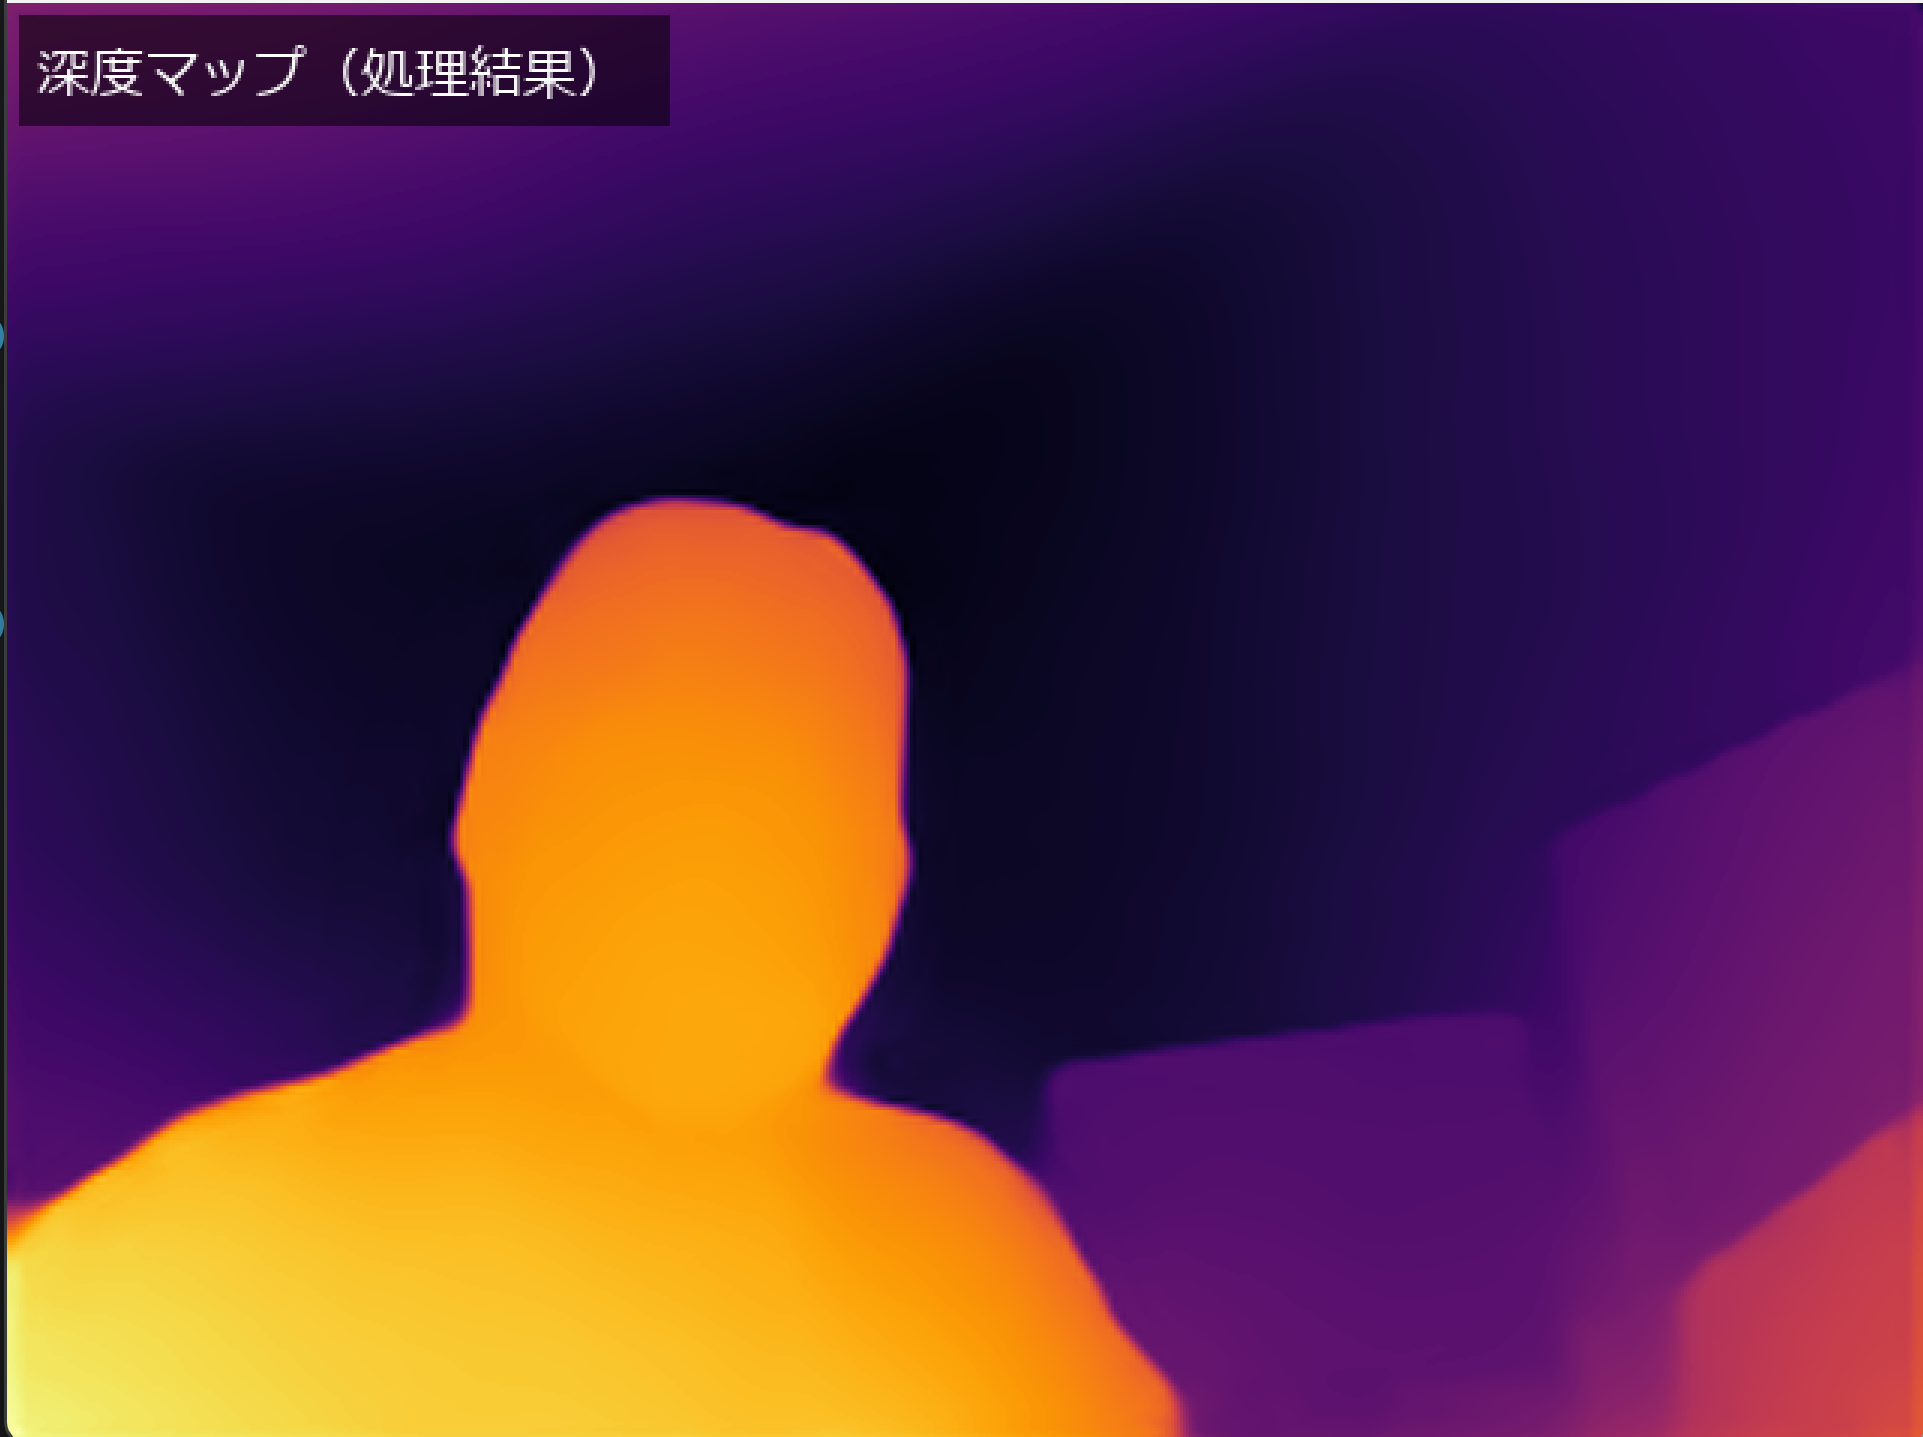
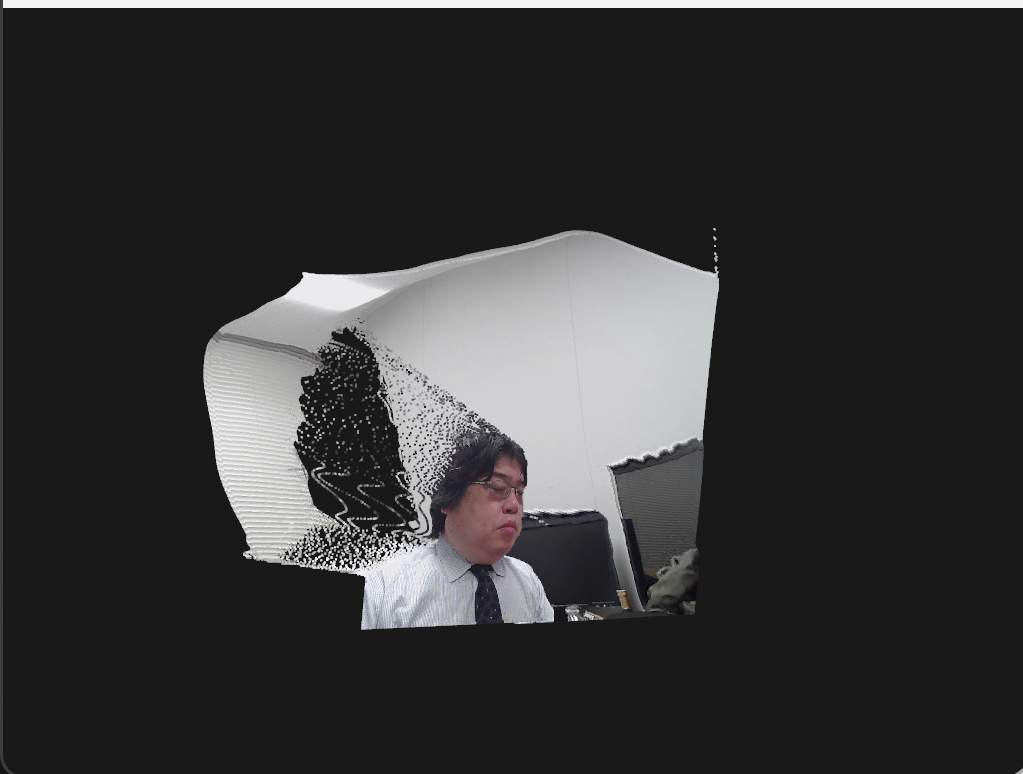
実行結果動画
演習2: Depth Anything による単眼深度推定
プログラム概要
このプログラムは、より新しいAIモデル「Depth Anything V2」を使って、PCカメラの1枚の画像から奥行きを推定する演習である。 このモデルは多様で大量の画像で学習しているため、屋内外を問わず安定した深度推定ができる。 モデルはHugging Face(学習済みモデルを配布する公開プラットフォーム)から初回実行時に自動ダウンロードされ、GPUがあれば自動で使い、無ければCPUで動作する。
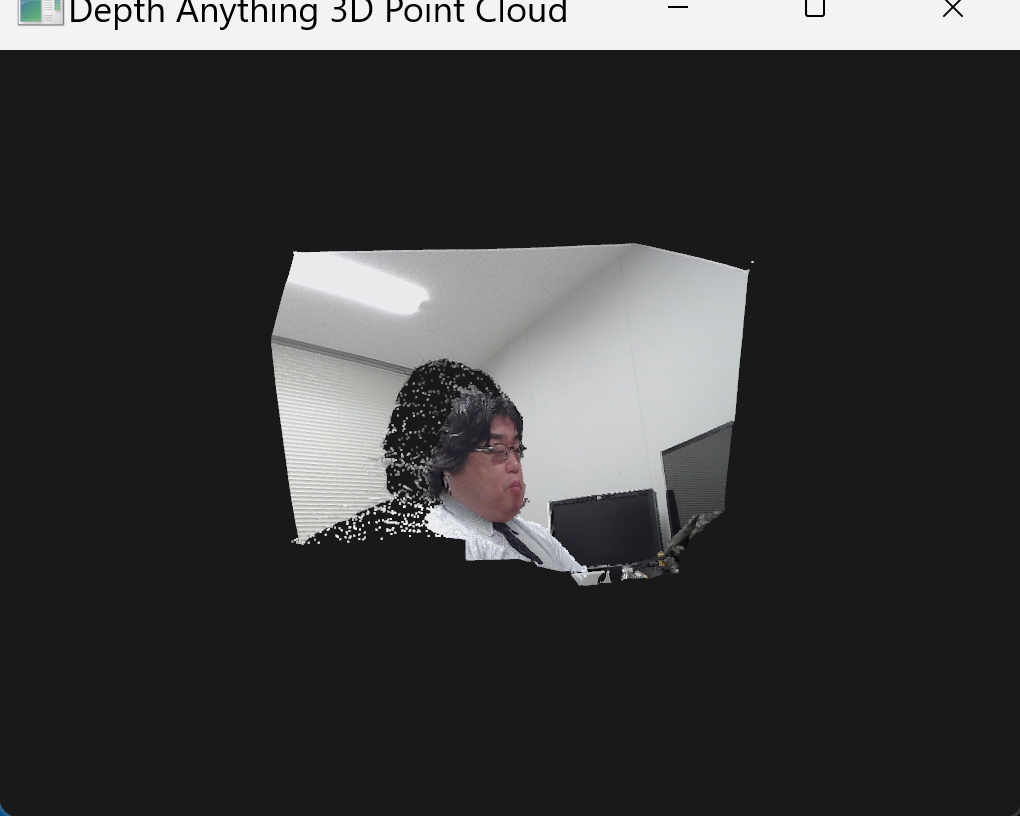
画面にはカメラ映像と操作説明が表示され、深度マップ(奥行きを色の明暗で表した画像。暗い色ほど遠く、明るい色ほど近い)は別ウィンドウに表示される。 CPU環境でも操作不能になりにくいように、深度マップは一定のフレーム間隔(既定では2フレームに1回)で更新する。 また、dキーで深度推定処理と深度マップ更新を一時停止できる。 sキーを押すと、その時点の画像と深度から3次元の点群を生成し、ファイルに保存して立体表示する。 演習1のMiDaSと結果を見比べることで、モデルの違いが3次元復元の品質にどう影響するかを確かめられる。
演習の進め方
演習番号:演習2
テーマ名:Depth Anything V2 による単眼深度推定と点群復元
手順:
- 下記のインストールコマンドで必要なライブラリを準備する。
- PCにカメラが接続されていることを確認する。
- 下記のコードを実行(メモ帳を用いる場合は a.py のようなファイル名で保存して実行)する。初回はモデルが自動でダウンロードされる。
- 演習1と同じ被写体を映し、深度マップを観察する。
- sキーを押して点群を生成し、立体構造を確認する。
ヒント:
- Depth Anything V2の出力はMiDaSと同じく相対的な逆深度(視差に相当する量)で、値が大きいほど手前を表す。深度マップでは明るい部分ほど近い。
- 同じ被写体を演習1と本演習の両方で試すと比較しやすい。
- dキーを押すと、深度推定処理と深度マップ更新を一時停止する。もう一度dキーを押すと再開する。
- sキーを押すと、その時点の映像から点群生成用の深度推定を行う。
- 点群の密度はコード中の
POINT_STRIDEで調整できる。1にすると高密度、3以上にすると軽量になる。 - 点群のウィンドウを閉じると、カメラ映像の画面に戻る。再度sキーを押せば、その時点の映像から改めて点群を生成できる。
考察ポイント:
- 同じ被写体に対して、MiDaSとDepth Anythingの深度マップにどのような差が現れるかを比べる。
- 復元した点群の立体構造が、どちらのモデルでより滑らかか、または正確に見えるかを読み取る(演習1と演習2は同じ変換式で点群を作るため、差はモデルの推定結果の違いによる)。
- いずれの点群もカメラ校正なしの相対的な3次元復元であり、実寸法の計測結果ではない点に注意する。
必要なライブラリのインストール
管理者権限でコマンドプロンプトを起動する
(手順:Windowsキーまたはスタートメニュー → cmd と入力 → 右クリック → 「管理者として実行」)。
そして、以下のコマンドを実行し、関連ライブラリをインストールする。
Depth Anything V2はtransformersライブラリ(Hugging Faceが提供する、学習済みモデルを共通の手順で利用するためのライブラリ)経由で読み込む。PyTorchも必要である。
pip install --no-user --upgrade torch torchvision transformers pillow opencv-python numpy open3dimport torch
import cv2
import numpy as np
import open3d as o3d
from PIL import Image, ImageDraw, ImageFont
import os
from transformers import AutoImageProcessor, AutoModelForDepthEstimation
device = torch.device("cuda" if torch.cuda.is_available() else "cpu")
print(f"使用デバイス: {device}")
# ---- 実行設定 ----
CAMERA_ID = 0
CAMERA_WIDTH = 640
CAMERA_HEIGHT = 480
# CPU環境でも操作不能になりにくいよう、深度マップ更新を間引く
DEPTH_UPDATE_INTERVAL = 2
# 点群を軽量化するため、2画素ごとに点を作る
POINT_STRIDE = 2
# 相対深度を点群表示用の奥行きスケールへ変換する範囲
NEAR_DEPTH = 1.0
FAR_DEPTH = 4.0
# カメラ未校正のため、一般的なWebカメラに近い画角(カメラが写せる範囲の角度)を仮定する
FOV_DEG = 60.0
# ---- 日本語フォントの取得 ----
def get_japanese_font(size=24):
candidates = [
"/usr/share/fonts/truetype/fonts-japanese-gothic.ttf",
"/usr/share/fonts/opentype/noto/NotoSansCJK-Regular.ttc",
"/usr/share/fonts/truetype/noto/NotoSansCJK-Regular.ttc",
"C:/Windows/Fonts/meiryo.ttc",
"C:/Windows/Fonts/msgothic.ttc",
"C:/Windows/Fonts/YuGothM.ttc",
"C:/Windows/Fonts/YuGothR.ttc",
"/System/Library/Fonts/ヒラギノ角ゴシック W3.ttc",
"/System/Library/Fonts/Hiragino Sans GB.ttc",
]
for path in candidates:
if os.path.exists(path):
return ImageFont.truetype(path, size), True
return ImageFont.load_default(), False
jp_font, has_japanese_font = get_japanese_font(22)
jp_font_small, _ = get_japanese_font(18)
if has_japanese_font:
HELP_LINES = [
"Depth Anything 単眼深度推定 デモ",
"[s] キー : 3D点群を生成・保存・表示",
"[d] キー : 深度推定・深度マップを一時停止/再開",
"[Esc] キー : 終了",
]
DEPTH_TITLE = "深度マップ(処理結果)"
DEPTH_WAIT_TITLE = "深度マップ準備中"
DEPTH_OFF_TITLE = "深度推定は一時停止中(dキーで再開)"
else:
HELP_LINES = [
"Depth Anything monocular depth demo",
"[s] key : save and show 3D point cloud",
"[d] key : pause/resume depth estimation",
"[Esc] key : quit",
]
DEPTH_TITLE = "Depth map"
DEPTH_WAIT_TITLE = "Preparing depth map"
DEPTH_OFF_TITLE = "Depth estimation paused: press d to resume"
def draw_japanese_text(img_bgr, lines, org=(10, 10), font=jp_font,
color=(255, 255, 255), bg=(0, 0, 0)):
# OpenCV(BGR:青・緑・赤の順に色が並ぶ形式)画像にPILで文字を重畳する
img_pil = Image.fromarray(cv2.cvtColor(img_bgr, cv2.COLOR_BGR2RGB))
draw = ImageDraw.Draw(img_pil)
x, y = org
max_w = 0
max_h = 0
for line in lines:
bbox = draw.textbbox((0, 0), line, font=font)
max_w = max(max_w, bbox[2] - bbox[0])
max_h = max(max_h, bbox[3] - bbox[1])
line_h = max_h + 8
panel = Image.new("RGBA", img_pil.size, (0, 0, 0, 0))
pdraw = ImageDraw.Draw(panel)
pdraw.rectangle(
[x - 6, y - 6, x + max_w + 12, y + line_h * len(lines) + 4],
fill=(bg[0], bg[1], bg[2], 140),
)
img_pil = Image.alpha_composite(img_pil.convert("RGBA"), panel).convert("RGB")
draw = ImageDraw.Draw(img_pil)
for i, line in enumerate(lines):
draw.text((x, y + i * line_h), line, font=font, fill=color[::-1])
return cv2.cvtColor(np.array(img_pil), cv2.COLOR_RGB2BGR)
def make_message_view(message, width=CAMERA_WIDTH, height=120):
img = np.zeros((height, width, 3), dtype=np.uint8)
return draw_japanese_text(
img,
[message],
org=(10, 10),
font=jp_font_small,
color=(255, 255, 255),
bg=(0, 0, 0),
)
# ---- 学習済みDepth Anything V2モデルをHugging Faceから自動ダウンロード ----
model_name = "depth-anything/Depth-Anything-V2-Small-hf"
processor = AutoImageProcessor.from_pretrained(model_name)
model = AutoModelForDepthEstimation.from_pretrained(model_name)
model.to(device)
model.eval()
def estimate_depth(img_rgb):
H, W = img_rgb.shape[:2]
image = Image.fromarray(img_rgb)
inputs = processor(images=image, return_tensors="pt").to(device)
with torch.no_grad():
outputs = model(**inputs)
predicted_depth = outputs.predicted_depth
prediction = torch.nn.functional.interpolate(
predicted_depth.unsqueeze(1),
size=(H, W),
mode="bicubic",
align_corners=False,
).squeeze()
return prediction.cpu().numpy().astype(np.float32)
def normalize01_by_percentile(values, low=2, high=98):
# 外れ値の影響を抑えるため、下位low%〜上位high%の範囲に値を切り詰めてから0〜1へ正規化する
v = np.nan_to_num(values.astype(np.float32), nan=0.0, posinf=0.0, neginf=0.0)
lo, hi = np.percentile(v, [low, high])
v = np.clip(v, lo, hi)
return (v - v.min()) / (v.max() - v.min() + 1e-8)
def make_depth_view(depth):
depth_norm = normalize01_by_percentile(depth)
depth_vis = (depth_norm * 255).astype(np.uint8)
depth_color = cv2.applyColorMap(depth_vis, cv2.COLORMAP_INFERNO)
return draw_japanese_text(
depth_color,
[DEPTH_TITLE],
org=(10, 10),
font=jp_font_small,
color=(255, 255, 255),
)
def make_point_cloud(img_rgb, depth, stride=POINT_STRIDE):
# Depth Anything V2の出力は相対的な「逆深度(視差)」。値が大きいほど近い。
H, W = img_rgb.shape[:2]
# 点群を軽量化するため、画像と深度を同じ間隔で間引く
img_s = img_rgb[::stride, ::stride, :]
depth_s = depth[::stride, ::stride]
# 演習1と同じ手順で、視差を安定化してから距離へ変換する
disp_norm = normalize01_by_percentile(depth_s)
disp_norm = disp_norm * 0.9 + 0.1
z_raw = 1.0 / disp_norm
# 表示用の相対奥行きスケールへ変換する
z_norm = normalize01_by_percentile(z_raw)
z = z_norm * (FAR_DEPTH - NEAR_DEPTH) + NEAR_DEPTH
# 間引き後の点にも元画像上の画素座標を対応させる
ys, xs = np.mgrid[0:H:stride, 0:W:stride]
# ピンホールカメラ(レンズを1点の穴とみなす単純なカメラモデル)を仮定した逆投影
# (画素の位置と奥行きから3次元座標を求める計算)
# fx, fy は焦点距離を画素数で表した値、cx, cy は画像中心(主点)の画素座標
fx = 0.5 * W / np.tan(np.deg2rad(FOV_DEG) / 2.0)
fy = fx
cx = (W - 1) / 2.0
cy = (H - 1) / 2.0
X = (xs - cx) * z / fx
Y = -(ys - cy) * z / fy
Z = -z
points = np.stack([X, Y, Z], axis=-1).reshape(-1, 3)
colors = img_s.reshape(-1, 3).astype(np.float32) / 255.0
pcd = o3d.geometry.PointCloud()
pcd.points = o3d.utility.Vector3dVector(points)
pcd.colors = o3d.utility.Vector3dVector(colors)
pcd.translate(-pcd.get_center())
return pcd
def show_point_cloud(pcd, window_name):
vis = o3d.visualization.Visualizer()
vis.create_window(window_name=window_name, width=1024, height=768)
vis.add_geometry(pcd)
opt = vis.get_render_option()
opt.point_size = 2.0
opt.background_color = np.array([0.1, 0.1, 0.1])
vis.reset_view_point(True)
vis.run()
vis.destroy_window()
camera_api = cv2.CAP_DSHOW if os.name == "nt" else cv2.CAP_ANY
cap = cv2.VideoCapture(CAMERA_ID, camera_api)
cap.set(cv2.CAP_PROP_FRAME_WIDTH, CAMERA_WIDTH)
cap.set(cv2.CAP_PROP_FRAME_HEIGHT, CAMERA_HEIGHT)
cap.set(cv2.CAP_PROP_BUFFERSIZE, 1)
show_depth = True
force_depth_update = True
frame_index = 0
last_depth_color = make_message_view(DEPTH_WAIT_TITLE)
depth_off_view = make_message_view(DEPTH_OFF_TITLE)
print("カメラ起動中... 操作方法は画面内に表示されます。")
while True:
ret, frame = cap.read()
if not ret:
break
img_rgb = cv2.cvtColor(frame, cv2.COLOR_BGR2RGB)
display = draw_japanese_text(frame.copy(), HELP_LINES, org=(10, 10))
cv2.imshow("camera", display)
if show_depth:
cv2.imshow("depth (result)", last_depth_color)
else:
cv2.imshow("depth (result)", depth_off_view)
key = cv2.waitKey(1) & 0xFF
if key == 27:
break
elif key == ord("d"):
show_depth = not show_depth
force_depth_update = show_depth
elif key == ord("s"):
depth_for_cloud = estimate_depth(img_rgb)
last_depth_color = make_depth_view(depth_for_cloud)
pcd = make_point_cloud(img_rgb, depth_for_cloud)
# PLY形式(点群を保存する標準的なファイル形式)で保存する
o3d.io.write_point_cloud("pointcloud_anything.ply", pcd)
print(f"3D点群を保存: pointcloud_anything.ply(点数: {len(pcd.points)})")
show_point_cloud(pcd, "Depth Anything 3D Point Cloud")
force_depth_update = True
frame_index += 1
continue
if show_depth and (force_depth_update or frame_index % DEPTH_UPDATE_INTERVAL == 0):
depth_for_view = estimate_depth(img_rgb)
last_depth_color = make_depth_view(depth_for_view)
force_depth_update = False
frame_index += 1
cap.release()
cv2.destroyAllWindows()
実行結果例
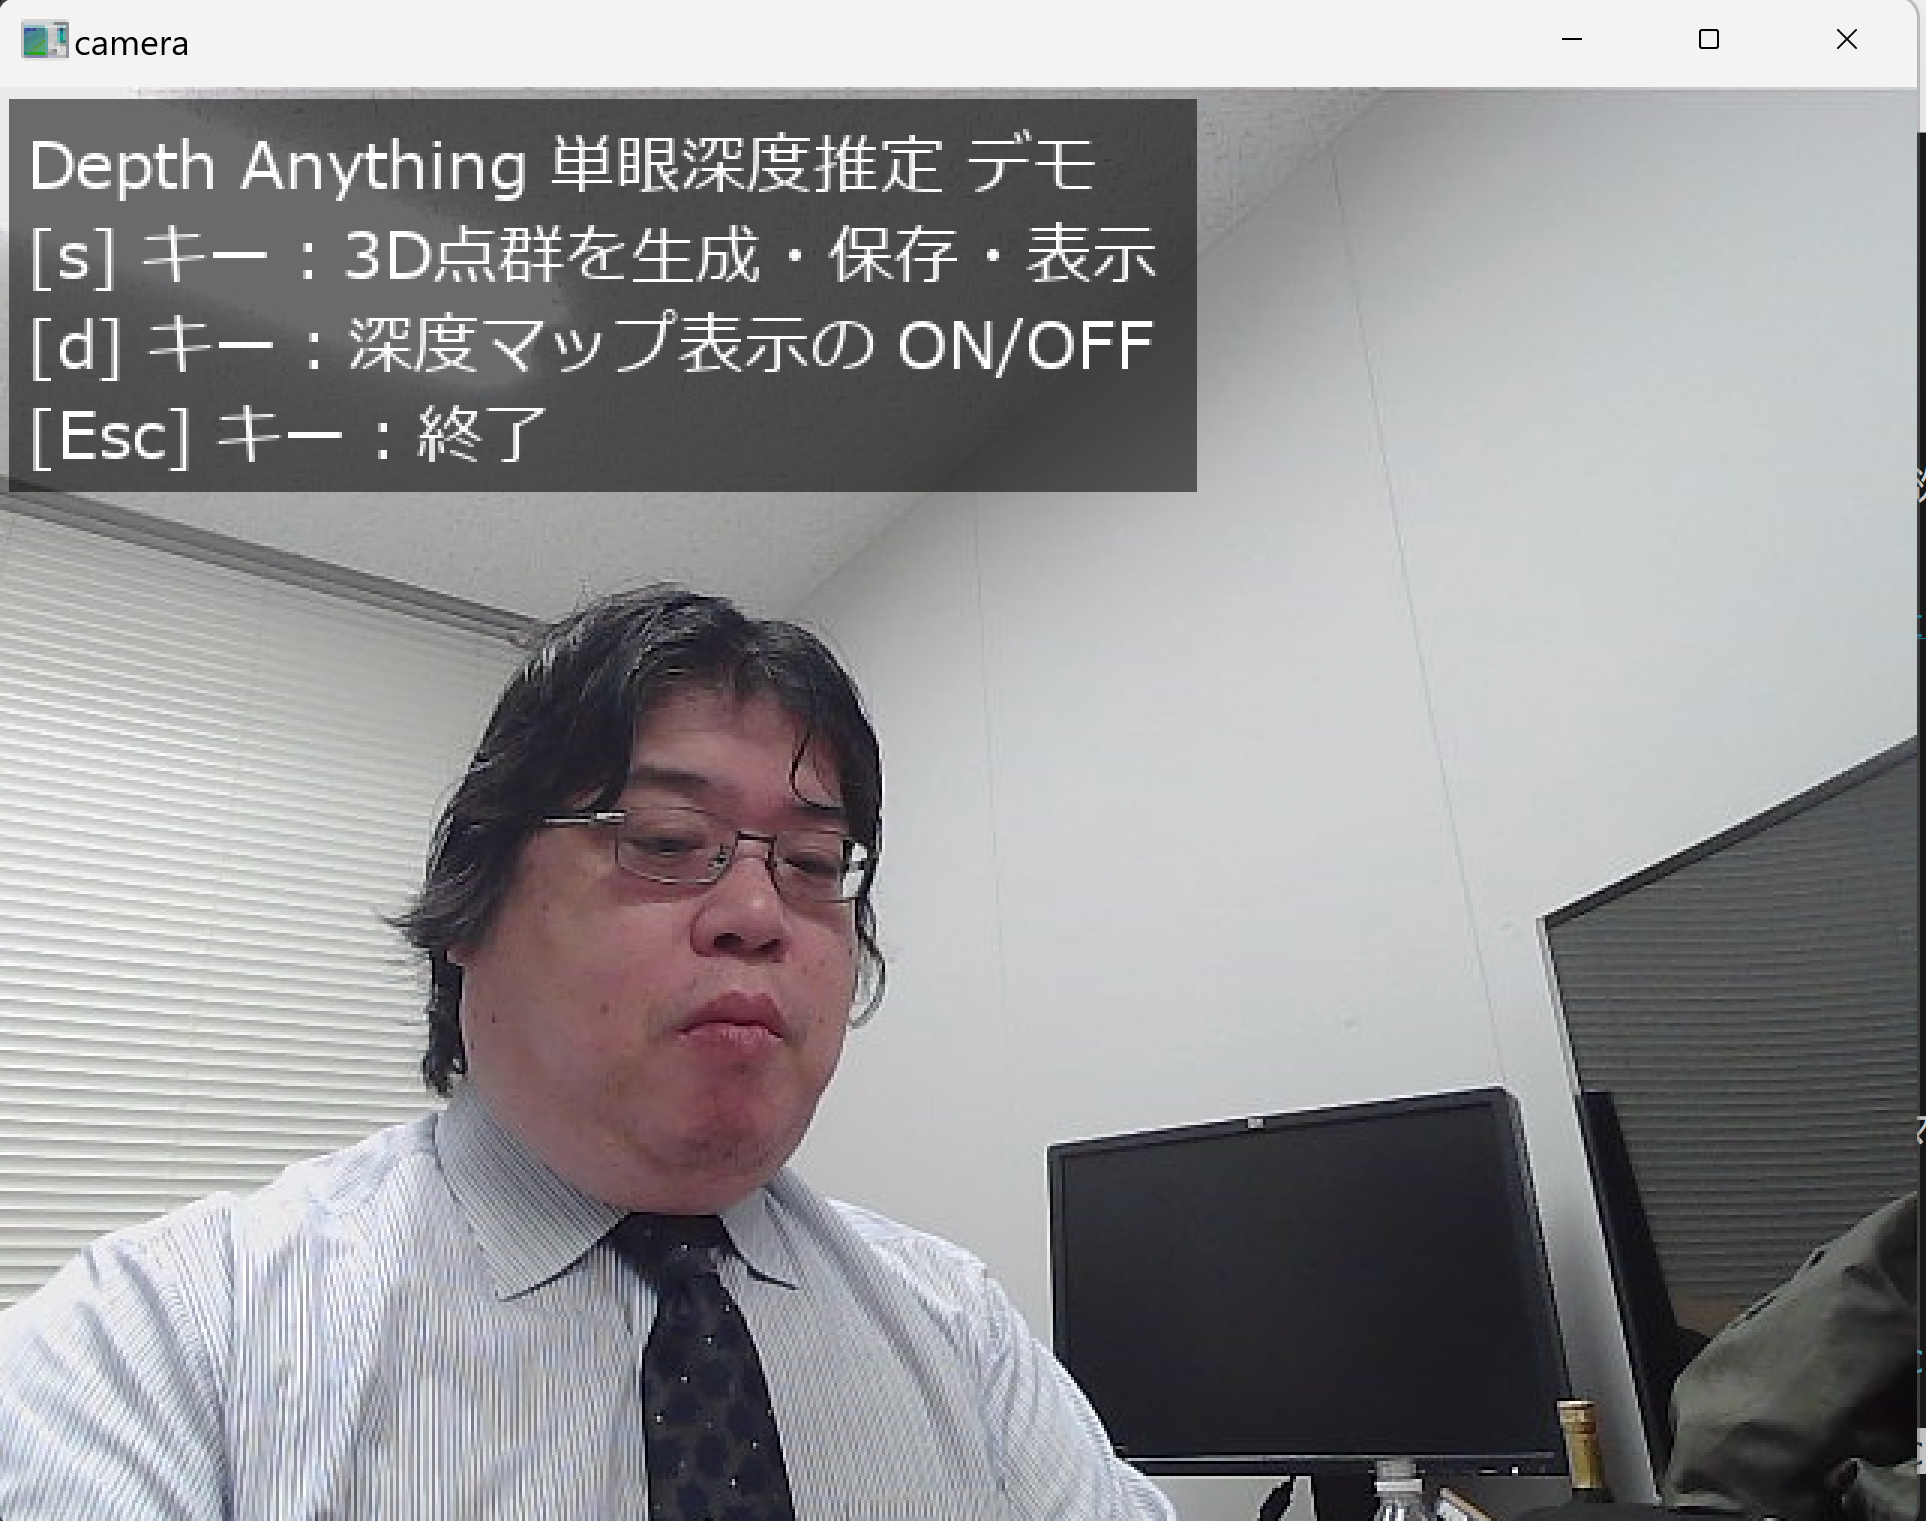
実行結果動画