Cocos2d を使ってみる
【概要】
Cocos2d は2次元ゲームのフレームワークであり,Python で動作する. (Cocos2d の系譜を受け継ぐ Cocos2d-x は iOS や Android でも動き,普及している.)
このページでは,cocos2d の基本を見本プログラムで演習する.扱う題材は次のとおりである.
- レイヤのクラス定義,ゲームの登場物のクラス定義
- イベントハンドラ(キーボード,マウス)
- レイヤの切り替え
【目次】
- 1. 前準備
- 2. 必要なライブラリのインストール
- 3. 実行手順
- 4. 演習1:テキスト表示
- 5. 演習2:キーボードのイベント
- 6. 演習3:マウスのイベント
- 7. 演習4:画面切り替え(画面のレイヤ分け)
- 8. まとめ
【関連する外部ページ】
cocos2d(Python 版)の公式ドキュメント:https://los-cocos.github.io/cocos-site/
【サイト内の関連情報】
関連する資料:Cocos2d の概要 [PDF], [パワーポイント]
関連する資料:ゲームエンジン[PDF], [パワーポイント]
関連する資料:Cocos2d のイベントハンドラ,アクション
1. 前準備
Python 3.12 のインストール
Pythonのインストールを行い、Pythonのプログラムを実行する環境を整える。扱う環境は、Windows搭載パソコンである。金子研究室では、Python 3.12.10を推奨する。
[Windows での Python 3.12 のインストール手順を見るには、ここをクリック]
Windows での Python 3.12 のインストール
以下のいずれかの方法でPython 3.12をインストールする。Pythonがインストール済みの場合、この手順は不要である。
方法 1:winget によるインストール
【インストールコマンドの実行方法】
管理者権限でコマンドプロンプトを起動する(手順:Windowsキーまたはスタートメニュー → cmd と入力 → 右クリック → 「管理者として実行」)。そして、コマンド全体をコマンドプロンプトにコピー&ペーストする。
--scope machine を指定することで、システム全体(全ユーザー向け)にインストールされる。このオプションの実行には管理者権限が必要である。インストール完了後、コマンドプロンプトを再起動するとPATHが反映される。
REM Python 3.12 をシステム領域にインストール
winget install --id Python.Python.3.12 -e --scope machine --silent --accept-source-agreements --accept-package-agreements --override "/quiet InstallAllUsers=1 PrependPath=1 Include_test=0 Include_pip=1 Include_launcher=1 InstallLauncherAllUsers=1 TargetDir=\"C:\Program Files\Python312\""

REM Python と Scripts を PATH 先頭に追加
powershell -NoProfile -Command "$p='C:\Program Files\Python312'; $s=\"$p\Scripts\"; $c=[Environment]::GetEnvironmentVariable('Path','Machine'); if((Test-Path $p) -and (';'+$c+';' -notlike \"*;$p;*\") -and (';'+$c+';' -notlike \"*;$s;*\")){[Environment]::SetEnvironmentVariable('Path',\"$p;$s;$c\",'Machine')}"
方法 2:インストーラーによるインストール
- Python公式サイト(https://www.python.org/downloads/)にアクセスし、「Download Python 3.x.x」ボタンからWindows用インストーラーをダウンロードする。
- ダウンロードしたインストーラーを実行する。
- 初期画面の下部に表示される「Add python.exe to PATH」にチェックを入れてから「Customize installation」を選択する。このチェックを入れ忘れると、コマンドプロンプトから
pythonコマンドを実行できない。 - 「Install Python 3.xx for all users」にチェックを入れ、「Install」をクリックする。
インストールの確認
コマンドプロンプトで以下を実行する。
python --versionバージョン番号(例:Python 3.12.x)が表示されればインストール成功である。「'python' は、内部コマンドまたは外部コマンドとして認識されていません。」と表示される場合は、インストールが正常に完了していない。
Python の開発環境 Visual Studio Code のインストールと Python 用の設定
Python の開発環境Visual Studio Code(プログラムを編集するソフトウェア。以下、VS Code)を整える。
[Windows での Visual Studio Code のインストールと Python 用の設定手順を見るには、ここをクリック]
Windows での Visual Studio Code のインストールと Python 用の設定手順
1. VS Code と拡張機能のインストール
以下のコマンドにより,既存の VS Code を削除し,全ユーザー共有の設定で再インストールしたうえで,拡張機能(VS Code に機能を追加するソフトウェア)をまとめて導入する.
【インストールコマンドの実行方法】
管理者権限でコマンドプロンプトを起動する(手順:Windows キーまたはスタートメニュー → cmd と入力 → 右クリック → 「管理者として実行」)。そして,コマンド全体をコマンドプロンプトにコピー&ペーストする。
インストールコマンド
REM ============================================================
REM Microsoft Visual Studio Code
REM ============================================================
winget uninstall -e --id Microsoft.VisualStudioCode --silent --disable-interactivity --accept-source-agreements
rmdir /s /q C:\ProgramData\vscode-extensions 2>nul
rmdir /s /q "%APPDATA%\Code" 2>nul
rmdir /s /q "%USERPROFILE%\.vscode" 2>nul
rmdir /s /q "%LOCALAPPDATA%\Microsoft\vscode-update" 2>nul

REM VS Code をシステム領域に新規インストール
winget install --scope machine --id Microsoft.VisualStudioCode -e --silent --accept-source-agreements --accept-package-agreements

REM 全ユーザー共有の拡張機能フォルダ
mkdir C:\ProgramData\vscode-extensions 2>nul
icacls "C:\ProgramData\vscode-extensions" /grant "Everyone:(OI)(CI)M" /T

REM スタートメニューのショートカットを --extensions-dir 付きで再作成
rmdir /s /q "C:\ProgramData\Microsoft\Windows\Start Menu\Programs\Visual Studio Code" 2>nul
del "C:\ProgramData\Microsoft\Windows\Start Menu\Programs\Visual Studio Code.lnk" 2>nul
powershell -NoProfile -Command "$s=New-Object -ComObject WScript.Shell; $lnk=$s.CreateShortcut('C:\ProgramData\Microsoft\Windows\Start Menu\Programs\Visual Studio Code.lnk'); $lnk.TargetPath='C:\Program Files\Microsoft VS Code\Code.exe'; $lnk.Arguments='--extensions-dir \"C:\ProgramData\vscode-extensions\"'; $lnk.Save()"
REM ショートカットの検証
powershell -NoProfile -Command "$s=New-Object -ComObject WScript.Shell; $lnk=$s.CreateShortcut('C:\ProgramData\Microsoft\Windows\Start Menu\Programs\Visual Studio Code.lnk'); Write-Host 'TargetPath:' $lnk.TargetPath; Write-Host 'Arguments:' $lnk.Arguments"

REM ファイル / フォルダ右クリックの「Code で開く」を登録
reg add "HKLM\SOFTWARE\Classes\*\shell\VSCode\command" /ve /d "\"C:\Program Files\Microsoft VS Code\Code.exe\" --extensions-dir \"C:\ProgramData\vscode-extensions\" \"%1\"" /f
reg add "HKLM\SOFTWARE\Classes\Directory\shell\VSCode\command" /ve /d "\"C:\Program Files\Microsoft VS Code\Code.exe\" --extensions-dir \"C:\ProgramData\vscode-extensions\" \"%1\"" /f
reg add "HKLM\SOFTWARE\Classes\Directory\Background\shell\VSCode\command" /ve /d "\"C:\Program Files\Microsoft VS Code\Code.exe\" --extensions-dir \"C:\ProgramData\vscode-extensions\" \"%V\"" /f

REM --extensions-dir 付きで起動する code.cmd ラッパを作成
REM (%* を echo で書くと対話的 cmd で失われるため、PowerShell で [char]37+'*' を書き出す)
powershell -NoProfile -Command "$pct=[char]37; $q=[char]34; $c='@echo off'+[char]13+[char]10+$q+'C:\Program Files\Microsoft VS Code\bin\code.cmd'+$q+' --extensions-dir '+$q+'C:\ProgramData\vscode-extensions'+$q+' '+$pct+'*'+[char]13+[char]10; [IO.File]::WriteAllText('C:\ProgramData\vscode-extensions\vscode.cmd',$c,[Text.Encoding]::ASCII)"

REM 拡張機能のインストール
set "CODE=C:\Program Files\Microsoft VS Code\bin\code.cmd"
"%CODE%" --extensions-dir "C:\ProgramData\vscode-extensions" --uninstall-extension GitHub.copilot
"%CODE%" --extensions-dir "C:\ProgramData\vscode-extensions" --uninstall-extension GitHub.copilot-chat
"%CODE%" --extensions-dir "C:\ProgramData\vscode-extensions" --install-extension ms-python.python
"%CODE%" --extensions-dir "C:\ProgramData\vscode-extensions" --install-extension ms-python.vscode-pylance
"%CODE%" --extensions-dir "C:\ProgramData\vscode-extensions" --install-extension ms-python.debugpy
"%CODE%" --extensions-dir "C:\ProgramData\vscode-extensions" --install-extension MS-CEINTL.vscode-language-pack-ja
"%CODE%" --extensions-dir "C:\ProgramData\vscode-extensions" --install-extension saoudrizwan.claude-dev
"%CODE%" --extensions-dir "C:\ProgramData\vscode-extensions" --install-extension rust-lang.rust-analyzer
"%CODE%" --extensions-dir "C:\ProgramData\vscode-extensions" --install-extension tamasfe.even-better-toml
"%CODE%" --extensions-dir "C:\ProgramData\vscode-extensions" --install-extension anthropic.claude-code
"%CODE%" --extensions-dir "C:\ProgramData\vscode-extensions" --install-extension almenon.arepl
"%CODE%" --extensions-dir "C:\ProgramData\vscode-extensions" --list-extensions --show-versions
echo === セットアップ完了 ===
2. Python インタプリタの選択
同一マシンに複数の Python がインストールされている場合,VS Code で使用する Python 本体(インタプリタ:Python プログラムを解釈・実行するソフトウェア)を選択する必要がある.
- コマンドパレット(コマンド名で機能を呼び出す VS Code の入力欄)を開く(
Ctrl+Shift+P) Python: Select Interpreterと入力する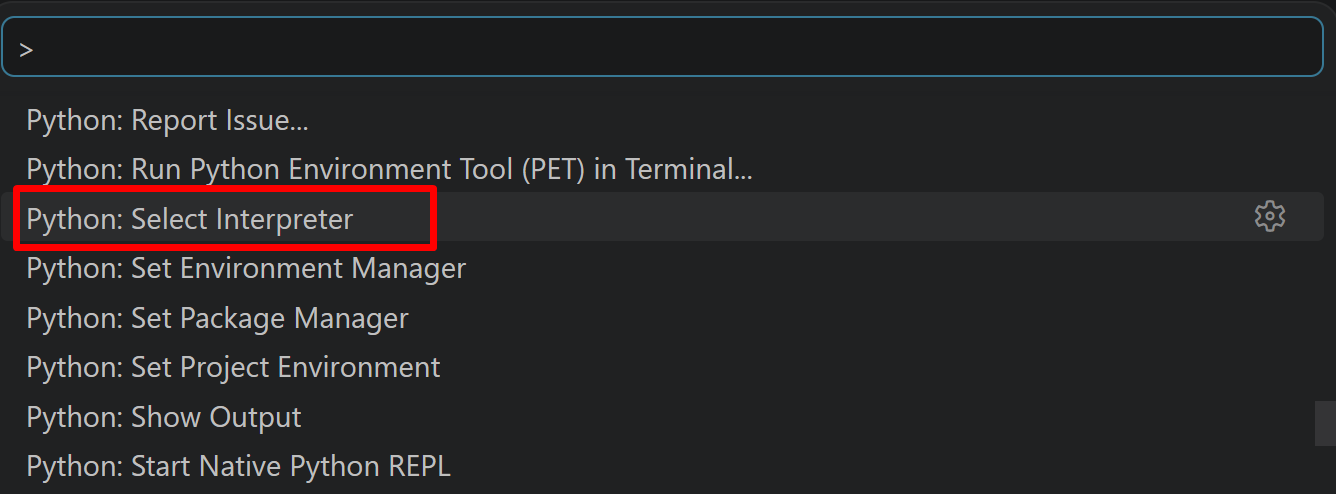
- 表示される一覧から,使用する Python(例:
C:\Program Files\Python312\python.exe)を選択する.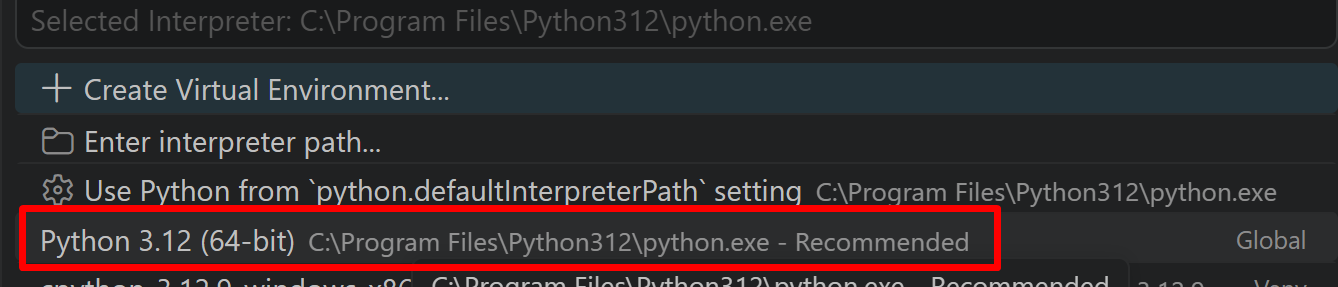
Python プログラム実行手順
[Windows での Python プログラム実行手順を見るには、ここをクリック]
Windows での Python 実行手順(Visual Studio Codeを使用)
プログラムファイルの作成と保存
- 左サイドバーの「エクスプローラー」アイコン(
Ctrl+Shift+E)をクリックする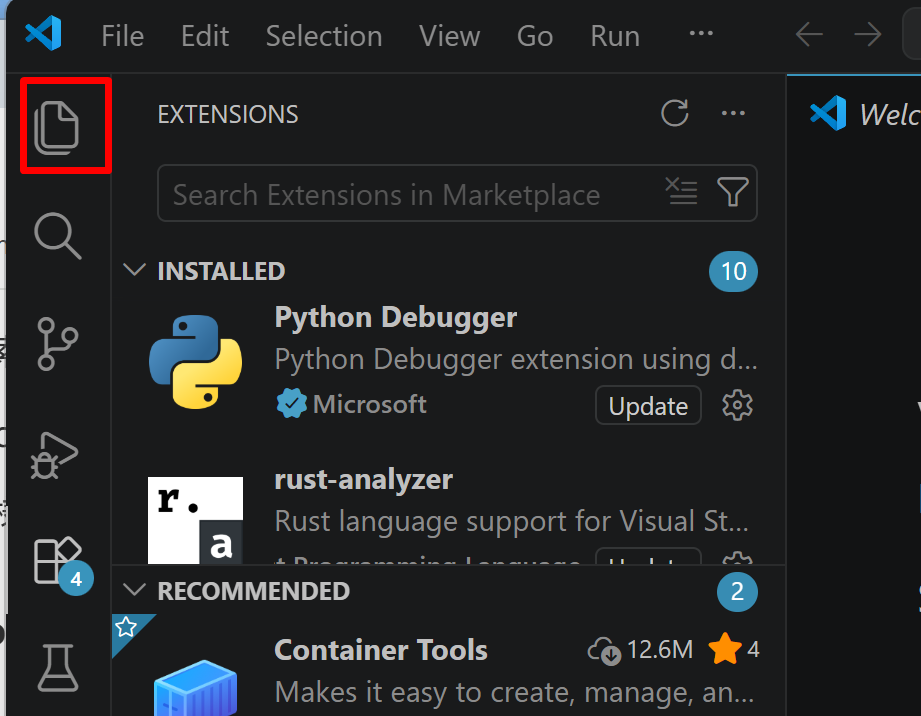
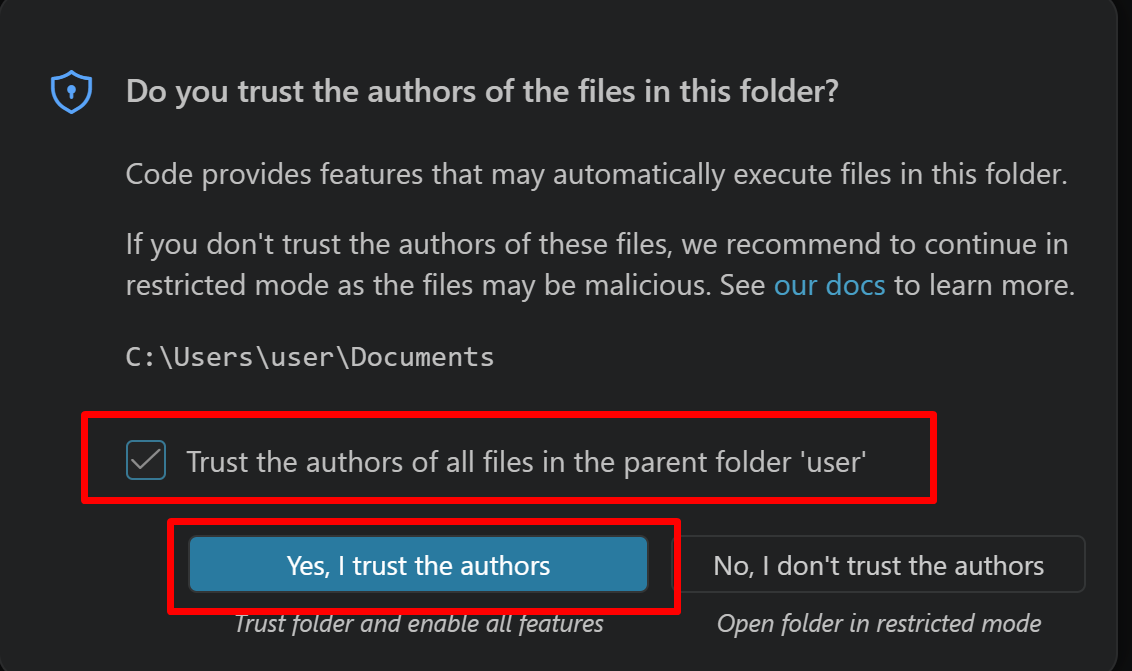
- 「NO FOLDER OPENED」(作業対象フォルダが未選択の状態)と表示される場合は,「Open Folder」をクリックし,プログラムを保存するフォルダを選択する
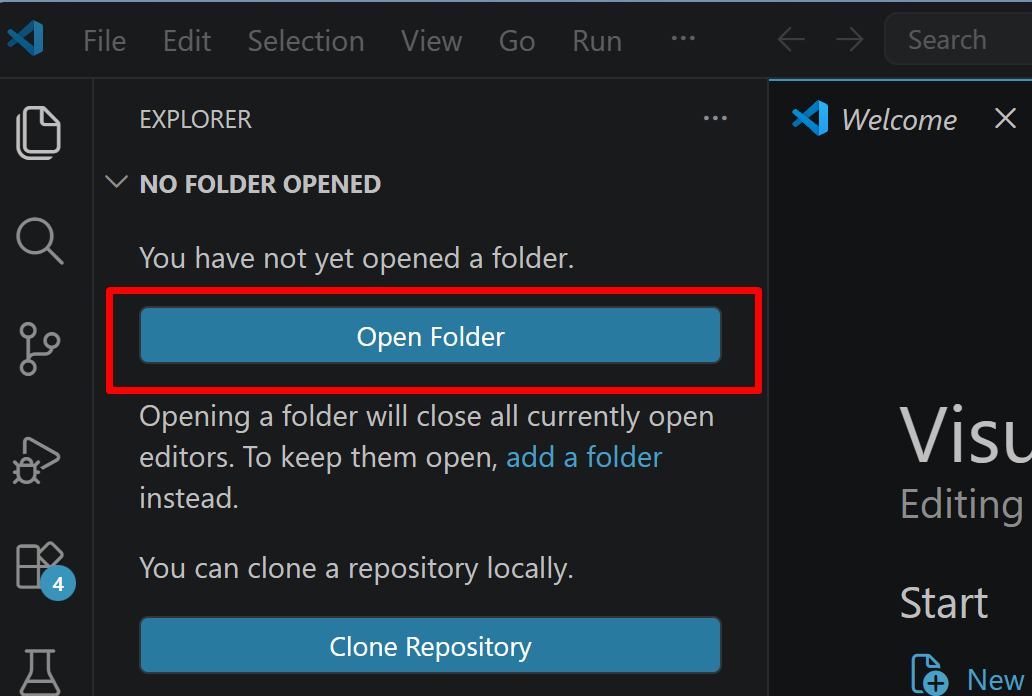
続いて「フォルダを信用するか」を確認する画面(フォルダ内のコードを実行してよいか確認する VS Code の仕組み)が表示されるので,チェックして Yes を選択する
- フォルダ名の右側に表示される「新しいファイル」アイコンをクリックする
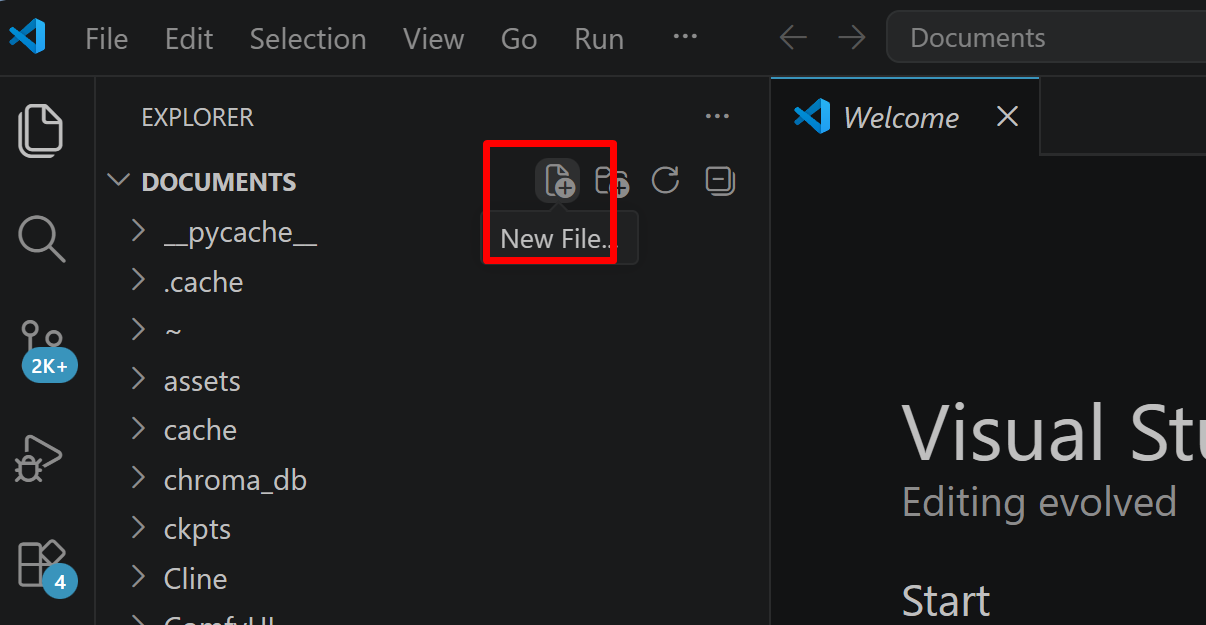
- ファイル名(例:
aitask.py.ファイル名は何でも良い)を入力しEnterを押す.拡張子は.py(Python ファイルを示す拡張子)とする
- 実行したいコードを選択し,
Ctrl+Cでコピーする.VS Code のエディタ領域にCtrl+Vで貼り付ける Ctrl+Sで保存する
プログラムの実行
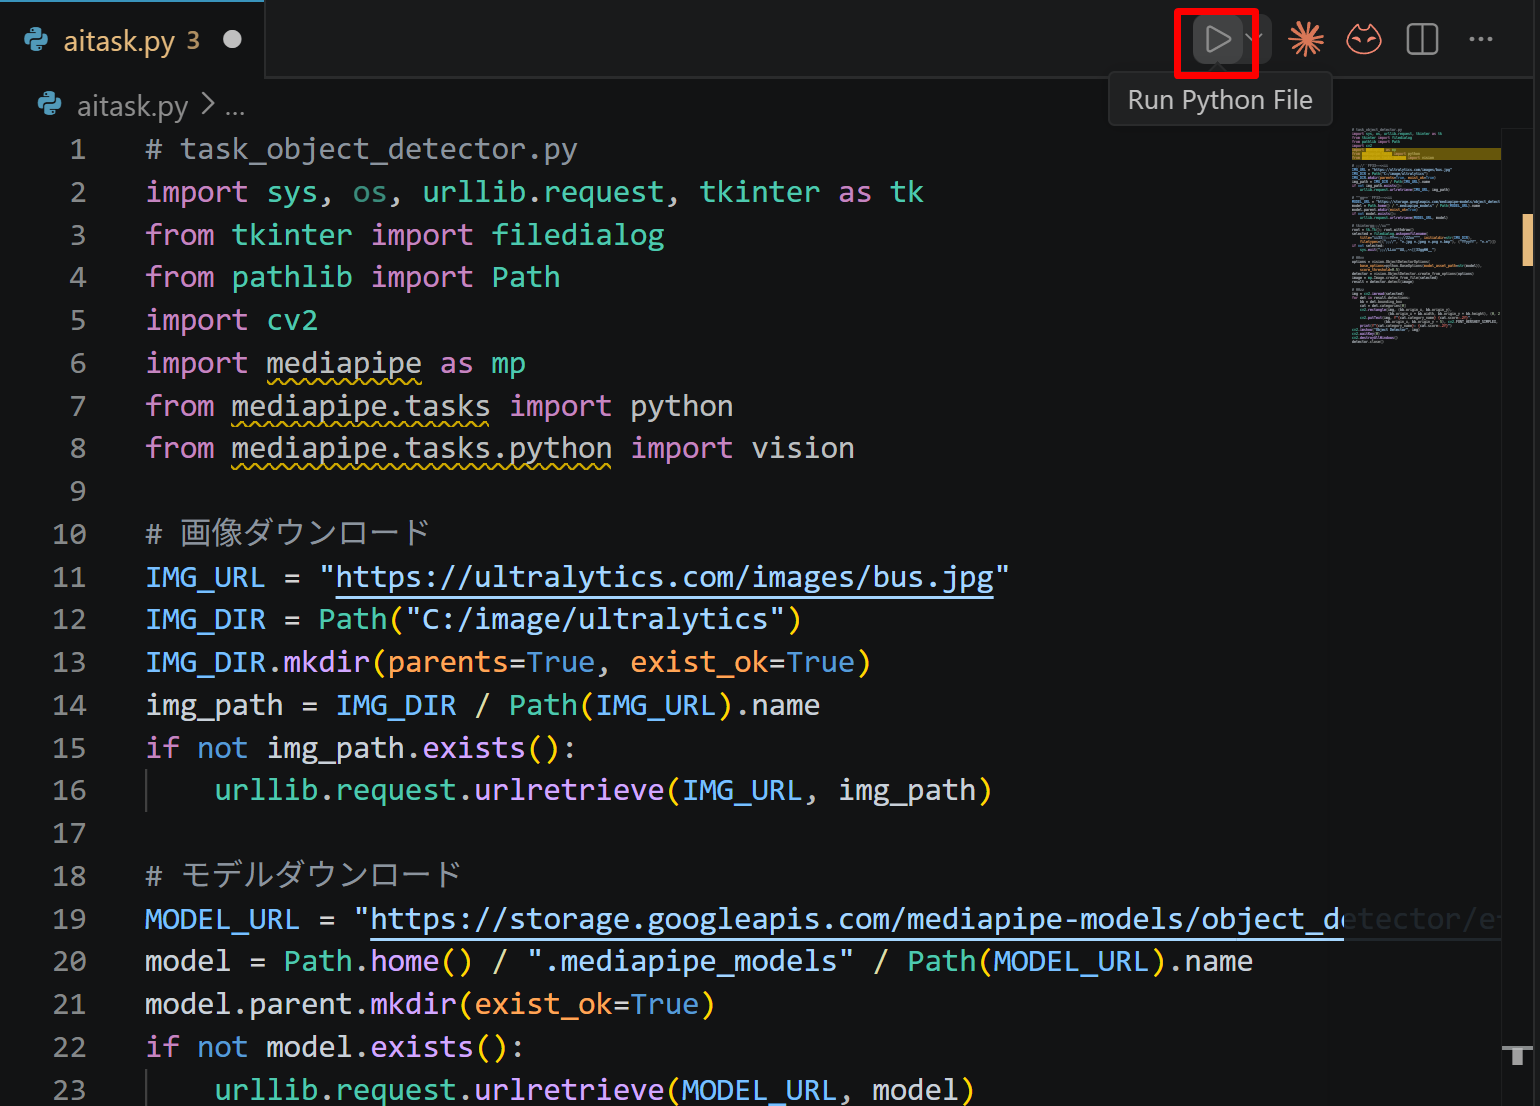
- エディタ右上の三角形「▷」アイコン(Run Python File:現在開いている Python ファイルを実行するボタン)をクリックする.または,エディタ上で右クリックし「ターミナルで Python ファイルを実行」を選択する
- VS Code 下部のターミナル(コマンドの入出力を表示する画面)に,実行結果(
print関数の出力等)が表示される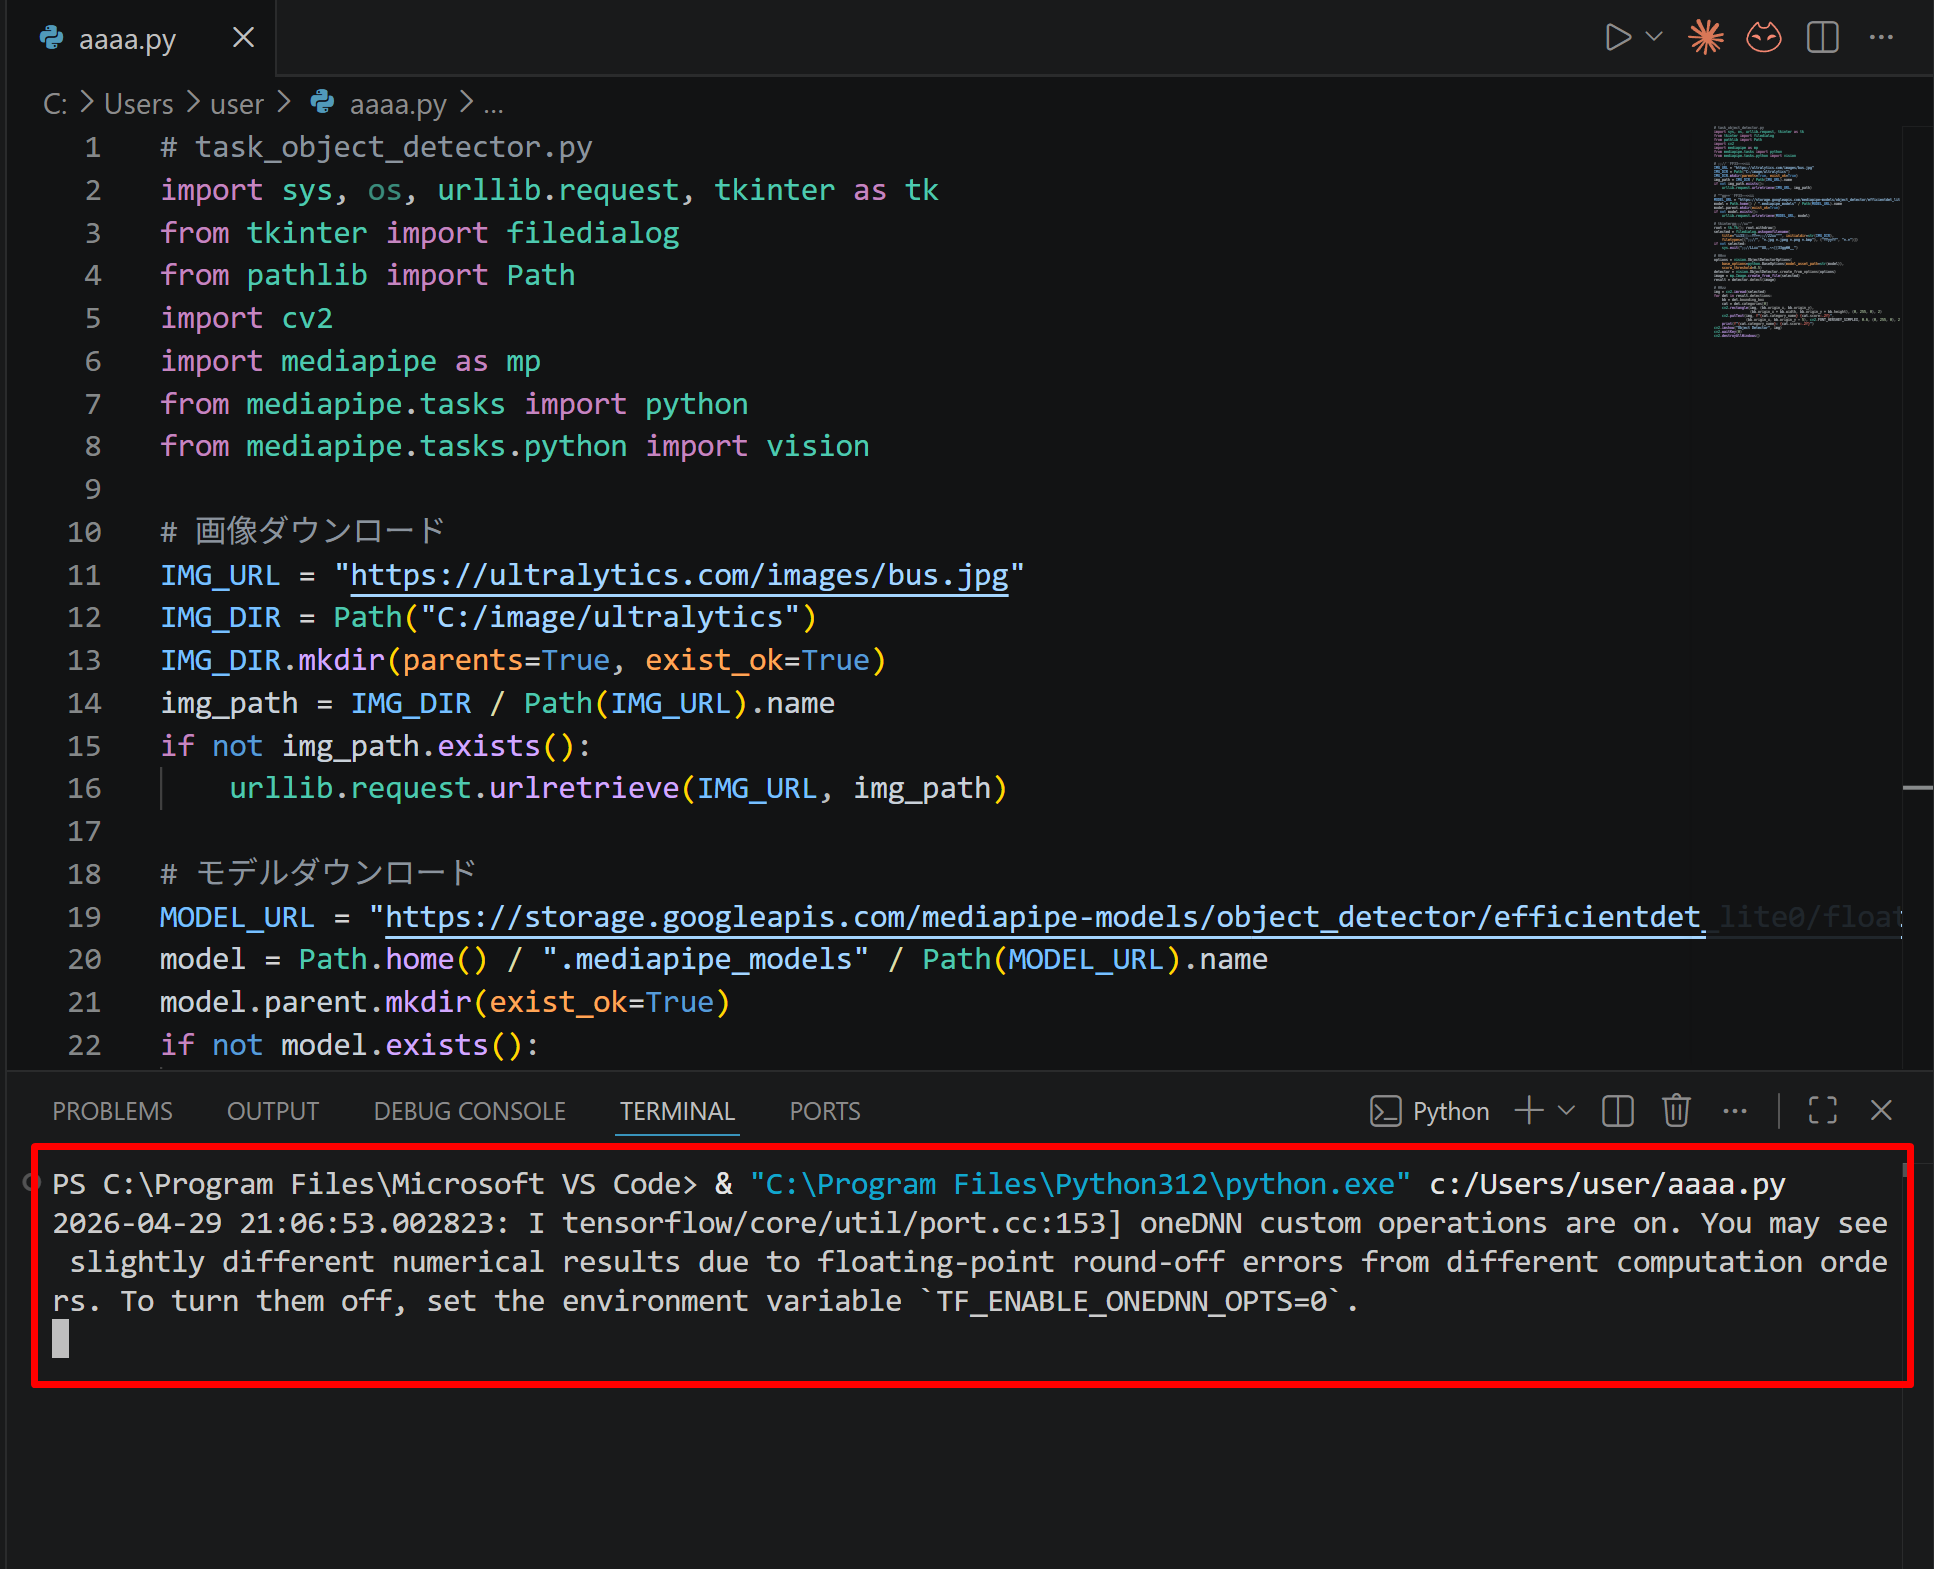
- tkinter(Python 標準の GUI ライブラリ)のファイル選択ダイアログを使うプログラムを実行した場合は,ダイアログが開くので対象画像を選択する
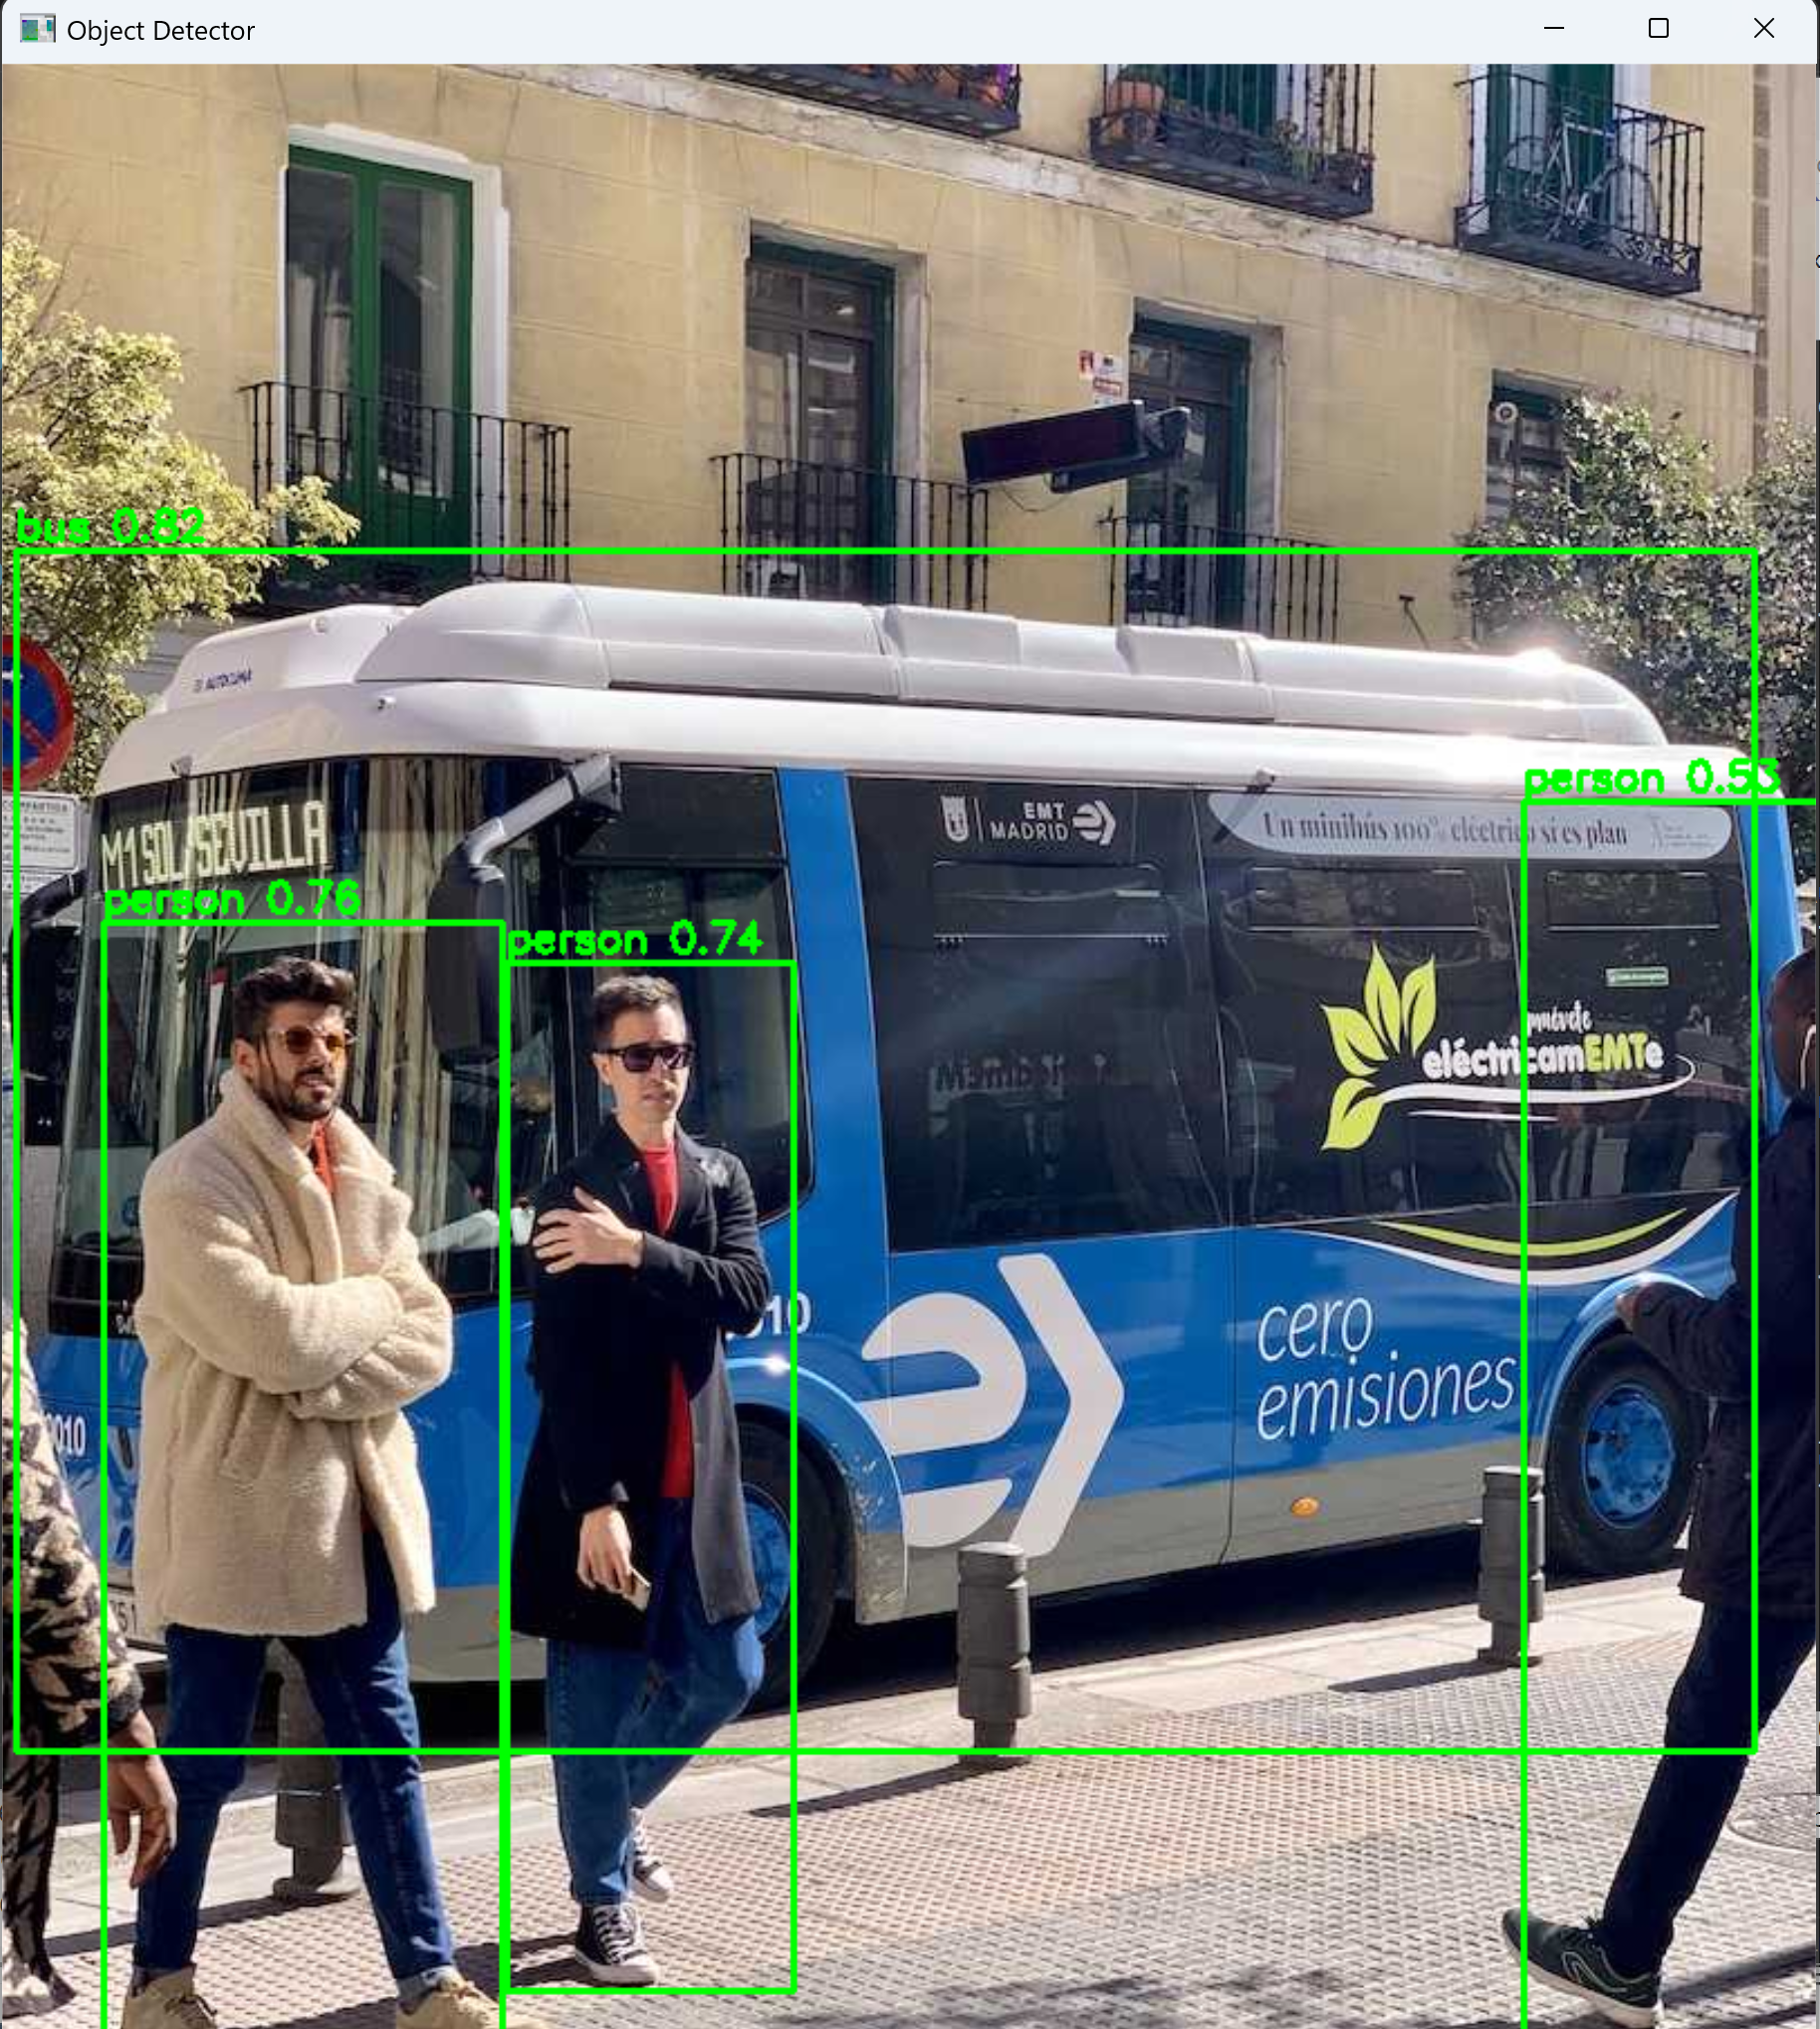
- VS Code 下部のターミナルで実行結果を確認する.OpenCV ウィンドウ(OpenCV が画像を表示するために開く専用ウィンドウ)が開いた場合はそちらも確認する.OpenCV ウィンドウは,マウスクリックでウィンドウをアクティブ(操作対象の状態)にしてからキーを押すと終了する

2. 必要なライブラリのインストール
管理者権限でコマンドプロンプトを起動する
(手順:Windowsキーまたはスタートメニュー → cmd と入力 → 右クリック → 「管理者として実行」)。
cocos2d は pyglet 1.4.10 以上 2.0 未満に依存する。次のコマンドで cocos2d, pyglet をインストールする
pip uninstall pyglet -y
pip install --no-user cocos2d "pyglet<2.0,>=1.4.10"
3. 実行手順
手順:コードを実行する(メモ帳を用いる場合は a.py のようなファイル名で保存して実行)。
動作確認チェックリスト
| 確認項目 | 期待される結果 |
|---|---|
| テキスト表示のプログラムの起動時 | 640x480 のウィンドウが開き,「Hello,World!」が画面中央付近(座標 400, 240)に表示される |
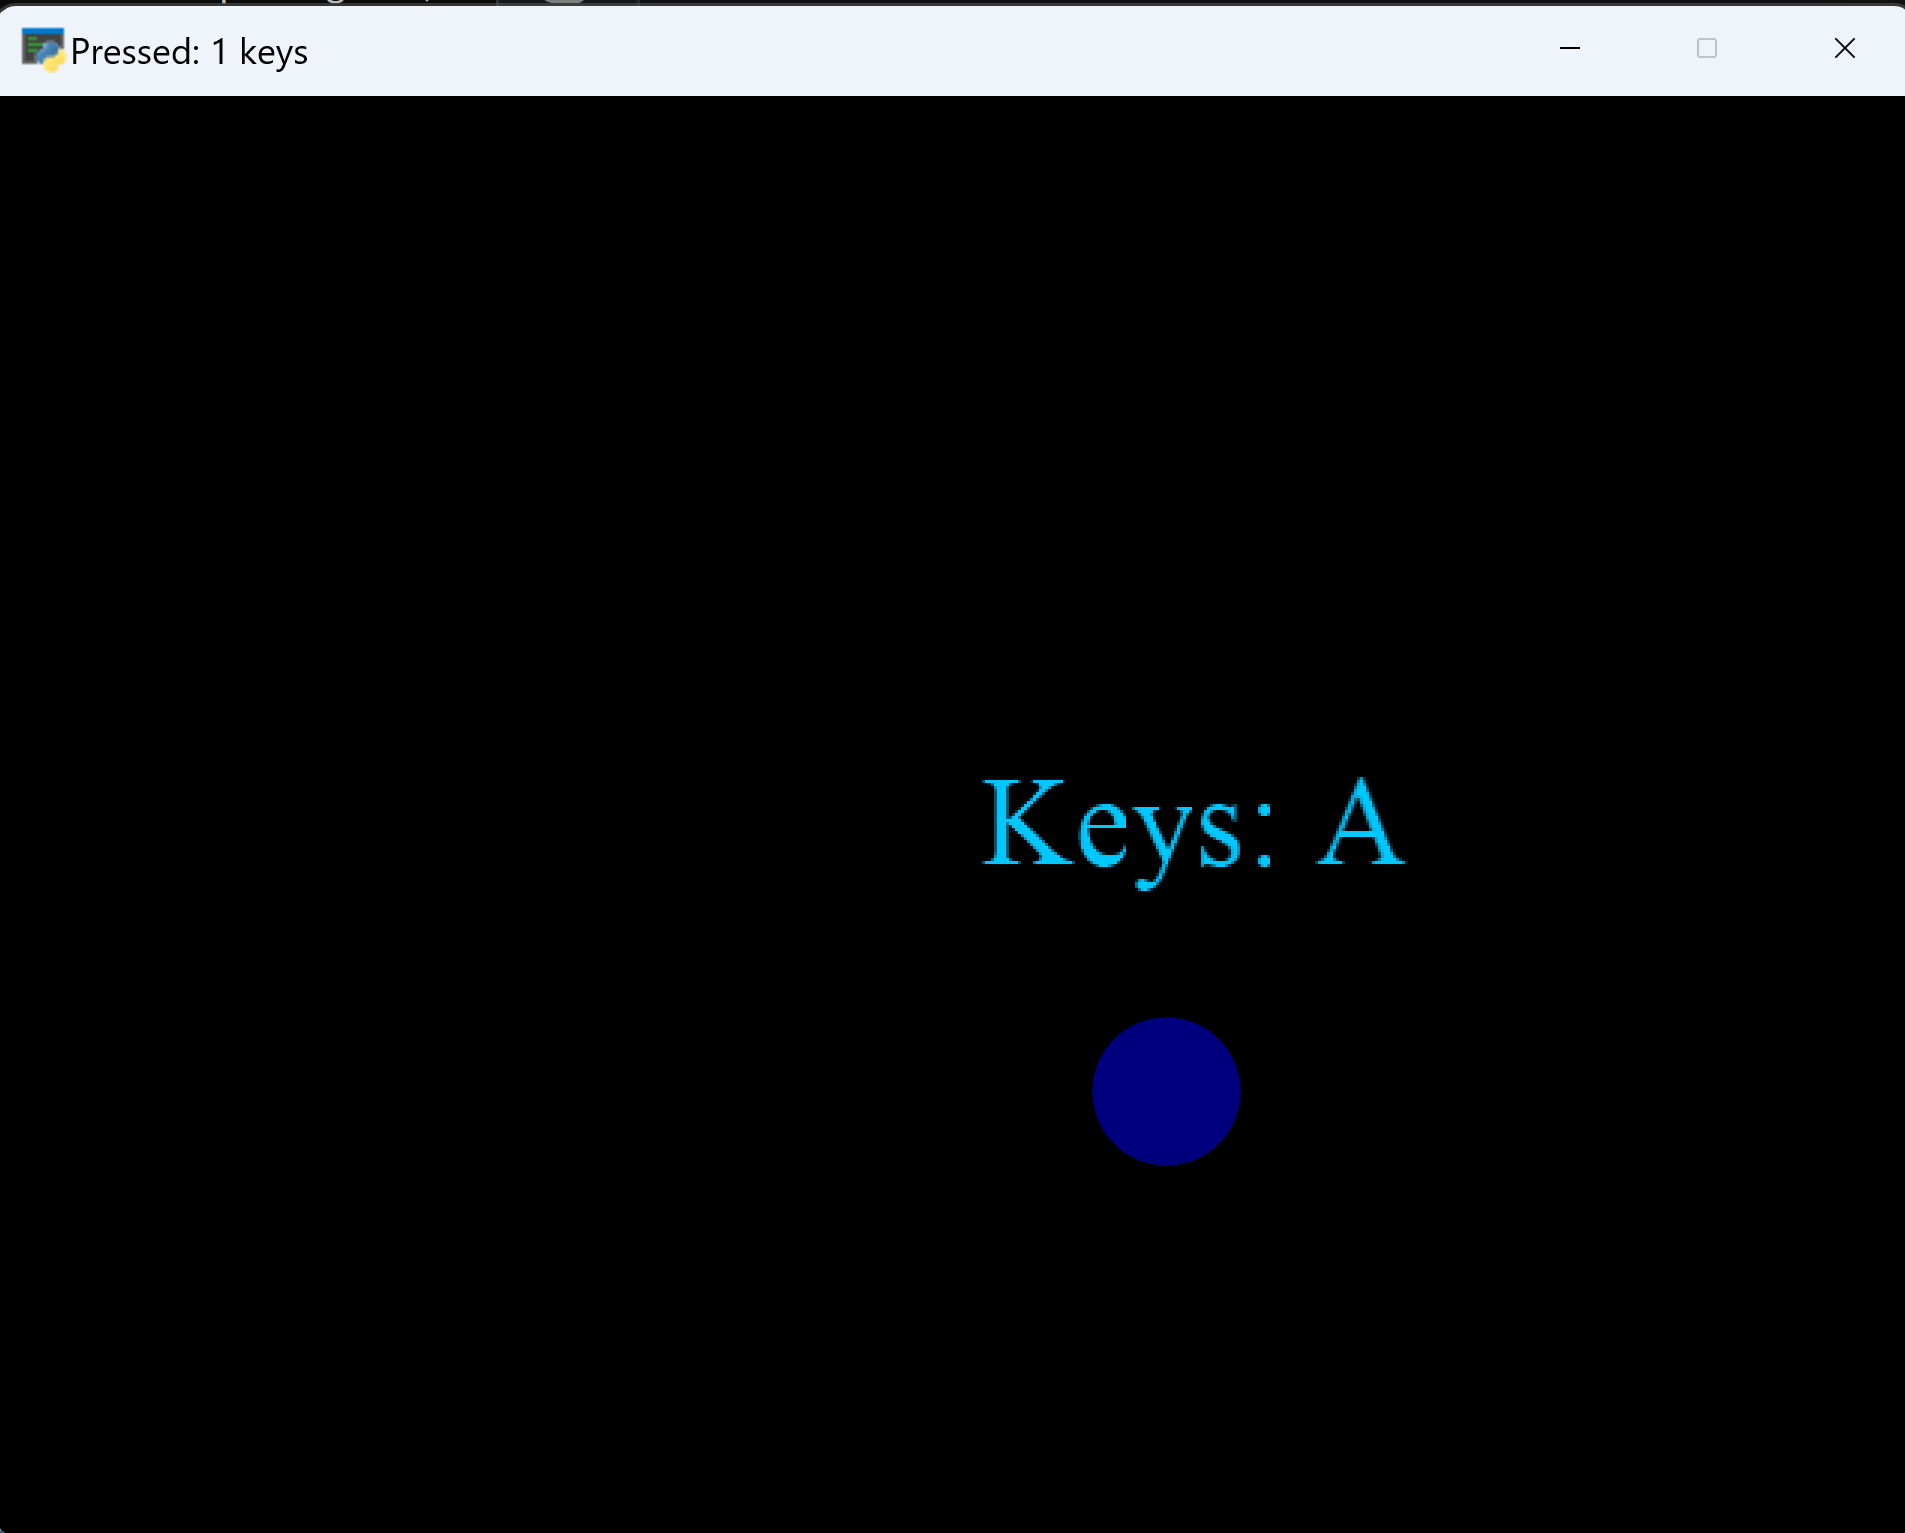
| キーボードのイベントのプログラムでキーを押す | 押されているキーの名前が「Keys: 」に続いて画面に表示される.タイトルバーに押下中のキー数が表示される |
| キーボードのイベントのプログラムで複数のキーを同時に押す | 同時に押されている全キーの名前がカンマ区切りで表示される |
| キーボードのイベントのプログラムでキーを離す | 離したキーの名前が表示から消える |
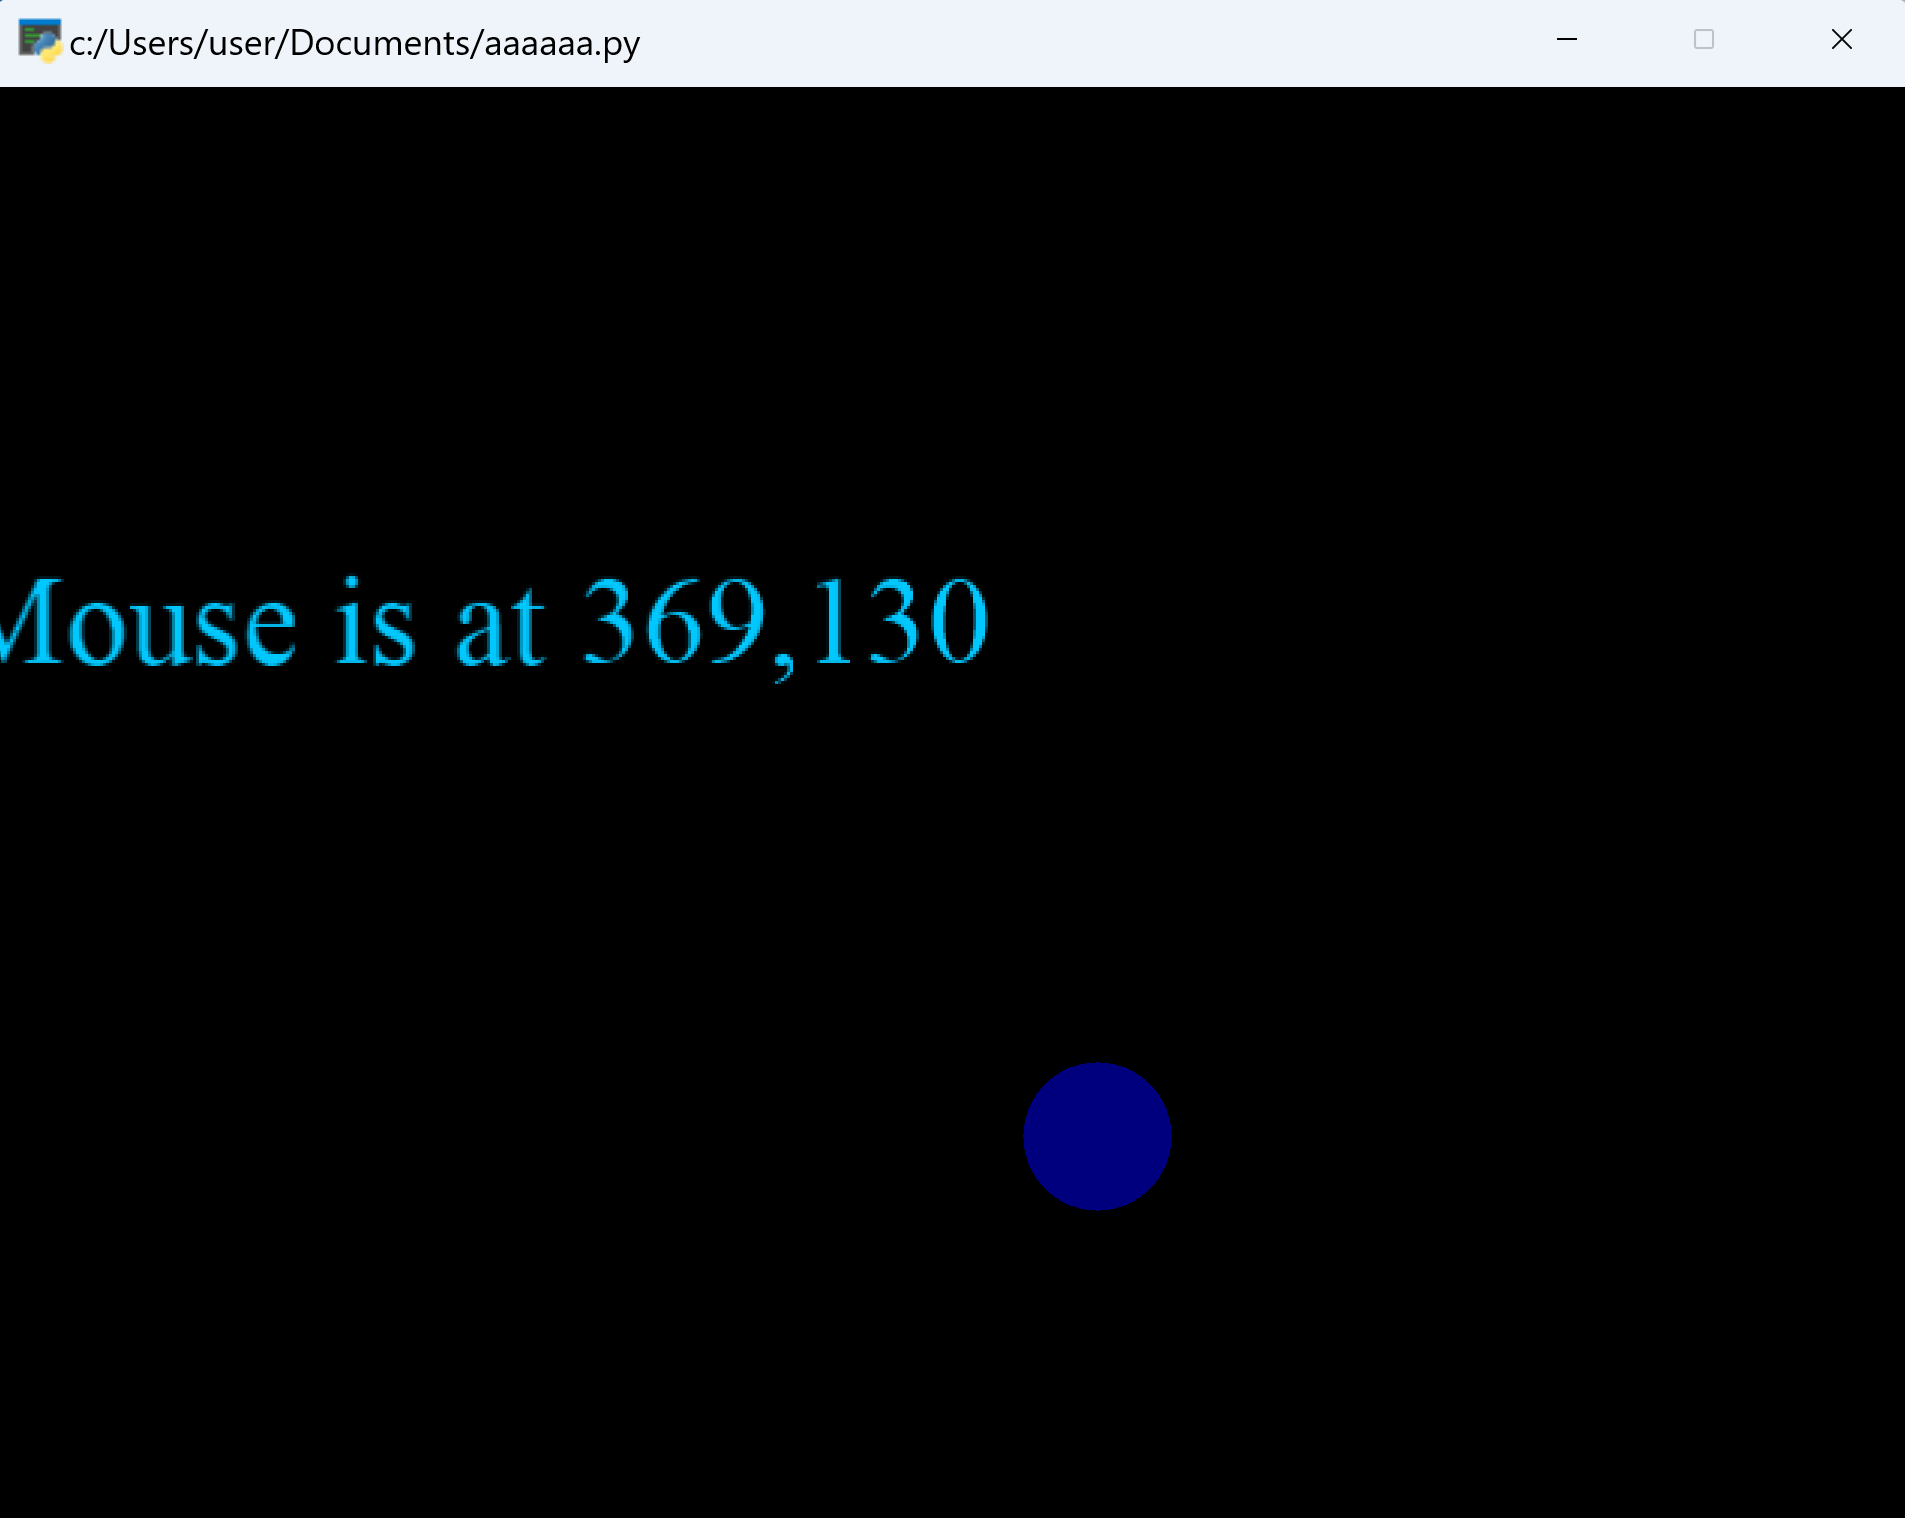
| マウスのイベントのプログラムでマウスを動かす | 「Mouse is at x,y」の形式でマウス座標が表示される |
| マウスのイベントのプログラムでマウスボタンを押す | ラベルの表示位置がクリック座標に移動する |
| マウスのイベントのプログラムでマウスをドラッグする | ドラッグ中もマウス座標の表示が更新される |
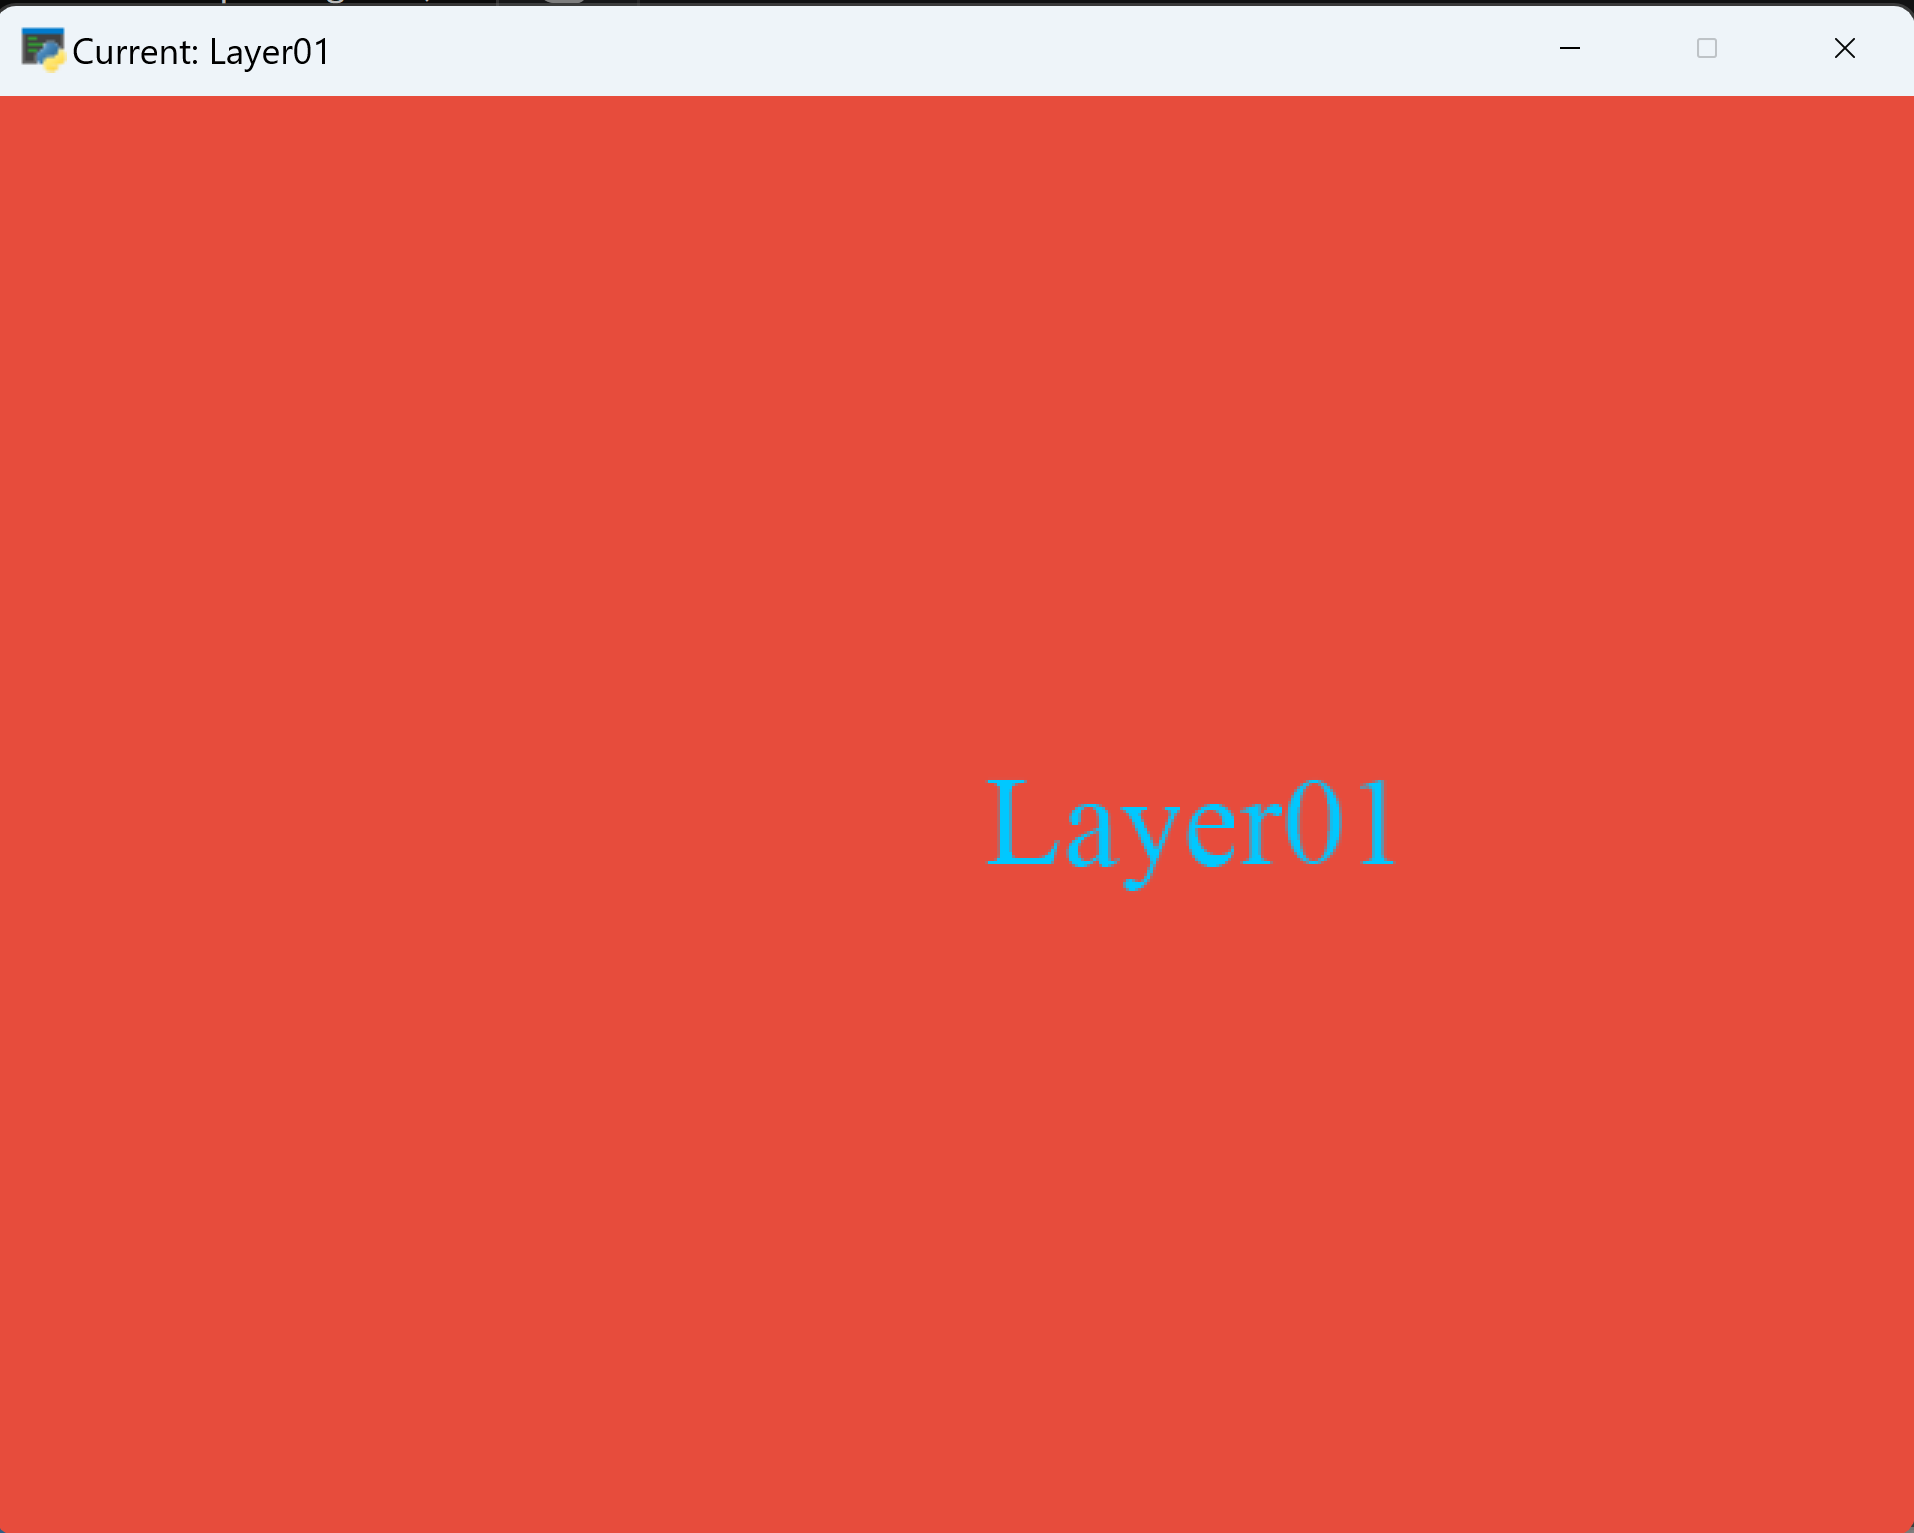
| 画面切り替えのプログラムの起動時 | 紫色の背景(Layer00)が表示され,タイトルバーに「Current: Layer00」と表示される |
| 画面切り替えのプログラムでキーを押す | Layer00(紫)と Layer01(赤)が切り替わり,タイトルバーも連動して変わる |
| 各プログラムの終了 | 右上の「x」をクリックするとプログラムが終了する |
4. 演習1:テキスト表示
テーマ:ラベルのテキストとフォントサイズの変更
手順:次のコードを実行(メモ帳を用いる場合は a.py のようなファイル名で保存して実行)し,「Hello,World!」の文字列を別の文字列に書き換えて再度実行する.次に,MyActor の呼び出しでフォントサイズに渡している値(32)を別の数値に書き換えて実行する.
ヒント:表示文字列は MyActor の第1引数,フォントサイズは第4引数で指定している.
考察ポイント:数値を大きくしたとき,文字が画面中央(座標 400, 240)を基準にどう広がるかを確認する.
import cocos
from cocos import scene
from cocos.layer import Layer
from cocos.director import director
import sys
import pyglet
setattr(sys.modules['pyglet'], 'mock_level', None)

class MyActor(cocos.text.Label):
    def __init__(self, text, x, y, size, rgba):
        super().__init__(
            text,
            font_name="Times New Roman",
            font_size=size,
            anchor_x='center',
            anchor_y='center',
            color=rgba
        )
        self.position = cocos.euclid.Vector2(x, y)

class Layer00(Layer):
    is_event_handler = True

    def __init__(self):
        super().__init__()
        self.myactor = MyActor("Hello,World!", 400, 240, 32, (0, 200, 255, 255))
        self.add(self.myactor)

director.init(width=640, height=480)
director.run(scene.Scene(Layer00()))

5. 演習2:キーボードのイベント
テーマ:押下中のキーの確認
手順:次のコードを実行(メモ帳を用いる場合は a.py のようなファイル名で保存して実行)し,キーの押下と解放,複数キーの同時押下を試す.
ヒント:押下中のキーは self.keys_being_pressed に格納され,タイトルバーにはその数が表示される.
考察ポイント:同時に押したキーの数と,タイトルバーの数および画面の「Keys: 」表示が一致するかを確認する.
import cocos
from cocos import scene
from cocos.layer import Layer
from cocos.director import director
import sys
import pyglet
setattr(sys.modules['pyglet'], 'mock_level', None)
from pyglet.window import key

class MyActor(cocos.text.Label):
    def __init__(self, text, x, y, size, rgba):
        super().__init__(
            text,
            font_name="Times New Roman",
            font_size=size,
            anchor_x='center',
            anchor_y='center',
            color=rgba
        )
        self.position = cocos.euclid.Vector2(x, y)

class Layer00(Layer):
    is_event_handler = True

    def __init__(self):
        super().__init__()
        self.myactor = MyActor("Hello,World!", 400, 240, 32, (0, 200, 255, 255))
        self.keys_being_pressed = set()
        self.update_text()
        self.add(self.myactor)

    def update_text(self):
        key_names = [key.symbol_string(k) for k in self.keys_being_pressed]
        self.myactor.element.text = "Keys: " + ", ".join(key_names)
        director.window.set_caption("Pressed: %d keys" % len(self.keys_being_pressed))

    def on_key_press(self, key, modifiers):
        self.keys_being_pressed.add(key)
        self.update_text()

    def on_key_release(self, key, modifiers):
        self.keys_being_pressed.discard(key)
        self.update_text()

director.init(width=640, height=480)
director.run(scene.Scene(Layer00()))
6. 演習3:マウスのイベント
テーマ:マウス座標とラベル位置
手順:次のコードを実行(メモ帳を用いる場合は a.py のようなファイル名で保存して実行)し,マウスの移動,ドラッグ,ボタン押下を試す.
ヒント:座標表示は移動・ドラッグで更新され,ラベルの表示位置はボタン押下時の座標へ移動する.
考察ポイント:移動時とボタン押下時で,表示される座標と実際のラベル位置の関係がどう変わるかを確認する.
import cocos
from cocos import scene
from cocos.layer import Layer
from cocos.director import director
import sys
import pyglet
setattr(sys.modules['pyglet'], 'mock_level', None)

class MyActor(cocos.text.Label):
    def __init__(self, text, x, y, size, rgba):
        super().__init__(
            text,
            font_name="Times New Roman",
            font_size=size,
            anchor_x='center',
            anchor_y='center',
            color=rgba
        )
        self.position = cocos.euclid.Vector2(x, y)

class Layer00(Layer):
    is_event_handler = True

    def __init__(self):
        super().__init__()
        self.position_x = 0
        self.position_y = 0
        self.myactor = MyActor("Hello,World!", 0, 0, 32, (0, 200, 255, 255))
        self.add(self.myactor)

    def update_text(self, mouse_x_pos, mouse_y_pos):
        self.myactor.element.text = 'Mouse is at %d,%d' % (mouse_x_pos, mouse_y_pos)
        self.myactor.x = self.position_x
        self.myactor.y = self.position_y

    def on_mouse_motion(self, x, y, dx, dy):
        self.update_text(x, y)

    def on_mouse_drag(self, x, y, dx, dy, buttons, modifiers):
        self.update_text(x, y)

    def on_mouse_press(self, x, y, buttons, modifiers):
        self.position_x, self.position_y = director.get_virtual_coordinates(x, y)
        self.update_text(x, y)

director.init(width=640, height=480)
director.run(scene.Scene(Layer00()))
7. 演習4:画面切り替え(画面のレイヤ分け)
テーマ:シーンの切り替え
手順:次のコードを実行(メモ帳を用いる場合は a.py のようなファイル名で保存して実行)し,キーを押して Layer00(紫)と Layer01(赤)を切り替える.
ヒント:キー押下のたびに director.replace で別のシーンに置き換わり,タイトルバーのレイヤ名も変わる.
考察ポイント:背景色とタイトルバーの表示が連動して切り替わることを確認する.
import cocos
from cocos import scene
from cocos.layer import ColorLayer
from cocos.director import director
import sys
import pyglet
setattr(sys.modules['pyglet'], 'mock_level', None)

class MyActor(cocos.text.Label):
    def __init__(self, text, x, y, size, rgba):
        super().__init__(
            text,
            font_name="Times New Roman",
            font_size=size,
            anchor_x='center',
            anchor_y='center',
            color=rgba
        )
        self.position = cocos.euclid.Vector2(x, y)

class Layer00(ColorLayer):
    is_event_handler = True

    def __init__(self):
        super().__init__(155, 89, 182, 255)
        self.myactor = MyActor("Layer00", 400, 240, 32, (0, 200, 255, 255))
        self.add(self.myactor)
        director.window.set_caption("Current: Layer00")

    def on_key_press(self, key, modifiers):
        director.replace(scene.Scene(Layer01()))

class Layer01(ColorLayer):
    is_event_handler = True

    def __init__(self):
        super().__init__(231, 76, 60, 255)
        self.myactor = MyActor("Layer01", 400, 240, 32, (0, 200, 255, 255))
        self.add(self.myactor)
        director.window.set_caption("Current: Layer01")

    def on_key_press(self, key, modifiers):
        director.replace(scene.Scene(Layer00()))

director.init(width=640, height=480)
director.run(scene.Scene(Layer00()))
9. まとめ
- レイヤのクラス定義:
LayerクラスまたはColorLayerクラスを継承してレイヤを定義する.レイヤはシーンの構成単位であり,is_event_handler = Trueを設定するとイベントを受け取れる. - ゲームの登場物のクラス定義:
cocos.text.Labelを継承したMyActorクラスにより,テキスト,フォント,サイズ,色,座標を指定してラベルを生成する.element.textプロパティ(Labelが内部で持つ pyglet のラベルオブジェクトのテキスト)により,実行中にラベルの表示テキストを更新できる. - キーボードのイベントハンドラ:
on_key_pressとon_key_releaseにより,キーの押下・解放イベントを処理する.self.keys_being_pressedに現在押されているキーの情報が格納される. - マウスのイベントハンドラ:
on_mouse_motion,on_mouse_drag,on_mouse_pressにより,マウスの移動,ドラッグ,クリックの各イベントを処理する.director.get_virtual_coordinatesでウィンドウ座標を仮想座標(論理座標)に変換する. - レイヤの切り替え:
director.replaceにより,現在のシーンを新しいシーンに切り替える.複数のレイヤを定義し,キー押下で画面が切り替わる仕組みにより,画面のレイヤ分けを実現する.