![[kaneko lab.]](https://www.kkaneko.jp/info/logo_png.png)
PyCUDA のインストール,PyCUDA のプログラム例(Windows 上)
【目次】
PyCUDA
PyCUDA は NVIDIA CUDA APIにアクセスできるようにするライブラリ
pip を用いたインストールコマンド: python -m pip install -U pycuda
【関連する外部ページ】
【関連項目】 NVIDIA CUDA
前準備
Python 3.12 のインストール
Pythonのインストールを行い、Pythonのプログラムを実行する環境を整える。扱う環境は、Windows搭載パソコンである。金子研究室では、Python 3.12.10を推奨する。
[Windows での Python 3.12 のインストール手順を見るには、ここをクリック]
Windows での Python 3.12 のインストール
以下のいずれかの方法でPython 3.12をインストールする。Pythonがインストール済みの場合、この手順は不要である。
方法 1:winget によるインストール
【インストールコマンドの実行方法】
管理者権限でコマンドプロンプトを起動する(手順:Windowsキーまたはスタートメニュー → cmd と入力 → 右クリック → 「管理者として実行」)。そして、コマンド全体をコマンドプロンプトにコピー&ペーストする。
--scope machine を指定することで、システム全体(全ユーザー向け)にインストールされる。このオプションの実行には管理者権限が必要である。インストール完了後、コマンドプロンプトを再起動するとPATHが反映される。
REM Python 3.12 をシステム領域にインストール
winget install --id Python.Python.3.12 -e --scope machine --silent --accept-source-agreements --accept-package-agreements --override "/quiet InstallAllUsers=1 PrependPath=1 Include_test=0 Include_pip=1 Include_launcher=1 InstallLauncherAllUsers=1 TargetDir=\"C:\Program Files\Python312\""
if not "%ERRORLEVEL%"=="0" ( color 0c & echo Python 3.12 のインストールに失敗しました & ping 127.0.0.1 -n 6 >nul & color )

REM Python と Scripts を PATH 先頭に追加
powershell -NoProfile -Command "$p='C:\Program Files\Python312'; $s=\"$p\Scripts\"; if(Test-Path $p){$k=[Microsoft.Win32.Registry]::LocalMachine.OpenSubKey('SYSTEM\CurrentControlSet\Control\Session Manager\Environment',$true); $c=$k.GetValue('Path','',[Microsoft.Win32.RegistryValueOptions]::DoNotExpandEnvironmentNames); $t=$k.GetValueKind('Path'); $new=$c; if((';'+$new+';') -notlike \"*;$p;*\"){$new=$p+';'+$new}; if((';'+$new+';') -notlike \"*;$s;*\"){$new=$s+';'+$new}; if($new -ne $c){$k.SetValue('Path',$new,$t)}; $k.Close()}"

REM 現在のセッションにも反映(システムPATHを再取得して連結)
for /f "usebackq tokens=2,*" %A in (`reg query "HKLM\SYSTEM\CurrentControlSet\Control\Session Manager\Environment" /v Path`) do set "PATH=%B"

REM pip / wheel の更新
python -m pip install --no-user -U pip wheel
if not "%ERRORLEVEL%"=="0" ( color 0c & echo pip / wheel の更新に失敗しました & ping 127.0.0.1 -n 6 >nul & color )
方法 2:インストーラーによるインストール
- Python公式サイト(https://www.python.org/downloads/)にアクセスし、「Download Python 3.x.x」ボタンからWindows用インストーラーをダウンロードする。
- ダウンロードしたインストーラーを実行する。
- 初期画面の下部に表示される「Add python.exe to PATH」にチェックを入れてから「Customize installation」を選択する。このチェックを入れ忘れると、コマンドプロンプトから
pythonコマンドを実行できない。 - 「Install Python 3.xx for all users」にチェックを入れ、「Install」をクリックする。
インストールの確認
コマンドプロンプトで以下を実行する。
python --versionバージョン番号(例:Python 3.12.x)が表示されればインストール成功である。「'python' は、内部コマンドまたは外部コマンドとして認識されていません。」と表示される場合は、インストールが正常に完了していない。
Git のインストール(Windows 上) [クリックして展開]
管理者権限のコマンドプロンプトで以下を実行する.管理者権限は,winget の --scope machine オプションでシステム全体にインストールするために必要となる.
REM Git をシステム領域にインストール
winget install --scope machine --id Git.Git -e --silent --disable-interactivity --force --accept-source-agreements --accept-package-agreements --override "/VERYSILENT /NORESTART /NOCANCEL /SP- /CLOSEAPPLICATIONS /RESTARTAPPLICATIONS /COMPONENTS=""icons,ext\reg\shellhere,assoc,assoc_sh"" /o:PathOption=Cmd /o:CRLFOption=CRLFCommitAsIs /o:BashTerminalOption=MinTTY /o:DefaultBranchOption=main /o:EditorOption=VIM /o:SSHOption=OpenSSH /o:UseCredentialManager=Enabled /o:PerformanceTweaksFSCache=Enabled /o:EnableSymlinks=Disabled /o:EnableFSMonitor=Disabled"
Build Tools for Visual Studio 2026(ビルドツール)のインストール
Build Tools for Visual Studio 2026(ビルドツール)のインストールを行い、C/C++ コードのビルド環境を整える。
Build Tools for Visual Studio は,Visual Studio の IDE を含まない C/C++ コンパイラ,ライブラリ,ビルドツール等のコマンドライン向け開発ツールセットである。インストール済みの場合,この手順は不要である。 以下のコマンドは、Build Tools が未インストールの場合は winget で新規インストールし、インストール済みの場合は 【インストールコマンドの実行方法】 管理者権限でコマンドプロンプトを起動する(手順:Windows キーまたはスタートメニュー → 上記のコマンドでは、Build Tools 本体と Visual C++ 再頒布可能パッケージをインストールし、続いて以下のコンポーネントを追加している。 追加のコンポーネントが必要になった場合は Visual Studio Installer で個別にインストールできる。 インストール完了の確認 Visual Studio を必要とするとき Visual Studio の機能を必要とする場合は,追加インストールできる。[Build Tools for Visual Studio 2026(ビルドツール)のインストール手順を見るには、ここをクリック]
Windows での Build Tools for Visual Studio 2026 のインストール
setup.exe modify でコンポーネントを追加する(バージョンは変更しない)。cmd と入力 → 右クリック → 「管理者として実行」)。そして、コマンド全体をコマンドプロンプトにコピー&ペーストする。REM ============================================================
REM Visual C++ 再頒布可能パッケージ (VCRedist 2015-)
REM ============================================================
winget install --scope machine --id Microsoft.VCRedist.2015+.x64 -e --silent --disable-interactivity --force --accept-source-agreements --accept-package-agreements --override "/quiet /norestart"
if not "%ERRORLEVEL%"=="0" ( color 0c & echo VCRedist のインストールに失敗しました & ping 127.0.0.1 -n 6 >nul & color )
REM ============================================================
REM Visual Studio Build Tools + Desktop development with C++
REM (VCTools、MSBuildTools、CMake連携、Clang、Windows 11 SDK)
REM ============================================================
REM 進行中のインストーラーを停止(ロック競合回避。対象プロセスが存在しない場合は
REM taskkillがエラーを返すが、これは想定内であるため出力のみ抑制する)
taskkill /F /IM vs_setup.exe /T >nul 2>&1
taskkill /F /IM vs_installer.exe /T >nul 2>&1
taskkill /F /IM vs_installerservice.exe /T >nul 2>&1
taskkill /F /IM msiexec.exe /T >nul 2>&1
REM Build Tools + Desktop development with C++(VCTools)+ 追加コンポーネント(一括)
REM 未インストール時: winget で新規インストール
REM インストール済み時: setup.exe modify でコンポーネント追加(バージョンは変更しない)
winget list --id Microsoft.VisualStudio.BuildTools 2>nul | findstr /i "BuildTools" >nul 2>&1
if %ERRORLEVEL% EQU 0 (
for /f "usebackq delims=" %P in (`"C:\Program Files (x86)\Microsoft Visual Studio\Installer\vswhere.exe" -products Microsoft.VisualStudio.Product.BuildTools -property installationPath`) do start /wait "" "C:\Program Files (x86)\Microsoft Visual Studio\Installer\setup.exe" modify --installPath "%P" --add Microsoft.VisualStudio.Workload.VCTools --add Microsoft.VisualStudio.Workload.MSBuildTools --add Microsoft.VisualStudio.Component.VC.CMake.Project --add Microsoft.VisualStudio.Component.VC.Llvm.Clang --add Microsoft.VisualStudio.Component.VC.Llvm.ClangToolset --add Microsoft.VisualStudio.Component.Windows11SDK.26100 --add Microsoft.VisualStudio.Component.VC.v143.x86.x64 --includeRecommended --quiet --norestart --nocache
if not "%ERRORLEVEL%"=="0" ( color 0c & echo Build Tools のコンポーネント追加に失敗しました & ping 127.0.0.1 -n 6 >nul & color )
) else (
winget install --scope machine --id Microsoft.VisualStudio.BuildTools -e --silent --disable-interactivity --force --accept-source-agreements --accept-package-agreements --override "--quiet --wait --norestart --nocache --add Microsoft.VisualStudio.Workload.VCTools --includeRecommended --add Microsoft.VisualStudio.Workload.MSBuildTools --add Microsoft.VisualStudio.Component.VC.CMake.Project --add Microsoft.VisualStudio.Component.VC.Llvm.Clang --add Microsoft.VisualStudio.Component.VC.Llvm.ClangToolset --add Microsoft.VisualStudio.Component.Windows11SDK.26100 --add Microsoft.VisualStudio.Component.VC.v143.x86.x64"
if not "%ERRORLEVEL%"=="0" ( color 0c & echo Build Tools のインストールに失敗しました & ping 127.0.0.1 -n 6 >nul & color )
)
REM
REM BuildTools のインストールパスを vswhere.exe で取得(メジャーバージョンに依存しない)
set "VSWHERE=C:\Program Files (x86)\Microsoft Visual Studio\Installer\vswhere.exe"
set "BT_PATH="
for /f "usebackq delims=" %P in (`"%VSWHERE%" -products Microsoft.VisualStudio.Product.BuildTools -property installationPath`) do set "BT_PATH=%P"
if not defined BT_PATH ( color 0c & echo Build Tools のインストールパスを取得できませんでした & ping 127.0.0.1 -n 6 >nul & color )
REM 破損時の修復(任意、動作がおかしくなった場合)
REM if defined BT_PATH "C:\Program Files (x86)\Microsoft Visual Studio\Installer\setup.exe" repair --installPath "%BT_PATH%" --quiet --norestart
REM 導入確認(インストールパスが表示されれば正常)
"%VSWHERE%" -products * -requires Microsoft.VisualStudio.Workload.VCTools -property installationPath
--includeRecommended により、MSVC コンパイラ、C++ AddressSanitizer、vcpkg、CMake ツール、Windows 11 SDK 等の推奨コンポーネントが含まれる)winget list Microsoft.VisualStudio.BuildTools
NVIDIA CUDA Toolkit 12.8のインストール
- 前提条件(NVIDIA CUDA Toolkit インストール前): NVIDIA GPU,NVIDIA ドライバ,および Build Tools for Visual Studio もしくは Visual Studio が必要である.
- インストール中の注意: なるべく他のウインドウはすべて閉じておくこと.
以下のコマンドを管理者権限のコマンドプロンプトで実行する
(手順:Windowsキーまたはスタートメニュー → cmd と入力 → 右クリック → 「管理者として実行」)。
REM NVIDIA CUDA Toolkit 12.8 をシステム領域にインストール
winget install --scope machine --id Nvidia.CUDA --version 12.8 -e --silent --disable-interactivity --force --uninstall-previous --accept-source-agreements --accept-package-agreements --override "-s -n"

REM 環境変数TEMP, TMPの設定(一時ファイルの保存先を短いパスに変更)
mkdir C:\TEMP
set "TEMP_PATH=C:\TEMP"
setx TEMP "%TEMP_PATH%" /M >nul
setx TMP "%TEMP_PATH%" /M >nul
PyCUDA のインストール(Windows 上)
- 次のコマンドを管理者権限のコマンドプロンプトで実行する
(手順:Windowsキーまたはスタートメニュー →
cmdと入力 → 右クリック → 「管理者として実行」)。
次のコマンドは,pycuda をインストールするものである.
python -m pip install pycuda
【関連する外部ページ】
PyCUDA のプログラム例(公式サイトのプログラムを利用)
試しに、https://documen.tician.de/pycuda/ で公開されているサンプルプログラムを動かしてみる.
- 以下の操作をx64 Native Tools コマンドプロンプト (x64 Native Tools Command Prompt)で実行する
(手順:スタートメニュー → 「Visual C++ Build Tools」の下の「x64 Native Tools コマンドプロンプト (x64 Native Tools Command Prompt)」を選ぶ)。
「x64 Native Tools コマンドプロンプト」がないときは,ビルドツール (Build Tools) をインストールすると,x64 Native Tools コマンドプロンプトもインストールされる.その手順は,別ページ »で説明している.
- Python プログラムの実行
python次の Python プログラムを実行する
import pycuda.autoinit
import pycuda.driver as drv
import numpy

from pycuda.compiler import SourceModule
mod = SourceModule("""
__global__ void multiply_them(float *dest, float *a, float *b)
{
  const int i = threadIdx.x;
  dest[i] = a[i] * b[i];
}
""", options=['-allow-unsupported-compiler'])

multiply_them = mod.get_function("multiply_them")

a = numpy.random.randn(400).astype(numpy.float32)
b = numpy.random.randn(400).astype(numpy.float32)

dest = numpy.zeros_like(a)
multiply_them(
        drv.Out(dest), drv.In(a), drv.In(b),
        block=(400,1,1), grid=(1,1))

print(dest-a*b)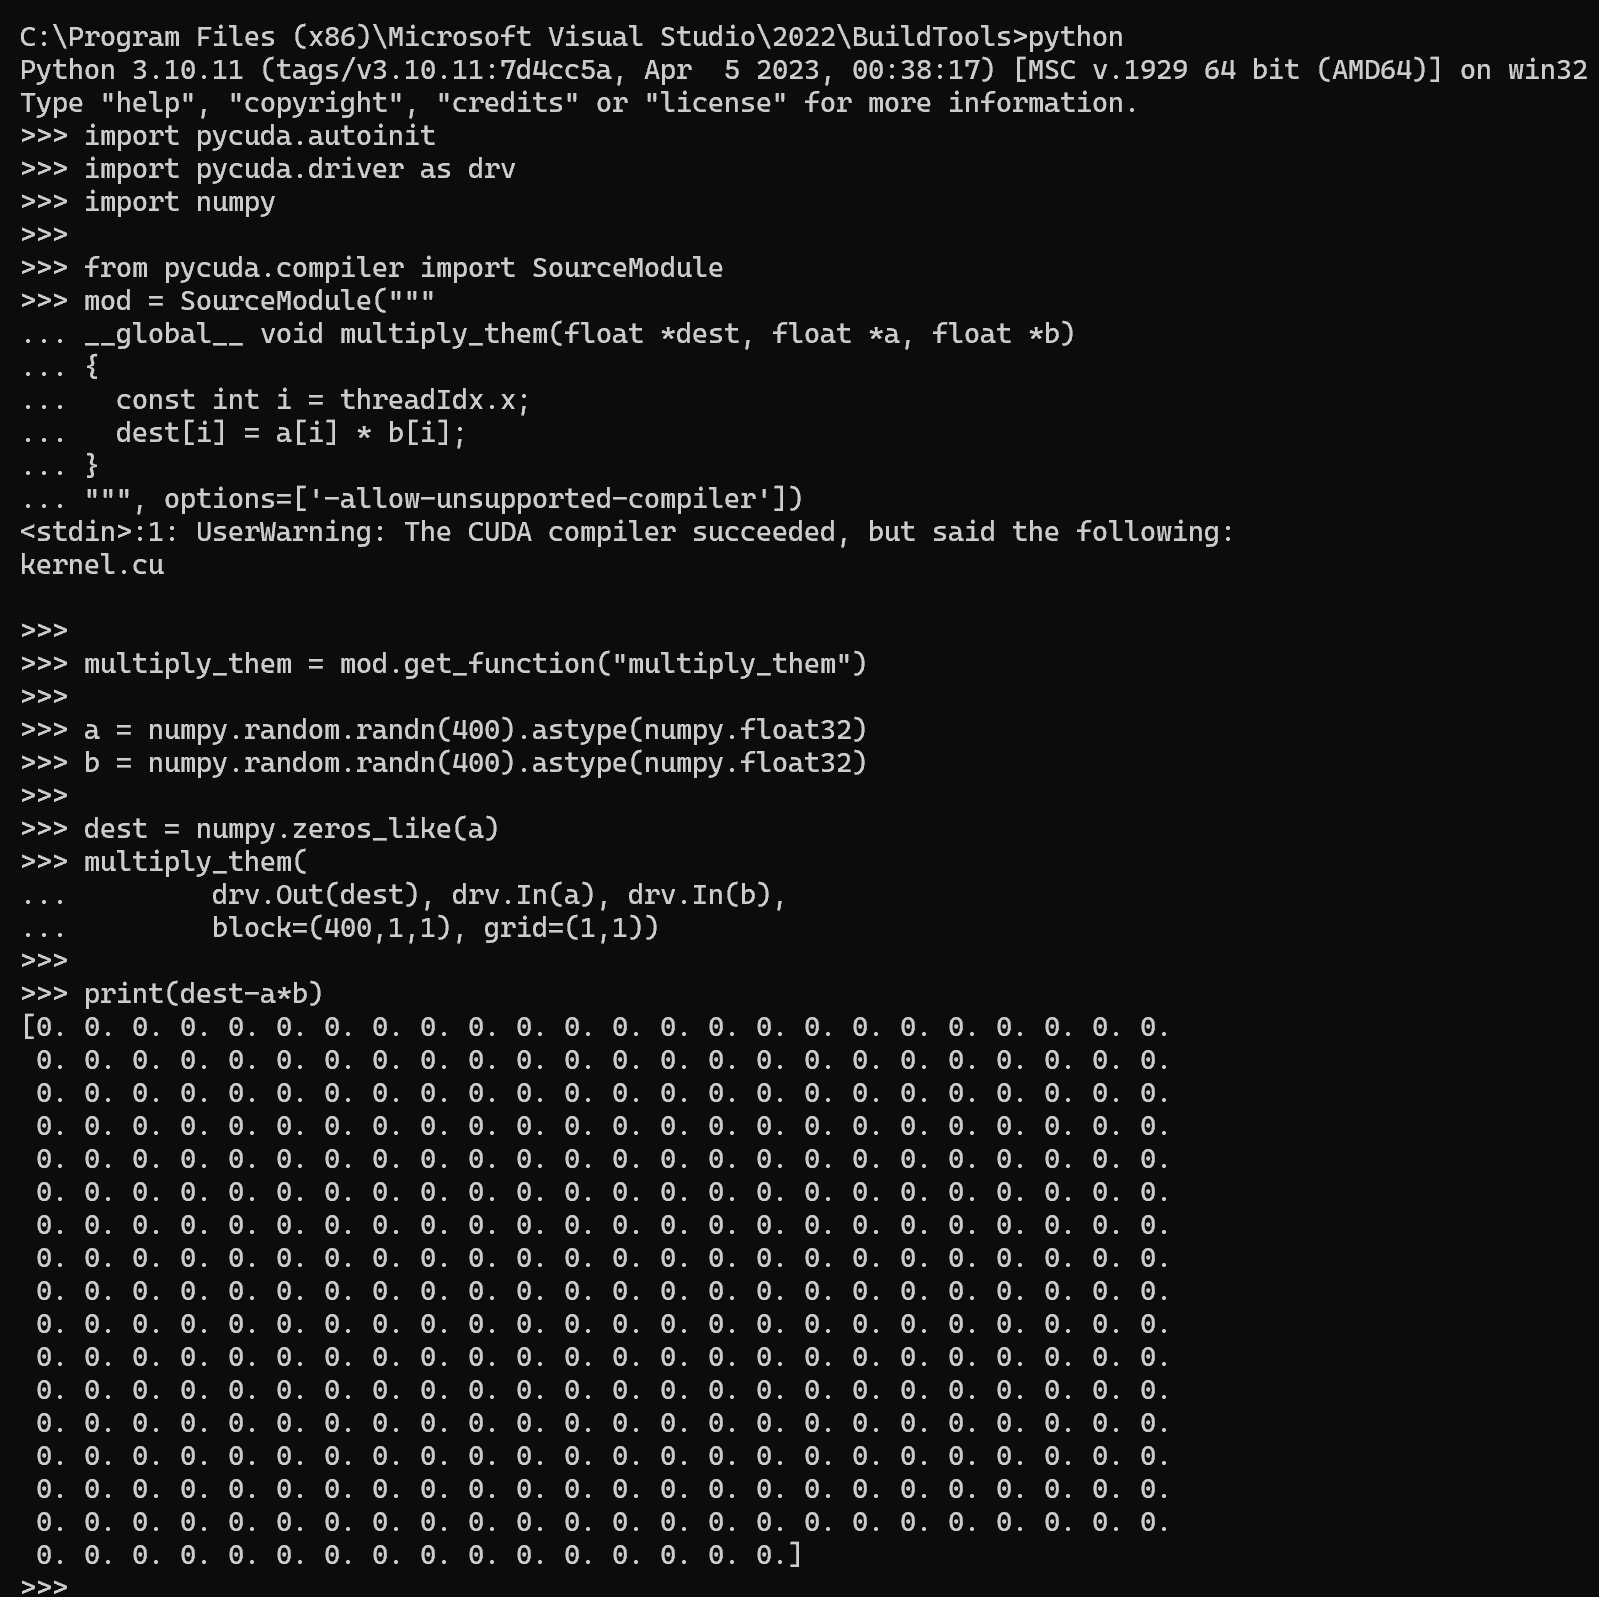
PyCUDA の主な機能
公式チュートリアル
https://documen.tician.de/pycuda/tutorial.html#getting-started に掲載されているプログラムと実行結果を紹介
import pycuda.driver as cuda
import pycuda.autoinit
import numpy as np

# データ準備
a = np.random.randn(4, 4).astype(np.float32)

# GPU上でメモリ確保
a_gpu = cuda.mem_alloc(a.nbytes)

# データをGPUに転送
cuda.memcpy_htod(a_gpu, a)

# GPUからデータを取得して確認
a_result = np.empty_like(a)
cuda.memcpy_dtoh(a_result, a_gpu)
print("Original data:", a)
print("Data after GPU transfer:", a_result)
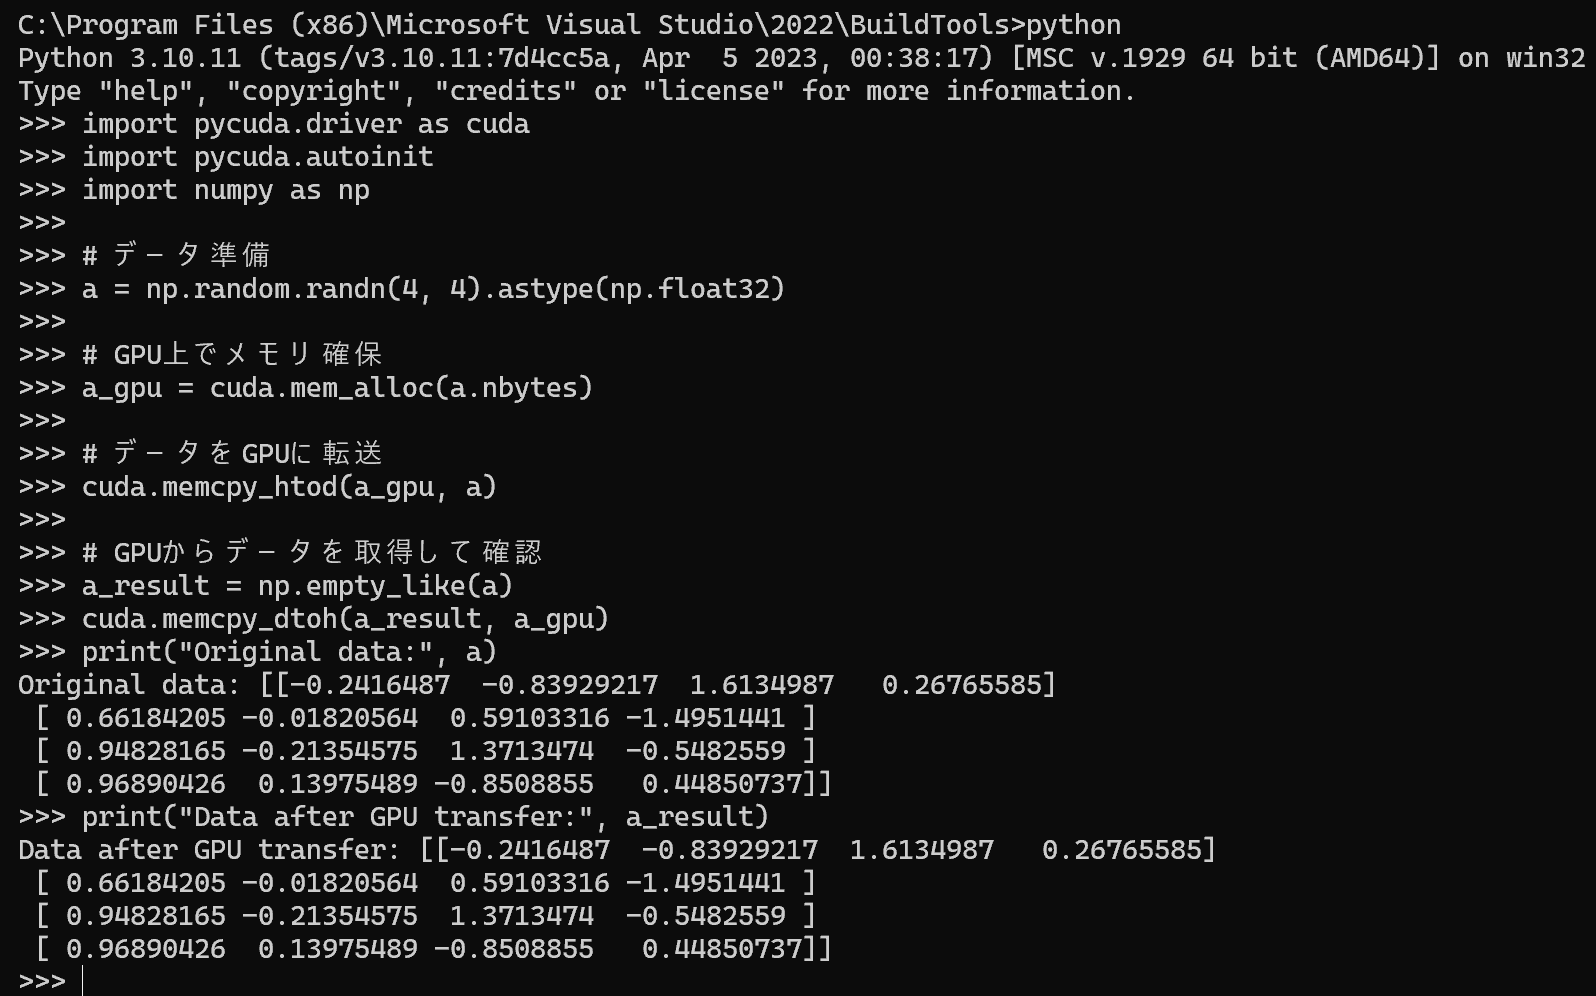
import pycuda.driver as cuda
import pycuda.autoinit
import numpy as np
from pycuda.compiler import SourceModule

mod = SourceModule("""
__global__ void double_array(float *a)
{
    int idx = threadIdx.x + threadIdx.y*4;
    a[idx] *= 2;
}
""", options=['-allow-unsupported-compiler'])

# データ準備
a = np.random.randn(4, 4).astype(np.float32)

# GPU上でメモリ確保
a_gpu = cuda.mem_alloc(a.nbytes)

# データをGPUに転送
cuda.memcpy_htod(a_gpu, a)

func = mod.get_function("double_array")
func(a_gpu, block=(4, 4, 1))

# 結果を確認
a_doubled = np.empty_like(a)
cuda.memcpy_dtoh(a_doubled, a_gpu)
print("Original array:", a)
print("Doubled array:", a_doubled)
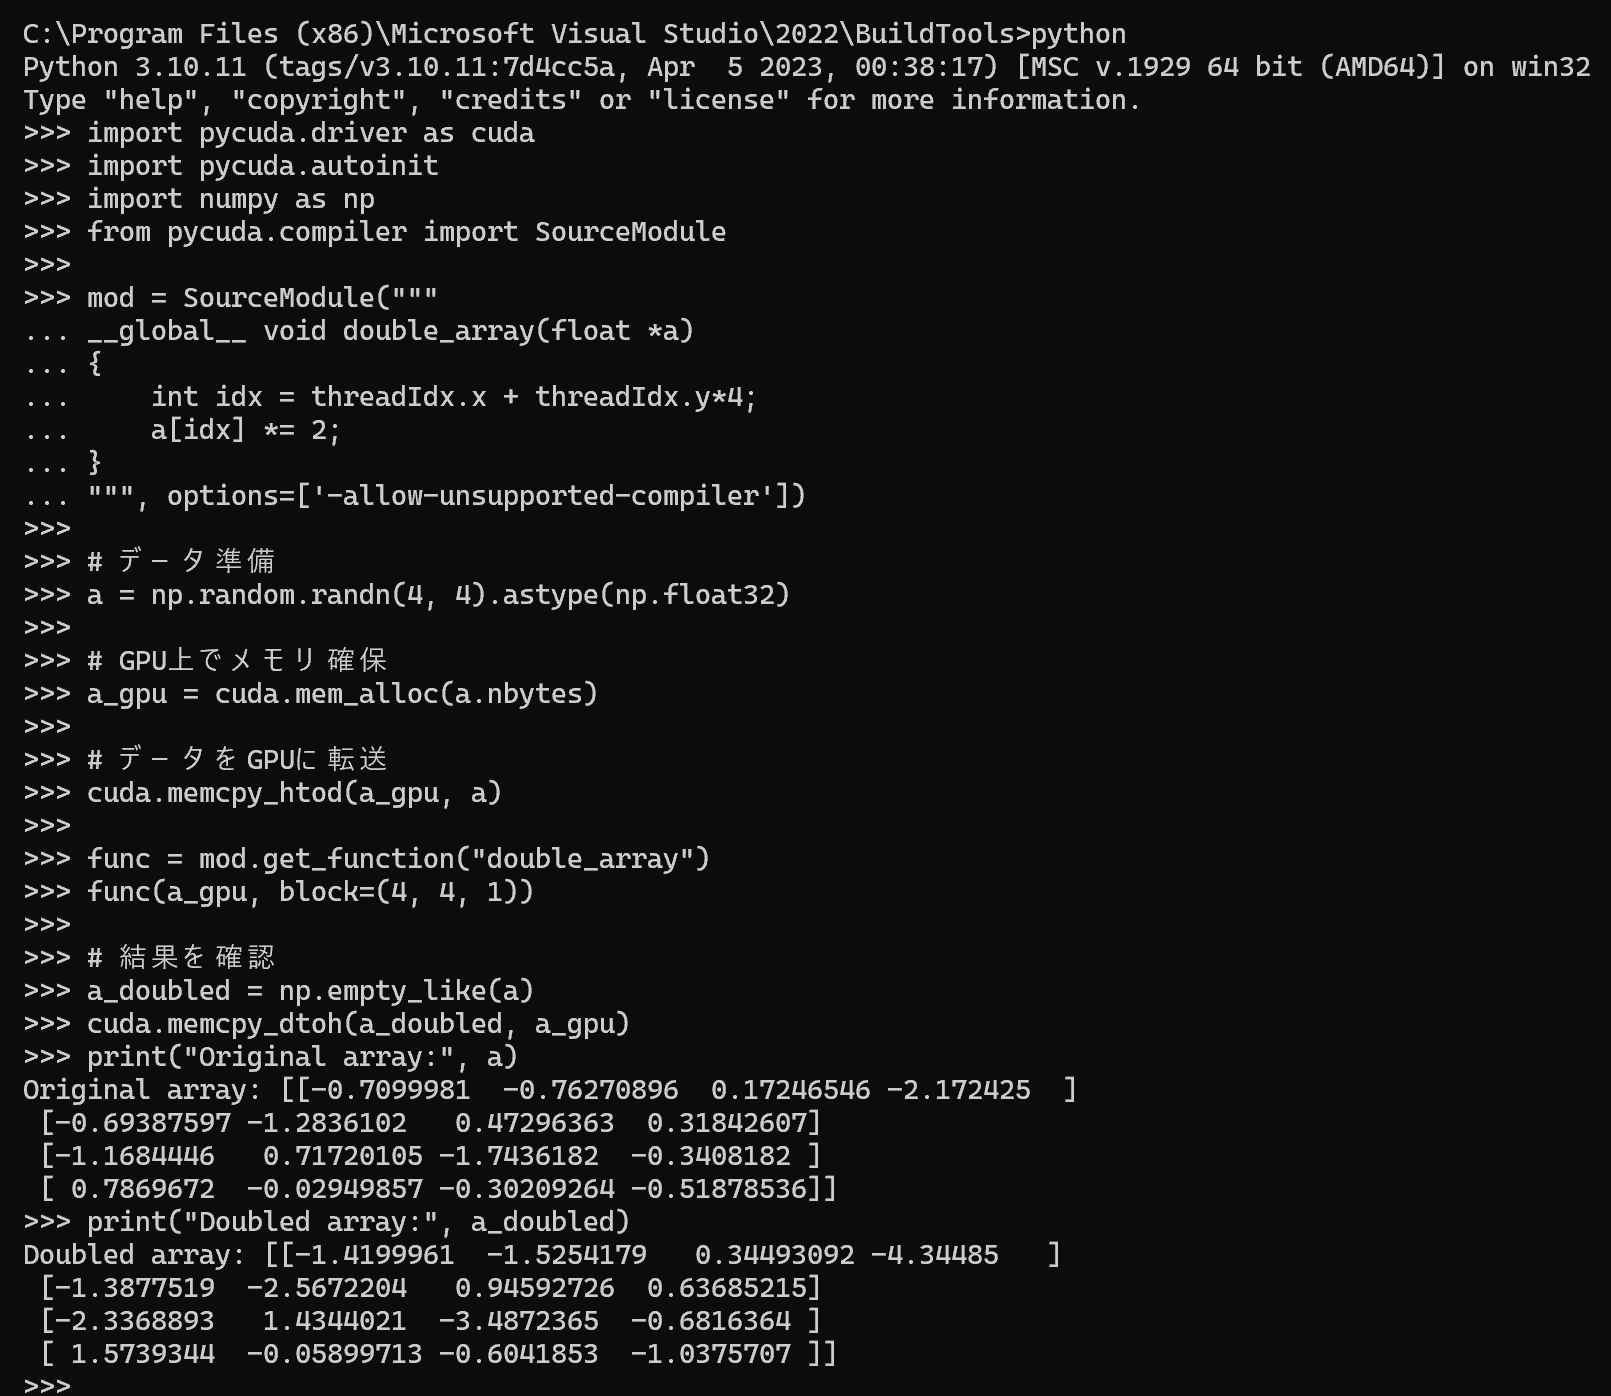
import pycuda.driver as cuda
import pycuda.autoinit
import numpy as np
from pycuda.compiler import SourceModule

# カーネル関数の定義
mod = SourceModule("""
__global__ void double_array(float *a)
{
    int idx = threadIdx.x + threadIdx.y*4;
    a[idx] *= 2;
}
""", options=['-allow-unsupported-compiler'])

# 関数の取得
func = mod.get_function("double_array")

# データの準備
a = np.random.randn(4, 4).astype(np.float32)
a_gpu = cuda.mem_alloc(a.nbytes)
cuda.memcpy_htod(a_gpu, a)

# 関数の準備と呼び出し
func.prepare("P")
func.prepared_call((1, 1), (4, 4, 1), a_gpu)

# 結果の取得と表示
a_result = np.empty_like(a)
cuda.memcpy_dtoh(a_result, a_gpu)
print("Original array:", a)
print("Result using prepared call:", a_result)
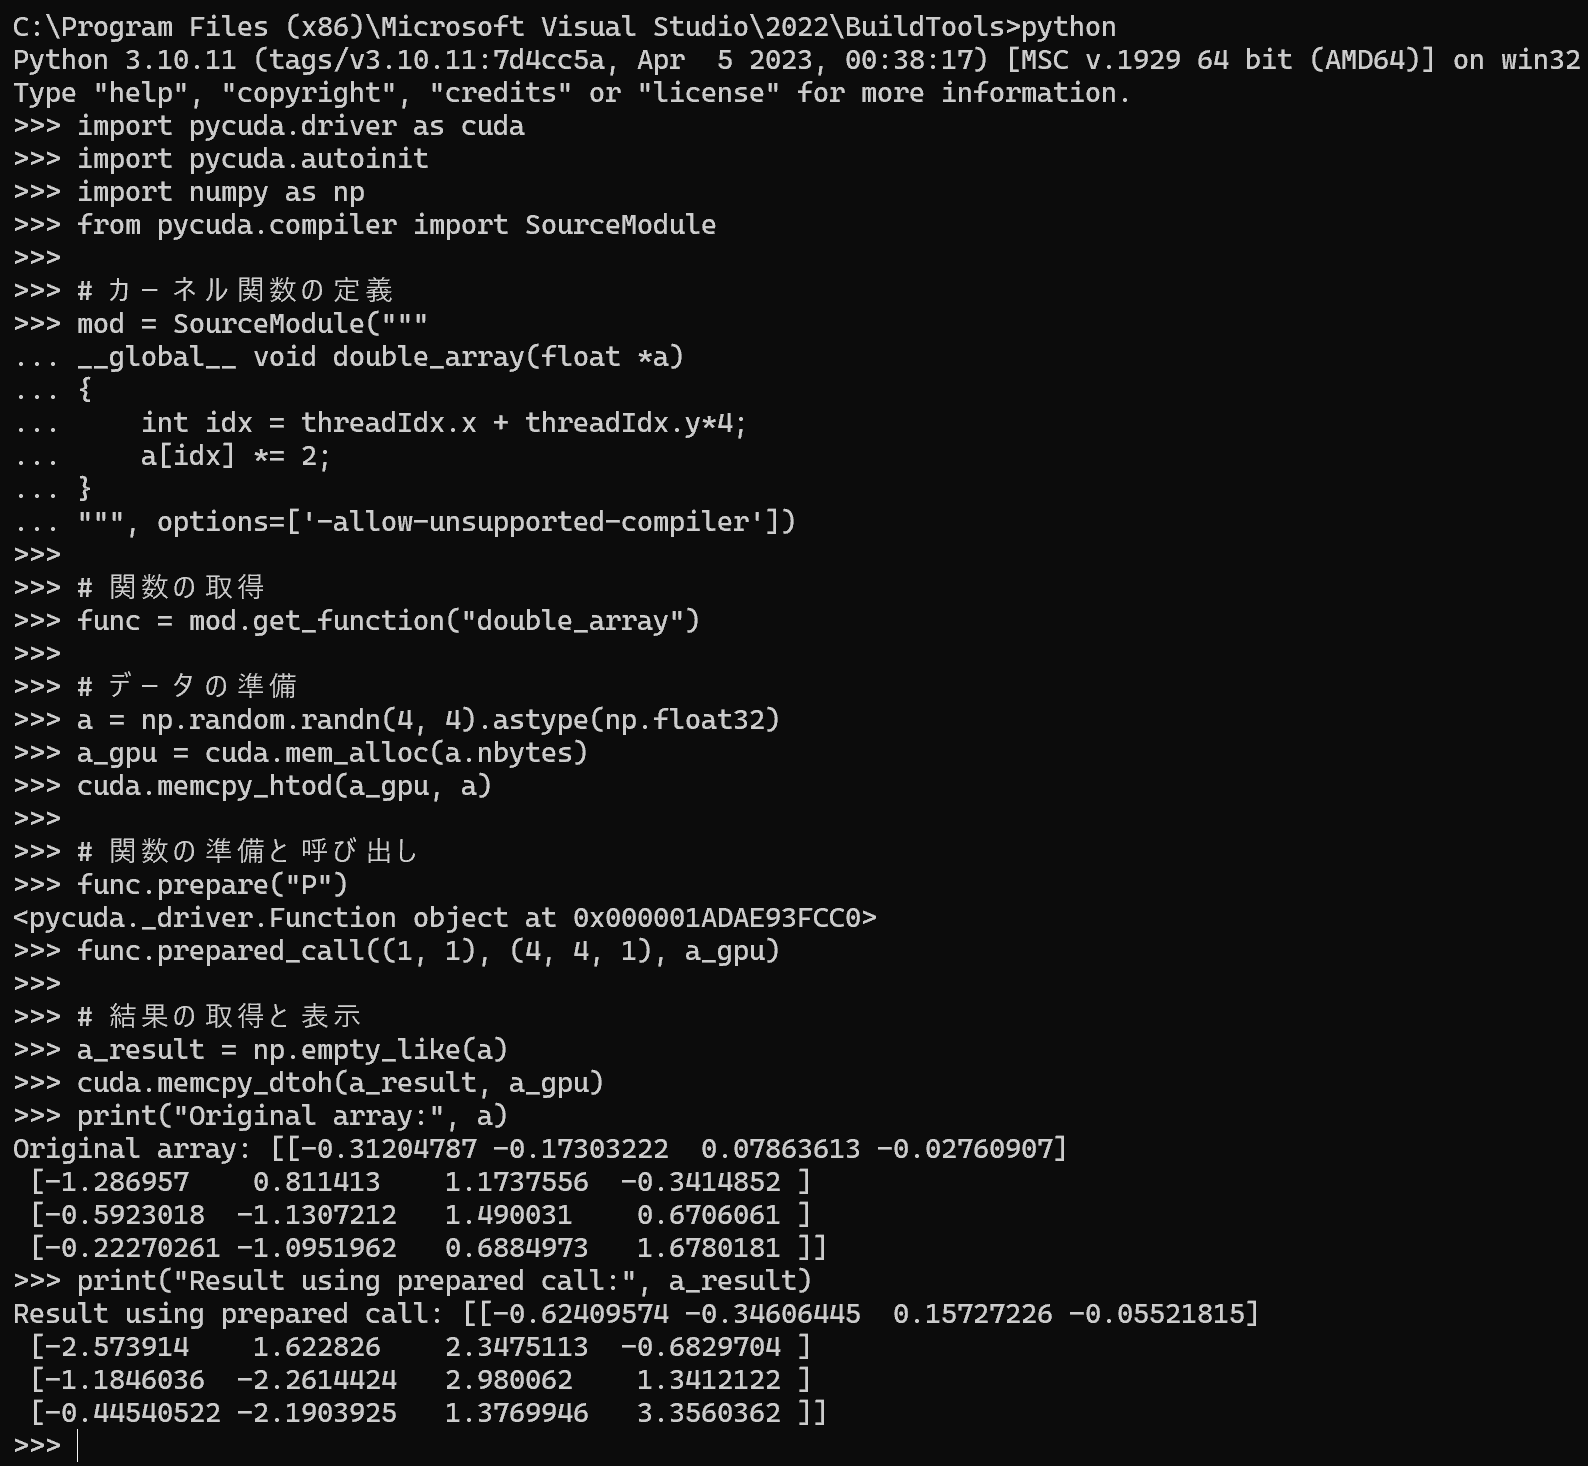
import pycuda.driver as cuda
import pycuda.autoinit
import pycuda.compiler as compiler
import pycuda.gpuarray as gpuarray
import numpy as np

# コンパイラオプションを設定
compiler.DEFAULT_NVCC_FLAGS.append('-allow-unsupported-compiler')

# GPUArrayの作成と計算
a_gpu = gpuarray.to_gpu(np.random.randn(4, 4).astype(np.float32))
a_doubled = (2 * a_gpu).get()

print("Original GPUArray:")
print(a_gpu)
print("\nDoubled GPUArray:")
print(a_doubled)