![[kaneko lab.]](https://www.kkaneko.jp/info/logo_png.png)
Fashion MNIST データセット(Python を使用)
【概要】
Fashion MNIST データセットを紹介する。利用条件は利用者で確認すること。
* Fashion MNIST データセット
Fashion MNIST データセットは、公開されているデータセット(オープンデータ)である。
Fashion MNIST データセットは、10 種類のモノクロ画像と、各画像に付いたラベル(10 種類の中の種類を示す)から構成されるデータセットである。機械学習での画像分類の学習や検証に利用できる。
- 画像の枚数:合計 70000枚。
(内訳)70000枚の内訳は次の通りである。
60000枚:教師データ
10000枚:検証データ
- 画像のサイズ: 28x28 である。
- ラベル
- 0: T-shirt/top
- 1: Trouser
- 2: Pullover
- 3: Dress
- 4: Coat
- 5: Sandal
- 6: Shirt
- 7: Sneaker
- 8: Bag
- 9: Ankle boot
- 画素はグレースケールであり、画素値は 0~255 である。0 が黒、255 が白。
【文献】
Han Xiao, Kashif Rasul, and Roland Vollgraf, Fashion-MNIST: a Novel Image Dataset for Benchmarking Machine Learning Algorithms, arXiv:1708.07747 [cs.LG], 2017.
【目次】
【関連する外部ページ】
- 公式ページ: https://github.com/zalandoresearch/fashion-mnist
- TensorFlow データセットの Fashion MNIST データセット: https://www.tensorflow.org/datasets/catalog/fashion_mnist
【サイト内の関連情報】
- Fashion MNIST データセットを扱う Python プログラム: 別ページ で説明している。
1. 前準備
Python 3.12 のインストール
Pythonのインストールを行い、Pythonのプログラムを実行する環境を整える。扱う環境は、Windows搭載パソコンである。金子研究室では、Python 3.12.10を推奨する。
[Windows での Python 3.12 のインストール手順を見るには、ここをクリック]
Windows での Python 3.12 のインストール
以下のいずれかの方法でPython 3.12をインストールする。Pythonがインストール済みの場合、この手順は不要である。
方法 1:winget によるインストール
【インストールコマンドの実行方法】
管理者権限でコマンドプロンプトを起動する(手順:Windowsキーまたはスタートメニュー → cmd と入力 → 右クリック → 「管理者として実行」)。そして、コマンド全体をコマンドプロンプトにコピー&ペーストする。
--scope machine を指定することで、システム全体(全ユーザー向け)にインストールされる。このオプションの実行には管理者権限が必要である。インストール完了後、コマンドプロンプトを再起動するとPATHが反映される。
REM Python 3.12 をシステム領域にインストール
winget install --id Python.Python.3.12 -e --scope machine --silent --accept-source-agreements --accept-package-agreements --override "/quiet InstallAllUsers=1 PrependPath=1 Include_test=0 Include_pip=1 Include_launcher=1 InstallLauncherAllUsers=1 TargetDir=\"C:\Program Files\Python312\""
if not "%ERRORLEVEL%"=="0" ( color 0c & echo Python 3.12 のインストールに失敗しました & ping 127.0.0.1 -n 6 >nul & color )

REM Python と Scripts を PATH 先頭に追加
powershell -NoProfile -Command "$p='C:\Program Files\Python312'; $s=\"$p\Scripts\"; if(Test-Path $p){$k=[Microsoft.Win32.Registry]::LocalMachine.OpenSubKey('SYSTEM\CurrentControlSet\Control\Session Manager\Environment',$true); $c=$k.GetValue('Path','',[Microsoft.Win32.RegistryValueOptions]::DoNotExpandEnvironmentNames); $t=$k.GetValueKind('Path'); $new=$c; if((';'+$new+';') -notlike \"*;$p;*\"){$new=$p+';'+$new}; if((';'+$new+';') -notlike \"*;$s;*\"){$new=$s+';'+$new}; if($new -ne $c){$k.SetValue('Path',$new,$t)}; $k.Close()}"

REM 現在のセッションにも反映(システムPATHを再取得して連結)
for /f "usebackq tokens=2,*" %A in (`reg query "HKLM\SYSTEM\CurrentControlSet\Control\Session Manager\Environment" /v Path`) do set "PATH=%B"

REM pip / wheel の更新
python -m pip install --no-user -U pip wheel
if not "%ERRORLEVEL%"=="0" ( color 0c & echo pip / wheel の更新に失敗しました & ping 127.0.0.1 -n 6 >nul & color )
方法 2:インストーラーによるインストール
- Python公式サイト(https://www.python.org/downloads/)にアクセスし、「Download Python 3.x.x」ボタンからWindows用インストーラーをダウンロードする。
- ダウンロードしたインストーラーを実行する。
- 初期画面の下部に表示される「Add python.exe to PATH」にチェックを入れてから「Customize installation」を選択する。このチェックを入れ忘れると、コマンドプロンプトから
pythonコマンドを実行できない。 - 「Install Python 3.xx for all users」にチェックを入れ、「Install」をクリックする。
インストールの確認
コマンドプロンプトで以下を実行する。
python --versionバージョン番号(例:Python 3.12.x)が表示されればインストール成功である。「'python' は、内部コマンドまたは外部コマンドとして認識されていません。」と表示される場合は、インストールが正常に完了していない。
Python の開発環境 Visual Studio Code のインストールと Python 用の設定
Python の開発環境Visual Studio Code(プログラムを編集するソフトウェア。以下、VS Code)を整える。
[Windows での Visual Studio Code のインストールと Python 用の設定手順を見るには、ここをクリック]
Windows での Visual Studio Code のインストールと Python 用の設定手順
1. VS Code と拡張機能のインストール
以下のコマンドにより,既存の VS Code を削除し,全ユーザー共有の設定で再インストールしたうえで,拡張機能(VS Code に機能を追加するソフトウェア)をまとめて導入する.
【インストールコマンドの実行方法】
管理者権限でコマンドプロンプトを起動する(手順:Windows キーまたはスタートメニュー → cmd と入力 → 右クリック → 「管理者として実行」)。そして,コマンド全体をコマンドプロンプトにコピー&ペーストする。
インストールコマンド
REM ============================================================
REM Microsoft Visual Studio Code
REM ============================================================
REM Build Tools + Desktop development with C++(VCTools)+ 追加コンポーネント(一括)
REM 未インストール時: winget で新規インストール
REM インストール済み時: setup.exe modify でコンポーネント追加(バージョンは変更しない)
winget list --id Microsoft.VisualStudio.BuildTools 2>nul | findstr /i "BuildTools" >nul 2>&1
if %ERRORLEVEL% EQU 0 (
    for /f "usebackq delims=" %P in (`"C:\Program Files (x86)\Microsoft Visual Studio\Installer\vswhere.exe" -products Microsoft.VisualStudio.Product.BuildTools -property installationPath`) do start /wait "" "C:\Program Files (x86)\Microsoft Visual Studio\Installer\setup.exe" modify --installPath "%P" --add Microsoft.VisualStudio.Workload.VCTools --add Microsoft.VisualStudio.Workload.MSBuildTools --add Microsoft.VisualStudio.Component.VC.CMake.Project --add Microsoft.VisualStudio.Component.VC.Llvm.Clang --add Microsoft.VisualStudio.Component.VC.Llvm.ClangToolset --add Microsoft.VisualStudio.Component.Windows11SDK.26100 --add Microsoft.VisualStudio.Component.VC.v143.x86.x64 --includeRecommended --quiet --norestart --nocache
    if not "%ERRORLEVEL%"=="0" ( color 0c & echo Build Tools のコンポーネント追加に失敗しました & ping 127.0.0.1 -n 6 >nul & color )
) else (
    winget install --scope machine --id Microsoft.VisualStudio.BuildTools -e --silent --disable-interactivity --force --accept-source-agreements --accept-package-agreements --override "--quiet --wait --norestart --nocache --add Microsoft.VisualStudio.Workload.VCTools --includeRecommended --add Microsoft.VisualStudio.Workload.MSBuildTools --add Microsoft.VisualStudio.Component.VC.CMake.Project --add Microsoft.VisualStudio.Component.VC.Llvm.Clang --add Microsoft.VisualStudio.Component.VC.Llvm.ClangToolset --add Microsoft.VisualStudio.Component.Windows11SDK.26100 --add Microsoft.VisualStudio.Component.VC.v143.x86.x64"
    if not "%ERRORLEVEL%"=="0" ( color 0c & echo Build Tools のインストールに失敗しました & ping 127.0.0.1 -n 6 >nul & color )
)

REM 全ユーザー共有の拡張機能フォルダ
if not exist "C:\ProgramData\vscode-extensions" mkdir "C:\ProgramData\vscode-extensions"
icacls "C:\ProgramData\vscode-extensions" /grant "Everyone:(OI)(CI)M" /T

REM スタートメニューのショートカットを --extensions-dir 付きで再作成
if exist "C:\ProgramData\Microsoft\Windows\Start Menu\Programs\Visual Studio Code" rmdir /s /q "C:\ProgramData\Microsoft\Windows\Start Menu\Programs\Visual Studio Code"
if exist "C:\ProgramData\Microsoft\Windows\Start Menu\Programs\Visual Studio Code.lnk" del "C:\ProgramData\Microsoft\Windows\Start Menu\Programs\Visual Studio Code.lnk"
powershell -NoProfile -Command "$s=New-Object -ComObject WScript.Shell; $lnk=$s.CreateShortcut('C:\ProgramData\Microsoft\Windows\Start Menu\Programs\Visual Studio Code.lnk'); $lnk.TargetPath='C:\Program Files\Microsoft VS Code\Code.exe'; $lnk.Arguments='--extensions-dir \"C:\ProgramData\vscode-extensions\"'; $lnk.Save()"
REM ショートカットの検証
powershell -NoProfile -Command "$s=New-Object -ComObject WScript.Shell; $lnk=$s.CreateShortcut('C:\ProgramData\Microsoft\Windows\Start Menu\Programs\Visual Studio Code.lnk'); Write-Host 'TargetPath:' $lnk.TargetPath; Write-Host 'Arguments:' $lnk.Arguments"

REM ファイル / フォルダ右クリックの「Code で開く」を登録
reg add "HKLM\SOFTWARE\Classes\*\shell\VSCode\command" /ve /d "\"C:\Program Files\Microsoft VS Code\Code.exe\" --extensions-dir \"C:\ProgramData\vscode-extensions\" \"%1\"" /f
reg add "HKLM\SOFTWARE\Classes\Directory\shell\VSCode\command" /ve /d "\"C:\Program Files\Microsoft VS Code\Code.exe\" --extensions-dir \"C:\ProgramData\vscode-extensions\" \"%1\"" /f
reg add "HKLM\SOFTWARE\Classes\Directory\Background\shell\VSCode\command" /ve /d "\"C:\Program Files\Microsoft VS Code\Code.exe\" --extensions-dir \"C:\ProgramData\vscode-extensions\" \"%V\"" /f

REM --extensions-dir 付きで起動する code.cmd ラッパを作成
REM (%* を echo で書くと対話的 cmd で失われるため、PowerShell で [char]37+'*' を書き出す)
powershell -NoProfile -Command "$pct=[char]37; $q=[char]34; $c='@echo off'+[char]13+[char]10+$q+'C:\Program Files\Microsoft VS Code\bin\code.cmd'+$q+' --extensions-dir '+$q+'C:\ProgramData\vscode-extensions'+$q+' '+$pct+'*'+[char]13+[char]10; [IO.File]::WriteAllText('C:\ProgramData\vscode-extensions\vscode.cmd',$c,[Text.Encoding]::ASCII)"

REM 拡張機能のインストール
set "CODE=C:\Program Files\Microsoft VS Code\bin\code.cmd"
"%CODE%" --extensions-dir "C:\ProgramData\vscode-extensions" --uninstall-extension GitHub.copilot
"%CODE%" --extensions-dir "C:\ProgramData\vscode-extensions" --uninstall-extension GitHub.copilot-chat
"%CODE%" --extensions-dir "C:\ProgramData\vscode-extensions" --install-extension ms-python.python
"%CODE%" --extensions-dir "C:\ProgramData\vscode-extensions" --install-extension ms-python.vscode-pylance
"%CODE%" --extensions-dir "C:\ProgramData\vscode-extensions" --install-extension ms-python.debugpy
"%CODE%" --extensions-dir "C:\ProgramData\vscode-extensions" --install-extension MS-CEINTL.vscode-language-pack-ja
"%CODE%" --extensions-dir "C:\ProgramData\vscode-extensions" --install-extension saoudrizwan.claude-dev
"%CODE%" --extensions-dir "C:\ProgramData\vscode-extensions" --install-extension rust-lang.rust-analyzer
"%CODE%" --extensions-dir "C:\ProgramData\vscode-extensions" --install-extension tamasfe.even-better-toml
"%CODE%" --extensions-dir "C:\ProgramData\vscode-extensions" --install-extension anthropic.claude-code
"%CODE%" --extensions-dir "C:\ProgramData\vscode-extensions" --install-extension almenon.arepl
"%CODE%" --extensions-dir "C:\ProgramData\vscode-extensions" --list-extensions --show-versions

REM settings.json を作成(自動更新オフ、Python、Claude Code 設定)
if not exist "%APPDATA%\Code\User" mkdir "%APPDATA%\Code\User"
python -c "import json,os;data={'update.mode':'none','update.enableWindowsBackgroundUpdates':False,'extensions.autoUpdate':False,'python.defaultInterpreterPath':r'C:\Program Files\Python312\python.exe','claudeCode.environmentVariables':[{'name':'ANTHROPIC_API_KEY','value':'not-needed'},{'name':'ANTHROPIC_AUTH_TOKEN','value':'ollama'},{'name':'ANTHROPIC_BASE_URL','value':'http://localhost:11434'},{'name':'ANTHROPIC_MODEL','value':'glm-4.7-flash'},{'name':'CLAUDE_CODE_DISABLE_NONESSENTIAL_TRAFFIC','value':'1'}]};p=os.path.join(os.environ['APPDATA'],'Code','User','settings.json');open(p,'w',encoding='utf-8').write(json.dumps(data,indent=4));print('Done:',p)"

REM 自動更新の抑止ポリシー(settings.json に加えて、レジストリ側でも明示的にオフ)
reg add "HKLM\SOFTWARE\Policies\Microsoft\VSCode" /v "UpdateMode" /t REG_SZ /d "none" /f
echo === セットアップ完了 ===
2. Python インタプリタの選択
同一マシンに複数の Python がインストールされている場合,VS Code で使用する Python 本体(インタプリタ:Python プログラムを解釈・実行するソフトウェア)を選択する必要がある.
- コマンドパレット(コマンド名で機能を呼び出す VS Code の入力欄)を開く(
Ctrl+Shift+P) Python: Select Interpreterと入力する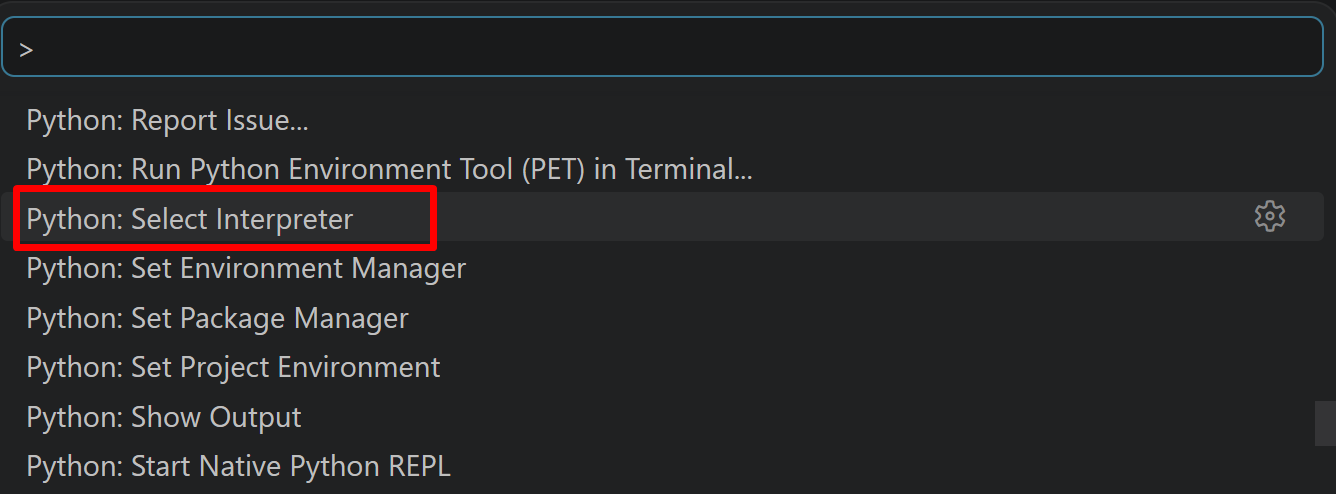
- 表示される一覧から,使用する Python(例:
C:\Program Files\Python312\python.exe)を選択する.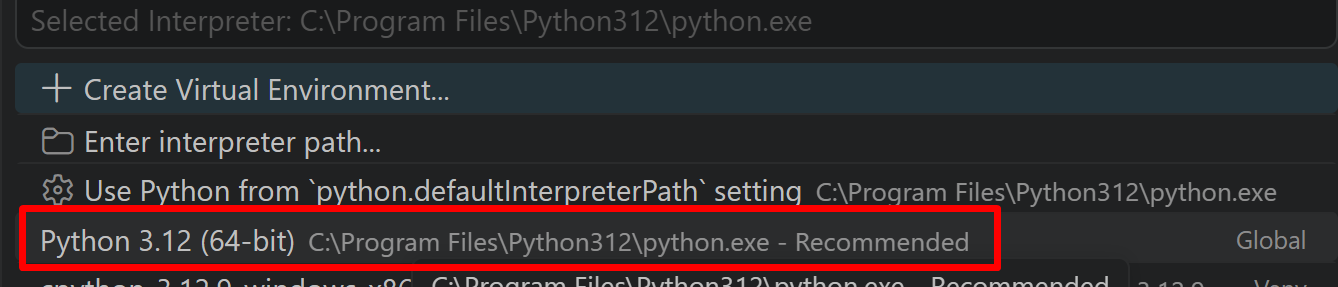
TensorFlow, TensorFlow データセット, Keras, numpy, matplotlib のインストール
管理者権限でコマンドプロンプトを起動する
(手順:Windowsキーまたはスタートメニュー → cmd と入力 → 右クリック → 「管理者として実行」)。
そのうえで、次のコマンドを実行する。
python -m pip install -U --no-user tensorflow tensorflow_datasets keras numpy matplotlib
(このページで、Build Tools for Visual Studio 2022、NVIDIA ドライバ、 NVIDIA CUDA ツールキット、 NVIDIA cuDNNのインストールも説明している。)
2. Fashion MNIST データセットのロード
- パッケージのインポート、TensorFlow のバージョン確認など
import tensorflow as tf
import numpy as np
import tensorflow_datasets as tfds

%matplotlib inline
import matplotlib.pyplot as plt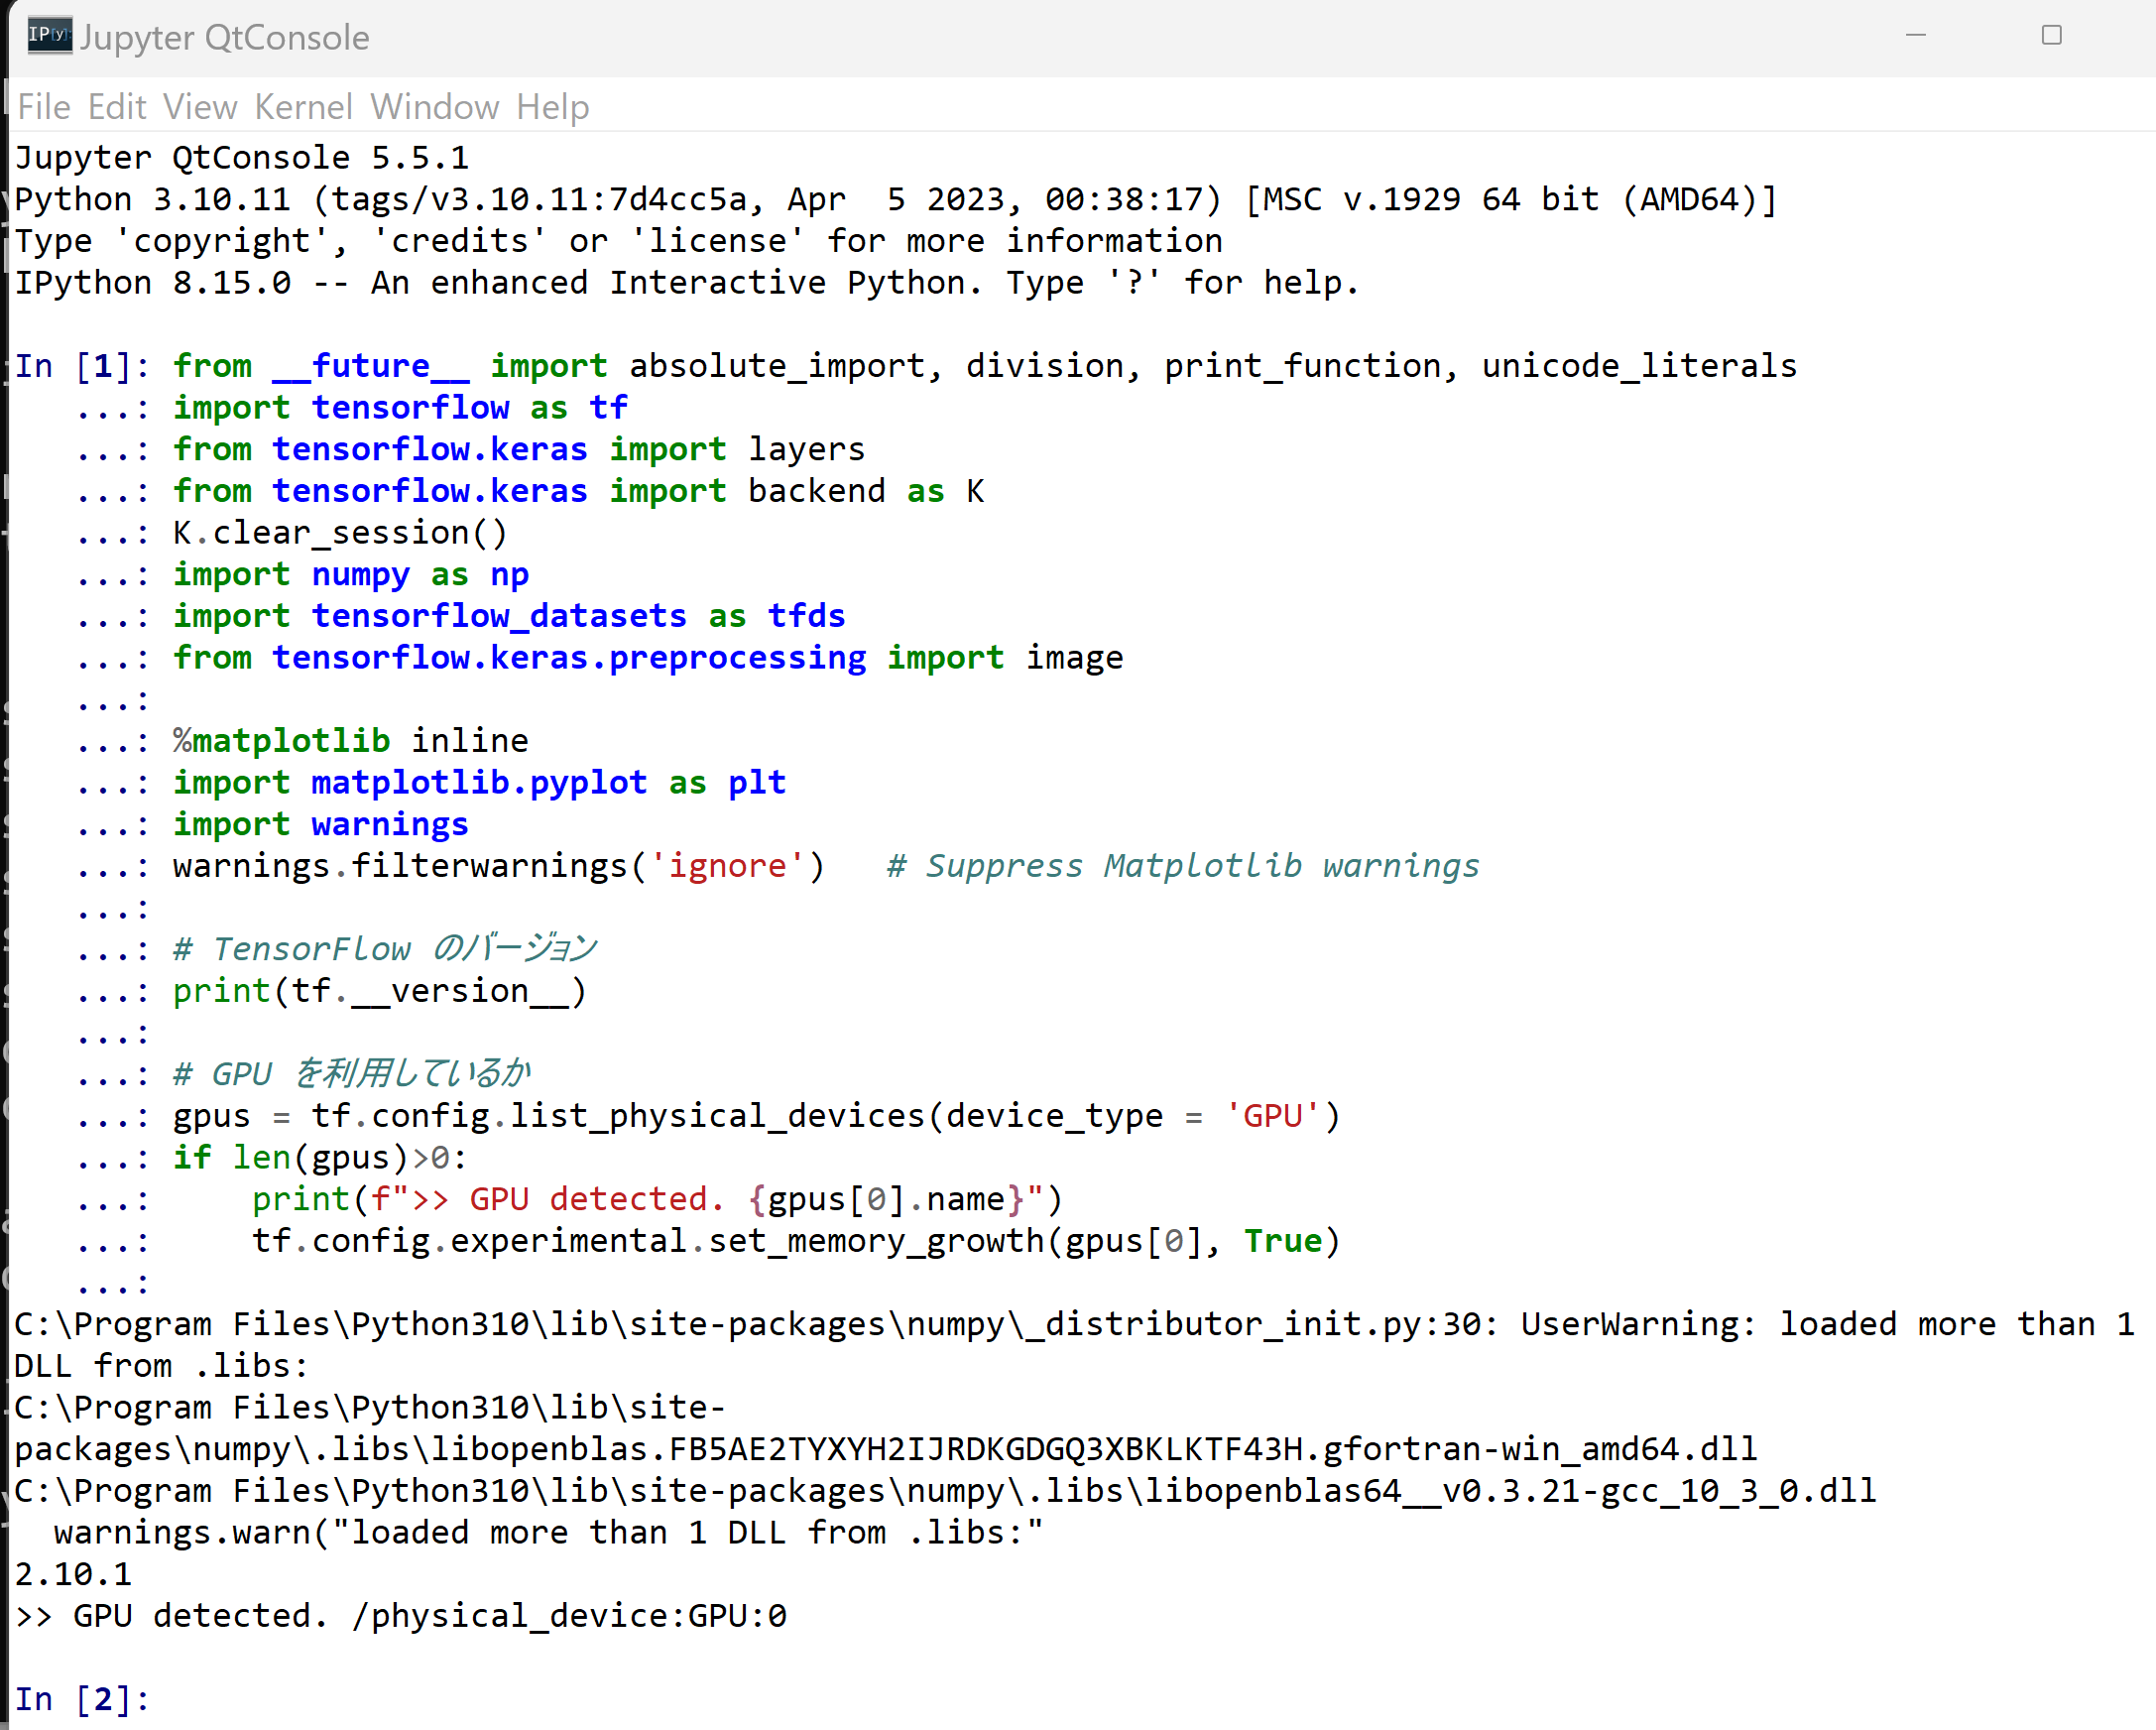
- TensorFlow データセット から Fashion MNIST データセット をロードする
- x_train: サイズ 28 × 28 の 60000枚のモノクロ画像
- y_train: 60000枚のモノクロ画像それぞれの、種類番号(0 から 9 のどれか)
- x_test: サイズ 28 × 28 の 10000枚のモノクロ画像
- y_test: 10000枚のモノクロ画像それぞれの、種類番号(0 から 9 のどれか)
結果は、NumPy 配列である。
tensorflow_datasets の load で、 「batch_size = -1」を指定して、一括読み込みを行っている。 as_supervised=True により、各データは(画像, ラベル)の2要素の組として得られる。 tfds.as_numpy を通すことで、結果を NumPy 配列として得ている。
(x_train, y_train), (x_test, y_test) = tfds.as_numpy(tfds.load('fashion_mnist', split=['train', 'test'], shuffle_files=True, as_supervised=True, batch_size=-1))
fashion_mnist_metadata = tfds.builder('fashion_mnist').info
print(fashion_mnist_metadata)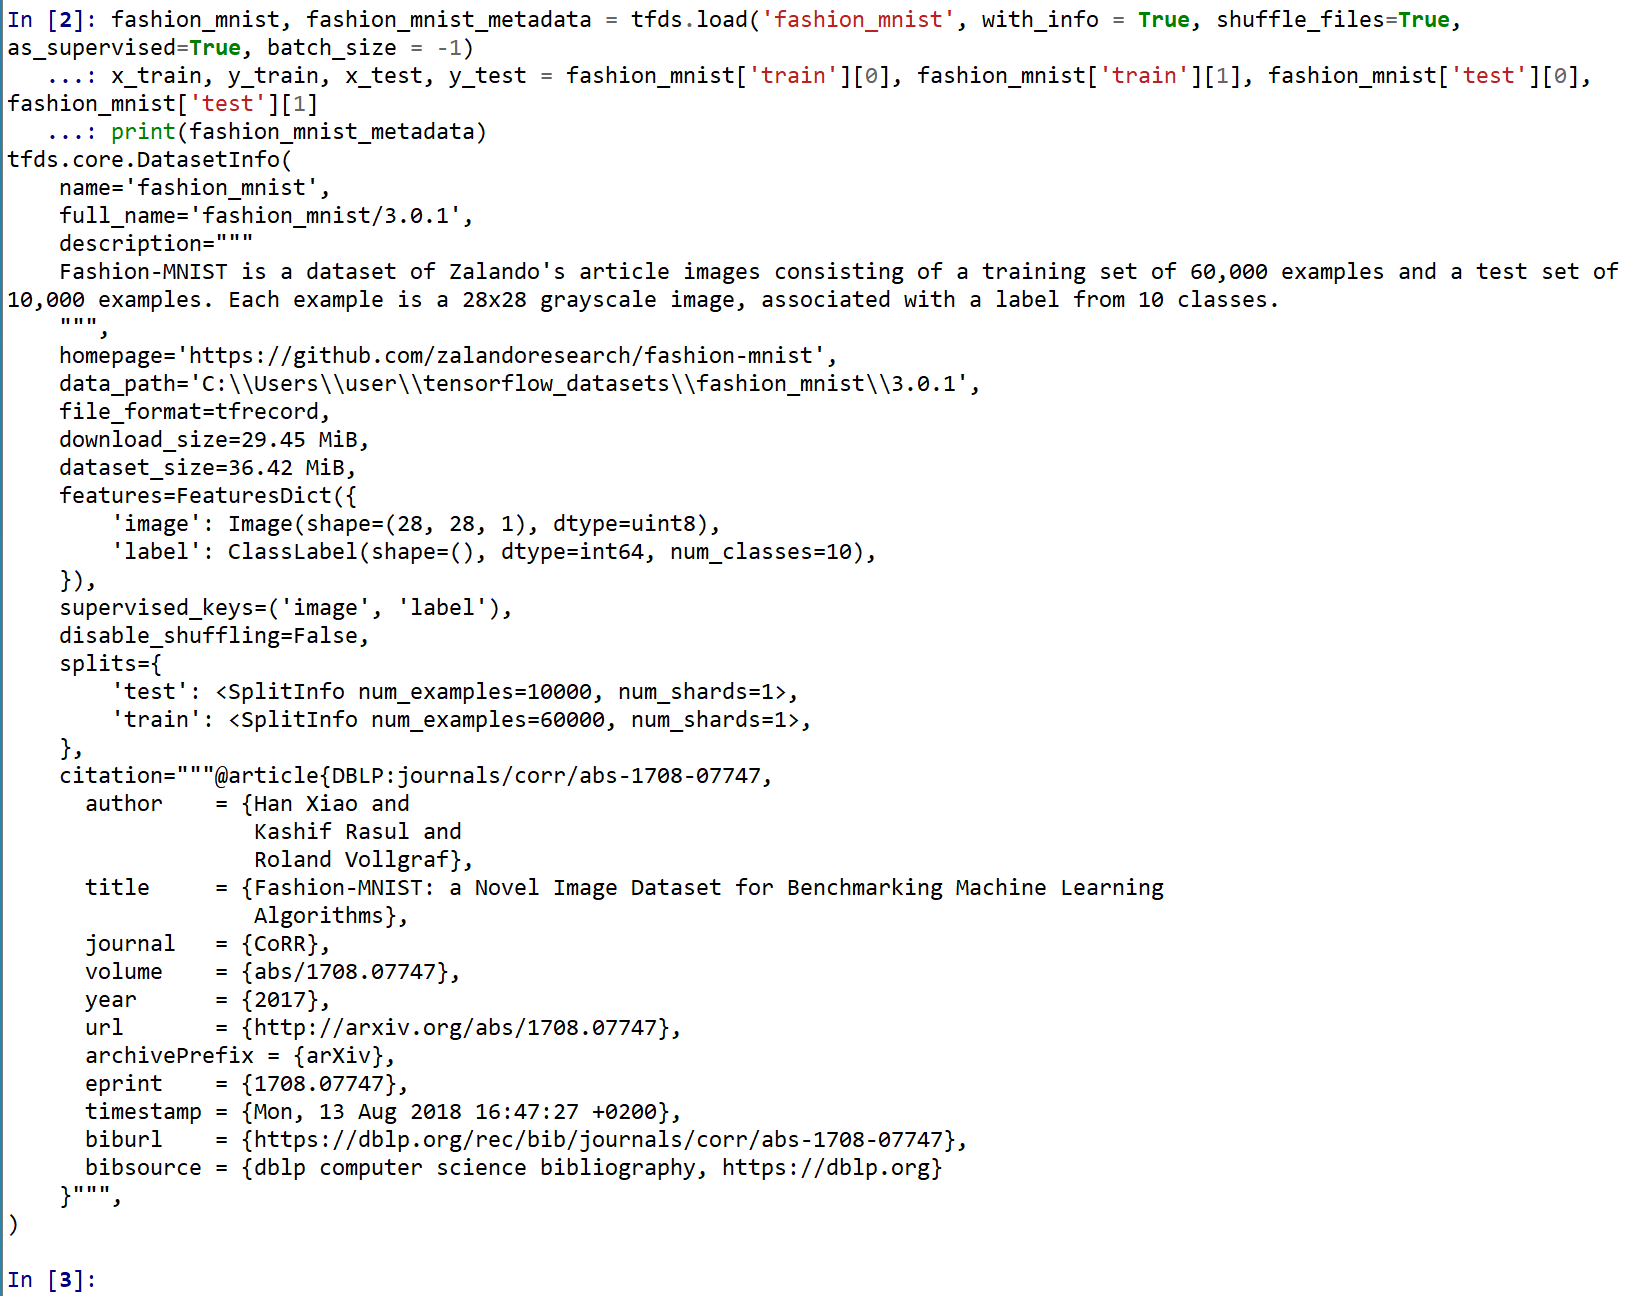
3. Fashion MNIST データセットの確認
- データセットの中の画像を表示する
Matplotlib を用いて、0 番目の画像を表示する。
NUM = 0
plt.figure()
plt.imshow(x_train[NUM,:,:,0], cmap='gray')
plt.colorbar()
plt.gca().grid(False)
plt.show()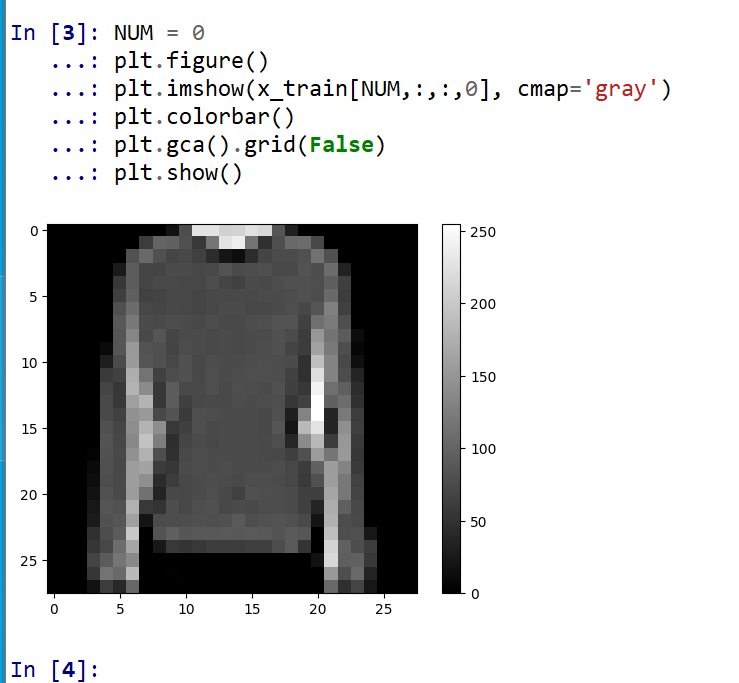
- データセットの情報を表示する
print(fashion_mnist_metadata)
print(fashion_mnist_metadata.features["label"].num_classes)
print(fashion_mnist_metadata.features["label"].names)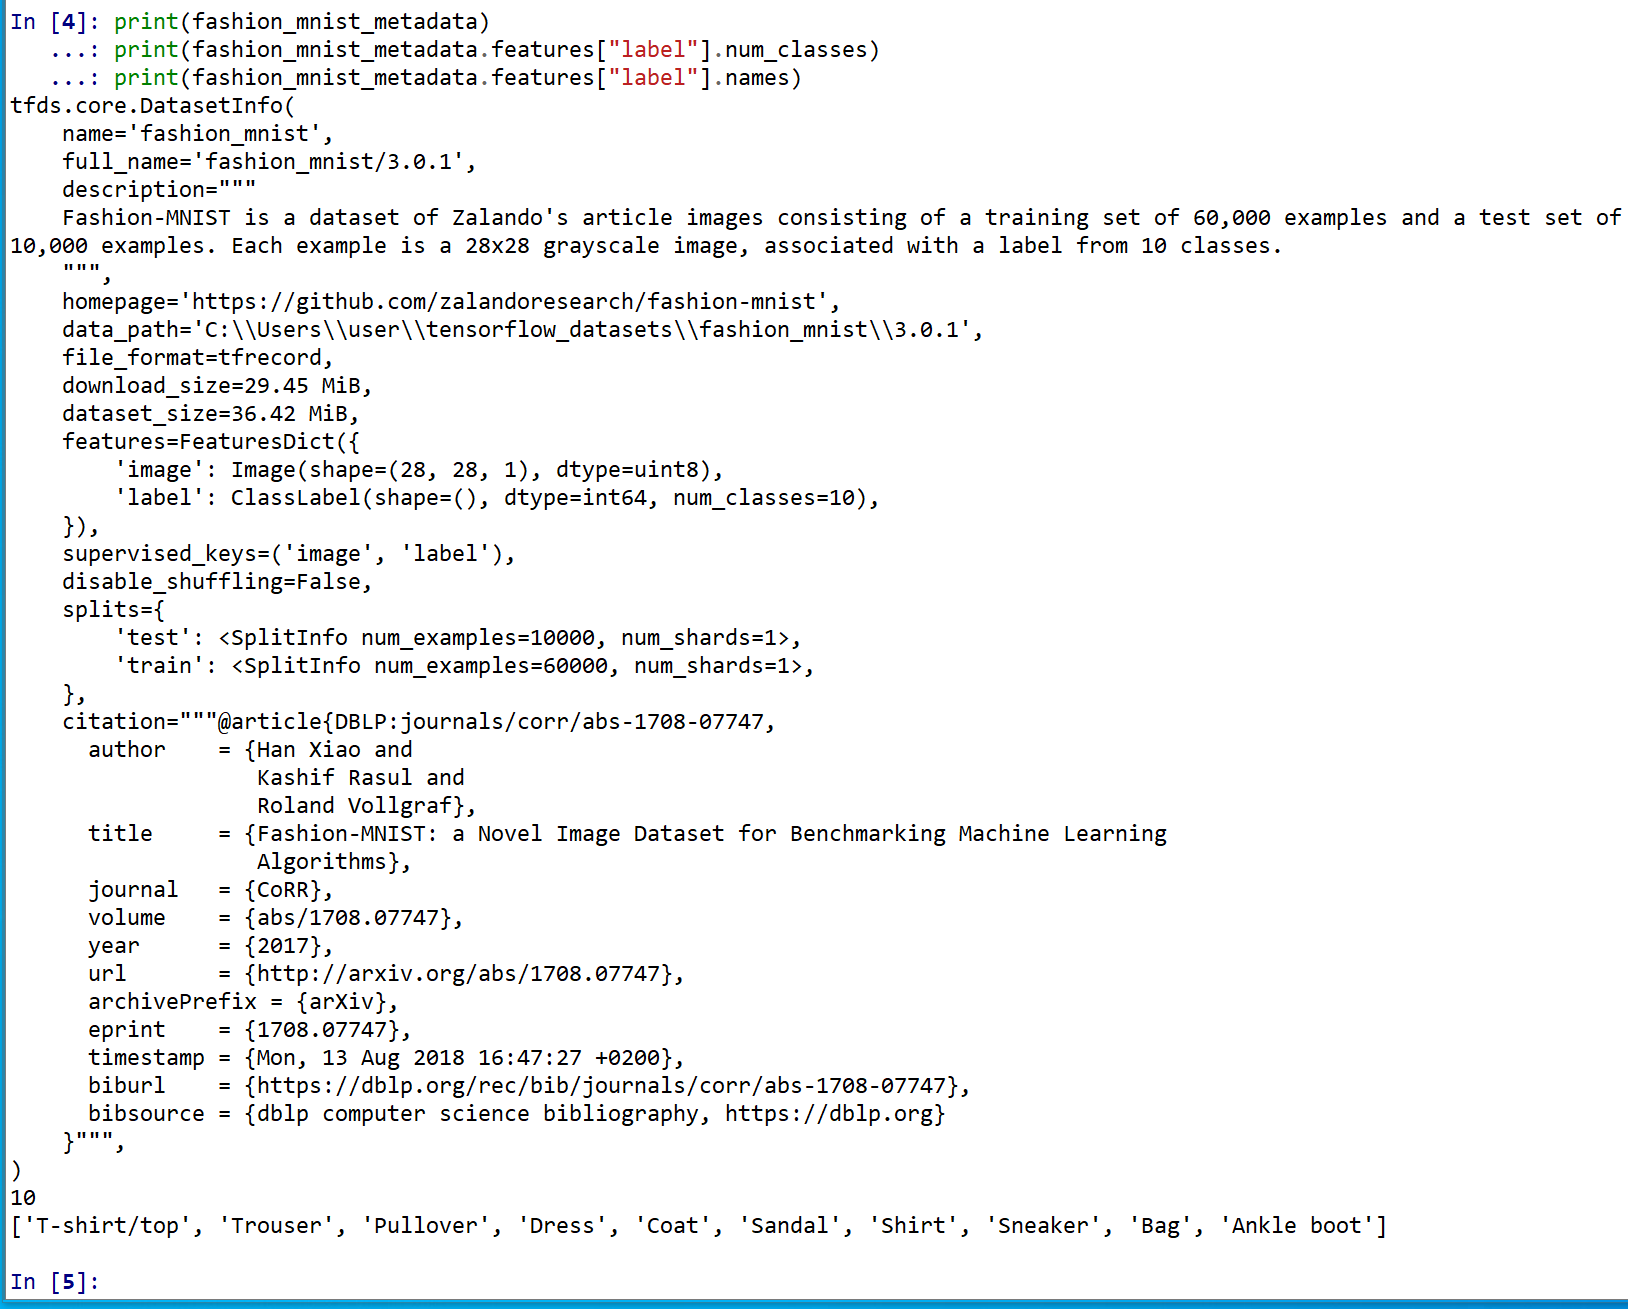
- データの確認表示
Matplotlib を用いて、複数の画像を並べて表示する。
class_names = ['T-shirt/top', 'Trouser', 'Pullover', 'Dress', 'Coat', 'Sandal', 'Shirt', 'Sneaker', 'Bag', 'Ankle boot']
plt.style.use('default')
plt.figure(figsize=(10,10))
for i in range(25):
    plt.subplot(5,5,i+1)
    plt.xticks([])
    plt.yticks([])
    plt.grid(False)
    plt.imshow(x_train[i,:,:,0], cmap=plt.cm.binary)
    plt.xlabel(class_names[y_train[i]])

plt.show()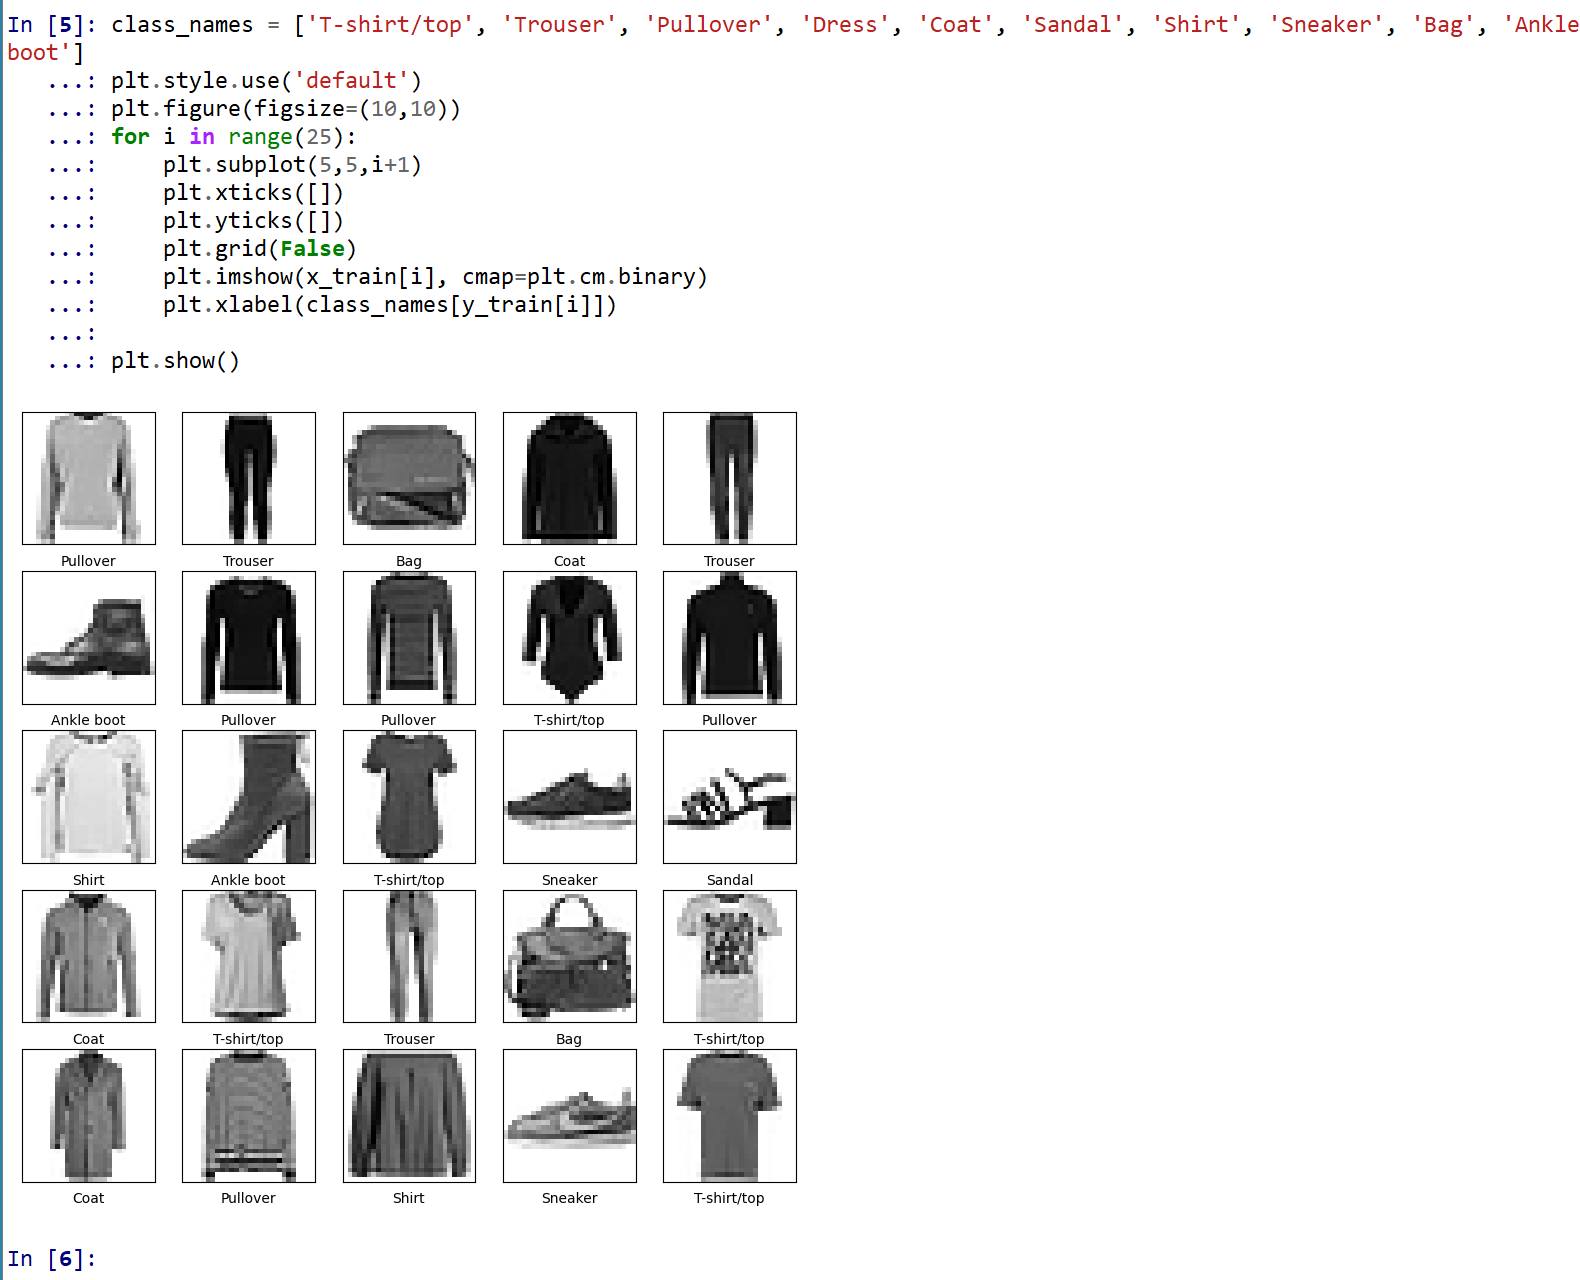
- train, test の確認
train = (x_train, y_train)
test = (x_test, y_test)
print(train)
print(test)