MediaPipe による15種類のAIタスク実行(Windows)
【概要】
- MediaPipe Tasks API(Googleが提供する事前学習済みAIタスクを数行のコードで呼び出せるライブラリ)を用いて,物体検出,画像セグメンテーション(画像を領域ごとに分割する処理),姿勢・手・顔・ジェスチャー認識,音声分類,テキスト処理等の15種類のAIタスクを実行する
- Pythonプログラムは,処理対象ファイル(画像・音声)の自動ダウンロード,モデル自動ダウンロード,ファイル選択ダイアログ,AIによる推論,結果表示の手順で統一し,理解と改変を容易にする
- Windowsマシンでのローカル実行に対応する.繰り返し検証,Webカメラによるリアルタイム処理等への発展に適する
- 期待した精度・性能が得られない場合,設定の変更や学習済みモデルの選択を行う.データの前処理,他の技術の利用,追加学習等の検討も考えられる
【説明資料】
[PDF], [パワーポイント] (同じ内容,クリックしてダウンロード), [動画]
【目次】
- Python の実行環境を整える
- MediaPipe の概要、インストール、動作確認
- プログラム実行手順
- Pythonプログラムの共通構造
- 下記の15プログラムの実行時の留意事項
- タスク1:物体検出(Object Detector)
- タスク2:画像分類(Image Classifier)
- タスク3:画像セグメンテーション(Image Segmenter)
- タスク4:姿勢推定(Pose Landmarker)
- タスク5:手のランドマーク検出(Hand Landmarker)
- タスク6:ジェスチャー認識(Gesture Recognizer)
- タスク7:顔ランドマーク検出(Face Landmarker)
- タスク8:顔検出(Face Detector)
- タスク9:画像埋め込み(Image Embedder)
- タスク10:音声分類(Audio Classifier)
- タスク11:テキスト分類(Text Classifier,画像不要)
- タスク12:言語検出(Language Detector,画像不要)
- タスク13:ホリスティック検出(Holistic Landmarker)
- タスク14:手の3D可視化(Hand Landmarker world landmarks)
- タスク15:姿勢の3D可視化(Pose Landmarker world landmarks)
- MediaPipe の用途例
前準備
Python 3.12 のインストール
Pythonのインストールを行い、Pythonのプログラムを実行する環境を整える。扱う環境は、Windows搭載パソコンである。金子研究室では、Python 3.12.10を推奨する。
[Windows での Python 3.12 のインストール手順を見るには、ここをクリック]
Windows での Python 3.12 のインストール
以下のいずれかの方法でPython 3.12をインストールする。Pythonがインストール済みの場合、この手順は不要である。
方法 1:winget によるインストール
【インストールコマンドの実行方法】
管理者権限でコマンドプロンプトを起動する(手順:Windowsキーまたはスタートメニュー → cmd と入力 → 右クリック → 「管理者として実行」)。そして、コマンド全体をコマンドプロンプトにコピー&ペーストする。
--scope machine を指定することで、システム全体(全ユーザー向け)にインストールされる。このオプションの実行には管理者権限が必要である。インストール完了後、コマンドプロンプトを再起動するとPATHが反映される。
REM Python 3.12 をシステム領域にインストール
winget install --id Python.Python.3.12 -e --scope machine --silent --accept-source-agreements --accept-package-agreements --override "/quiet InstallAllUsers=1 PrependPath=1 Include_test=0 Include_pip=1 Include_launcher=1 InstallLauncherAllUsers=1 TargetDir=\"C:\Program Files\Python312\""

REM Python と Scripts を PATH 先頭に追加
powershell -NoProfile -Command "$p='C:\Program Files\Python312'; $s=\"$p\Scripts\"; $c=[Environment]::GetEnvironmentVariable('Path','Machine'); if((Test-Path $p) -and (';'+$c+';' -notlike \"*;$p;*\") -and (';'+$c+';' -notlike \"*;$s;*\")){[Environment]::SetEnvironmentVariable('Path',\"$p;$s;$c\",'Machine')}"
方法 2:インストーラーによるインストール
- Python公式サイト(https://www.python.org/downloads/)にアクセスし、「Download Python 3.x.x」ボタンからWindows用インストーラーをダウンロードする。
- ダウンロードしたインストーラーを実行する。
- 初期画面の下部に表示される「Add python.exe to PATH」にチェックを入れてから「Customize installation」を選択する。このチェックを入れ忘れると、コマンドプロンプトから
pythonコマンドを実行できない。 - 「Install Python 3.xx for all users」にチェックを入れ、「Install」をクリックする。
インストールの確認
コマンドプロンプトで以下を実行する。
python --versionバージョン番号(例:Python 3.12.x)が表示されればインストール成功である。「'python' は、内部コマンドまたは外部コマンドとして認識されていません。」と表示される場合は、インストールが正常に完了していない。
Python の開発環境 Visual Studio Code のインストールと Python 用の設定
Python の開発環境Visual Studio Code(プログラムを編集するソフトウェア。以下、VS Code)を整える。
[Windows での Visual Studio Code のインストールと Python 用の設定手順を見るには、ここをクリック]
Windows での Visual Studio Code のインストールと Python 用の設定手順
1. VS Code と拡張機能のインストール
以下のコマンドにより,既存の VS Code を削除し,全ユーザー共有の設定で再インストールしたうえで,拡張機能(VS Code に機能を追加するソフトウェア)をまとめて導入する.
【インストールコマンドの実行方法】
管理者権限でコマンドプロンプトを起動する(手順:Windows キーまたはスタートメニュー → cmd と入力 → 右クリック → 「管理者として実行」)。そして,コマンド全体をコマンドプロンプトにコピー&ペーストする。
インストールコマンド
REM ============================================================
REM Microsoft Visual Studio Code
REM ============================================================
winget uninstall -e --id Microsoft.VisualStudioCode --silent --disable-interactivity --accept-source-agreements
rmdir /s /q C:\ProgramData\vscode-extensions 2>nul
rmdir /s /q "%APPDATA%\Code" 2>nul
rmdir /s /q "%USERPROFILE%\.vscode" 2>nul
rmdir /s /q "%LOCALAPPDATA%\Microsoft\vscode-update" 2>nul

REM VS Code をシステム領域に新規インストール
winget install --scope machine --id Microsoft.VisualStudioCode -e --silent --accept-source-agreements --accept-package-agreements

REM 全ユーザー共有の拡張機能フォルダ
mkdir C:\ProgramData\vscode-extensions 2>nul
icacls "C:\ProgramData\vscode-extensions" /grant "Everyone:(OI)(CI)M" /T

REM スタートメニューのショートカットを --extensions-dir 付きで再作成
rmdir /s /q "C:\ProgramData\Microsoft\Windows\Start Menu\Programs\Visual Studio Code" 2>nul
del "C:\ProgramData\Microsoft\Windows\Start Menu\Programs\Visual Studio Code.lnk" 2>nul
powershell -NoProfile -Command "$s=New-Object -ComObject WScript.Shell; $lnk=$s.CreateShortcut('C:\ProgramData\Microsoft\Windows\Start Menu\Programs\Visual Studio Code.lnk'); $lnk.TargetPath='C:\Program Files\Microsoft VS Code\Code.exe'; $lnk.Arguments='--extensions-dir \"C:\ProgramData\vscode-extensions\"'; $lnk.Save()"
REM ショートカットの検証
powershell -NoProfile -Command "$s=New-Object -ComObject WScript.Shell; $lnk=$s.CreateShortcut('C:\ProgramData\Microsoft\Windows\Start Menu\Programs\Visual Studio Code.lnk'); Write-Host 'TargetPath:' $lnk.TargetPath; Write-Host 'Arguments:' $lnk.Arguments"

REM ファイル / フォルダ右クリックの「Code で開く」を登録
reg add "HKLM\SOFTWARE\Classes\*\shell\VSCode\command" /ve /d "\"C:\Program Files\Microsoft VS Code\Code.exe\" --extensions-dir \"C:\ProgramData\vscode-extensions\" \"%1\"" /f
reg add "HKLM\SOFTWARE\Classes\Directory\shell\VSCode\command" /ve /d "\"C:\Program Files\Microsoft VS Code\Code.exe\" --extensions-dir \"C:\ProgramData\vscode-extensions\" \"%1\"" /f
reg add "HKLM\SOFTWARE\Classes\Directory\Background\shell\VSCode\command" /ve /d "\"C:\Program Files\Microsoft VS Code\Code.exe\" --extensions-dir \"C:\ProgramData\vscode-extensions\" \"%V\"" /f

REM --extensions-dir 付きで起動する code.cmd ラッパを作成
REM (%* を echo で書くと対話的 cmd で失われるため、PowerShell で [char]37+'*' を書き出す)
powershell -NoProfile -Command "$pct=[char]37; $q=[char]34; $c='@echo off'+[char]13+[char]10+$q+'C:\Program Files\Microsoft VS Code\bin\code.cmd'+$q+' --extensions-dir '+$q+'C:\ProgramData\vscode-extensions'+$q+' '+$pct+'*'+[char]13+[char]10; [IO.File]::WriteAllText('C:\ProgramData\vscode-extensions\vscode.cmd',$c,[Text.Encoding]::ASCII)"

REM 拡張機能のインストール
set "CODE=C:\Program Files\Microsoft VS Code\bin\code.cmd"
"%CODE%" --extensions-dir "C:\ProgramData\vscode-extensions" --uninstall-extension GitHub.copilot
"%CODE%" --extensions-dir "C:\ProgramData\vscode-extensions" --uninstall-extension GitHub.copilot-chat
"%CODE%" --extensions-dir "C:\ProgramData\vscode-extensions" --install-extension ms-python.python
"%CODE%" --extensions-dir "C:\ProgramData\vscode-extensions" --install-extension ms-python.vscode-pylance
"%CODE%" --extensions-dir "C:\ProgramData\vscode-extensions" --install-extension ms-python.debugpy
"%CODE%" --extensions-dir "C:\ProgramData\vscode-extensions" --install-extension MS-CEINTL.vscode-language-pack-ja
"%CODE%" --extensions-dir "C:\ProgramData\vscode-extensions" --install-extension saoudrizwan.claude-dev
"%CODE%" --extensions-dir "C:\ProgramData\vscode-extensions" --install-extension rust-lang.rust-analyzer
"%CODE%" --extensions-dir "C:\ProgramData\vscode-extensions" --install-extension tamasfe.even-better-toml
"%CODE%" --extensions-dir "C:\ProgramData\vscode-extensions" --install-extension anthropic.claude-code
"%CODE%" --extensions-dir "C:\ProgramData\vscode-extensions" --install-extension almenon.arepl
"%CODE%" --extensions-dir "C:\ProgramData\vscode-extensions" --list-extensions --show-versions
echo === セットアップ完了 ===
2. Python インタプリタの選択
同一マシンに複数の Python がインストールされている場合,VS Code で使用する Python 本体(インタプリタ:Python プログラムを解釈・実行するソフトウェア)を選択する必要がある.
- コマンドパレット(コマンド名で機能を呼び出す VS Code の入力欄)を開く(
Ctrl+Shift+P) Python: Select Interpreterと入力する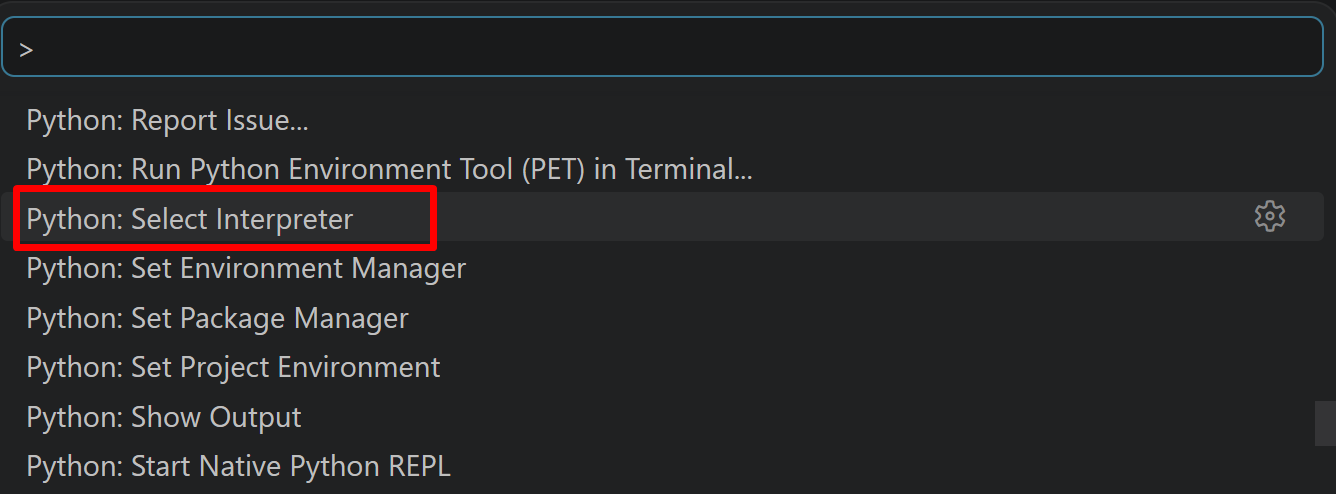
- 表示される一覧から,使用する Python(例:
C:\Program Files\Python312\python.exe)を選択する.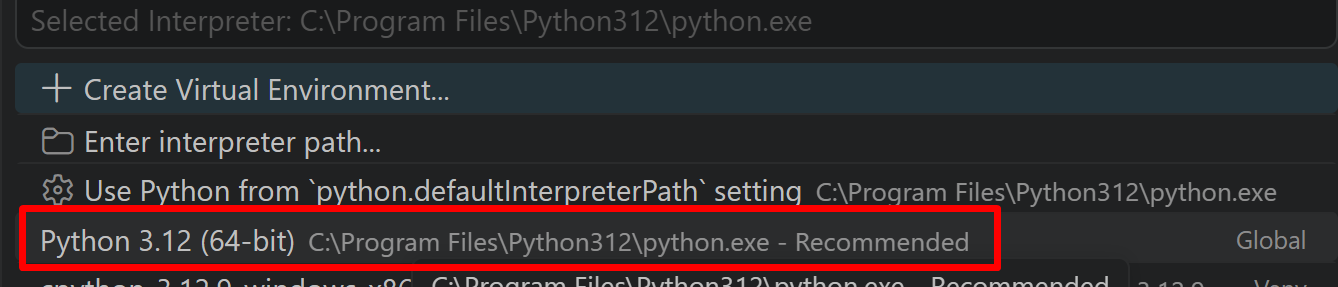
Python プログラム実行手順
[Windows での Python プログラム実行手順を見るには、ここをクリック]
Windows での Python 実行手順(Visual Studio Codeを使用)
プログラムファイルの作成と保存
- 左サイドバーの「エクスプローラー」アイコン(
Ctrl+Shift+E)をクリックする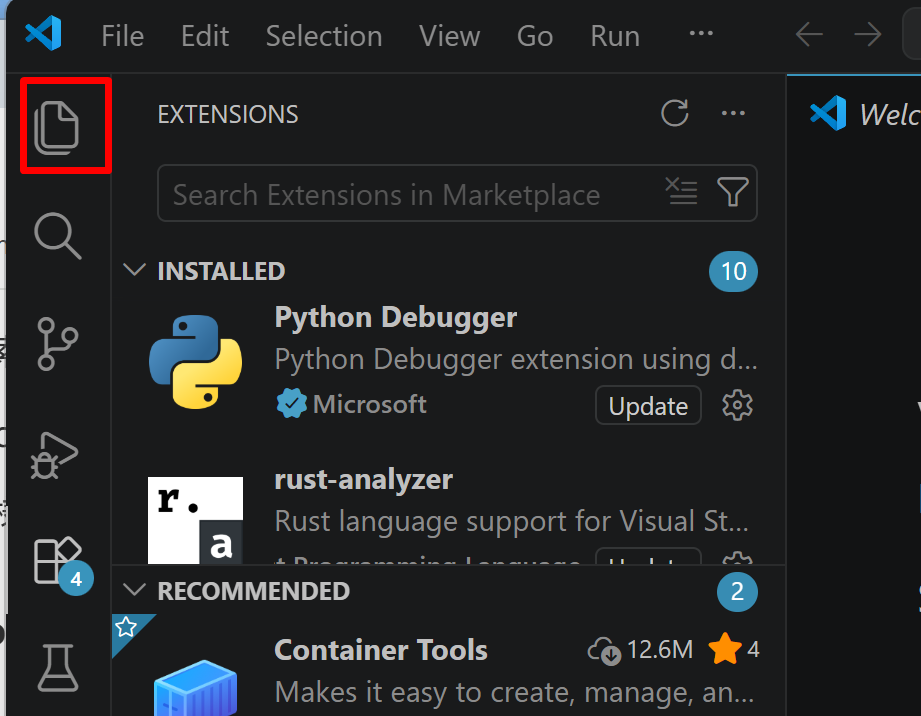
- 「NO FOLDER OPENED」(作業対象フォルダが未選択の状態)と表示される場合は,「Open Folder」をクリックし,プログラムを保存するフォルダを選択する
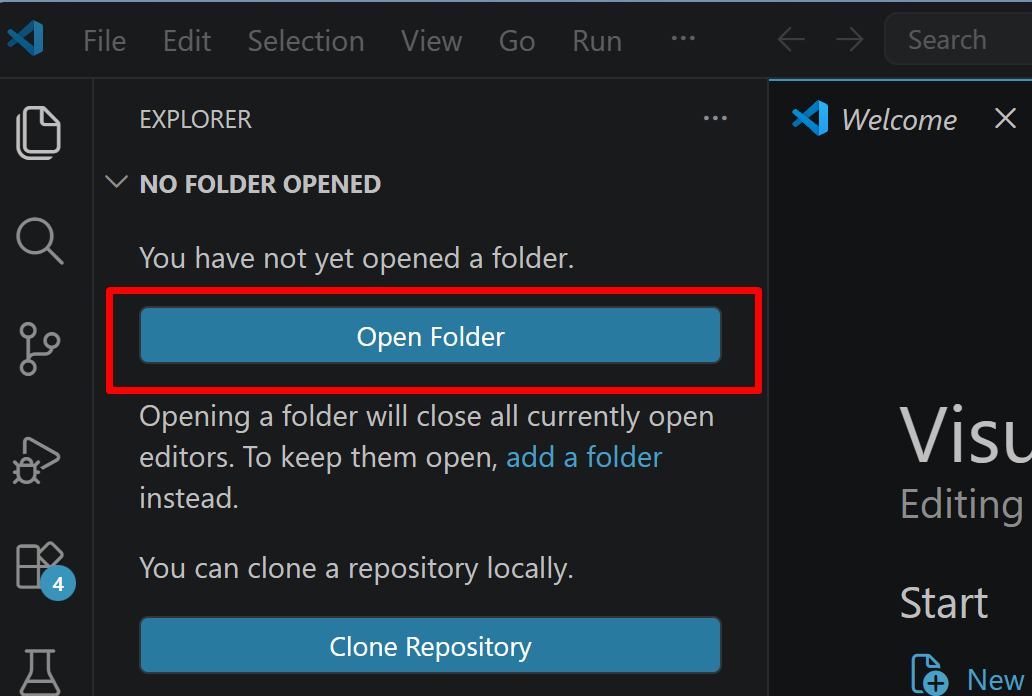
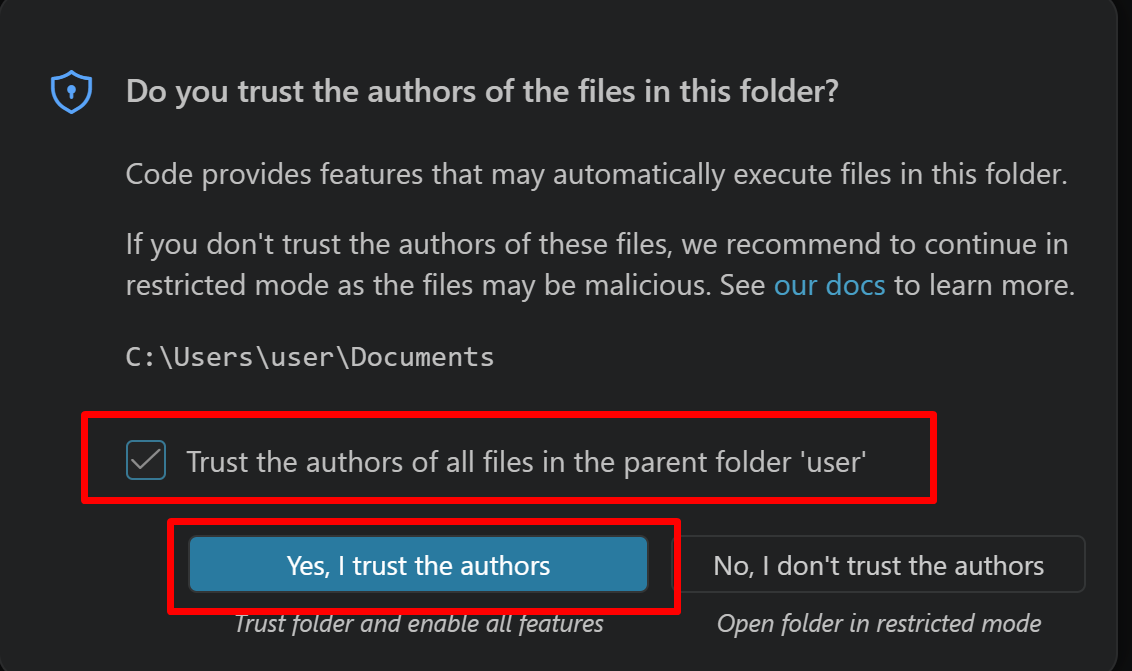
続いて「フォルダを信用するか」を確認する画面(フォルダ内のコードを実行してよいか確認する VS Code の仕組み)が表示されるので,チェックして Yes を選択する
- フォルダ名の右側に表示される「新しいファイル」アイコンをクリックする
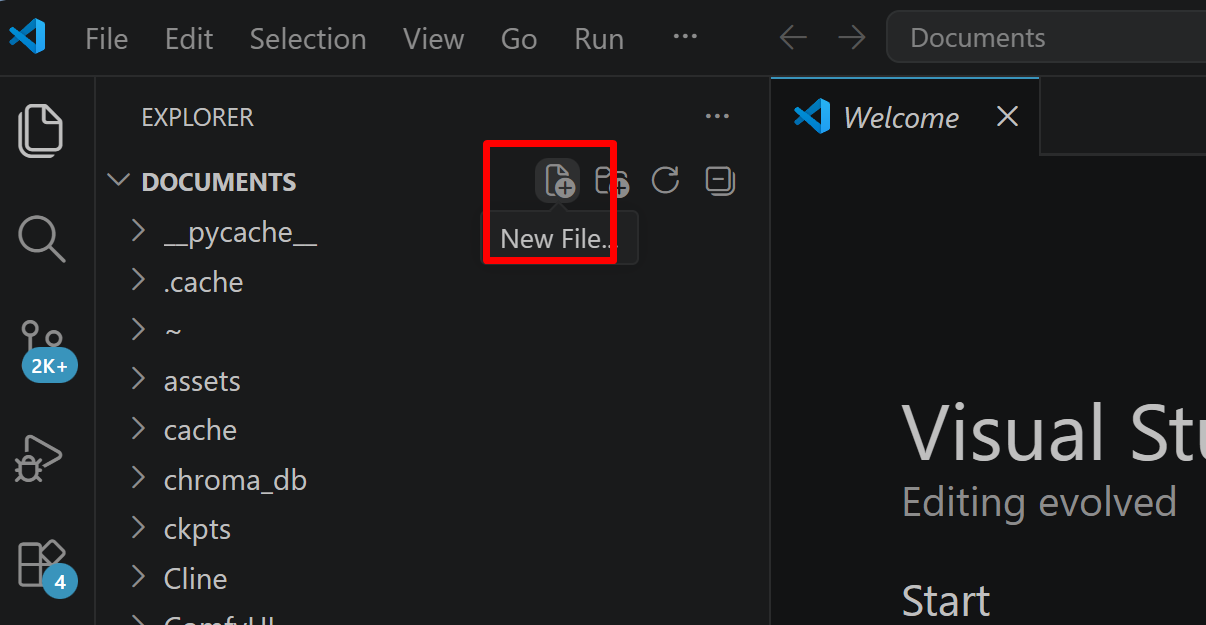
- ファイル名(例:
aitask.py.ファイル名は何でも良い)を入力しEnterを押す.拡張子は.py(Python ファイルを示す拡張子)とする
- 実行したいコードを選択し,
Ctrl+Cでコピーする.VS Code のエディタ領域にCtrl+Vで貼り付ける Ctrl+Sで保存する
プログラムの実行
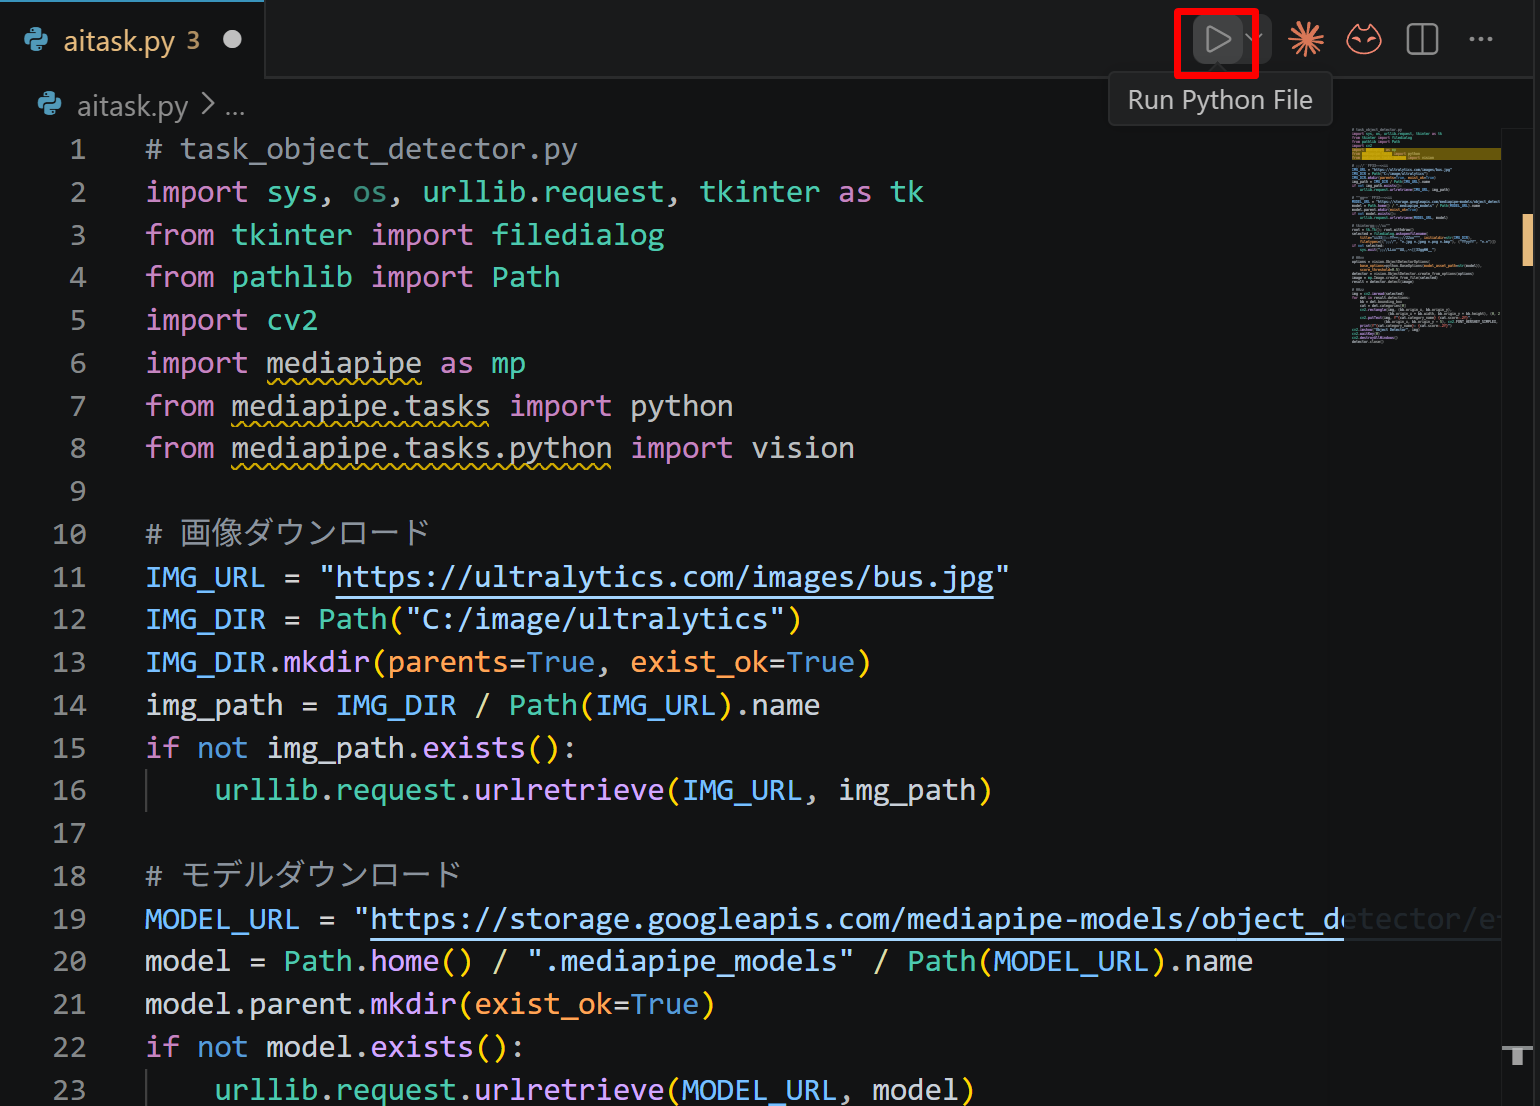
- エディタ右上の三角形「▷」アイコン(Run Python File:現在開いている Python ファイルを実行するボタン)をクリックする.または,エディタ上で右クリックし「ターミナルで Python ファイルを実行」を選択する
- VS Code 下部のターミナル(コマンドの入出力を表示する画面)に,実行結果(
print関数の出力等)が表示される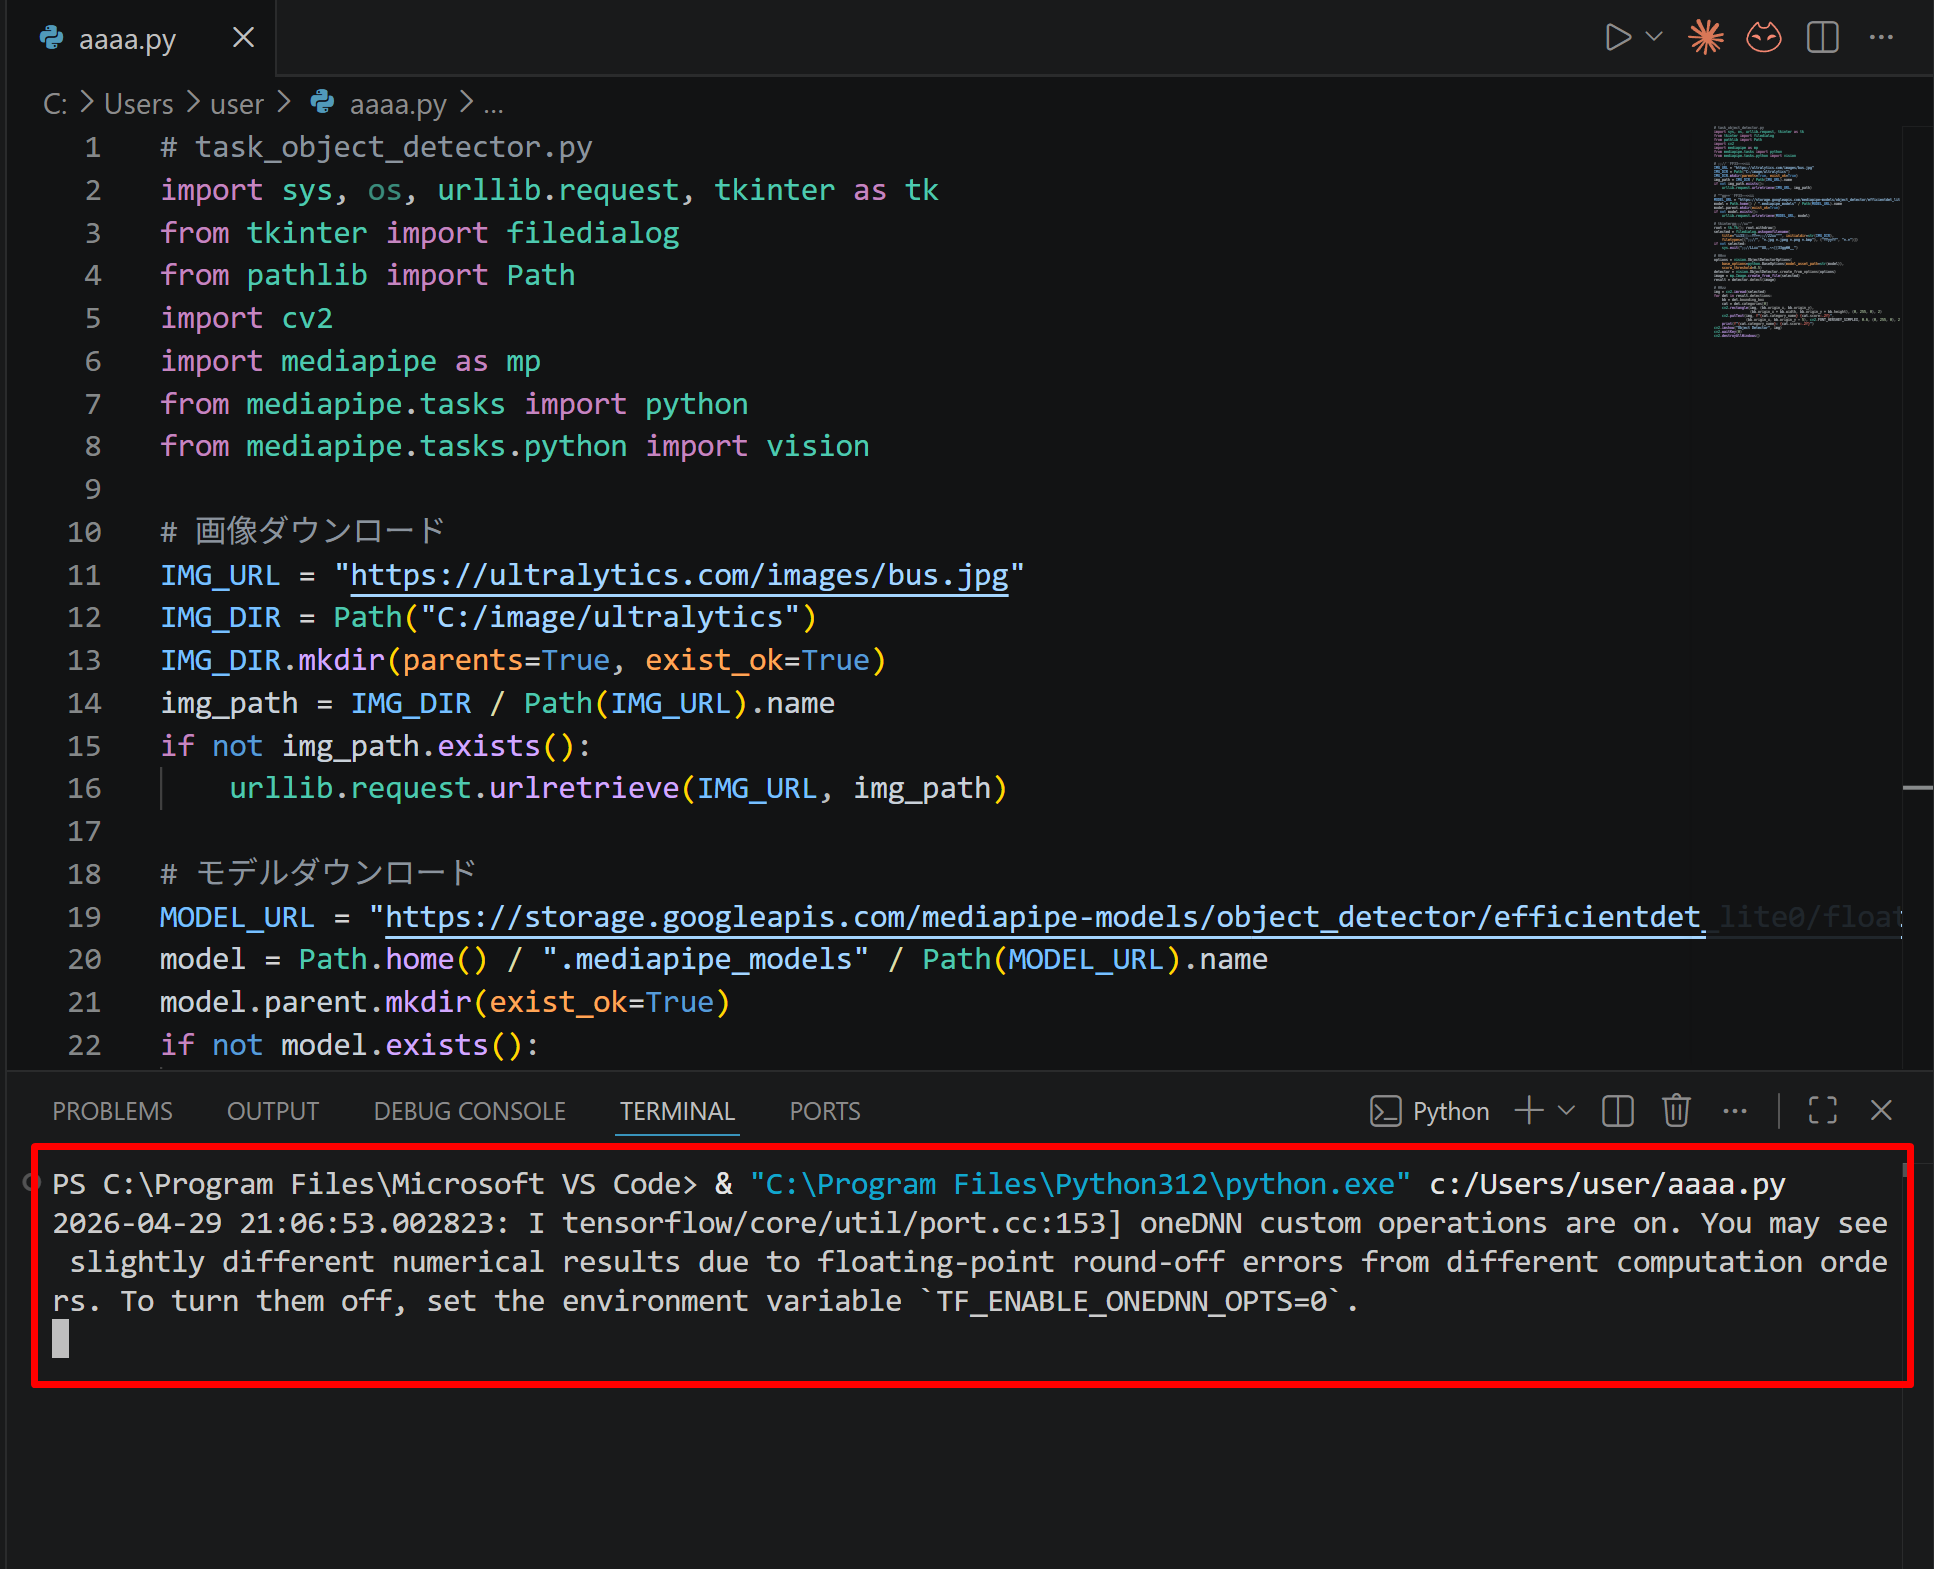
- tkinter(Python 標準の GUI ライブラリ)のファイル選択ダイアログを使うプログラムを実行した場合は,ダイアログが開くので対象画像を選択する
- VS Code 下部のターミナルで実行結果を確認する.OpenCV ウィンドウ(OpenCV が画像を表示するために開く専用ウィンドウ)が開いた場合はそちらも確認する.OpenCV ウィンドウは,マウスクリックでウィンドウをアクティブ(操作対象の状態)にしてからキーを押すと終了する

Windows での MediaPipe のインストールと動作確認
管理者権限でコマンドプロンプトを起動する(手順:Windows キーまたはスタートメニュー → cmd と入力 → 右クリック → 「管理者として実行」)
そして,以下のコマンドを実行し,MediaPipe および関連ライブラリをインストールしたうえで,動作確認を行う.
REM MediaPipe 標準機能のインストール
pip uninstall -y opencv-python-headless opencv-contrib-python-headless opencv-python
pip install --no-user --force-reinstall opencv-contrib-python
pip install -U --no-user mediapipe onnxruntime-gpu opencv-contrib-python protobuf==6.33.6
python -c "import mediapipe as mp; print('mediapipe:', mp.__version__)"
python -c "import onnxruntime as ort; print('providers:', ort.get_available_providers())"
python -c "import cv2; print('opencv:', cv2.__version__)"
REM
REM MediaPipe Tasks API 動作確認
python -c "from mediapipe.tasks import python as mp_py; from mediapipe.tasks.python import vision; print('tasks API OK')"
Pythonプログラムの共通構造
すべてのPythonプログラムの構造は,以下のとおり共通化している.
- 処理対象ファイル(画像・音声)の自動ダウンロード(存在チェックを含む).保存先は
C:\image\配下のサブフォルダ(opencv,ultralytics,mediapipe,audioset,pixabay)である.これらのファイルを使用できる - 学習済みモデル(AIモデルファイル)の自動ダウンロード(存在チェックを含む).保存先はスクリプトと同じディレクトリである
- 画像・音声ファイルの選択:tkinter filedialog(Python標準GUIライブラリtkinterのファイル選択ダイアログ)を用いる.テキスト系タスクでは simpledialog による文字列入力を用いる
- 結果表示:OpenCV ウィンドウ(
cv2.imshow)を用いる.matplotlib またはprintによる表示も用いる
処理対象ファイルおよびモデルは,初回実行時にコード内で自動ダウンロードする.ファイル選択ダイアログにより,ダウンロード済みファイル以外の任意のローカルファイルも処理対象とできる.
下記の15プログラムの実行時の留意事項
- 初回実行時はインターネット接続が必要である(モデルおよびサンプル画像のダウンロードのため)
- 初回実行時は処理開始までに数十秒から数分程度かかる場合がある(モデルおよびサンプル画像のダウンロードのため)
- 学習済みモデルの保存先はスクリプトと同じディレクトリ,処理対象ファイルの保存先は
C:\image\配下のサブフォルダである(2回目以降の実行ではダウンロードを省略する) - OpenCV ウィンドウが画面奥に隠れる場合は,タスクバーから前面に出す
- tkinter ダイアログが応答しなくなった場合は,VSCode下部のターミナルで
Ctrl+C(実行中の処理を中断するキー操作)を押して中断する - タスク14およびタスク15ではmatplotlibを使用する.未インストール環境では
pip install --no-user matplotlibを実行する
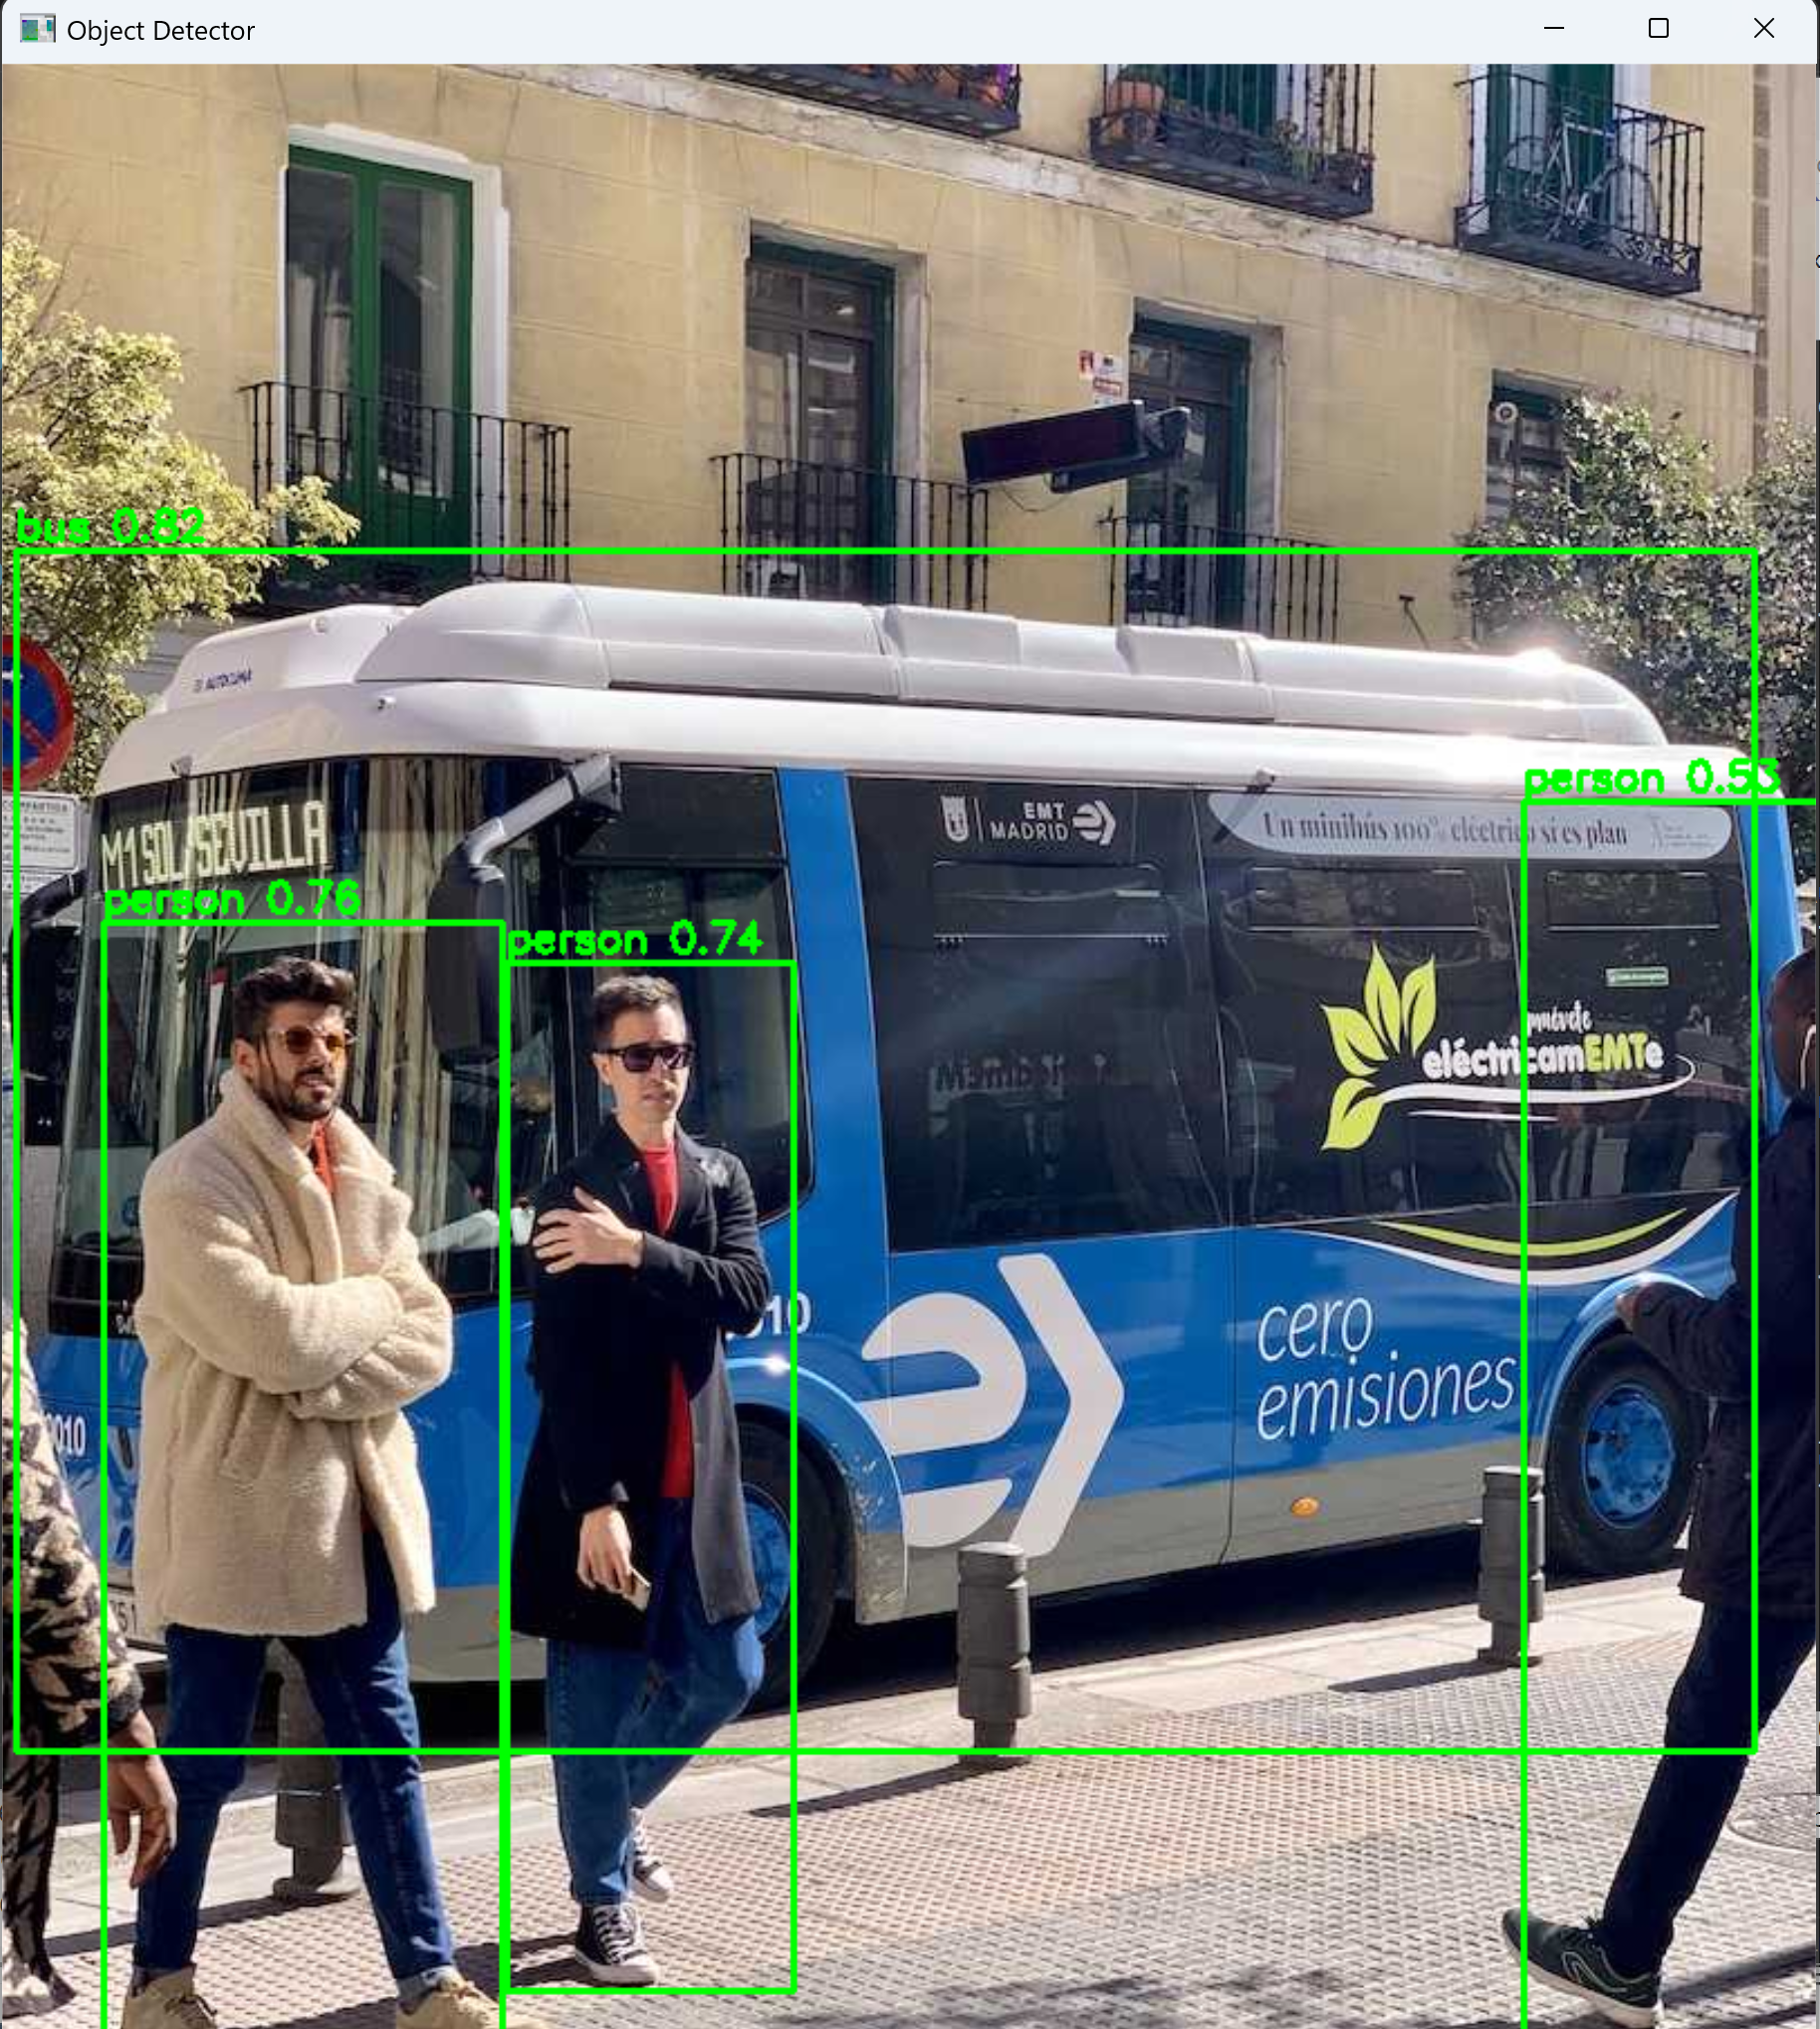
【MediaPipe版】タスク1:物体検出(Object Detector)
機能説明:画像内の物体をバウンディングボックス(物体を囲む矩形領域)で検出し,COCOデータセット(Microsoftが公開した画像認識用の代表的データセット)の80クラス(人,車,犬,椅子等)から分類する.EfficientDet-Lite2(448×448入力,BiFPN特徴ネットワーク採用の物体検出モデル)をベースモデル(推論の基盤となる学習済みモデル)とする.防犯カメラの物体カウント,写真整理の自動タグ付け,在庫管理等に利用される.
- 既知の限界:COCO 80クラスのみが検出対象であり,クラス外(食品,医療器具,工業部品等)は検出されない.小物体や遮蔽物体の検出精度はモデルの表現能力に制約される.
- 設定での精度向上:score_threshold(検出結果として採用する最低スコアの閾値)を下げると見逃しが減り,上げると誤検出が減る.category_allowlist(検出対象とするクラスの限定リスト)で対象クラスを絞り込むと誤検出を抑制でき,max_results(出力する検出結果の最大件数)で検出数の上限を制御できる.
# task_object_detector
import os, urllib.request
from pathlib import Path
import cv2
import mediapipe as mp
from mediapipe.tasks import python
from mediapipe.tasks.python import vision
# ==== ヘルパ ====
def get_script_dir():
return Path(os.path.dirname(os.path.abspath(__file__)))
def get_image_dir(subdir):
d = Path("C:/image") / subdir
d.mkdir(parents=True, exist_ok=True)
return d
def select_file(title, initialdir, filetypes):
import tkinter as tk
from tkinter import filedialog
root = tk.Tk(); root.withdraw()
path = filedialog.askopenfilename(title=title, initialdir=str(initialdir), filetypes=filetypes)
root.destroy()
return path
def show_image(window_name, img):
cv2.imshow(window_name, img)
cv2.waitKey(0)
cv2.destroyAllWindows()
# ================
# User-Agent設定(一部サーバのアクセス制限回避のため)
opener = urllib.request.build_opener()
opener.addheaders = [("User-Agent", "Mozilla/5.0")]
urllib.request.install_opener(opener)
# 画像ダウンロード
IMG_URL = "https://ultralytics.com/images/bus.jpg"
IMG_DIR = get_image_dir("ultralytics")
img_path = IMG_DIR / Path(IMG_URL).name
if not img_path.exists():
urllib.request.urlretrieve(IMG_URL, img_path)
# モデルダウンロード(スクリプトと同じディレクトリに保存)
SCRIPT_DIR = get_script_dir()
MODEL_URL = "https://storage.googleapis.com/mediapipe-models/object_detector/efficientdet_lite2/float16/latest/efficientdet_lite2.tflite"
model = SCRIPT_DIR / Path(MODEL_URL).name
if not model.exists():
urllib.request.urlretrieve(MODEL_URL, model)
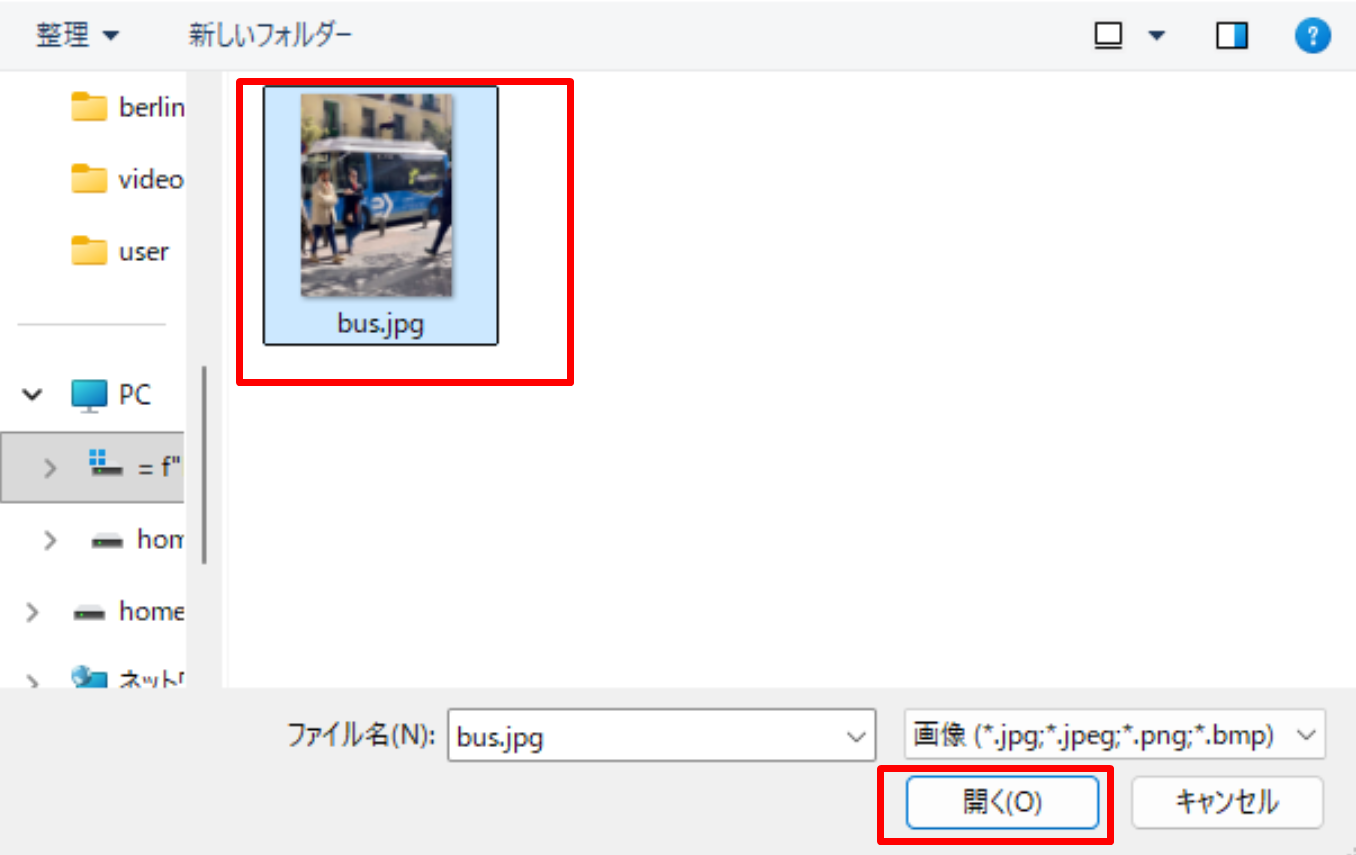
# 画像選択
selected = select_file(
title="物体検出する画像を選択", initialdir=IMG_DIR,
filetypes=[("画像", "*.jpg *.jpeg *.png *.bmp"), ("すべて", "*.*")])
# 推論
options = vision.ObjectDetectorOptions(
base_options=python.BaseOptions(model_asset_path=str(model)),
score_threshold=0.5)
detector = vision.ObjectDetector.create_from_options(options)
image = mp.Image.create_from_file(selected)
result = detector.detect(image)
# 表示
img = cv2.imread(selected)
for det in result.detections:
bb = det.bounding_box
cat = det.categories[0]
cv2.rectangle(img, (bb.origin_x, bb.origin_y),
(bb.origin_x + bb.width, bb.origin_y + bb.height), (0, 255, 0), 2)
cv2.putText(img, f"{cat.category_name} {cat.score:.2f}",
(bb.origin_x, bb.origin_y - 5), cv2.FONT_HERSHEY_SIMPLEX, 0.6, (0, 255, 0), 2)
print(f"{cat.category_name}: {cat.score:.2f}")
show_image("Object Detector", img)
detector.close()

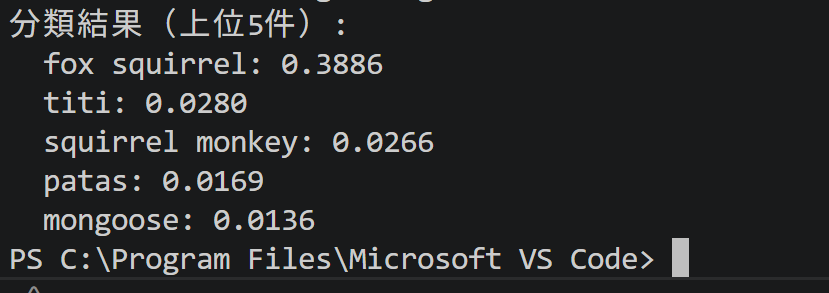
【MediaPipe版】タスク2:画像分類(Image Classifier)
機能説明:画像全体に対して単一の分類ラベルを推定する.EfficientNet-Lite2(EfficientNetアーキテクチャによる画像分類モデル)をベースモデルとし,ImageNet(約120万枚・1000クラスの画像分類用大規模データセット)の1000クラスに対応する.画像検索の自動タグ付け,コンテンツモデレーション(不適切コンテンツの選別),アルバム整理等に利用される.
- 既知の限界:ImageNet 1000クラスに限定され,画像全体に対する単一ラベル推定のため複数物体の同時分類はできない.被写体が小さい画像や複数被写体の画像では精度が頭打ちとなる.
- 設定での精度向上:max_resultsを増やすと上位候補の観察により判断材料が増える.score_thresholdで低信頼度候補を除外し,category_allowlist/category_denylist(除外対象クラスのリスト)で対象クラスを限定すれば誤分類が減少する.
# task_image_classifier
import os, urllib.request
from pathlib import Path
import mediapipe as mp
from mediapipe.tasks import python
from mediapipe.tasks.python import vision

# ==== ヘルパ ====
def get_script_dir():
    return Path(os.path.dirname(os.path.abspath(__file__)))

def get_image_dir(subdir):
    d = Path("C:/image") / subdir
    d.mkdir(parents=True, exist_ok=True)
    return d

def select_file(title, initialdir, filetypes):
    import tkinter as tk
    from tkinter import filedialog
    root = tk.Tk(); root.withdraw()
    path = filedialog.askopenfilename(title=title, initialdir=str(initialdir), filetypes=filetypes)
    root.destroy()
    return path
# ================

# User-Agent設定
opener = urllib.request.build_opener()
opener.addheaders = [("User-Agent", "Mozilla/5.0")]
urllib.request.install_opener(opener)

# 画像ダウンロード
IMG_URL = "https://raw.githubusercontent.com/opencv/opencv/4.x/samples/data/squirrel_cls.jpg"
IMG_DIR = get_image_dir("opencv")
img_path = IMG_DIR / Path(IMG_URL).name
if not img_path.exists():
    urllib.request.urlretrieve(IMG_URL, img_path)

# モデルダウンロード(スクリプトと同じディレクトリに保存)
SCRIPT_DIR = get_script_dir()
MODEL_URL = "https://storage.googleapis.com/mediapipe-models/image_classifier/efficientnet_lite2/float32/latest/efficientnet_lite2.tflite"
model = SCRIPT_DIR / Path(MODEL_URL).name
if not model.exists():
    urllib.request.urlretrieve(MODEL_URL, model)

# 画像選択
selected = select_file(
    title="分類する画像を選択", initialdir=IMG_DIR,
    filetypes=[("画像", "*.jpg *.jpeg *.png *.bmp"), ("すべて", "*.*")])

# 推論
options = vision.ImageClassifierOptions(
    base_options=python.BaseOptions(model_asset_path=str(model)), max_results=5)
classifier = vision.ImageClassifier.create_from_options(options)
result = classifier.classify(mp.Image.create_from_file(selected))

# 表示
print("分類結果(上位5件):")
for cat in result.classifications[0].categories:
    print(f"  {cat.category_name}: {cat.score:.4f}")
classifier.close()
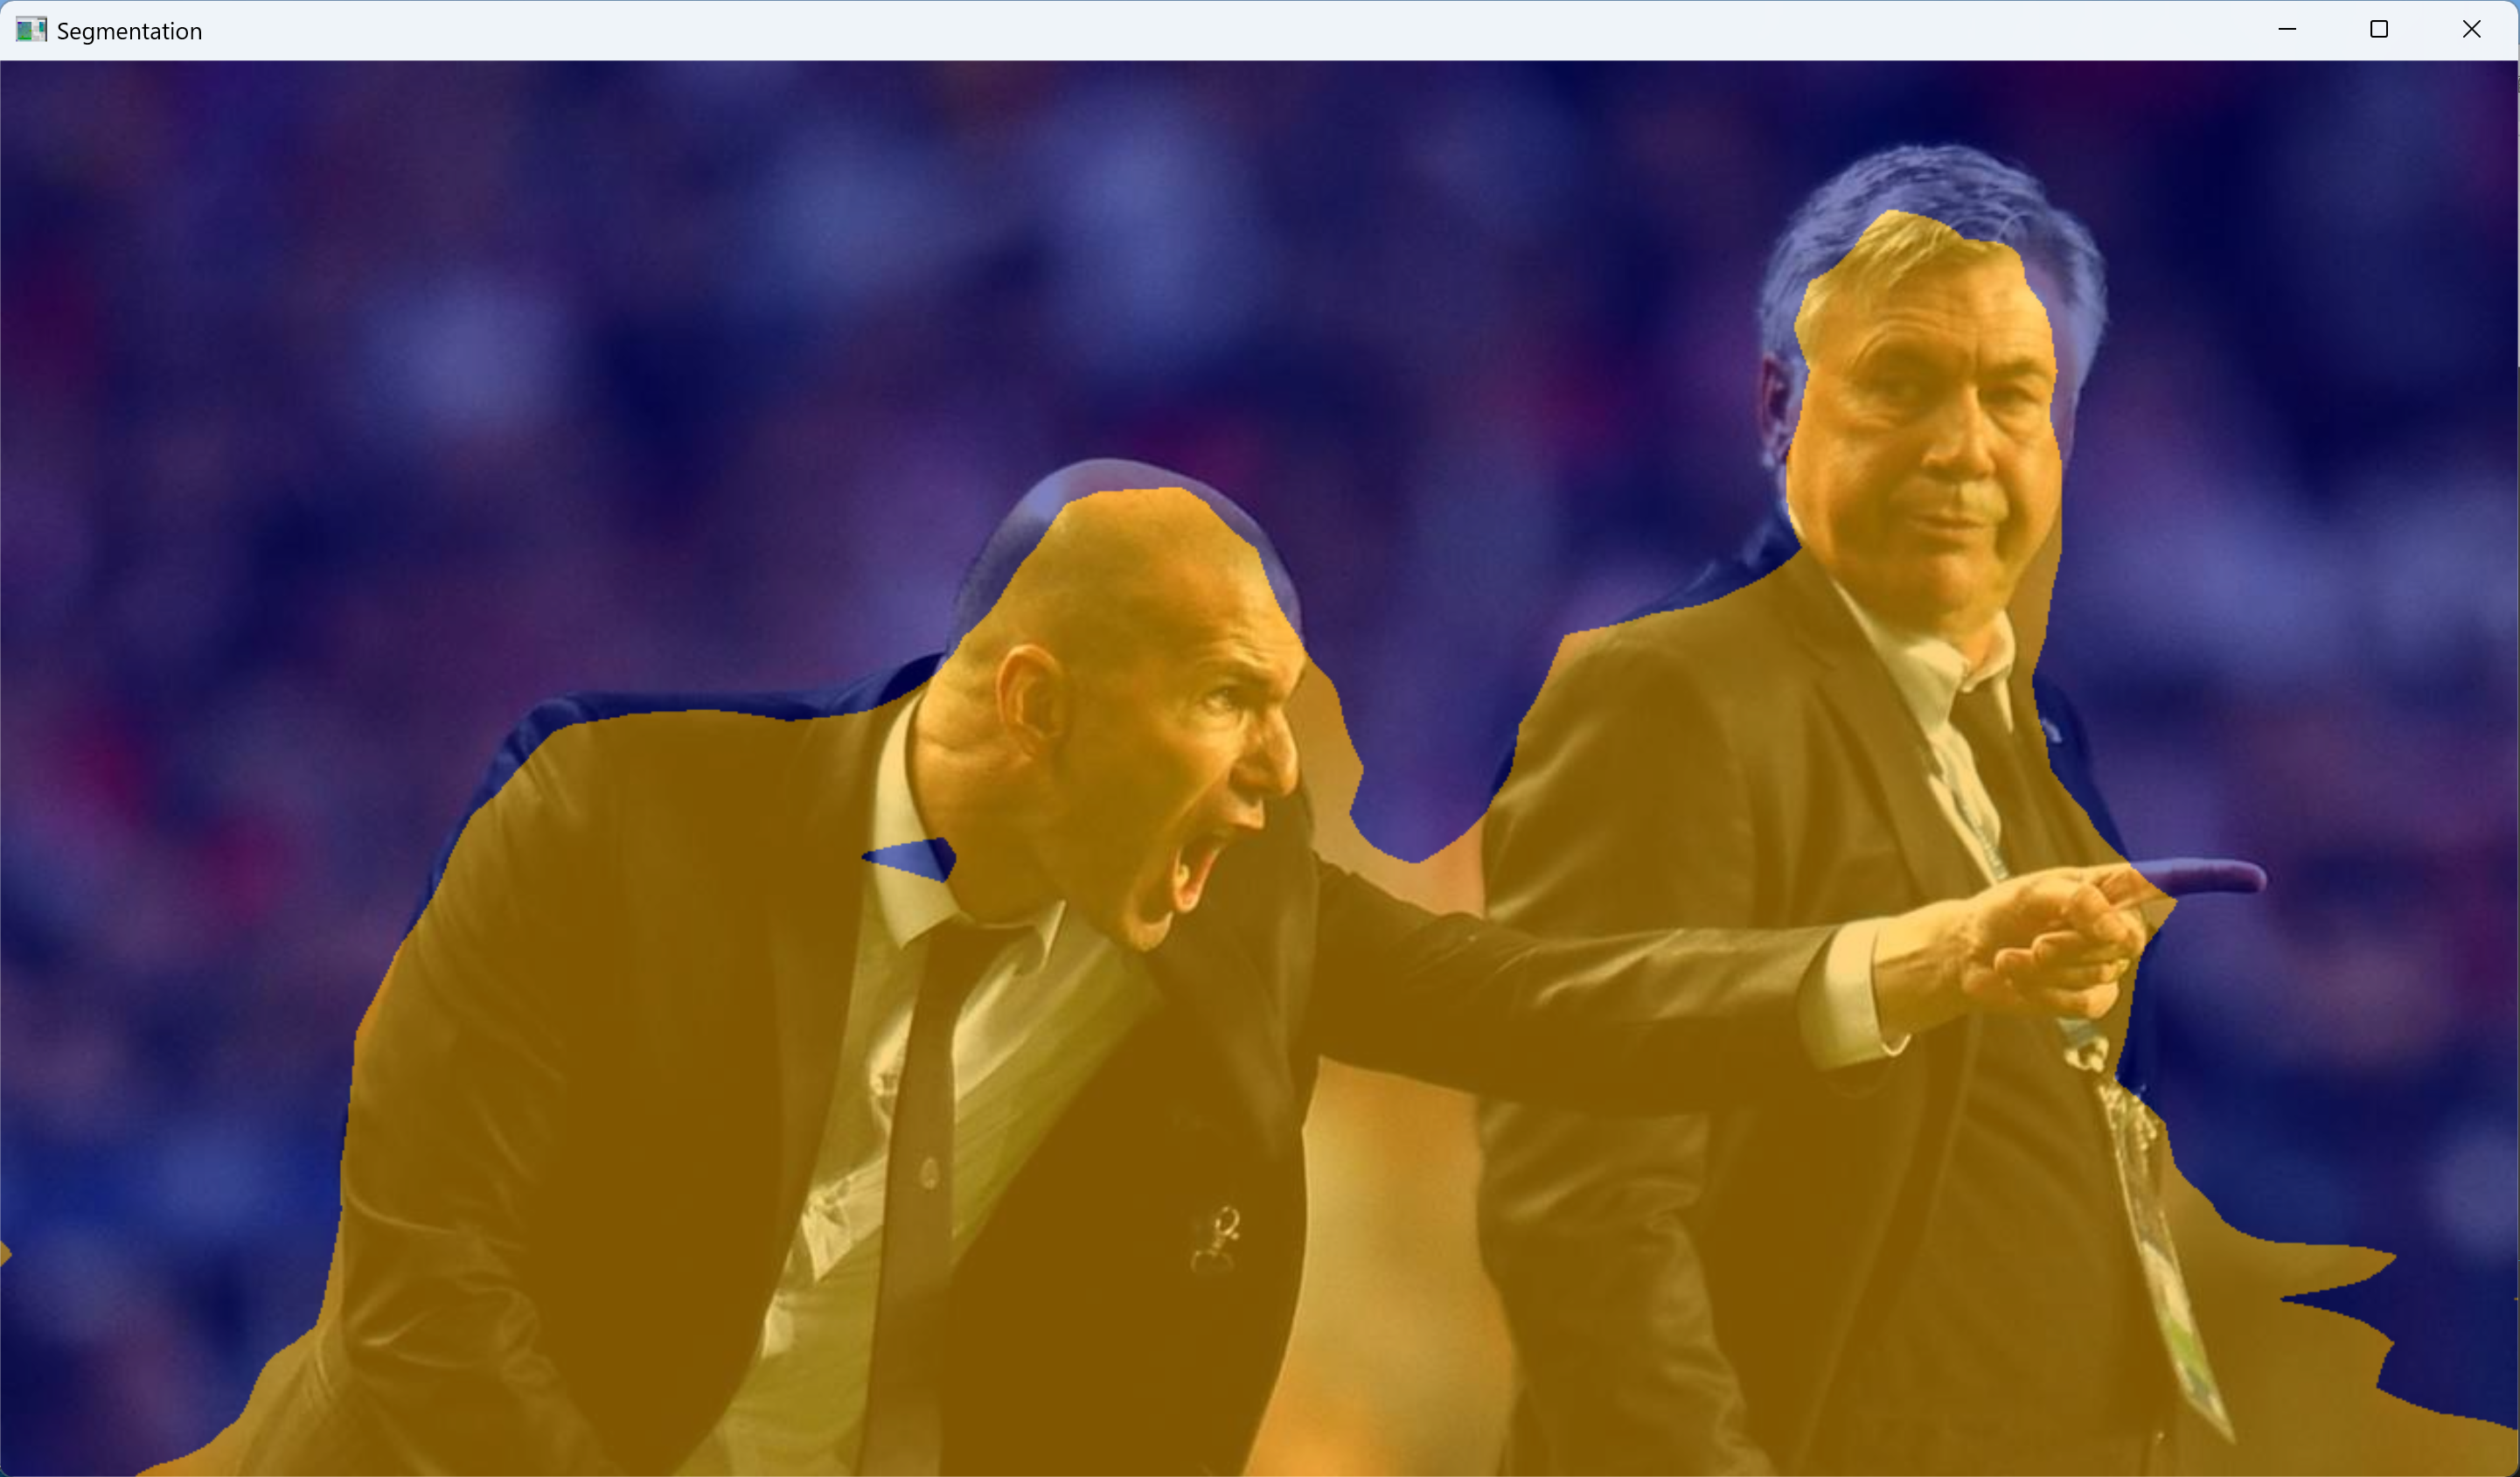
【MediaPipe版】タスク3:画像セグメンテーション(Image Segmenter)
機能説明:画像を画素単位で領域分割する(各画素がどのクラスに属するかを判定する処理).DeepLab V3(Googleが開発したセマンティックセグメンテーション用モデル)をベースモデルとし,Pascal VOC 2012(物体認識評価のための代表的データセット)の21クラス(背景,人,車,犬,猫,自転車,椅子,植木鉢等)に対応する.背景除去,写真合成,自動運転の領域認識等に利用される.本タスクでは output_confidence_masks を有効化し,各クラスの確信度マスクを参照することで,境界の不確実領域を識別できる構成とする.
- 既知の限界:Pascal VOC 2012の21クラスのみに対応し,果物,料理,建築物等は背景として扱われる.細部の輪郭精度はDeepLab V3の出力解像度に依存し,細い物体や複雑な形状は崩れやすい.
- 設定での精度向上:output_confidence_masks(各クラスの確信度マスクを出力するオプション)の確信度閾値を調整すれば境界の不確実領域を除外できる.対象物が画像中で十分に大きく写るよう前処理(リサイズ,トリミング)を行うと境界精度が向上する.
# task_image_segmenter
import os, urllib.request
from pathlib import Path
import cv2, numpy as np
import mediapipe as mp
from mediapipe.tasks import python
from mediapipe.tasks.python import vision

# ==== ヘルパ ====
def get_script_dir():
    return Path(os.path.dirname(os.path.abspath(__file__)))

def get_image_dir(subdir):
    d = Path("C:/image") / subdir
    d.mkdir(parents=True, exist_ok=True)
    return d

def select_file(title, initialdir, filetypes):
    import tkinter as tk
    from tkinter import filedialog
    root = tk.Tk(); root.withdraw()
    path = filedialog.askopenfilename(title=title, initialdir=str(initialdir), filetypes=filetypes)
    root.destroy()
    return path

def show_image(window_name, img):
    cv2.imshow(window_name, img)
    cv2.waitKey(0)
    cv2.destroyAllWindows()
# ================

# User-Agent設定
opener = urllib.request.build_opener()
opener.addheaders = [("User-Agent", "Mozilla/5.0")]
urllib.request.install_opener(opener)

# 画像ダウンロード
IMG_URL = "https://ultralytics.com/images/zidane.jpg"  # 'person'クラスで認識される
IMG_DIR = get_image_dir("ultralytics")
img_path = IMG_DIR / Path(IMG_URL).name
if not img_path.exists():
    urllib.request.urlretrieve(IMG_URL, img_path)

# モデルダウンロード(スクリプトと同じディレクトリに保存)
SCRIPT_DIR = get_script_dir()
MODEL_URL = "https://storage.googleapis.com/mediapipe-models/image_segmenter/deeplab_v3/float32/latest/deeplab_v3.tflite"
model = SCRIPT_DIR / Path(MODEL_URL).name
if not model.exists():
    urllib.request.urlretrieve(MODEL_URL, model)

# 画像選択
selected = select_file(
    title="セグメンテーションする画像を選択", initialdir=IMG_DIR,
    filetypes=[("画像", "*.jpg *.jpeg *.png *.bmp"), ("すべて", "*.*")])

# 推論(カテゴリマスクと確信度マスクの両方を出力)
options = vision.ImageSegmenterOptions(
    base_options=python.BaseOptions(model_asset_path=str(model)),
    output_category_mask=True,
    output_confidence_masks=True)
segmenter = vision.ImageSegmenter.create_from_options(options)
result = segmenter.segment(mp.Image.create_from_file(selected))

# 表示
mask = result.category_mask.numpy_view()
print(f"検出クラス: {np.unique(mask)}")
# 各クラスの確信度マスクから低確信度領域を背景化
confidence_threshold = 0.5
refined = mask.copy()
for cls in np.unique(mask):
    if cls == 0:
        continue
    conf = result.confidence_masks[cls].numpy_view()
    refined[(mask == cls) & (conf < confidence_threshold)] = 0
colored = cv2.applyColorMap((refined * 12 % 255).astype(np.uint8), cv2.COLORMAP_JET)
img = cv2.resize(cv2.imread(selected), (colored.shape[1], colored.shape[0]))
overlay = cv2.addWeighted(img, 0.5, colored, 0.5, 0)
show_image("Image Segmenter", overlay)
segmenter.close()
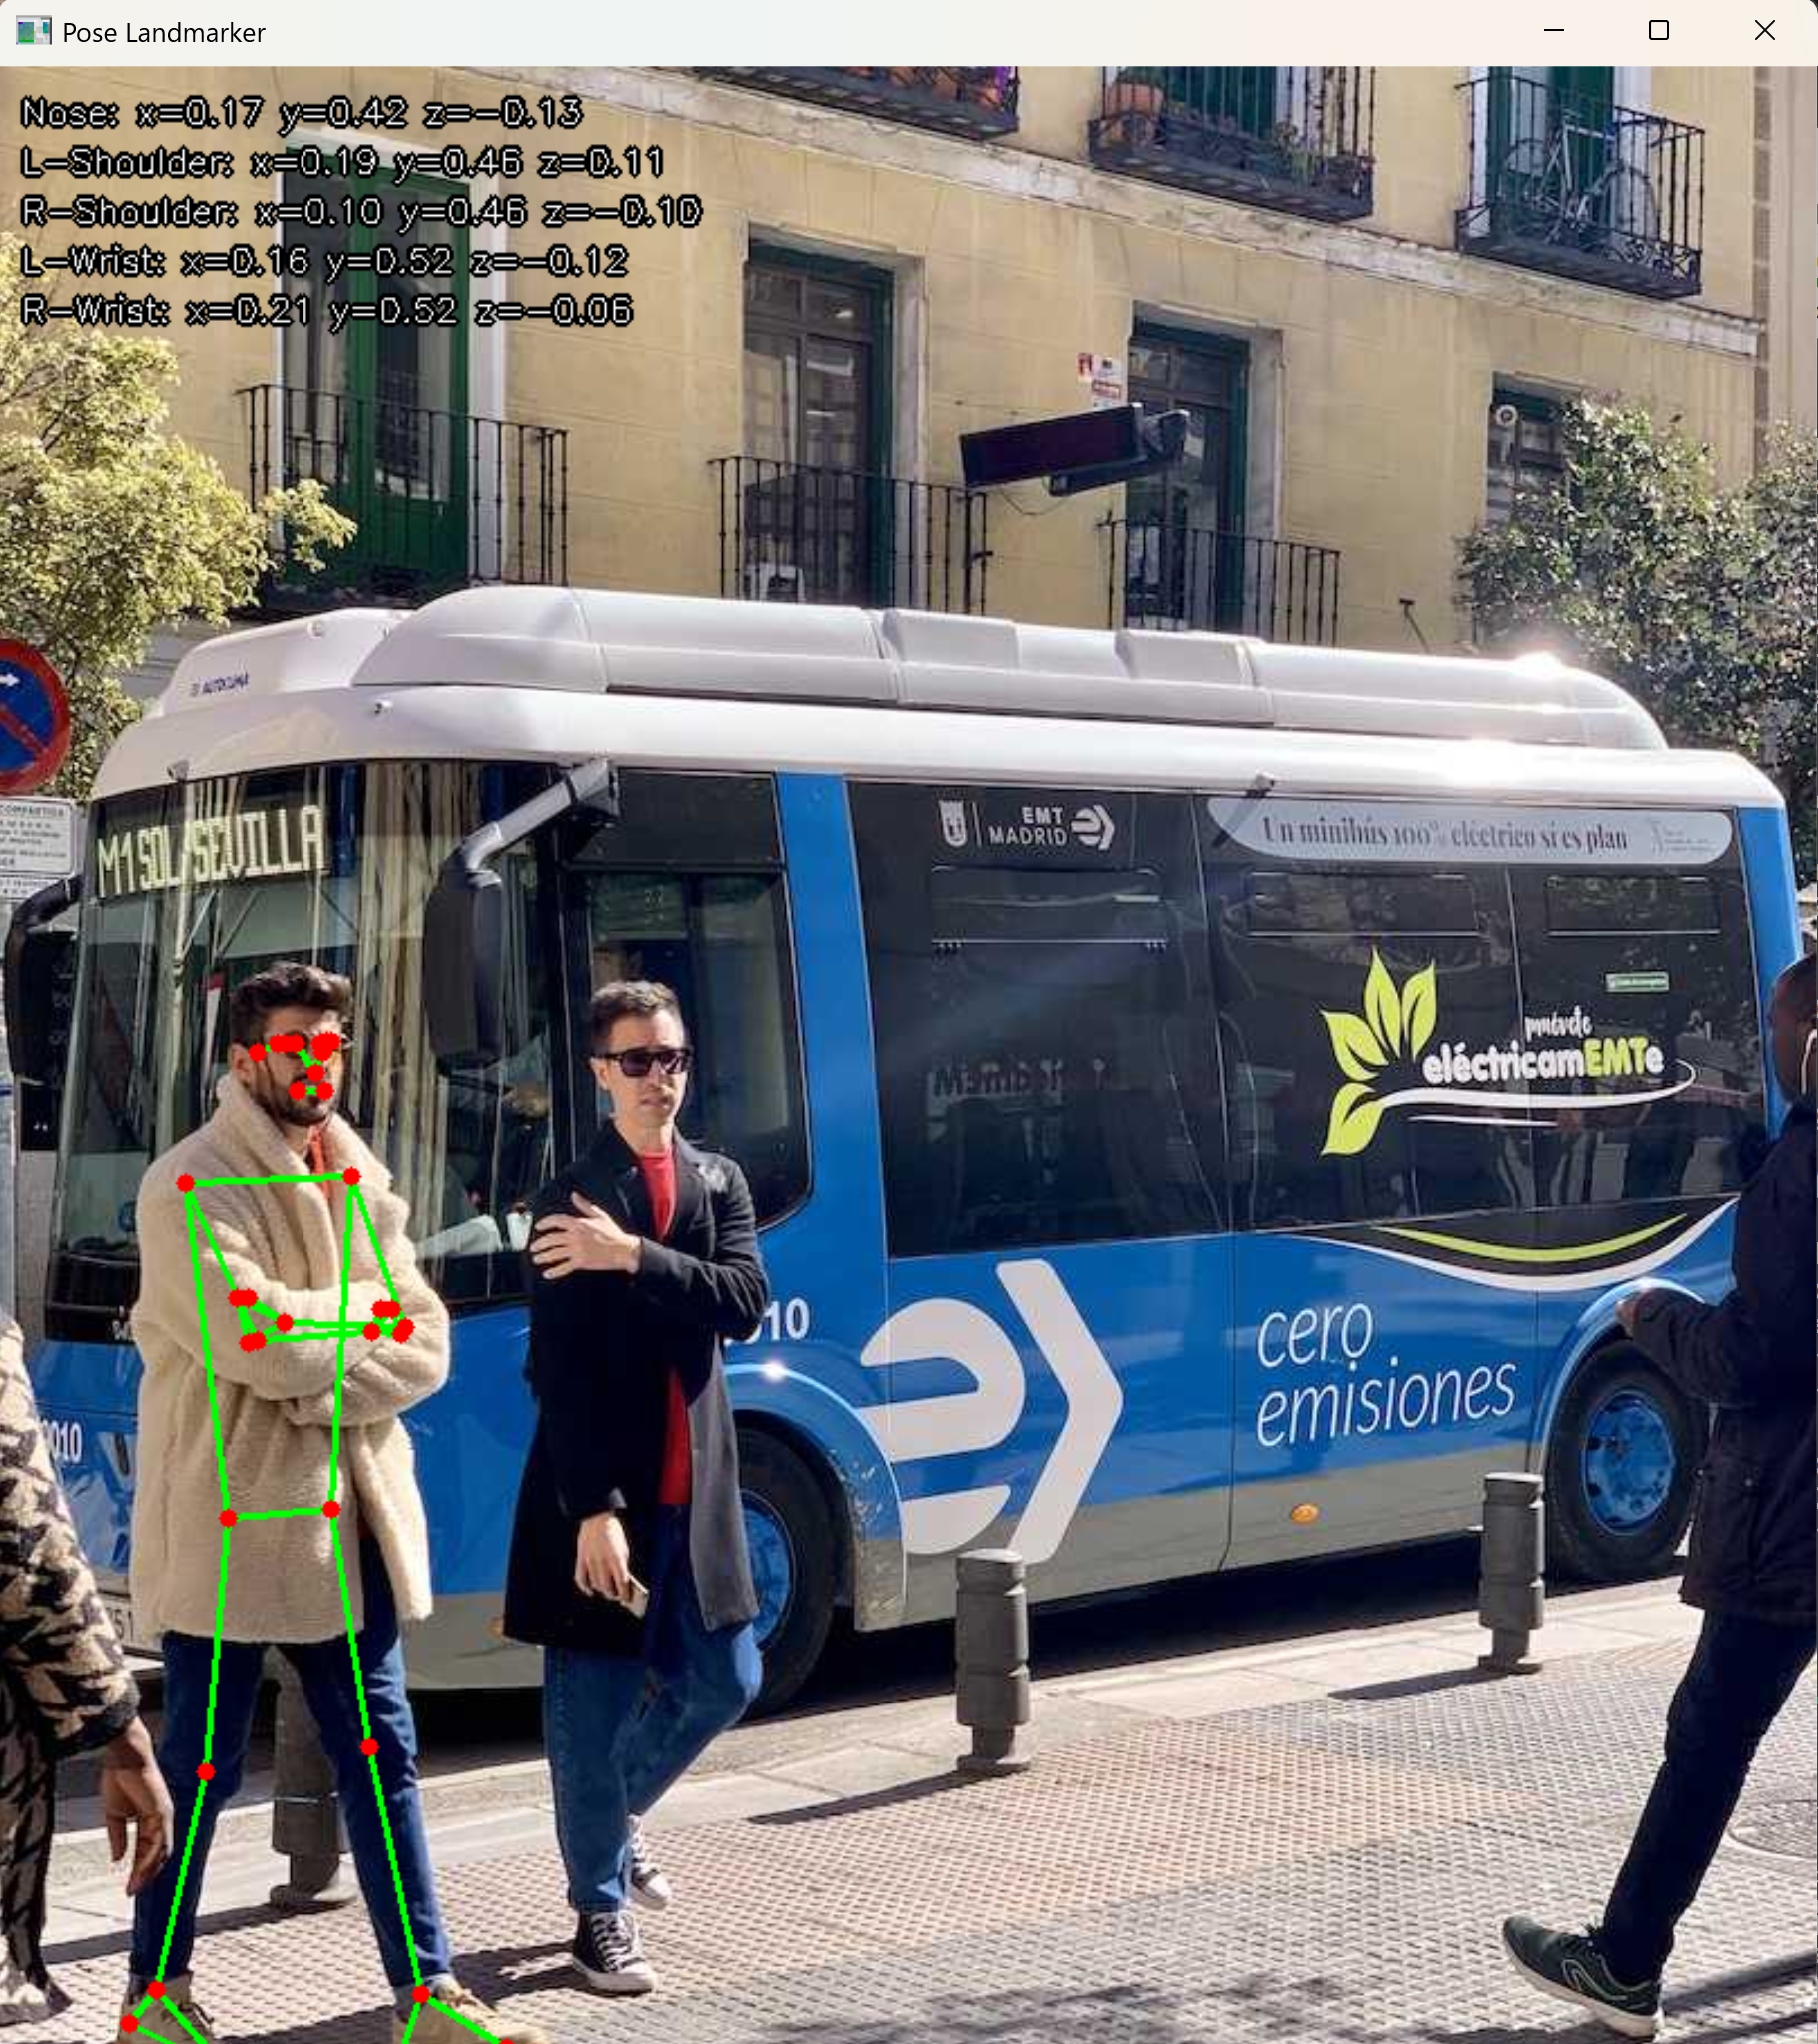
【MediaPipe版】タスク4:姿勢推定(Pose Landmarker)
機能説明:人体の33個の3Dランドマーク(特徴点の3次元座標.鼻,肩,肘,手首,腰,膝,足首等)を検出する.BlazePose GHUM Heavy(Googleの高精度姿勢推定モデル)をベースモデルとする.フィットネス分析,モーションキャプチャ(身体動作のデジタル記録),リハビリ動作評価等に利用される.本タスクではx, y座標による2D描画に加え,代表5点(鼻,両肩,両手首)のx, y, z値を画面およびコンソールに表示することで,正規化座標としての3D性を直接確認できる構成とする.
- 既知の限界:標準モデルは単一人物向けであり,2名以上の同時検出はできない.遮蔽,後ろ向き,激しい動作時は誤検出や欠落が生じる.
- 設定での精度向上:min_pose_detection_confidence(姿勢検出の最小信頼度)の引き上げで誤検出を抑制できる.本コードでは0.7を設定している.min_pose_presence_confidence(姿勢の存在確率の最小値)とmin_tracking_confidence(追跡の最小信頼度)で検出の厳しさを調整できる.
- z値について:本タスクで表示されるz値は,腰の中央を原点とした相対深度の正規化値である(メートル単位の3D座標はpose_world_landmarksで取得可能であり,これはタスク15で可視化する).
# task_pose_landmarker
import os, urllib.request
from pathlib import Path
import cv2
import mediapipe as mp
from mediapipe.tasks import python
from mediapipe.tasks.python import vision

# ==== ヘルパ ====
def get_script_dir():
    return Path(os.path.dirname(os.path.abspath(__file__)))

def get_image_dir(subdir):
    d = Path("C:/image") / subdir
    d.mkdir(parents=True, exist_ok=True)
    return d

def select_file(title, initialdir, filetypes):
    import tkinter as tk
    from tkinter import filedialog
    root = tk.Tk(); root.withdraw()
    path = filedialog.askopenfilename(title=title, initialdir=str(initialdir), filetypes=filetypes)
    root.destroy()
    return path

def show_image(window_name, img):
    cv2.imshow(window_name, img)
    cv2.waitKey(0)
    cv2.destroyAllWindows()
# ================

# User-Agent設定
opener = urllib.request.build_opener()
opener.addheaders = [("User-Agent", "Mozilla/5.0")]
urllib.request.install_opener(opener)

# 画像ダウンロード
IMG_URL = "https://ultralytics.com/images/bus.jpg"
IMG_DIR = get_image_dir("ultralytics")
img_path = IMG_DIR / Path(IMG_URL).name
if not img_path.exists():
    urllib.request.urlretrieve(IMG_URL, img_path)

# モデルダウンロード(スクリプトと同じディレクトリに保存)
SCRIPT_DIR = get_script_dir()
MODEL_URL = "https://storage.googleapis.com/mediapipe-models/pose_landmarker/pose_landmarker_heavy/float16/latest/pose_landmarker_heavy.task"
model = SCRIPT_DIR / Path(MODEL_URL).name
if not model.exists():
    urllib.request.urlretrieve(MODEL_URL, model)

# BlazePoseの33点接続関係(公式定義)
POSE_CONNECTIONS = [
    (0, 1), (1, 2), (2, 3), (3, 7), (0, 4), (4, 5), (5, 6), (6, 8),
    (9, 10), (11, 12), (11, 13), (13, 15), (15, 17), (15, 19), (15, 21),
    (17, 19), (12, 14), (14, 16), (16, 18), (16, 20), (16, 22), (18, 20),
    (11, 23), (12, 24), (23, 24), (23, 25), (24, 26), (25, 27), (26, 28),
    (27, 29), (28, 30), (29, 31), (30, 32), (27, 31), (28, 32)]

# 代表5点(インデックス, 表示名)
POSE_KEY_POINTS = [(0, "Nose"), (11, "L-Shoulder"), (12, "R-Shoulder"),
                   (15, "L-Wrist"), (16, "R-Wrist")]

# 画像選択
selected = select_file(
    title="姿勢推定する画像を選択", initialdir=IMG_DIR,
    filetypes=[("画像", "*.jpg *.jpeg *.png *.bmp"), ("すべて", "*.*")])

# 推論
options = vision.PoseLandmarkerOptions(
    base_options=python.BaseOptions(model_asset_path=str(model)),
    min_pose_detection_confidence=0.7,
    min_pose_presence_confidence=0.7,
    min_tracking_confidence=0.7)
landmarker = vision.PoseLandmarker.create_from_options(options)
image = mp.Image.create_from_file(selected)
result = landmarker.detect(image)

# 表示
img = cv2.imread(selected)
h, w = img.shape[:2]
for pose_landmarks in result.pose_landmarks:
    points = [(int(lm.x * w), int(lm.y * h)) for lm in pose_landmarks]
    for s, e in POSE_CONNECTIONS:
        cv2.line(img, points[s], points[e], (0, 255, 0), 2)
    for p in points:
        cv2.circle(img, p, 4, (0, 0, 255), -1)
    print("33個のランドマーク検出完了")
    # 代表点のx, y, z値を画面とコンソールに表示
    y_offset = 25
    for idx, name in POSE_KEY_POINTS:
        lm = pose_landmarks[idx]
        text = f"{name}: x={lm.x:.2f} y={lm.y:.2f} z={lm.z:.2f}"
        cv2.putText(img, text, (10, y_offset), cv2.FONT_HERSHEY_SIMPLEX, 0.5, (0, 0, 0), 3)
        cv2.putText(img, text, (10, y_offset), cv2.FONT_HERSHEY_SIMPLEX, 0.5, (255, 255, 255), 1)
        print(f"  {text}")
        y_offset += 22
show_image("Pose Landmarker", img)
landmarker.close()
【MediaPipe版】タスク5:手のランドマーク検出(Hand Landmarker)
機能説明:両手それぞれについて21個のランドマーク(手首,各指の関節,指先)を検出し,左右の判定(handedness:検出した手が左右いずれかの識別)も同時に行う.手話認識,VR/ARのジェスチャー入力,リモコン代替等に利用される.本タスクではx, y座標による2D描画に加え,5指先(親指・人差し指・中指・薬指・小指)のx, y, z値を画面およびコンソールに表示することで,正規化座標としての3D性を直接確認できる構成とする.
- 既知の限界:手が小さく写る場合や強い遮蔽がある場合は検出されにくく,左右判定も誤る場合がある.指の重なりや高速な動作時の座標精度はモデルの表現能力に制約される.
- 設定での精度向上:num_hands(検出する手の最大数)を実際の手の数に合わせる.本コードではmin_hand_detection_confidenceおよびmin_hand_presence_confidenceに0.7を設定し,誤検出を抑制している.min_tracking_confidence(追跡の最小信頼度)で検出・追跡の厳しさを調整できる.
- z値について:本タスクで表示されるz値は,手首を原点とした相対深度の正規化値である(メートル単位の3D座標はhand_world_landmarksで取得可能であり,これはタスク14で可視化する).
# task_hand_landmarker
import os, urllib.request
from pathlib import Path
import cv2
import mediapipe as mp
from mediapipe.tasks import python
from mediapipe.tasks.python import vision

# ==== ヘルパ ====
def get_script_dir():
    return Path(os.path.dirname(os.path.abspath(__file__)))

def get_image_dir(subdir):
    d = Path("C:/image") / subdir
    d.mkdir(parents=True, exist_ok=True)
    return d

def select_file(title, initialdir, filetypes):
    import tkinter as tk
    from tkinter import filedialog
    root = tk.Tk(); root.withdraw()
    path = filedialog.askopenfilename(title=title, initialdir=str(initialdir), filetypes=filetypes)
    root.destroy()
    return path

def show_image(window_name, img):
    cv2.imshow(window_name, img)
    cv2.waitKey(0)
    cv2.destroyAllWindows()
# ================

# User-Agent設定
opener = urllib.request.build_opener()
opener.addheaders = [("User-Agent", "Mozilla/5.0")]
urllib.request.install_opener(opener)

# 画像ダウンロード
IMG_URL = "https://storage.googleapis.com/mediapipe-tasks/hand_landmarker/woman_hands.jpg"
IMG_DIR = get_image_dir("mediapipe")
img_path = IMG_DIR / Path(IMG_URL).name
if not img_path.exists():
    urllib.request.urlretrieve(IMG_URL, img_path)

# モデルダウンロード(スクリプトと同じディレクトリに保存)
SCRIPT_DIR = get_script_dir()
MODEL_URL = "https://storage.googleapis.com/mediapipe-models/hand_landmarker/hand_landmarker/float16/latest/hand_landmarker.task"
model = SCRIPT_DIR / Path(MODEL_URL).name
if not model.exists():
    urllib.request.urlretrieve(MODEL_URL, model)

# 手の21点接続関係(公式定義:手首・親指・人差指・中指・薬指・小指の各骨格)
HAND_CONNECTIONS = [
    (0, 1), (1, 2), (2, 3), (3, 4),
    (0, 5), (5, 6), (6, 7), (7, 8),
    (5, 9), (9, 10), (10, 11), (11, 12),
    (9, 13), (13, 14), (14, 15), (15, 16),
    (13, 17), (0, 17), (17, 18), (18, 19), (19, 20)]

# 5指先(インデックス, 表示名)
HAND_KEY_POINTS = [(4, "Thumb"), (8, "Index"), (12, "Middle"),
                   (16, "Ring"), (20, "Pinky")]

# 画像選択
selected = select_file(
    title="手の画像を選択", initialdir=IMG_DIR,
    filetypes=[("画像", "*.jpg *.jpeg *.png *.bmp"), ("すべて", "*.*")])

# 推論
options = vision.HandLandmarkerOptions(
    base_options=python.BaseOptions(model_asset_path=str(model)),
    num_hands=2,
    min_hand_detection_confidence=0.7,
    min_hand_presence_confidence=0.7,
    min_tracking_confidence=0.7)
landmarker = vision.HandLandmarker.create_from_options(options)
image = mp.Image.create_from_file(selected)
result = landmarker.detect(image)

# 表示
img = cv2.imread(selected)
h, w = img.shape[:2]
y_offset = 25
for hand_landmarks, handedness in zip(result.hand_landmarks, result.handedness):
    points = [(int(lm.x * w), int(lm.y * h)) for lm in hand_landmarks]
    for s, e in HAND_CONNECTIONS:
        cv2.line(img, points[s], points[e], (0, 255, 0), 2)
    for p in points:
        cv2.circle(img, p, 4, (0, 0, 255), -1)
    label = handedness[0].category_name
    print(f"{label} の手を検出(信頼度: {handedness[0].score:.2f})")
    # 5指先のx, y, z値を画面とコンソールに表示
    for idx, name in HAND_KEY_POINTS:
        lm = hand_landmarks[idx]
        text = f"{label[0]}-{name}: x={lm.x:.2f} y={lm.y:.2f} z={lm.z:.2f}"
        cv2.putText(img, text, (10, y_offset), cv2.FONT_HERSHEY_SIMPLEX, 0.5, (0, 0, 0), 3)
        cv2.putText(img, text, (10, y_offset), cv2.FONT_HERSHEY_SIMPLEX, 0.5, (255, 255, 255), 1)
        print(f"  {text}")
        y_offset += 22
show_image("Hand Landmarker", img)
landmarker.close()

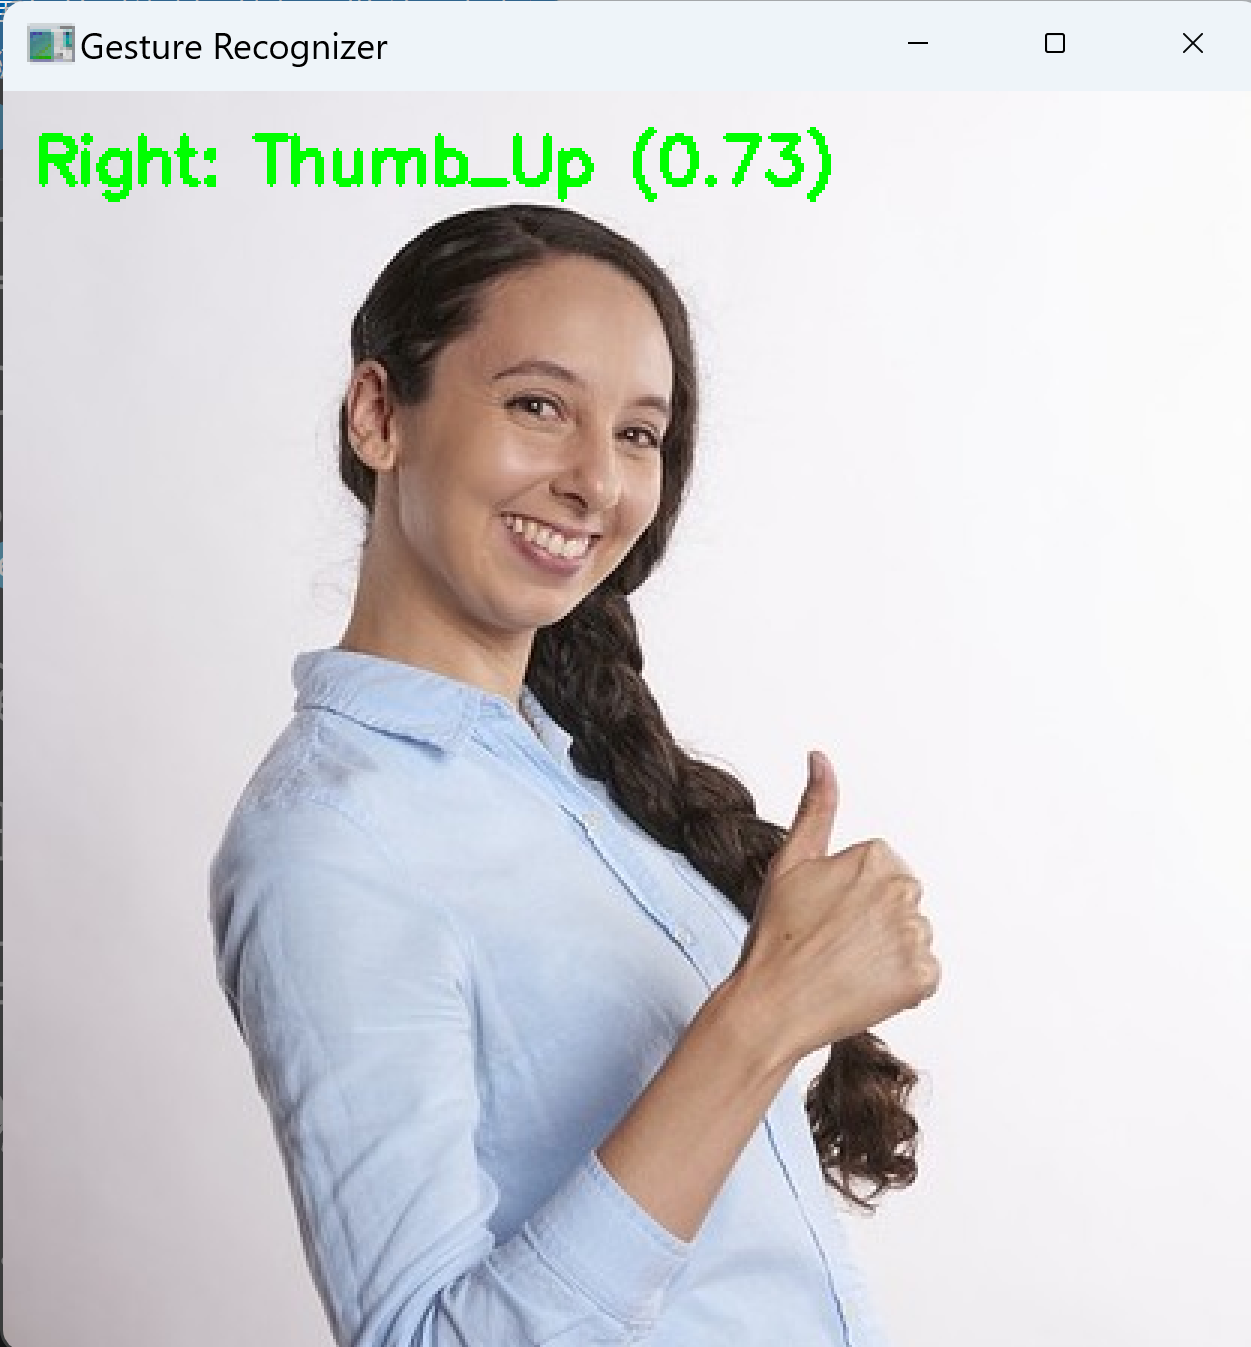
【MediaPipe版】タスク6:ジェスチャー認識(Gesture Recognizer)
機能説明:Hand Landmarkerを基盤として手の形状を分類するタスクである.標準7種類のジェスチャー(Closed_Fist:グー,Open_Palm:パー,Pointing_Up:指差し,Thumb_Down:サムズダウン,Thumb_Up:サムズアップ,Victory:ピース,ILoveYou:アイラブユー)に対応する.非接触UI(手を触れずに操作するインタフェース),プレゼンテーション制御,アクセシビリティ用途(身体的制約のあるユーザの操作支援)等に利用される.
- 既知の限界:標準7種類のみが認識対象であり,それ以外の独自ジェスチャーは認識できない.追加には別モデルの利用あるいはカスタム学習(独自データでの追加学習)が必要となる.
- 設定での精度向上:本コードではmin_hand_detection_confidenceに0.7,canned_gesture_classifier_options(組み込みジェスチャー分類器のオプション)のscore_thresholdに0.5を設定し,低信頼度の検出・分類を抑制している.同オプションのcategory_allowlist/category_denylistで対象ジェスチャーを絞り込み,num_handsで検出数を制御できる.
# task_gesture_recognizer
import os, urllib.request
from pathlib import Path
import cv2
import mediapipe as mp
from mediapipe.tasks import python
from mediapipe.tasks.python import vision
from mediapipe.tasks.python.components import processors

# ==== ヘルパ ====
def get_script_dir():
    return Path(os.path.dirname(os.path.abspath(__file__)))

def get_image_dir(subdir):
    d = Path("C:/image") / subdir
    d.mkdir(parents=True, exist_ok=True)
    return d

def select_file(title, initialdir, filetypes):
    import tkinter as tk
    from tkinter import filedialog
    root = tk.Tk(); root.withdraw()
    path = filedialog.askopenfilename(title=title, initialdir=str(initialdir), filetypes=filetypes)
    root.destroy()
    return path

def show_image(window_name, img):
    cv2.imshow(window_name, img)
    cv2.waitKey(0)
    cv2.destroyAllWindows()
# ================

# User-Agent設定
opener = urllib.request.build_opener()
opener.addheaders = [("User-Agent", "Mozilla/5.0")]
urllib.request.install_opener(opener)

# 画像ダウンロード
IMG_URL = "https://storage.googleapis.com/mediapipe-tasks/gesture_recognizer/thumbs_up.jpg"
IMG_DIR = get_image_dir("mediapipe")
img_path = IMG_DIR / Path(IMG_URL).name
if not img_path.exists():
    urllib.request.urlretrieve(IMG_URL, img_path)

# モデルダウンロード(スクリプトと同じディレクトリに保存)
SCRIPT_DIR = get_script_dir()
MODEL_URL = "https://storage.googleapis.com/mediapipe-models/gesture_recognizer/gesture_recognizer/float16/latest/gesture_recognizer.task"
model = SCRIPT_DIR / Path(MODEL_URL).name
if not model.exists():
    urllib.request.urlretrieve(MODEL_URL, model)

# 画像選択
selected = select_file(
    title="ジェスチャー画像を選択", initialdir=IMG_DIR,
    filetypes=[("画像", "*.jpg *.jpeg *.png *.bmp"), ("すべて", "*.*")])

# 推論
options = vision.GestureRecognizerOptions(
    base_options=python.BaseOptions(model_asset_path=str(model)),
    num_hands=2,
    min_hand_detection_confidence=0.7,
    canned_gesture_classifier_options=processors.ClassifierOptions(score_threshold=0.5))
recognizer = vision.GestureRecognizer.create_from_options(options)
image = mp.Image.create_from_file(selected)
result = recognizer.recognize(image)

# 表示(OpenCV-MediaPipe間の色変換:MediaPipeのRGB配列をOpenCVのBGRに変換)
img = cv2.cvtColor(image.numpy_view(), cv2.COLOR_RGB2BGR).copy()
for i, gestures in enumerate(result.gestures):
    gesture = gestures[0]
    handedness = result.handedness[i][0].category_name
    text = f"{handedness}: {gesture.category_name} ({gesture.score:.2f})"
    cv2.putText(img, text, (10, 30 + i * 30), cv2.FONT_HERSHEY_SIMPLEX, 0.7, (0, 255, 0), 2)
    print(text)
show_image("Gesture Recognizer", img)
recognizer.close()
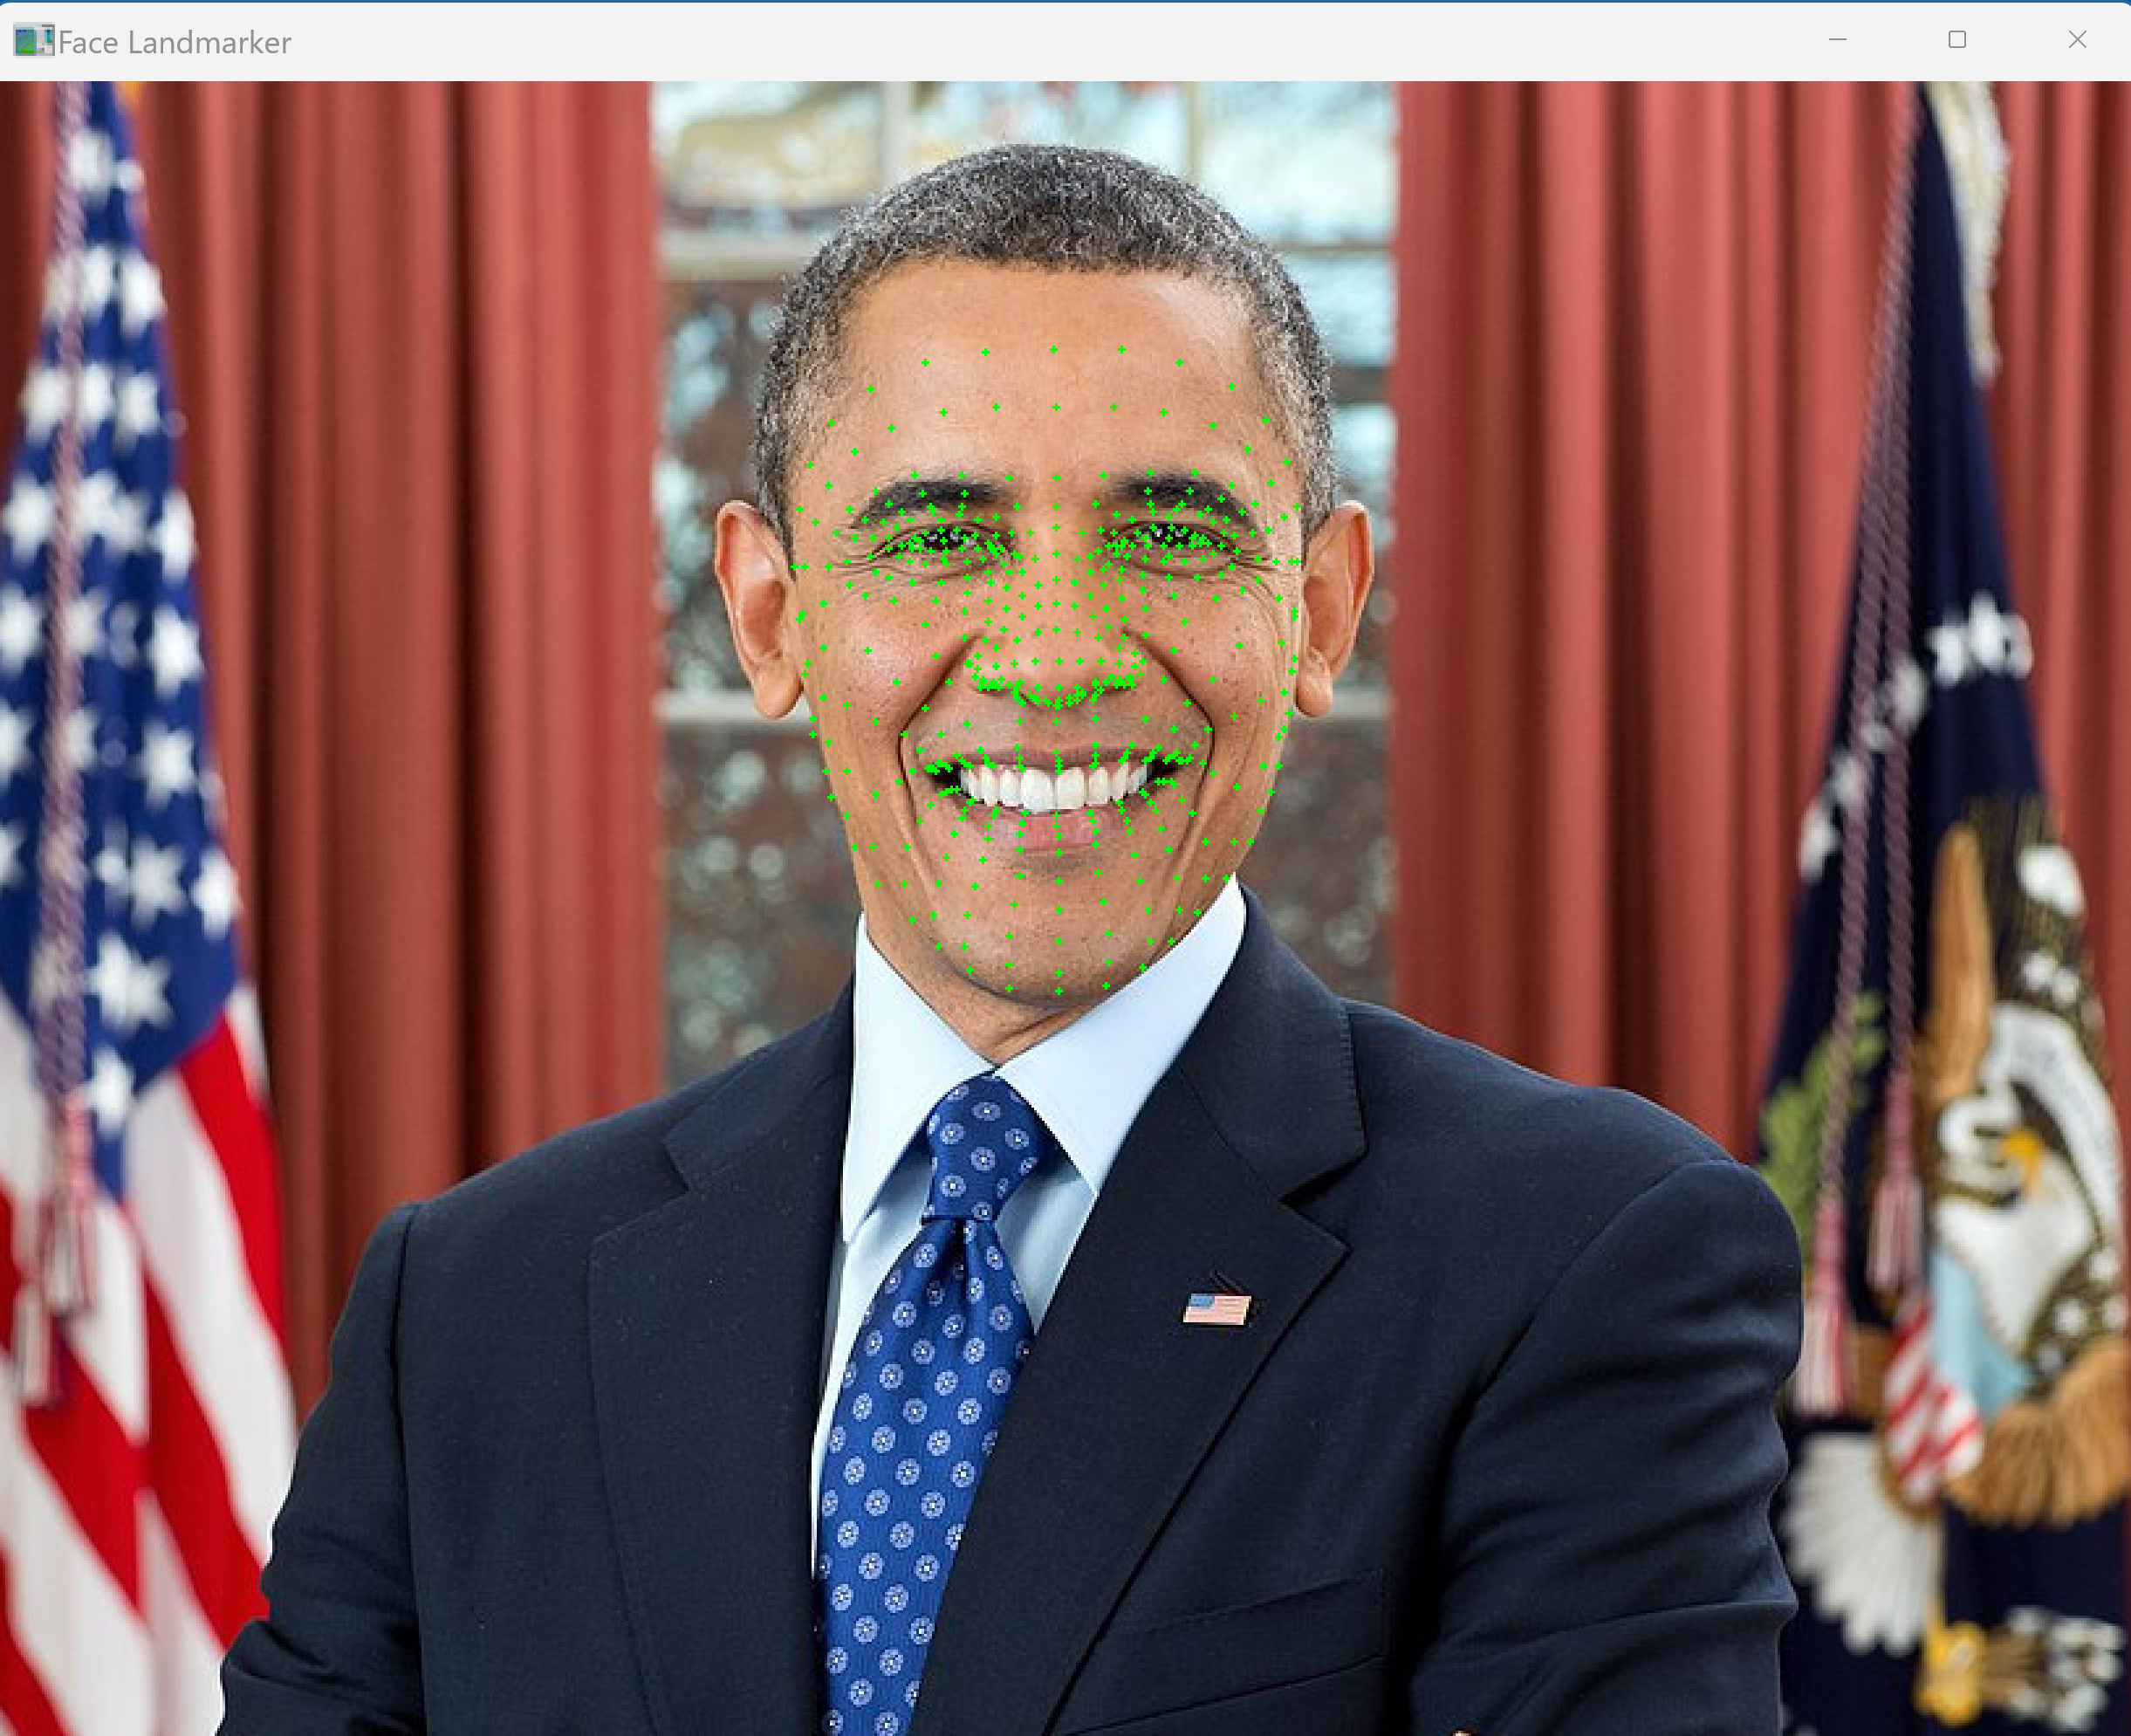
【MediaPipe版】タスク7:顔ランドマーク検出(Face Landmarker)
機能説明:顔の478個の3Dランドマーク(顔メッシュ:顔表面を細かい多角形で覆う点群)を検出する.加えて52種類の表情ブレンドシェイプ係数(blendshape:表情の基本要素ごとの強さを0〜1で表す値.笑顔,目を閉じる,眉を上げる等)と頭部姿勢の変換行列(顔の向きを表す4×4行列)を出力する.アバター制御,AR効果,表情解析,運転手の眠気検知等に利用される.
- 既知の限界:大きな頭部回転,強い遮蔽,小さい顔では478点の位置精度が低下する.微細な表情差や横顔の奥行き推定精度には限界がある.
- 設定での精度向上:num_facesを実際の顔数に合わせる.本コードではmin_face_detection_confidenceおよびmin_face_presence_confidenceに0.7を設定し,誤検出を抑制している.output_face_blendshapesやoutput_facial_transformation_matrixesは必要な場合のみ有効化すると処理負荷が減る.
# task_face_landmarker
import os, urllib.request
from pathlib import Path
import cv2, numpy as np
import mediapipe as mp
from mediapipe.tasks import python
from mediapipe.tasks.python import vision

# ==== ヘルパ ====
def get_script_dir():
    return Path(os.path.dirname(os.path.abspath(__file__)))

def get_image_dir(subdir):
    d = Path("C:/image") / subdir
    d.mkdir(parents=True, exist_ok=True)
    return d

def select_file(title, initialdir, filetypes):
    import tkinter as tk
    from tkinter import filedialog
    root = tk.Tk(); root.withdraw()
    path = filedialog.askopenfilename(title=title, initialdir=str(initialdir), filetypes=filetypes)
    root.destroy()
    return path

def show_image(window_name, img):
    cv2.imshow(window_name, img)
    cv2.waitKey(0)
    cv2.destroyAllWindows()
# ================

# User-Agent設定
opener = urllib.request.build_opener()
opener.addheaders = [("User-Agent", "Mozilla/5.0")]
urllib.request.install_opener(opener)

# 画像ダウンロード
IMG_URL = "https://storage.googleapis.com/mediapipe-assets/portrait.jpg"
IMG_DIR = get_image_dir("mediapipe")
img_path = IMG_DIR / Path(IMG_URL).name
if not img_path.exists():
    urllib.request.urlretrieve(IMG_URL, img_path)

# モデルダウンロード(スクリプトと同じディレクトリに保存)
SCRIPT_DIR = get_script_dir()
MODEL_URL = "https://storage.googleapis.com/mediapipe-models/face_landmarker/face_landmarker/float16/latest/face_landmarker.task"
model = SCRIPT_DIR / Path(MODEL_URL).name
if not model.exists():
    urllib.request.urlretrieve(MODEL_URL, model)

# 画像選択
selected = select_file(
    title="顔の画像を選択", initialdir=IMG_DIR,
    filetypes=[("画像", "*.jpg *.jpeg *.png *.bmp"), ("すべて", "*.*")])

# 推論
options = vision.FaceLandmarkerOptions(
    base_options=python.BaseOptions(model_asset_path=str(model)),
    output_face_blendshapes=True,
    output_facial_transformation_matrixes=True,
    num_faces=1,
    min_face_detection_confidence=0.7,
    min_face_presence_confidence=0.7,
    min_tracking_confidence=0.7)
landmarker = vision.FaceLandmarker.create_from_options(options)
image = mp.Image.create_from_file(selected)
result = landmarker.detect(image)

# 表示
img = cv2.imread(selected)
h, w = img.shape[:2]
for face_landmarks in result.face_landmarks:
    for lm in face_landmarks:
        cv2.circle(img, (int(lm.x * w), int(lm.y * h)), 1, (0, 255, 0), -1)

if result.face_blendshapes:
    print("ブレンドシェイプ(上位5件):")
    for bs in sorted(result.face_blendshapes[0], key=lambda x: x.score, reverse=True)[:5]:
        print(f"  {bs.category_name}: {bs.score:.4f}")

if result.facial_transformation_matrixes:
    print("頭部姿勢の変換行列(4×4):")
    print(np.array(result.facial_transformation_matrixes[0]))
show_image("Face Landmarker", img)
landmarker.close()
【MediaPipe版】タスク8:顔検出(Face Detector)
機能説明:画像内の顔を矩形で検出し,両目・鼻先・口・両耳の耳珠点(じじゅてん:耳の前方にある軟骨突起)の6点キーポイントを出力する.BlazeFace full-range(CenterNet系の構造を採用した遠距離・広範囲向け顔検出モデル)をベースモデルとし,遠距離の被写体や背面カメラ画像にも対応する.プライバシー保護のための顔ぼかし,参加人数カウント等に利用される.
- 既知の限界:強い横顔や極端な遮蔽下では検出精度が低下する.
- 設定での精度向上:min_detection_confidenceを下げると遠い顔も検出できる一方,誤検出が増える.min_suppression_threshold(重複検出を統合する際の重なり判定の閾値)で重複検出の統合度合いを調整できる.
# task_face_detector
import os, urllib.request
from pathlib import Path
import cv2
import mediapipe as mp
from mediapipe.tasks import python
from mediapipe.tasks.python import vision

# ==== ヘルパ ====
def get_script_dir():
    return Path(os.path.dirname(os.path.abspath(__file__)))

def get_image_dir(subdir):
    d = Path("C:/image") / subdir
    d.mkdir(parents=True, exist_ok=True)
    return d

def select_file(title, initialdir, filetypes):
    import tkinter as tk
    from tkinter import filedialog
    root = tk.Tk(); root.withdraw()
    path = filedialog.askopenfilename(title=title, initialdir=str(initialdir), filetypes=filetypes)
    root.destroy()
    return path

def show_image(window_name, img):
    cv2.imshow(window_name, img)
    cv2.waitKey(0)
    cv2.destroyAllWindows()
# ================

# User-Agent設定
opener = urllib.request.build_opener()
opener.addheaders = [("User-Agent", "Mozilla/5.0")]
urllib.request.install_opener(opener)

# 画像ダウンロード
IMG_URL = "https://storage.googleapis.com/mediapipe-assets/portrait.jpg"
IMG_DIR = get_image_dir("mediapipe")
img_path = IMG_DIR / Path(IMG_URL).name
if not img_path.exists():
    urllib.request.urlretrieve(IMG_URL, img_path)

# モデルダウンロード(スクリプトと同じディレクトリに保存)
SCRIPT_DIR = get_script_dir()
MODEL_URL = "https://storage.googleapis.com/mediapipe-models/face_detector/blaze_face_full_range/float16/latest/blaze_face_full_range.tflite"
model = SCRIPT_DIR / Path(MODEL_URL).name
if not model.exists():
    urllib.request.urlretrieve(MODEL_URL, model)

# 画像選択
selected = select_file(
    title="顔の画像を選択", initialdir=IMG_DIR,
    filetypes=[("画像", "*.jpg *.jpeg *.png *.bmp"), ("すべて", "*.*")])

# 推論
options = vision.FaceDetectorOptions(base_options=python.BaseOptions(model_asset_path=str(model)))
detector = vision.FaceDetector.create_from_options(options)
result = detector.detect(mp.Image.create_from_file(selected))

# 表示
img = cv2.imread(selected)
for det in result.detections:
    bb = det.bounding_box
    cv2.rectangle(img, (bb.origin_x, bb.origin_y),
                  (bb.origin_x + bb.width, bb.origin_y + bb.height), (0, 255, 0), 2)
    for kp in det.keypoints:
        cv2.circle(img, (int(kp.x * img.shape[1]), int(kp.y * img.shape[0])), 3, (0, 0, 255), -1)
    print(f"顔検出: スコア {det.categories[0].score:.2f}")
show_image("Face Detector", img)
detector.close()

【MediaPipe版】タスク9:画像埋め込み(Image Embedder)
機能説明:画像を高次元の特徴ベクトル(埋め込み:画像の内容を数百次元程度の数値の並びで表現したもの)に変換する.MobileNet V3 Large(高表現能力を持つMobileNet V3アーキテクチャ)をベースモデルとする.2画像間のコサイン類似度(2つのベクトルがなす角度に基づく類似度.1に近いほど類似)を計算することで類似画像検索が可能となる.画像検索エンジン,重複画像検出,クラスタリング(類似データを自動的にグループ化する処理)等に利用される.
- 既知の限界:MobileNet V3 Largeによる汎用特徴量であり,細かな意味的差異の識別能力には限りがある.
- 設定での精度向上:l2_normalize=True(特徴ベクトルの長さを1に正規化する設定)でコサイン類似度の比較が安定する.quantize(数値精度を落として軽量化する量子化の有無)で量子化を切り替え,速度と精度のバランスを調整できる.
画像を2枚選択するため,選択操作を2回行う(ダイアログを2回表示する).
# task_image_embedder
import os, urllib.request
from pathlib import Path
import mediapipe as mp
from mediapipe.tasks import python
from mediapipe.tasks.python import vision

# ==== ヘルパ ====
def get_script_dir():
    return Path(os.path.dirname(os.path.abspath(__file__)))

def get_image_dir(subdir):
    d = Path("C:/image") / subdir
    d.mkdir(parents=True, exist_ok=True)
    return d

def select_file(title, initialdir, filetypes):
    import tkinter as tk
    from tkinter import filedialog
    root = tk.Tk(); root.withdraw()
    path = filedialog.askopenfilename(title=title, initialdir=str(initialdir), filetypes=filetypes)
    root.destroy()
    return path
# ================

# User-Agent設定
opener = urllib.request.build_opener()
opener.addheaders = [("User-Agent", "Mozilla/5.0")]
urllib.request.install_opener(opener)

# 画像ダウンロード
IMG_URLS = [
    "https://raw.githubusercontent.com/opencv/opencv/4.x/samples/data/aero1.jpg",
    "https://raw.githubusercontent.com/opencv/opencv/4.x/samples/data/aero3.jpg"]
IMG_DIR = get_image_dir("opencv")
for url in IMG_URLS:
    p = IMG_DIR / Path(url).name
    if not p.exists():
        urllib.request.urlretrieve(url, p)

# モデルダウンロード(スクリプトと同じディレクトリに保存)
SCRIPT_DIR = get_script_dir()
MODEL_URL = "https://storage.googleapis.com/mediapipe-models/image_embedder/mobilenet_v3_large/float32/latest/mobilenet_v3_large.tflite"
model = SCRIPT_DIR / Path(MODEL_URL).name
if not model.exists():
    urllib.request.urlretrieve(MODEL_URL, model)

# 画像選択(2枚)
path1 = select_file(
    title="比較する1枚目の画像を選択", initialdir=IMG_DIR,
    filetypes=[("画像", "*.jpg *.jpeg *.png *.bmp"), ("すべて", "*.*")])
path2 = select_file(
    title="比較する2枚目の画像を選択", initialdir=IMG_DIR,
    filetypes=[("画像", "*.jpg *.jpeg *.png *.bmp"), ("すべて", "*.*")])

# 推論
options = vision.ImageEmbedderOptions(
    base_options=python.BaseOptions(model_asset_path=str(model)), l2_normalize=True)
embedder = vision.ImageEmbedder.create_from_options(options)
emb1 = embedder.embed(mp.Image.create_from_file(path1))
emb2 = embedder.embed(mp.Image.create_from_file(path2))

# 表示
similarity = vision.ImageEmbedder.cosine_similarity(emb1.embeddings[0], emb2.embeddings[0])
print(f"画像間のコサイン類似度: {similarity:.4f}")
print("(1.0に近いほど類似)")
embedder.close()

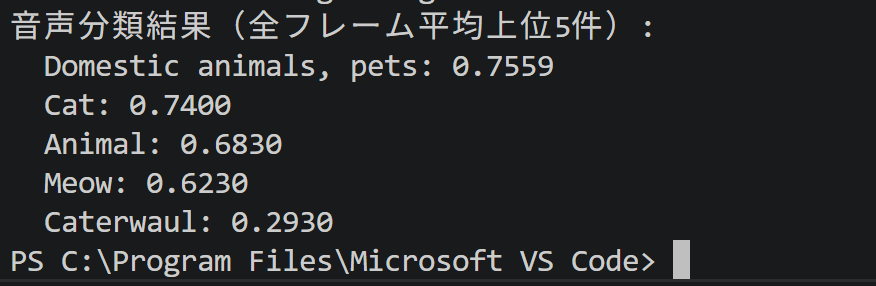
【MediaPipe版】タスク10:音声分類(Audio Classifier)
機能説明:音声波形を入力として,AudioSet(Googleが公開した約200万件の音響イベントのデータセット)オントロジー(音響イベントの階層的な分類体系)の521種類の音響イベント(音楽,会話,犬の鳴き声,車のクラクション等)を分類する.YAMNet(AudioSetで学習された音響イベント分類モデル)をベースモデルとする.スマートホームの異常音検知,音響シーン解析,自動字幕用の音響タグ付け等に利用される.本タスクではYAMNetの前提に従い,入力WAVは16kHzモノラル16ビットPCM(音声をデジタル化する代表的な符号化方式)であることを前提とする.本タスクではフレームごとの分類結果をクラスごとに平均化することで,入力音声全体の主たる音響イベントを判定する構成とする.
- 既知の限界:AudioSet 521クラスに限定され,入力は16kHzモノラルである必要がある.音響イベントの細分類,話者識別等,YAMNetの定義外のタスクには対応できない.
- 設定での精度向上:max_resultsを増やして上位候補を観察し,score_thresholdで低信頼度を除外できる.前処理でノイズ除去や音量正規化(音量を一定範囲に揃える処理)を行うと分類精度が向上する場合がある.
# task_audio_classifier
import os, urllib.request, wave
from collections import defaultdict
from pathlib import Path
import numpy as np
from mediapipe.tasks import python
from mediapipe.tasks.python import audio
from mediapipe.tasks.python.components import containers

# ==== ヘルパ ====
def get_script_dir():
    return Path(os.path.dirname(os.path.abspath(__file__)))

def get_image_dir(subdir):
    d = Path("C:/image") / subdir
    d.mkdir(parents=True, exist_ok=True)
    return d

def select_file(title, initialdir, filetypes):
    import tkinter as tk
    from tkinter import filedialog
    root = tk.Tk(); root.withdraw()
    path = filedialog.askopenfilename(title=title, initialdir=str(initialdir), filetypes=filetypes)
    root.destroy()
    return path
# ================

# User-Agent設定
opener = urllib.request.build_opener()
opener.addheaders = [("User-Agent", "Mozilla/5.0")]
urllib.request.install_opener(opener)

# 音声ダウンロード
WAV_URL = "https://storage.googleapis.com/audioset/miaow_16k.wav"
WAV_DIR = get_image_dir("audioset")
wav_path = WAV_DIR / Path(WAV_URL).name
if not wav_path.exists():
    urllib.request.urlretrieve(WAV_URL, wav_path)

# モデルダウンロード(スクリプトと同じディレクトリに保存)
SCRIPT_DIR = get_script_dir()
MODEL_URL = "https://storage.googleapis.com/mediapipe-models/audio_classifier/yamnet/float32/latest/yamnet.tflite"
model = SCRIPT_DIR / Path(MODEL_URL).name
if not model.exists():
    urllib.request.urlretrieve(MODEL_URL, model)

# 音声選択
selected = select_file(
    title="WAVファイルを選択", initialdir=WAV_DIR,
    filetypes=[("WAV", "*.wav"), ("すべて", "*.*")])

# WAV読み込み(16kHzモノラル16ビットPCM前提)
with wave.open(selected, 'rb') as wf:
    n_channels = wf.getnchannels()
    sr = wf.getframerate()
    frames = wf.readframes(wf.getnframes())
samples = np.frombuffer(frames, dtype=np.int16)
if n_channels > 1:
    samples = samples.reshape(-1, n_channels).mean(axis=1)
samples = samples.astype(np.float32) / 32768.0

# 推論
options = audio.AudioClassifierOptions(
    base_options=python.BaseOptions(model_asset_path=str(model)), max_results=5)
classifier = audio.AudioClassifier.create_from_options(options)
audio_data = containers.AudioData.create_from_array(samples, sr)
result = classifier.classify(audio_data)

# 全フレームの結果をクラスごとに平均化
sums = defaultdict(float)
counts = defaultdict(int)
for frame_result in result:
    for cat in frame_result.classifications[0].categories:
        sums[cat.category_name] += cat.score
        counts[cat.category_name] += 1
averaged = sorted(((name, sums[name] / counts[name]) for name in sums),
                  key=lambda x: x[1], reverse=True)

# 表示
print("音声分類結果(全フレーム平均上位5件):")
for name, score in averaged[:5]:
    print(f"  {name}: {score:.4f}")
classifier.close()
【MediaPipe版】タスク11:テキスト分類(Text Classifier,画像不要)
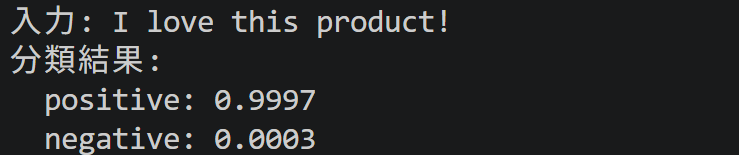
機能説明:入力テキストの感情を肯定的・否定的に分類する.BERT-classifier(MobileBERTベースの分類モデル)をベースモデルとし,SST-2(Stanford Sentiment Treebank:映画レビューの感情ラベル付きデータセット)で学習され,英語の感情分析(二値分類)に対応する.レビュー分析,SNS投稿のセンチメント解析(文章から書き手の感情の肯定・否定度を推定する分析),カスタマーサポートのトリアージ(問い合わせの重要度・種別による振り分け)等に利用される.
テキスト入力には,tkinter.simpledialog(tkinterの文字列入力用簡易ダイアログ)を用いる.本コードでは入力前処理(前後の空白除去,連続空白の単一化)を行う.
- 既知の限界:既定モデルは英語の感情二値分類(肯定・否定)のみであり,日本語や多クラス分類には対応しない.ドメイン固有表現(特定分野でのみ用いられる用語),皮肉,反語等はモデルの能力を超える場合がある.
- 設定での精度向上:max_resultsとscore_thresholdで出力候補の範囲を調整できる.入力前処理(記号除去,小文字化,略語展開)で精度が向上する場合がある.
# task_text_classifier
import os, re, urllib.request
from pathlib import Path
from mediapipe.tasks import python
from mediapipe.tasks.python import text

# ==== ヘルパ ====
def get_script_dir():
    return Path(os.path.dirname(os.path.abspath(__file__)))

def input_text(title, prompt, initialvalue=""):
    import tkinter as tk
    from tkinter import simpledialog
    root = tk.Tk(); root.withdraw()
    s = simpledialog.askstring(title, prompt, initialvalue=initialvalue)
    root.destroy()
    return s
# ================

# User-Agent設定
opener = urllib.request.build_opener()
opener.addheaders = [("User-Agent", "Mozilla/5.0")]
urllib.request.install_opener(opener)

# モデルダウンロード(スクリプトと同じディレクトリに保存)
SCRIPT_DIR = get_script_dir()
MODEL_URL = "https://storage.googleapis.com/mediapipe-models/text_classifier/bert_classifier/float32/latest/bert_classifier.tflite"
model = SCRIPT_DIR / Path(MODEL_URL).name
if not model.exists():
    urllib.request.urlretrieve(MODEL_URL, model)

# テキスト入力
input_str = input_text("テキスト分類", "分類したい英語テキストを入力:",
                       initialvalue="I love this product!")

# 入力前処理(前後空白除去・連続空白の単一化)
normalized_text = re.sub(r"\s+", " ", input_str).strip()

# 推論
options = text.TextClassifierOptions(base_options=python.BaseOptions(model_asset_path=str(model)))
classifier = text.TextClassifier.create_from_options(options)
result = classifier.classify(normalized_text)

# 表示
print(f"入力: {normalized_text}")
print("分類結果:")
for cat in result.classifications[0].categories:
    print(f"  {cat.category_name}: {cat.score:.4f}")
classifier.close()
【MediaPipe版】タスク12:言語検出(Language Detector,画像不要)
機能説明:入力テキストの言語を判定する.110言語に対応する.多言語コンテンツのルーティング(言語ごとに処理経路を振り分けること),自動翻訳の前段処理(翻訳元言語を特定する処理),国際化対応のWebサービス等に利用される.本コードでは入力テキストが20文字未満の場合に注意を表示し,短文での精度低下を利用者に明示する構成とする.
- 既知の限界:短文,固有名詞のみの文,複数言語が混在する文では判定精度が低下する.類似言語の識別や混在文の主言語判定精度はモデルの訓練データに依存する.
- 設定での精度向上:max_resultsを増やして上位候補を確認することで誤判定を検知しやすくなる.score_thresholdで低確率の候補を除外し,最上位のみを採用すると出力の安定性が高まる.
# task_language_detector
import os, urllib.request
from pathlib import Path
from mediapipe.tasks import python
from mediapipe.tasks.python import text

# ==== ヘルパ ====
def get_script_dir():
    return Path(os.path.dirname(os.path.abspath(__file__)))

def input_text(title, prompt, initialvalue=""):
    import tkinter as tk
    from tkinter import simpledialog
    root = tk.Tk(); root.withdraw()
    s = simpledialog.askstring(title, prompt, initialvalue=initialvalue)
    root.destroy()
    return s
# ================

# User-Agent設定
opener = urllib.request.build_opener()
opener.addheaders = [("User-Agent", "Mozilla/5.0")]
urllib.request.install_opener(opener)

# モデルダウンロード(スクリプトと同じディレクトリに保存)
SCRIPT_DIR = get_script_dir()
MODEL_URL = "https://storage.googleapis.com/mediapipe-models/language_detector/language_detector/float32/1/language_detector.tflite"
model = SCRIPT_DIR / Path(MODEL_URL).name
if not model.exists():
    urllib.request.urlretrieve(MODEL_URL, model)

# テキスト入力
input_str = input_text("言語検出", "言語を判定したいテキストを入力:",
                       initialvalue="今日は良い天気です.")

# 短文での精度低下に関する注意
if len(input_str) < 20:
    print(f"注意: 入力が短い({len(input_str)}文字)ため判定精度が低下する場合があります")

# 推論
options = text.LanguageDetectorOptions(base_options=python.BaseOptions(model_asset_path=str(model)))
detector = text.LanguageDetector.create_from_options(options)
result = detector.detect(input_str)

# 表示
print(f"入力: {input_str}")
print("言語検出結果(上位):")
for d in result.detections[:5]:
    print(f"  {d.language_code}: {d.probability:.4f}")
detector.close()

【MediaPipe版】タスク13:ホリスティック検出(Holistic Landmarker)
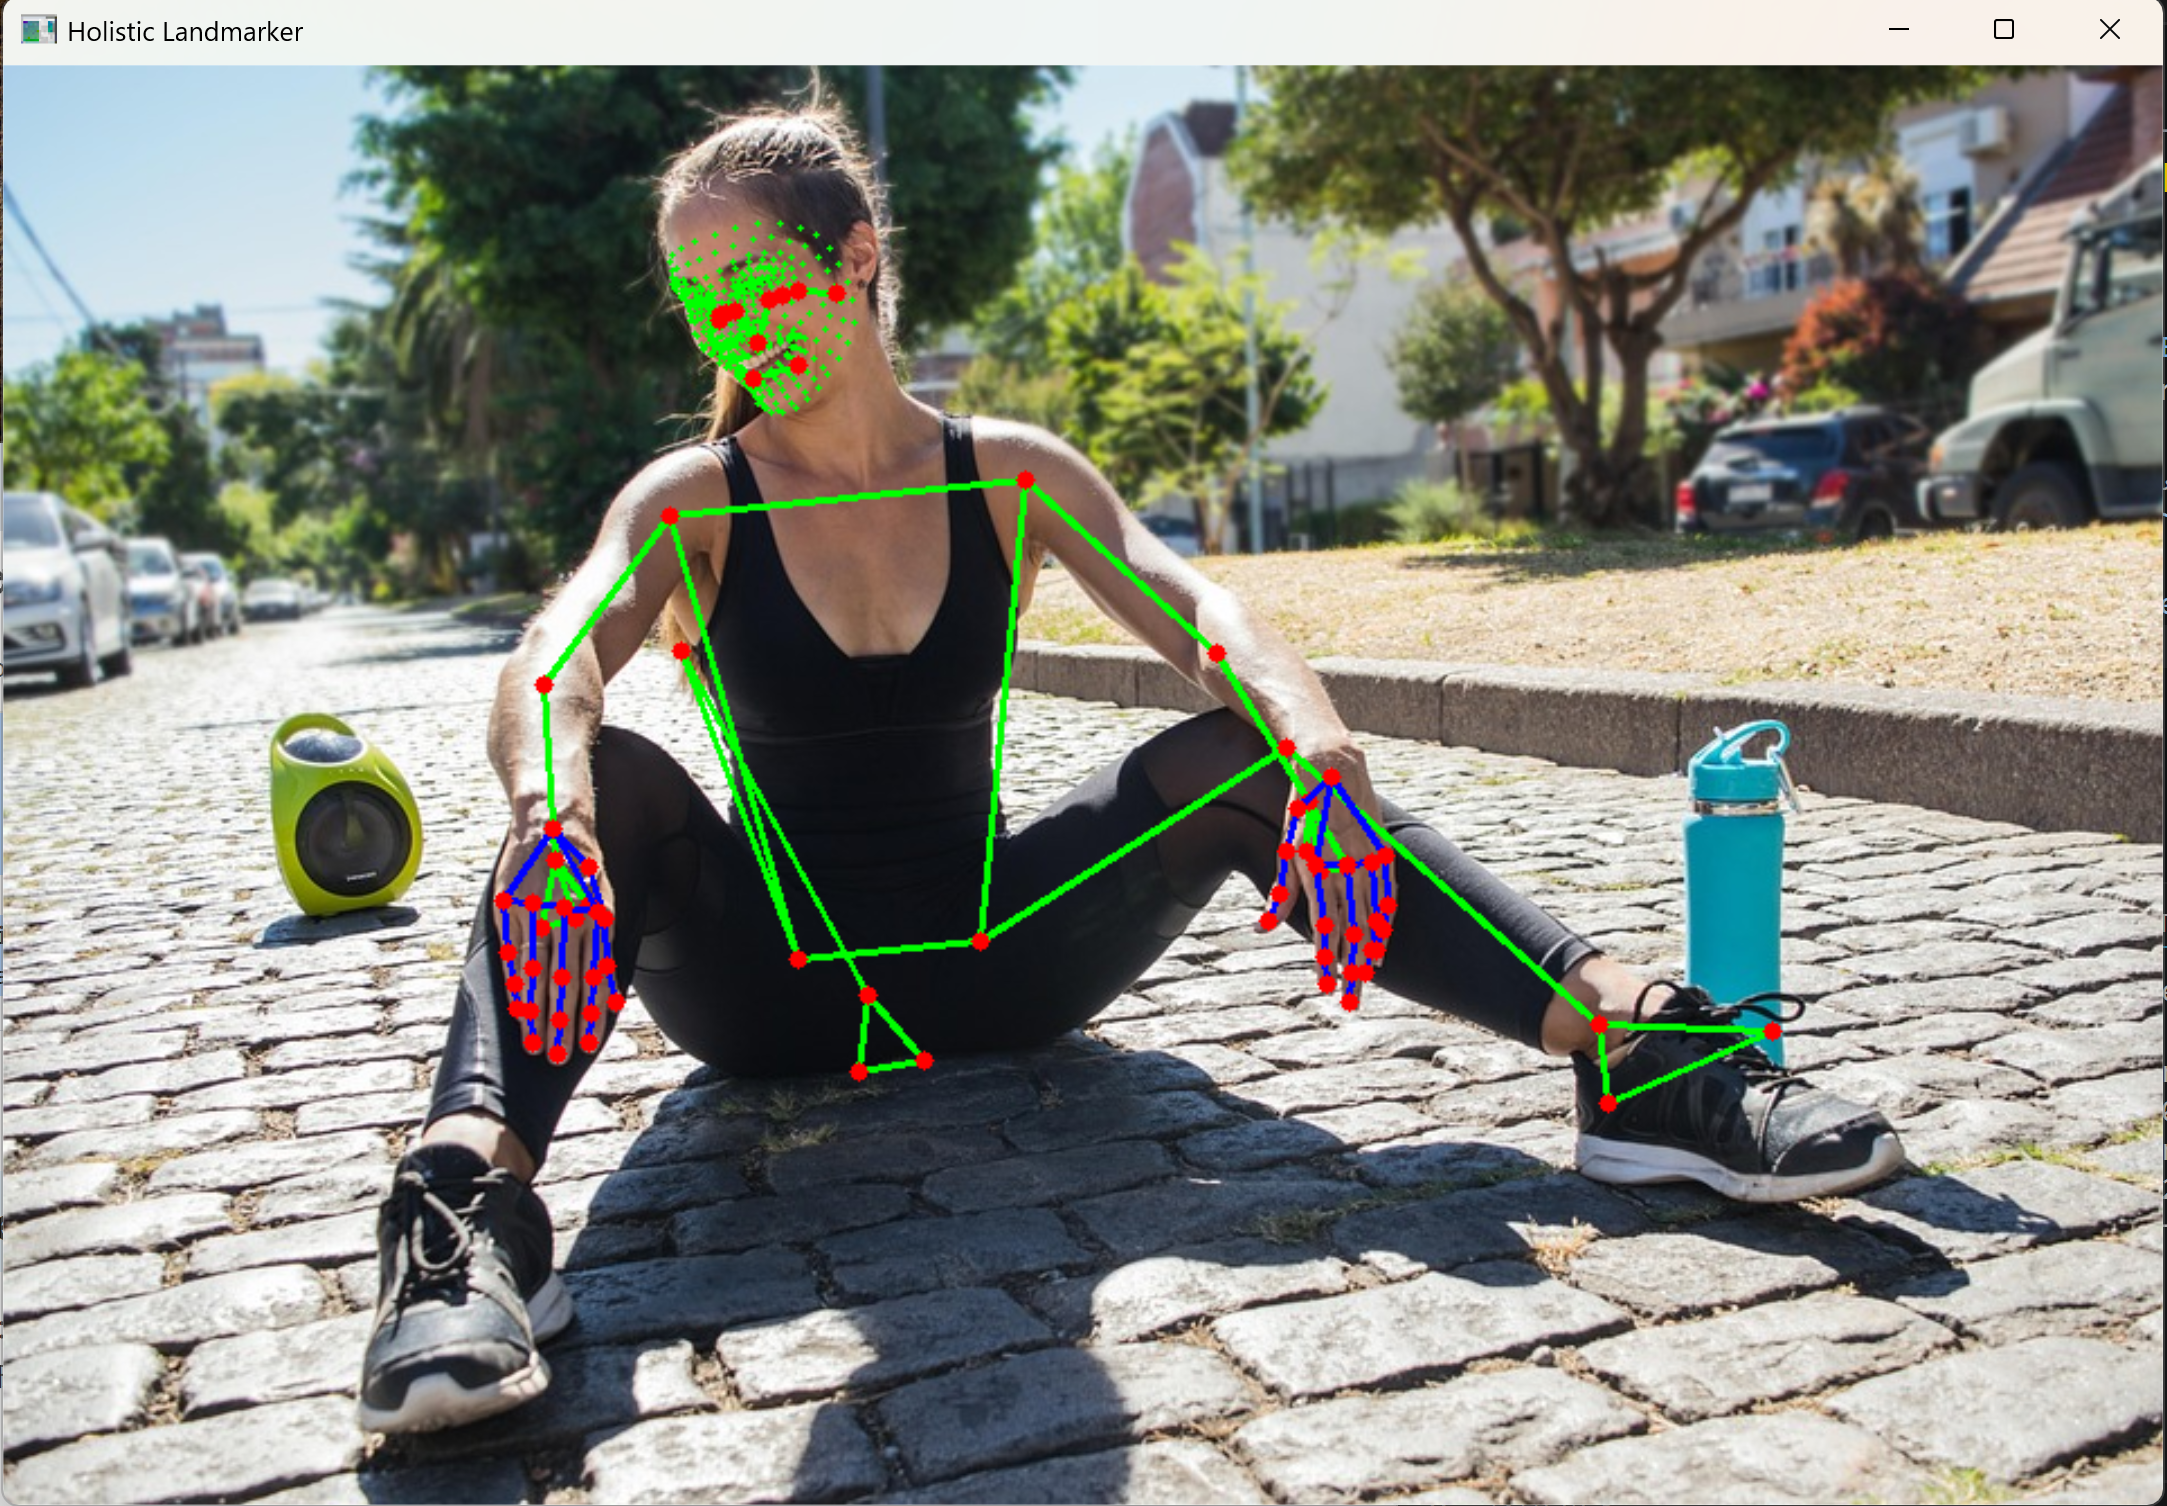
機能説明:単一の人物に対して顔ランドマーク(468点),ポーズランドマーク(33点),左右の手ランドマーク(各21点)を一度の推論で同時検出する.合計543点の人体ランドマークを一括取得できるため,全身ジェスチャー解析,手話認識,スポーツフォーム解析,アバター駆動等の,顔・体幹・手指を統合的に扱う応用に適する.
タスク4・タスク5との関係:
- 同一点:内部の検出原理はPose Landmarker(タスク4)とHand Landmarker(タスク5)と共通であり,ランドマーク番号体系および接続関係(POSE_CONNECTIONS,HAND_CONNECTIONS)も同一である.本タスクでも同じ定義を用いる.
- 違い:タスク4・5は対象を1種類(ポーズのみ,手のみ)に限定するのに対し,本タスクは顔・ポーズ・両手を1つのモデル呼び出しで統合検出する.本タスクは単一人物専用であり,複数人物の同時検出はできない.
- 既知の限界:単一人物専用であり,複数人物が写る画像では1人分のみが検出される.全身が写る画像を前提とし,顔のみ・上半身のみの画像ではポーズや手の検出が不安定となる.
- 設定での精度向上:本コードではmin_pose_detection_confidence,min_pose_landmarks_confidence,min_face_detection_confidence,min_face_landmarks_confidence,min_hand_landmarks_confidenceに0.7を設定し,各部位の検出感度を厳密化している.output_face_blendshapesやoutput_segmentation_maskは必要時のみ有効化する.なお,HolisticLandmarkerOptionsの信頼度関連引数はPose Landmarker(タスク4)やFace Landmarkerと命名規則が異なり,ランドマーク追跡側の信頼度は
presenceではなくlandmarksを用いる点に留意する. - インポートに関する注意:HolisticLandmarkerは
mediapipe.tasks.python.visionパッケージから直接公開されていない場合があり,mediapipe.tasks.python.vision.holistic_landmarkerサブモジュールから明示的にインポートする.
# task_holistic_landmarker
import os, urllib.request
from pathlib import Path
import cv2
import mediapipe as mp
from mediapipe.tasks import python
from mediapipe.tasks.python.vision.holistic_landmarker import (
    HolisticLandmarker, HolisticLandmarkerOptions)

# ==== ヘルパ ====
def get_script_dir():
    return Path(os.path.dirname(os.path.abspath(__file__)))

def get_image_dir(subdir):
    d = Path("C:/image") / subdir
    d.mkdir(parents=True, exist_ok=True)
    return d

def select_file(title, initialdir, filetypes):
    import tkinter as tk
    from tkinter import filedialog
    root = tk.Tk(); root.withdraw()
    path = filedialog.askopenfilename(title=title, initialdir=str(initialdir), filetypes=filetypes)
    root.destroy()
    return path

def show_image(window_name, img):
    cv2.imshow(window_name, img)
    cv2.waitKey(0)
    cv2.destroyAllWindows()
# ================

# User-Agent設定
opener = urllib.request.build_opener()
opener.addheaders = [("User-Agent", "Mozilla/5.0")]
urllib.request.install_opener(opener)

# 画像ダウンロード(全身が写る画像)
IMG_URL = "https://cdn.pixabay.com/photo/2019/03/12/20/39/girl-4051811_960_720.jpg"
IMG_DIR = get_image_dir("pixabay")
img_path = IMG_DIR / Path(IMG_URL).name
if not img_path.exists():
    urllib.request.urlretrieve(IMG_URL, img_path)

# モデルダウンロード(スクリプトと同じディレクトリに保存)
SCRIPT_DIR = get_script_dir()
MODEL_URL = "https://storage.googleapis.com/mediapipe-models/holistic_landmarker/holistic_landmarker/float16/latest/holistic_landmarker.task"
model = SCRIPT_DIR / Path(MODEL_URL).name
if not model.exists():
    urllib.request.urlretrieve(MODEL_URL, model)

# BlazePoseの33点接続関係(タスク4と同一定義)
POSE_CONNECTIONS = [
    (0, 1), (1, 2), (2, 3), (3, 7), (0, 4), (4, 5), (5, 6), (6, 8),
    (9, 10), (11, 12), (11, 13), (13, 15), (15, 17), (15, 19), (15, 21),
    (17, 19), (12, 14), (14, 16), (16, 18), (16, 20), (16, 22), (18, 20),
    (11, 23), (12, 24), (23, 24), (23, 25), (24, 26), (25, 27), (26, 28),
    (27, 29), (28, 30), (29, 31), (30, 32), (27, 31), (28, 32)]

# 手の21点接続関係(タスク5と同一定義)
HAND_CONNECTIONS = [
    (0, 1), (1, 2), (2, 3), (3, 4),
    (0, 5), (5, 6), (6, 7), (7, 8),
    (5, 9), (9, 10), (10, 11), (11, 12),
    (9, 13), (13, 14), (14, 15), (15, 16),
    (13, 17), (0, 17), (17, 18), (18, 19), (19, 20)]

# 画像選択
selected = select_file(
    title="ホリスティック検出する画像を選択", initialdir=IMG_DIR,
    filetypes=[("画像", "*.jpg *.jpeg *.png *.bmp"), ("すべて", "*.*")])

# 推論
options = HolisticLandmarkerOptions(
    base_options=python.BaseOptions(model_asset_path=str(model)),
    min_pose_detection_confidence=0.7,
    min_pose_landmarks_confidence=0.7,
    min_face_detection_confidence=0.7,
    min_face_landmarks_confidence=0.7,
    min_hand_landmarks_confidence=0.7)
landmarker = HolisticLandmarker.create_from_options(options)
image = mp.Image.create_from_file(selected)
result = landmarker.detect(image)

# 表示
img = cv2.imread(selected)
h, w = img.shape[:2]

# 顔ランドマーク(468点を緑の小点で描画)
if result.face_landmarks:
    for lm in result.face_landmarks:
        cv2.circle(img, (int(lm.x * w), int(lm.y * h)), 1, (0, 255, 0), -1)
    print("顔ランドマーク: 468点検出")

# ポーズランドマーク(タスク4と同一の描画形式)
if result.pose_landmarks:
    points = [(int(lm.x * w), int(lm.y * h)) for lm in result.pose_landmarks]
    for s, e in POSE_CONNECTIONS:
        cv2.line(img, points[s], points[e], (0, 255, 0), 2)
    for p in points:
        cv2.circle(img, p, 4, (0, 0, 255), -1)
    print("ポーズランドマーク: 33点検出")

# 両手ランドマーク(タスク5と同一の描画形式)
for hand_landmarks, label in [(result.left_hand_landmarks, "Left"),
                              (result.right_hand_landmarks, "Right")]:
    if hand_landmarks:
        points = [(int(lm.x * w), int(lm.y * h)) for lm in hand_landmarks]
        for s, e in HAND_CONNECTIONS:
            cv2.line(img, points[s], points[e], (255, 0, 0), 2)
        for p in points:
            cv2.circle(img, p, 4, (0, 0, 255), -1)
        print(f"{label}手ランドマーク: 21点検出")

show_image("Holistic Landmarker", img)
landmarker.close()
【MediaPipe版】タスク14:手の3D可視化(Hand Landmarker world landmarks)
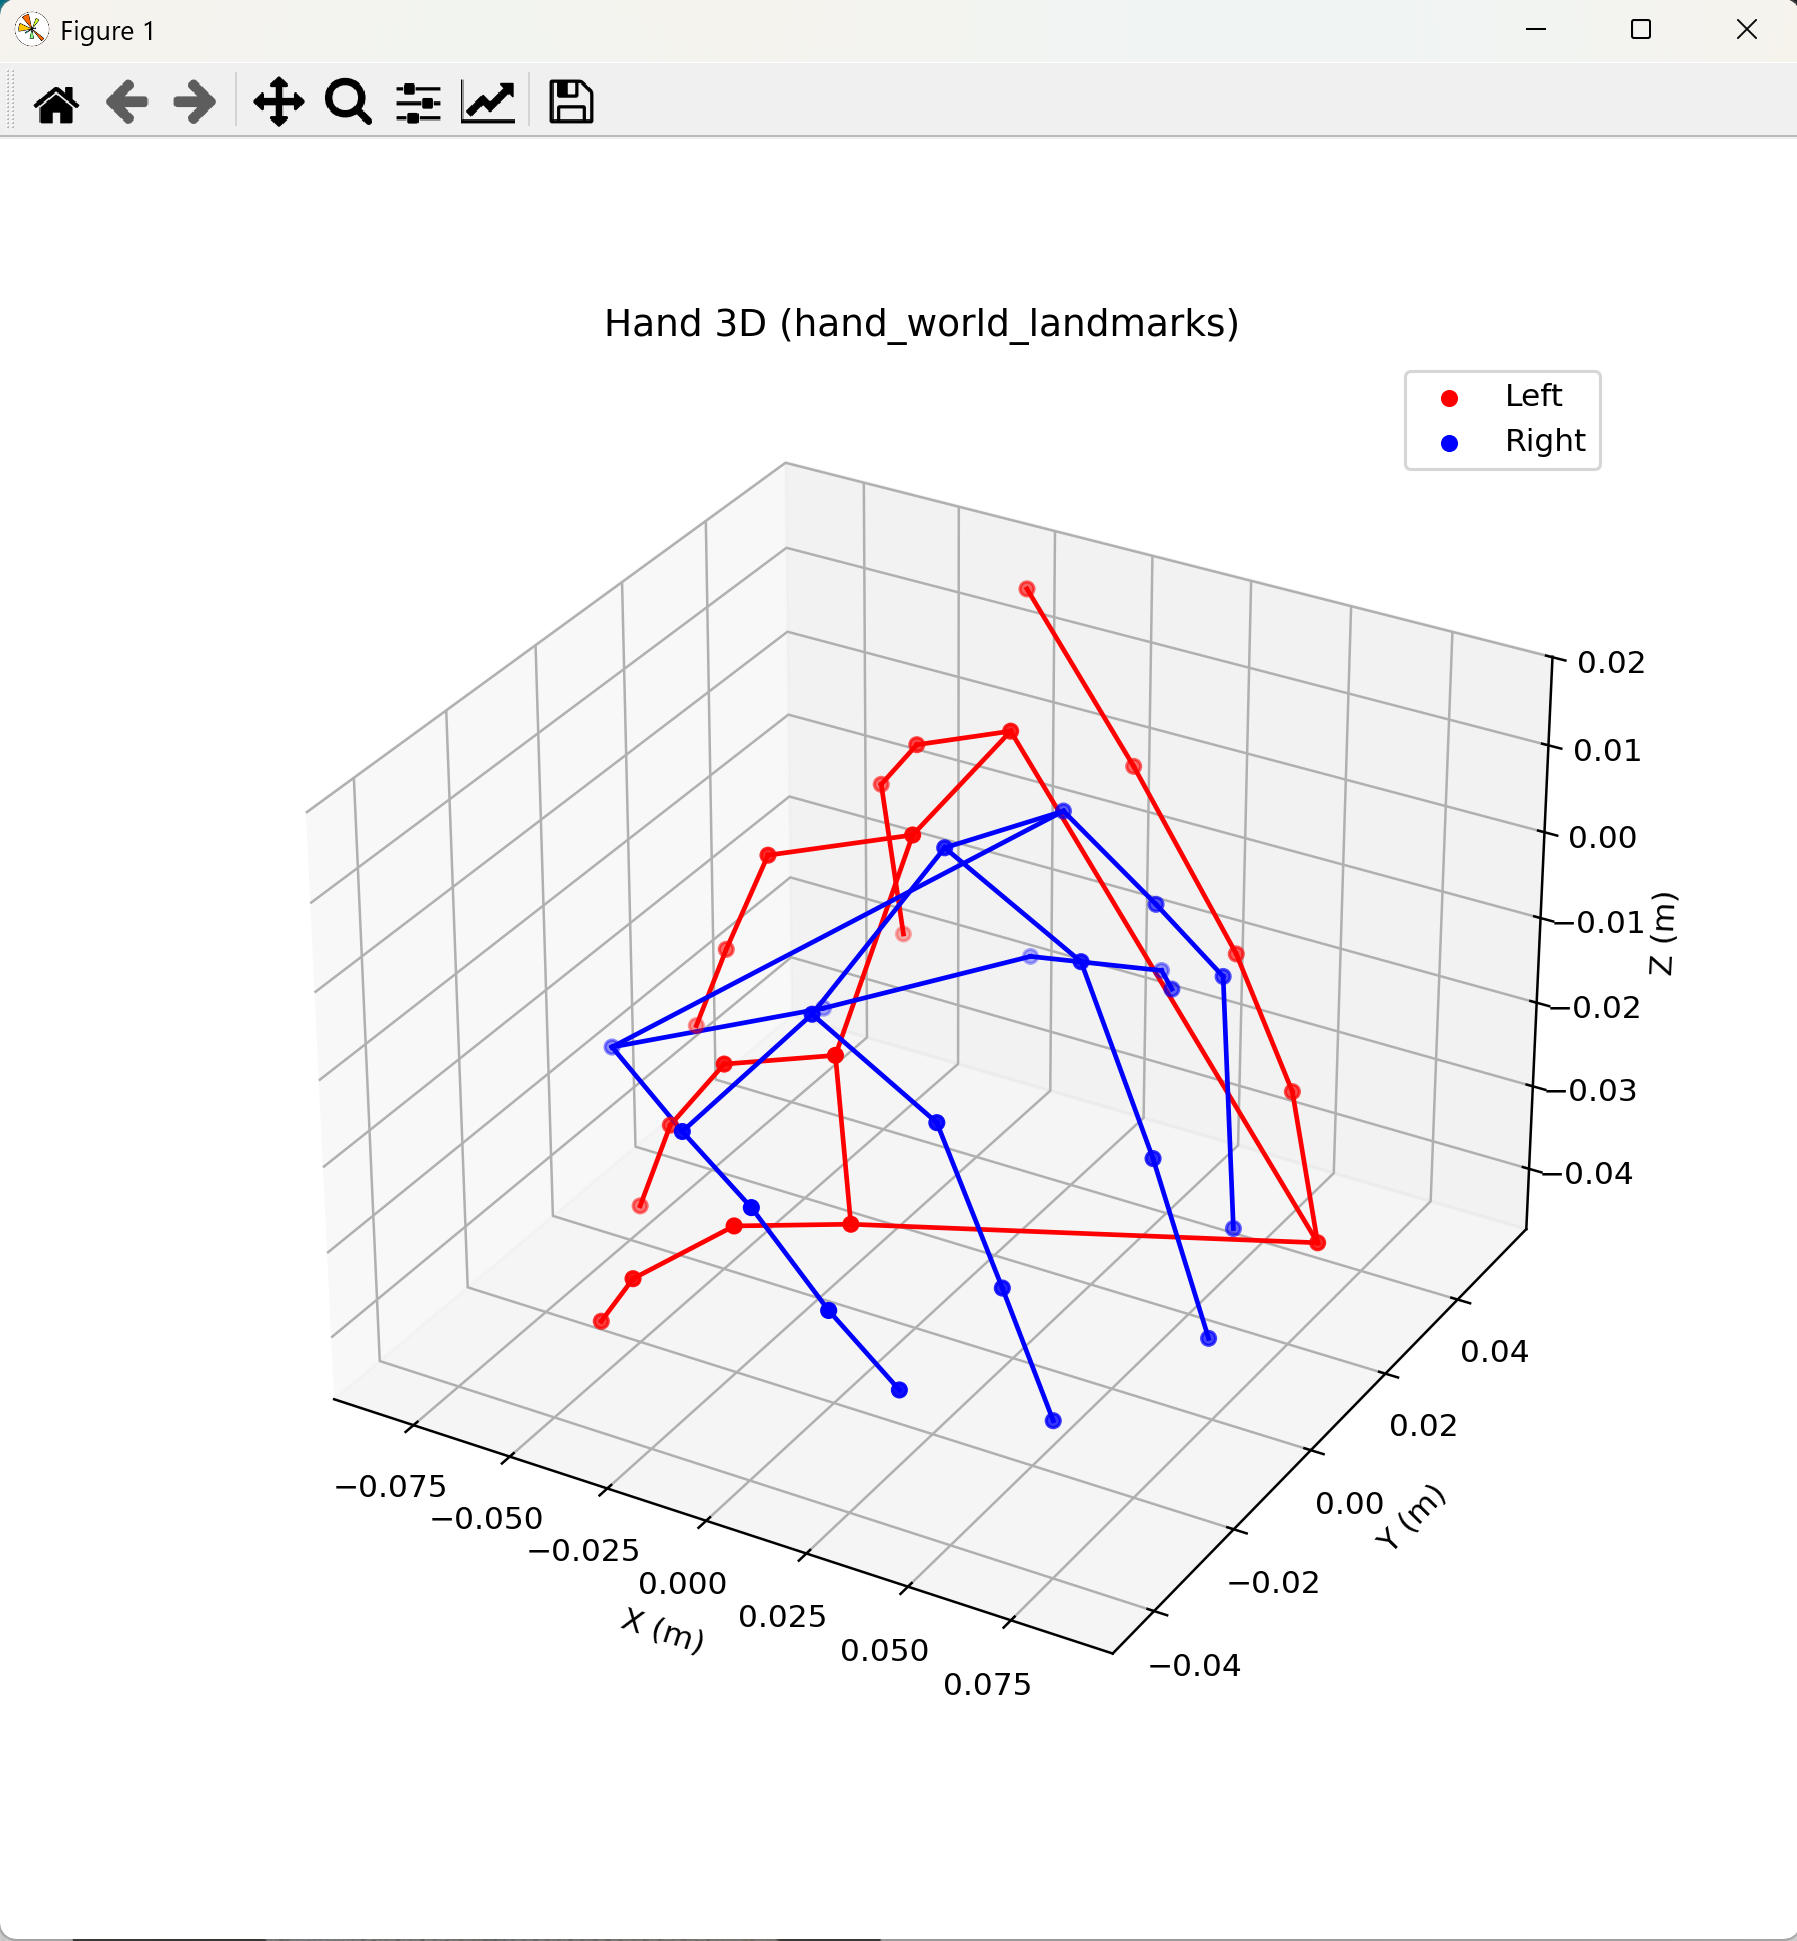
機能説明:Hand Landmarkerが出力するhand_world_landmarks(手首を原点とするメートル単位の3D座標)を,matplotlibの3D散布図および骨格線として可視化する.画面はマウスドラッグで回転でき,手指の立体構造を任意の視点から観察できる.モーション解析,手形状の3D計測,VR/AR用ジェスチャー設計等に利用される.
タスク5との関係:
- 同一点:使用するモデル(hand_landmarker.task),推論API(vision.HandLandmarker),21点の接続関係(HAND_CONNECTIONS),信頼度閾値の設定値(0.7)はすべてタスク5と同一である.推論部分のコードは同一形式とする.
- 違い:タスク5は2D画像座標(x, y)を画像平面に描画し,z値は数値表示のみであった.本タスクはhand_world_landmarksを参照することで,メートル単位の実空間スケールの3D座標を取得し,matplotlibの3D空間にプロットする.これにより,画像平面では確認しにくい奥行き方向の指の曲がり等を立体的に確認できる.
- 既知の限界:hand_world_landmarksは手首を原点とした相対座標であり,カメラからの絶対距離は得られない.左右の手が同時に検出された場合,各手の世界座標は独立した原点を持つため,両手の相対位置関係は本座標系では表現されない(相対位置はhand_landmarksの正規化画像座標を参照する).
- 設定での精度向上:信頼度閾値の調整はタスク5と共通.3D表示の見やすさのため,matplotlibのウィンドウサイズは適宜調整する.
# task_hand_landmarker_3d
import os, urllib.request
from pathlib import Path
import matplotlib.pyplot as plt
import mediapipe as mp
from mediapipe.tasks import python
from mediapipe.tasks.python import vision

# ==== ヘルパ ====
def get_script_dir():
    return Path(os.path.dirname(os.path.abspath(__file__)))

def get_image_dir(subdir):
    d = Path("C:/image") / subdir
    d.mkdir(parents=True, exist_ok=True)
    return d

def select_file(title, initialdir, filetypes):
    import tkinter as tk
    from tkinter import filedialog
    root = tk.Tk(); root.withdraw()
    path = filedialog.askopenfilename(title=title, initialdir=str(initialdir), filetypes=filetypes)
    root.destroy()
    return path
# ================

# User-Agent設定
opener = urllib.request.build_opener()
opener.addheaders = [("User-Agent", "Mozilla/5.0")]
urllib.request.install_opener(opener)

# 画像ダウンロード(タスク5と同一)
IMG_URL = "https://storage.googleapis.com/mediapipe-tasks/hand_landmarker/woman_hands.jpg"
IMG_DIR = get_image_dir("mediapipe")
img_path = IMG_DIR / Path(IMG_URL).name
if not img_path.exists():
    urllib.request.urlretrieve(IMG_URL, img_path)

# モデルダウンロード(スクリプトと同じディレクトリに保存.タスク5と同一モデル)
SCRIPT_DIR = get_script_dir()
MODEL_URL = "https://storage.googleapis.com/mediapipe-models/hand_landmarker/hand_landmarker/float16/latest/hand_landmarker.task"
model = SCRIPT_DIR / Path(MODEL_URL).name
if not model.exists():
    urllib.request.urlretrieve(MODEL_URL, model)

# 手の21点接続関係(タスク5と同一定義)
HAND_CONNECTIONS = [
    (0, 1), (1, 2), (2, 3), (3, 4),
    (0, 5), (5, 6), (6, 7), (7, 8),
    (5, 9), (9, 10), (10, 11), (11, 12),
    (9, 13), (13, 14), (14, 15), (15, 16),
    (13, 17), (0, 17), (17, 18), (18, 19), (19, 20)]

# 画像選択
selected = select_file(
    title="手の画像を選択", initialdir=IMG_DIR,
    filetypes=[("画像", "*.jpg *.jpeg *.png *.bmp"), ("すべて", "*.*")])

# 推論(タスク5と同一形式)
options = vision.HandLandmarkerOptions(
    base_options=python.BaseOptions(model_asset_path=str(model)),
    num_hands=2,
    min_hand_detection_confidence=0.7,
    min_hand_presence_confidence=0.7,
    min_tracking_confidence=0.7)
landmarker = vision.HandLandmarker.create_from_options(options)
image = mp.Image.create_from_file(selected)
result = landmarker.detect(image)

# 3D可視化(world landmarks使用)
fig = plt.figure(figsize=(8, 8))
ax = fig.add_subplot(111, projection='3d')
colors = ['r', 'b']
for i, (hand_world, handedness) in enumerate(zip(result.hand_world_landmarks, result.handedness)):
    label = handedness[0].category_name
    xs = [lm.x for lm in hand_world]
    ys = [lm.y for lm in hand_world]
    zs = [lm.z for lm in hand_world]
    c = colors[i % len(colors)]
    ax.scatter(xs, ys, zs, c=c, marker='o', label=label)
    for s, e in HAND_CONNECTIONS:
        ax.plot([xs[s], xs[e]], [ys[s], ys[e]], [zs[s], zs[e]], c=c)
    print(f"{label} hand: 21 world landmarks (meters)")
ax.set_xlabel('X (m)')
ax.set_ylabel('Y (m)')
ax.set_zlabel('Z (m)')
ax.set_title('Hand 3D (hand_world_landmarks)')
ax.legend()
plt.show()
landmarker.close()
【MediaPipe版】タスク15:姿勢の3D可視化(Pose Landmarker world landmarks)
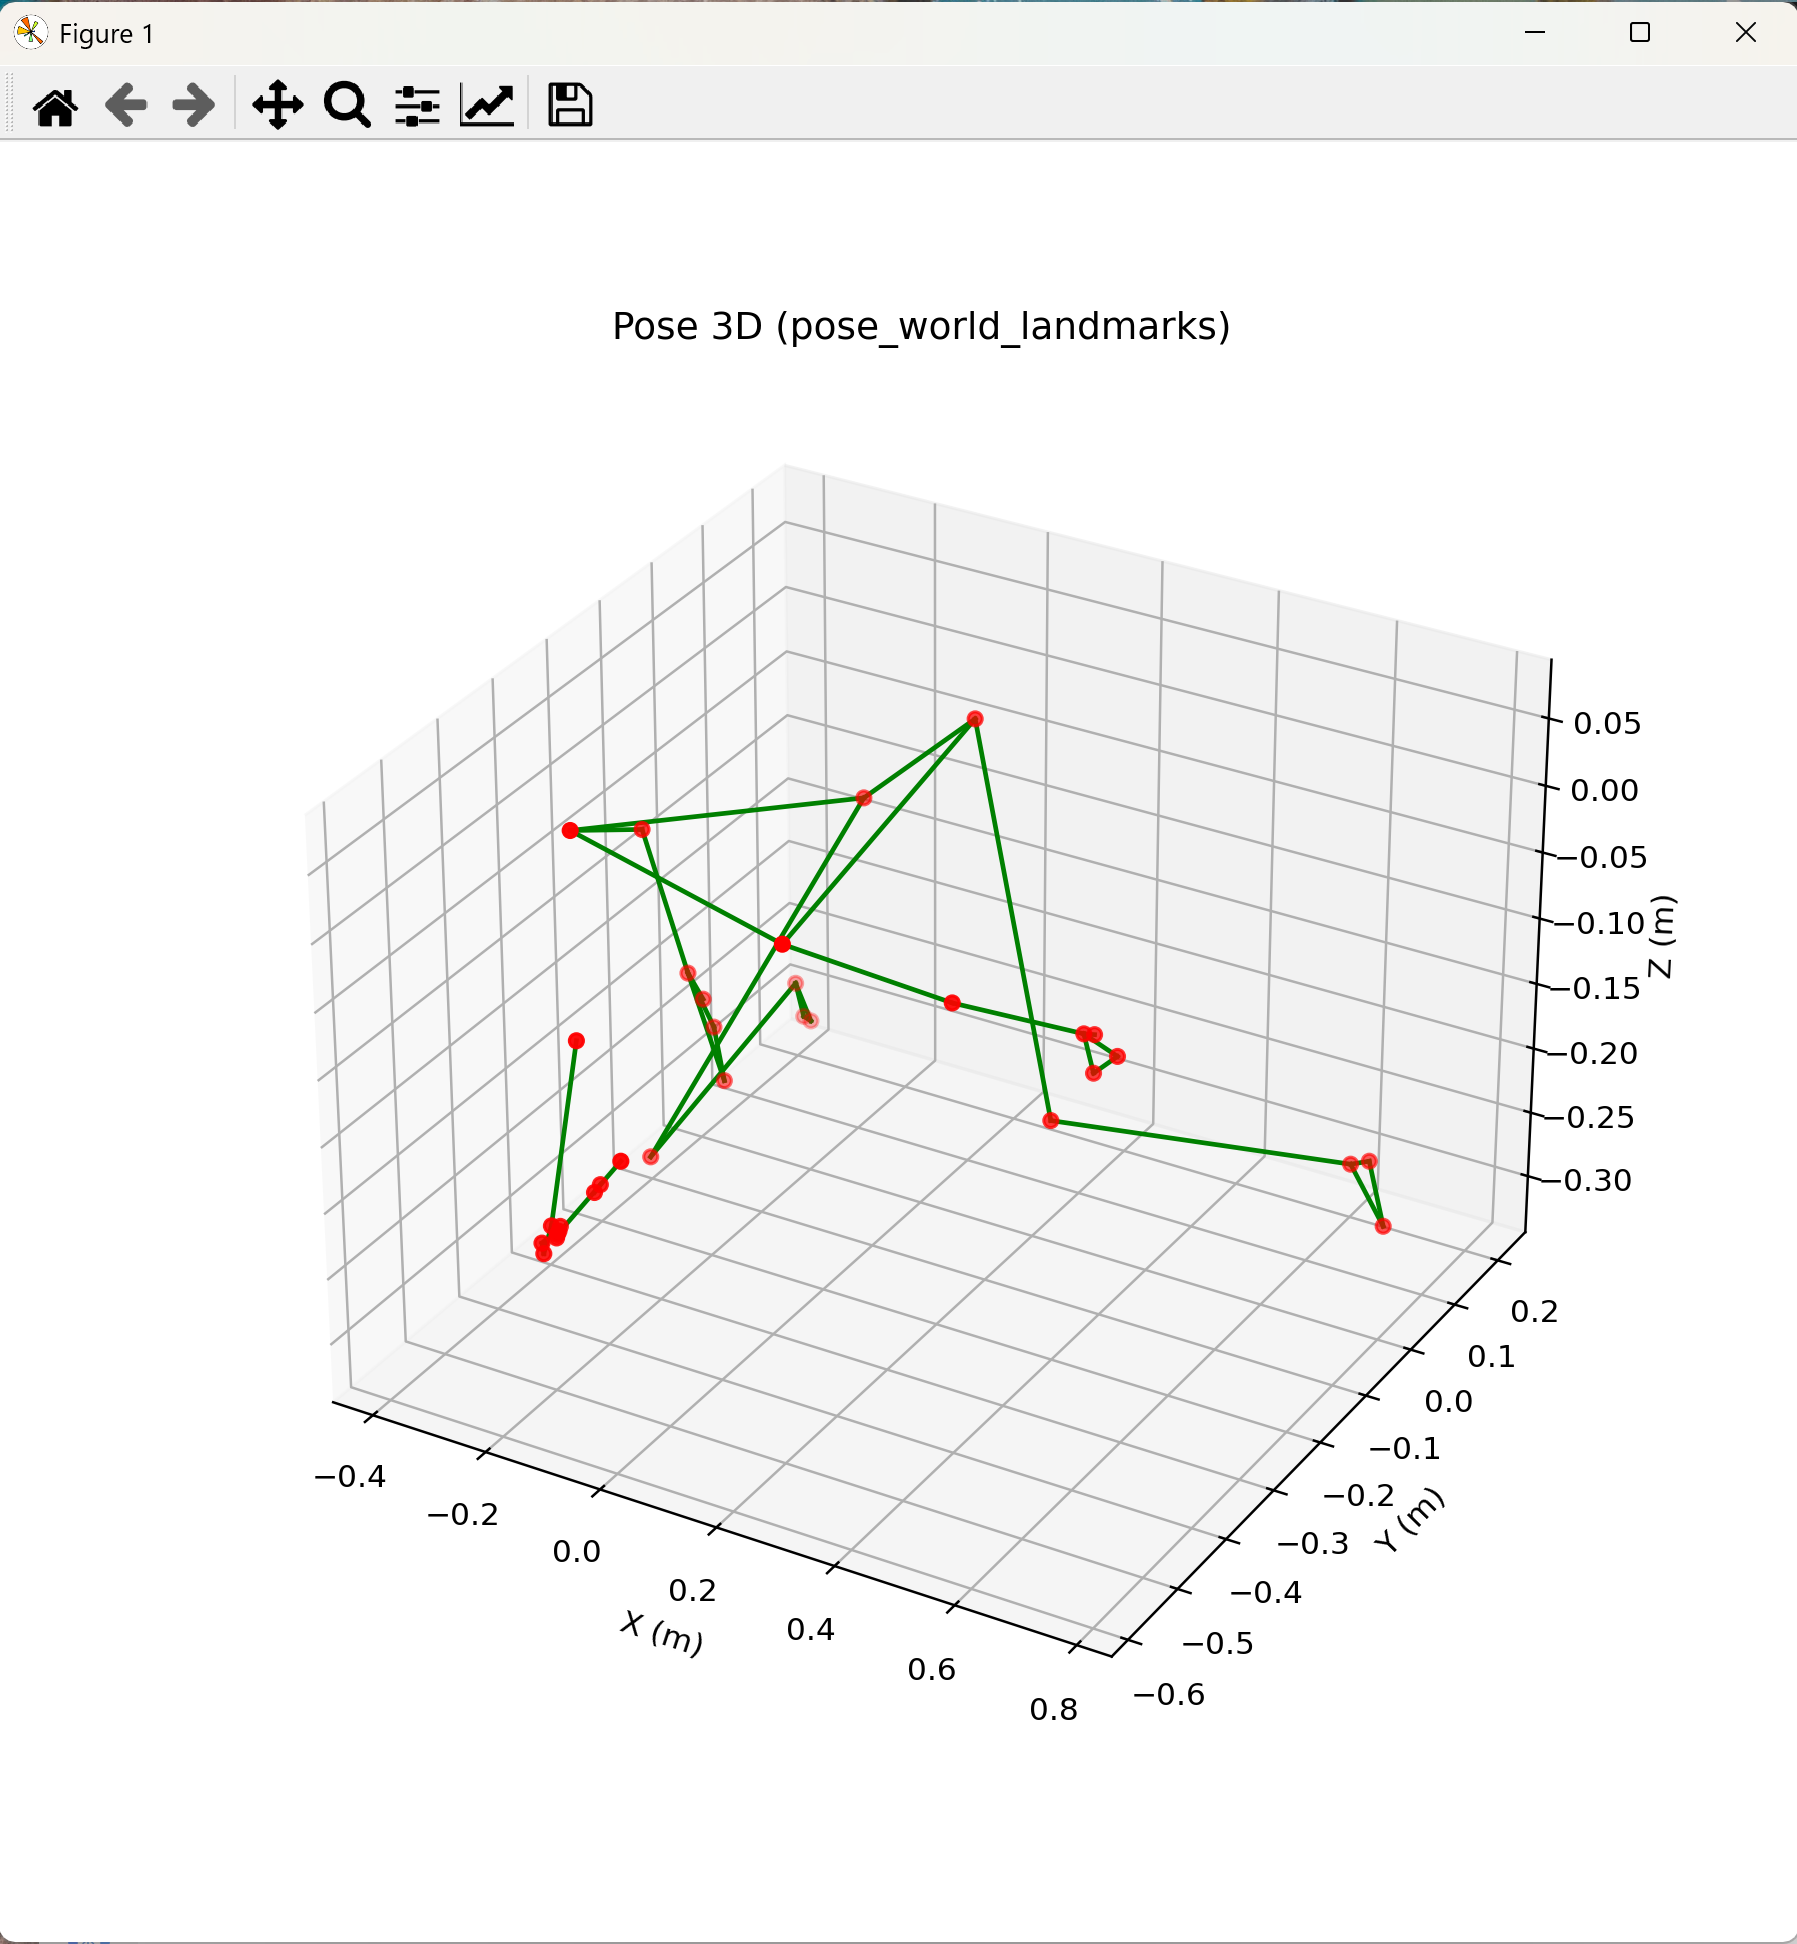
機能説明:Pose Landmarkerが出力するpose_world_landmarks(腰中央を原点とするメートル単位の3D座標)を,matplotlibの3D散布図および骨格線として可視化する.画面はマウスドラッグで回転でき,全身姿勢の立体構造を任意の視点から観察できる.フィットネスフォーム解析,リハビリ評価,モーションキャプチャの可視化等に利用される.
タスク4との関係:
- 同一点:使用するモデル(pose_landmarker_heavy.task),推論API(vision.PoseLandmarker),33点の接続関係(POSE_CONNECTIONS),信頼度閾値の設定値(0.7)はすべてタスク4と同一である.推論部分のコードも同一形式とする.
- 違い:タスク4は2D画像座標(x, y)を画像平面に描画し,z値は代表5点の数値表示のみであった.本タスクはpose_world_landmarksを参照することで,メートル単位の実空間スケールの3D座標を取得し,matplotlibの3D空間にプロットする.これにより,画像平面では確認しにくい前後方向の体幹の傾き等を立体的に確認できる.
- 既知の限界:pose_world_landmarksは腰中央を原点とした相対座標であり,カメラからの絶対距離は得られない.被写体の身長や体格による絶対スケールの個体差はモデルが推定する範囲内に限られる.
- 設定での精度向上:信頼度閾値の調整はタスク4と共通.3D表示の見やすさのため,matplotlibのウィンドウサイズは適宜調整する.
# task_pose_landmarker_3d
import os, urllib.request
from pathlib import Path
import matplotlib.pyplot as plt
import mediapipe as mp
from mediapipe.tasks import python
from mediapipe.tasks.python import vision

# ==== ヘルパ ====
def get_script_dir():
    return Path(os.path.dirname(os.path.abspath(__file__)))

def get_image_dir(subdir):
    d = Path("C:/image") / subdir
    d.mkdir(parents=True, exist_ok=True)
    return d

def select_file(title, initialdir, filetypes):
    import tkinter as tk
    from tkinter import filedialog
    root = tk.Tk(); root.withdraw()
    path = filedialog.askopenfilename(title=title, initialdir=str(initialdir), filetypes=filetypes)
    root.destroy()
    return path
# ================

# User-Agent設定
opener = urllib.request.build_opener()
opener.addheaders = [("User-Agent", "Mozilla/5.0")]
urllib.request.install_opener(opener)

# 画像ダウンロード(全身が写る単一人物画像)
IMG_URL = "https://cdn.pixabay.com/photo/2019/03/12/20/39/girl-4051811_960_720.jpg"
IMG_DIR = get_image_dir("pixabay")
img_path = IMG_DIR / Path(IMG_URL).name
if not img_path.exists():
    urllib.request.urlretrieve(IMG_URL, img_path)

# モデルダウンロード(スクリプトと同じディレクトリに保存.タスク4と同一モデル)
SCRIPT_DIR = get_script_dir()
MODEL_URL = "https://storage.googleapis.com/mediapipe-models/pose_landmarker/pose_landmarker_heavy/float16/latest/pose_landmarker_heavy.task"
model = SCRIPT_DIR / Path(MODEL_URL).name
if not model.exists():
    urllib.request.urlretrieve(MODEL_URL, model)

# BlazePoseの33点接続関係(タスク4と同一定義)
POSE_CONNECTIONS = [
    (0, 1), (1, 2), (2, 3), (3, 7), (0, 4), (4, 5), (5, 6), (6, 8),
    (9, 10), (11, 12), (11, 13), (13, 15), (15, 17), (15, 19), (15, 21),
    (17, 19), (12, 14), (14, 16), (16, 18), (16, 20), (16, 22), (18, 20),
    (11, 23), (12, 24), (23, 24), (23, 25), (24, 26), (25, 27), (26, 28),
    (27, 29), (28, 30), (29, 31), (30, 32), (27, 31), (28, 32)]

# 画像選択
selected = select_file(
    title="姿勢推定する画像を選択", initialdir=IMG_DIR,
    filetypes=[("画像", "*.jpg *.jpeg *.png *.bmp"), ("すべて", "*.*")])

# 推論(タスク4と同一形式)
options = vision.PoseLandmarkerOptions(
    base_options=python.BaseOptions(model_asset_path=str(model)),
    min_pose_detection_confidence=0.7,
    min_pose_presence_confidence=0.7,
    min_tracking_confidence=0.7)
landmarker = vision.PoseLandmarker.create_from_options(options)
image = mp.Image.create_from_file(selected)
result = landmarker.detect(image)

# 3D可視化(world landmarks使用)
fig = plt.figure(figsize=(8, 8))
ax = fig.add_subplot(111, projection='3d')
for pose_world in result.pose_world_landmarks:
    xs = [lm.x for lm in pose_world]
    ys = [lm.y for lm in pose_world]
    zs = [lm.z for lm in pose_world]
    ax.scatter(xs, ys, zs, c='r', marker='o')
    for s, e in POSE_CONNECTIONS:
        ax.plot([xs[s], xs[e]], [ys[s], ys[e]], [zs[s], zs[e]], c='g')
    print("33 world landmarks 検出 (meters)")
ax.set_xlabel('X (m)')
ax.set_ylabel('Y (m)')
ax.set_zlabel('Z (m)')
ax.set_title('Pose 3D (pose_world_landmarks)')
plt.show()
landmarker.close()
MediaPipe の用途例
本資料の構成と前提
本節で用いる「12タスク」は,タスク1〜10(実装対象)にタスク11・12(Text Classifier,Language Detector)を加えた,MediaPipe Tasks API のタスク種別の総数を指す.冒頭の「15種類のAIタスク」およびタスク1〜15は,これら10種類のタスク種別に対し,タスク13〜15(Holistic Landmarker,および Hand/Pose Landmarker の3D可視化)という派生・組み合わせプログラムを加えた本資料のプログラム本数であり,両者は数える対象が異なる別の集計である.
本資料では,MediaPipe Tasks API のうち Vision 系9タスク(Object Detector,Image Classifier,Image Segmenter,Pose Landmarker,Hand Landmarker,Gesture Recognizer,Face Landmarker,Face Detector,Image Embedder)と Audio 系1タスク(Audio Classifier)を組み合わせた7つの応用例を扱う.Text 系2タスク(Text Classifier,Language Detector)は本資料の対象外であるが,Tasks API の全体像を示す目的で「12タスク」として併記する.
7応用例の内訳は,用途例として概観する5件(WebVTuberスタジオ,ARフォトスタジオ,なんでも画像検索,ジェスチャと指先動作による対話型コントローラ,リアルタイム音響イベント分類)と,Face Landmarker を深掘りする2件(顔交換オーバーレイ,表情・頭部姿勢転写)からなる.
各コード例は学習目的のため簡略化しており,エラーチェック,例外処理,フォールバック処理は省略する(顔・手・音などの検出が空のフレームで実行時例外が生じる場合がある).本番運用ではこれらを別途実装すること.実行環境としては,pip install --no-user および「コマンドプロンプトを管理者として実行」は OS 全体に共通導入する場合の手順であり,venv 等の仮想環境を用いる場合はいずれも不要である.
MediaPipe の用途例を以下に示す.
- WebVTuberスタジオ
Face Landmarker,Pose Landmarker,Hand Landmarker の出力を ARKit(AppleのAR開発フレームワーク.業界標準のブレンドシェイプ名を提供)互換係数で VRM(VRMコンソーシアムが策定した3Dアバター用ファイル形式)アバターに反映する.顔の表情,全身姿勢,手指形状をリアルタイムに3Dキャラクタへ転写する.ライブ配信,遠隔授業,匿名での講演収録において,演者の素顔を露出せずに表現を維持する用途に適する. - ARフォトスタジオ(背景・髪色・服色・顔フィルタの一括変換)
Image Segmenter のマスク(領域分割結果を画素ごとのクラス番号で表したデータ)と Face Detector で背景,髪,服を一括変換する.人物,髪,衣服の領域を画素単位で分離し色や質感を差し替える.オンライン会議の背景除去,SNS向けの外観シミュレーション,プライバシー配慮が必要な映像素材の生成に適する. - 「なんでも画像検索」(類似画像検索)
Object Detector と Image Embedder のコサイン類似度(2つのベクトルのなす角度から計算する類似度.値域は-1から1で,1に近いほど類似)で自前コレクションを近傍検索(特徴ベクトル空間で最も近いデータを探す処理)する.COCO 80クラスで物体位置を特定し,ImageNet 由来の1000クラスで細分類したうえで独自画像群と照合する.博物館の展示解説,地域生物観察,研究室備品の棚卸し等で「カメラに写したものが何か」を同定する用途に適する. - ジェスチャと指先動作による対話型コントローラ
Hand Landmarker の指先座標と Gesture Recognizer の7クラスで楽器や機器を操作する.指先の空間位置と7種類の組み込みジェスチャを入力信号化する.エアピアノ等の音楽パフォーマンス教材,プレゼンテーションの非接触操作,手術室や調理現場等で手が塞がる場面でのスマート家電制御に適する. - マイク入力によるリアルタイム音響イベント分類と音声波形・スペクトル表示
YAMNet 521クラス(音響イベントの分類カテゴリ数)でマイク入力を分類し,時間波形と周波数スペクトルを同期表示する.授業の音環境分析,異常音検知,音声アーカイブの自動タグ付けにおいて,ASR(自動音声認識:音声を文字に変換する技術)に依存せず音響状況を把握する用途に適する.
ここで参照する MediaPipe Tasks API の12タスクは次のとおりである.
Object Detector(1),Image Classifier(2),Image Segmenter(3),Pose Landmarker(4),Hand Landmarker(5),Gesture Recognizer(6),Face Landmarker(7),Face Detector(8),Image Embedder(9),Audio Classifier(10),Text Classifier(11),Language Detector(12).本資料で実装するのはこのうち1〜10の10タスクである.
後続のコード中の t += 33 は VIDEOモード(連続フレームを時系列的に処理する動作モード)に与えるミリ秒単位のタイムスタンプ(フレームごとの時刻情報)であり,約30 FPS相当である(1000ミリ秒 ÷ 30 ≒ 33ミリ秒).cv2.waitKey(1) == 27 の 27 はESCキーのASCIIコード(文字に割り当てられた数値.ESCは27番)を指す.MediaPipe公式配布モデルは Apache License 2.0(再配布や改変を認めるオープンソースライセンス)であるが,個別モデルは学習データ由来の制約等で別条件が付くことがあるため,商用利用および再配布時は各モデルカード(モデルの仕様やライセンスを記載した公式文書)のライセンス条項を確認すること.
各コード例は次のスタイル方針で記述する.モデルファイルの自動ダウンロードはスクリプト先頭の辞書 MODELS によるループで統一する.エラーチェック,例外処理,フォールバック処理は記述しない.関数化は行数削減に寄与する場合のみ行う.同一機能(モデルダウンロード,OpenCV-MediaPipe間の色変換,VIDEOモードのタイムスタンプ更新,ESCキーによる終了処理,リソース解放)は全コードで同一の記述に揃える.Pose Landmarker および Hand Landmarker のランドマーク番号(例:左肩=11,人差し指先=8)は MediaPipe 公式ドキュメントのランドマーク対応図に従う.正規化座標(画像の左上を(0,0),右下を(1,1)とする無次元座標)から画素位置への変換は,画像の幅 W と高さ H を乗じることで行う.
1. WebVTuberスタジオ
本コードは Face Landmarker,Pose Landmarker,Hand Landmarker を VIDEOモードで併用し,ウェブカメラ映像から毎フレーム以下を取得する.
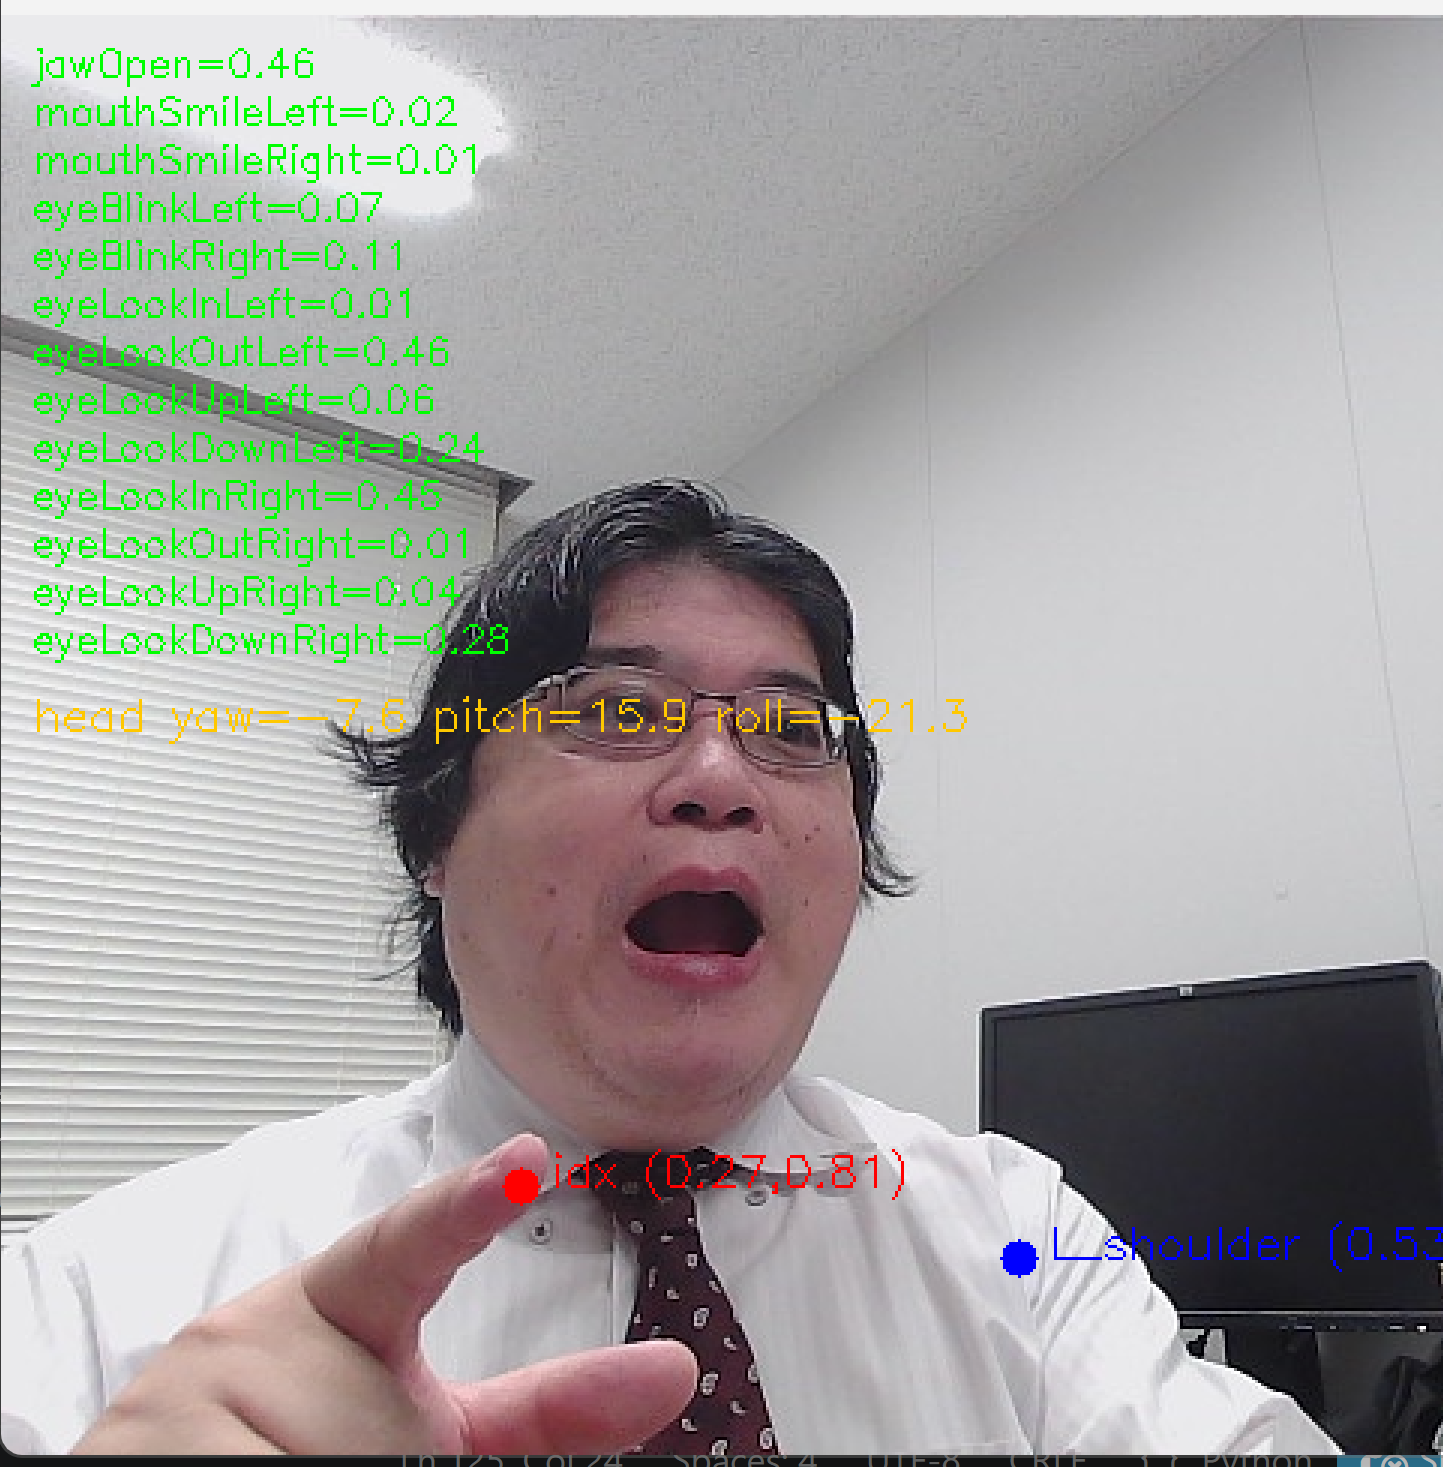
output_face_blendshapes=True で取得したARKit互換ブレンドシェイプ係数(顔の各部位の動きを0から1の数値で表す係数)から,口パク用の jawOpen(顎の開き),mouthSmileLeft,mouthSmileRight(左右の口角),瞬き用の eyeBlinkLeft,eyeBlinkRight(左右の目の閉じ),視線用の eyeLookIn/Out/Up/Down × Left/Right(左右各眼の内・外・上・下方向への視線移動)を抽出する.左右で対をなす項目を1組と数えると,jawOpen 1項目,口角1組,瞬き1組,視線4組の8カテゴリ・計13値となる.さらに output_facial_transformation_matrixes=True で得られる4×4変換行列(3次元空間における回転と並進を表す行列)の回転成分から頭部姿勢のyaw(左右の首振り),pitch(上下のうなずき),roll(左右の首傾げ)を算出する.
補助情報として身体の左肩座標および両手の人差し指先座標も併せて取得する.
Face Landmarker(478個の3Dランドマーク,52個の blendshapes スコア(各表情パラメータの強度),4×4の facial_transformation_matrixes),Pose Landmarker(33個のランドマーク:各点に x,y,z,visibility(点が可視である確率),presence(点が画像内に存在する確率)),Hand Landmarker(21個のランドマーク × 最大2手,handedness(左右の判定))の出力をマッピング層(Kalidokit 等:MediaPipe出力をVRMボーン回転値に変換するライブラリ)で @pixiv/three-vrm(Three.js上でVRMアバターを表示するライブラリ)のボーン回転と表情パラメータに変換する.
WebAssembly(ブラウザ上で動作するバイナリ実行形式)により単一タスクならCPUで30 FPS級,三タスク並行時は端末性能に応じた間引き(処理フレームを一定間隔で省略する手法)が必要となる.OBS仮想カメラ連携(配信ソフトOBSの仮想カメラ機能と接続する機能)で配信環境にも展開できる.
使用タスク:Face Landmarker(7),Pose Landmarker(4),Hand Landmarker(5)
ユーザ操作
- コマンドプロンプトを管理者として実行し,
pip install --no-user mediapipe opencv-pythonを実行する(仮想環境利用時は管理者権限および--no-userは不要) - ウェブカメラを接続してスクリプトを実行する(VRMレンダリングは別途Three.js(WebGLベースの3D描画ライブラリ)等での実装を想定し,本コードは抽出値の出力と確認表示までを担当する).ESCキーで終了する
Pythonコード
import os
import urllib.request
import cv2
import numpy as np
import mediapipe as mp
from mediapipe.tasks import python
from mediapipe.tasks.python import vision

# モデルファイルの自動ダウンロード
MODELS = {
    'face_landmarker.task':
        'https://storage.googleapis.com/mediapipe-models/face_landmarker/face_landmarker/float16/1/face_landmarker.task',
    'pose_landmarker_lite.task':
        'https://storage.googleapis.com/mediapipe-models/pose_landmarker/pose_landmarker_lite/float16/1/pose_landmarker_lite.task',
    'hand_landmarker.task':
        'https://storage.googleapis.com/mediapipe-models/hand_landmarker/hand_landmarker/float16/1/hand_landmarker.task',
}
for name, url in MODELS.items():
    if not os.path.exists(name):
        urllib.request.urlretrieve(url, name)

# 取り出すブレンドシェイプ係数(ARKit互換名,8カテゴリ・計13値)
BLENDSHAPES = [
    'jawOpen',
    'mouthSmileLeft', 'mouthSmileRight',
    'eyeBlinkLeft', 'eyeBlinkRight',
    'eyeLookInLeft', 'eyeLookOutLeft', 'eyeLookUpLeft', 'eyeLookDownLeft',
    'eyeLookInRight', 'eyeLookOutRight', 'eyeLookUpRight', 'eyeLookDownRight',
]

# タスクの初期化(VIDEOモード)
face = vision.FaceLandmarker.create_from_options(vision.FaceLandmarkerOptions(
    base_options=python.BaseOptions(model_asset_path='face_landmarker.task'),
    running_mode=vision.RunningMode.VIDEO,
    output_face_blendshapes=True,
    output_facial_transformation_matrixes=True,
    num_faces=1))
pose = vision.PoseLandmarker.create_from_options(vision.PoseLandmarkerOptions(
    base_options=python.BaseOptions(model_asset_path='pose_landmarker_lite.task'),
    running_mode=vision.RunningMode.VIDEO,
    num_poses=1))
hand = vision.HandLandmarker.create_from_options(vision.HandLandmarkerOptions(
    base_options=python.BaseOptions(model_asset_path='hand_landmarker.task'),
    running_mode=vision.RunningMode.VIDEO,
    num_hands=2))

cap = cv2.VideoCapture(0)
t = 0  # ミリ秒単位のタイムスタンプ
while True:
    ok, frame = cap.read()
    if not ok:
        break
    H, W = frame.shape[:2]
    img = mp.Image(image_format=mp.ImageFormat.SRGB,
                   data=cv2.cvtColor(frame, cv2.COLOR_BGR2RGB))
    f = face.detect_for_video(img, t)
    p = pose.detect_for_video(img, t)
    h = hand.detect_for_video(img, t)
    t += 33  # 約30FPS相当

    # 顔ブレンドシェイプ:口パク・瞬き・視線
    if f.face_blendshapes:
        s = {b.category_name: b.score for b in f.face_blendshapes[0]}
        print('blend:', ' '.join(f'{k}={s[k]:.2f}' for k in BLENDSHAPES))
        for i, k in enumerate(BLENDSHAPES):
            cv2.putText(frame, f'{k}={s[k]:.2f}', (10, 20 + i * 16),
                        cv2.FONT_HERSHEY_SIMPLEX, 0.42, (0, 255, 0), 1)

    # 顔変換行列:頭部姿勢(yaw・pitch・roll)
    if f.facial_transformation_matrixes:
        R = f.facial_transformation_matrixes[0][:3, :3]
        yaw = np.degrees(np.arctan2(R[1, 0], R[0, 0]))
        pitch = np.degrees(np.arctan2(-R[2, 0], np.sqrt(R[2, 1] ** 2 + R[2, 2] ** 2)))
        roll = np.degrees(np.arctan2(R[2, 1], R[2, 2]))
        print(f'head: yaw={yaw:.1f} pitch={pitch:.1f} roll={roll:.1f}')
        cv2.putText(frame,
                    f'head yaw={yaw:.1f} pitch={pitch:.1f} roll={roll:.1f}',
                    (10, 20 + len(BLENDSHAPES) * 16 + 10),
                    cv2.FONT_HERSHEY_SIMPLEX, 0.5, (0, 200, 255), 1)

    # 左肩(Pose Landmarker のランドマーク番号11)
    if p.pose_landmarks:
        ls = p.pose_landmarks[0][11]
        print(f'left_shoulder=({ls.x:.2f}, {ls.y:.2f})')
        px, py = int(ls.x * W), int(ls.y * H)
        cv2.circle(frame, (px, py), 6, (255, 0, 0), -1)
        cv2.putText(frame, f'L_shoulder ({ls.x:.2f},{ls.y:.2f})',
                    (px + 10, py), cv2.FONT_HERSHEY_SIMPLEX, 0.5, (255, 0, 0), 1)

    # 両手の人差し指先(Hand Landmarker のランドマーク番号8)
    for hlm in h.hand_landmarks:
        tip = hlm[8]
        print(f'index_tip=({tip.x:.2f}, {tip.y:.2f})')
        px, py = int(tip.x * W), int(tip.y * H)
        cv2.circle(frame, (px, py), 6, (0, 0, 255), -1)
        cv2.putText(frame, f'idx ({tip.x:.2f},{tip.y:.2f})',
                    (px + 10, py), cv2.FONT_HERSHEY_SIMPLEX, 0.5, (0, 0, 255), 1)

    cv2.imshow('vtuber preview', frame)
    if cv2.waitKey(1) == 27:  # ESCキーによる終了処理
        break

cap.release()
cv2.destroyAllWindows()
演習1.WebVTuberスタジオ
手順
- コマンドプロンプトを管理者として実行し,
pip install --no-user mediapipe opencv-pythonを実行する(仮想環境利用時は管理者権限および--no-userは不要) - ウェブカメラを接続してスクリプトを実行する
- 口を開閉,左右の口角を上げる,瞬き,左右上下への視線移動,首の左右振り・上下うなずき・左右傾げの動作を順に行う
- 左肩を画面内で動かし,両手の人差し指を画面内で移動させる
- ESCキーで終了する
ヒント
- 顔の向きが正面に近いほどブレンドシェイプ係数の出力が安定する
- 左肩は
pose_landmarks[0][11],人差し指先はhand_landmarks[i][8]に対応する
考察ポイント
- 口の開閉に対し
jawOpenの値がどの範囲で変化するか - 瞬きの瞬間に
eyeBlinkLeft,eyeBlinkRightがどのように変化するか - 首を振った際のyaw,pitch,rollの値域と,動作との対応
- 正規化座標(x, y)が左肩・人差し指先の画面内位置とどう対応するか
2. ARフォトスタジオ(背景・髪色・服色・顔フィルタの一括変換)
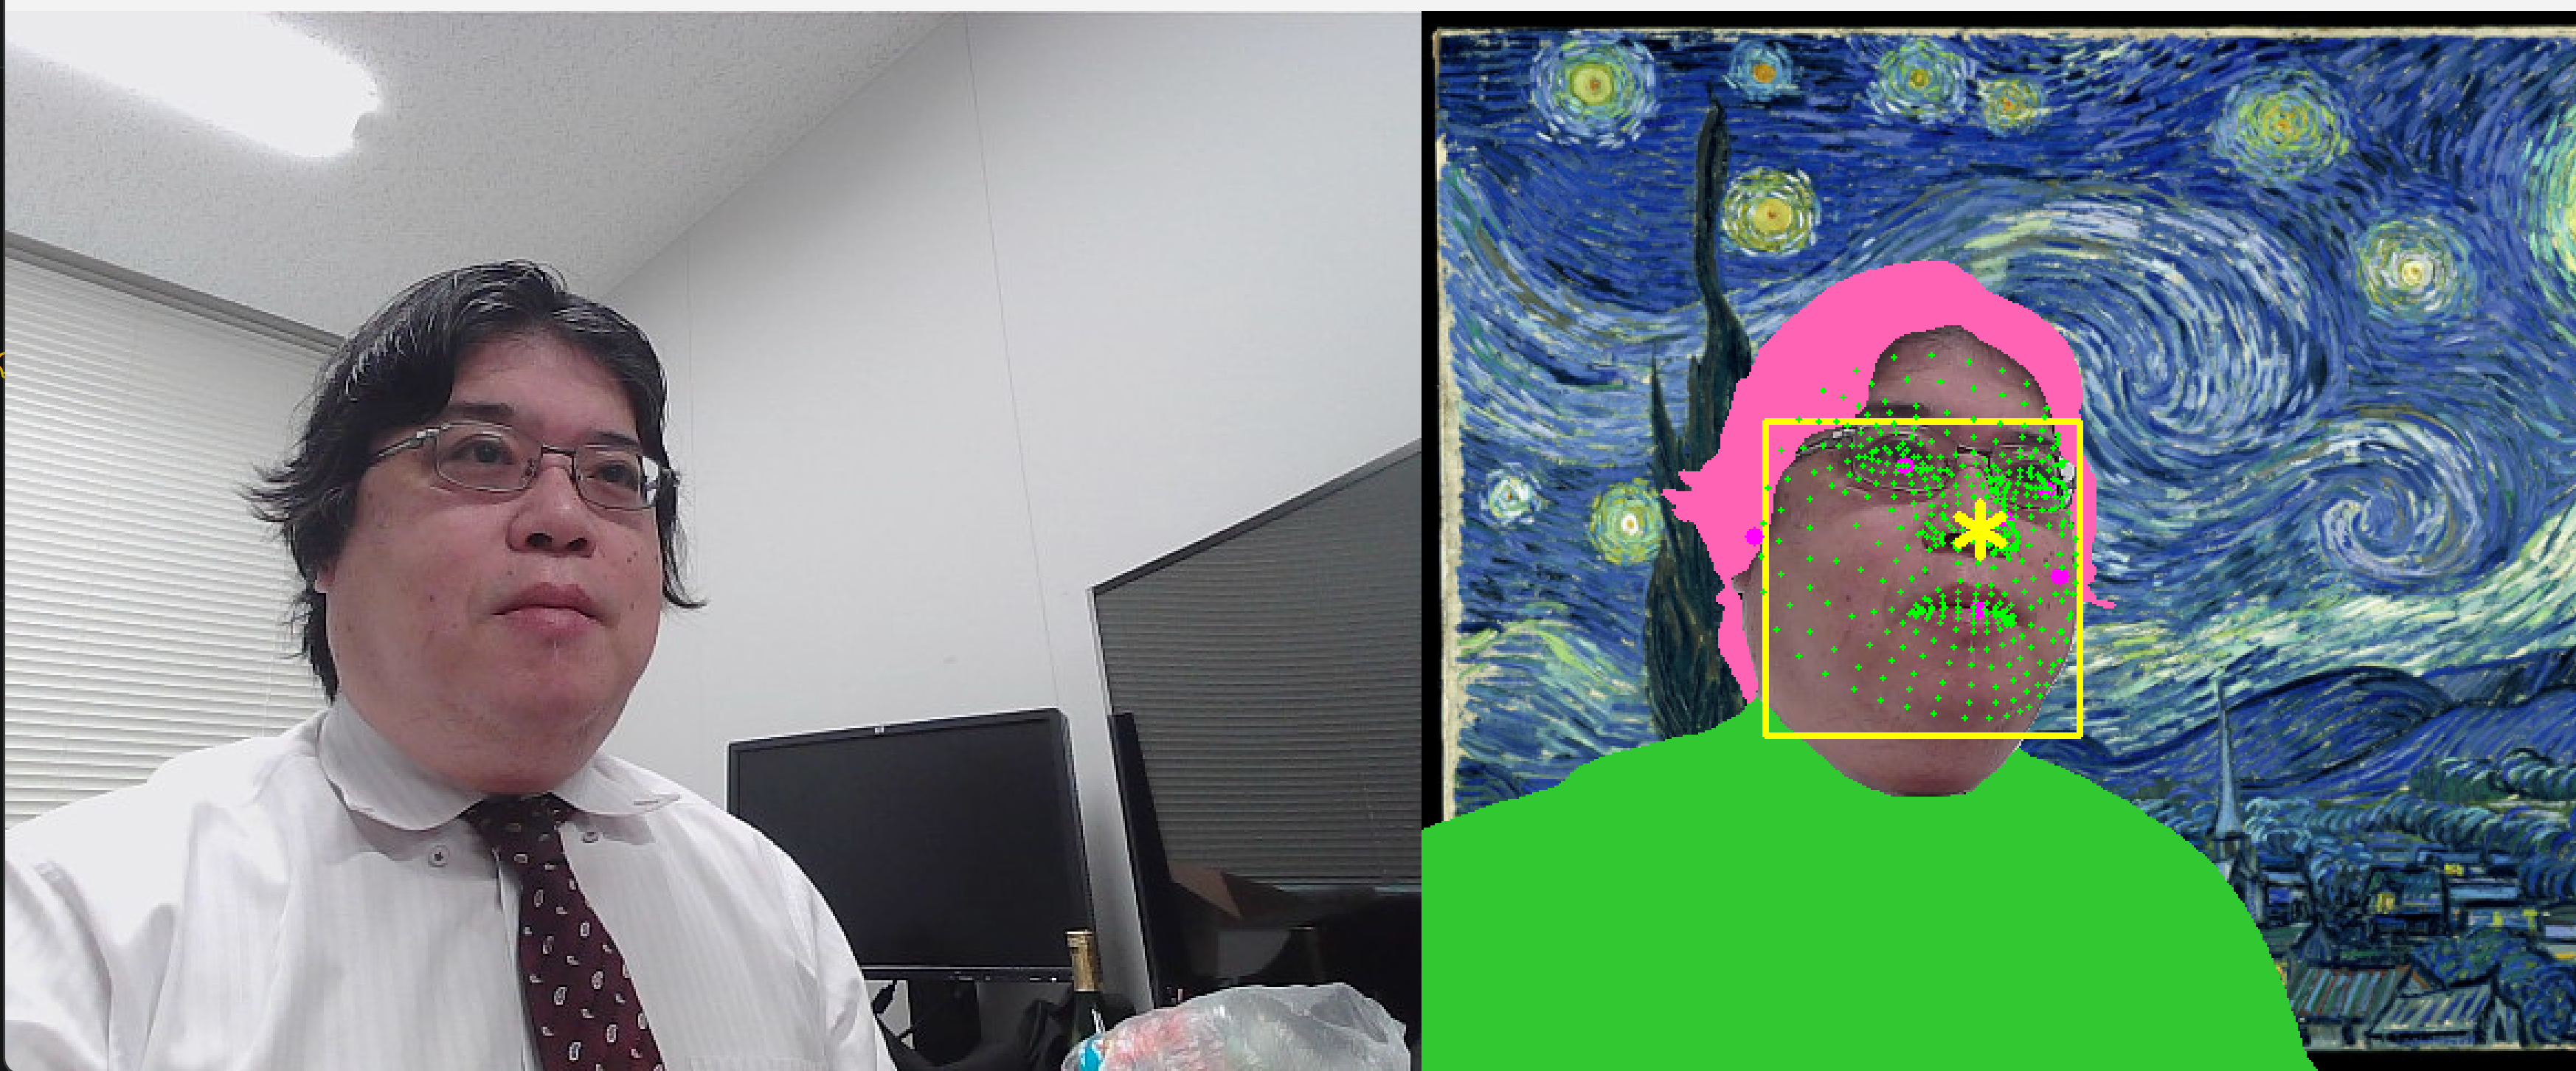
Image Segmenter で人物,髪,服を画素単位に分離し,output_category_mask=True(画素ごとに最も確率の高いクラス番号を出力する設定)と output_confidence_masks=True(クラスごとの確率マップを出力する設定)で取得したマスクを参照して領域ごとに色を差し替える(ブラウザ実装では同等処理を WebGL シェーダ(GPU上で描画処理を行う小さなプログラム)で行うこともできる).
分離手段の選択肢としては,背景差し替え用の Selfie segmentation(selfie_segmenter.tflite),髪色変換用の Hair segmentation(hair_segmenter.tflite),多領域同時分離用の Multi-class selfie(selfie_multiclass_256x256.tflite,6クラス:0:background,1:hair,2:body-skin,3:face-skin,4:clothes,5:others)の3モデルが利用可能である.本コードでは1つのモデルで背景・髪・服を同時に分離できる Multi-class selfie のみを採用する.
Face Detector の6個のキーポイント(左眼,右眼,鼻先,口中心,左耳珠点,右耳珠点.公式名は left/right eye tragion)で顔向き判定とプライバシーぼかしを行い,Face Landmarker の facial_transformation_matrixes で立体スタンプ(3次元位置に追従して描画する装飾)を位置合わせする.
ビフォーアフター比較による教材演出やSNS投稿向けコンテンツ生成に応用できる.
使用タスク:Image Segmenter(3),Face Detector(8),Face Landmarker(7)
ユーザ操作
- コマンドプロンプトを管理者として実行し,
pip install --no-user mediapipe opencv-python numpyを実行する(仮想環境利用時は管理者権限および--no-userは不要) - ウェブカメラを接続してスクリプトを実行する(モデルファイルは初回起動時のみダウンロードされ,スクリプトと同一ディレクトリに保存される.参照画像はスクリプト起動ごとに上書きダウンロードされる).ESCキーで終了する
Pythonコード
import os
import urllib.request
import cv2
import mediapipe as mp
from mediapipe.tasks import python
from mediapipe.tasks.python import vision

# モデルファイルの自動ダウンロード
MODELS = {
    'selfie_multiclass_256x256.tflite':
        'https://storage.googleapis.com/mediapipe-models/image_segmenter/selfie_multiclass_256x256/float32/latest/selfie_multiclass_256x256.tflite',
    'blaze_face_short_range.tflite':
        'https://storage.googleapis.com/mediapipe-models/face_detector/blaze_face_short_range/float16/1/blaze_face_short_range.tflite',
    'face_landmarker.task':
        'https://storage.googleapis.com/mediapipe-models/face_landmarker/face_landmarker/float16/1/face_landmarker.task',
}
for name, url in MODELS.items():
    if not os.path.exists(name):
        urllib.request.urlretrieve(url, name)

# バーチャル背景用の参照画像(OpenCV公式テストデータ:ゴッホ「星月夜」)を上書きダウンロード
urllib.request.urlretrieve(
    'https://raw.githubusercontent.com/opencv/opencv/master/samples/data/starry_night.jpg',
    'reference.jpg')

# タスクの初期化(VIDEOモード)
seg = vision.ImageSegmenter.create_from_options(vision.ImageSegmenterOptions(
    base_options=python.BaseOptions(model_asset_path='selfie_multiclass_256x256.tflite'),
    running_mode=vision.RunningMode.VIDEO,
    output_category_mask=True,
    output_confidence_masks=True))
fd = vision.FaceDetector.create_from_options(vision.FaceDetectorOptions(
    base_options=python.BaseOptions(model_asset_path='blaze_face_short_range.tflite'),
    running_mode=vision.RunningMode.VIDEO))
fl = vision.FaceLandmarker.create_from_options(vision.FaceLandmarkerOptions(
    base_options=python.BaseOptions(model_asset_path='face_landmarker.task'),
    running_mode=vision.RunningMode.VIDEO,
    output_facial_transformation_matrixes=True))

cap = cv2.VideoCapture(0)
W = int(cap.get(cv2.CAP_PROP_FRAME_WIDTH))
H = int(cap.get(cv2.CAP_PROP_FRAME_HEIGHT))
bg = cv2.resize(cv2.imread('reference.jpg'), (W, H))  # 背景合成用に画像サイズを揃える

t = 0  # ミリ秒単位のタイムスタンプ
while True:
    ok, frame = cap.read()
    if not ok:
        break
    img = mp.Image(image_format=mp.ImageFormat.SRGB,
                   data=cv2.cvtColor(frame, cv2.COLOR_BGR2RGB))
    s = seg.segment_for_video(img, t)
    d = fd.detect_for_video(img, t)
    l = fl.detect_for_video(img, t)
    t += 33  # 約30FPS相当

    # カテゴリマスクを画素単位のクラス番号に変換し,領域ごとに色を差し替える
    mask = s.category_mask.numpy_view().squeeze()  # 形状 (H, W, 1) を (H, W) に
    out = frame.copy()
    out[mask == 0] = bg[mask == 0]     # 0:background → 参照画像で合成
    out[mask == 1] = (180, 100, 255)   # 1:hair → ピンク
    out[mask == 4] = (50, 200, 50)     # 4:clothes → 緑

    # Face Detector:バウンディングボックス + 6キーポイント
    # (左眼,右眼,鼻先,口中心,左耳珠点,右耳珠点)
    for det in d.detections:
        bb = det.bounding_box
        cv2.rectangle(out, (bb.origin_x, bb.origin_y),
                      (bb.origin_x + bb.width, bb.origin_y + bb.height),
                      (0, 255, 255), 2)
        for kp in det.keypoints:
            cv2.circle(out, (int(kp.x * W), int(kp.y * H)), 4, (255, 0, 255), -1)

    # Face Landmarker:478点ランドマーク + 立体スタンプ(鼻先=ランドマーク番号1 に星)
    for face in l.face_landmarks:
        for lm in face:
            cv2.circle(out, (int(lm.x * W), int(lm.y * H)), 1, (0, 255, 0), -1)
        nose = face[1]
        cv2.putText(out, '*', (int(nose.x * W) - 20, int(nose.y * H) + 20),
                    cv2.FONT_HERSHEY_SIMPLEX, 2.0, (0, 255, 255), 3)

    if l.facial_transformation_matrixes:
        print('head_pose_matrix:', l.facial_transformation_matrixes[0])

    # ビフォーアフター比較:左=元映像,右=加工後
    cv2.imshow('photo studio', cv2.hconcat([frame, out]))
    if cv2.waitKey(1) == 27:  # ESCキーによる終了処理
        break

cap.release()
cv2.destroyAllWindows()
演習2.ARフォトスタジオ
手順
- コマンドプロンプトを管理者として実行し,
pip install --no-user mediapipe opencv-python numpyを実行する(仮想環境利用時は管理者権限および--no-userは不要) - ウェブカメラを接続してスクリプトを実行する
- カメラに向かって正面・横顔・うつむきなど顔向きを変える
- 体を左右に動かし,髪と服が領域ごとに色付けされる様子を確認する
- ESCキーで終了する
ヒント
- マスクのクラス番号と色付けの対応はコード中のコメント(0:background,1:hair,4:clothes)を参照する
- 髪と服の境界は元映像と加工後映像のビフォーアフター比較で確認する
考察ポイント
- 髪と服の境界,背景と人物の境界が正しく分離されている画素と誤分離される画素の傾向
- 顔向きを変えた際に Face Detector の6キーポイントの位置がどのように追従するか
- 鼻先に置いた立体スタンプ(星)の位置が,頭部姿勢に応じてどう変化するか
3. 「なんでも画像検索」(類似画像検索)
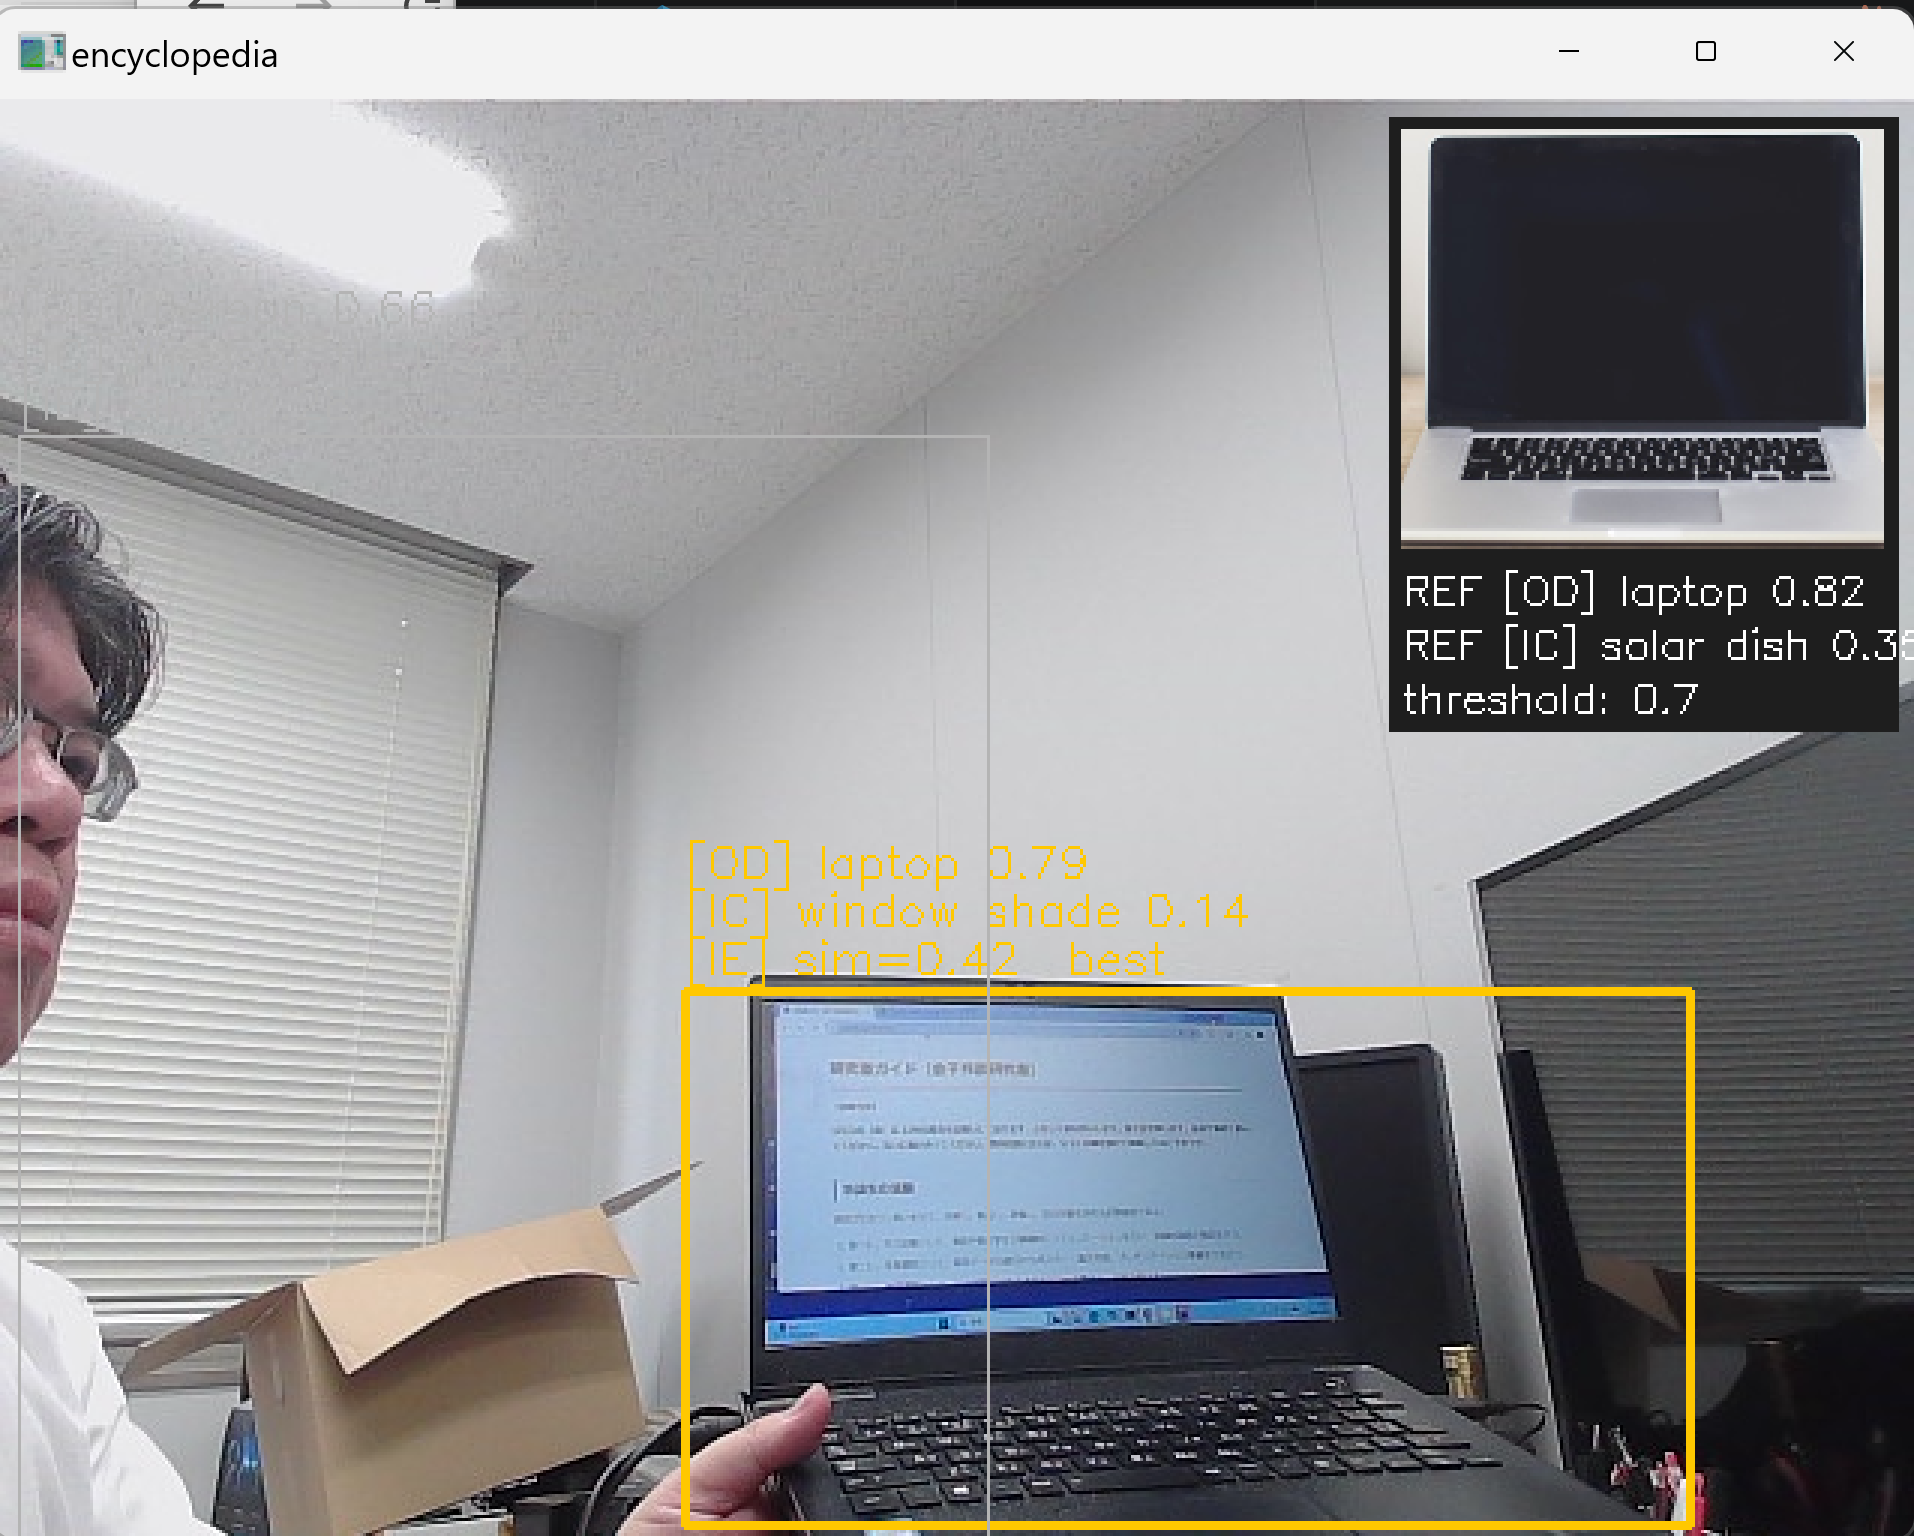
Object Detector の efficientdet_lite0.tflite(COCO 80クラスで学習された物体検出モデル)で実世界の物体をリアルタイムに検出し,max_results(返す検出結果の最大件数)と score_threshold(採用する検出スコアの下限)で対象を絞り込む.
本コードでは参照画像にノートPCの写真を固定で用いるが,reference.jpg を任意の画像に差し替えれば,地域生物・展示物・備品など別対象に同じ枠組みを適用できる.参照画像(Unsplash公開のノートPC写真)を1枚自動ダウンロードし,これにもObject Detectorを適用して最高スコアの領域を切り出すことで,背景を除いた対象物体のみの特徴を参照とする.参照領域は Image Classifier で細分類し,Image Embedder で埋め込みベクトル(画像内容を表す数値ベクトル)に変換しておく.
ウェブカメラの各フレームでは,検出された全領域について,Object DetectorのCOCOクラス名と検出スコア,Image ClassifierのImageNet細分類名(ImageNet 1000クラス)と分類スコア,参照とのコサイン類似度の3つを枠の上に常時表示する.参照に最も類似する1領域を緑(しきい値以上で MATCH!)またはシアン(best)で強調し,他は薄い灰色で並置する.参照画像のサムネイル,COCOラベル,細分類ラベル,しきい値は画面右上に常時オーバーレイ表示する.
COCOとImageNetの結果を併用する意義は次の3点である.
- 第1に役割分担で,COCO(80クラス)はフレーム内の物体位置と粗カテゴリを提供し,ImageNet(1000クラス)は切り出した領域に対する細カテゴリを提供する.Image Classifierは画像全体に1ラベルを返す設計のため,COCOの検出領域で切り出してからImageNet分類を適用することで,多物体シーンでも各物体に細ラベルを付けられる.
- 第2に解釈性で,語彙が限定的で安定したCOCOラベルと,語彙が広く具体的なImageNetラベルを併記することで,粗い分類の一致と細かい候補名の妥当性を同時に確認できる.
- 第3にコサイン類似度との相補性で,数値のみの類似度に2種類のラベルを併記することで,「類似度は高いがクラスが異なる」「クラスは一致するが類似度が低い」といった切り分けが可能になる.
vision.ImageEmbedder.cosine_similarity はクラスメソッドであり,引数として生のベクトルではなく Embedding オブジェクトを受け取る.COCO・ImageNet いずれも学習データの分布に依存するため,分布外(学習時に存在しないカテゴリや極端な構図)の入力では性能が低下しうる.
使用タスク:Object Detector(1),Image Classifier(2),Image Embedder(9)
ユーザ操作
- コマンドプロンプトを管理者として実行し,
pip install --no-user mediapipe opencv-pythonを実行する(仮想環境利用時は管理者権限および--no-userは不要) - ウェブカメラを接続してスクリプトを実行する(モデルファイルは初回起動時のみダウンロードされ,スクリプトと同一ディレクトリに保存される.参照画像はスクリプト起動ごとに上書きダウンロードされる).ESCキーで終了する
Pythonコード
import os
import urllib.request
import cv2
import mediapipe as mp
from mediapipe.tasks import python
from mediapipe.tasks.python import vision

# モデルファイルの自動ダウンロード
MODELS = {
    'efficientdet_lite0.tflite':
        'https://storage.googleapis.com/mediapipe-models/object_detector/efficientdet_lite0/int8/1/efficientdet_lite0.tflite',
    'efficientnet_lite0.tflite':
        'https://storage.googleapis.com/mediapipe-models/image_classifier/efficientnet_lite0/float32/1/efficientnet_lite0.tflite',
    'mobilenet_v3_small.tflite':
        'https://storage.googleapis.com/mediapipe-models/image_embedder/mobilenet_v3_small/float32/1/mobilenet_v3_small.tflite',
}
for name, url in MODELS.items():
    if not os.path.exists(name):
        urllib.request.urlretrieve(url, name)

# 参照画像(Unsplash公開のノートPC画像)を上書きダウンロード
urllib.request.urlretrieve(
    'https://images.unsplash.com/photo-1496181133206-80ce9b88a853?w=1280',
    'reference.jpg')

SIM_THRESHOLD = 0.7  # MATCH! 判定のコサイン類似度しきい値

# タスクの初期化(VIDEOモードと IMAGEモードを併用)
det_video = vision.ObjectDetector.create_from_options(vision.ObjectDetectorOptions(
    base_options=python.BaseOptions(model_asset_path='efficientdet_lite0.tflite'),
    running_mode=vision.RunningMode.VIDEO,
    max_results=5,
    score_threshold=0.5))
det_image = vision.ObjectDetector.create_from_options(vision.ObjectDetectorOptions(
    base_options=python.BaseOptions(model_asset_path='efficientdet_lite0.tflite'),
    running_mode=vision.RunningMode.IMAGE,
    max_results=5,
    score_threshold=0.3))
cls = vision.ImageClassifier.create_from_options(vision.ImageClassifierOptions(
    base_options=python.BaseOptions(model_asset_path='efficientnet_lite0.tflite'),
    running_mode=vision.RunningMode.IMAGE,
    max_results=1))
emb = vision.ImageEmbedder.create_from_options(vision.ImageEmbedderOptions(
    base_options=python.BaseOptions(model_asset_path='mobilenet_v3_small.tflite'),
    running_mode=vision.RunningMode.IMAGE))

# 参照画像から対象物体を切り出し,参照ラベルと参照埋め込みベクトルを作成する
ref_bgr = cv2.imread('reference.jpg')
ref_rgb = cv2.cvtColor(ref_bgr, cv2.COLOR_BGR2RGB)
ref_mp = mp.Image(image_format=mp.ImageFormat.SRGB, data=ref_rgb)
ref_best = max(det_image.detect(ref_mp).detections,
               key=lambda d: d.categories[0].score)
bb = ref_best.bounding_box
RH, RW = ref_rgb.shape[:2]
rx1, ry1 = max(0, bb.origin_x), max(0, bb.origin_y)
rx2, ry2 = min(RW, bb.origin_x + bb.width), min(RH, bb.origin_y + bb.height)
ref_crop_rgb = ref_rgb[ry1:ry2, rx1:rx2]
ref_crop_mp = mp.Image(image_format=mp.ImageFormat.SRGB, data=ref_crop_rgb)
ref_coco = ref_best.categories[0]
ref_fine = cls.classify(ref_crop_mp).classifications[0].categories[0]
ref_embedding = emb.embed(ref_crop_mp).embeddings[0]

# 参照画像のサムネイル(高さ140画素に縮小)
THUMB_H = 140
ref_thumb_bgr = cv2.resize(
    cv2.cvtColor(ref_crop_rgb, cv2.COLOR_RGB2BGR),
    (int(THUMB_H * ref_crop_rgb.shape[1] / ref_crop_rgb.shape[0]), THUMB_H))

cap = cv2.VideoCapture(0)
t = 0  # ミリ秒単位のタイムスタンプ
while True:
    ok, frame = cap.read()
    if not ok:
        break
    H, W = frame.shape[:2]
    rgb = cv2.cvtColor(frame, cv2.COLOR_BGR2RGB)
    img = mp.Image(image_format=mp.ImageFormat.SRGB, data=rgb)

    # 各検出領域について COCOラベル,ImageNetラベル,参照とのコサイン類似度を計算
    items = []
    best_sim = -2.0
    for d in det_video.detect_for_video(img, t).detections:
        bb = d.bounding_box
        x1, y1 = max(0, bb.origin_x), max(0, bb.origin_y)
        x2, y2 = min(W, bb.origin_x + bb.width), min(H, bb.origin_y + bb.height)
        crop_mp = mp.Image(image_format=mp.ImageFormat.SRGB, data=rgb[y1:y2, x1:x2])
        coco = d.categories[0]
        fine = cls.classify(crop_mp).classifications[0].categories[0]
        # cosine_similarity はクラスメソッド.Embedding オブジェクトを引数に取る
        sim = vision.ImageEmbedder.cosine_similarity(
            ref_embedding, emb.embed(crop_mp).embeddings[0])
        items.append((sim, x1, y1, x2, y2, coco, fine))
        best_sim = max(best_sim, sim)
    t += 33  # 約30FPS相当

    # 検出領域ごとに枠とラベルを描画
    for sim, x1, y1, x2, y2, coco, fine in items:
        is_best = sim == best_sim
        matched = is_best and sim >= SIM_THRESHOLD
        color = (0, 255, 0) if matched else ((0, 200, 255) if is_best else (180, 180, 180))
        thickness = 3 if matched else (2 if is_best else 1)
        cv2.rectangle(frame, (x1, y1), (x2, y2), color, thickness)
        lines = [
            f'[OD] {coco.category_name} {coco.score:.2f}',
            f'[IC] {fine.category_name} {fine.score:.2f}',
            f'[IE] sim={sim:.2f}' + ('  MATCH!' if matched else ('  best' if is_best else '')),
        ]
        for k, txt in enumerate(lines):
            cv2.putText(frame, txt, (x1, max(y1 - 38, 14) + k * 16),
                        cv2.FONT_HERSHEY_SIMPLEX, 0.5, color, 1)

    # 参照画像のサムネイルとラベルを画面右上にオーバーレイ
    th, tw = ref_thumb_bgr.shape[:2]
    x0, y0 = W - tw - 10, 10
    cv2.rectangle(frame, (x0 - 4, y0 - 4), (x0 + tw + 4, y0 + th + 60),
                  (30, 30, 30), -1)
    frame[y0:y0 + th, x0:x0 + tw] = ref_thumb_bgr
    cv2.putText(frame, f'REF [OD] {ref_coco.category_name} {ref_coco.score:.2f}',
                (x0, y0 + th + 18), cv2.FONT_HERSHEY_SIMPLEX, 0.45, (255, 255, 255), 1)
    cv2.putText(frame, f'REF [IC] {ref_fine.category_name} {ref_fine.score:.2f}',
                (x0, y0 + th + 36), cv2.FONT_HERSHEY_SIMPLEX, 0.45, (255, 255, 255), 1)
    cv2.putText(frame, f'threshold: {SIM_THRESHOLD}',
                (x0, y0 + th + 54), cv2.FONT_HERSHEY_SIMPLEX, 0.45, (255, 255, 255), 1)

    cv2.imshow('encyclopedia', frame)
    if cv2.waitKey(1) == 27:  # ESCキーによる終了処理
        break

cap.release()
cv2.destroyAllWindows()
演習3.「なんでも画像検索」
手順
- コマンドプロンプトを管理者として実行し,
pip install --no-user mediapipe opencv-pythonを実行する(仮想環境利用時は管理者権限および--no-userは不要) - ウェブカメラを接続してスクリプトを実行する
- ノートPC(参照画像と同種の物体)をカメラに写し,COCOラベル,ImageNetラベル,コサイン類似度の表示を確認する
- カップ・本・ペットボトル等,参照画像と異なる物体を写し,類似度の値を観察する
reference.jpgを別の画像に差し替えてスクリプトを再起動し,参照対象を変えた挙動を確認する- ESCキーで終了する
ヒント
- 強調表示の色は,しきい値以上で緑,最も類似する領域がシアン,それ以外が灰色である
- 類似度のしきい値は
SIM_THRESHOLDの値で変更できる
考察ポイント
- 同種の物体に対して類似度がどの値域に分布するか
- 異種の物体に対して類似度がどの値域に分布するか
- COCOラベルとImageNetラベルが一致するケースと一致しないケースの傾向
- 「類似度は高いがクラスが異なる」「クラスは一致するが類似度が低い」事例が観察されるか
4. ジェスチャと指先動作による対話型コントローラ
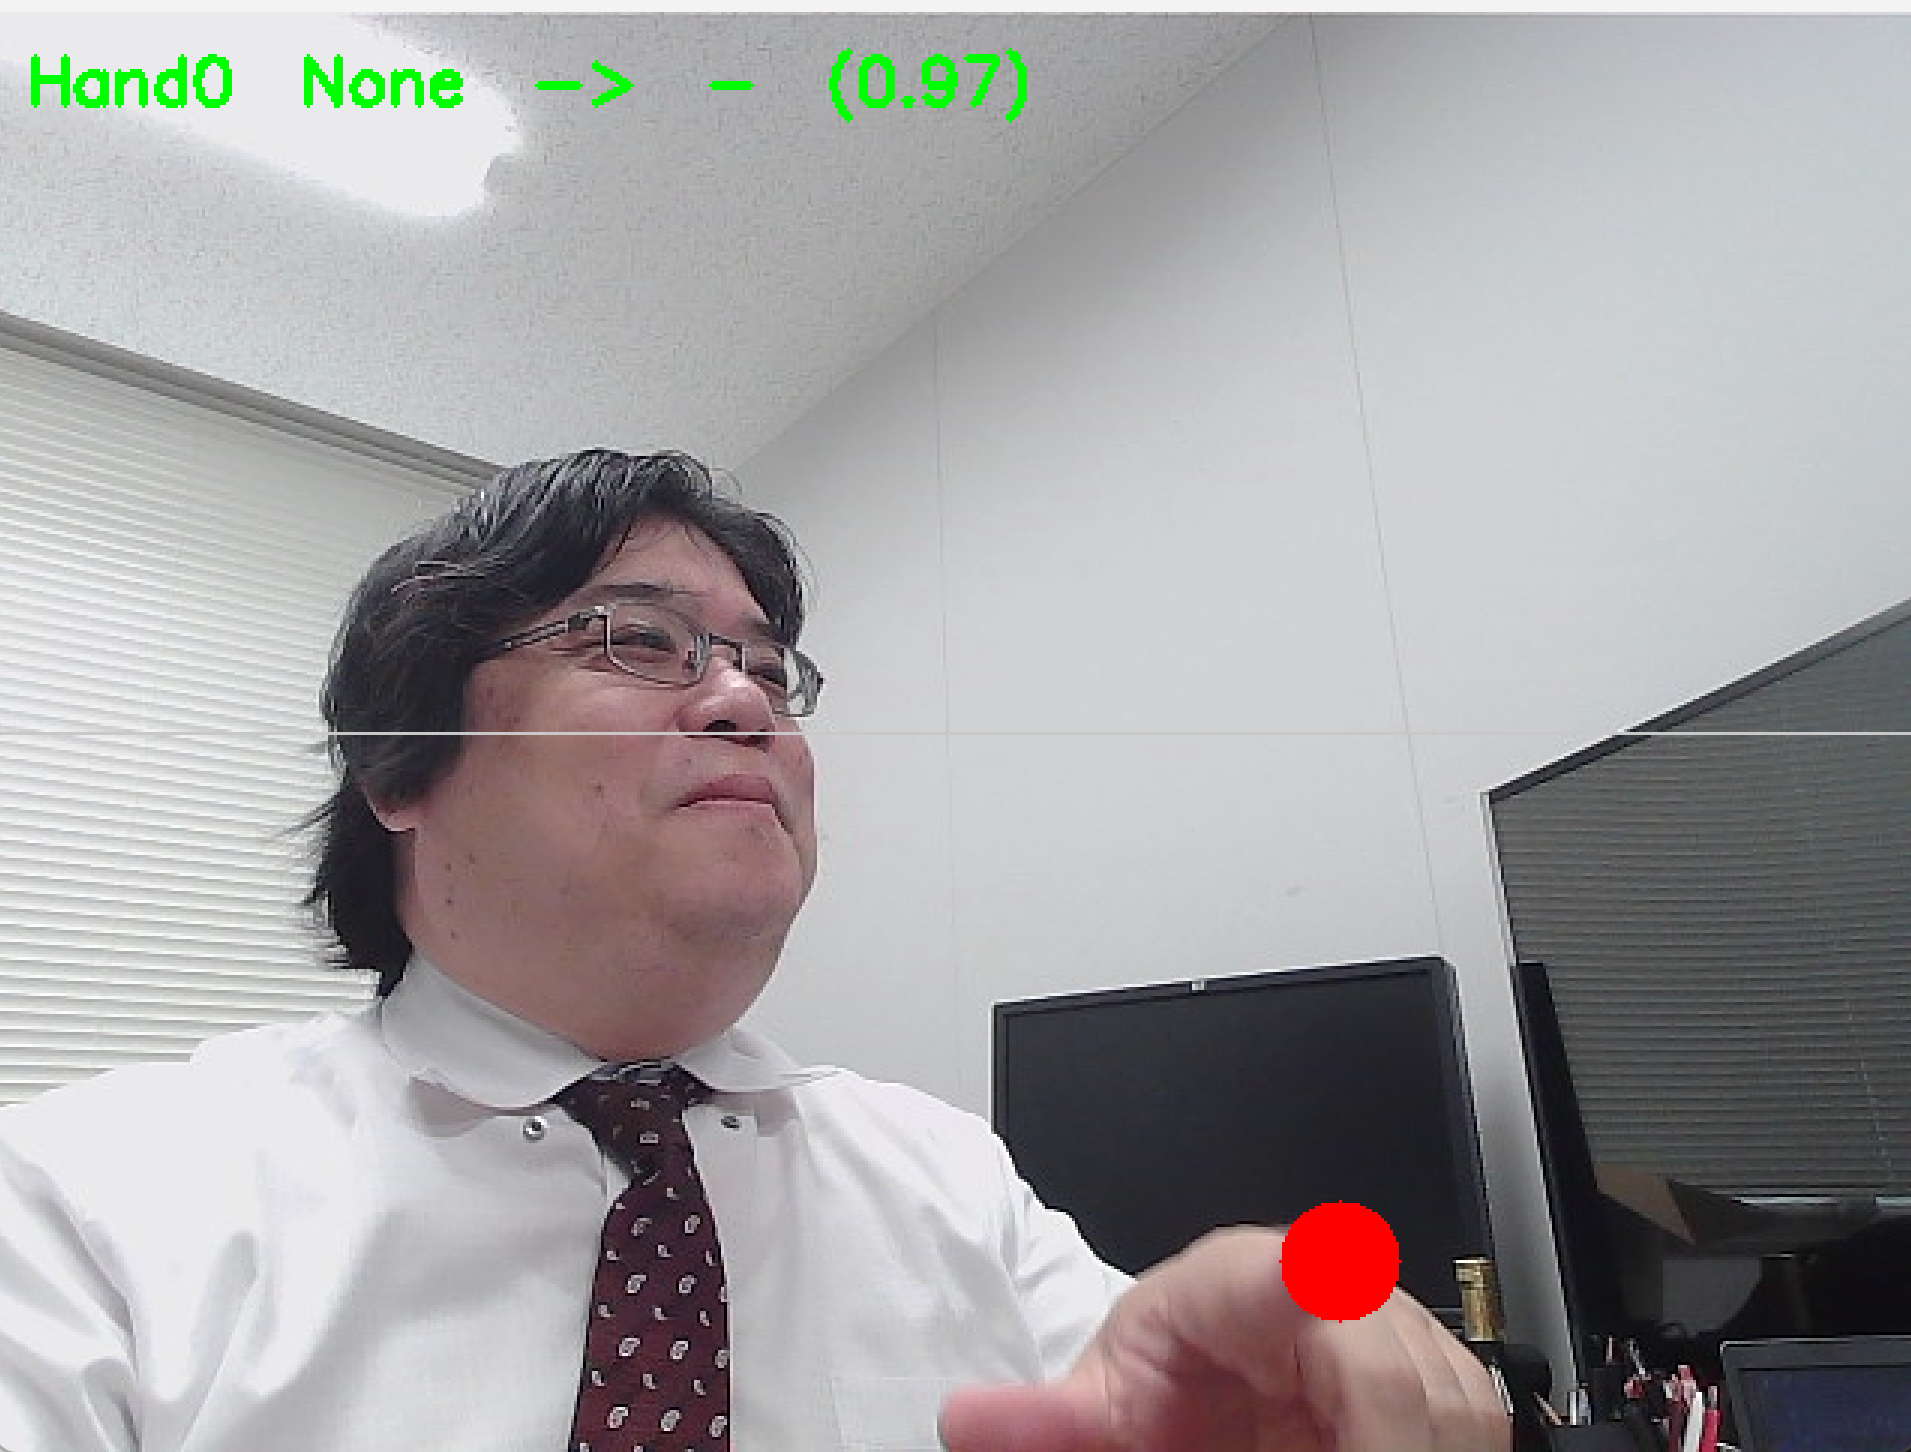
Hand Landmarker(手のひらと指の21点の位置を検出するMediaPipeのタスク)が出力する指先ランドマーク(ランドマークとは検出対象上の特徴点であり,番号で識別される.INDEX_FINGER_TIP=8,MIDDLE_FINGER_TIP=12,RING_FINGER_TIP=16,PINKY_TIP=20,THUMB_TIP=4 が各指の先端を指す)の y 座標(正規化座標における縦方向の値.画面上端を0,下端を1とする)と速度を監視し,閾値交差(指先 y 座標が事前に定めた境界値を上から下へまたは下から上へまたぐ事象)を打点イベントとして検出する.
Gesture Recognizer(手の形状を分類するMediaPipeのタスク)の組み込み7クラス(Closed_Fist:握り拳,Open_Palm:開いた手のひら,Pointing_Up:人差し指で上を指す,Thumb_Up:親指を上に立てる,Thumb_Down:親指を下に向ける,Victory:人差し指と中指でV字,ILoveYou:親指・人差し指・小指を立てる手話サイン)を用いることで,ジェスチャごとに離散的なコマンドを生成する.
Gesture Recognizer は内部で手のランドマーク検出を含むため,その出力 hand_landmarks を経由して指先座標を参照する.本コードでは Hand Landmarker タスクを別途初期化していない(「使用タスク」欄の Hand Landmarker は Gesture Recognizer の付随出力として参照される位置づけである).
検出した打点イベントと離散コマンドは,下流の処理に渡すことで多様な応用に展開できる.たとえば,ジェスチャに音高を割り当てればエアピアノやエアドラムとなり,OSのキーボードショートカットに割り当てればプレゼンテーション操作となり,IoT機器のAPIに接続すればスマート家電制御となり,ゲームの入力イベントに接続すればコマンド入力となる.本コードでは下流処理を分離するため,検出結果を画面オーバーレイと標準出力に送出するまでを担当する.標準出力された NOTE_ON を実際の音に変換するには,別途 MIDI 出力ライブラリやサウンド合成ライブラリへの結線が必要である.
本実装では prev_y[i] を「r.hand_landmarks の i 番目」に紐づけているため,フレーム間で手の検出順序が入れ替わった場合に偽の閾値交差が生じうる(教材用途では片手運用または安定した手の出現順を前提とする).
Model Maker(MediaPipeが提供するモデル再学習用ツール)で独自の指型を学習させた gesture_recognizer.task(MediaPipe Tasksが読み込むモデルバンドルファイル形式)を生成すれば,手話の指文字(日本手話・米国手話などで五十音やアルファベットを表す指の形)や独自ジェスチャへ拡張できる.
使用タスク:Hand Landmarker(5),Gesture Recognizer(6)
ユーザ操作
- コマンドプロンプトを管理者として実行し,
pip install --no-user mediapipe opencv-pythonを実行する(仮想環境利用時は管理者権限および--no-userは不要) - ウェブカメラを接続してスクリプトを実行する(モデルファイルは初回起動時のみダウンロードされ,スクリプトと同一ディレクトリに保存される)
- 検出結果は画面上にオーバーレイ表示されると同時に,イベント(
NOTE_ON,DRUM_HIT)が標準出力に送出される.ESCキーで終了する
Pythonコード
import os
import urllib.request
import cv2
import mediapipe as mp
from mediapipe.tasks import python
from mediapipe.tasks.python import vision

# モデルファイルの自動ダウンロード
MODELS = {
    'gesture_recognizer.task':
        'https://storage.googleapis.com/mediapipe-models/gesture_recognizer/gesture_recognizer/float16/latest/gesture_recognizer.task',
}
for name, url in MODELS.items():
    if not os.path.exists(name):
        urllib.request.urlretrieve(url, name)

# ジェスチャ名と音高(科学的音名表記.C4が中央ド,数字は音域)の対応表
NOTES = {'Closed_Fist': 'C4', 'Open_Palm': 'E4', 'Pointing_Up': 'G4',
         'Thumb_Up': 'A4', 'Thumb_Down': 'B4', 'Victory': 'C5', 'ILoveYou': 'D5'}

# タスクの初期化(VIDEOモード).Gesture Recognizer は内部に Hand Landmarker を含む
gr = vision.GestureRecognizer.create_from_options(vision.GestureRecognizerOptions(
    base_options=python.BaseOptions(model_asset_path='gesture_recognizer.task'),
    running_mode=vision.RunningMode.VIDEO,
    num_hands=2))

prev_y = [1.0, 1.0]   # 直前フレームの指先y座標(手2本分).初期値1.0は画面下端
drum_flash = [0, 0]   # ドラムヒット表示の残フレーム数(手2本分)

cap = cv2.VideoCapture(0)
t = 0  # ミリ秒単位のタイムスタンプ
while True:
    ok, frame = cap.read()
    if not ok:
        break
    H, W = frame.shape[:2]
    img = mp.Image(image_format=mp.ImageFormat.SRGB,
                   data=cv2.cvtColor(frame, cv2.COLOR_BGR2RGB))
    r = gr.recognize_for_video(img, t)
    t += 33  # 約30FPS相当

    # ジェスチャ認識結果と対応ノートを画面左上に表示する
    for idx, g in enumerate(r.gestures):
        name = g[0].category_name
        score = g[0].score
        note = NOTES.get(name, '-')
        cv2.putText(frame, f'Hand{idx}  {name}  ->  {note}  ({score:.2f})',
                    (10, 30 + 30 * idx),
                    cv2.FONT_HERSHEY_SIMPLEX, 0.7, (0, 255, 0), 2)
        if name in NOTES:
            print(f'NOTE_ON {note}  (gesture: {name})')

    # 各手の人差し指先(ランドマーク番号8)のy座標を取得し,
    # 「上から下へ閾値0.5を越えた瞬間」を打楽器ヒットとして検出する
    # ※ prev_y[i] は r.hand_landmarks の i 番目に紐づくため,
    #   手の検出順序が入れ替わると偽の閾値交差が生じうる(教材用途では片手運用を前提)
    for i, lm in enumerate(r.hand_landmarks[:2]):
        y = lm[8].y
        px, py = int(lm[8].x * W), int(y * H)
        cv2.circle(frame, (px, py), 8, (255, 255, 0), 2)
        if prev_y[i] < 0.5 <= y:  # 上方から下方への閾値交差
            print(f'DRUM_HIT  hand={i}')
            drum_flash[i] = 8  # 8フレーム間ヒット表示を残す
        prev_y[i] = y
        if drum_flash[i] > 0:
            cv2.circle(frame, (px, py), 20, (0, 0, 255), -1)
            drum_flash[i] -= 1

    # 閾値ライン(y=0.5)を水平線として描画し,打点基準を可視化する
    cv2.line(frame, (0, H // 2), (W, H // 2), (200, 200, 200), 1)

    cv2.imshow('gesture instrument', frame)
    if cv2.waitKey(1) == 27:  # ESCキーによる終了処理
        break

cap.release()
cv2.destroyAllWindows()
演習4.ジェスチャと指先動作による対話型コントローラ
手順
- コマンドプロンプトを管理者として実行し,
pip install --no-user mediapipe opencv-pythonを実行する(仮想環境利用時は管理者権限および--no-userは不要) - ウェブカメラを接続してスクリプトを実行する
- 片手で7種類のジェスチャ(
Closed_Fist,Open_Palm,Pointing_Up,Thumb_Up,Thumb_Down,Victory,ILoveYou)を順に作る - 人差し指を画面上部から閾値ライン(y=0.5の水平線)を越えて下方向に振り下ろす動作を繰り返す
- 標準出力の
NOTE_ONとDRUM_HITの出力タイミングを確認する - ESCキーで終了する
ヒント
- ジェスチャ名と音高の対応はコード中の
NOTES辞書を参照する - 閾値ラインは画面中央の水平線として描画される
考察ポイント
- 各ジェスチャに対する分類スコアの値域
- 類似する形状のジェスチャ間で誤分類が起きるケース
- 振り下ろし速度と
DRUM_HIT検出の関係 - 両手を入れ替えた際に
prev_yのインデックスがどう振る舞うか
5. マイク入力によるリアルタイム音響イベント分類と音声波形・スペクトル表示
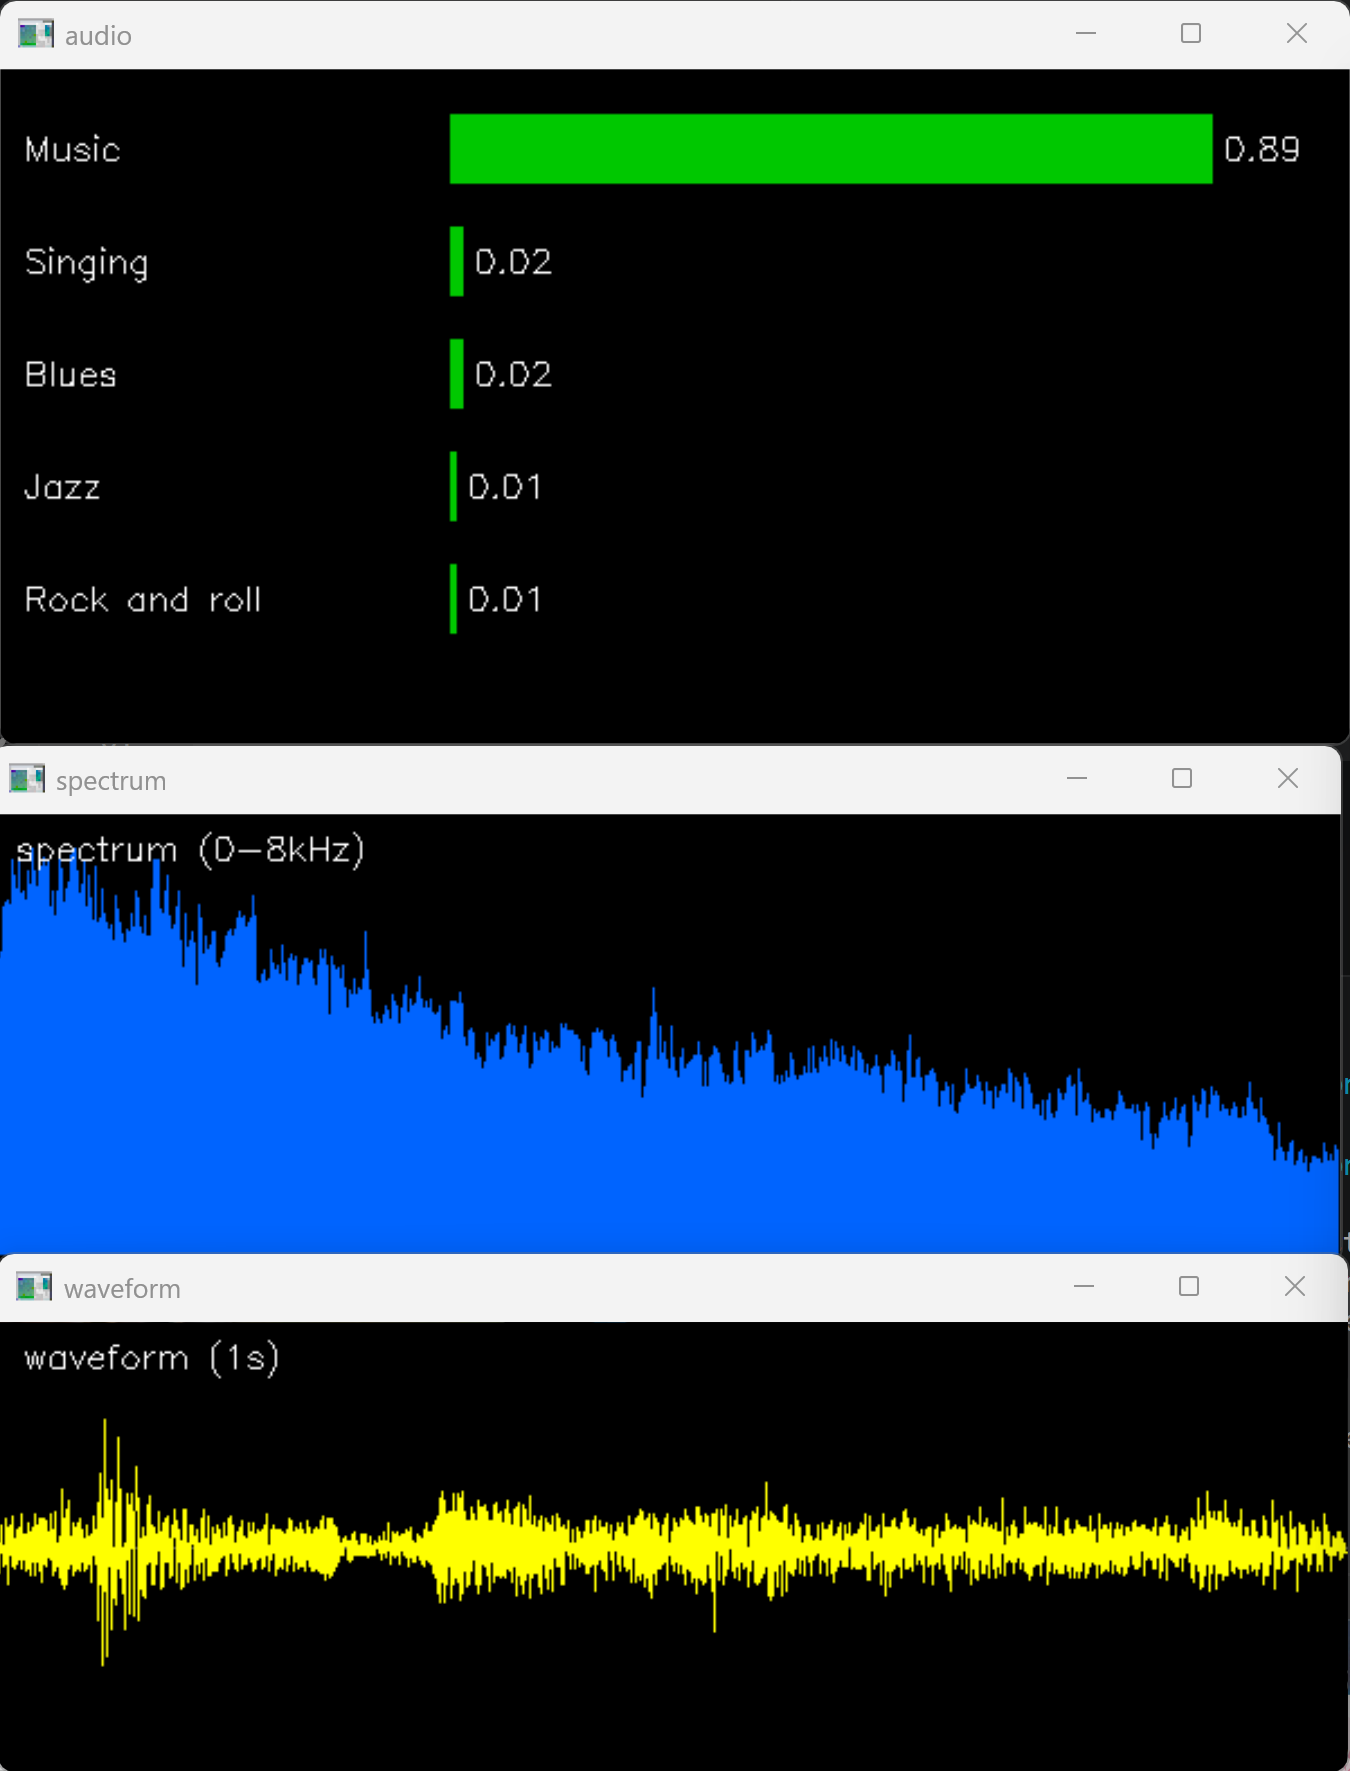
Audio Classifier(音声データに含まれる音響イベントを分類するMediaPipeのタスク)に YAMNet(Googleが公開する事前学習済みモデルであり,AudioSetデータセットで学習された521クラスの音響イベント分類器)を読み込ませることで,マイクから取り込んだ音声を分類する.YAMNetは入力として16kHz・モノラル・float32の波形(標本化周波数16kHz・1チャネル・32ビット浮動小数点形式の音声信号)を前提とし,各クラスに対するスコア(0から1の範囲をとる確信度)を出力する.動作モードは AUDIO_CLIPS(独立した固定長の音声クリップを同期的に分類するモード)を採用し,1秒分の音声を1クリップとして逐次分類する.録音と分類が直列に進むため,連続ストリーミング処理ではなく1秒ブロック単位の準リアルタイムである.連続ストリーミングが必要な場合は AUDIO_STREAM モード(コールバックで分類結果を非同期に受け取るモード)を用いる.
時間波形表示(横軸を時刻,縦軸を振幅とする音の大きさの時間変化を示す表示)と周波数スペクトル表示(音に含まれる各周波数成分の強度分布を示す表示)を併用することで,分類結果と入力信号の対応関係を確認できる.スペクトルは numpy.fft.rfft(実数信号に対する高速フーリエ変換.時間波形を周波数成分に分解する処理)で得られた振幅をdB(デシベル,対数スケールでの強度単位)に変換して描画する.サンプリング周波数16kHzに対するナイキスト周波数(標本化定理により再現可能な最高周波数であり,サンプリング周波数の半分)は8kHzであり,スペクトルの右端が8kHzに対応する.コード中の (spec_db + 40) / 80 という正規化は,表示レンジを-40 dBを画面下端,+40 dBを画面上端に対応付けるための便宜的な選択であり,入力ゲインに応じて調整してよい.
分類結果と音声特徴は,下流の処理に渡すことで多様な応用に展開できる.たとえば,特定カテゴリ(Speech:人の発話,Music:音楽,Dog:犬の鳴き声)の検出をトリガとしてOSの通知APIに接続すれば異常音検知の警告システムとなり,録音ファイルの自動タグ付けに用いれば音声アーカイブの索引化となり,IoT機器のAPIに接続すれば音声反応型のスマート家電制御となり,スペクトル形状を特徴量として扱えば楽器音の識別や話者照合の入力となる.本コードでは下流処理を分離するため,検出結果と入力波形・スペクトルを画面表示するまでを担当する.
Model Maker(MediaPipeが提供するモデル再学習用ツール)で独自の音響カテゴリ(特定の機械動作音,動物の鳴き声,楽器音等)を学習させた .tflite(TensorFlow Liteのモデルファイル形式)のモデルを生成すれば,用途に特化した分類器へ拡張できる.
使用タスク:Audio Classifier(10)
ユーザ操作
- コマンドプロンプトを管理者として実行し,
pip install --no-user mediapipe sounddevice opencv-python numpyを実行する(仮想環境利用時は管理者権限および--no-userは不要) - マイクを接続してスクリプトを実行する(モデルファイルは初回起動時のみダウンロードされ,スクリプトと同一ディレクトリに保存される)
- 検出結果は3つのウィンドウにオーバーレイ表示される(
audio:上位5クラスの分類結果とスコアを水平棒グラフで表示,waveform:1秒間の時間波形を表示,spectrum:0-8000Hzの周波数スペクトルを表示).ESCキーで終了する
Pythonコード
import os
import urllib.request
import cv2
import numpy as np
import sounddevice as sd
from mediapipe.tasks import python
from mediapipe.tasks.python import audio
from mediapipe.tasks.python.components.containers.audio_data import AudioData

# モデルファイルの自動ダウンロード
MODELS = {
    'yamnet.tflite':
        'https://storage.googleapis.com/mediapipe-models/audio_classifier/yamnet/float32/1/yamnet.tflite',
}
for name, url in MODELS.items():
    if not os.path.exists(name):
        urllib.request.urlretrieve(url, name)

# タスクの初期化(AUDIO_CLIPSモード:固定長クリップを同期的に分類)
ac = audio.AudioClassifier.create_from_options(audio.AudioClassifierOptions(
    base_options=python.BaseOptions(model_asset_path='yamnet.tflite'),
    running_mode=audio.RunningMode.AUDIO_CLIPS,
    max_results=5))

while True:
    # 1秒分(16000サンプル)の音声をマイクから録音.
    # 録音と分類が直列のため,処理は1秒ブロック単位の準リアルタイム
    buf = sd.rec(16000, samplerate=16000, channels=1, dtype='float32')
    sd.wait()
    wave = buf.flatten()

    # AudioData:MediaPipe Audio Classifier の入力形式(波形配列とサンプリング周波数を保持)
    cats = ac.classify(AudioData.create_from_array(wave, 16000))[0].classifications[0].categories

    # 分類結果パネル:上位5クラスのスコアを水平棒グラフで表示
    img = np.zeros((300, 600, 3), dtype=np.uint8)
    for i, c in enumerate(cats):
        y = 40 + i * 50
        cv2.rectangle(img, (200, y - 20), (200 + int(c.score * 380), y + 10), (0, 200, 0), -1)
        cv2.putText(img, f'{c.category_name}', (10, y),
                    cv2.FONT_HERSHEY_SIMPLEX, 0.5, (255, 255, 255), 1)
        cv2.putText(img, f'{c.score:.2f}', (200 + int(c.score * 380) + 5, y),
                    cv2.FONT_HERSHEY_SIMPLEX, 0.5, (255, 255, 255), 1)
    cv2.imshow('audio', img)

    # 時間波形パネル(横軸:時刻0-1秒,縦軸:振幅-1~+1)
    wave_img = np.zeros((200, 600, 3), dtype=np.uint8)
    cv2.line(wave_img, (0, 100), (600, 100), (80, 80, 80), 1)
    xs = np.linspace(0, 599, len(wave)).astype(np.int32)
    ys = (100 - wave * 95).astype(np.int32)
    cv2.polylines(wave_img, [np.stack([xs, ys], axis=1)], False, (0, 255, 255), 1)
    cv2.putText(wave_img, 'waveform (1s)', (10, 20),
                cv2.FONT_HERSHEY_SIMPLEX, 0.5, (255, 255, 255), 1)
    cv2.imshow('waveform', wave_img)

    # 周波数スペクトルパネル(rfftの結果をdB変換し,0-8000Hzを表示)
    spec = np.abs(np.fft.rfft(wave))
    spec_db = 20 * np.log10(spec + 1e-6)              # dB変換(log10の発散を避けるため微小値を加算)
    spec_db = np.clip((spec_db + 40) / 80, 0, 1)      # -40dBを画面下端,+40dBを画面上端に対応付け
    spec_img = np.zeros((200, 600, 3), dtype=np.uint8)
    bin_x = np.linspace(0, 599, len(spec_db)).astype(np.int32)
    for i in range(len(spec_db) - 1):
        bar_h = int(spec_db[i] * 180)
        cv2.line(spec_img, (bin_x[i], 195), (bin_x[i], 195 - bar_h), (255, 100, 0), 1)
    cv2.putText(spec_img, 'spectrum (0-8kHz)', (10, 20),
                cv2.FONT_HERSHEY_SIMPLEX, 0.5, (255, 255, 255), 1)
    cv2.imshow('spectrum', spec_img)

    if cv2.waitKey(1) == 27:  # ESCキーによる終了処理
        break

cv2.destroyAllWindows()
演習5.リアルタイム音響イベント分類
手順
- コマンドプロンプトを管理者として実行し,
pip install --no-user mediapipe sounddevice opencv-python numpyを実行する(仮想環境利用時は管理者権限および--no-userは不要) - マイクを接続してスクリプトを実行する
- マイクに向かって「発話」「拍手」「指笛または口笛」「机を叩く音」など異なる音響イベントを1秒以上ずつ入力する
- 音楽再生(スマートフォン等の音源)をマイクに聞かせる
audio,waveform,spectrumの3ウィンドウの表示変化を確認する- ESCキーで終了する
ヒント
- 分類は1秒ブロック単位で更新されるため,各音は1秒以上継続して入力する
- スペクトル表示の右端は8kHz(ナイキスト周波数)に対応する
考察ポイント
- 発話・拍手・口笛・打撃音それぞれで上位5クラスにどのラベルが現れるか
- 音量を変えた際に時間波形の振幅とスコアがどう変化するか
- 低音中心の音と高音中心の音でスペクトルの分布形状がどう異なるか
- 無音時に分類結果がどのカテゴリに偏るか
6. 顔交換オーバーレイ
ユーザから見える効果は次のとおりである.画面には自分の背景・体・髪型がそのまま映り,顔だけが別人物の顔に置き換わる(自分が別の顔を持って動いているように見える).
ウェブカメラの各フレームに対し,ユーザの顔位置を別人物の静止画の顔で差し替える.Face Landmarker(顔の478点を検出するMediaPipeタスク)で取得したランドマークのうち顔メッシュ部分(先頭468点,虹彩の10点を除く)をDelaunay三角形分割(点集合をどの三角形の外接円も他の点を含まないように分割する手法)し,三角形ごとに静止画の対応領域をアフィン変換(拡大・縮小・回転・平行移動の組み合わせ)で写像する.
処理の流れ
- 静止画を
IMAGEモード(静止画用の動作モード)で1回だけ検出し,468点のランドマークと三角形分割を事前計算する - ウェブカメラの各フレームについて
VIDEOモード(連続フレームを時系列的に処理する動作モード,ミリ秒単位のタイムスタンプを与える)でユーザのランドマークを検出する - 三角形ごとに,静止画上の三角形領域をユーザの三角形位置にアフィン変換で写像する
- ユーザのランドマークの凸包(点集合を包む最小の凸多角形)をマスクとし,
cv2.seamlessClone(境界と色調を馴染ませて合成するOpenCV関数)でフレームに合成する
精度・安定性の工夫
- GPU推論の自動選択:起動時にGPU推論を試行し,成功すればGPU,失敗すればCPUを採用する
- ウェブカメラ入力解像度の引き上げ:
CAP_PROP_FRAME_WIDTH/CAP_PROP_FRAME_HEIGHTに1280×720を要求する(カメラが対応する場合はランドマーク検出が安定する.非対応時はカメラ実装値で動作) - ランドマーク座標の指数移動平均(α=0.5):新値 = 0.5 × 現フレーム値 + 0.5 × 前フレーム値.時間的ジッタを抑制する
- 凸包マスクへのGaussian Blur(カーネル21×21):マスク境界を羽根状にして合成境界の段差を軽減する
- Z座標による裏面カリング:三角形法線のZ成分(2次元の符号付き面積に等しい)の符号が静止画基準と反転した三角形は描画しない(頭部を大きく回転させた際の三角形のねじれを抑制する)
tkinterによる画像選択ダイアログ:起動時に画像ファイル選択ダイアログを表示する.初期ディレクトリはSCRIPT_DIR(スクリプト所在ディレクトリ)とする
本実装の前提と限界
- 単一顔を想定する.
prev_pointsは1つだけ保持するため,複数顔同時に追従させる場合は顔ごとに独立に保持する必要がある - Delaunay三角形分割とアフィン変換による方式は,顔の前向きに近い姿勢では自然に動作するが,横顔に近い大角度の回転,強い陰影,参照顔とユーザ顔の肌色差が大きい場合には合成境界が目立つ場合がある
- 本資料のスタイル方針に従いエラーチェックを省略しているため,顔が一切検出されないフレームでは
cv2.seamlessClone等で実行時エラーとなりうる.運用時には検出有無のチェックを補うこと
使用タスク:Face Landmarker(7)
ユーザ操作
- コマンドプロンプトを管理者として実行し,
pip install --no-user mediapipe opencv-python numpyを実行する(仮想環境利用時は管理者権限および--no-userは不要) - ウェブカメラを接続してスクリプトを実行する(モデルファイルは初回起動時のみダウンロードされ,スクリプトと同一ディレクトリに保存される)
- 起動時に表示されるダイアログで別人物の正面顔画像を選択する(初期ディレクトリはスクリプトと同じ位置).ESCキーで終了する
Pythonコード
import os
import urllib.request
import tkinter as tk
from tkinter import filedialog
import cv2
import numpy as np
import mediapipe as mp
from mediapipe.tasks import python
from mediapipe.tasks.python import vision

# スクリプト所在ディレクトリ:モデル保存先と画像選択ダイアログの初期位置
SCRIPT_DIR = os.path.dirname(os.path.abspath(__file__))

# モデルファイルの自動ダウンロード(SCRIPT_DIR配下に保存)
URL = 'https://storage.googleapis.com/mediapipe-models/face_landmarker/face_landmarker/float16/1/face_landmarker.task'
MODEL_PATH = os.path.join(SCRIPT_DIR, 'face_landmarker.task')
if not os.path.exists(MODEL_PATH):
    urllib.request.urlretrieve(URL, MODEL_PATH)

# GPU推論の自動選択(GPU利用可能ならGPU,不可ならCPU)
try:
    _t = vision.FaceLandmarker.create_from_options(vision.FaceLandmarkerOptions(
        base_options=python.BaseOptions(model_asset_path=MODEL_PATH,
                                         delegate=python.BaseOptions.Delegate.GPU),
        running_mode=vision.RunningMode.IMAGE))
    _t.close()
    DELEGATE = python.BaseOptions.Delegate.GPU
except Exception:
    DELEGATE = python.BaseOptions.Delegate.CPU
print('delegate:', DELEGATE.name)

# 参照画像の選択(tkinterダイアログ,初期位置はSCRIPT_DIR)
_root = tk.Tk()
_root.withdraw()
SOURCE_PATH = filedialog.askopenfilename(
    initialdir=SCRIPT_DIR,
    title='別人物の正面顔画像を選択',
    filetypes=[('画像ファイル', '*.jpg *.jpeg *.png *.bmp')])
_root.destroy()

# 静止画の読み込みと顔ランドマーク検出(IMAGEモード,1回のみ)
src_bgr = cv2.imread(SOURCE_PATH)
src_h, src_w = src_bgr.shape[:2]
fl_image = vision.FaceLandmarker.create_from_options(vision.FaceLandmarkerOptions(
    base_options=python.BaseOptions(model_asset_path=MODEL_PATH, delegate=DELEGATE),
    running_mode=vision.RunningMode.IMAGE))
src_mp = mp.Image(image_format=mp.ImageFormat.SRGB,
                  data=cv2.cvtColor(src_bgr, cv2.COLOR_BGR2RGB))
src_result = fl_image.detect(src_mp)

# 顔メッシュ用は先頭468点(虹彩の10点を除く)
N = 468
src_points = np.array([(lm.x * src_w, lm.y * src_h)
                       for lm in src_result.face_landmarks[0][:N]], dtype=np.float32)

# Delaunay三角形分割:ランドマーク番号の三つ組として記録
subdiv = cv2.Subdiv2D((0, 0, src_w, src_h))
for p in src_points:
    subdiv.insert((float(p[0]), float(p[1])))
triangles = []
for tr in subdiv.getTriangleList():
    verts = [(tr[0], tr[1]), (tr[2], tr[3]), (tr[4], tr[5])]
    idx = []
    for v in verts:
        d = np.linalg.norm(src_points - v, axis=1)
        i = int(np.argmin(d))
        if d[i] < 1.0:
            idx.append(i)
    if len(idx) == 3 and len(set(idx)) == 3:
        triangles.append(idx)

# 静止画三角形の符号付き面積(三角形法線のZ成分に等しい)を事前計算
def signed_area(pts):
    a, b, c = pts
    return (b[0]-a[0])*(c[1]-a[1]) - (b[1]-a[1])*(c[0]-a[0])
src_signs = [np.sign(signed_area(src_points[t])) for t in triangles]

# ウェブカメラ用 Face Landmarker (VIDEOモード)
fl_video = vision.FaceLandmarker.create_from_options(vision.FaceLandmarkerOptions(
    base_options=python.BaseOptions(model_asset_path=MODEL_PATH, delegate=DELEGATE),
    running_mode=vision.RunningMode.VIDEO))

# ウェブカメラ解像度を1280x720に要求(非対応カメラは実装値で動作)
cap = cv2.VideoCapture(0)
cap.set(cv2.CAP_PROP_FRAME_WIDTH, 1280)
cap.set(cv2.CAP_PROP_FRAME_HEIGHT, 720)
W = int(cap.get(cv2.CAP_PROP_FRAME_WIDTH))
H = int(cap.get(cv2.CAP_PROP_FRAME_HEIGHT))

# 指数移動平均パラメータ(α=0.5.大きいほど平滑強).※単一顔前提
SMOOTH = 0.5
prev_points = None

t = 0  # ミリ秒単位のタイムスタンプ
while True:
    ok, frame = cap.read()
    if not ok:
        break
    img = mp.Image(image_format=mp.ImageFormat.SRGB,
                   data=cv2.cvtColor(frame, cv2.COLOR_BGR2RGB))
    result = fl_video.detect_for_video(img, t)
    t += 33  # 約30FPS相当

    output = frame.copy()
    for face in result.face_landmarks:
        dst_points = np.array([(lm.x * W, lm.y * H)
                               for lm in face[:N]], dtype=np.float32)
        # 指数移動平均(α=0.5)で時間的平滑化
        if prev_points is None:
            prev_points = dst_points
        dst_points = (1 - SMOOTH) * dst_points + SMOOTH * prev_points
        prev_points = dst_points

        # 三角形ごとにアフィン変換,Z座標による裏面カリング適用
        warped_face = np.zeros_like(frame)
        for tri, src_sign in zip(triangles, src_signs):
            # 裏面カリング:符号反転した三角形は描画しない
            if np.sign(signed_area(dst_points[tri])) != src_sign:
                continue
            s = src_points[tri]
            d = dst_points[tri]
            r1 = cv2.boundingRect(s)
            r2 = cv2.boundingRect(d)
            s_local = s - np.array([r1[0], r1[1]], dtype=np.float32)
            d_local = d - np.array([r2[0], r2[1]], dtype=np.float32)
            crop = src_bgr[r1[1]:r1[1]+r1[3], r1[0]:r1[0]+r1[2]]
            M = cv2.getAffineTransform(s_local, d_local)
            w_tri = cv2.warpAffine(crop, M, (r2[2], r2[3]),
                                   None, flags=cv2.INTER_LINEAR,
                                   borderMode=cv2.BORDER_REFLECT_101)
            mask = np.zeros((r2[3], r2[2]), dtype=np.uint8)
            cv2.fillConvexPoly(mask, np.int32(d_local), 255)
            roi = warped_face[r2[1]:r2[1]+r2[3], r2[0]:r2[0]+r2[2]]
            np.copyto(roi, w_tri, where=mask[:, :, None].astype(bool))

        # 凸包マスクへのGaussian Blur(カーネル21×21)で羽根化,seamlessCloneで合成
        hull = cv2.convexHull(dst_points.astype(np.int32))
        face_mask = np.zeros((H, W), dtype=np.uint8)
        cv2.fillConvexPoly(face_mask, hull, 255)
        face_mask = cv2.GaussianBlur(face_mask, (21, 21), 0)
        Mm = cv2.moments(face_mask)
        cx = int(Mm['m10'] / Mm['m00'])
        cy = int(Mm['m01'] / Mm['m00'])
        output = cv2.seamlessClone(warped_face, frame, face_mask,
                                   (cx, cy), cv2.NORMAL_CLONE)

    cv2.imshow('face swap', output)
    if cv2.waitKey(1) == 27:  # ESCキーによる終了処理
        break

cap.release()
cv2.destroyAllWindows()
演習6.顔交換オーバーレイ
手順
- コマンドプロンプトを管理者として実行し,
pip install --no-user mediapipe opencv-python numpyを実行する(仮想環境利用時は管理者権限および--no-userは不要) - ウェブカメラを接続してスクリプトを実行する
- 起動時のダイアログで別人物の正面顔画像(jpg/jpeg/png/bmp)を選択する
- 正面,左右への首振り,上下のうなずき,左右の首傾げを順に行う
- 口の開閉,瞬きなどの表情変化を加える
- ESCキーで終了する
ヒント
- 参照画像は正面顔が望ましい
- 標準出力に表示される
delegate:でGPUとCPUのいずれが選択されたかを確認できる
考察ポイント
- 正面に近い姿勢と大きな回転姿勢で合成境界の見え方がどう変わるか
- 参照顔とユーザ顔の肌色差・ライティング差が合成結果に与える影響
- 裏面カリングによって描画されない三角形が生じる姿勢条件
- 指数移動平均(α=0.5)による時間的ジッタ抑制の効果
7. 表情・頭部姿勢転写
ユーザから見える効果は次のとおりである.画面には別人物の静止画が映り,その顔がユーザの表情と頭の向きに追従して動く(他人の写真が自分の真似をするように見える).
別人物の静止画の顔を,ウェブカメラのユーザの表情と頭部姿勢に追従させる.Face Landmarker の output_face_blendshapes=True と output_facial_transformation_matrixes=True を有効化し,52次元のブレンドシェイプ係数(無表情からの各部位の動きの強度)と4×4の頭部姿勢行列(頭部の3次元位置と向きを表す同次変換行列)を取得する.表情と頭部姿勢はランドマーク座標自体に反映されるため,Delaunay三角形分割で静止画の顔を変形してアバター化する.併せてブレンドシェイプ係数の上位5項目を画面に,頭部姿勢行列を標準出力に提示する.
処理の流れ
- 静止画を
IMAGEモードで1回だけ検出し,468点のランドマークと三角形分割を事前計算する - ウェブカメラの各フレームについて
VIDEOモードでユーザのランドマーク・ブレンドシェイプ係数・頭部姿勢行列を取得する - ユーザのランドマークの境界矩形を静止画の境界矩形に整列する(平行移動と均一スケール,両者の顔の大きさを揃える処理)
- 三角形ごとに,静止画の三角形領域を整列後の位置にアフィン変換で写像し,静止画キャンバスに合成する
- ブレンドシェイプ係数を画面に重畳し,頭部姿勢行列を標準出力に出力する
精度・安定性の工夫
- GPU推論の自動選択:起動時にGPU推論を試行し,成功すればGPU,失敗すればCPUを採用する
- ウェブカメラ入力解像度の引き上げ:
CAP_PROP_FRAME_WIDTH/CAP_PROP_FRAME_HEIGHTに1280×720を要求する - ランドマーク座標の指数移動平均(α=0.5):新値 = 0.5 × 現フレーム値 + 0.5 × 前フレーム値.時間的ジッタを抑制する
- 凸包マスクへのGaussian Blur(カーネル21×21):マスク境界を羽根状にして合成境界の段差を軽減する
- Z座標による裏面カリング:三角形法線のZ成分の符号が静止画基準と反転した三角形は描画しない
tkinterによる画像選択ダイアログ:起動時に画像ファイル選択ダイアログを表示する.初期ディレクトリはSCRIPT_DIRとする
本実装の前提と限界
- 単一顔を想定する.
prev_pointsは1つだけ保持するため,複数顔同時に追従させる場合は顔ごとに独立に保持する必要がある - Delaunay三角形分割とアフィン変換による方式は,顔の前向きに近い姿勢では自然に動作するが,横顔に近い大角度の回転,強い陰影,参照顔とユーザ顔の肌色差が大きい場合には合成境界が目立つ場合がある
- 本資料のスタイル方針に従いエラーチェックを省略しているため,顔が一切検出されないフレームでは
cv2.seamlessClone等で実行時エラーとなりうる.運用時には検出有無のチェックを補うこと
使用タスク:Face Landmarker(7)
ユーザ操作
- コマンドプロンプトを管理者として実行し,
pip install --no-user mediapipe opencv-python numpyを実行する(仮想環境利用時は管理者権限および--no-userは不要) - ウェブカメラを接続してスクリプトを実行する(モデルファイルは初回起動時のみダウンロードされ,スクリプトと同一ディレクトリに保存される)
- 起動時に表示されるダイアログで別人物の正面顔画像を選択する(初期ディレクトリはスクリプトと同じ位置).ESCキーで終了する
Pythonコード
import os
import urllib.request
import tkinter as tk
from tkinter import filedialog
import cv2
import numpy as np
import mediapipe as mp
from mediapipe.tasks import python
from mediapipe.tasks.python import vision

# スクリプト所在ディレクトリ:モデル保存先と画像選択ダイアログの初期位置
SCRIPT_DIR = os.path.dirname(os.path.abspath(__file__))

# モデルファイルの自動ダウンロード(SCRIPT_DIR配下に保存)
URL = 'https://storage.googleapis.com/mediapipe-models/face_landmarker/face_landmarker/float16/1/face_landmarker.task'
MODEL_PATH = os.path.join(SCRIPT_DIR, 'face_landmarker.task')
if not os.path.exists(MODEL_PATH):
    urllib.request.urlretrieve(URL, MODEL_PATH)

# GPU推論の自動選択(GPU利用可能ならGPU,不可ならCPU)
try:
    _t = vision.FaceLandmarker.create_from_options(vision.FaceLandmarkerOptions(
        base_options=python.BaseOptions(model_asset_path=MODEL_PATH,
                                         delegate=python.BaseOptions.Delegate.GPU),
        running_mode=vision.RunningMode.IMAGE))
    _t.close()
    DELEGATE = python.BaseOptions.Delegate.GPU
except Exception:
    DELEGATE = python.BaseOptions.Delegate.CPU
print('delegate:', DELEGATE.name)

# 参照画像の選択(tkinterダイアログ,初期位置はSCRIPT_DIR)
_root = tk.Tk()
_root.withdraw()
SOURCE_PATH = filedialog.askopenfilename(
    initialdir=SCRIPT_DIR,
    title='別人物の正面顔画像を選択',
    filetypes=[('画像ファイル', '*.jpg *.jpeg *.png *.bmp')])
_root.destroy()

# 静止画の読み込みと顔ランドマーク検出(IMAGEモード,1回のみ)
src_bgr = cv2.imread(SOURCE_PATH)
src_h, src_w = src_bgr.shape[:2]
fl_image = vision.FaceLandmarker.create_from_options(vision.FaceLandmarkerOptions(
    base_options=python.BaseOptions(model_asset_path=MODEL_PATH, delegate=DELEGATE),
    running_mode=vision.RunningMode.IMAGE))
src_mp = mp.Image(image_format=mp.ImageFormat.SRGB,
                  data=cv2.cvtColor(src_bgr, cv2.COLOR_BGR2RGB))
src_result = fl_image.detect(src_mp)

# 顔メッシュ用は先頭468点(虹彩の10点を除く)
N = 468
src_points = np.array([(lm.x * src_w, lm.y * src_h)
                       for lm in src_result.face_landmarks[0][:N]], dtype=np.float32)

# Delaunay三角形分割:ランドマーク番号の三つ組として記録
subdiv = cv2.Subdiv2D((0, 0, src_w, src_h))
for p in src_points:
    subdiv.insert((float(p[0]), float(p[1])))
triangles = []
for tr in subdiv.getTriangleList():
    verts = [(tr[0], tr[1]), (tr[2], tr[3]), (tr[4], tr[5])]
    idx = []
    for v in verts:
        d = np.linalg.norm(src_points - v, axis=1)
        i = int(np.argmin(d))
        if d[i] < 1.0:
            idx.append(i)
    if len(idx) == 3 and len(set(idx)) == 3:
        triangles.append(idx)

# 静止画三角形の符号付き面積(三角形法線のZ成分に等しい)を事前計算
def signed_area(pts):
    a, b, c = pts
    return (b[0]-a[0])*(c[1]-a[1]) - (b[1]-a[1])*(c[0]-a[0])
src_signs = [np.sign(signed_area(src_points[t])) for t in triangles]

# 静止画ランドマークの境界矩形(整列基準)
src_bbox_min = src_points.min(axis=0)
src_bbox_max = src_points.max(axis=0)
src_center = (src_bbox_min + src_bbox_max) / 2
src_size = src_bbox_max - src_bbox_min

# ウェブカメラ用 Face Landmarker (VIDEOモード,ブレンドシェイプと頭部姿勢行列を出力)
fl_video = vision.FaceLandmarker.create_from_options(vision.FaceLandmarkerOptions(
    base_options=python.BaseOptions(model_asset_path=MODEL_PATH, delegate=DELEGATE),
    running_mode=vision.RunningMode.VIDEO,
    output_face_blendshapes=True,
    output_facial_transformation_matrixes=True))

# ウェブカメラ解像度を1280x720に要求(非対応カメラは実装値で動作)
cap = cv2.VideoCapture(0)
cap.set(cv2.CAP_PROP_FRAME_WIDTH, 1280)
cap.set(cv2.CAP_PROP_FRAME_HEIGHT, 720)
W = int(cap.get(cv2.CAP_PROP_FRAME_WIDTH))
H = int(cap.get(cv2.CAP_PROP_FRAME_HEIGHT))

# 指数移動平均パラメータ(α=0.5.大きいほど平滑強).※単一顔前提
SMOOTH = 0.5
prev_points = None

t = 0  # ミリ秒単位のタイムスタンプ
while True:
    ok, frame = cap.read()
    if not ok:
        break
    img = mp.Image(image_format=mp.ImageFormat.SRGB,
                   data=cv2.cvtColor(frame, cv2.COLOR_BGR2RGB))
    result = fl_video.detect_for_video(img, t)
    t += 33  # 約30FPS相当

    avatar = src_bgr.copy()
    for i, face in enumerate(result.face_landmarks):
        user_points = np.array([(lm.x * W, lm.y * H)
                                for lm in face[:N]], dtype=np.float32)
        # 指数移動平均(α=0.5)で時間的平滑化
        if prev_points is None:
            prev_points = user_points
        user_points = (1 - SMOOTH) * user_points + SMOOTH * prev_points
        prev_points = user_points

        # ユーザ顔の境界矩形を静止画顔の境界矩形に整列(平行移動 + 均一スケール)
        user_bbox_min = user_points.min(axis=0)
        user_bbox_max = user_points.max(axis=0)
        user_center = (user_bbox_min + user_bbox_max) / 2
        user_size = user_bbox_max - user_bbox_min
        scale = float(np.mean(src_size / user_size))
        mapped = (user_points - user_center) * scale + src_center

        # 三角形ごとにアフィン変換,Z座標による裏面カリング適用
        warped = np.zeros_like(src_bgr)
        for tri, src_sign in zip(triangles, src_signs):
            # 裏面カリング:符号反転した三角形は描画しない
            if np.sign(signed_area(mapped[tri])) != src_sign:
                continue
            s = src_points[tri]
            d = mapped[tri]
            r1 = cv2.boundingRect(s)
            r2 = cv2.boundingRect(d)
            s_local = s - np.array([r1[0], r1[1]], dtype=np.float32)
            d_local = d - np.array([r2[0], r2[1]], dtype=np.float32)
            crop = src_bgr[r1[1]:r1[1]+r1[3], r1[0]:r1[0]+r1[2]]
            M = cv2.getAffineTransform(s_local, d_local)
            w_tri = cv2.warpAffine(crop, M, (r2[2], r2[3]),
                                   None, flags=cv2.INTER_LINEAR,
                                   borderMode=cv2.BORDER_REFLECT_101)
            mask = np.zeros((r2[3], r2[2]), dtype=np.uint8)
            cv2.fillConvexPoly(mask, np.int32(d_local), 255)
            roi = warped[r2[1]:r2[1]+r2[3], r2[0]:r2[0]+r2[2]]
            np.copyto(roi, w_tri, where=mask[:, :, None].astype(bool))

        # 凸包マスクへのGaussian Blur(カーネル21×21)で羽根化,seamlessCloneで合成
        hull = cv2.convexHull(mapped.astype(np.int32))
        face_mask = np.zeros((src_h, src_w), dtype=np.uint8)
        cv2.fillConvexPoly(face_mask, hull, 255)
        face_mask = cv2.GaussianBlur(face_mask, (21, 21), 0)
        Mm = cv2.moments(face_mask)
        cx = int(Mm['m10'] / Mm['m00'])
        cy = int(Mm['m01'] / Mm['m00'])
        avatar = cv2.seamlessClone(warped, src_bgr, face_mask,
                                    (cx, cy), cv2.NORMAL_CLONE)

        # ブレンドシェイプ係数(上位5項目)を画面に重畳
        top = sorted(result.face_blendshapes[i],
                     key=lambda c: c.score, reverse=True)[:5]
        for j, c in enumerate(top):
            cv2.putText(avatar, f'{c.category_name}: {c.score:.2f}',
                        (10, 30 + j * 25),
                        cv2.FONT_HERSHEY_SIMPLEX, 0.6, (0, 255, 255), 1)

        # 頭部姿勢行列を標準出力に出力
        print('head_pose_matrix:', result.facial_transformation_matrixes[i])

    cv2.imshow('expression transfer', avatar)
    if cv2.waitKey(1) == 27:  # ESCキーによる終了処理
        break

cap.release()
cv2.destroyAllWindows()
演習7.表情・頭部姿勢転写
手順
- コマンドプロンプトを管理者として実行し,
pip install --no-user mediapipe opencv-python numpyを実行する(仮想環境利用時は管理者権限および--no-userは不要) - ウェブカメラを接続してスクリプトを実行する
- 起動時のダイアログで別人物の正面顔画像(jpg/jpeg/png/bmp)を選択する
- 口の開閉,瞬き,左右の口角を上げる動作を順に行い,画面のブレンドシェイプ係数の上位5項目の変化を確認する
- 左右への首振り,上下のうなずき,左右の首傾げを順に行い,標準出力の頭部姿勢行列の変化を確認する
- ESCキーで終了する
ヒント
- 画面表示は別人物の静止画キャンバス上に行われる
- ブレンドシェイプ係数の上位5項目は,動作に応じてランキングが入れ替わる
考察ポイント
- 口の開閉・瞬き・口角操作のそれぞれで上位に現れるブレンドシェイプ名
- 頭部姿勢行列の3×3回転成分が,首振り・うなずき・首傾げでどの要素を中心に変化するか
- 境界矩形による整列が,ユーザ顔と参照顔のサイズ差に対して機能する範囲
- 顔交換オーバーレイ(演習6)と本演習との,画面に映る背景・顔の位置関係の違い