Aptana Studio を使って,Ruby on Rails を扱ってみる
* 参考Webページ
- Windows の場合:Aptana Studio 3 のインストールと実行(Windows 上)
- Linux の場合:Linux で Aptana Studio 3 のダウンロードとインストールと実行
- 「コマンド操作の方が好き」という人向けには,別の Web ページで説明している.
【関係するディレクトリとファイル(主要なもの)】
- config/database.yml: データベース管理システム名,データベース名等の設定
- db: データベースファイルが置かれるディレクトリ
- cc/migrate: マイグレーション・ファイルが置かれるディレクトリ
【この Web ページで行うこと】
- Rails アプリケーションのディレクトリと基本ファイルの生成
* (参考)コマンド操作で行う場合:
cd hoge rails new . - Rails アプリケーションのひな形 (scaffold アプリケーション) の生成
* (参考)コマンド操作で行う場合:
cd hoge ruby script/rails generate scaffold order_record id:integer year:integer month:integer day:integer customer_name:text product_name:text unit_price:float qty:integer created_at:timestamp updated_at:timestamp - マイグレーション・ファイルでのテーブル定義
* SQLite 3 でのマイグレーション・ファイルの設定例:
class CreateOrderRecords < ActiveRecord::Migration
  def change
    create_table :order_records do |t|
      t.integer :id,            :null => false
      t.integer :year,            :null => false
      t.integer :month,            :null => false
      t.integer :day,            :null => false
      t.text :customer_name,    :null => false
      t.text :product_name,    :null => false
      t.float :unit_price,    :null => false
      t.integer :qty,            :null => false, :default => 1
      t.timestamp :created_at,  :null => false
      t.timestamp :updated_at

      t.timestamps
    end
  end
end
* SQLite 3 以外でのマイグレーション・ファイルの設定例:
class CreateOrderRecords < ActiveRecord::Migration def change create_table :order_records do |t| t.integer :id, :null => false t.integer :year, :null => false t.integer :month, :null => false t.integer :day, :null => false t.text :customer_name, :null => false t.text :product_name, :null => false t.float :unit_price, :null => false t.integer :qty, :null => false, :default => 1 t.timestamp :created_at, :null => false t.timestamp :updated_at t.timestamps end #add constraints execute "ALTER TABLE order_records ADD CONSTRAINT c1_order_records CHECK ( year > 2008 );" execute "ALTER TABLE order_records ADD CONSTRAINT c2_order_records CHECK ( month >= 1 AND month <= 12 );" execute "ALTER TABLE order_records ADD CONSTRAINT c3_order_records CHECK ( day >= 1 AND day <= 31 );" execute "ALTER TABLE order_records ADD CONSTRAINT c4_order_records CHECK ( unit_price > 0 );" execute "ALTER TABLE order_records ADD CONSTRAINT c5_order_records CHECK ( qty > 0 );" execute "ALTER TABLE order_records ADD CONSTRAINT c6_order_records CHECK ( ( unit_price * qty ) < 200000 );" end end - リレーショナルデータベースの作成
* (参考)コマンド操作で行う場合:
rake db:create rake db:migrate - Rails サーバの起動
* (参考)コマンド操作で行う場合:
ruby scripts/rails server - 動作確認
前準備
- Ruby 処理系のインストールと, RubyGems のインストールと,Rails のインストールが済んでいること
* この Web ページの手順をなぞる場合は,sqlite3 パッケージのインストールも済んでいること
- JRuby を使う場合に限り,Windows での Java JDK 18 (Java SE Development Kit 18) のインストールが済んでいること.
- Aptana Studio 3 のインストールが済んでいること.
* 参考Webページ
前もって決めておく事項
- 全体のルートディレクトリ: 既定では Aptana Studio 3 のワークスペースのディレクトリになる.
- Rails アプリケーション名: このページでは hoge と書く
- Rails アプリケーションのルートディレクトリ: 「全体のルートディレクトリ/hoge」 のようになる.
- データベース管理システム名: このページでは sqlite3 を使う.
mysql, postgresql, sqlite3, oracle などが指定できる.
ここでは Ruby on Rails の学習を行いたいので,SQLite バージョン 3を使うことにする. Ruby から SQLite 3のデータベースを扱うようなプログラムの作成については, 別の Web ページで詳しく説明している.
実際に使うには,データベースの権限の設定,複数のアプリケーションプログラムでのデータベースの共有を行うでしょうから, SQLite ではなく,MySQL の利用 等を使うことを検討してください.
Rails アプリケーションのディレクトリと基本ファイルの生成
cd hoge
rails new .
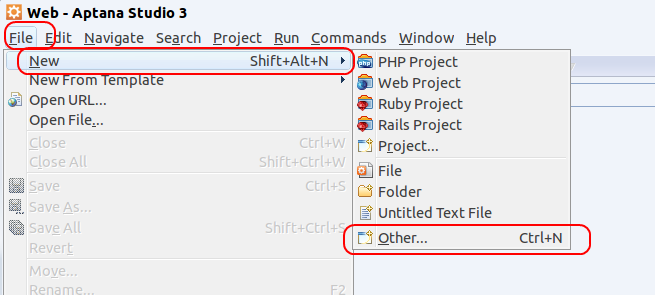
- プロジェクトの新規作成の開始
新規の Rails プロジェクトを作成したいので 「ファイル (File)」→「 新規 (New)」 →「 Rails プロジェクト (Rails Project)」と操作する.
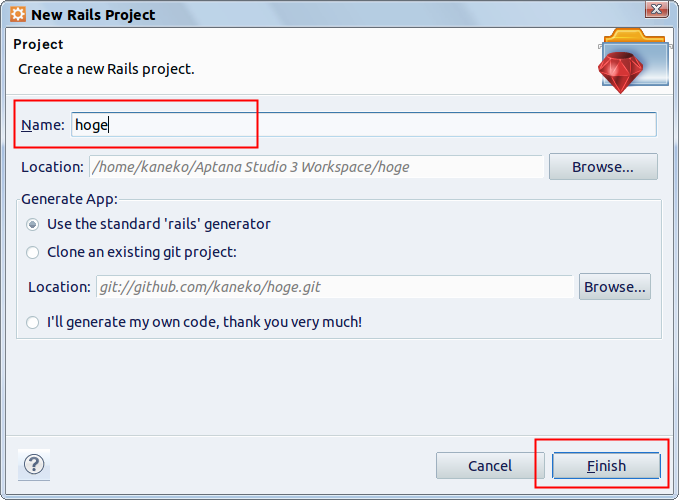
- Rails アプリケーション名の指定
Rails アプリケーション名につけて良いですが,全角文字は避けましょう.分かりやすい名前が良いです. ここでは, Rails アプリケーション名として「hoge」を指定します.
指定したら「Finish」をクリック.
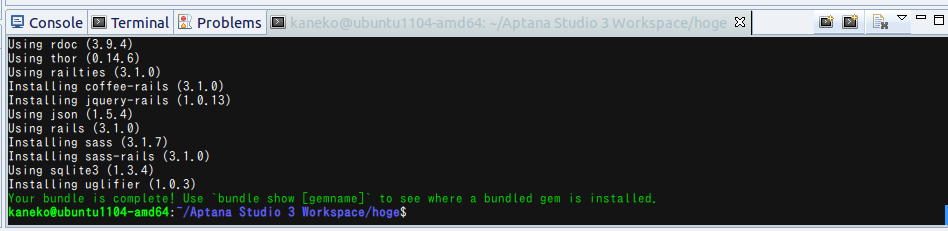
- コンソールで「完了したこと」の確認
「 Your bundle is complete! ... 」というようなメッセージが出るまでしばらく待つ
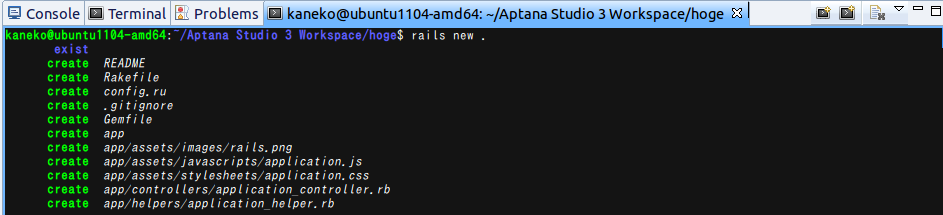
- コンソールを上の方にスクロールすると、「rails new .」が実行されたということが確認できる.
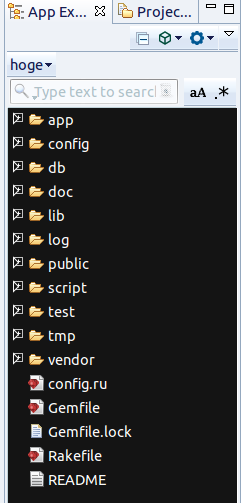
- いま作成した Rails プロジェクトが,App Explorer ウインドウに表示される
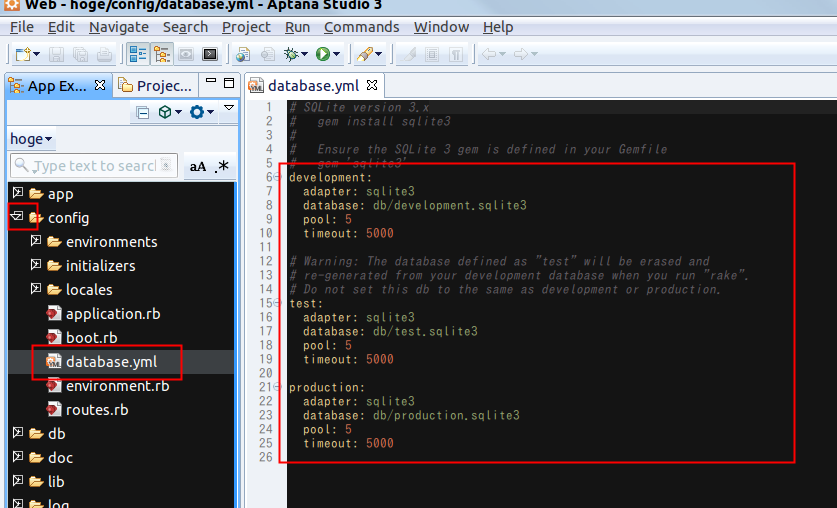
- (オプション)データベース設定ファイル config/database.yml の確認
既定(デフォルト)では,SQLite 3 が使われることが確認できる. この Web ページの目的である Ruby on Rails の入門用)としては全く問題ない.
データベース名も確認できる.
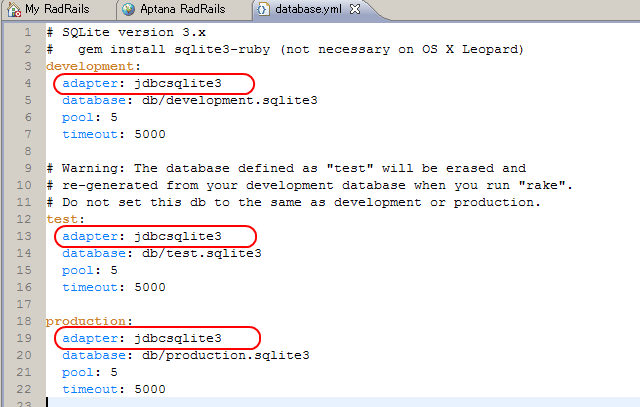
- (JRuby を使う場合のみ)アダプタの設定
(Ruby ではなく)JRuby を使う場合にはアダプタの設定を書き換える必要がある.
【SQLite 3 を使う場合の設定例】
Rails アプリケーションのひな形 (scaffold アプリケーション) の生成
cd hoge
ruby script/rails generate scaffold order_record id:integer year:integer month:integer day:integer customer_name:text product_name:text unit_price:float qty:integer created_at:timestamp updated_at:timestamp
前もって決めておく事項
- モデル名(単数形): このページでは order_record と書く
- テーブル名(複数形): このページでは order_records と書く
- テーブル定義:
このページでは,次のテーブル定義を使う.
* SQLite 3 の場合:
* SQLite 3以外 の場合:create table order_records ( id INTEGER PRIMARY KEY autoincrement not null, year INTEGER not null, month INTEGER not null, day INTEGER not null, customer_name TEXT not null, product_name TEXT not null, unit_price REAL not null, qty INTEGER not null DEFAULT 1, created_at DATETIME not null, updated_at DATETIME );create table order_records ( id INTEGER PRIMARY KEY autoincrement not null, year INTEGER not null CHECK ( year > 2008 ), month INTEGER not null CHECK ( month >= 1 AND month <= 12 ), day INTEGER not null CHECK ( day >= 1 AND day <= 31 ), customer_name TEXT not null, product_name TEXT not null, unit_price REAL not null CHECK ( unit_price > 0 ), qty INTEGER not null DEFAULT 1 CHECK ( qty > 0 ), created_at DATETIME not null, updated_at DATETIME, CHECK ( ( unit_price * qty ) < 200000 ) );
rails generate scaffold の実行
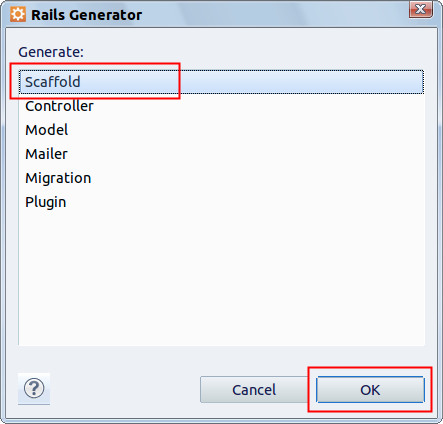
- Generate スクリプトの呼び出し
「コマンド (Commands)」→ 「Rails」→ 「Call Generate Script」
- 生成プログラムとして,「Scaffold」を選ぶ
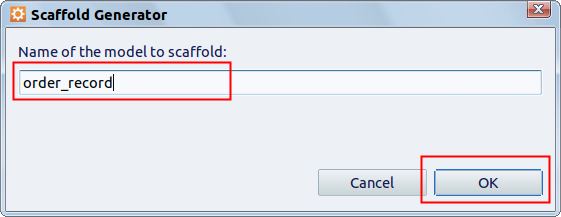
- モデル名(単数形)の設定
「order_record」の部分はモデル名(単数形)です.自由に設定できる.Rails の流儀では,モデル名には単数形の名詞を使う.
- 属性の設定
下記の通り設定し,OKをクリック.
データ型については,別の Web ページで説明する.
id:integer year:integer month:integer day:integer customer_name:text product_name:text unit_price:float qty:integer created_at:timestamp updated_at:timestamp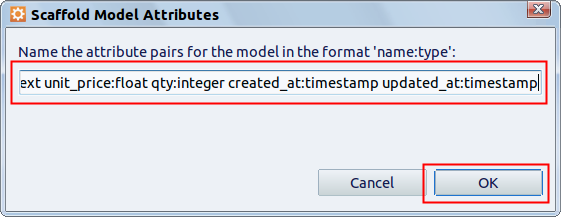
【ここで試している設定の要点】
- id, year, month, day, customer_name, product_name, unit_price, qty, created_at, updated_at: 属性名(Rails の流儀では,これら属性名はリレーショナルデータベースのテーブルの属性名と一致する)
- :integer, :text, :float, :timestampなど: データ型を表すシンボル
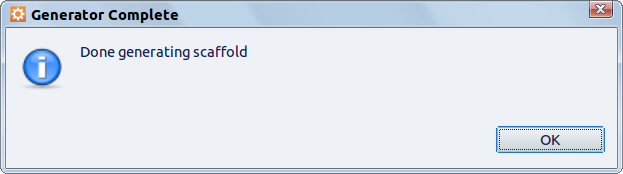
- 完了の確認
 *「Call Generate Script」が選べないと言う場合には,Aptana Studio 内のコンソール(Console)で、次のコマンドを実行する.
ruby script/rails generate scaffold order_record id:integer year:integer month:integer day:integer customer_name:text product_name:text unit_price:float qty:integer created_at:timestamp updated_at:timestamp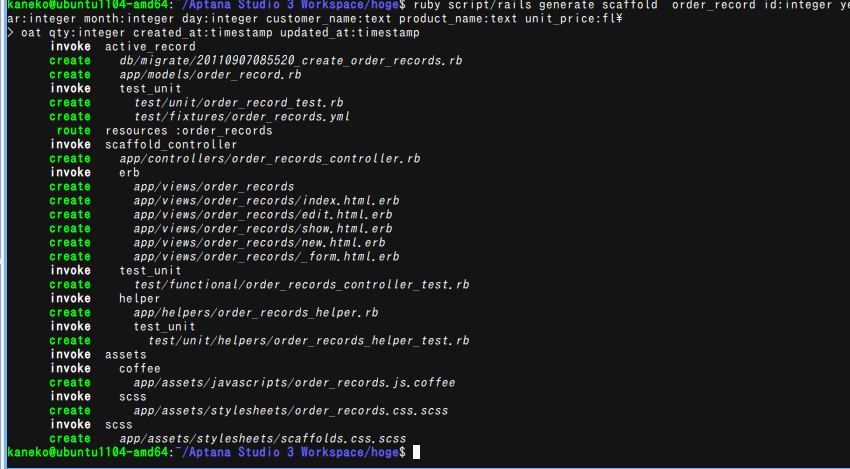
マイグレーション・ファイルでのテーブル定義
マイグレーション定義ファイルには,データベースのテーブル定義と一貫性制約の記述等を行う.
【関連する外部ページ】 https://api.rubyonrails.org/classes/ActiveRecord/ConnectionAdapters/SchemaStatements.html
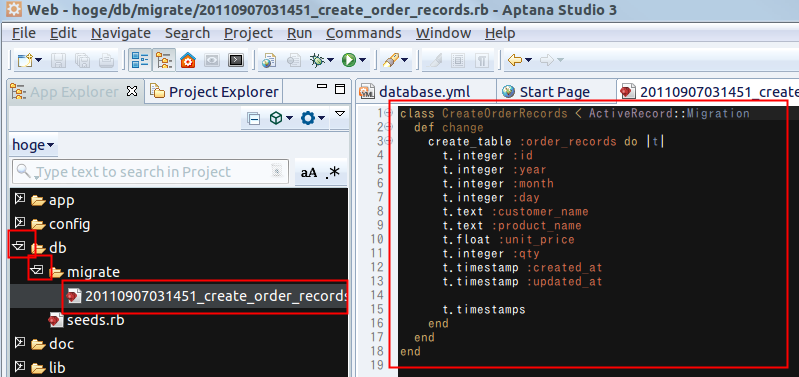
- Rails アプリケーションのひな形の作成において生成されたマイグレーション・ファイルの確認
cc/migrate の下にあるマイグレーション・ファイルをクリックする. 下の図での 20110907031451 は実際の日付に読み替えてください.
- マイグレーション・ファイルでのテーブル定義と一貫性制約の記述
いま確認したマイグレーション・ファイルを書き換えて,一貫性制約を記述したい.
記述したい一貫性制約は,SQL を使って次のように書くことができるとする.問題は,これを,マイグレーション・ファイルにどう書くか,ということ.
* SQL の文法と意味については,ここでは説明しないので, 別の Web ページを見てください.
◆ 一貫性制約を含むテーブル定義の例 (SQL での記述)
このページでは,次のテーブル定義を使う.
* SQLite 3 の場合:
create table order_records (
    id            INTEGER  PRIMARY KEY autoincrement not null,
    year          INTEGER  not null,
    month         INTEGER  not null,
    day           INTEGER  not null,
    customer_name TEXT  not null,
    product_name  TEXT  not null,
    unit_price    REAL     not null,
    qty           INTEGER  not null DEFAULT 1,
    created_at    DATETIME not null,
    updated_at    DATETIME );
* SQLite 3以外 の場合:
create table order_records ( id INTEGER PRIMARY KEY autoincrement not null, year INTEGER not null CHECK ( year > 2008 ), month INTEGER not null CHECK ( month >= 1 AND month <= 12 ), day INTEGER not null CHECK ( day >= 1 AND day <= 31 ), customer_name TEXT not null, product_name TEXT not null, unit_price REAL not null CHECK ( unit_price > 0 ), qty INTEGER not null DEFAULT 1 CHECK ( qty > 0 ), created_at DATETIME not null, updated_at DATETIME, CHECK ( ( unit_price * qty ) < 200000 ) );◆ ここで行うこと: 上記のテーブル定義と等価なものをマイグレーション・ファイルに記述したいということ
- SQL での not null と DEFAULT
SQL の not null は非空制約であり, SQL の DEFAULT はデフォルト値 (default value) の指定である.
「ActiveRecord::ConnectionAdapters::TableDefinition#column」の記述によれば,
- SQL の not null ・・・ マイグレーション・ファイルでは「:default => "Untitled"」のように書く
デフォルト値を SQL の「NULL」にしたい場合には,マイグレーション・ファイルでは 「:default => nil」のように書く
- SQL の DEFAULT ・・・ マイグレーション・ファイルでは「:null => false」のように書く
- SQL の not null ・・・ マイグレーション・ファイルでは「:default => "Untitled"」のように書く
- (SQLite 3 以外を使う場合) SQL での UNIQUE と CHECK (...) と REFERENCES
UNIQUE は一意制約であり, CHECK (...) は更新時にチェックされる式 であり, REFERENCES は参照整合性制約である.
* SQLite 3 でのマイグレーション・ファイルの設定例:
class CreateOrderRecords < ActiveRecord::Migration
  def change
    create_table :order_records do |t|
      t.integer :id,            :null => false
      t.integer :year,            :null => false
      t.integer :month,            :null => false
      t.integer :day,            :null => false
      t.text :customer_name,    :null => false
      t.text :product_name,    :null => false
      t.float :unit_price,    :null => false
      t.integer :qty,            :null => false, :default => 1
      t.timestamp :created_at,  :null => false
      t.timestamp :updated_at

      t.timestamps
    end
  end
end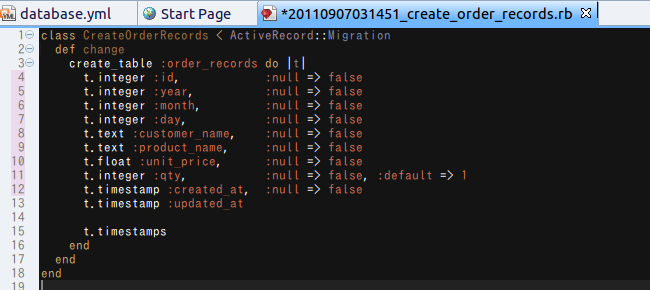
* SQLite 3 以外でのマイグレーション・ファイルの設定例:
http://guides.rails.info/migrations.html の記述によれば, マイグレーション・ファイル内に execute ... を含めることになる.実例を下に載せています.
SQLite 3 には ADD CONSTRAINT の機能が実装されていないため、下のプログラムは動かない(2011/09/01 時点).
class CreateOrderRecords < ActiveRecord::Migration def change create_table :order_records do |t| t.integer :id, :null => false t.integer :year, :null => false t.integer :month, :null => false t.integer :day, :null => false t.text :customer_name, :null => false t.text :product_name, :null => false t.float :unit_price, :null => false t.integer :qty, :null => false, :default => 1 t.timestamp :created_at, :null => false t.timestamp :updated_at t.timestamps end #add constraints execute "ALTER TABLE order_records ADD CONSTRAINT c1_order_records CHECK ( year > 2008 );" execute "ALTER TABLE order_records ADD CONSTRAINT c2_order_records CHECK ( month >= 1 AND month <= 12 );" execute "ALTER TABLE order_records ADD CONSTRAINT c3_order_records CHECK ( day >= 1 AND day <= 31 );" execute "ALTER TABLE order_records ADD CONSTRAINT c4_order_records CHECK ( unit_price > 0 );" execute "ALTER TABLE order_records ADD CONSTRAINT c5_order_records CHECK ( qty > 0 );" execute "ALTER TABLE order_records ADD CONSTRAINT c6_order_records CHECK ( ( unit_price * qty ) < 200000 );" end end - SQL での not null と DEFAULT
リレーショナルデータベースの作成
rake db:create
rake db:migrate
- (オプション)rake で実行可能なタスク一覧の表示
rake -T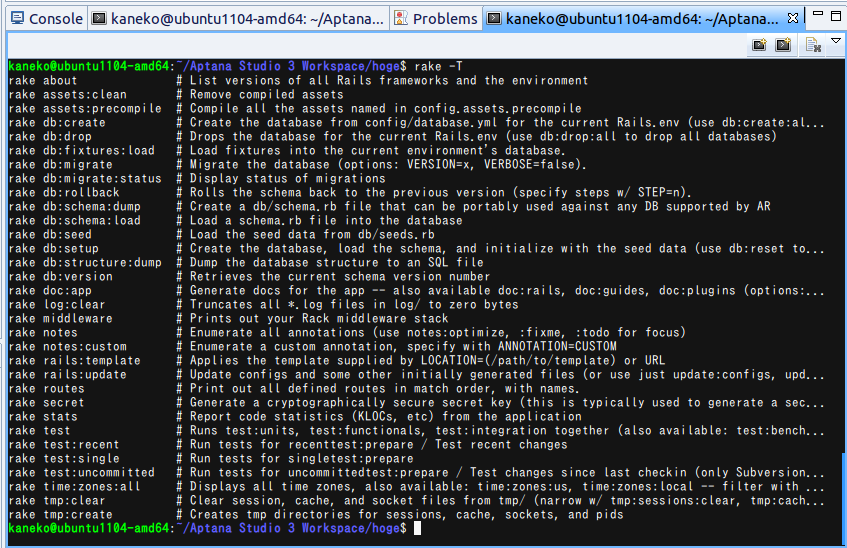
- (オプション)データベース・スキーマの版(バージョン)の確認
rake db:version
- (オプション)データベースのキャラクタ・セットの確認
「UTF-8」のように表示される.
rake db:charset
- データベース・マイグレーションの実行によるデータベースの生成
App Explorer を右クリックし,
rake db:create - マイグレーション・ファイルと rake コマンドを用いたマイグレーションの実行
メッセージから,新しいテーブルが定義されたことが分かります.
rake db:migrate
Rails サーバの起動と動作確認
- Rails サーバの起動
ruby scripts/rails serverWEBrick が起動していることが確認できる.ポート番号が 3000 であることも確認できる.
- Rails サーバと通信できることのテスト
Web ブラウザで http://127.0.0.1:3000 を指定します. Rails サーバと通信して,次のような Web ページが表示される.

* Windows のファイヤウオール機能により,ポート番号 3000 との通信が遮断されている場合があるので, ポート番号 3000 の通信については解除しておくこと.
- Ctrl + 「c」 による Rails サーバの終了