OpenBLAS のインストール(ソースコードを使用)(clang, flang を利用)(Windows 上)
【目次】
- 前準備
- perl, nijna, clang, flang および関連パッケージのインストール(conda3 を使用)
- Windows で OpenBLAS をソースコードからビルドして,インストールする
- OpenBLAS の動作確認
OpenBLAS
OpenBLAS はオープンソースの BLAS(Basic Linear Algebra Subprograms)ライブラリである.行列演算や線形代数計算のための関数を提供する.
主な機能:行列乗算(DGEMM)などの関数,マルチスレッド対応,自動的にCPUを検出してコンパイル,
BLAS を用いたプログラムは, https://gist.github.com/xianyi/6930656 などで公開されている.
【BLAS の主な関数】
- Level 1 ベクトルとベクトルの演算
- DOT : 内積
- AXPY : AXPY 演算 ( y <- ax + y の形など)
- NORM : ノルム など
- Level 2 行列とベクトルと計算
- 行列とベクトルの積 ( y <- Ax )
- 行列の rank-1 更新 ( A <- A + xy' )
- Level 3 行列同士の演算
- 行列と行列の積 ( Z <- XY )
【関連する外部ページ】
- OpenBLAS の Web ページ: https://www.openblas.net/
前準備
Build Tools for Visual Studio 2022 のインストール(Windows 上)
Build Tools for Visual Studio は,Visual Studio の IDE を含まない C/C++ コンパイラ,ライブラリ,ビルドツール等のコマンドライン向け開発ツールセットである。
以下のコマンドを管理者権限のコマンドプロンプトで実行する
(手順:Windowsキーまたはスタートメニュー → cmd と入力 → 右クリック → 「管理者として実行」)。
REM VC++ ランタイム
winget install --scope machine --id Microsoft.VCRedist.2015+.x64 -e --silent --disable-interactivity --force --accept-source-agreements --accept-package-agreements --override "/quiet /norestart"

REM Build Tools + Desktop development with C++(VCTools)+ 追加コンポーネント(一括)
winget install --id Microsoft.VisualStudio.2022.BuildTools --accept-source-agreements --accept-package-agreements ^
    --override "--passive --wait --norestart --add Microsoft.VisualStudio.Workload.VCTools --includeRecommended --add Microsoft.VisualStudio.Component.VC.Llvm.Clang --add Microsoft.VisualStudio.ComponentGroup.ClangCL --add Microsoft.VisualStudio.Component.VC.CMake.Project --add Microsoft.VisualStudio.Component.Windows11SDK.26100"
--add で追加されるコンポーネント
上記のコマンドでは,まず Build Tools 本体と Visual C++ 再頒布可能パッケージをインストールし,次に setup.exe を用いて以下のコンポーネントを追加している。
VCTools:C++ デスクトップ開発ワークロード(--includeRecommendedにより、MSVC コンパイラ、C++ AddressSanitizer、vcpkg、CMake ツール、Windows 11 SDK 等の推奨コンポーネントが含まれる)VC.Llvm.Clang:Windows 向け C++ Clang コンパイラClangCL:clang-cl ツールセットを含むコンポーネントグループ(MSBuild から Clang を使用するために必要)VC.CMake.Project:Windows 向け C++ CMake ツールWindows11SDK.26100:Windows 11 SDK(ビルド 10.0.26100)
インストール完了の確認
winget list Microsoft.VisualStudio.2022.BuildTools上記以外の追加のコンポーネントが必要になった場合は Visual Studio Installer で個別にインストールできる。
Visual Studio の機能を必要とする場合は、追加インストールできる。
Git のインストール(Windows 上) [クリックして展開]
管理者権限のコマンドプロンプトで以下を実行する.管理者権限は,winget の --scope machine オプションでシステム全体にインストールするために必要となる.
REM Git をシステム領域にインストール
winget install --scope machine --id Git.Git -e --silent --disable-interactivity --force --accept-source-agreements --accept-package-agreements --override "/VERYSILENT /NORESTART /NOCANCEL /SP- /CLOSEAPPLICATIONS /RESTARTAPPLICATIONS /COMPONENTS=""icons,ext\reg\shellhere,assoc,assoc_sh"" /o:PathOption=Cmd /o:CRLFOption=CRLFCommitAsIs /o:BashTerminalOption=MinTTY /o:DefaultBranchOption=main /o:EditorOption=VIM /o:SSHOption=OpenSSH /o:UseCredentialManager=Enabled /o:PerformanceTweaksFSCache=Enabled /o:EnableSymlinks=Disabled /o:EnableFSMonitor=Disabled"
CMakeのインストール(Windows 上) [クリックして展開]
管理者権限のコマンドプロンプトで以下を実行する。管理者権限のコマンドプロンプトを起動するには、Windows キーまたはスタートメニューから「cmd」と入力し、表示された「コマンドプロンプト」を右クリックして「管理者として実行」を選択する。
REM CMake をシステム領域にインストール
winget install --scope machine --id Kitware.CMake -e --silent --disable-interactivity --force --accept-source-agreements --accept-package-agreements --override "/qn /norestart ADD_CMAKE_TO_PATH=System"
perl, nijna, clang, flang および関連パッケージのインストール(conda を使用)
miniconda3 のインストール(Windows 上)
Anaconda をすでにインストール済みのときは,miniconda をインストールしないこと(Anaconda3 の中の conda を使うことにする)
Windows での miniconda3 のインストール手順は, 別ページ »で説明
perl, nijna, clang, flang および関連パッケージのインストール(conda を使用)
- 以下の手順を管理者権限のコマンドプロンプトで実行する
(手順:Windowsキーまたはスタートメニュー →
cmdと入力 → 右クリック → 「管理者として実行」)。 - perl, nijna, clang, flang および関連パッケージのインストール
https://github.com/xianyi/OpenBLAS/wiki/Installation-Guide の記述による
kitware/nijna の説明は https://github.com/Kitware/ninja
miniconda3 をインストールしたときに,パスを通していなかった場合は,「conda」と書く代わりに,「c:\tools\miniconda3\Library\bin\conda.bat」あるいは「C:\ProgramData\miniconda3\scripts\conda」のようにフルパスで指定する.
conda install -y perl
conda install -y -c conda-forge flang clangdev libflang
conda config --remove channels conda-forge
conda install -y -c isuruf kitware-ninja
conda config --remove channels isuruf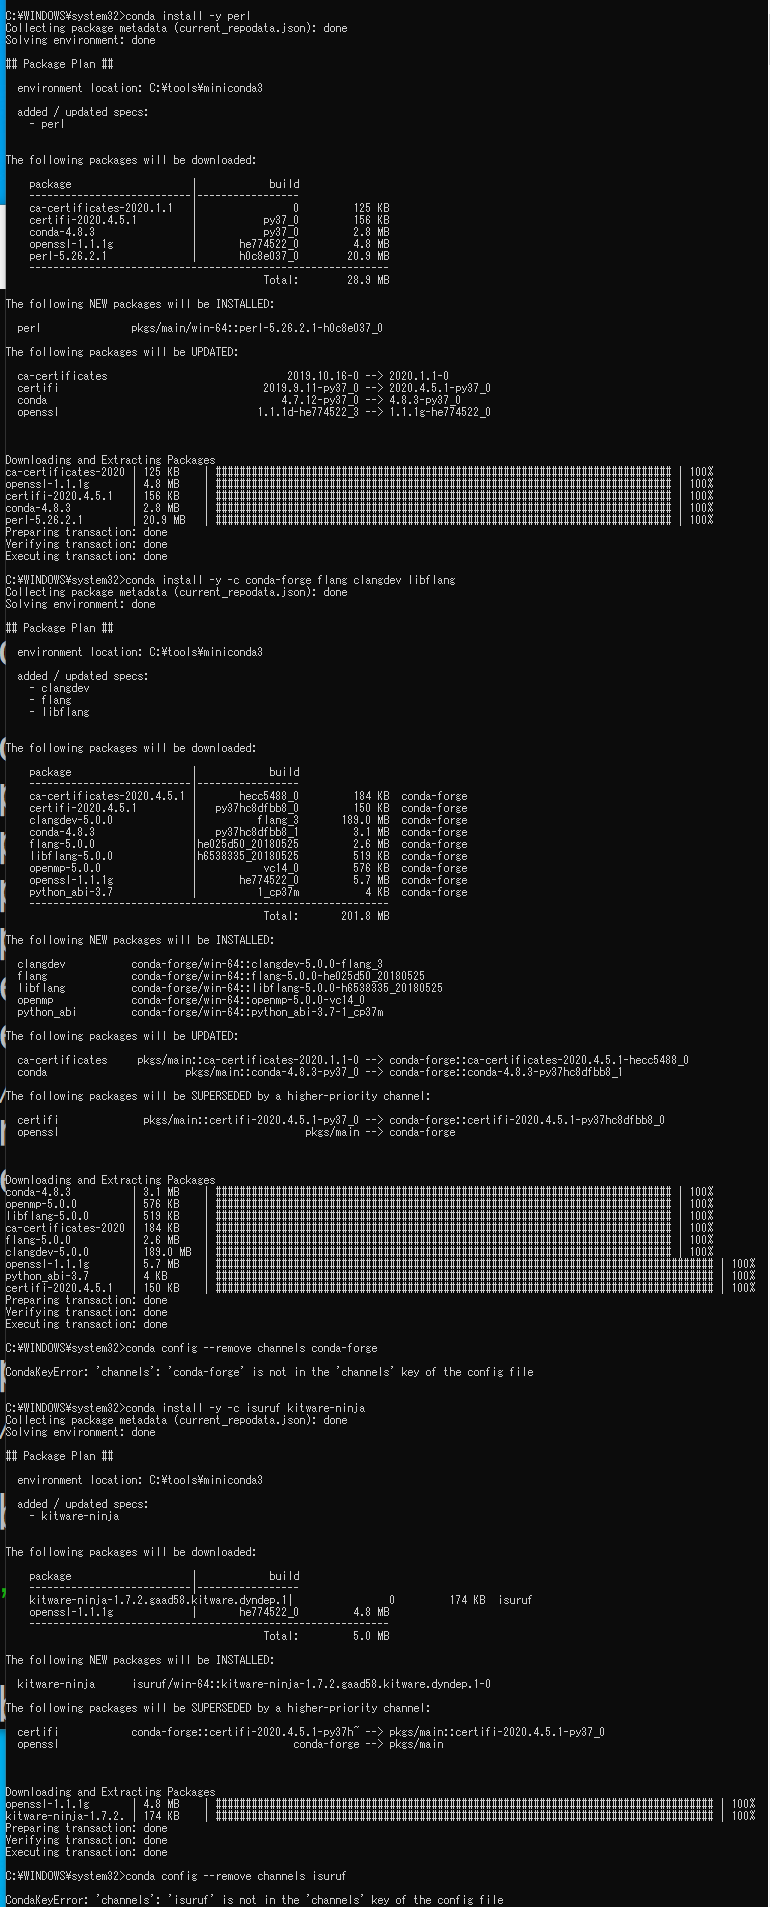
- 新しく、 Windows のコマンドプロンプトを開く
- OpenBLAS のインストールの前に、perl, cmake の確認
エラーメッセージが出なければ OK.
where perl
where cmake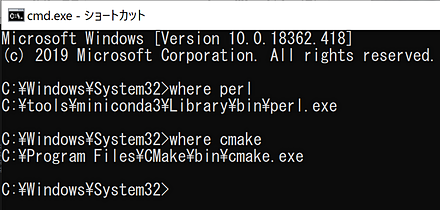
- clang, flang のバージョン、インストールディレクトリ等の確認
clang --version
flang --version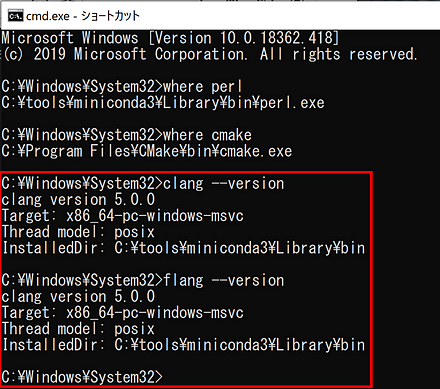
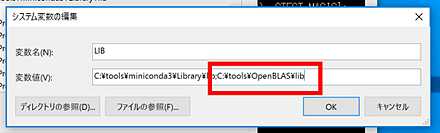
- システム環境変数 LIB の先頭に次を追加
miniconda3 の配下にインストールされたライブラリ等を有効にするため
「c:\tools\miniconda3」は実際のインストールディレクトリに置き換えること
c:\tools\miniconda3\Library\lib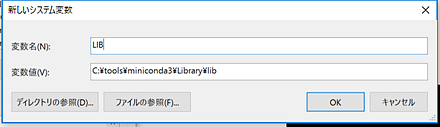
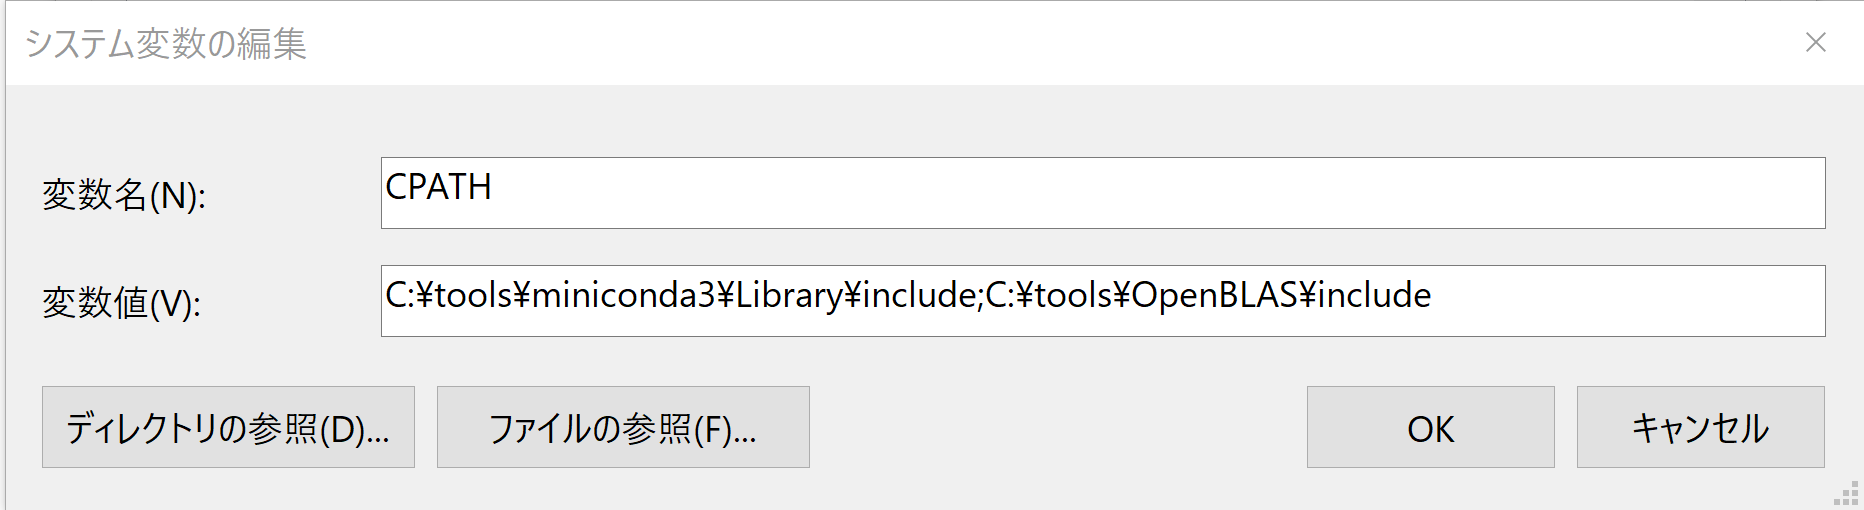
- システム環境変数 CPATH の先頭に次を追加
Anaconda3 の配下にインストールされたインクルードファイル等を有効にするため
「c:\tools\miniconda3」は実際のインストールディレクトリに置き換えること
c:\tools\miniconda3\Library\include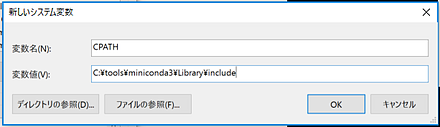
OpenBLAS のインストール(Windows 上)
【関連する外部ページ】 https://github.com/xianyi/OpenBLAS/wiki/Installation-Guide
- OpenBLAS のウェブページを開く
- このウェブページで利用条件などを確認
必ず、最新情報を確認すること
- 以下の操作をx64 Native Tools コマンドプロンプト (x64 Native Tools Command Prompt)で実行する
(手順:スタートメニュー →
」の下の「x64 Native Tools コマンドプロンプト (x64 Native Tools Command Prompt)」を選ぶ)。 「x64 Native Tools コマンドプロンプト」がないときは,ビルドツール (Build Tools) をインストールすると,x64 Native Tools コマンドプロンプトもインストールされる.その手順は,別ページ »で説明している.- OpenBLAS のインストールディレクトリを空にする
mkdir c:\tools
cd c:\tools
rmdir /s /q OpenBLAS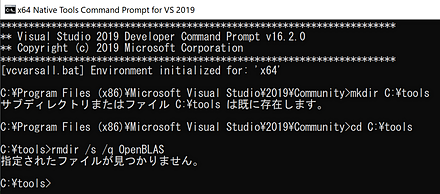
- ソースコードのダウンロード
cd c:\tools
git clone https://github.com/xianyi/OpenBLAS.git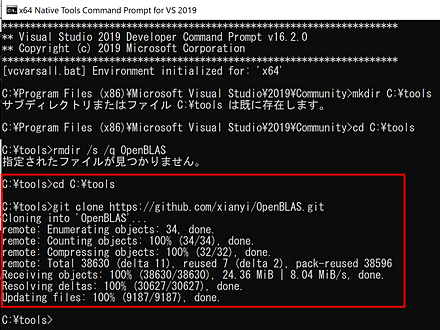
- cmake の実行
https://github.com/xianyi/OpenBLAS/wiki/Installation-Guide の記述による
cd c:\tools
cd OpenBLAS
rmdir /s /q build
mkdir build
cd build
del CMakeCache.txt
rmdir /s /q CMakeFiles
cmake .. -G "Ninja" ^
    -DCMAKE_C_COMPILER=clang-cl ^
    -DCMAKE_Fortran_COMPILER=flang ^
    -DNOFORTRAN=0 -DDYNAMIC_ARCH=OFF ^
    -DCMAKE_INSTALL_PREFIX="c:\tools\OpenBLAS" ^
    -DCMAKE_BUILD_TYPE=Release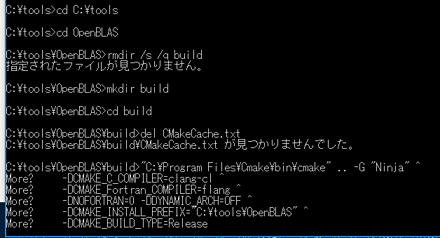
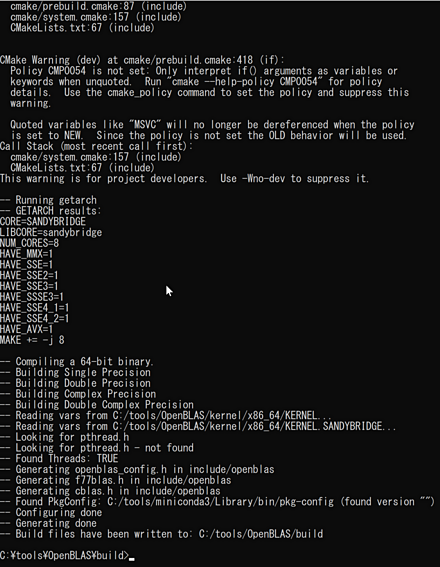
- cmake の結果の確認
エラーメッセージが出ていないこと
* ここでエラーが出た場合には、 「x64 Native Tools コマンドプロンプトを使っていることを確認する * ここでエラーが出て、 「x64 Native Tools コマンドプロンプトを使っている場合は、 システム環境変数 LIB、システム環境変数 CPATHを確認する
- ビルド
cmake --build . --config Release --target install
- ビルド結果の確認

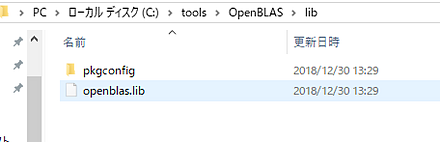
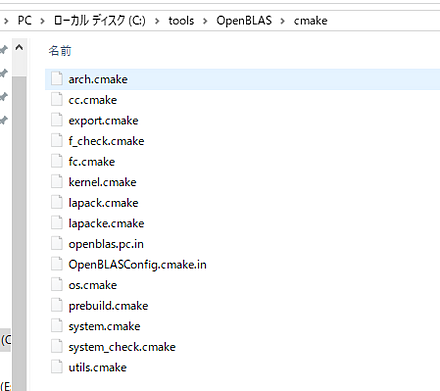
- c:\tools\OpenBLAS の下にファイルができるので確認する
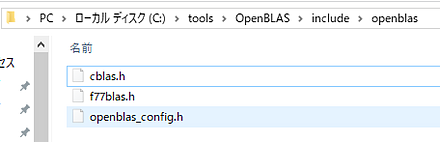
- Windows のシステム環境変数CPATH に c:\tools\OpenBLAS\include を追加
Windows での環境変数の設定は,マイコンピュータを右クリック → プロパティ→ 詳細設定 → 環境変数をクリックWindows の画面の表示では、「\」(円マーク)が表示される
- システムの環境変数 CPATH
- 追加する値: c:\tools\OpenBLAS\include
- Windows のシステム環境変数 LIB に c:\tools\OpenBLAS\lib を追加
- システムの環境変数 LIB
- 追加する値: c:\tools\OpenBLAS\lib
- Windows の システム環境変数 Pathに,c:\tools\OpenBLAS\bin を追加することにより,パスを通す.
Windows で,管理者権限でコマンドプロンプトを起動(手順:Windowsキーまたはスタートメニュー >
cmdと入力 > 右クリック > 「管理者として実行」)。次のコマンドを実行
powershell -command "$oldpath = [System.Environment]::GetEnvironmentVariable(\"Path\", \"Machine\"); $oldpath += \";c:\tools\OpenBLAS\bin\"; [System.Environment]::SetEnvironmentVariable(\"Path\", $oldpath, \"Machine\")"
- Windows のシステム環境変数 OpenBLAS, OpenBLAS_HOME に c:\tools\OpenBLAS を設定
これは OpenCV のビルドのときに利用される環境変数
- システムの環境変数 OpenBLAS_HOME
- 値: c:\tools\OpenBLAS
- OpenBLAS のインストールディレクトリを空にする
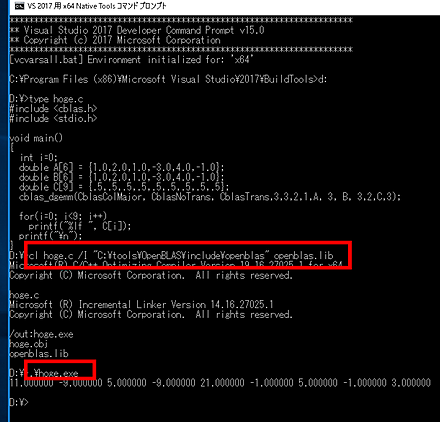
OpenBLAS の動作確認
https://gist.github.com/xianyi/6930656 に掲載の プログラムを利用
Windows での確認手順と結果は次の通り
- 以下の操作をx64 Native Tools コマンドプロンプト (x64 Native Tools Command Prompt)で実行する
(手順:スタートメニュー →
」の下の「x64 Native Tools コマンドプロンプト (x64 Native Tools Command Prompt)」を選ぶ)。 「x64 Native Tools コマンドプロンプト」がないときは,ビルドツール (Build Tools) をインストールすると,x64 Native Tools コマンドプロンプトもインストールされる.その手順は,別ページ »で説明している.- プログラムの準備
https://gist.github.com/xianyi/6930656 に掲載の プログラムを利用. hoge.cのようなファイル名で保存.
- ビルドして実行
ビルド時にエラーが出たときは、システム環境変数 LIB を確認すること
cl hoge.c /I "c:\tools\OpenBLAS\include\openblas" openblas.lib
.\hoge.exe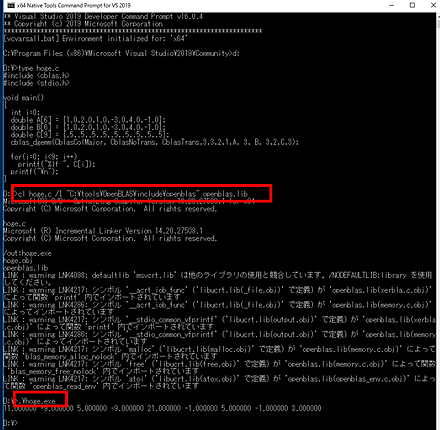
- プログラムの準備
サンプルプログラム
OpenBLAS を用いて行列の積を求める.実行結果は何も表示されない.
#include "stdafx.h"
#include<stdlib.h>
#include<cblas.h>
#define N 2000

int main()
{
	// C = AB
	int i;
	double *A, *B, *C;

	A = (double *)malloc(sizeof(double) * N * N);
	B = (double *)malloc(sizeof(double) * N * N);
	C = (double *)malloc(sizeof(double) * N * N);

	for (i = 0; i < N * N; i++) {
		A[i] = (double)rand() / RAND_MAX;
		B[i] = (double)rand() / RAND_MAX;
	}
	cblas_dgemm(CblasRowMajor, CblasNoTrans, CblasNoTrans, N, N, N, 1.0, A, N, B, N, 0.0, C, N);

	free(A);
	free(B);
	free(C);

	return 0;
}