![[kaneko lab.]](https://www.kkaneko.jp/info/logo_png.png)
BasicSR による超解像(ソースコードと実行結果)
【概要】
BasicSRは、画像・動画の復元を扱う深層学習のツールボックスであり、超解像の代表的なネットワークが実装されている。本ページでは、BasicSRが提供するRRDBNetにReal-ESRGANの学習済みモデルを読み込ませ、動画の各フレームを拡大するプログラムを扱う。Windows上でのPython開発環境の準備から、プログラムの実行までを順に説明する。
【目次】
- 1. Python開発環境,ライブラリ類
- 2. Python 3.12 のインストール
- 3. Python の開発環境 Visual Studio Code のインストールと Python 用の設定
- 4. 必要なソフトウェアとライブラリのインストール
- 5. BasicSR動画超解像処理プログラム
【関連する外部ページ】
- BasicSR の公式リポジトリ: https://github.com/XPixelGroup/BasicSR
- Real-ESRGAN の公式リポジトリ: https://github.com/xinntao/Real-ESRGAN
【サイト内の関連情報】
- AI開発環境の準備: https://www.kkaneko.jp/cc/dev/aiassist.html
1. Python開発環境,ライブラリ類
ここでは、最低限の事前準備について説明する。機械学習や深層学習を行う場合は、NVIDIA CUDA、Visual Studio、Cursorなどを追加でインストールすると便利である。これらについては別ページ https://www.kkaneko.jp/cc/dev/aiassist.html で解説している。
2. Python 3.12 のインストール
Pythonのインストールを行い、Pythonのプログラムを実行する環境を整える。扱う環境は、Windows搭載パソコンである。金子研究室では、Python 3.12.10を推奨する。
[Windows での Python 3.12 のインストール手順を見るには、ここをクリック]
Windows での Python 3.12 のインストール
以下のいずれかの方法でPython 3.12をインストールする。Pythonがインストール済みの場合、この手順は不要である。
方法 1:winget によるインストール
【インストールコマンドの実行方法】
管理者権限でコマンドプロンプトを起動する(手順:Windowsキーまたはスタートメニュー → cmd と入力 → 右クリック → 「管理者として実行」)。そして、コマンド全体をコマンドプロンプトにコピー&ペーストする。
--scope machine を指定することで、システム全体(全ユーザー向け)にインストールされる。このオプションの実行には管理者権限が必要である。インストール完了後、コマンドプロンプトを再起動するとPATHが反映される。
REM Python 3.12 をシステム領域にインストール
winget install --id Python.Python.3.12 -e --scope machine --silent --accept-source-agreements --accept-package-agreements --override "/quiet InstallAllUsers=1 PrependPath=1 Include_test=0 Include_pip=1 Include_launcher=1 InstallLauncherAllUsers=1 TargetDir=\"C:\Program Files\Python312\""
if not "%ERRORLEVEL%"=="0" ( color 0c & echo Python 3.12 のインストールに失敗しました & ping 127.0.0.1 -n 6 >nul & color )

REM Python と Scripts を PATH 先頭に追加
powershell -NoProfile -Command "$p='C:\Program Files\Python312'; $s=\"$p\Scripts\"; if(Test-Path $p){$k=[Microsoft.Win32.Registry]::LocalMachine.OpenSubKey('SYSTEM\CurrentControlSet\Control\Session Manager\Environment',$true); $c=$k.GetValue('Path','',[Microsoft.Win32.RegistryValueOptions]::DoNotExpandEnvironmentNames); $t=$k.GetValueKind('Path'); $new=$c; if((';'+$new+';') -notlike \"*;$p;*\"){$new=$p+';'+$new}; if((';'+$new+';') -notlike \"*;$s;*\"){$new=$s+';'+$new}; if($new -ne $c){$k.SetValue('Path',$new,$t)}; $k.Close()}"

REM 現在のセッションにも反映(システムPATHを再取得して連結)
for /f "usebackq tokens=2,*" %A in (`reg query "HKLM\SYSTEM\CurrentControlSet\Control\Session Manager\Environment" /v Path`) do set "PATH=%B"

REM pip / wheel の更新
python -m pip install --no-user -U pip wheel
if not "%ERRORLEVEL%"=="0" ( color 0c & echo pip / wheel の更新に失敗しました & ping 127.0.0.1 -n 6 >nul & color )
方法 2:インストーラーによるインストール
- Python公式サイト(https://www.python.org/downloads/)にアクセスし、「Download Python 3.x.x」ボタンからWindows用インストーラーをダウンロードする。
- ダウンロードしたインストーラーを実行する。
- 初期画面の下部に表示される「Add python.exe to PATH」にチェックを入れてから「Customize installation」を選択する。このチェックを入れ忘れると、コマンドプロンプトから
pythonコマンドを実行できない。 - 「Install Python 3.xx for all users」にチェックを入れ、「Install」をクリックする。
インストールの確認
コマンドプロンプトで以下を実行する。
python --versionバージョン番号(例:Python 3.12.x)が表示されればインストール成功である。「'python' は、内部コマンドまたは外部コマンドとして認識されていません。」と表示される場合は、インストールが正常に完了していない。
3. Python の開発環境 Visual Studio Code のインストールと Python 用の設定
Python の開発環境Visual Studio Code(プログラムを編集するソフトウェア。以下、VS Code)を整える。
[Windows での Visual Studio Code のインストールと Python 用の設定手順を見るには、ここをクリック]
Windows での Visual Studio Code のインストールと Python 用の設定手順
1. VS Code と拡張機能のインストール
以下のコマンドにより,既存の VS Code を削除し,全ユーザー共有の設定で再インストールしたうえで,拡張機能(VS Code に機能を追加するソフトウェア)をまとめて導入する.
【インストールコマンドの実行方法】
管理者権限でコマンドプロンプトを起動する(手順:Windows キーまたはスタートメニュー → cmd と入力 → 右クリック → 「管理者として実行」)。そして,コマンド全体をコマンドプロンプトにコピー&ペーストする。
インストールコマンド
REM ============================================================
REM Microsoft Visual Studio Code
REM ============================================================
REM Build Tools + Desktop development with C++(VCTools)+ 追加コンポーネント(一括)
REM 未インストール時: winget で新規インストール
REM インストール済み時: setup.exe modify でコンポーネント追加(バージョンは変更しない)
winget list --id Microsoft.VisualStudio.BuildTools 2>nul | findstr /i "BuildTools" >nul 2>&1
if %ERRORLEVEL% EQU 0 (
    for /f "usebackq delims=" %P in (`"C:\Program Files (x86)\Microsoft Visual Studio\Installer\vswhere.exe" -products Microsoft.VisualStudio.Product.BuildTools -property installationPath`) do start /wait "" "C:\Program Files (x86)\Microsoft Visual Studio\Installer\setup.exe" modify --installPath "%P" --add Microsoft.VisualStudio.Workload.VCTools --add Microsoft.VisualStudio.Workload.MSBuildTools --add Microsoft.VisualStudio.Component.VC.CMake.Project --add Microsoft.VisualStudio.Component.VC.Llvm.Clang --add Microsoft.VisualStudio.Component.VC.Llvm.ClangToolset --add Microsoft.VisualStudio.Component.Windows11SDK.26100 --add Microsoft.VisualStudio.Component.VC.v143.x86.x64 --includeRecommended --quiet --norestart --nocache
    if not "%ERRORLEVEL%"=="0" ( color 0c & echo Build Tools のコンポーネント追加に失敗しました & ping 127.0.0.1 -n 6 >nul & color )
) else (
    winget install --scope machine --id Microsoft.VisualStudio.BuildTools -e --silent --disable-interactivity --force --accept-source-agreements --accept-package-agreements --override "--quiet --wait --norestart --nocache --add Microsoft.VisualStudio.Workload.VCTools --includeRecommended --add Microsoft.VisualStudio.Workload.MSBuildTools --add Microsoft.VisualStudio.Component.VC.CMake.Project --add Microsoft.VisualStudio.Component.VC.Llvm.Clang --add Microsoft.VisualStudio.Component.VC.Llvm.ClangToolset --add Microsoft.VisualStudio.Component.Windows11SDK.26100 --add Microsoft.VisualStudio.Component.VC.v143.x86.x64"
    if not "%ERRORLEVEL%"=="0" ( color 0c & echo Build Tools のインストールに失敗しました & ping 127.0.0.1 -n 6 >nul & color )
)

REM 全ユーザー共有の拡張機能フォルダ
if not exist "C:\ProgramData\vscode-extensions" mkdir "C:\ProgramData\vscode-extensions"
icacls "C:\ProgramData\vscode-extensions" /grant "Everyone:(OI)(CI)M" /T

REM スタートメニューのショートカットを --extensions-dir 付きで再作成
if exist "C:\ProgramData\Microsoft\Windows\Start Menu\Programs\Visual Studio Code" rmdir /s /q "C:\ProgramData\Microsoft\Windows\Start Menu\Programs\Visual Studio Code"
if exist "C:\ProgramData\Microsoft\Windows\Start Menu\Programs\Visual Studio Code.lnk" del "C:\ProgramData\Microsoft\Windows\Start Menu\Programs\Visual Studio Code.lnk"
powershell -NoProfile -Command "$s=New-Object -ComObject WScript.Shell; $lnk=$s.CreateShortcut('C:\ProgramData\Microsoft\Windows\Start Menu\Programs\Visual Studio Code.lnk'); $lnk.TargetPath='C:\Program Files\Microsoft VS Code\Code.exe'; $lnk.Arguments='--extensions-dir \"C:\ProgramData\vscode-extensions\"'; $lnk.Save()"
REM ショートカットの検証
powershell -NoProfile -Command "$s=New-Object -ComObject WScript.Shell; $lnk=$s.CreateShortcut('C:\ProgramData\Microsoft\Windows\Start Menu\Programs\Visual Studio Code.lnk'); Write-Host 'TargetPath:' $lnk.TargetPath; Write-Host 'Arguments:' $lnk.Arguments"

REM ファイル / フォルダ右クリックの「Code で開く」を登録
reg add "HKLM\SOFTWARE\Classes\*\shell\VSCode\command" /ve /d "\"C:\Program Files\Microsoft VS Code\Code.exe\" --extensions-dir \"C:\ProgramData\vscode-extensions\" \"%1\"" /f
reg add "HKLM\SOFTWARE\Classes\Directory\shell\VSCode\command" /ve /d "\"C:\Program Files\Microsoft VS Code\Code.exe\" --extensions-dir \"C:\ProgramData\vscode-extensions\" \"%1\"" /f
reg add "HKLM\SOFTWARE\Classes\Directory\Background\shell\VSCode\command" /ve /d "\"C:\Program Files\Microsoft VS Code\Code.exe\" --extensions-dir \"C:\ProgramData\vscode-extensions\" \"%V\"" /f

REM --extensions-dir 付きで起動する code.cmd ラッパを作成
REM (%* を echo で書くと対話的 cmd で失われるため、PowerShell で [char]37+'*' を書き出す)
powershell -NoProfile -Command "$pct=[char]37; $q=[char]34; $c='@echo off'+[char]13+[char]10+$q+'C:\Program Files\Microsoft VS Code\bin\code.cmd'+$q+' --extensions-dir '+$q+'C:\ProgramData\vscode-extensions'+$q+' '+$pct+'*'+[char]13+[char]10; [IO.File]::WriteAllText('C:\ProgramData\vscode-extensions\vscode.cmd',$c,[Text.Encoding]::ASCII)"

REM 拡張機能のインストール
set "CODE=C:\Program Files\Microsoft VS Code\bin\code.cmd"
"%CODE%" --extensions-dir "C:\ProgramData\vscode-extensions" --uninstall-extension GitHub.copilot
"%CODE%" --extensions-dir "C:\ProgramData\vscode-extensions" --uninstall-extension GitHub.copilot-chat
"%CODE%" --extensions-dir "C:\ProgramData\vscode-extensions" --install-extension ms-python.python
"%CODE%" --extensions-dir "C:\ProgramData\vscode-extensions" --install-extension ms-python.vscode-pylance
"%CODE%" --extensions-dir "C:\ProgramData\vscode-extensions" --install-extension ms-python.debugpy
"%CODE%" --extensions-dir "C:\ProgramData\vscode-extensions" --install-extension MS-CEINTL.vscode-language-pack-ja
"%CODE%" --extensions-dir "C:\ProgramData\vscode-extensions" --install-extension saoudrizwan.claude-dev
"%CODE%" --extensions-dir "C:\ProgramData\vscode-extensions" --install-extension rust-lang.rust-analyzer
"%CODE%" --extensions-dir "C:\ProgramData\vscode-extensions" --install-extension tamasfe.even-better-toml
"%CODE%" --extensions-dir "C:\ProgramData\vscode-extensions" --install-extension anthropic.claude-code
"%CODE%" --extensions-dir "C:\ProgramData\vscode-extensions" --install-extension almenon.arepl
"%CODE%" --extensions-dir "C:\ProgramData\vscode-extensions" --list-extensions --show-versions

REM settings.json を作成(自動更新オフ、Python、Claude Code 設定)
if not exist "%APPDATA%\Code\User" mkdir "%APPDATA%\Code\User"
python -c "import json,os;data={'update.mode':'none','update.enableWindowsBackgroundUpdates':False,'extensions.autoUpdate':False,'python.defaultInterpreterPath':r'C:\Program Files\Python312\python.exe','claudeCode.environmentVariables':[{'name':'ANTHROPIC_API_KEY','value':'not-needed'},{'name':'ANTHROPIC_AUTH_TOKEN','value':'ollama'},{'name':'ANTHROPIC_BASE_URL','value':'http://localhost:11434'},{'name':'ANTHROPIC_MODEL','value':'glm-4.7-flash'},{'name':'CLAUDE_CODE_DISABLE_NONESSENTIAL_TRAFFIC','value':'1'}]};p=os.path.join(os.environ['APPDATA'],'Code','User','settings.json');open(p,'w',encoding='utf-8').write(json.dumps(data,indent=4));print('Done:',p)"

REM 自動更新の抑止ポリシー(settings.json に加えて、レジストリ側でも明示的にオフ)
reg add "HKLM\SOFTWARE\Policies\Microsoft\VSCode" /v "UpdateMode" /t REG_SZ /d "none" /f
echo === セットアップ完了 ===
2. Python インタプリタの選択
同一マシンに複数の Python がインストールされている場合,VS Code で使用する Python 本体(インタプリタ:Python プログラムを解釈・実行するソフトウェア)を選択する必要がある.
- コマンドパレット(コマンド名で機能を呼び出す VS Code の入力欄)を開く(
Ctrl+Shift+P) Python: Select Interpreterと入力する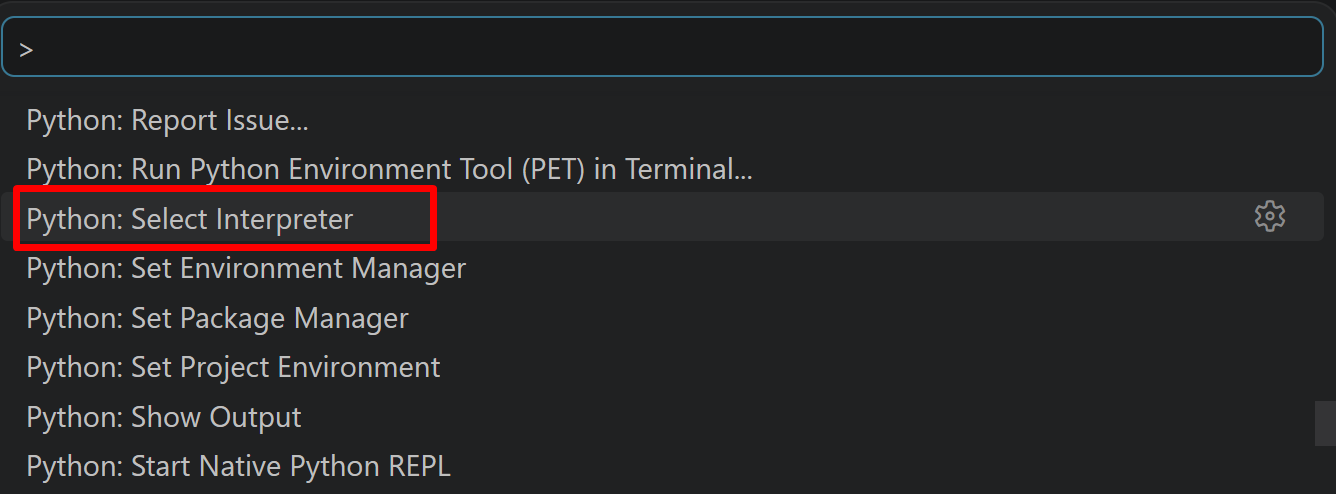
- 表示される一覧から,使用する Python(例:
C:\Program Files\Python312\python.exe)を選択する.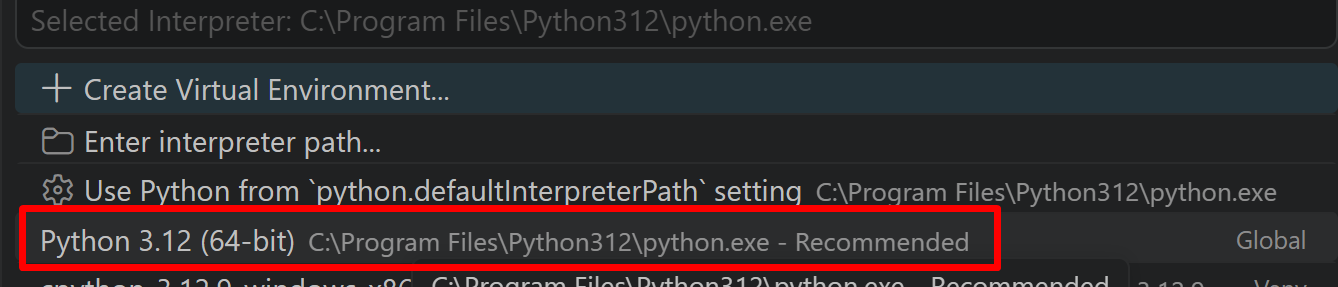
4. 必要なソフトウェアとライブラリのインストール
Windows での FFmpeg インストール手順(手動インストール)
処理結果を音声付きの動画ファイルにまとめるために FFmpeg を使う。公式ビルド版を使用する。
-
ダウンロード
- https://www.gyan.dev/ffmpeg/builds/ にアクセス
- 「release builds」セクションの「full」版をダウンロード
- ファイル名例:
ffmpeg-release-full.7z - essentials版ではなくfull版を選択(ffprobeも含まれる)
- ファイル名例:
-
解凍
- ダウンロードした7zファイルを右クリック
- 7-Zip等で解凍(Windows標準では7z非対応のため、7-Zipが必要)
- 7-Zipダウンロード: https://www.7-zip.org/
- 解凍先を
C:\ffmpegにする(推奨)- フォルダ構造:
C:\ffmpeg\bin\ffmpeg.exeとなるように配置
- フォルダ構造:
-
環境変数PATHの設定
- Windowsキー + R → 「sysdm.cpl」と入力してEnter
- 「詳細設定」タブ → 「環境変数」ボタンをクリック
- 「システム環境変数」の「Path」を選択 → 「編集」
- 「新規」をクリック →
C:\ffmpeg\binを追加 - 「OK」を3回クリックして設定を保存
-
動作確認
- コマンドプロンプトを新規で開く(既存のものは閉じる)
- 以下のコマンドを実行:
ffmpeg -version ffprobe -version - バージョン情報が表示されれば成功
必要なライブラリをシステム領域にインストール
管理者権限でコマンドプロンプトを起動する
(手順:Windowsキーまたはスタートメニュー → cmd と入力 → 右クリック → 「管理者として実行」)。
次のコマンドを実行する。--no-user オプションは、ユーザ領域ではなくシステム領域へインストールするために付ける。
REM PyTorch をインストール(GPU対応版)
set "CUDA_TAG=cu128"
set "PYTHON_PATH=C:\Program Files\Python312"
"%PYTHON_PATH%\Scripts\pip" install --no-user -U numpy torch torchvision torchaudio --index-url https://download.pytorch.org/whl/%CUDA_TAG%
pip install --no-user -U basicsr "opencv-python>=5.0.0" numpy pillow requests scikit-image
BasicSRは、torchvision 0.17 で削除された torchvision.transforms.functional_tensor を参照する。そのため、後述のソースコードの冒頭で、このモジュール名から現行の torchvision.transforms.functional へつなぐ処理を入れている(BasicSR公式リポジトリの Issue #711 で報告されている問題への対応)。
5. BasicSR動画超解像処理プログラム
概要
このプログラムは、BasicSRを基盤として動画の超解像処理を行う。RRDBNetを用い、入力動画の各フレームを拡大する。動画ファイル、カメラ、サンプル動画の3種類の入力に対応し、処理結果を表示しながら、処理情報をテキストファイルに記録する。
主要技術
BasicSR (Basic Super-Resolution framework)
画像・動画復元タスクのための深層学習ツールボックスである[1]。様々な超解像モデルの実装基盤として広く利用されており、本プログラムではその中のRRDBNetを使用する。
RRDB (Residual-in-Residual Dense Block) Network
ESRGANで提案されたネットワーク構造である[2]。複数のResidual Dense Block(密に結合した畳み込み層のまとまり)を階層的に組み合わせることで、画像の細部を保ちながら拡大する。本プログラムは、選んだモデルに応じて6個または23個のRRDBブロックを使い、64チャンネルの特徴マップを処理する。
技術的特徴
- Real-ESRGAN学習済みモデルの活用: Real-ESRGANの学習済み重みを使うことで、自分で学習させることなく超解像を実行できる
- GPU/CPU自動選択機構: PyTorchのCUDA検出機能により、利用できるハードウェアに応じて処理デバイスを自動的に選ぶ
- torchvision API互換性対策:
functional_tensorモジュールを動的に用意することで、現行のtorchvisionでもBasicSRを読み込めるようにする - 処理結果の表示: OpenCVを用いた動画フレームの逐次処理と表示により、処理過程を目で確認できる
実装の特色
- 多様な入力ソース対応: tkinterによるファイル選択ダイアログ、DirectShowを優先したカメラ取得、サンプル動画の自動ダウンロードに対応
- 日本語表示機能: PillowとOpenCVを組み合わせ、処理情報を日本語フォント(メイリオ)で画面上に表示
- 品質評価指標: 各フレームについて、Lanczos4法で拡大した画像を基準としたPSNRとSSIMを計算する
- 処理履歴の記録: 各フレームの処理結果(入力解像度、出力解像度、PSNR、SSIM)をresult.txtファイルに保存し、使用デバイス情報も併せて記録
- 色空間変換の適切な処理: OpenCVのBGR形式とPyTorchで扱うRGB形式の間の変換を正しく行い、色の整合性を保つ
参考文献
[1] X. Wang, et al. (2022). BasicSR: Open Source Image and Video Restoration Toolbox. GitHub repository. https://github.com/XPixelGroup/BasicSR
[2] X. Wang, et al. (2018). ESRGAN: Enhanced Super-Resolution Generative Adversarial Networks. In Proceedings of the European Conference on Computer Vision (ECCV) Workshops. https://arxiv.org/abs/1809.00219
[3] X. Wang, L. Xie, C. Dong, and Y. Shan (2021). Real-ESRGAN: Training Real-World Blind Super-Resolution with Pure Synthetic Data. In Proceedings of the IEEE/CVF International Conference on Computer Vision Workshops (pp. 1905-1914). https://arxiv.org/abs/2107.10833
ソースコード
# プログラム名: BasicSR動画超解像処理プログラム
# 特徴技術名: BasicSR (Basic Super-Resolution framework)
# 出典: X. Wang, et al. BasicSR: Open Source Image and Video Restoration Toolbox. https://github.com/XPixelGroup/BasicSR
# 特徴機能: BasicSRが提供するRRDBNetによる動画の超解像
# AI学習済みモデル: RealESRGAN_x4plus(汎用実写画像向け、23 RRDB構造、4倍)、RealESRGAN_x4plus_anime_6B(アニメ画像特化、6 RRDB構造、4倍)、RealESRGAN_x2plus(汎用実写画像向け、23 RRDB構造、2倍)
# 入力: 動画(動画ファイル、カメラ、サンプル動画)
# 出力: 処理結果の表示、処理結果をresult.txtに保存、音声付き動画ファイル(MP4)を生成
# 前準備: pip install --no-user -U numpy torch torchvision torchaudio --index-url https://download.pytorch.org/whl/cu128
#         pip install --no-user -U basicsr "opencv-python>=5.0.0" numpy pillow requests scikit-image
#         FFmpeg をインストールし、PATH を通しておく
# 方式設計:
#   - 関連利用技術: BasicSR(RRDBNetの提供)、OpenCV(動画処理)、Pillow(日本語テキスト描画)、FFmpeg(音声付き動画の生成)、scikit-image(PSNR・SSIMの計算)
#   - 処理手順: 1.モデル選択、2.学習済みモデルの取得と読み込み、3.入力ソース選択、4.フレーム読み込み、5.RRDBNetによる超解像、6.PSNR・SSIMの計算、7.表示と連番PNG保存、8.ffmpegで音声付きMP4を生成、9.result.txtへ保存
#   - 前処理、後処理: 前処理:BGR→RGB変換、0-1正規化、後処理:RGB→BGR変換、uint8化
#   - 調整を必要とする設定値: なし(GPUメモリに応じて半精度の使用を自動で切り替える)
# その他の重要事項: 音声付き動画の生成にはFFmpegが必要。Windows環境での動作を前提

import sys
import types

# torchvision 0.17 で削除された functional_tensor への互換対応(basicsr が参照するため)
try:
    import torchvision.transforms.functional_tensor as _ft  # noqa
except ModuleNotFoundError:
    import torchvision.transforms.functional as _F
    _module = types.ModuleType('torchvision.transforms.functional_tensor')
    _module.rgb_to_grayscale = _F.rgb_to_grayscale
    sys.modules['torchvision.transforms.functional_tensor'] = _module

import os
import subprocess
import cv2
import numpy as np
import torch
import tkinter as tk
from tkinter import filedialog
from PIL import Image, ImageDraw, ImageFont
import requests
import urllib.request
import time
from datetime import datetime
from skimage.metrics import structural_similarity as ssim
from skimage.metrics import peak_signal_noise_ratio as psnr
from basicsr.archs.rrdbnet_arch import RRDBNet

# 定数定義
WEIGHTS_DIR = 'weights'
OUTPUT_VIDEO_FILE = 'enhanced_output.mp4'
MAIN_FUNC_DESC = "BasicSR超解像処理"

# 日本語フォント
FONT_PATH = 'C:/Windows/Fonts/meiryo.ttc'
FONT_SIZE = 20
FONT_COLOR = (0, 255, 0)
TEXT_POSITION = (10, 10)

# モデル情報定義
MODEL_INFO = {
    'RealESRGAN_x4plus': {
        'name': 'RealESRGAN x4plus',
        'description': '汎用実写画像向け、標準品質',
        'scale': 4,
        'blocks': 23,
        'url': 'https://github.com/xinntao/Real-ESRGAN/releases/download/v0.1.0/RealESRGAN_x4plus.pth',
    },
    'RealESRGAN_x4plus_anime_6B': {
        'name': 'RealESRGAN x4plus Anime 6B',
        'description': 'アニメ画像特化、軽量モデル',
        'scale': 4,
        'blocks': 6,
        'url': 'https://github.com/xinntao/Real-ESRGAN/releases/download/v0.2.2.4/RealESRGAN_x4plus_anime_6B.pth',
    },
    'RealESRGAN_x2plus': {
        'name': 'RealESRGAN x2plus',
        'description': '汎用実写画像向け、2倍拡大',
        'scale': 2,
        'blocks': 23,
        'url': 'https://github.com/xinntao/Real-ESRGAN/releases/download/v0.2.1/RealESRGAN_x2plus.pth',
    },
}

# モデルダウンロード
def download_file_from_url(url, model_dir, file_name):
    os.makedirs(model_dir, exist_ok=True)
    file_path = os.path.join(model_dir, file_name)
    if os.path.exists(file_path):
        return file_path

    print(f'ダウンロード中: {url}')
    response = requests.get(url, stream=True)
    response.raise_for_status()
    total_size = int(response.headers.get('content-length', 0))
    downloaded = 0
    with open(file_path, 'wb') as f:
        for chunk in response.iter_content(chunk_size=8192):
            if chunk:
                f.write(chunk)
                downloaded += len(chunk)
                if total_size > 0:
                    print(f'\rダウンロード進捗: {(downloaded / total_size) * 100:.1f}%', end='', flush=True)
    print('\nダウンロード完了')
    return file_path

# 超解像処理プロセッサクラス
class SuperResolutionProcessor:
    def __init__(self, model, device, use_half):
        self.model = model.to(device)
        self.device = device
        self.use_half = use_half
        if self.use_half:
            self.model.half()
        self.model.eval()

    def process(self, img_tensor):
        img_tensor = img_tensor.to(self.device)
        if self.use_half:
            img_tensor = img_tensor.half()
        try:
            with torch.no_grad():
                output = self.model(img_tensor)
        except torch.cuda.OutOfMemoryError:
            # GPUメモリが不足した場合はCPUで処理を続ける
            print('GPUメモリ不足のためCPUに切り替えます')
            torch.cuda.empty_cache()
            self.device = torch.device('cpu')
            self.use_half = False
            self.model = self.model.float().to(self.device)
            img_tensor = img_tensor.float().to(self.device)
            with torch.no_grad():
                output = self.model(img_tensor)
        return output

# GPU/CPU自動選択
device = torch.device('cuda' if torch.cuda.is_available() else 'cpu')
print(f'デバイス: {str(device)}')
# GPU使用時の最適化
if device.type == 'cuda':
    torch.backends.cudnn.benchmark = True

# GPUメモリに応じた半精度(FP16)の設定
USE_HALF = False
if device.type == 'cuda':
    gpu_memory_gb = torch.cuda.get_device_properties(0).total_memory / 1024**3
    if gpu_memory_gb >= 4:
        USE_HALF = True
        print(f'GPUメモリ ({gpu_memory_gb:.1f}GB) を検出しました。半精度(FP16)を有効化します')
    else:
        print(f'GPUメモリ ({gpu_memory_gb:.1f}GB) が4GB未満のため、半精度(FP16)を無効化します')

# FFmpeg/ffprobe利用可能性チェック
FFMPEG_AVAILABLE = False
try:
    subprocess.run(['ffmpeg', '-version'], capture_output=True, check=True)
    FFMPEG_AVAILABLE = True
except Exception:
    pass

FFPROBE_AVAILABLE = False
try:
    subprocess.run(['ffprobe', '-version'], capture_output=True, check=True)
    FFPROBE_AVAILABLE = True
except Exception:
    pass

# ガイダンス表示
print('\n=== BasicSR動画超解像処理プログラム ===')
print('概要: BasicSRのRRDBNetにより動画を超解像します')
print('操作方法:')
print('  q キー: プログラム終了')
print()

# 日本語フォントの確認
if not os.path.exists(FONT_PATH):
    print(f'エラー: 日本語フォントが見つかりません: {FONT_PATH}')
    exit()
font = ImageFont.truetype(FONT_PATH, FONT_SIZE)

# モデル選択
print('=== モデル選択 ===')
models = list(MODEL_INFO.keys())
for i, model_key in enumerate(models, 1):
    info = MODEL_INFO[model_key]
    print(f'{i}. {info["name"]} ({info["description"]}, {info["scale"]}倍)')

while True:
    model_choice = input(f'モデルを選択してください (1-{len(models)}): ')
    if model_choice.isdigit() and 1 <= int(model_choice) <= len(models):
        selected_model_key = models[int(model_choice) - 1]
        break
    print(f'1から{len(models)}の間の数値を入力してください')

model_info = MODEL_INFO[selected_model_key]
print(f'{model_info["name"]} を読み込み中...')

# モデル初期化
model = RRDBNet(num_in_ch=3, num_out_ch=3, num_feat=64, num_block=model_info['blocks'], num_grow_ch=32, scale=model_info['scale'])
ckpt_path = download_file_from_url(model_info['url'], WEIGHTS_DIR, f'{selected_model_key}.pth')
ckpt = torch.load(ckpt_path, map_location='cpu', weights_only=True)
state = ckpt.get('params_ema') or ckpt.get('params') or ckpt
model.load_state_dict(state, strict=True)
processor = SuperResolutionProcessor(model, device, USE_HALF)
print('学習済みモデルを読み込みました')

frame_count = 0
results_log = []

def video_frame_processing(frame):
    global frame_count
    current_time = time.time()
    frame_count += 1

    # 前処理(BGR→RGB、0-1正規化)
    frame_rgb = cv2.cvtColor(frame, cv2.COLOR_BGR2RGB)
    img_tensor = torch.from_numpy(frame_rgb).float().div(255).permute(2, 0, 1).unsqueeze(0)

    # 推論実行
    output = processor.process(img_tensor)

    # 後処理(RGB→BGR、uint8化)
    output = output.squeeze(0).float().clamp(0, 1).mul(255).round().to(torch.uint8).cpu().permute(1, 2, 0).numpy()
    processed_frame = cv2.cvtColor(output, cv2.COLOR_RGB2BGR)

    # 元の低解像度画像をLanczos4法で拡大したものを基準に品質評価指標を計算
    original_resized = cv2.resize(frame, (processed_frame.shape[1], processed_frame.shape[0]), interpolation=cv2.INTER_LANCZOS4)
    psnr_val = psnr(original_resized, processed_frame, data_range=255)
    ssim_val = ssim(original_resized, processed_frame, channel_axis=2, data_range=255)

    # 日本語テキスト描画
    info_text = f'フレーム: {frame_count} | PSNR (vs Lanczos4): {psnr_val:.2f}dB | SSIM (vs Lanczos4): {ssim_val:.4f}'
    img_pil = Image.fromarray(cv2.cvtColor(processed_frame, cv2.COLOR_BGR2RGB))
    draw = ImageDraw.Draw(img_pil)
    draw.text(TEXT_POSITION, info_text, font=font, fill=FONT_COLOR)
    processed_frame = cv2.cvtColor(np.array(img_pil), cv2.COLOR_RGB2BGR)

    result = f'解像度: {frame.shape[1]}x{frame.shape[0]} → {processed_frame.shape[1]}x{processed_frame.shape[0]}, PSNR (vs Lanczos4): {psnr_val:.2f}dB, SSIM (vs Lanczos4): {ssim_val:.4f}'

    return processed_frame, result, current_time

print("0: 動画ファイル")
print("1: カメラ")
print("2: サンプル動画")

choice = input("選択: ")

if choice == '0':
    root = tk.Tk()
    root.withdraw()
    path = filedialog.askopenfilename()
    if not path:
        exit()
    cap = cv2.VideoCapture(path)
elif choice == '1':
    cap = cv2.VideoCapture(0, cv2.CAP_DSHOW)
    if not cap.isOpened():
        cap = cv2.VideoCapture(0)
    cap.set(cv2.CAP_PROP_BUFFERSIZE, 1)
else:
    # サンプル動画ダウンロード・処理
    SAMPLE_URL = 'https://raw.githubusercontent.com/opencv/opencv/master/samples/data/vtest.avi'
    SAMPLE_FILE = 'vtest.avi'
    urllib.request.urlretrieve(SAMPLE_URL, SAMPLE_FILE)
    path = SAMPLE_FILE
    cap = cv2.VideoCapture(SAMPLE_FILE)

if not cap.isOpened():
    print('動画ファイル・カメラを開けませんでした')
    exit()

# 連番画像保存ディレクトリ(動画入力時のみ)
frames_dir = None
if choice != '1':
    if FFMPEG_AVAILABLE and FFPROBE_AVAILABLE:
        frames_dir = f'frames_{datetime.now().strftime("%Y%m%d_%H%M%S")}'
        os.makedirs(frames_dir, exist_ok=True)
        print(f'処理フレームは {frames_dir} に一時保存されます')
    else:
        print('警告: ffmpeg/ffprobeが見つかりません。動画出力機能は利用できません')

# メイン処理
print('\n=== 動画処理開始 ===')
print('操作方法:')
print('  q キー: プログラム終了')
try:
    while True:
        ret, frame = cap.read()
        if not ret:
            break

        processed_frame, result, current_time = video_frame_processing(frame)
        cv2.imshow(MAIN_FUNC_DESC, processed_frame)
        if choice == '1':  # カメラの場合
            print(datetime.fromtimestamp(current_time).strftime("%Y-%m-%d %H:%M:%S.%f")[:-3], result)
        else:  # 動画ファイルの場合
            print(frame_count, result)
        results_log.append(result)

        # 動画入力の場合は連番PNGで保存
        if frames_dir is not None:
            cv2.imwrite(os.path.join(frames_dir, f'{frame_count:06d}.png'), processed_frame)

        if cv2.waitKey(1) & 0xFF == ord('q'):
            break
finally:
    print('\n=== プログラム終了 ===')
    cap.release()
    cv2.destroyAllWindows()

    # 処理済みフレームと音声を結合して動画ファイルを生成
    if frames_dir is not None and frame_count > 0:
        print('処理済みフレームと音声を結合して動画ファイルを生成中...')
        probe_cmd = [
            'ffprobe', '-v', 'error',
            '-select_streams', 'v:0',
            '-show_entries', 'stream=r_frame_rate',
            '-of', 'default=noprint_wrappers=1:nokey=1',
            path
        ]
        framerate = subprocess.run(probe_cmd, capture_output=True, text=True, check=True).stdout.strip()
        ffmpeg_cmd = [
            'ffmpeg', '-y',
            '-framerate', framerate,
            '-i', os.path.join(frames_dir, '%06d.png'),
            '-i', path,
            '-map', '0:v',
            '-map', '1:a?',
            '-shortest',
            '-c:v', 'libx264',
            '-pix_fmt', 'yuv420p',
            '-c:a', 'aac',
            OUTPUT_VIDEO_FILE
        ]
        subprocess.run(ffmpeg_cmd, capture_output=True, check=True)
        print(f'動画を{OUTPUT_VIDEO_FILE}に保存しました')

    # サンプル動画の削除
    if choice == '2' and os.path.exists(SAMPLE_FILE):
        os.remove(SAMPLE_FILE)

    if results_log:
        with open('result.txt', 'w', encoding='utf-8') as f:
            f.write('=== 結果 ===\n')
            f.write(f'使用モデル: {model_info["name"]}\n')
            f.write(f'処理フレーム数: {frame_count}\n')
            f.write(f'使用デバイス: {str(processor.device).upper()}\n')
            if processor.device.type == 'cuda':
                f.write(f'GPU: {torch.cuda.get_device_name(0)}\n')
            f.write('\n')
            f.write('\n'.join(results_log))
        print('\n処理結果をresult.txtに保存しました')