![[kaneko lab.]](https://www.kkaneko.jp/info/logo_png.png)
Stable Diffusion 3.5 Large による Text-to-Image (ソースコードと実行結果)
【概要】
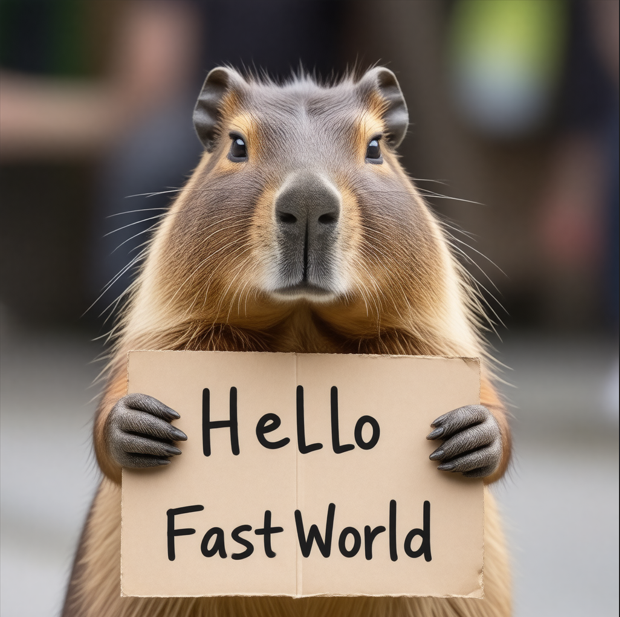
Stable Diffusion 3.5 LargeおよびSDXL 1.0モデルを使用し、テキストプロンプトから画像を生成するコマンドライン版Pythonプログラムである。複数モデルから選択して画像を生成できる。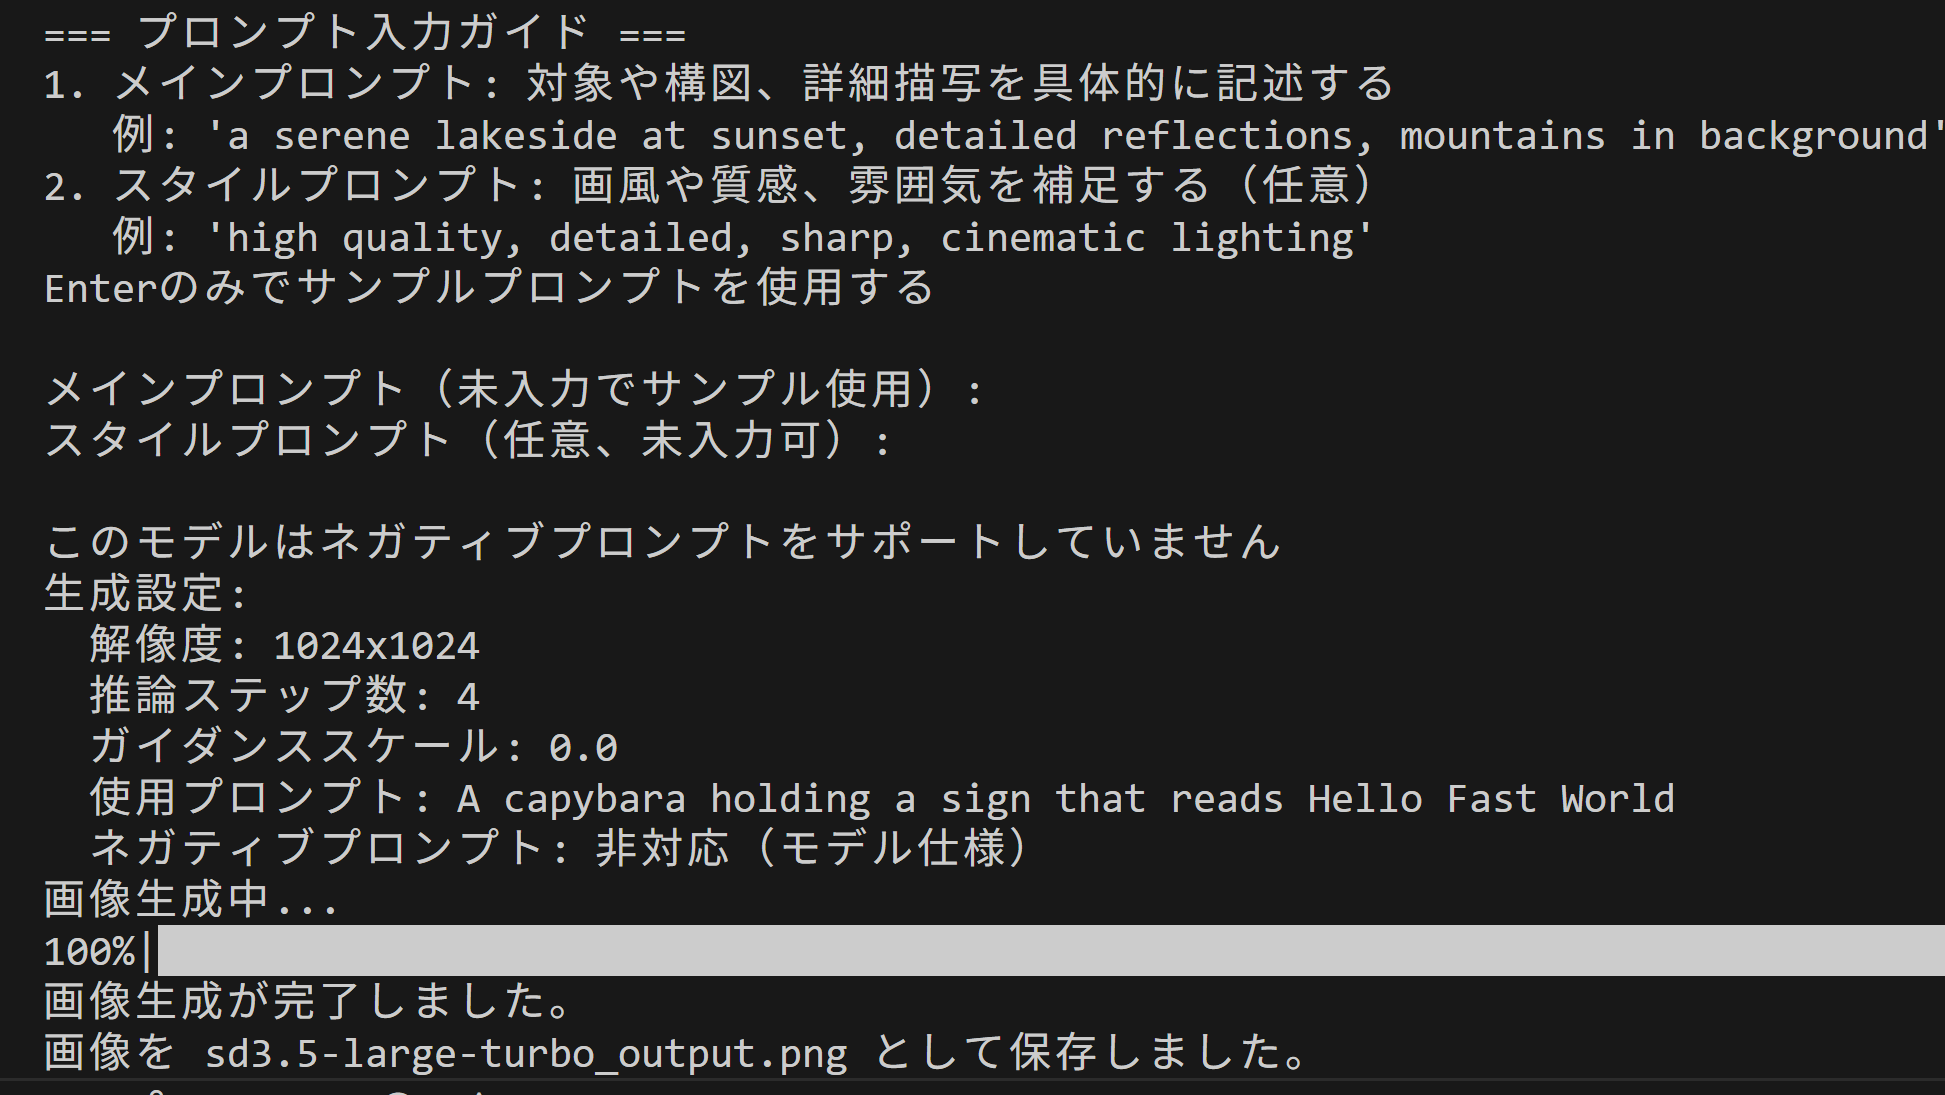
【目次】
第1章 Python開発環境,ライブラリ類
ここでは、最低限の事前準備について説明する。機械学習や深層学習を行う場合は、NVIDIA CUDA、Visual Studio、Cursorなどを追加でインストールすると便利である。これらについては別ページ https://www.kkaneko.jp/cc/dev/aiassist.htmlで詳しく解説しているので、必要に応じて参照してください。
第2章 Python 3.12 のインストール
Pythonのインストールを行い、Pythonのプログラムを実行する環境を整える。扱う環境は、Windows搭載パソコンである。金子研究室では、Python 3.12.10を推奨する。
[Windows での Python 3.12 のインストール手順を見るには、ここをクリック]
Windows での Python 3.12 のインストール
以下のいずれかの方法でPython 3.12をインストールする。Pythonがインストール済みの場合、この手順は不要である。
方法 1:winget によるインストール
【インストールコマンドの実行方法】
管理者権限でコマンドプロンプトを起動する(手順:Windowsキーまたはスタートメニュー → cmd と入力 → 右クリック → 「管理者として実行」)。そして、コマンド全体をコマンドプロンプトにコピー&ペーストする。
--scope machine を指定することで、システム全体(全ユーザー向け)にインストールされる。このオプションの実行には管理者権限が必要である。インストール完了後、コマンドプロンプトを再起動するとPATHが反映される。
REM Python 3.12 をシステム領域にインストール
winget install --id Python.Python.3.12 -e --scope machine --silent --accept-source-agreements --accept-package-agreements --override "/quiet InstallAllUsers=1 PrependPath=1 Include_test=0 Include_pip=1 Include_launcher=1 InstallLauncherAllUsers=1 TargetDir=\"C:\Program Files\Python312\""
if not "%ERRORLEVEL%"=="0" ( color 0c & echo Python 3.12 のインストールに失敗しました & ping 127.0.0.1 -n 6 >nul & color )

REM Python と Scripts を PATH 先頭に追加
powershell -NoProfile -Command "$p='C:\Program Files\Python312'; $s=\"$p\Scripts\"; if(Test-Path $p){$k=[Microsoft.Win32.Registry]::LocalMachine.OpenSubKey('SYSTEM\CurrentControlSet\Control\Session Manager\Environment',$true); $c=$k.GetValue('Path','',[Microsoft.Win32.RegistryValueOptions]::DoNotExpandEnvironmentNames); $t=$k.GetValueKind('Path'); $new=$c; if((';'+$new+';') -notlike \"*;$p;*\"){$new=$p+';'+$new}; if((';'+$new+';') -notlike \"*;$s;*\"){$new=$s+';'+$new}; if($new -ne $c){$k.SetValue('Path',$new,$t)}; $k.Close()}"

REM 現在のセッションにも反映(システムPATHを再取得して連結)
for /f "usebackq tokens=2,*" %A in (`reg query "HKLM\SYSTEM\CurrentControlSet\Control\Session Manager\Environment" /v Path`) do set "PATH=%B"

REM pip / wheel の更新
python -m pip install --no-user -U pip wheel
if not "%ERRORLEVEL%"=="0" ( color 0c & echo pip / wheel の更新に失敗しました & ping 127.0.0.1 -n 6 >nul & color )
方法 2:インストーラーによるインストール
- Python公式サイト(https://www.python.org/downloads/)にアクセスし、「Download Python 3.x.x」ボタンからWindows用インストーラーをダウンロードする。
- ダウンロードしたインストーラーを実行する。
- 初期画面の下部に表示される「Add python.exe to PATH」にチェックを入れてから「Customize installation」を選択する。このチェックを入れ忘れると、コマンドプロンプトから
pythonコマンドを実行できない。 - 「Install Python 3.xx for all users」にチェックを入れ、「Install」をクリックする。
インストールの確認
コマンドプロンプトで以下を実行する。
python --versionバージョン番号(例:Python 3.12.x)が表示されればインストール成功である。「'python' は、内部コマンドまたは外部コマンドとして認識されていません。」と表示される場合は、インストールが正常に完了していない。
第3章 Python の開発環境 Visual Studio Code のインストールと Python 用の設定
Python の開発環境Visual Studio Code(プログラムを編集するソフトウェア。以下、VS Code)を整える。
[Windows での Visual Studio Code のインストールと Python 用の設定手順を見るには、ここをクリック]
Windows での Visual Studio Code のインストールと Python 用の設定手順
1. VS Code と拡張機能のインストール
以下のコマンドにより,既存の VS Code を削除し,全ユーザー共有の設定で再インストールしたうえで,拡張機能(VS Code に機能を追加するソフトウェア)をまとめて導入する.
【インストールコマンドの実行方法】
管理者権限でコマンドプロンプトを起動する(手順:Windows キーまたはスタートメニュー → cmd と入力 → 右クリック → 「管理者として実行」)。そして,コマンド全体をコマンドプロンプトにコピー&ペーストする。
インストールコマンド
REM ============================================================
REM Microsoft Visual Studio Code
REM ============================================================
REM Build Tools + Desktop development with C++(VCTools)+ 追加コンポーネント(一括)
REM 未インストール時: winget で新規インストール
REM インストール済み時: setup.exe modify でコンポーネント追加(バージョンは変更しない)
winget list --id Microsoft.VisualStudio.BuildTools 2>nul | findstr /i "BuildTools" >nul 2>&1
if %ERRORLEVEL% EQU 0 (
    for /f "usebackq delims=" %P in (`"C:\Program Files (x86)\Microsoft Visual Studio\Installer\vswhere.exe" -products Microsoft.VisualStudio.Product.BuildTools -property installationPath`) do start /wait "" "C:\Program Files (x86)\Microsoft Visual Studio\Installer\setup.exe" modify --installPath "%P" --add Microsoft.VisualStudio.Workload.VCTools --add Microsoft.VisualStudio.Workload.MSBuildTools --add Microsoft.VisualStudio.Component.VC.CMake.Project --add Microsoft.VisualStudio.Component.VC.Llvm.Clang --add Microsoft.VisualStudio.Component.VC.Llvm.ClangToolset --add Microsoft.VisualStudio.Component.Windows11SDK.26100 --add Microsoft.VisualStudio.Component.VC.v143.x86.x64 --includeRecommended --quiet --norestart --nocache
    if not "%ERRORLEVEL%"=="0" ( color 0c & echo Build Tools のコンポーネント追加に失敗しました & ping 127.0.0.1 -n 6 >nul & color )
) else (
    winget install --scope machine --id Microsoft.VisualStudio.BuildTools -e --silent --disable-interactivity --force --accept-source-agreements --accept-package-agreements --override "--quiet --wait --norestart --nocache --add Microsoft.VisualStudio.Workload.VCTools --includeRecommended --add Microsoft.VisualStudio.Workload.MSBuildTools --add Microsoft.VisualStudio.Component.VC.CMake.Project --add Microsoft.VisualStudio.Component.VC.Llvm.Clang --add Microsoft.VisualStudio.Component.VC.Llvm.ClangToolset --add Microsoft.VisualStudio.Component.Windows11SDK.26100 --add Microsoft.VisualStudio.Component.VC.v143.x86.x64"
    if not "%ERRORLEVEL%"=="0" ( color 0c & echo Build Tools のインストールに失敗しました & ping 127.0.0.1 -n 6 >nul & color )
)

REM 全ユーザー共有の拡張機能フォルダ
if not exist "C:\ProgramData\vscode-extensions" mkdir "C:\ProgramData\vscode-extensions"
icacls "C:\ProgramData\vscode-extensions" /grant "Everyone:(OI)(CI)M" /T

REM スタートメニューのショートカットを --extensions-dir 付きで再作成
if exist "C:\ProgramData\Microsoft\Windows\Start Menu\Programs\Visual Studio Code" rmdir /s /q "C:\ProgramData\Microsoft\Windows\Start Menu\Programs\Visual Studio Code"
if exist "C:\ProgramData\Microsoft\Windows\Start Menu\Programs\Visual Studio Code.lnk" del "C:\ProgramData\Microsoft\Windows\Start Menu\Programs\Visual Studio Code.lnk"
powershell -NoProfile -Command "$s=New-Object -ComObject WScript.Shell; $lnk=$s.CreateShortcut('C:\ProgramData\Microsoft\Windows\Start Menu\Programs\Visual Studio Code.lnk'); $lnk.TargetPath='C:\Program Files\Microsoft VS Code\Code.exe'; $lnk.Arguments='--extensions-dir \"C:\ProgramData\vscode-extensions\"'; $lnk.Save()"
REM ショートカットの検証
powershell -NoProfile -Command "$s=New-Object -ComObject WScript.Shell; $lnk=$s.CreateShortcut('C:\ProgramData\Microsoft\Windows\Start Menu\Programs\Visual Studio Code.lnk'); Write-Host 'TargetPath:' $lnk.TargetPath; Write-Host 'Arguments:' $lnk.Arguments"

REM ファイル / フォルダ右クリックの「Code で開く」を登録
reg add "HKLM\SOFTWARE\Classes\*\shell\VSCode\command" /ve /d "\"C:\Program Files\Microsoft VS Code\Code.exe\" --extensions-dir \"C:\ProgramData\vscode-extensions\" \"%1\"" /f
reg add "HKLM\SOFTWARE\Classes\Directory\shell\VSCode\command" /ve /d "\"C:\Program Files\Microsoft VS Code\Code.exe\" --extensions-dir \"C:\ProgramData\vscode-extensions\" \"%1\"" /f
reg add "HKLM\SOFTWARE\Classes\Directory\Background\shell\VSCode\command" /ve /d "\"C:\Program Files\Microsoft VS Code\Code.exe\" --extensions-dir \"C:\ProgramData\vscode-extensions\" \"%V\"" /f

REM --extensions-dir 付きで起動する code.cmd ラッパを作成
REM (%* を echo で書くと対話的 cmd で失われるため、PowerShell で [char]37+'*' を書き出す)
powershell -NoProfile -Command "$pct=[char]37; $q=[char]34; $c='@echo off'+[char]13+[char]10+$q+'C:\Program Files\Microsoft VS Code\bin\code.cmd'+$q+' --extensions-dir '+$q+'C:\ProgramData\vscode-extensions'+$q+' '+$pct+'*'+[char]13+[char]10; [IO.File]::WriteAllText('C:\ProgramData\vscode-extensions\vscode.cmd',$c,[Text.Encoding]::ASCII)"

REM 拡張機能のインストール
set "CODE=C:\Program Files\Microsoft VS Code\bin\code.cmd"
"%CODE%" --extensions-dir "C:\ProgramData\vscode-extensions" --uninstall-extension GitHub.copilot
"%CODE%" --extensions-dir "C:\ProgramData\vscode-extensions" --uninstall-extension GitHub.copilot-chat
"%CODE%" --extensions-dir "C:\ProgramData\vscode-extensions" --install-extension ms-python.python
"%CODE%" --extensions-dir "C:\ProgramData\vscode-extensions" --install-extension ms-python.vscode-pylance
"%CODE%" --extensions-dir "C:\ProgramData\vscode-extensions" --install-extension ms-python.debugpy
"%CODE%" --extensions-dir "C:\ProgramData\vscode-extensions" --install-extension MS-CEINTL.vscode-language-pack-ja
"%CODE%" --extensions-dir "C:\ProgramData\vscode-extensions" --install-extension saoudrizwan.claude-dev
"%CODE%" --extensions-dir "C:\ProgramData\vscode-extensions" --install-extension rust-lang.rust-analyzer
"%CODE%" --extensions-dir "C:\ProgramData\vscode-extensions" --install-extension tamasfe.even-better-toml
"%CODE%" --extensions-dir "C:\ProgramData\vscode-extensions" --install-extension anthropic.claude-code
"%CODE%" --extensions-dir "C:\ProgramData\vscode-extensions" --install-extension almenon.arepl
"%CODE%" --extensions-dir "C:\ProgramData\vscode-extensions" --list-extensions --show-versions

REM settings.json を作成(自動更新オフ、Python、Claude Code 設定)
if not exist "%APPDATA%\Code\User" mkdir "%APPDATA%\Code\User"
python -c "import json,os;data={'update.mode':'none','update.enableWindowsBackgroundUpdates':False,'extensions.autoUpdate':False,'python.defaultInterpreterPath':r'C:\Program Files\Python312\python.exe','claudeCode.environmentVariables':[{'name':'ANTHROPIC_API_KEY','value':'not-needed'},{'name':'ANTHROPIC_AUTH_TOKEN','value':'ollama'},{'name':'ANTHROPIC_BASE_URL','value':'http://localhost:11434'},{'name':'ANTHROPIC_MODEL','value':'glm-4.7-flash'},{'name':'CLAUDE_CODE_DISABLE_NONESSENTIAL_TRAFFIC','value':'1'}]};p=os.path.join(os.environ['APPDATA'],'Code','User','settings.json');open(p,'w',encoding='utf-8').write(json.dumps(data,indent=4));print('Done:',p)"

REM 自動更新の抑止ポリシー(settings.json に加えて、レジストリ側でも明示的にオフ)
reg add "HKLM\SOFTWARE\Policies\Microsoft\VSCode" /v "UpdateMode" /t REG_SZ /d "none" /f
echo === セットアップ完了 ===
2. Python インタプリタの選択
同一マシンに複数の Python がインストールされている場合,VS Code で使用する Python 本体(インタプリタ:Python プログラムを解釈・実行するソフトウェア)を選択する必要がある.
- コマンドパレット(コマンド名で機能を呼び出す VS Code の入力欄)を開く(
Ctrl+Shift+P) Python: Select Interpreterと入力する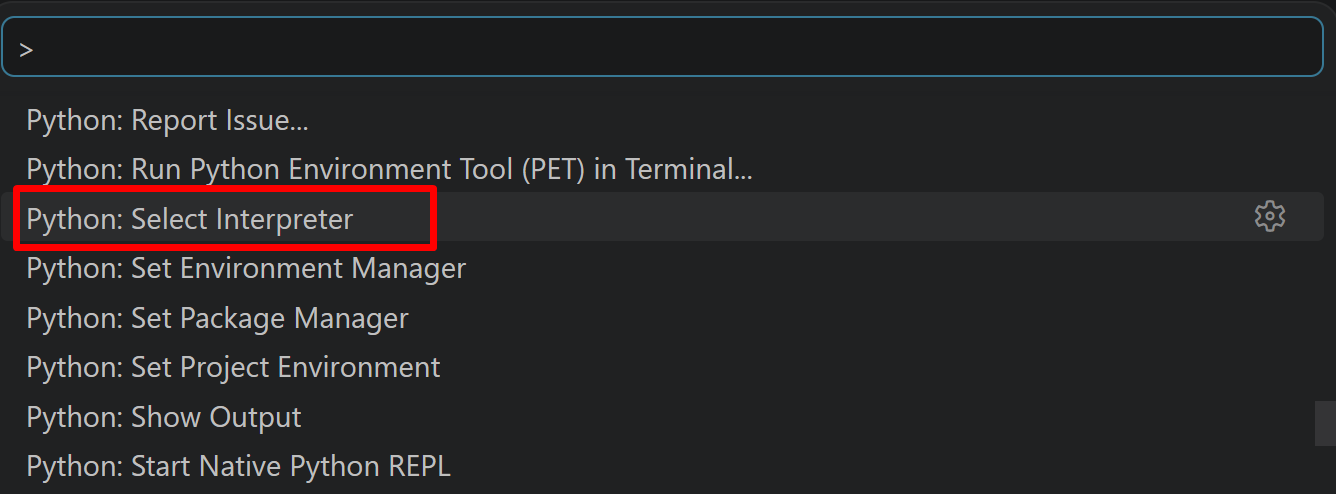
- 表示される一覧から,使用する Python(例:
C:\Program Files\Python312\python.exe)を選択する.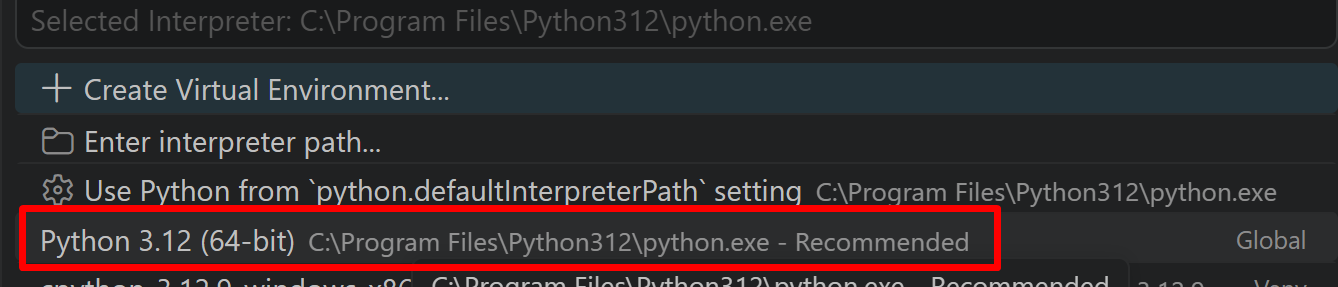
必要なライブラリをシステム領域にインストール
管理者権限でコマンドプロンプトを起動する
(手順:Windowsキーまたはスタートメニュー → cmd と入力 → 右クリック → 「管理者として実行」)。
以下を実行する。
REM PyTorch をインストール(GPU対応版)
set "CUDA_TAG=cu128"
set "PYTHON_PATH=C:\Program Files\Python312"
"%PYTHON_PATH%\Scripts\pip" install --no-user -U numpy torch torchvision torchaudio --index-url https://download.pytorch.org/whl/%CUDA_TAG%
pip install --no-user diffusers huggingface_hub transformers accelerate pillow
HuggingFace トークン取得
https://huggingface.co/settings/tokens にアクセスする。 HuggingFaceトークンを設定する。保存の支援ツールは別ページ (https://www.kkaneko.jp/ai/labo/hf.html)で紹介している。
第4章 Stable Diffusion 3.5 Large による Text-to-Image プログラム
概要
このプログラムは、Stable Diffusion 3.5 LargeおよびSDXL 1.0モデルを使用して、テキストプロンプトから画像を生成する。Hugging FaceのDiffusersライブラリ[4]を使用し、複数の画像生成モデルを操作できる。ユーザーはモデルを選択し、プロンプトを入力することで、画像を生成できる。
主要技術
Stable Diffusion 3.5
Stability AIが2024年に公開した画像生成モデル[1]。Rectified Flowベースの拡散モデルであり、Flow Matchingアルゴリズム[2]を採用している。本プログラムでは、通常版(28ステップ)とTurbo版(4ステップ)の両方に対応している。
SDXL 1.0
Stable Diffusion XL(SDXL)は、高解像度画像生成に対応したモデル[3]である。U-Netアーキテクチャの改良により、1024×1024ピクセルのネイティブ解像度での生成を可能にしている。
Flow Matching Scheduler
SD3.5で採用されているFlowMatchEulerDiscreteSchedulerは、常微分方程式(Ordinary Differential Equation)を離散的に解く手法である[2]。
技術的特徴
自動デバイス選択とメモリ最適化
プログラムはCUDA対応GPUの有無を自動検出し、適切なデバイスとデータ型を選択する。GPU環境ではbfloat16またはfloat16精度を使用し、CPU環境ではfloat32にフォールバックする。メモリ効率化のため、model_cpu_offload機能とVAEタイリングを有効化し、大規模モデルの実行を可能にしている。
モデル設定の辞書管理
MODEL_CONFIGSディクショナリにより、各モデルの設定を一元管理している。推論ステップ数、ガイダンススケール、スケジューラークラスなどのパラメータを事前定義することで、モデル固有の設定を自動適用する。この設計により、新規モデルの追加が容易になっている。
Hugging Face認証の統合
環境変数HF_TOKENを通じたトークン管理を実装し、ゲート付きモデルへのアクセスを自動化している。model_info APIを使用してアクセス権限を事前確認し、必要に応じてライセンス同意の案内を表示する。
実装の特色
対話形式のインターフェース
ユーザーとの対話を通じて、モデル選択、プロンプト入力、パラメータ設定を行う。各段階で説明を提供し、操作を支援する設計となっている。サンプルプロンプトの提供により、動作確認が可能である。
ネガティブプロンプトの動的制御
モデルごとのネガティブプロンプト対応状況を設定で管理し、SD3.5 Turboのような非対応モデルでは自動的に無効化する。対応モデルではデフォルト値を提供し、ユーザーによるカスタマイズも可能にしている。
参考文献
[1] Stability AI. (2024). Stable Diffusion 3.5 Large. Hugging Face Model Repository. https://huggingface.co/stabilityai/stable-diffusion-3.5-large
[2] Esser, P., et al. (2024). Scaling Rectified Flow Transformers for High-Resolution Image Synthesis. arXiv:2403.03206. https://arxiv.org/abs/2403.03206
[3] Podell, D., et al. (2023). SDXL: Improving Latent Diffusion Models for High-Resolution Image Synthesis. arXiv:2307.01952. https://arxiv.org/abs/2307.01952
[4] Hugging Face. (2024). Diffusers Documentation. https://huggingface.co/docs/diffusers
ソースコード
# プログラム名: Stable Diffusion 3.5 Large による Text-to-Image プログラム
# pip install --no-user -U numpy torch torchvision torchaudio --index-url https://download.pytorch.org/whl/cu128
# pip install --no-user diffusers huggingface_hub transformers accelerate pillow
import os
import sys
import subprocess
import torch
from diffusers import StableDiffusion3Pipeline, FlowMatchEulerDiscreteScheduler, StableDiffusionXLPipeline
from huggingface_hub import login, model_info
from huggingface_hub.utils import RepositoryNotFoundError, GatedRepoError

def print_dependency_guide():
    print("\n依存関係インストールガイド")
    print("GPU環境:")
    print("  1. PyTorch公式サイトからCUDA対応版を選択してインストール")
    print("     https://pytorch.org/get-started/locally/")
    print("  2. 任意: pip install --no-user xformers")
    print("CPU環境:")
    print("  pip install --no-user -U numpy torch torchvision torchaudio --index-url https://download.pytorch.org/whl/cpu")
    print("共通:")
    print("  pip install --no-user 'diffusers>=0.30.0' huggingface_hub transformers accelerate pillow")

# モデル固有の設定を定数化
MODEL_CONFIGS = {
    "sd3.5-large": {
        "model_id": "stabilityai/stable-diffusion-3.5-large",
        "pipeline_class": StableDiffusion3Pipeline,
        "default_dtype": torch.bfloat16,
        "cpu_dtype": torch.float32,
        "num_inference_steps": 28,  # 公式推奨値
        "guidance_scale": 3.5,      # 公式推奨値
        "width": 1024,              # 1メガピクセル対応
        "height": 1024,             # 1メガピクセル対応
        "scheduler_class": FlowMatchEulerDiscreteScheduler,  # SD3.5に適したスケジューラー
        "enable_cpu_offload": True,
        "enable_vae_tiling": True,
        "model_name": "SD3.5 Large",
        "model_url": "https://huggingface.co/stabilityai/stable-diffusion-3.5-large",
        "setup_message": "SD3.5 Largeを使用する前に以下を確認してください:\n"
                         "1. https://huggingface.co/stabilityai/stable-diffusion-3.5-large にアクセス\n"
                         "2. 「Agree and access repository」ボタンをクリックしてライセンスに同意\n"
                         "3. アクセスが承認されるまで待つ\n"
                         "4. pip install --no-user -U diffusers を実行済みであること",
        "sample_prompt": "A capybara holding a sign that reads Hello World",  # 公式例
        "model_description": "最新・高品質・英語・1メガピクセル",
        "supports_negative_prompt": True,  # ネガティブプロンプトをサポート
    },
    "sd3.5-large-turbo": {
        "model_id": "stabilityai/stable-diffusion-3.5-large-turbo",
        "pipeline_class": StableDiffusion3Pipeline,
        "default_dtype": torch.bfloat16,
        "cpu_dtype": torch.float32,
        "num_inference_steps": 4,
        "guidance_scale": 0.0,      # Turboモデルはguidance不要(公式推奨値)
        "width": 1024,              # 1メガピクセル対応
        "height": 1024,             # 1メガピクセル対応
        "scheduler_class": FlowMatchEulerDiscreteScheduler,
        "enable_cpu_offload": True,
        "enable_vae_tiling": True,
        "model_name": "SD3.5 Large Turbo",
        "model_url": "https://huggingface.co/stabilityai/stable-diffusion-3.5-large-turbo",
        "setup_message": "SD3.5 Large Turboを使用する前に以下を確認してください:\n"
                         "1. https://huggingface.co/stabilityai/stable-diffusion-3.5-large-turbo にアクセス\n"
                         "2. 「Agree and access repository」ボタンをクリックしてライセンスに同意\n"
                         "3. アクセスが承認されるまで待つ\n"
                         "4. pip install --no-user -U diffusers を実行済みであること",
        "sample_prompt": "A capybara holding a sign that reads Hello Fast World",  # 公式例
        "model_description": "超高速・英語・4ステップ生成・1メガピクセル",
        "supports_negative_prompt": False,  # Turboモデルはネガティブプロンプト不使用
    },
    # SDXL 1.0 モデル構成
    "sdxl-1.0": {
        "model_id": "stabilityai/stable-diffusion-xl-base-1.0",
        "pipeline_class": StableDiffusionXLPipeline,
        "default_dtype": torch.float16,   # SDXLはGPUでfloat16推奨
        "cpu_dtype": torch.float32,
        "num_inference_steps": 50,
        "guidance_scale": 7.5,
        "width": 1024,                    # 表示用(SDXLでは指定なしでも既定1024x1024)
        "height": 1024,
        "scheduler_class": "default",     # SDXLはデフォルトスケジューラーを使用
        "enable_cpu_offload": True,
        "enable_vae_tiling": True,
        "model_name": "SDXL 1.0",
        "model_url": "https://huggingface.co/stabilityai/stable-diffusion-xl-base-1.0",
        "setup_message": "SDXL 1.0は通常、追加のライセンス同意や認証は不要です。\n"
                         "pip install --no-user -U diffusers を実行済みであることを確認してください。",
        "sample_prompt": "A capybara in watercolor style, soft pastel colors",
        "model_description": "従来SDXL・1024x1024・英語",
        "supports_negative_prompt": True,  # ネガティブプロンプトをサポート
    }
}

def setup_token():
    print("\nトークンの取得方法:")
    print("1. https://huggingface.co/settings/tokens にアクセス.ログインしていない場合はログイン")
    print("2. 「Create new token」をクリック")
    print("3. Token nameを入力(例: my-app-token)")
    print("4. Token typeで「Write」を選択")
    print("5. 「Create token」をクリック")
    print("6. 生成されたトークンをコピー(「Copy」をクリック)")

    # トークン入力を求める
    token = input("\nトークンを入力してください: ")

    # Windowsの場合、setxコマンドで永続的に設定
    try:
        subprocess.run(['setx', 'HF_TOKEN', token], check=True)
        print("\n環境変数を設定しました。新しいコマンドプロンプトを開いて再実行してください。VSCode や Windsurf などの開発環境を用いている場合には、開発環境を終了し、再度起動してください")
    except subprocess.CalledProcessError:
        print("\n環境変数の設定に失敗しました。")

    sys.exit(0)

# トークンの存在確認
hf_token = os.environ.get("HF_TOKEN")
if not hf_token:
    print("HF_TOKEN環境変数が設定されていません。")
    setup_token()

# huggingface_hubでログイン(トークンを保存)
try:
    login(token=hf_token, add_to_git_credential=False)
except Exception:
    print("トークンが無効です。")
    setup_token()

# 依存関係インストールガイドの表示(任意)
show_guide = input("\n依存関係インストールガイドを表示しますか? [y/N]: ").strip().lower()
if show_guide == 'y':
    print_dependency_guide()

# モデル選択メニューを表示し、ユーザーの選択を返す
print("\n使用するモデルを選択してください:")
model_keys = list(MODEL_CONFIGS.keys())
for i, key in enumerate(model_keys, 1):
    config = MODEL_CONFIGS[key]
    print(f"{i}. {config['model_name']} ({config['model_description']})")
    print(f"   モデルID: {config['model_id']}")
    print(f"   URL: {config['model_url']}")

while True:
    try:
        choice = input("\n番号を入力してください (1-{}): ".format(len(model_keys)))
        choice_idx = int(choice) - 1
        if 0 <= choice_idx < len(model_keys):
            selected_model = model_keys[choice_idx]
            print(f"\n{MODEL_CONFIGS[selected_model]['model_name']}を選択しました。")
            break
        else:
            print("有効な番号を入力してください。")
    except ValueError:
        print("数字を入力してください。")

model_config = MODEL_CONFIGS[selected_model]

# モデルへのアクセス権限を確認
try:
    info = model_info(model_config["model_id"], token=hf_token)
    access_ok, error_msg = True, None
except GatedRepoError:
    access_ok, error_msg = False, "ライセンス同意が必要です"
except RepositoryNotFoundError:
    access_ok, error_msg = False, "モデルが見つかりません"
except Exception as e:
    access_ok, error_msg = False, f"アクセスエラー: {str(e)}"

if not access_ok:
    print(f"\nモデルへのアクセスに問題があります: {error_msg}")
    print(model_config["setup_message"])
    input("\n準備ができたらEnterキーを押してください...")
else:
    print(f"\n{model_config['model_name']}へのアクセスが確認できました。")

# デバイスの自動選択
device = "cuda" if torch.cuda.is_available() else "cpu"
dtype = model_config["default_dtype"] if device == "cuda" else model_config["cpu_dtype"]

if device == "cpu":
    print("GPUが利用できないため、CPUで実行します。処理に時間がかかる場合があります。")
# デバイス名とdtypeの明示出力
if device == "cuda":
    try:
        print(f"デバイス: GPU ({torch.cuda.get_device_name(0)})")
    except Exception:
        print("デバイス: GPU")
else:
    print("デバイス: CPU")
print(f"データ型: {dtype}")

try:
    # パイプラインの読み込み
    print("モデルの読み込み中...")
    from_pretrained_kwargs = {
        "torch_dtype": dtype,
        "token": hf_token,
        "use_safetensors": True
    }

    # SDXL + GPU時にvariant設定を適切に処理
    if selected_model.startswith("sdxl") and device == "cuda":
        if dtype == torch.float16:
            from_pretrained_kwargs["variant"] = "fp16"
        # bfloat16の場合は特別な処理は不要(デフォルトで対応)

    pipe = model_config["pipeline_class"].from_pretrained(
        model_config["model_id"],
        **from_pretrained_kwargs
    )
    pipe = pipe.to(device)

    # メモリ最適化
    if device == "cuda" and model_config.get("enable_cpu_offload", False):
        pipe.enable_model_cpu_offload()
    if model_config.get("enable_vae_tiling", False) and hasattr(pipe, 'vae'):
        pipe.vae.enable_tiling()
    # attention slicing と xFormers(可能な場合のみ)
    if hasattr(pipe, "enable_attention_slicing"):
        try:
            pipe.enable_attention_slicing()
        except Exception:
            pass
    if device == "cuda" and hasattr(pipe, "enable_xformers_memory_efficient_attention"):
        try:
            pipe.enable_xformers_memory_efficient_attention()
            print("XFormers memory optimization enabled")
        except Exception:
            print("XFormers not available, skipping memory optimization")

    # VAEの精度設定
    if hasattr(pipe, 'vae'):
        pipe.vae.to(dtype)

    # スケジューラーの設定
    if "scheduler_class" in model_config:
        if model_config["scheduler_class"] == "default":
            # SDXLはデフォルトのスケジューラーを使用
            print("デフォルトのスケジューラーを使用します")
        elif model_config["scheduler_class"] is not None:
            # カスタムスケジューラーを設定
            pipe.scheduler = model_config["scheduler_class"].from_config(pipe.scheduler.config)
            print(f"カスタムスケジューラー({model_config['scheduler_class'].__name__})を設定しました")

    print("モデルの読み込みが完了しました。")

    # プロンプト入力ガイド(メイン+スタイル結合)
    print("\n=== プロンプト入力ガイド ===")
    print("1. メインプロンプト: 対象や構図、詳細描写を具体的に記述する")
    print("   例: 'a serene lakeside at sunset, detailed reflections, mountains in background'")
    print("2. スタイルプロンプト: 画風や質感、雰囲気を補足する(任意)")
    print("   例: 'high quality, detailed, sharp, cinematic lighting'")
    print("Enterのみでサンプルプロンプトを使用する")

    main_prompt_in = input("\nメインプロンプト(未入力でサンプル使用): ").strip()
    style_prompt_in = input("スタイルプロンプト(任意、未入力可): ").strip()

    if main_prompt_in:
        combined_prompt = f"{main_prompt_in}, {style_prompt_in}" if style_prompt_in else main_prompt_in
    else:
        combined_prompt = model_config["sample_prompt"]

    # ネガティブプロンプトの判定ロジックを修正
    use_neg_prompt = model_config.get("supports_negative_prompt", True)

    if use_neg_prompt:
        default_negative_prompt = (
            "low quality, worst quality, blurry, out of frame, watermark, signature, jpeg artifacts, "
            "text, logo, extra fingers, extra limbs, extra digits, deformed, disfigured, poorly drawn hands, "
            "bad anatomy, cropped, duplicate"
        )
        print("\nネガティブプロンプトについて")
        print("未入力の場合、以下のデフォルト値が使用される")
        print(f"デフォルトのネガティブプロンプト: {default_negative_prompt}")
        neg_in = input("\nネガティブプロンプト(任意、上書き可): ").strip()
        if neg_in:
            negative_prompt_value = neg_in
            print(f"ネガティブプロンプトを使用: {negative_prompt_value}")
        else:
            negative_prompt_value = default_negative_prompt
            print("デフォルトのネガティブプロンプトを使用する")
            print(f"使用するデフォルトのネガティブプロンプト: {negative_prompt_value}")
    else:
        negative_prompt_value = None
        print("\nこのモデルはネガティブプロンプトをサポートしていません")

    # 画像生成パラメータの準備
    generation_params = {
        "prompt": combined_prompt,
        "num_inference_steps": model_config["num_inference_steps"],
        "guidance_scale": model_config["guidance_scale"],
    }

    # ネガティブプロンプトの追加
    if use_neg_prompt:
        generation_params["negative_prompt"] = negative_prompt_value

    # 解像度設定(SD3.5とSDXL両方に適用)
    if "width" in model_config and "height" in model_config:
        generation_params.update({
            "width": model_config["width"],
            "height": model_config["height"],
        })

    # 実行前の設定表示(確認用)
    print("生成設定:")
    if "width" in model_config and "height" in model_config:
        print(f"  解像度: {model_config['width']}x{model_config['height']}")
    print(f"  推論ステップ数: {model_config['num_inference_steps']}")
    print(f"  ガイダンススケール: {model_config['guidance_scale']}")
    print(f"  使用プロンプト: {combined_prompt}")
    if use_neg_prompt:
        print(f"  ネガティブプロンプト: {negative_prompt_value}")
    else:
        print("  ネガティブプロンプト: 非対応(モデル仕様)")

    # 画像生成
    print("画像生成中...")
    with torch.no_grad():
        image = pipe(**generation_params).images[0]
    print("画像生成が完了しました。")

    # 画像を保存(モデル名を含むファイル名)
    output_filename = f"{selected_model}_output.png"
    image.save(output_filename)
    print(f"画像を {output_filename} として保存しました。")
    try:
        image.show()
    except Exception:
        pass

except Exception as e:
    print(f"画像生成に失敗しました: {e}")
    if any(s in str(e).lower() for s in ["kmp_duplicate_lib_ok", "libiomp5", "openmp"]):
        print("\nOpenMP関連のエラーが疑われる。暫定対処として以下を試すことがある。")
        print("  Windows: setx KMP_DUPLICATE_LIB_OK TRUE")
        print("  Linux/macOS: export KMP_DUPLICATE_LIB_OK=TRUE")
        print("注意: 恒久対策ではなく、可能であれば重複するOpenMPランタイムの解消を推奨する")
    response = input("\nトークンを再設定しますか? [Y/n]: ")
    if response.lower() != 'n':
        setup_token()