![[kaneko lab.]](https://www.kkaneko.jp/info/logo_png.png)
FLUX.1 [schnell] Text-to-Image Generator によるテキストからの画像生成
【概要】
Black Forest LabsのFLUX.1 [schnell]を用い、1〜4ステップの高速推論でテキストから高品質画像を生成するプログラムを解説する。
【目次】
Python開発環境,ライブラリ類
ここでは、最低限の事前準備について説明する。機械学習や深層学習を行う場合は、NVIDIA CUDA、Visual Studio、Cursorなどを追加でインストールすると便利である。これらについては別ページ https://www.kkaneko.jp/cc/dev/aiassist.htmlで詳しく解説しているので、必要に応じて参照してください。
Python 3.12 のインストール
Pythonのインストールを行い、Pythonのプログラムを実行する環境を整える。扱う環境は、Windows搭載パソコンである。金子研究室では、Python 3.12.10を推奨する。
[Windows での Python 3.12 のインストール手順を見るには、ここをクリック]
Windows での Python 3.12 のインストール
以下のいずれかの方法でPython 3.12をインストールする。Pythonがインストール済みの場合、この手順は不要である。
方法 1:winget によるインストール
【インストールコマンドの実行方法】
管理者権限でコマンドプロンプトを起動する(手順:Windowsキーまたはスタートメニュー → cmd と入力 → 右クリック → 「管理者として実行」)。そして、コマンド全体をコマンドプロンプトにコピー&ペーストする。
--scope machine を指定することで、システム全体(全ユーザー向け)にインストールされる。このオプションの実行には管理者権限が必要である。インストール完了後、コマンドプロンプトを再起動するとPATHが反映される。
REM Python 3.12 をシステム領域にインストール
winget install --id Python.Python.3.12 -e --scope machine --silent --accept-source-agreements --accept-package-agreements --override "/quiet InstallAllUsers=1 PrependPath=1 Include_test=0 Include_pip=1 Include_launcher=1 InstallLauncherAllUsers=1 TargetDir=\"C:\Program Files\Python312\""
if not "%ERRORLEVEL%"=="0" ( color 0c & echo Python 3.12 のインストールに失敗しました & ping 127.0.0.1 -n 6 >nul & color )

REM Python と Scripts を PATH 先頭に追加
powershell -NoProfile -Command "$p='C:\Program Files\Python312'; $s=\"$p\Scripts\"; if(Test-Path $p){$k=[Microsoft.Win32.Registry]::LocalMachine.OpenSubKey('SYSTEM\CurrentControlSet\Control\Session Manager\Environment',$true); $c=$k.GetValue('Path','',[Microsoft.Win32.RegistryValueOptions]::DoNotExpandEnvironmentNames); $t=$k.GetValueKind('Path'); $new=$c; if((';'+$new+';') -notlike \"*;$p;*\"){$new=$p+';'+$new}; if((';'+$new+';') -notlike \"*;$s;*\"){$new=$s+';'+$new}; if($new -ne $c){$k.SetValue('Path',$new,$t)}; $k.Close()}"

REM 現在のセッションにも反映(システムPATHを再取得して連結)
for /f "usebackq tokens=2,*" %A in (`reg query "HKLM\SYSTEM\CurrentControlSet\Control\Session Manager\Environment" /v Path`) do set "PATH=%B"

REM pip / wheel の更新
python -m pip install --no-user -U pip wheel
if not "%ERRORLEVEL%"=="0" ( color 0c & echo pip / wheel の更新に失敗しました & ping 127.0.0.1 -n 6 >nul & color )
方法 2:インストーラーによるインストール
- Python公式サイト(https://www.python.org/downloads/)にアクセスし、「Download Python 3.x.x」ボタンからWindows用インストーラーをダウンロードする。
- ダウンロードしたインストーラーを実行する。
- 初期画面の下部に表示される「Add python.exe to PATH」にチェックを入れてから「Customize installation」を選択する。このチェックを入れ忘れると、コマンドプロンプトから
pythonコマンドを実行できない。 - 「Install Python 3.xx for all users」にチェックを入れ、「Install」をクリックする。
インストールの確認
コマンドプロンプトで以下を実行する。
python --versionバージョン番号(例:Python 3.12.x)が表示されればインストール成功である。「'python' は、内部コマンドまたは外部コマンドとして認識されていません。」と表示される場合は、インストールが正常に完了していない。
Python の開発環境 Visual Studio Code のインストールと Python 用の設定
Python の開発環境Visual Studio Code(プログラムを編集するソフトウェア。以下、VS Code)を整える。
[Windows での Visual Studio Code のインストールと Python 用の設定手順を見るには、ここをクリック]
Windows での Visual Studio Code のインストールと Python 用の設定手順
1. VS Code と拡張機能のインストール
以下のコマンドにより,既存の VS Code を削除し,全ユーザー共有の設定で再インストールしたうえで,拡張機能(VS Code に機能を追加するソフトウェア)をまとめて導入する.
【インストールコマンドの実行方法】
管理者権限でコマンドプロンプトを起動する(手順:Windows キーまたはスタートメニュー → cmd と入力 → 右クリック → 「管理者として実行」)。そして,コマンド全体をコマンドプロンプトにコピー&ペーストする。
インストールコマンド
REM ============================================================
REM Microsoft Visual Studio Code
REM ============================================================
REM Build Tools + Desktop development with C++(VCTools)+ 追加コンポーネント(一括)
REM 未インストール時: winget で新規インストール
REM インストール済み時: setup.exe modify でコンポーネント追加(バージョンは変更しない)
winget list --id Microsoft.VisualStudio.BuildTools 2>nul | findstr /i "BuildTools" >nul 2>&1
if %ERRORLEVEL% EQU 0 (
    for /f "usebackq delims=" %P in (`"C:\Program Files (x86)\Microsoft Visual Studio\Installer\vswhere.exe" -products Microsoft.VisualStudio.Product.BuildTools -property installationPath`) do start /wait "" "C:\Program Files (x86)\Microsoft Visual Studio\Installer\setup.exe" modify --installPath "%P" --add Microsoft.VisualStudio.Workload.VCTools --add Microsoft.VisualStudio.Workload.MSBuildTools --add Microsoft.VisualStudio.Component.VC.CMake.Project --add Microsoft.VisualStudio.Component.VC.Llvm.Clang --add Microsoft.VisualStudio.Component.VC.Llvm.ClangToolset --add Microsoft.VisualStudio.Component.Windows11SDK.26100 --add Microsoft.VisualStudio.Component.VC.v143.x86.x64 --includeRecommended --quiet --norestart --nocache
    if not "%ERRORLEVEL%"=="0" ( color 0c & echo Build Tools のコンポーネント追加に失敗しました & ping 127.0.0.1 -n 6 >nul & color )
) else (
    winget install --scope machine --id Microsoft.VisualStudio.BuildTools -e --silent --disable-interactivity --force --accept-source-agreements --accept-package-agreements --override "--quiet --wait --norestart --nocache --add Microsoft.VisualStudio.Workload.VCTools --includeRecommended --add Microsoft.VisualStudio.Workload.MSBuildTools --add Microsoft.VisualStudio.Component.VC.CMake.Project --add Microsoft.VisualStudio.Component.VC.Llvm.Clang --add Microsoft.VisualStudio.Component.VC.Llvm.ClangToolset --add Microsoft.VisualStudio.Component.Windows11SDK.26100 --add Microsoft.VisualStudio.Component.VC.v143.x86.x64"
    if not "%ERRORLEVEL%"=="0" ( color 0c & echo Build Tools のインストールに失敗しました & ping 127.0.0.1 -n 6 >nul & color )
)

REM 全ユーザー共有の拡張機能フォルダ
if not exist "C:\ProgramData\vscode-extensions" mkdir "C:\ProgramData\vscode-extensions"
icacls "C:\ProgramData\vscode-extensions" /grant "Everyone:(OI)(CI)M" /T

REM スタートメニューのショートカットを --extensions-dir 付きで再作成
if exist "C:\ProgramData\Microsoft\Windows\Start Menu\Programs\Visual Studio Code" rmdir /s /q "C:\ProgramData\Microsoft\Windows\Start Menu\Programs\Visual Studio Code"
if exist "C:\ProgramData\Microsoft\Windows\Start Menu\Programs\Visual Studio Code.lnk" del "C:\ProgramData\Microsoft\Windows\Start Menu\Programs\Visual Studio Code.lnk"
powershell -NoProfile -Command "$s=New-Object -ComObject WScript.Shell; $lnk=$s.CreateShortcut('C:\ProgramData\Microsoft\Windows\Start Menu\Programs\Visual Studio Code.lnk'); $lnk.TargetPath='C:\Program Files\Microsoft VS Code\Code.exe'; $lnk.Arguments='--extensions-dir \"C:\ProgramData\vscode-extensions\"'; $lnk.Save()"
REM ショートカットの検証
powershell -NoProfile -Command "$s=New-Object -ComObject WScript.Shell; $lnk=$s.CreateShortcut('C:\ProgramData\Microsoft\Windows\Start Menu\Programs\Visual Studio Code.lnk'); Write-Host 'TargetPath:' $lnk.TargetPath; Write-Host 'Arguments:' $lnk.Arguments"

REM ファイル / フォルダ右クリックの「Code で開く」を登録
reg add "HKLM\SOFTWARE\Classes\*\shell\VSCode\command" /ve /d "\"C:\Program Files\Microsoft VS Code\Code.exe\" --extensions-dir \"C:\ProgramData\vscode-extensions\" \"%1\"" /f
reg add "HKLM\SOFTWARE\Classes\Directory\shell\VSCode\command" /ve /d "\"C:\Program Files\Microsoft VS Code\Code.exe\" --extensions-dir \"C:\ProgramData\vscode-extensions\" \"%1\"" /f
reg add "HKLM\SOFTWARE\Classes\Directory\Background\shell\VSCode\command" /ve /d "\"C:\Program Files\Microsoft VS Code\Code.exe\" --extensions-dir \"C:\ProgramData\vscode-extensions\" \"%V\"" /f

REM --extensions-dir 付きで起動する code.cmd ラッパを作成
REM (%* を echo で書くと対話的 cmd で失われるため、PowerShell で [char]37+'*' を書き出す)
powershell -NoProfile -Command "$pct=[char]37; $q=[char]34; $c='@echo off'+[char]13+[char]10+$q+'C:\Program Files\Microsoft VS Code\bin\code.cmd'+$q+' --extensions-dir '+$q+'C:\ProgramData\vscode-extensions'+$q+' '+$pct+'*'+[char]13+[char]10; [IO.File]::WriteAllText('C:\ProgramData\vscode-extensions\vscode.cmd',$c,[Text.Encoding]::ASCII)"

REM 拡張機能のインストール
set "CODE=C:\Program Files\Microsoft VS Code\bin\code.cmd"
"%CODE%" --extensions-dir "C:\ProgramData\vscode-extensions" --uninstall-extension GitHub.copilot
"%CODE%" --extensions-dir "C:\ProgramData\vscode-extensions" --uninstall-extension GitHub.copilot-chat
"%CODE%" --extensions-dir "C:\ProgramData\vscode-extensions" --install-extension ms-python.python
"%CODE%" --extensions-dir "C:\ProgramData\vscode-extensions" --install-extension ms-python.vscode-pylance
"%CODE%" --extensions-dir "C:\ProgramData\vscode-extensions" --install-extension ms-python.debugpy
"%CODE%" --extensions-dir "C:\ProgramData\vscode-extensions" --install-extension MS-CEINTL.vscode-language-pack-ja
"%CODE%" --extensions-dir "C:\ProgramData\vscode-extensions" --install-extension saoudrizwan.claude-dev
"%CODE%" --extensions-dir "C:\ProgramData\vscode-extensions" --install-extension rust-lang.rust-analyzer
"%CODE%" --extensions-dir "C:\ProgramData\vscode-extensions" --install-extension tamasfe.even-better-toml
"%CODE%" --extensions-dir "C:\ProgramData\vscode-extensions" --install-extension anthropic.claude-code
"%CODE%" --extensions-dir "C:\ProgramData\vscode-extensions" --install-extension almenon.arepl
"%CODE%" --extensions-dir "C:\ProgramData\vscode-extensions" --list-extensions --show-versions

REM settings.json を作成(自動更新オフ、Python、Claude Code 設定)
if not exist "%APPDATA%\Code\User" mkdir "%APPDATA%\Code\User"
python -c "import json,os;data={'update.mode':'none','update.enableWindowsBackgroundUpdates':False,'extensions.autoUpdate':False,'python.defaultInterpreterPath':r'C:\Program Files\Python312\python.exe','claudeCode.environmentVariables':[{'name':'ANTHROPIC_API_KEY','value':'not-needed'},{'name':'ANTHROPIC_AUTH_TOKEN','value':'ollama'},{'name':'ANTHROPIC_BASE_URL','value':'http://localhost:11434'},{'name':'ANTHROPIC_MODEL','value':'glm-4.7-flash'},{'name':'CLAUDE_CODE_DISABLE_NONESSENTIAL_TRAFFIC','value':'1'}]};p=os.path.join(os.environ['APPDATA'],'Code','User','settings.json');open(p,'w',encoding='utf-8').write(json.dumps(data,indent=4));print('Done:',p)"

REM 自動更新の抑止ポリシー(settings.json に加えて、レジストリ側でも明示的にオフ)
reg add "HKLM\SOFTWARE\Policies\Microsoft\VSCode" /v "UpdateMode" /t REG_SZ /d "none" /f
echo === セットアップ完了 ===
2. Python インタプリタの選択
同一マシンに複数の Python がインストールされている場合,VS Code で使用する Python 本体(インタプリタ:Python プログラムを解釈・実行するソフトウェア)を選択する必要がある.
- コマンドパレット(コマンド名で機能を呼び出す VS Code の入力欄)を開く(
Ctrl+Shift+P) Python: Select Interpreterと入力する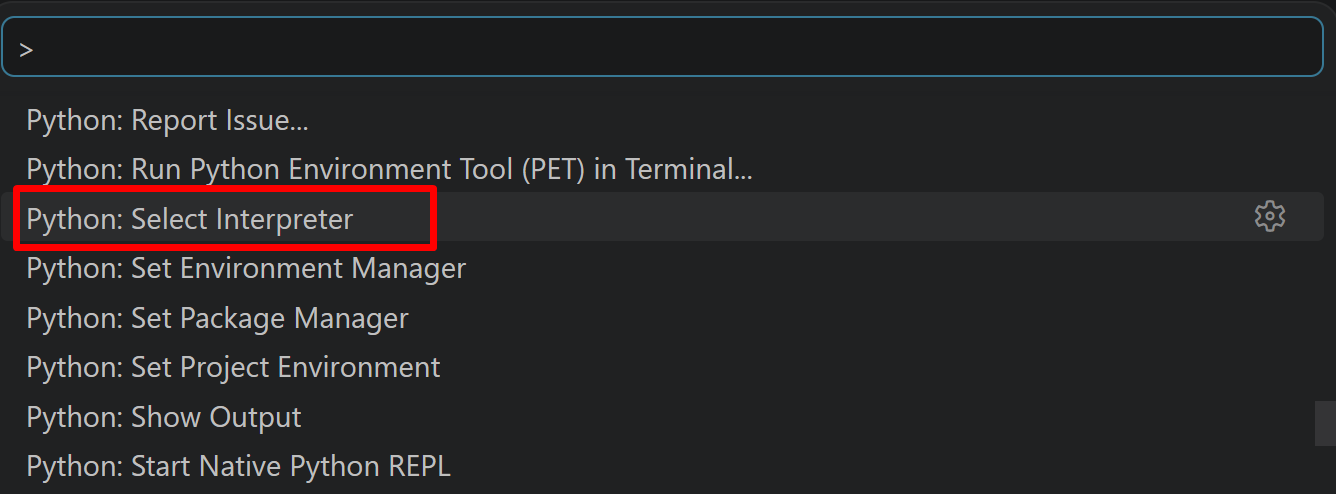
- 表示される一覧から,使用する Python(例:
C:\Program Files\Python312\python.exe)を選択する.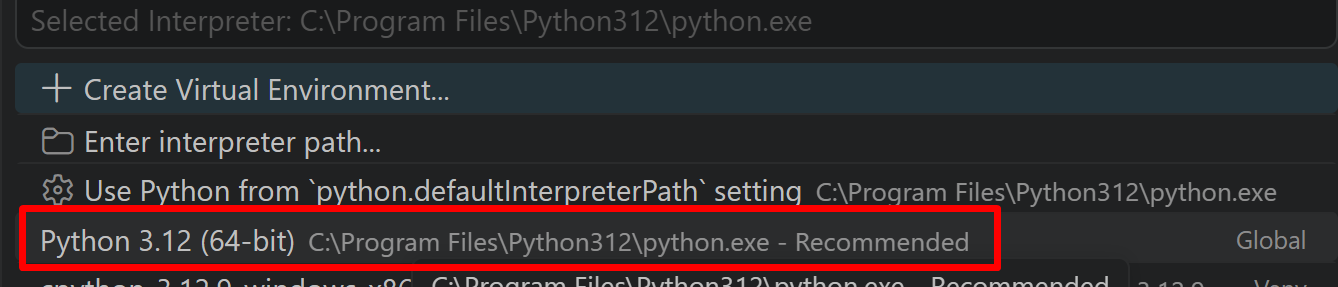
必要なライブラリをシステム領域にインストール
FLUX.1 [schnell] はHugging Face上でアクセス許可が必要なモデルである(https://huggingface.co/black-forest-labs/FLUX.1-schnell)。事前にHugging Faceアカウントでログインし、利用条件に同意したうえで、アクセストークンを用いて認証しておく。
管理者権限でコマンドプロンプトを起動する
(手順:Windowsキーまたはスタートメニュー → cmd と入力 → 右クリック → 「管理者として実行」)。以下を実行する。
REM PyTorch をインストール(GPU対応版)
set "CUDA_TAG=cu128"
set "PYTHON_PATH=C:\Program Files\Python312"
"%PYTHON_PATH%\Scripts\pip" install --no-user -U numpy torch torchvision torchaudio --index-url https://download.pytorch.org/whl/%CUDA_TAG%
pip install --no-user diffusers transformers accelerate sentencepiece protobuf huggingface_hub
FLUX.1 [schnell] Text-to-Image Generator によるテキストからの画像生成プログラム
概要
このプログラムは、Black Forest LabsのFLUX.1 [schnell]モデルを使用したテキストから画像生成を行うプログラムである。12Bパラメータの整流フロー変換器(Rectified Flow Transformer)により、1〜4ステップという少ない推論回数で高品質な画像を生成する。
主要技術
FLUX.1 [schnell]
Black Forest Labsが2024年8月に発表した整流フロー変換器モデルである[1]。潜在対抗的拡散蒸留(Latent Adversarial Diffusion Distillation)により学習されており、1〜4ステップという少ない推論回数で高品質な画像を生成できる。Apache 2.0ライセンスで公開されており、個人利用・研究利用・商用利用のいずれにも制限なく使用できる。
整流フロー変換器(Rectified Flow Transformer)
従来のU-Netベースの拡散モデルとは異なり、Transformerアーキテクチャを用いてノイズと画像の間の変換経路を直線的な軌道として学習する手法である[2]。少ない推論ステップで高品質な生成が可能になる。
デュアルテキストエンコーダー
CLIPとT5-XXLの2つのテキストエンコーダーを併用する[2]。CLIPはプロンプト全体を集約したグローバルな特徴を抽出し、Transformer内の適応正規化層に渡される。T5-XXLは最大512トークンの系列に対応したトークン単位の特徴を抽出し、画像トークンと連結されたうえでTransformer内部の結合アテンション機構に用いられる。この二種類の特徴を組み合わせることで、プロンプトへの高い忠実度を実現している。
技術的特徴
メモリ効率化機能
enable_model_cpu_offload()による、使用していないモデル部分のCPUへの一時退避を実装している。限られたVRAMでも動作可能な最適化である。
実装の特色
GPU/CPU自動選択機能
実行環境に応じてtorch.cuda.is_available()による自動デバイス選択と、bfloat16/float32データ型の最適化を実装している。
少ステップ推論
guidance_scale=0.0、num_inference_steps=4という設定により、ネガティブプロンプトを使わずに高速な画像生成を行う。
参考文献
[1] Black Forest Labs. FLUX.1 [schnell]. Hugging Face Model Hub. https://huggingface.co/black-forest-labs/FLUX.1-schnell
[2] Black Forest Labs. FLUX Model Architecture. https://github.com/black-forest-labs/flux
ソースコード
# FLUX.1 [schnell] Text-to-Image Generator によるテキストからの画像生成
# 特徴技術名: FLUX.1 [schnell] (Rectified Flow Transformer)
# 出典: Black Forest Labs. FLUX.1 [schnell]. Hugging Face Model Hub.
#        https://huggingface.co/black-forest-labs/FLUX.1-schnell
# 特徴機能: 12Bパラメータの整流フロー変換器モデル。潜在対抗的拡散蒸留により1〜4ステップという
#          少ない推論回数で高品質な画像生成が可能。CLIPとT5-XXLのデュアルテキストエンコーダーによりプロンプトへの高い忠実度を実現する。
# 学習済みモデル: black-forest-labs/FLUX.1-schnell, Rectified flow transformer with dual text encoders (CLIP, T5-XXL),
#                https://huggingface.co/black-forest-labs/FLUX.1-schnell
# 方式設計:
#   関連利用技術: diffusers(Hugging Face製、FluxPipelineを提供), torch(PyTorch深層学習フレームワーク)
#   入力と出力: 入力(プロンプト(詳細描写・オブジェクト・構図)(input()で入力)),
#              出力(高品質画像をPNG形式で保存、PIL Image.show()で表示)
#   処理手順: 1.FLUX.1 [schnell]パイプラインを読み込み, 2.プロンプト入力ガイダンス表示,
#            3.プロンプトを受け取り, 4.少ステップ推論による画像生成, 5.生成画像を保存・表示
#   前処理、後処理: 前処理(プロンプトのデュアルエンコーディング(自動実行)), 後処理(生成画像の保存)
#   追加処理: GPU/CPU自動選択による最適なデバイス利用で処理効率向上、enable_model_cpu_offload()によるメモリ節約
#   調整を必要とする設定値: num_inference_steps(推論ステップ数(デフォルト4)、品質と速度のバランス調整),
#                          guidance_scale(プロンプト遵守度(デフォルト0.0、蒸留モデルのため通常0を使用))
#   算出・計算処理の検証: FLUX.1 [schnell]パイプラインにより正しくプロンプトからの高品質画像生成が実行され、適切な画像が出力されることを確認
# 将来方策: パラメータ調整GUIの実装、プロンプト最適化機能、バッチ処理機能の追加
# その他の重要事項: 初回実行時に約24GBのFLUX.1 [schnell]モデルダウンロードが発生、Hugging Face上でのモデルアクセス許可取得が必要、
#                 デュアルテキストエンコーダー仕様(CLIP、T5-XXL)、GPU環境ではVRAM 16GB以上を推奨
# 前準備:
# pip install --no-user -U numpy torch torchvision torchaudio --index-url https://download.pytorch.org/whl/cu128
# pip install --no-user diffusers transformers accelerate sentencepiece protobuf huggingface_hub
# Hugging Faceにログインしてください:
# huggingface-cli login
# FLUX.1 [schnell]へのアクセス許可を取得してください:
# https://huggingface.co/black-forest-labs/FLUX.1-schnell

import os
os.environ["KMP_DUPLICATE_LIB_OK"] = "TRUE"

from diffusers import FluxPipeline
import torch
from datetime import datetime

# GPU/CPU自動選択
device = torch.device('cuda' if torch.cuda.is_available() else 'cpu')
print(f'デバイス: {str(device)}')
# GPU使用時の最適化
if device.type == 'cuda':
    torch.backends.cudnn.benchmark = True

if torch.cuda.is_available():
    torch_dtype = torch.bfloat16
else:
    torch_dtype = torch.float32
print(f'データ型: {torch_dtype}')
print("FLUX.1 [schnell] Text-to-Image Generator")
print("プロンプトから高解像度画像生成を行います(デュアルテキストエンコーダー使用)")

# モデル読み込み
print("FLUX.1 [schnell]モデルを読み込み中...")
pipeline = FluxPipeline.from_pretrained(
    "black-forest-labs/FLUX.1-schnell",
    torch_dtype=torch_dtype
)

# メモリ節約設定。GPU環境ではモデルの一部をCPUへ退避することでVRAM使用量を削減する
if device.type == 'cuda':
    pipeline.enable_model_cpu_offload()
else:
    pipeline = pipeline.to(device)
print("モデルの読み込みが完了しました")

# プロンプト入力ガイダンス
print("\n=== FLUX.1 [schnell] デュアルテキストエンコーダー プロンプト入力ガイド ===")
print("FLUX.1 [schnell] は2つのテキストエンコーダーを使用して高品質な画像を生成します:")
print("1. CLIP: プロンプト全体を集約したグローバルな特徴を抽出")
print("2. T5-XXL: 詳細な意味理解に基づくトークン単位の特徴を抽出(最大512トークン)")
print("• 自然な文章での指示が効果的です")
print("• 蒸留モデルのためguidance_scale=0.0、ネガティブプロンプトは使用しません")
print("• 1〜4ステップという少ない推論回数で高品質な結果を生成します")
print("=" * 75)

# プロンプト入力
prompt_default = "Astronaut in a jungle, cold color palette, muted colors, detailed, 8k"
prompt_input = input(f"生成したい画像の説明を入力してください [デフォルト: {prompt_default}]: ")
prompt = prompt_input.strip() if prompt_input.strip() else prompt_default

print(f"\n使用するプロンプト: {prompt}")

# 画像生成設定
width = 1024
height = 1024
num_inference_steps = 4
guidance_scale = 0.0

print(f"\n生成設定:")
print(f"  解像度: {width}x{height}")
print(f"  推論ステップ数: {num_inference_steps}")
print(f"  ガイダンススケール: {guidance_scale}")

# 画像生成
print("\n画像生成中...")
with torch.no_grad():
    image = pipeline(
        prompt=prompt,
        width=width,
        height=height,
        num_inference_steps=num_inference_steps,
        guidance_scale=guidance_scale,
        max_sequence_length=256
    ).images[0]
print("画像生成が完了しました")

# 結果保存・表示
timestamp = datetime.now().strftime("%Y%m%d_%H%M%S")
filename = f"flux_schnell_generated_{timestamp}.png"
image.save(filename)
print(f"画像を{filename}に保存しました")
image.show()

# 結果ログ保存
with open('result.txt', 'w', encoding='utf-8') as f:
    f.write('=== FLUX.1 [schnell] Text-to-Image 生成結果 ===\n')
    f.write(f'使用デバイス: {str(device).upper()}\n')
    f.write(f'データ型: {str(torch_dtype)}\n')
    if device.type == 'cuda':
        f.write(f'GPU: {torch.cuda.get_device_name(0)}\n')
    f.write(f'プロンプト: {prompt}\n')
    f.write(f'使用モデル: FLUX.1 [schnell] (black-forest-labs/FLUX.1-schnell)\n')
    f.write(f'テキストエンコーダー: デュアルエンコーダー(CLIP、T5-XXL)\n')
    f.write(f'出力解像度: {width}x{height}\n')
    f.write(f'推論ステップ数: {num_inference_steps}\n')
    f.write(f'ガイダンススケール: {guidance_scale}\n')
    f.write(f'保存ファイル: {filename}\n')
print('処理結果をresult.txtに保存しました')