FlexGen のインストールと動作確認(大規模言語モデル,チャットボット)(Python,PyTorch を使用)(Windows 上)
FlexGen
FlexGen は,大規模言語モデル (large language model)を用いた推論で必要とされる計算とメモリの要求を削減する技術. 実験では,大規模言語モデル OPTOPT-175B を,16GB の単一 GPU で実行したとき 100倍以上の高速化が可能であるとされている.
【文献】 Ying Sheng, Lianmin Zheng, Binhang Yuan, Zhuohan Li, Max Ryabinin, Beidi Chen, Percy Liang, Ce Zhang, Ion Stoica, Christopher Ré., High-throughput Generative Inference of Large Language Model with a Single GPU, 2023.
PDF ファイル: https://github.com/FMInference/FlexiGen/blob/main/docs/paper.md
【サイト内の関連ページ】
- Meta の言語モデルと日本語で対話できる chatBOT プログラム(chatBOT)(FlexGen, DeepL, Python を使用)(Windows 上): 別ページ »で説明
- 対話システム,chatBOT: PDFファイル, パワーポイントファイル
【関連する外部ページ】
FlexGen の GitHub のページ: https://github.com/FMInference/FlexGen
【関連項目】 OPT
前準備
Build Tools for Visual Studio 2026(ビルドツール)のインストール
Build Tools for Visual Studio 2026(ビルドツール)のインストールを行い、C/C++ コードのビルド環境を整える。
Build Tools for Visual Studio は,Visual Studio の IDE を含まない C/C++ コンパイラ,ライブラリ,ビルドツール等のコマンドライン向け開発ツールセットである。インストール済みの場合,この手順は不要である。 以下のコマンドは、Build Tools が未インストールの場合は winget で新規インストールし、インストール済みの場合は 【インストールコマンドの実行方法】 管理者権限でコマンドプロンプトを起動する(手順:Windows キーまたはスタートメニュー → 上記のコマンドでは、Build Tools 本体と Visual C++ 再頒布可能パッケージをインストールし、続いて以下のコンポーネントを追加している。 上記以外の追加のコンポーネントが必要になった場合は Visual Studio Installer で個別にインストールできる。 インストール完了の確認 Visual Studio を必要とするとき Visual Studio の機能を必要とする場合は,追加インストールできる。[Build Tools for Visual Studio 2026(ビルドツール)のインストール手順を見るには、ここをクリック]
Windows での Build Tools for Visual Studio 2026 のインストール
setup.exe modify でコンポーネントを追加する(バージョンは変更しない)。cmd と入力 → 右クリック → 「管理者として実行」)。そして、コマンド全体をコマンドプロンプトにコピー&ペーストする。REM VC++ ランタイム
winget install --scope machine --id Microsoft.VCRedist.2015+.x64 -e --silent --disable-interactivity --force --accept-source-agreements --accept-package-agreements --override "/quiet /norestart"
REM ============================================================
REM Visual Studio Build Tools + Desktop development with C++
REM (VCTools、MSBuildTools、CMake連携、Clang、Windows 11 SDK)
REM ============================================================
REM 進行中のインストーラーを停止(ロック競合回避)
taskkill /F /IM vs_setup.exe /T >nul 2>&1
taskkill /F /IM vs_installer.exe /T >nul 2>&1
taskkill /F /IM vs_installerservice.exe /T >nul 2>&1
REM 未インストール時: winget で新規インストール
REM インストール済み時: setup.exe modify でコンポーネント追加(バージョンは変更しない)
winget list --id Microsoft.VisualStudio.BuildTools 2>nul | findstr /i "BuildTools" >nul 2>&1
if %ERRORLEVEL% EQU 0 (
for /f "usebackq delims=" %P in (`"C:\Program Files (x86)\Microsoft Visual Studio\Installer\vswhere.exe" -products Microsoft.VisualStudio.Product.BuildTools -property installationPath`) do start /wait "" "C:\Program Files (x86)\Microsoft Visual Studio\Installer\setup.exe" modify --installPath "%P" --add Microsoft.VisualStudio.Workload.VCTools --add Microsoft.VisualStudio.Workload.MSBuildTools --add Microsoft.VisualStudio.Component.VC.CMake.Project --add Microsoft.VisualStudio.Component.VC.Llvm.Clang --add Microsoft.VisualStudio.Component.VC.Llvm.ClangToolset --add Microsoft.VisualStudio.Component.Windows11SDK.26100 --includeRecommended --quiet --norestart --nocache
) else (
winget install --scope machine --id Microsoft.VisualStudio.BuildTools -e --silent --disable-interactivity --force --accept-source-agreements --accept-package-agreements --override "--quiet --wait --norestart --nocache --add Microsoft.VisualStudio.Workload.VCTools --includeRecommended --add Microsoft.VisualStudio.Workload.MSBuildTools --add Microsoft.VisualStudio.Component.VC.CMake.Project --add Microsoft.VisualStudio.Component.VC.Llvm.Clang --add Microsoft.VisualStudio.Component.VC.Llvm.ClangToolset --add Microsoft.VisualStudio.Component.Windows11SDK.26100"
)
REM 破損時の修復(任意、動作がおかしくなった場合)
REM "C:\Program Files (x86)\Microsoft Visual Studio\Installer\setup.exe" repair --installPath "C:\Program Files (x86)\Microsoft Visual Studio\18\BuildTools" --quiet --norestart
REM 導入確認(インストールパスが表示されれば正常)
"C:\Program Files (x86)\Microsoft Visual Studio\Installer\vswhere.exe" -products * -requires Microsoft.VisualStudio.Workload.VCTools -property installationPath
--includeRecommended により、MSVC コンパイラ、C++ AddressSanitizer、vcpkg、CMake ツール、Windows 11 SDK 等の推奨コンポーネントが含まれる)winget list Microsoft.VisualStudio.BuildTools
Python 3.12 のインストール
Pythonのインストールを行い、Pythonのプログラムを実行する環境を整える。扱う環境は、Windows搭載パソコンである。金子研究室では、Python 3.12.10を推奨する。
[Windows での Python 3.12 のインストール手順を見るには、ここをクリック]
Windows での Python 3.12 のインストール
以下のいずれかの方法でPython 3.12をインストールする。Pythonがインストール済みの場合、この手順は不要である。
方法 1:winget によるインストール
【インストールコマンドの実行方法】
管理者権限でコマンドプロンプトを起動する(手順:Windowsキーまたはスタートメニュー → cmd と入力 → 右クリック → 「管理者として実行」)。そして、コマンド全体をコマンドプロンプトにコピー&ペーストする。
--scope machine を指定することで、システム全体(全ユーザー向け)にインストールされる。このオプションの実行には管理者権限が必要である。インストール完了後、コマンドプロンプトを再起動するとPATHが反映される。
REM Python 3.12 をシステム領域にインストール
winget install --id Python.Python.3.12 -e --scope machine --silent --accept-source-agreements --accept-package-agreements --override "/quiet InstallAllUsers=1 PrependPath=1 Include_test=0 Include_pip=1 Include_launcher=1 InstallLauncherAllUsers=1 TargetDir=\"C:\Program Files\Python312\""

REM Python と Scripts を PATH 先頭に追加
powershell -NoProfile -Command "$p='C:\Program Files\Python312'; $s=\"$p\Scripts\"; $c=[Environment]::GetEnvironmentVariable('Path','Machine'); if((Test-Path $p) -and (';'+$c+';' -notlike \"*;$p;*\") -and (';'+$c+';' -notlike \"*;$s;*\")){[Environment]::SetEnvironmentVariable('Path',\"$p;$s;$c\",'Machine')}"
方法 2:インストーラーによるインストール
- Python公式サイト(https://www.python.org/downloads/)にアクセスし、「Download Python 3.x.x」ボタンからWindows用インストーラーをダウンロードする。
- ダウンロードしたインストーラーを実行する。
- 初期画面の下部に表示される「Add python.exe to PATH」にチェックを入れてから「Customize installation」を選択する。このチェックを入れ忘れると、コマンドプロンプトから
pythonコマンドを実行できない。 - 「Install Python 3.xx for all users」にチェックを入れ、「Install」をクリックする。
インストールの確認
コマンドプロンプトで以下を実行する。
python --versionバージョン番号(例:Python 3.12.x)が表示されればインストール成功である。「'python' は、内部コマンドまたは外部コマンドとして認識されていません。」と表示される場合は、インストールが正常に完了していない。
Git のインストール
管理者権限のコマンドプロンプトで以下を実行する。管理者権限のコマンドプロンプトを起動するには、Windows キーまたはスタートメニューから「cmd」と入力し、表示された「コマンドプロンプト」を右クリックして「管理者として実行」を選択する。
REM Git をシステム領域にインストール
winget install --scope machine --id Git.Git -e --silent --disable-interactivity --force --accept-source-agreements --accept-package-agreements --override "/VERYSILENT /NORESTART /NOCANCEL /SP- /CLOSEAPPLICATIONS /RESTARTAPPLICATIONS /COMPONENTS=""icons,ext\reg\shellhere,assoc,assoc_sh"" /o:PathOption=Cmd /o:CRLFOption=CRLFCommitAsIs /o:BashTerminalOption=MinTTY /o:DefaultBranchOption=main /o:EditorOption=VIM /o:SSHOption=OpenSSH /o:UseCredentialManager=Enabled /o:PerformanceTweaksFSCache=Enabled /o:EnableSymlinks=Disabled /o:EnableFSMonitor=Disabled"
【関連する外部ページ】
- Git の公式ページ: https://git-scm.com/
Build Tools for Visual Studio 2022,NVIDIA ドライバ,NVIDIA CUDA ツールキット 11.8,NVIDIA cuDNN 8.9.7 のインストール(Windows 上)
【サイト内の関連ページ】 NVIDIA グラフィックスボードを搭載しているパソコンの場合には, NVIDIA ドライバ, NVIDIA CUDA ツールキット, NVIDIA cuDNN のインストールを行う.
- Windows での Build Tools for Visual Studio 2022 のインストール: 別ページ »で説明
- Windows での NVIDIA ドライバ,NVIDIA CUDA ツールキット 11.8,NVIDIA cuDNN v8.9.7 のインストール手順: 別ページ »で説明
【関連する外部ページ】
- Build Tools for Visual Studio 2022 (ビルドツール for Visual Studio 2022)の公式ダウンロードページ: https://visualstudio.microsoft.com/ja/visual-cpp-build-tools/
- NVIDIA ドライバのダウンロードの公式ページ: https://www.nvidia.co.jp/Download/index.aspx?lang=jp
- NVIDIA CUDA ツールキットのアーカイブの公式ページ: https://developer.nvidia.com/cuda-toolkit-archive
- NVIDIA cuDNN のダウンロードの公式ページ: https://developer.nvidia.com/cudnn
PyTorch のインストール(Windows 上)
- 以下の手順を管理者権限のコマンドプロンプトで実行する
(手順:Windowsキーまたはスタートメニュー →
cmdと入力 → 右クリック → 「管理者として実行」)。 - PyTorch のページを確認
- 次のようなコマンドを実行(実行するコマンドは,PyTorch のページの表示されるコマンドを使う).
次のコマンドを実行することにより, PyTorch 2.3 (NVIDIA CUDA 11.8 用)がインストールされる. 但し,Anaconda3を使いたい場合には別手順になる.
事前に NVIDIA CUDA のバージョンを確認しておくこと(ここでは,NVIDIA CUDA ツールキット 11.8 が前もってインストール済みであるとする).
PyTorch で,GPU が動作している場合には,「torch.cuda.is_available()」により,True が表示される.
python -m pip install -U --ignore-installed pip python -m pip uninstall -y torch torchvision torchaudio torchtext xformers python -m pip install -U torch torchvision torchaudio numpy --index-url https://download.pytorch.org/whl/cu118 python -c "import torch; print(torch.__version__, torch.cuda.is_available())"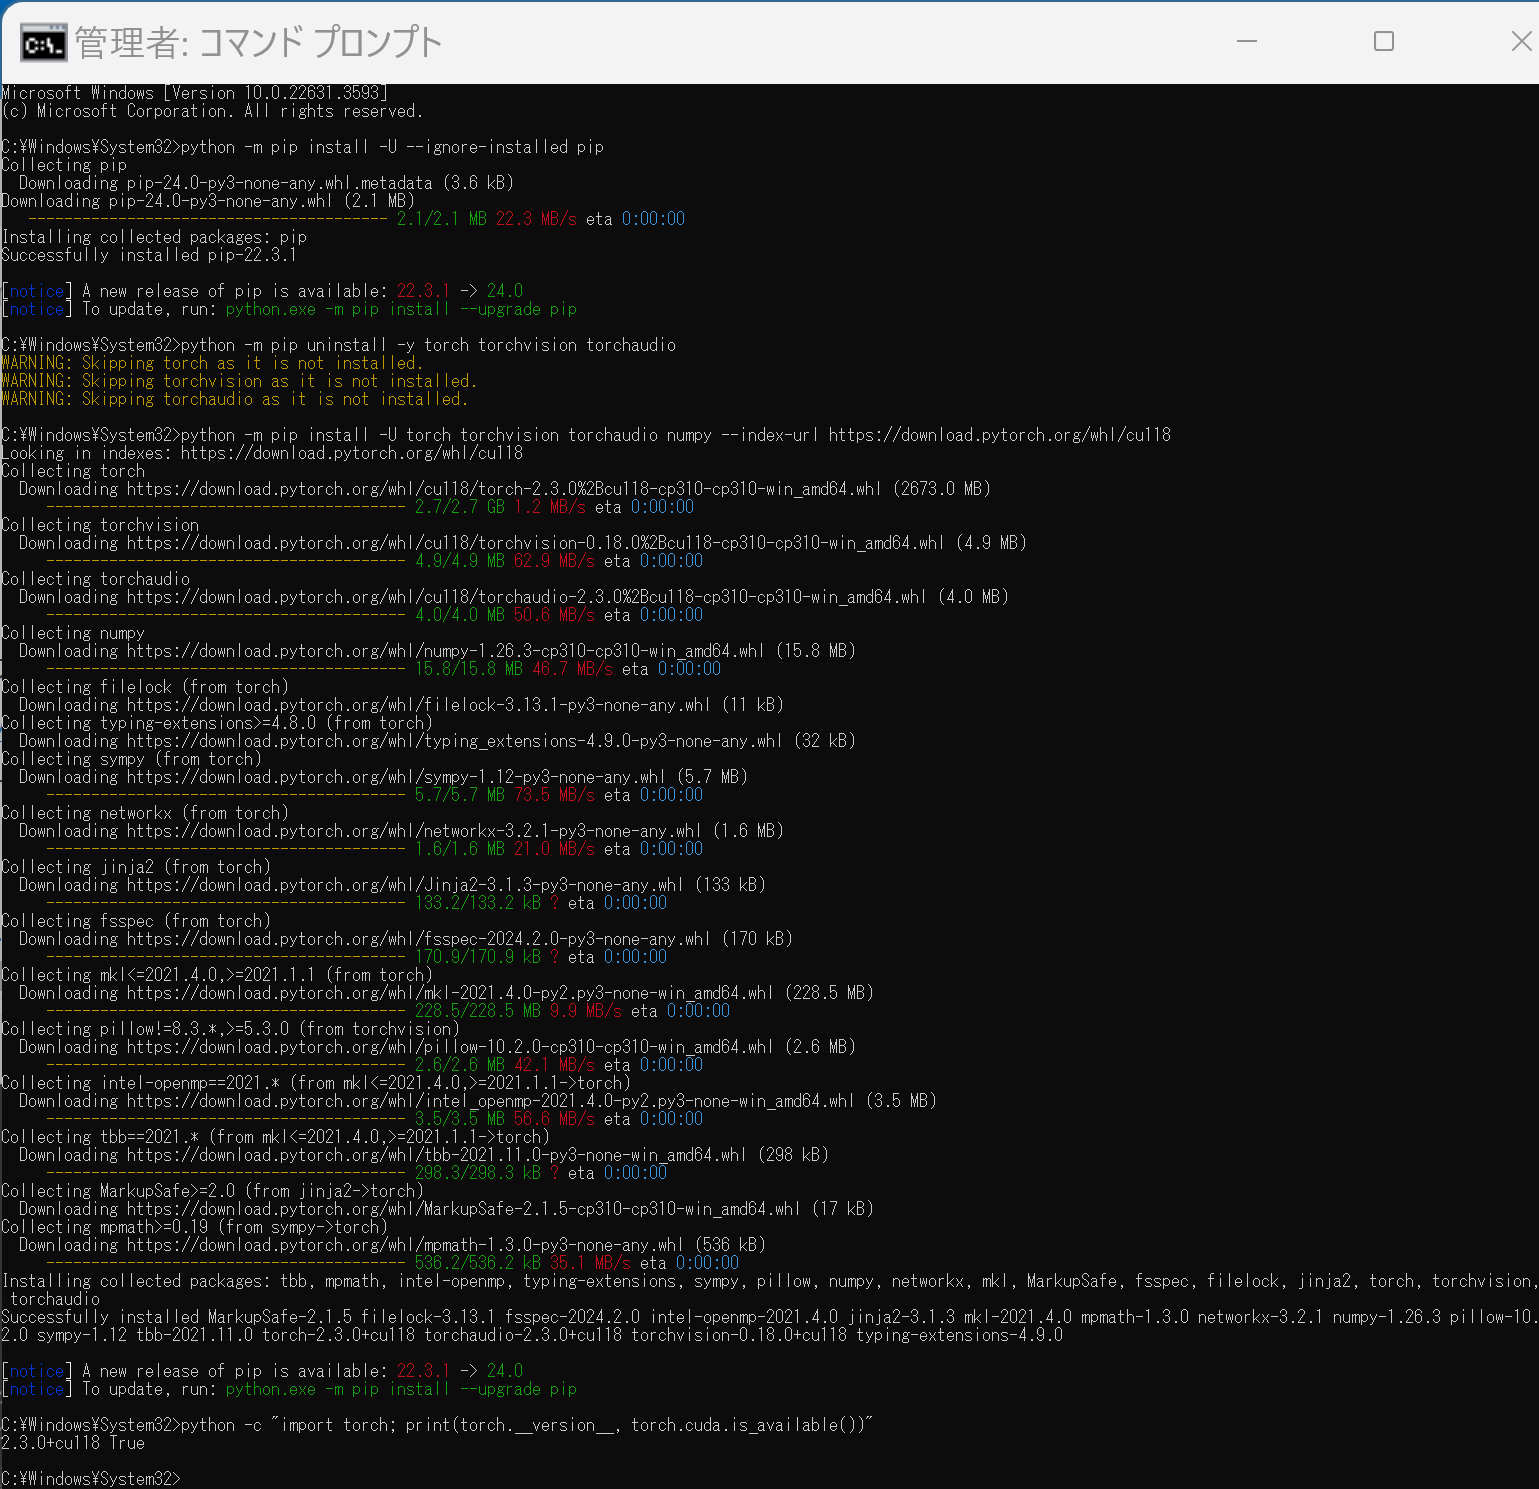 Anaconda3を使いたい場合には, Anaconda プロンプト (Anaconda Prompt) を管理者として実行し, 次のコマンドを実行する. (PyTorch と NVIDIA CUDA との連携がうまくいかない可能性があるため,Anaconda3を使わないことも検討して欲しい).
conda install -y pytorch torchvision torchaudio pytorch-cuda=11.8 cudnn -c pytorch -c nvidia py -c "import torch; print(torch.__version__, torch.cuda.is_available())"【サイト内の関連ページ】
【関連する外部ページ】
FlexGen のインストール
公式ページ https://github.com/FMInference/FlexGen の記載に従う.
- 以下の手順を管理者権限のコマンドプロンプトで実行する
(手順:Windowsキーまたはスタートメニュー →
cmdと入力 → 右クリック → 「管理者として実行」)。 - ダウンロードとインストール
cd /d c:%HOMEPATH% rmdir /s /q FlexGen git clone https://github.com/FMInference/FlexGen.git cd FlexGen pip3 install -e . - 動作確認のため,OPT-1.3Bで実行してみる.
OPT (Open Pre-Trained Transformer) は,事前学習済みの大規模言語モデル (large language model) である.GitHub のページでは,OPT-125M, OPT-350M, OPT-1.3B, OPT-2.7B, OPT-6.7B, OPT-13B, OPT-30B, OPT-66B, OPT-175B が公開されている.
実行の結果,エラーメッセージが出ないことを確認
python -m flexgen.flex_opt --model facebook/opt-1.3b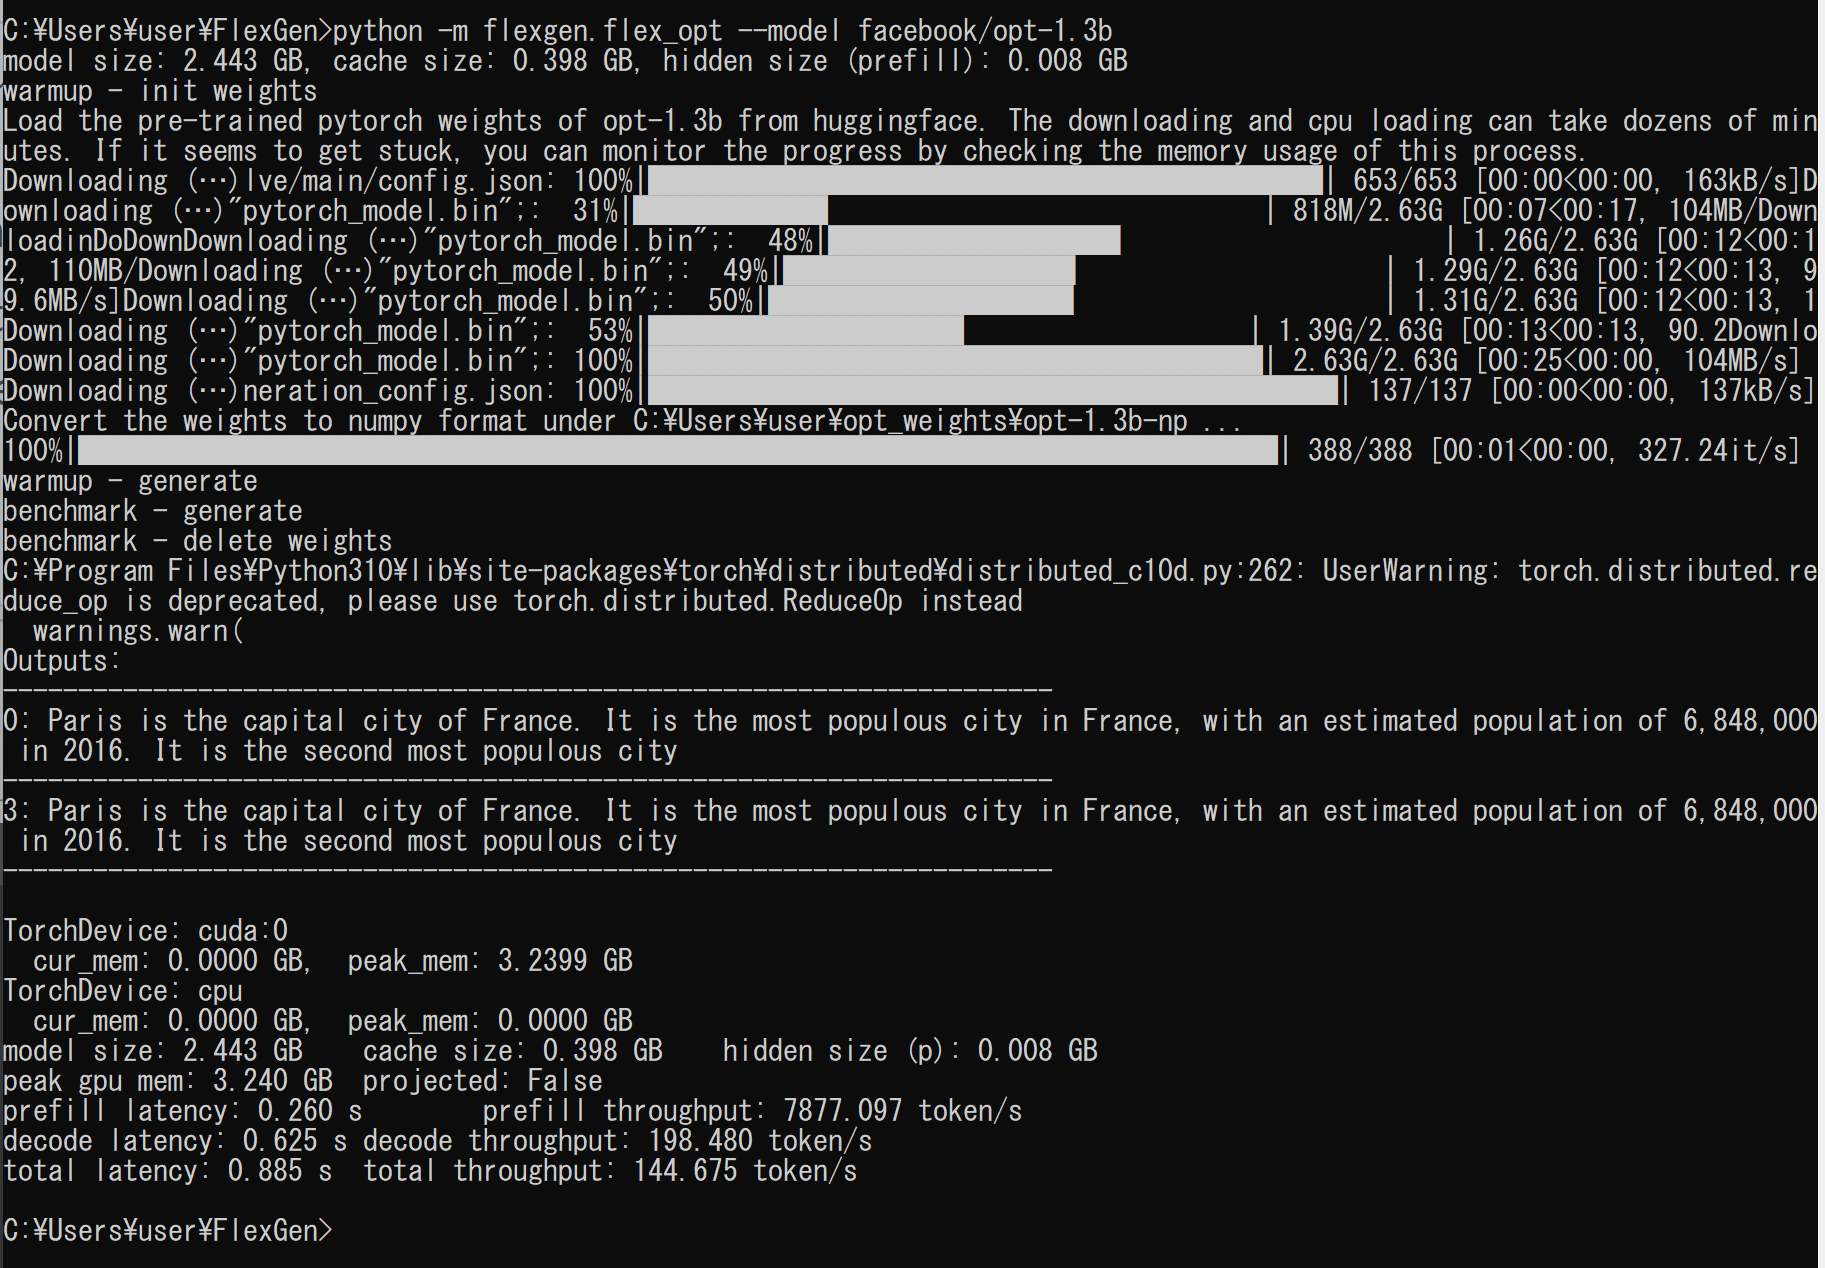
チャットボットを動かす(FlexGen,OPT を使用)(Windows 上)
次のコマンドを実行する.プログラム中にプロンプトが記載されている. プログラムの実行により,プロンプトと,回答が表示される.
英語,中国語に対応しているようである.
OPT (Open Pre-Trained Transformer) は,事前学習済みの大規模言語モデル (large language model) である.GitHub のページでは,OPT-125M, OPT-350M, OPT-1.3B, OPT-2.7B, OPT-6.7B, OPT-13B, OPT-30B, OPT-66B, OPT-175B が公開されている.- OPT-125M を使う場合
cd /d c:%HOMEPATH% cd FlexGen cd flexgen cd apps python completion.py --model facebook/opt-125m - OPT-6.7B を使う場合
OPT-125M より大きなメモリが必要.メモリが足りない場合には動かない
cd /d c:%HOMEPATH%
cd FlexGen
cd flexgen
cd apps
python completion.py --model facebook/opt-6.7b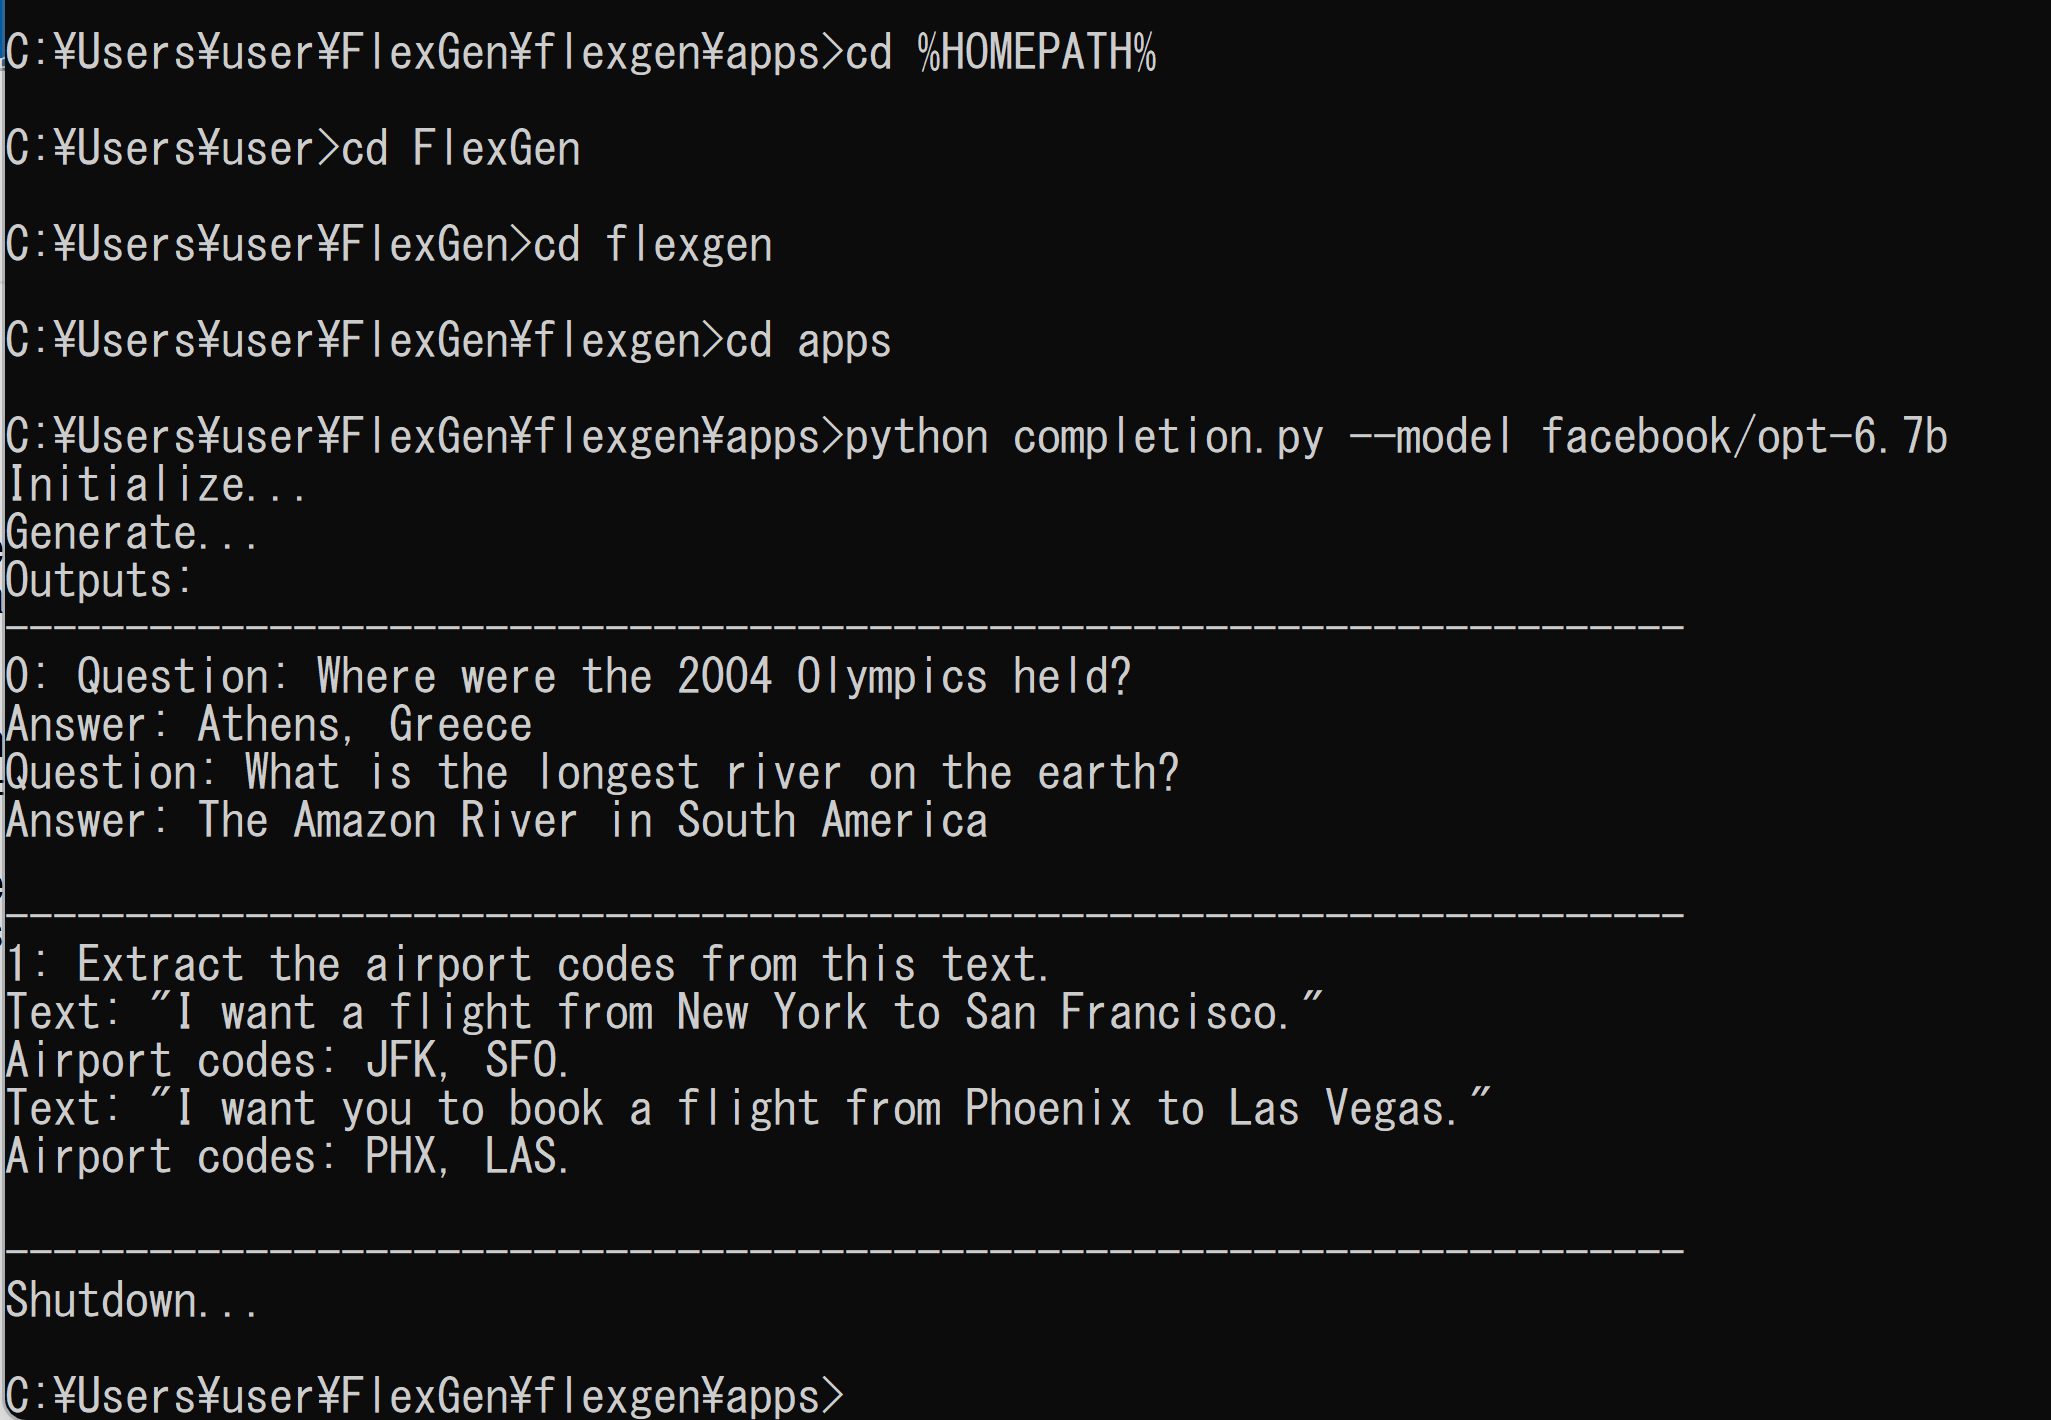
日本語で使いたい場合のために,Meta の言語モデルと日本語で対話できる chatBOT プログラム(chatBOT)(FlexGen, DeepL, Python を使用)(Windows 上)を,別ページ »で説明
チャットボットに対話,音声合成を行う Python プログラム(FlexGen,OPT を使用)(Windows 上)
- Windows で,コマンドプロンプトを実行
- エディタを起動
cd /d c:%HOMEPATH% notepad qa.py - エディタで,次のプログラムを保存
"""Run a chatBOT with FlexGen and OPT models.""" import argparse import sys import win32com.client import flexgen from flexgen.flex_opt import (Policy, OptLM, ExecutionEnv, CompressionConfig, str2bool) from transformers import AutoTokenizer speech = win32com.client.Dispatch("Sapi.SpVoice") def main(args): # Initialize environment env = ExecutionEnv.create(args.offload_dir) # Offloading policy policy = Policy(1, 1, args.percent[0], args.percent[1], args.percent[2], args.percent[3], args.percent[4], args.percent[5], overlap=True, sep_layer=True, pin_weight=args.pin_weight, cpu_cache_compute=False, attn_sparsity=1.0, compress_weight=args.compress_weight, comp_weight_config=CompressionConfig( num_bits=4, group_size=64, group_dim=0, symmetric=False), compress_cache=args.compress_cache, comp_cache_config=CompressionConfig( num_bits=4, group_size=64, group_dim=2, symmetric=False)) # Model print("Initialize...") tokenizer = AutoTokenizer.from_pretrained("facebook/opt-30b", padding_side="left") tokenizer.add_bos_token = False stop = tokenizer("\n").input_ids[0] model = OptLM(args.model, env, args.path, policy) context = ( "A chat between a curious human and a knowledgeable artificial intelligence assistant.\n" "Human: Hello! What can you do?\n" "Assistant: As an AI assistant, I can answer questions and chat with you.\n" ) # Chat print(context, end="") while True: inp = input("Human: ") if not inp: print("exit...") break speech.Speak(inp) context += "Human: " + inp + "\n" inputs = tokenizer([context]) output_ids = model.generate( inputs.input_ids, do_sample=True, temperature=0.7, max_new_tokens=96, stop=stop) outputs = tokenizer.batch_decode(output_ids, skip_special_tokens=True)[0] try: index = outputs.index("\n", len(context)) except ValueError: outputs += "\n" index = outputs.index("\n", len(context)) outputs = outputs[:index + 1] print(outputs[len(context):], end="") speech.Speak(outputs[len(context):]) context = outputs # TODO: optimize the performance by reusing context cache and reducing redundant computation. # Shutdown env.close_copy_threads() if __name__ == "__main__": parser = argparse.ArgumentParser() parser.add_argument("--model", type=str, default="facebook/opt-6.7b", help="The model name.") parser.add_argument("--path", type=str, default="~/opt_weights", help="The path to the model weights. If there are no cached weights, " "FlexGen will automatically download them from HuggingFace.") parser.add_argument("--offload-dir", type=str, default="~/flexgen_offload_dir", help="The directory to offload tensors. ") parser.add_argument("--percent", nargs="+", type=int, default=[100, 0, 100, 0, 100, 0], help="Six numbers. They are " "the percentage of weight on GPU, " "the percentage of weight on CPU, " "the percentage of attention cache on GPU, " "the percentage of attention cache on CPU, " "the percentage of activations on GPU, " "the percentage of activations on CPU") parser.add_argument("--pin-weight", type=str2bool, nargs="?", const=True, default=True) parser.add_argument("--compress-weight", action="store_true", help="Whether to compress weight.") parser.add_argument("--compress-cache", action="store_true", help="Whether to compress cache.") args = parser.parse_args() assert len(args.percent) == 6 main(args) - プログラム実行
プログラムを qa.pyのようなファイル名で保存したので, 「python c.py --model facebook/opt-125m」のようなコマンドで行う.「opt-125m」のところは,使用するOPT言語モデル名を指定.
cd /d c:%HOMEPATH%
python qa.py --model facebook/opt-125m
- 以下の手順を管理者権限のコマンドプロンプトで実行する
(手順:Windowsキーまたはスタートメニュー →