![[kaneko lab.]](https://www.kkaneko.jp/info/logo_png.png)
VGGT による多視点画像からの3次元再構成デモ
【概要】
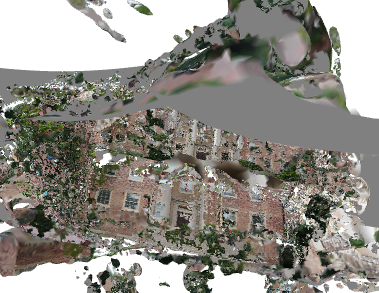
VGGTは、同じ対象を別々の位置から撮影した複数枚の画像(多視点画像)から、カメラの位置・向き、深度マップ(各画素までの距離を表す画像)、3次元の点群をまとめて推定する学習済みモデルである。このページでは、Windows上でVGGTを動かす手順と、推定結果をCOLMAP形式(3次元再構成ソフトの標準的なデータ形式)やメッシュとして保存するプログラムを示す。
【目次】
- 1. VGGT による多視点画像からの3次元再構成
- 2. Python開発環境、ライブラリ類
- 3. Python 3.12 のインストール
- 4. Python の開発環境 Visual Studio Code のインストールと Python 用の設定
- 5. VGGT による多視点画像からの3次元再構成デモプログラム
【関連する外部ページ】
- VGGT公式リポジトリ: https://github.com/facebookresearch/vggt
- Hugging Face公式モデル: https://huggingface.co/facebook/VGGT-1B
- Open3D公式ページ: https://www.open3d.org/
【サイト内の関連情報】
1. VGGT による多視点画像からの3次元再構成
概要
VGGT(Visual Geometry Grounded Transformer)は、1枚から数百枚までの画像を入力として、カメラの外部パラメータ(位置と向き)と内部パラメータ(焦点距離など)、深度マップ、点群、3次元の点追跡結果を、1回の順方向の計算でまとめて推定するモデルである。従来のStructure from Motion(SfM:多数の画像から形状とカメラ位置を復元する古典的手法)のように繰り返し最適化を行わないため、処理が速い。
主な特徴
- 学習済みモデル(facebook/VGGT-1B)をHugging Faceから自動で取得できる
- カメラパラメータ、深度マップ、点群、点追跡を1つのモデルで出力する
- 推定した点群からメッシュを作り、COLMAP形式で保存してGaussian Splatting(点の集まりで見た目を再現する描画手法)の入力に利用できる
参考文献
- 公式論文: Wang, J., et al. "VGGT: Visual Geometry Grounded Transformer" (CVPR 2025) - arXiv:2503.11651
- 公式リポジトリ: https://github.com/facebookresearch/vggt
- Hugging Face公式モデル: https://huggingface.co/facebook/VGGT-1B
2. Python開発環境、ライブラリ類
ここでは、最低限の事前準備について説明する。機械学習や深層学習を行う場合は、NVIDIA CUDA、Visual Studio、Cursorなどを追加でインストールすると便利である。これらについては別ページ https://www.kkaneko.jp/cc/dev/aiassist.html で解説している。
3. Python 3.12 のインストール
Pythonのインストールを行い、Pythonのプログラムを実行する環境を整える。扱う環境は、Windows搭載パソコンである。金子研究室では、Python 3.12.10を推奨する。
[Windows での Python 3.12 のインストール手順を見るには、ここをクリック]
Windows での Python 3.12 のインストール
以下のいずれかの方法でPython 3.12をインストールする。Pythonがインストール済みの場合、この手順は不要である。
方法 1:winget によるインストール
【インストールコマンドの実行方法】
管理者権限でコマンドプロンプトを起動する(手順:Windowsキーまたはスタートメニュー → cmd と入力 → 右クリック → 「管理者として実行」)。そして、コマンド全体をコマンドプロンプトにコピー&ペーストする。
--scope machine を指定することで、システム全体(全ユーザー向け)にインストールされる。このオプションの実行には管理者権限が必要である。インストール完了後、コマンドプロンプトを再起動するとPATHが反映される。
REM Python 3.12 をシステム領域にインストール
winget install --id Python.Python.3.12 -e --scope machine --silent --accept-source-agreements --accept-package-agreements --override "/quiet InstallAllUsers=1 PrependPath=1 Include_test=0 Include_pip=1 Include_launcher=1 InstallLauncherAllUsers=1 TargetDir=\"C:\Program Files\Python312\""
if not "%ERRORLEVEL%"=="0" ( color 0c & echo Python 3.12 のインストールに失敗しました & ping 127.0.0.1 -n 6 >nul & color )

REM Python と Scripts を PATH 先頭に追加
powershell -NoProfile -Command "$p='C:\Program Files\Python312'; $s=\"$p\Scripts\"; if(Test-Path $p){$k=[Microsoft.Win32.Registry]::LocalMachine.OpenSubKey('SYSTEM\CurrentControlSet\Control\Session Manager\Environment',$true); $c=$k.GetValue('Path','',[Microsoft.Win32.RegistryValueOptions]::DoNotExpandEnvironmentNames); $t=$k.GetValueKind('Path'); $new=$c; if((';'+$new+';') -notlike \"*;$p;*\"){$new=$p+';'+$new}; if((';'+$new+';') -notlike \"*;$s;*\"){$new=$s+';'+$new}; if($new -ne $c){$k.SetValue('Path',$new,$t)}; $k.Close()}"

REM 現在のセッションにも反映(システムPATHを再取得して連結)
for /f "usebackq tokens=2,*" %A in (`reg query "HKLM\SYSTEM\CurrentControlSet\Control\Session Manager\Environment" /v Path`) do set "PATH=%B"

REM pip / wheel の更新
python -m pip install --no-user -U pip wheel
if not "%ERRORLEVEL%"=="0" ( color 0c & echo pip / wheel の更新に失敗しました & ping 127.0.0.1 -n 6 >nul & color )
方法 2:インストーラーによるインストール
- Python公式サイト(https://www.python.org/downloads/)にアクセスし、「Download Python 3.x.x」ボタンからWindows用インストーラーをダウンロードする。
- ダウンロードしたインストーラーを実行する。
- 初期画面の下部に表示される「Add python.exe to PATH」にチェックを入れてから「Customize installation」を選択する。このチェックを入れ忘れると、コマンドプロンプトから
pythonコマンドを実行できない。 - 「Install Python 3.xx for all users」にチェックを入れ、「Install」をクリックする。
インストールの確認
コマンドプロンプトで以下を実行する。
python --versionバージョン番号(例:Python 3.12.x)が表示されればインストール成功である。「'python' は、内部コマンドまたは外部コマンドとして認識されていません。」と表示される場合は、インストールが正常に完了していない。
4. Python の開発環境 Visual Studio Code のインストールと Python 用の設定
Python の開発環境Visual Studio Code(プログラムを編集するソフトウェア。以下、VS Code)を整える。
[Windows での Visual Studio Code のインストールと Python 用の設定手順を見るには、ここをクリック]
Windows での Visual Studio Code のインストールと Python 用の設定手順
1. VS Code と拡張機能のインストール
以下のコマンドにより,既存の VS Code を削除し,全ユーザー共有の設定で再インストールしたうえで,拡張機能(VS Code に機能を追加するソフトウェア)をまとめて導入する.
【インストールコマンドの実行方法】
管理者権限でコマンドプロンプトを起動する(手順:Windows キーまたはスタートメニュー → cmd と入力 → 右クリック → 「管理者として実行」)。そして,コマンド全体をコマンドプロンプトにコピー&ペーストする。
インストールコマンド
REM ============================================================
REM Microsoft Visual Studio Code
REM ============================================================
REM Build Tools + Desktop development with C++(VCTools)+ 追加コンポーネント(一括)
REM 未インストール時: winget で新規インストール
REM インストール済み時: setup.exe modify でコンポーネント追加(バージョンは変更しない)
winget list --id Microsoft.VisualStudio.BuildTools 2>nul | findstr /i "BuildTools" >nul 2>&1
if %ERRORLEVEL% EQU 0 (
    for /f "usebackq delims=" %P in (`"C:\Program Files (x86)\Microsoft Visual Studio\Installer\vswhere.exe" -products Microsoft.VisualStudio.Product.BuildTools -property installationPath`) do start /wait "" "C:\Program Files (x86)\Microsoft Visual Studio\Installer\setup.exe" modify --installPath "%P" --add Microsoft.VisualStudio.Workload.VCTools --add Microsoft.VisualStudio.Workload.MSBuildTools --add Microsoft.VisualStudio.Component.VC.CMake.Project --add Microsoft.VisualStudio.Component.VC.Llvm.Clang --add Microsoft.VisualStudio.Component.VC.Llvm.ClangToolset --add Microsoft.VisualStudio.Component.Windows11SDK.26100 --add Microsoft.VisualStudio.Component.VC.v143.x86.x64 --includeRecommended --quiet --norestart --nocache
    if not "%ERRORLEVEL%"=="0" ( color 0c & echo Build Tools のコンポーネント追加に失敗しました & ping 127.0.0.1 -n 6 >nul & color )
) else (
    winget install --scope machine --id Microsoft.VisualStudio.BuildTools -e --silent --disable-interactivity --force --accept-source-agreements --accept-package-agreements --override "--quiet --wait --norestart --nocache --add Microsoft.VisualStudio.Workload.VCTools --includeRecommended --add Microsoft.VisualStudio.Workload.MSBuildTools --add Microsoft.VisualStudio.Component.VC.CMake.Project --add Microsoft.VisualStudio.Component.VC.Llvm.Clang --add Microsoft.VisualStudio.Component.VC.Llvm.ClangToolset --add Microsoft.VisualStudio.Component.Windows11SDK.26100 --add Microsoft.VisualStudio.Component.VC.v143.x86.x64"
    if not "%ERRORLEVEL%"=="0" ( color 0c & echo Build Tools のインストールに失敗しました & ping 127.0.0.1 -n 6 >nul & color )
)

REM 全ユーザー共有の拡張機能フォルダ
if not exist "C:\ProgramData\vscode-extensions" mkdir "C:\ProgramData\vscode-extensions"
icacls "C:\ProgramData\vscode-extensions" /grant "Everyone:(OI)(CI)M" /T

REM スタートメニューのショートカットを --extensions-dir 付きで再作成
if exist "C:\ProgramData\Microsoft\Windows\Start Menu\Programs\Visual Studio Code" rmdir /s /q "C:\ProgramData\Microsoft\Windows\Start Menu\Programs\Visual Studio Code"
if exist "C:\ProgramData\Microsoft\Windows\Start Menu\Programs\Visual Studio Code.lnk" del "C:\ProgramData\Microsoft\Windows\Start Menu\Programs\Visual Studio Code.lnk"
powershell -NoProfile -Command "$s=New-Object -ComObject WScript.Shell; $lnk=$s.CreateShortcut('C:\ProgramData\Microsoft\Windows\Start Menu\Programs\Visual Studio Code.lnk'); $lnk.TargetPath='C:\Program Files\Microsoft VS Code\Code.exe'; $lnk.Arguments='--extensions-dir \"C:\ProgramData\vscode-extensions\"'; $lnk.Save()"
REM ショートカットの検証
powershell -NoProfile -Command "$s=New-Object -ComObject WScript.Shell; $lnk=$s.CreateShortcut('C:\ProgramData\Microsoft\Windows\Start Menu\Programs\Visual Studio Code.lnk'); Write-Host 'TargetPath:' $lnk.TargetPath; Write-Host 'Arguments:' $lnk.Arguments"

REM ファイル / フォルダ右クリックの「Code で開く」を登録
reg add "HKLM\SOFTWARE\Classes\*\shell\VSCode\command" /ve /d "\"C:\Program Files\Microsoft VS Code\Code.exe\" --extensions-dir \"C:\ProgramData\vscode-extensions\" \"%1\"" /f
reg add "HKLM\SOFTWARE\Classes\Directory\shell\VSCode\command" /ve /d "\"C:\Program Files\Microsoft VS Code\Code.exe\" --extensions-dir \"C:\ProgramData\vscode-extensions\" \"%1\"" /f
reg add "HKLM\SOFTWARE\Classes\Directory\Background\shell\VSCode\command" /ve /d "\"C:\Program Files\Microsoft VS Code\Code.exe\" --extensions-dir \"C:\ProgramData\vscode-extensions\" \"%V\"" /f

REM --extensions-dir 付きで起動する code.cmd ラッパを作成
REM (%* を echo で書くと対話的 cmd で失われるため、PowerShell で [char]37+'*' を書き出す)
powershell -NoProfile -Command "$pct=[char]37; $q=[char]34; $c='@echo off'+[char]13+[char]10+$q+'C:\Program Files\Microsoft VS Code\bin\code.cmd'+$q+' --extensions-dir '+$q+'C:\ProgramData\vscode-extensions'+$q+' '+$pct+'*'+[char]13+[char]10; [IO.File]::WriteAllText('C:\ProgramData\vscode-extensions\vscode.cmd',$c,[Text.Encoding]::ASCII)"

REM 拡張機能のインストール
set "CODE=C:\Program Files\Microsoft VS Code\bin\code.cmd"
"%CODE%" --extensions-dir "C:\ProgramData\vscode-extensions" --uninstall-extension GitHub.copilot
"%CODE%" --extensions-dir "C:\ProgramData\vscode-extensions" --uninstall-extension GitHub.copilot-chat
"%CODE%" --extensions-dir "C:\ProgramData\vscode-extensions" --install-extension ms-python.python
"%CODE%" --extensions-dir "C:\ProgramData\vscode-extensions" --install-extension ms-python.vscode-pylance
"%CODE%" --extensions-dir "C:\ProgramData\vscode-extensions" --install-extension ms-python.debugpy
"%CODE%" --extensions-dir "C:\ProgramData\vscode-extensions" --install-extension MS-CEINTL.vscode-language-pack-ja
"%CODE%" --extensions-dir "C:\ProgramData\vscode-extensions" --install-extension saoudrizwan.claude-dev
"%CODE%" --extensions-dir "C:\ProgramData\vscode-extensions" --install-extension rust-lang.rust-analyzer
"%CODE%" --extensions-dir "C:\ProgramData\vscode-extensions" --install-extension tamasfe.even-better-toml
"%CODE%" --extensions-dir "C:\ProgramData\vscode-extensions" --install-extension anthropic.claude-code
"%CODE%" --extensions-dir "C:\ProgramData\vscode-extensions" --install-extension almenon.arepl
"%CODE%" --extensions-dir "C:\ProgramData\vscode-extensions" --list-extensions --show-versions

REM settings.json を作成(自動更新オフ、Python、Claude Code 設定)
if not exist "%APPDATA%\Code\User" mkdir "%APPDATA%\Code\User"
python -c "import json,os;data={'update.mode':'none','update.enableWindowsBackgroundUpdates':False,'extensions.autoUpdate':False,'python.defaultInterpreterPath':r'C:\Program Files\Python312\python.exe','claudeCode.environmentVariables':[{'name':'ANTHROPIC_API_KEY','value':'not-needed'},{'name':'ANTHROPIC_AUTH_TOKEN','value':'ollama'},{'name':'ANTHROPIC_BASE_URL','value':'http://localhost:11434'},{'name':'ANTHROPIC_MODEL','value':'glm-4.7-flash'},{'name':'CLAUDE_CODE_DISABLE_NONESSENTIAL_TRAFFIC','value':'1'}]};p=os.path.join(os.environ['APPDATA'],'Code','User','settings.json');open(p,'w',encoding='utf-8').write(json.dumps(data,indent=4));print('Done:',p)"

REM 自動更新の抑止ポリシー(settings.json に加えて、レジストリ側でも明示的にオフ)
reg add "HKLM\SOFTWARE\Policies\Microsoft\VSCode" /v "UpdateMode" /t REG_SZ /d "none" /f
echo === セットアップ完了 ===
2. Python インタプリタの選択
同一マシンに複数の Python がインストールされている場合,VS Code で使用する Python 本体(インタプリタ:Python プログラムを解釈・実行するソフトウェア)を選択する必要がある.
- コマンドパレット(コマンド名で機能を呼び出す VS Code の入力欄)を開く(
Ctrl+Shift+P) Python: Select Interpreterと入力する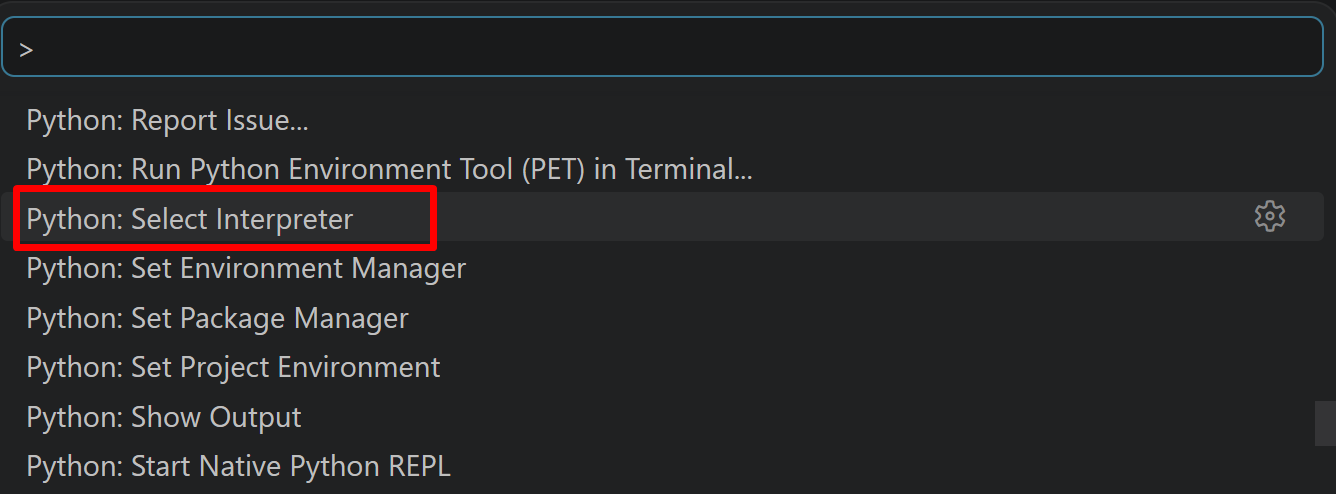
- 表示される一覧から,使用する Python(例:
C:\Program Files\Python312\python.exe)を選択する.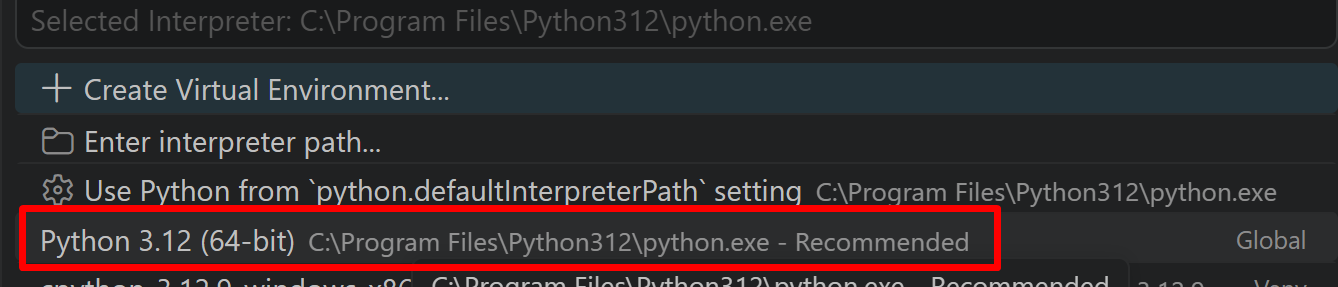
Build Tools for Visual Studio 2026(ビルドツール)のインストール
gsplat など、インストール時にC++のコンパイル(ソースコードを実行可能な形に変換する処理)が必要なパッケージのために導入する。
Build Tools for Visual Studio 2026(ビルドツール)のインストールを行い、C/C++ コードのビルド環境を整える。
Build Tools for Visual Studio は,Visual Studio の IDE を含まない C/C++ コンパイラ,ライブラリ,ビルドツール等のコマンドライン向け開発ツールセットである。インストール済みの場合,この手順は不要である。 以下のコマンドは、Build Tools が未インストールの場合は winget で新規インストールし、インストール済みの場合は 【インストールコマンドの実行方法】 管理者権限でコマンドプロンプトを起動する(手順:Windows キーまたはスタートメニュー → 上記のコマンドでは、Build Tools 本体と Visual C++ 再頒布可能パッケージをインストールし、続いて以下のコンポーネントを追加している。 追加のコンポーネントが必要になった場合は Visual Studio Installer で個別にインストールできる。 インストール完了の確認 Visual Studio を必要とするとき Visual Studio の機能を必要とする場合は,追加インストールできる。[Build Tools for Visual Studio 2026(ビルドツール)のインストール手順を見るには、ここをクリック]
Windows での Build Tools for Visual Studio 2026 のインストール
setup.exe modify でコンポーネントを追加する(バージョンは変更しない)。cmd と入力 → 右クリック → 「管理者として実行」)。そして、コマンド全体をコマンドプロンプトにコピー&ペーストする。REM ============================================================
REM Visual C++ 再頒布可能パッケージ (VCRedist 2015-)
REM ============================================================
winget install --scope machine --id Microsoft.VCRedist.2015+.x64 -e --silent --disable-interactivity --force --accept-source-agreements --accept-package-agreements --override "/quiet /norestart"
if not "%ERRORLEVEL%"=="0" ( color 0c & echo VCRedist のインストールに失敗しました & ping 127.0.0.1 -n 6 >nul & color )
REM ============================================================
REM Visual Studio Build Tools + Desktop development with C++
REM (VCTools、MSBuildTools、CMake連携、Clang、Windows 11 SDK)
REM ============================================================
REM 進行中のインストーラーを停止(ロック競合回避。対象プロセスが存在しない場合は
REM taskkillがエラーを返すが、これは想定内であるため出力のみ抑制する)
taskkill /F /IM vs_setup.exe /T >nul 2>&1
taskkill /F /IM vs_installer.exe /T >nul 2>&1
taskkill /F /IM vs_installerservice.exe /T >nul 2>&1
taskkill /F /IM msiexec.exe /T >nul 2>&1
REM Build Tools + Desktop development with C++(VCTools)+ 追加コンポーネント(一括)
REM 未インストール時: winget で新規インストール
REM インストール済み時: setup.exe modify でコンポーネント追加(バージョンは変更しない)
winget list --id Microsoft.VisualStudio.BuildTools 2>nul | findstr /i "BuildTools" >nul 2>&1
if %ERRORLEVEL% EQU 0 (
for /f "usebackq delims=" %P in (`"C:\Program Files (x86)\Microsoft Visual Studio\Installer\vswhere.exe" -products Microsoft.VisualStudio.Product.BuildTools -property installationPath`) do start /wait "" "C:\Program Files (x86)\Microsoft Visual Studio\Installer\setup.exe" modify --installPath "%P" --add Microsoft.VisualStudio.Workload.VCTools --add Microsoft.VisualStudio.Workload.MSBuildTools --add Microsoft.VisualStudio.Component.VC.CMake.Project --add Microsoft.VisualStudio.Component.VC.Llvm.Clang --add Microsoft.VisualStudio.Component.VC.Llvm.ClangToolset --add Microsoft.VisualStudio.Component.Windows11SDK.26100 --add Microsoft.VisualStudio.Component.VC.v143.x86.x64 --includeRecommended --quiet --norestart --nocache
if not "%ERRORLEVEL%"=="0" ( color 0c & echo Build Tools のコンポーネント追加に失敗しました & ping 127.0.0.1 -n 6 >nul & color )
) else (
winget install --scope machine --id Microsoft.VisualStudio.BuildTools -e --silent --disable-interactivity --force --accept-source-agreements --accept-package-agreements --override "--quiet --wait --norestart --nocache --add Microsoft.VisualStudio.Workload.VCTools --includeRecommended --add Microsoft.VisualStudio.Workload.MSBuildTools --add Microsoft.VisualStudio.Component.VC.CMake.Project --add Microsoft.VisualStudio.Component.VC.Llvm.Clang --add Microsoft.VisualStudio.Component.VC.Llvm.ClangToolset --add Microsoft.VisualStudio.Component.Windows11SDK.26100 --add Microsoft.VisualStudio.Component.VC.v143.x86.x64"
if not "%ERRORLEVEL%"=="0" ( color 0c & echo Build Tools のインストールに失敗しました & ping 127.0.0.1 -n 6 >nul & color )
)
REM
REM BuildTools のインストールパスを vswhere.exe で取得(メジャーバージョンに依存しない)
set "VSWHERE=C:\Program Files (x86)\Microsoft Visual Studio\Installer\vswhere.exe"
set "BT_PATH="
for /f "usebackq delims=" %P in (`"%VSWHERE%" -products Microsoft.VisualStudio.Product.BuildTools -property installationPath`) do set "BT_PATH=%P"
if not defined BT_PATH ( color 0c & echo Build Tools のインストールパスを取得できませんでした & ping 127.0.0.1 -n 6 >nul & color )
REM 破損時の修復(任意、動作がおかしくなった場合)
REM if defined BT_PATH "C:\Program Files (x86)\Microsoft Visual Studio\Installer\setup.exe" repair --installPath "%BT_PATH%" --quiet --norestart
REM 導入確認(インストールパスが表示されれば正常)
"%VSWHERE%" -products * -requires Microsoft.VisualStudio.Workload.VCTools -property installationPath
--includeRecommended により、MSVC コンパイラ、C++ AddressSanitizer、vcpkg、CMake ツール、Windows 11 SDK 等の推奨コンポーネントが含まれる)winget list Microsoft.VisualStudio.BuildTools
必要なライブラリをシステム領域にインストール
管理者権限でコマンドプロンプトを起動する
(手順:Windowsキーまたはスタートメニュー → cmd と入力 → 右クリック → 「管理者として実行」)。
次のコマンドを実行する。--no-user は、ユーザ領域ではなくシステム領域へインストールするための指定である。
REM PyTorch をインストール(GPU対応版)
set "CUDA_TAG=cu128"
set "PYTHON_PATH=C:\Program Files\Python312"
"%PYTHON_PATH%\Scripts\pip" install --no-user -U numpy torch torchvision torchaudio --index-url https://download.pytorch.org/whl/%CUDA_TAG%
"%PYTHON_PATH%\Scripts\pip" install --no-user -U numpy Pillow huggingface_hub
"%PYTHON_PATH%\Scripts\pip" install --no-user -U git+https://github.com/facebookresearch/vggt.git
"%PYTHON_PATH%\Scripts\pip" install --no-user -U open3d
"%PYTHON_PATH%\Scripts\pip" install --no-user -U gsplat
5. VGGT による多視点画像からの3次元再構成デモプログラム
実行手順
次のソースコードを保存して実行する。実行するとテスト画像のダウンロードの可否を聞かれる。y を入力するとCOLMAP South Buildingデータセット(建物を多方向から撮影した公開データ)を取得して使用し、n を入力すると自分で用意した画像フォルダを指定できる。
初回実行時は学習済みモデル(約1GB)のダウンロードが行われる。処理後に結果を保存すると、点群、COLMAP形式のデータ、テクスチャ付きメッシュ(textured_mesh.ply)が vggt_output フォルダに出力される。3Dプレビューのウィンドウはマウスで回転でき、閉じると処理が続く。
ソースコード
# VGGT による多視点画像からの3次元再構成デモ
#
# 【前準備・インストール】
# 以下のコマンドを実行してから本プログラムを実行する。
#
# 1. PyTorchのインストール(CUDA対応)
# pip install --no-user -U numpy torch torchvision torchaudio --index-url https://download.pytorch.org/whl/cu128
#
# 2. 基本ライブラリのインストール
# pip install --no-user -U numpy Pillow huggingface_hub
#
# 3. VGGTライブラリのインストール
# pip install --no-user -U git+https://github.com/facebookresearch/vggt.git
#
# 4. 3D処理ライブラリのインストール
# pip install --no-user -U open3d
#
# 5. Gaussian Splatting用ライブラリ
# pip install --no-user -U gsplat
#
# 【実行環境】
# - Python 3.12
# - CUDA 12.8 対応GPU(推奨、CPUでも動作可能)
#
# 【注意事項】
# - 初回実行時はVGGTモデル(約1GB)のダウンロードが発生する
# - CUDA Compute Capability 8.0以上のGPUでbfloat16精度が使用可能である

import torch
import numpy as np
from pathlib import Path
import urllib.request
import zipfile
import struct
import open3d as o3d

from vggt.models.vggt import VGGT
from vggt.utils.load_fn import load_and_preprocess_images
from vggt.utils.pose_enc import pose_encoding_to_extri_intri
from vggt.utils.geometry import unproject_depth_map_to_point_map

def download_test_images():
    """COLMAP South Building多視点データセットをダウンロード"""
    print("COLMAP South Building多視点データセットをダウンロード中...")

    # ETHのミラーサイトを使用
    url = "https://cvg-data.inf.ethz.ch/local-feature-evaluation-schoenberger2017/South-Building.zip"
    zip_path = "South-Building.zip"
    extract_dir = "south_building_extracted"

    print("South-Building.zipをダウンロード中...")
    urllib.request.urlretrieve(url, zip_path)
    print("ダウンロード完了")

    print("アーカイブを展開中...")
    with zipfile.ZipFile(zip_path, 'r') as zip_ref:
        zip_ref.extractall(extract_dir)

    # 画像ディレクトリを探索
    extract_path = Path(extract_dir)
    image_files = []

    # 一般的な画像フォルダ名を試行
    possible_dirs = [
        extract_path / "South-Building" / "images",
        extract_path / "images",
        extract_path / "South-Building",
        extract_path
    ]

    for img_dir in possible_dirs:
        if img_dir.exists():
            for ext in ['.jpg', '.JPG', '.jpeg', '.JPEG', '.png', '.PNG']:
                image_files.extend(list(img_dir.glob(f"*{ext}")))
            if image_files:
                break

    # ファイル名でソート(大文字小文字を区別しないファイルシステムでの重複を除去)
    image_files = sorted(set(image_files))
    total_images = len(image_files)
    print(f"総画像数: {total_images}枚")

    # 連続しないように12枚を選択(1, 11, 21, 31, ...)
    selected_files = []
    for i in range(12):
        index = i * 10  # 10枚おきに選択
        if index < total_images:
            selected_files.append(str(image_files[index]))

    print(f"選択された画像: {len(selected_files)}枚")
    for i, filepath in enumerate(selected_files):
        print(f"  {i+1}: {Path(filepath).name}")

    return selected_files

def save_colmap_format(extrinsic, intrinsic, point_map_3d_np, image_names, output_dir):
    """COLMAP形式で結果を保存(Gaussian Splatting用)"""
    sparse_dir = output_dir / "sparse"
    sparse_dir.mkdir(exist_ok=True)

    num_cameras = len(image_names)
    height, width = point_map_3d_np.shape[1], point_map_3d_np.shape[2]

    # cameras.bin
    with open(sparse_dir / "cameras.bin", "wb") as f:
        f.write(struct.pack("<Q", num_cameras))
        for i in range(num_cameras):
            K = intrinsic[0, i].cpu().numpy()
            fx, fy = K[0, 0], K[1, 1]
            cx, cy = K[0, 2], K[1, 2]
            f.write(struct.pack("<i", i + 1))
            f.write(struct.pack("<i", 1))
            f.write(struct.pack("<Q", width))
            f.write(struct.pack("<Q", height))
            f.write(struct.pack("<dddd", fx, fy, cx, cy))

    # images.bin
    with open(sparse_dir / "images.bin", "wb") as f:
        f.write(struct.pack("<Q", num_cameras))
        for i in range(num_cameras):
            R = extrinsic[0, i, :3, :3].cpu().numpy()
            t = extrinsic[0, i, :3, 3].cpu().numpy()
            qw, qx, qy, qz = rotation_matrix_to_quaternion(R)
            f.write(struct.pack("<I", i + 1))
            f.write(struct.pack("<dddd", qw, qx, qy, qz))
            f.write(struct.pack("<ddd", t[0], t[1], t[2]))
            f.write(struct.pack("<I", i + 1))
            name = Path(image_names[i]).name
            # COLMAPの画像名はヌル終端文字列で格納する
            f.write(name.encode('utf-8') + b"\x00")
            f.write(struct.pack("<Q", 0))

    # points3D.bin - 実際の3D点群データを保存
    points = point_map_3d_np.reshape(-1, 3)
    valid_mask = ~np.isnan(points).any(axis=1)
    valid_points = points[valid_mask]

    with open(sparse_dir / "points3D.bin", "wb") as f:
        f.write(struct.pack("<Q", len(valid_points)))
        for i, point in enumerate(valid_points):
            x, y, z = point
            f.write(struct.pack("<Q", i + 1))
            f.write(struct.pack("<ddd", x, y, z))
            f.write(struct.pack("<BBB", 128, 128, 128))
            f.write(struct.pack("<d", 1.0))
            f.write(struct.pack("<Q", 0))

    print(f"COLMAP形式で保存: {sparse_dir}")

def rotation_matrix_to_quaternion(R):
    """回転行列をクォータニオンに変換"""
    trace = np.trace(R)
    if trace > 0:
        s = np.sqrt(trace + 1.0) * 2
        qw = 0.25 * s
        qx = (R[2, 1] - R[1, 2]) / s
        qy = (R[0, 2] - R[2, 0]) / s
        qz = (R[1, 0] - R[0, 1]) / s
    else:
        if R[0, 0] > R[1, 1] and R[0, 0] > R[2, 2]:
            s = np.sqrt(1.0 + R[0, 0] - R[1, 1] - R[2, 2]) * 2
            qw = (R[2, 1] - R[1, 2]) / s
            qx = 0.25 * s
            qy = (R[0, 1] + R[1, 0]) / s
            qz = (R[0, 2] + R[2, 0]) / s
        elif R[1, 1] > R[2, 2]:
            s = np.sqrt(1.0 + R[1, 1] - R[0, 0] - R[2, 2]) * 2
            qw = (R[0, 2] - R[2, 0]) / s
            qx = (R[0, 1] + R[1, 0]) / s
            qy = 0.25 * s
            qz = (R[1, 2] + R[2, 1]) / s
        else:
            s = np.sqrt(1.0 + R[2, 2] - R[0, 0] - R[1, 1]) * 2
            qw = (R[1, 0] - R[0, 1]) / s
            qx = (R[0, 2] + R[2, 0]) / s
            qy = (R[1, 2] + R[2, 1]) / s
            qz = 0.25 * s
    return qw, qx, qy, qz

def run_gaussian_splatting(output_dir):
    """Gaussian Splattingの実行コマンドを表示"""
    print(f"実行コマンド: python -m gsplat.examples.simple_trainer --data_dir {output_dir.absolute()}")

def apply_texture_to_mesh(mesh, images_np, extrinsic, intrinsic):
    """複数視点からの色を重み付きで統合して頂点色を与える"""
    print("テクスチャマッピングを適用中...")

    vertices = np.asarray(mesh.vertices)
    vertex_normals = np.asarray(mesh.vertex_normals)
    vertex_colors = np.zeros((len(vertices), 3))

    num_views = images_np.shape[0]
    img_height, img_width = images_np.shape[2], images_np.shape[3]

    # 冗長計算を事前に実行
    R_matrices = []
    t_vectors = []
    K_matrices = []
    camera_positions = []

    for view_idx in range(num_views):
        R = extrinsic[0, view_idx, :3, :3].cpu().numpy()
        t = extrinsic[0, view_idx, :3, 3].cpu().numpy()
        K = intrinsic[0, view_idx].cpu().numpy()
        camera_pos = -R.T @ t

        R_matrices.append(R)
        t_vectors.append(t)
        K_matrices.append(K)
        camera_positions.append(camera_pos)

    for i, vertex in enumerate(vertices):
        best_color = np.array([0.5, 0.5, 0.5])
        max_weight = 0

        for view_idx in range(num_views):
            R = R_matrices[view_idx]
            t = t_vectors[view_idx]
            K = K_matrices[view_idx]
            camera_pos = camera_positions[view_idx]

            vertex_cam = R @ vertex + t

            if vertex_cam[2] <= 0:
                continue

            u = int((K[0, 0] * vertex_cam[0] / vertex_cam[2]) + K[0, 2])
            v = int((K[1, 1] * vertex_cam[1] / vertex_cam[2]) + K[1, 2])

            if 0 <= u < img_width and 0 <= v < img_height:
                view_dir = vertex - camera_pos
                view_dir = view_dir / np.linalg.norm(view_dir)

                normal = vertex_normals[i]
                angle_weight = max(0, np.dot(-view_dir, normal))
                distance_weight = 1.0 / (1.0 + np.linalg.norm(vertex_cam) * 0.1)
                weight = angle_weight * distance_weight

                if weight > max_weight:
                    max_weight = weight
                    r = images_np[view_idx, 0, v, u]
                    g = images_np[view_idx, 1, v, u]
                    b = images_np[view_idx, 2, v, u]
                    best_color = np.array([r, g, b])

        vertex_colors[i] = best_color

    mesh.vertex_colors = o3d.utility.Vector3dVector(vertex_colors)
    return mesh

def create_mesh_from_pointcloud(point_map_3d_np, output_dir, images, extrinsic, intrinsic):
    """点群からPoisson表面再構築でメッシュ生成"""
    print("Poisson表面再構築でメッシュを生成中...")

    points = point_map_3d_np.reshape(-1, 3)
    valid_points = points[~np.isnan(points).any(axis=1)]

    print(f"有効な点群数: {len(valid_points)}")

    pcd = o3d.geometry.PointCloud()
    pcd.points = o3d.utility.Vector3dVector(valid_points)
    pcd.estimate_normals()

    print("Poissonメッシュ生成中...")
    mesh, _ = o3d.geometry.TriangleMesh.create_from_point_cloud_poisson(pcd, depth=9)

    images_np = images.cpu().numpy()
    mesh = apply_texture_to_mesh(mesh, images_np, extrinsic, intrinsic)

    mesh_path = output_dir / "textured_mesh.ply"
    print(f"メッシュ保存中: {mesh_path}")
    o3d.io.write_triangle_mesh(str(mesh_path), mesh)
    print(f"テクスチャ付きメッシュ保存: {mesh_path}")

    print("3Dプレビューを表示中...")
    o3d.visualization.draw_geometries([mesh],
                                    window_name="textured mesh preview",
                                    width=1024, height=768)
    print("3Dプレビュー完了")

    return mesh_path

def main():
    print("VGGT による多視点画像からの3次元再構成デモ")
    print("=" * 40)
    print("操作方法:")
    print("  - テスト画像を使用するか、独自の画像フォルダを指定する")
    print("  - 結果の保存は任意である")
    print("注意事項:")
    print("  - CUDA対応GPUが推奨される")
    print("  - 初回実行時はモデルのダウンロードに時間がかかる")
    print("  - 2枚の画像でも深度推定が可能である")
    print()

    device = 'cuda' if torch.cuda.is_available() else 'cpu'
    print(f'使用デバイス: {device}')

    if torch.cuda.is_available() and torch.cuda.get_device_capability()[0] >= 8:
        dtype = torch.bfloat16
        print("精度: bfloat16")
    else:
        dtype = torch.float16
        print("精度: float16")

    use_test_images = input("テスト画像をダウンロードしますか? (y/n): ").strip().lower() == 'y'

    if use_test_images:
        image_names = download_test_images()
    else:
        image_folder = input("画像フォルダのパスを入力(空白でデフォルト'images'): ").strip()
        if not image_folder:
            image_folder = "images"

        image_path = Path(image_folder)
        image_extensions = ['.jpg', '.jpeg', '.png', '.bmp']
        image_files = []
        for ext in image_extensions:
            image_files.extend(list(image_path.glob(f"*{ext}")))
            image_files.extend(list(image_path.glob(f"*{ext.upper()}")))

        image_names = [str(f) for f in sorted(set(image_files))]

    print(f"処理対象: {len(image_names)}枚の画像")
    for name in image_names:
        print(f"  - {name}")

    print('モデルを読み込み中...')
    model = VGGT.from_pretrained("facebook/VGGT-1B").to(device)
    print('モデルの読み込み完了')

    print("画像の読み込みと前処理中...")
    images = load_and_preprocess_images(image_names).to(device)

    print("3D再構築実行中...")
    with torch.no_grad():
        with torch.amp.autocast(device, dtype=dtype):
            images_batch = images[None]

            aggregated_tokens_list, ps_idx = model.aggregator(images_batch)

            pose_enc = model.camera_head(aggregated_tokens_list)[-1]
            extrinsic, intrinsic = pose_encoding_to_extri_intri(pose_enc, images.shape[-2:])

            depth_map, _ = model.depth_head(aggregated_tokens_list, images_batch, ps_idx)

            point_map, _ = model.point_head(aggregated_tokens_list, images_batch, ps_idx)

            point_map_3d = unproject_depth_map_to_point_map(
                depth_map.squeeze(0),
                extrinsic.squeeze(0),
                intrinsic.squeeze(0)
            )

            query_points = torch.FloatTensor([[100.0, 200.0], [60.72, 259.94]]).to(device)
            track_list, _, _ = model.track_head(
                aggregated_tokens_list, images_batch, ps_idx, query_points=query_points[None]
            )

    print("\n再構築完了")
    print(f"カメラ外部パラメータ形状: {extrinsic.shape}")
    print(f"カメラ内部パラメータ形状: {intrinsic.shape}")
    print(f"深度マップ形状: {depth_map.shape}")
    print(f"ポイントマップ形状: {point_map.shape}")
    print(f"3D点群形状: {point_map_3d.shape}")
    print(f"追跡点数: {len(track_list)}個のトラック")

    save_results = input("結果をファイルに保存しますか? (y/n): ").strip().lower() == 'y'
    if save_results:
        output_dir = Path("vggt_output")
        output_dir.mkdir(exist_ok=True)

        print("結果保存中...")
        torch.save(extrinsic.cpu(), output_dir / "extrinsic.pt")
        torch.save(intrinsic.cpu(), output_dir / "intrinsic.pt")
        torch.save(depth_map.cpu(), output_dir / "depth_maps.pt")

        print("点群データをnumpy配列に変換中...")
        if isinstance(point_map_3d, torch.Tensor):
            point_map_3d_np = point_map_3d.cpu().numpy()
        else:
            point_map_3d_np = point_map_3d
        np.save(output_dir / "point_cloud_3d.npy", point_map_3d_np)

        print("COLMAP形式保存中...")
        save_colmap_format(extrinsic, intrinsic, point_map_3d_np, image_names, output_dir)

        print("メッシュ生成開始...")
        mesh_path = create_mesh_from_pointcloud(point_map_3d_np, output_dir, images, extrinsic, intrinsic)

        print("Gaussian Splattingの実行コマンド...")
        run_gaussian_splatting(output_dir)

        print(f"結果保存先: {output_dir}")
        print(f"生成テクスチャ付きメッシュ: {mesh_path}")
        print("3D再構築パイプライン完了")

    print("\nVGGTデモ実行完了")

if __name__ == "__main__":
    main()