Python,TensorFlow 2.20 のインストール(Windows 上)
【目次】
- 前準備
- TensorFlow 2.20(GPU 対応可能)のインストール(Windows 上)
- 行列の掛け算,主成分分析,特異値分解(TensorFlow 2 のプログラム例)(Windows 上)
- ImageNet で学習済みの ConvNeXtBase モデルを用いた画像分類(TensorFlow, Keras を使用)
【サイト内の関連ページ】
- Windows の種々のソフトウェアのインストール: 別ページ »にまとめ
- 人工知能の実行(Google Colaboratory を使用): 別ページ »にまとめ
- TensorFlow GPU 版 1.15 のインストール: 別ページ »で説明
このWebページに記載しているプログラムは https://github.com/tensorflow/tensorflow#download-and-setup をもとに作成
【関連する外部ページ】
- https://pypi.python.org/pypi/tensorflow-gpu (TensorFlow の最新バージョンの確認など)
- https://github.com/tensorflow/tensorflow#download-and-setup (TensorFlow の最新情報の確認など)
GPUとは
GPU(Graphics Processing Unit)は,高い並列計算能力を持つプロセッサです.3次元コンピュータグラフィックス,3次元ゲーム,動画編集,科学計算,ディープラーニングなど,並列処理が求められる幅広い分野で活用されています.
TensorFlowとNVIDIAソフトウェアの関連
TensorFlowは,Googleが開発した機械学習フレームワークであり,ディープラーニング開発で広く使われています.Python,C/C++から利用可能で,CPUだけでなく,NVIDIA GPUやGoogle TPU上で計算を高速化できます.TensorFlowでGPUの計算能力を活用するには,NVIDIAが提供するドライバ,CUDAツールキット,cuDNNライブラリが必要です.
TensorFlowの特徴として「データフローグラフ」があります.これは「データの流れ」を表現するもので,グラフの節点(ノード)は演算(オペレーション)を,エッジはデータ(テンソル)の流れを表します.TensorFlowを使用することで,音声,画像,テキスト,ビデオなど多様なデータを扱う機械学習アプリケーションの開発が容易になります.2015年11月の初版リリース以来,継続的にバージョンアップが行われています.
TensorFlow GPU版などのGPU対応フレームワークを利用するための主な動作要件:
- NVIDIA グラフィックス・ボード: CUDAに対応したNVIDIA製GPUが必要です.
WindowsでNVIDIA グラフィックス・ボードの種類を確認するには,次のコマンドをコマンドプロンプトで実行します.
wmic path win32_VideoController get name - NVIDIA ドライバ: GPUをOSに認識させ,性能を引き出すためのソフトウェアです.
- NVIDIA CUDA ツールキット: GPU上でプログラムを開発・実行するためのプラットフォームです.コンパイラ(nvcc),ライブラリ,APIなどが含まれます.
TensorFlowのバージョンによって要求されるCUDAバージョンは異なります.TensorFlow 2.20 は CUDA 12.x を使用します.
本記事の前準備でインストールする CUDA 12.8 は,PyTorch ならびに TensorFlow 以外の GPU 開発(PyTorch,カスタム CUDA プログラムの nvcc コンパイルなど)で利用できます.
また,NVIDIA CUDA ツールキットのバージョンを選ぶ際は,NVIDIA cuDNNとの互換性も確認してください. 詳細はcuDNNの公式アーカイブページで確認できます.
- NVIDIA cuDNN: ディープニューラルネットワークのためのGPUアクセラレーションライブラリです.畳み込み演算などを高速化します.
本記事の前準備では cuDNN 9.19.0(CUDA 12.8 対応)をインストールします.
TensorFlowの古いバージョンを使用する場合や,特定のバージョンの組み合わせについては,対応バージョン情報(別ページ »)も参照してください.
Windows ネイティブでの GPU サポートについて
TensorFlow 2.10 は,Windows ネイティブで GPU をサポートする最後のバージョンです.TensorFlow 2.11 以降で GPU を使用するには,WSL2(Windows Subsystem for Linux 2)上で pip install tensorflow[and-cuda] を実行する必要があります.Windows ネイティブでは CPU のみで動作します.
前準備
Build Tools for Visual Studio 2026 のインストール(Windows 上) [クリックして展開]
Build Tools for Visual Studio は,Visual Studio の IDE を含まない C/C++ コンパイラ,ライブラリ,ビルドツール等のコマンドライン向け開発ツールセットである。インストール済みの場合、この手順は不要である。
管理者権限のコマンドプロンプトで以下を実行する。管理者権限のコマンドプロンプトを起動するには、Windows キーまたはスタートメニューから「cmd」と入力し、表示された「コマンドプロンプト」を右クリックして「管理者として実行」を選択する。
REM VC++ ランタイム
winget install --scope machine --id Microsoft.VCRedist.2015+.x64 -e --silent --disable-interactivity --force --accept-source-agreements --accept-package-agreements --override "/quiet /norestart"

REM Build Tools + Desktop development with C++(VCTools)+ 追加コンポーネント(一括)
winget list --id Microsoft.VisualStudio.BuildTools 2>nul | findstr /i "BuildTools" >nul 2>&1
if %ERRORLEVEL% EQU 0 (
    for /f "delims=" %P in ('"C:\Program Files (x86)\Microsoft Visual Studio\Installer\vswhere.exe" -products * -property installationPath') do start /wait "" "C:\Program Files (x86)\Microsoft Visual Studio\Installer\setup.exe" modify --installPath "%P" --add Microsoft.VisualStudio.Workload.VCTools --add Microsoft.VisualStudio.Workload.MSBuildTools --add Microsoft.VisualStudio.Component.VC.CMake.Project --add Microsoft.VisualStudio.Component.VC.Llvm.Clang --add Microsoft.VisualStudio.Component.VC.Llvm.ClangToolset --add Microsoft.VisualStudio.Component.Windows11SDK.26100 --includeRecommended --quiet --norestart
) else (
    winget install --scope machine --id Microsoft.VisualStudio.BuildTools -e --silent --disable-interactivity --force --accept-source-agreements --accept-package-agreements --override "--quiet --wait --norestart --nocache --add Microsoft.VisualStudio.Workload.VCTools --includeRecommended --add Microsoft.VisualStudio.Workload.MSBuildTools --add Microsoft.VisualStudio.Component.VC.CMake.Project --add Microsoft.VisualStudio.Component.VC.Llvm.Clang --add Microsoft.VisualStudio.Component.VC.Llvm.ClangToolset --add Microsoft.VisualStudio.Component.Windows11SDK.26100"
)
REM  何らかの理由で BuildTools の動作がおかしくなった場合は,以下を実行すると,既存のインストールのファイル破損・欠損を修復し正常な状態に復元する効果がある.
REM "C:\Program Files (x86)\Microsoft Visual Studio\Installer\setup.exe" repair --installPath "C:\Program Files (x86)\Microsoft Visual Studio\18\BuildTools" --quiet --norestart
REM 以下で正常であることを確認する.パスが表示されれば正常である.
REM "C:\Program Files (x86)\Microsoft Visual Studio\Installer\vswhere.exe" -products * -requires Microsoft.VisualStudio.Workload.VCTools -property installationPath
--add で追加されるコンポーネント
上記のコマンドでは,まず Build Tools 本体と Visual C++ 再頒布可能パッケージをインストールし,次に setup.exe を用いて以下のコンポーネントを追加している。
VCTools:C++ デスクトップ開発ワークロード(--includeRecommendedにより、MSVC コンパイラ、C++ AddressSanitizer、vcpkg、CMake ツール、Windows 11 SDK 等の推奨コンポーネントが含まれる)VC.Llvm.Clang:Windows 向け C++ Clang コンパイラClangCL:clang-cl ツールセットを含むコンポーネントグループ(MSBuild から Clang を使用するために必要)VC.CMake.Project:Windows 向け C++ CMake ツールWindows11SDK.26100:Windows 11 SDK(ビルド 10.0.26100)
インストール完了の確認
winget list Microsoft.VisualStudio.BuildTools上記以外の追加のコンポーネントが必要になった場合は Visual Studio Installer で個別にインストールできる。
Visual Studio の機能を必要とする場合は、追加インストールできる。
Python 3.12 のインストール(Windows 上) [クリックして展開]
以下のいずれかの方法で Python 3.12 をインストールする。Python がインストール済みの場合、この手順は不要である。
方法1:winget によるインストール
管理者権限のコマンドプロンプトで以下を実行する。管理者権限のコマンドプロンプトを起動するには、Windows キーまたはスタートメニューから「cmd」と入力し、表示された「コマンドプロンプト」を右クリックして「管理者として実行」を選択する。
winget install --id Python.Python.3.12 -e --scope machine --silent --accept-source-agreements --accept-package-agreements --override "/quiet InstallAllUsers=1 PrependPath=1 Include_test=0 Include_pip=1 Include_launcher=1 InstallLauncherAllUsers=1 TargetDir=\"C:\Program Files\Python312\""
powershell -Command "$p='C:\Program Files\Python312'; $s=\"$p\Scripts\"; $m=[Environment]::GetEnvironmentVariable('Path','Machine'); if($m -notlike \"*$s*\") { [Environment]::SetEnvironmentVariable('Path', \"$p;$s;$m\", 'Machine') }"
--scope machine を指定することで、システム全体(全ユーザー向け)にインストールされる。このオプションの実行には管理者権限が必要である。インストール完了後、コマンドプロンプトを再起動すると PATH が自動的に設定される。
方法2:インストーラーによるインストール
- Python 公式サイト(https://www.python.org/downloads/)にアクセスし、「Download Python 3.x.x」ボタンから Windows 用インストーラーをダウンロードする。
- ダウンロードしたインストーラーを実行する。
- 初期画面の下部に表示される「Add python.exe to PATH」に必ずチェックを入れてから「Customize installation」を選択する。このチェックを入れ忘れると、コマンドプロンプトから
pythonコマンドを実行できない。 - 「Install Python 3.xx for all users」にチェックを入れ、「Install」をクリックする。
インストールの確認
コマンドプロンプトで以下を実行する。
python --versionバージョン番号(例:Python 3.12.x)が表示されればインストール成功である。「'python' は、内部コマンドまたは外部コマンドとして認識されていません。」と表示される場合は、インストールが正常に完了していない。
Git のインストール(Windows 上) [クリックして展開]
管理者権限のコマンドプロンプトで以下を実行する.管理者権限は,winget の --scope machine オプションでシステム全体にインストールするために必要となる.
REM Git をシステム領域にインストール
winget install --scope machine --id Git.Git -e --silent --disable-interactivity --force --accept-source-agreements --accept-package-agreements --override "/VERYSILENT /NORESTART /NOCANCEL /SP- /CLOSEAPPLICATIONS /RESTARTAPPLICATIONS /COMPONENTS=""icons,ext\reg\shellhere,assoc,assoc_sh"" /o:PathOption=Cmd /o:CRLFOption=CRLFCommitAsIs /o:BashTerminalOption=MinTTY /o:DefaultBranchOption=main /o:EditorOption=VIM /o:SSHOption=OpenSSH /o:UseCredentialManager=Enabled /o:PerformanceTweaksFSCache=Enabled /o:EnableSymlinks=Disabled /o:EnableFSMonitor=Disabled"
CMakeのインストール(Windows 上) [クリックして展開]
管理者権限のコマンドプロンプトで以下を実行する。管理者権限のコマンドプロンプトを起動するには、Windows キーまたはスタートメニューから「cmd」と入力し、表示された「コマンドプロンプト」を右クリックして「管理者として実行」を選択する。
REM CMake をシステム領域にインストール
winget install --scope machine --id Kitware.CMake -e --silent --disable-interactivity --force --accept-source-agreements --accept-package-agreements --override "/qn /norestart ADD_CMAKE_TO_PATH=System"
7-Zip のインストール(Windows 上) [クリックして展開]
管理者権限のコマンドプロンプトで以下を実行する。管理者権限のコマンドプロンプトを起動するには、Windows キーまたはスタートメニューから「cmd」と入力し、表示された「コマンドプロンプト」を右クリックして「管理者として実行」を選択する。
REM 7-Zip をシステム領域にインストール
winget install --scope machine --id 7zip.7zip -e --silent --disable-interactivity --force --accept-source-agreements --accept-package-agreements
REM 7-Zip のパス設定
powershell -NoProfile -Command "$p='C:\Program Files\7-Zip'; $c=[Environment]::GetEnvironmentVariable('Path','Machine'); if((Test-Path $p) -and $c -notlike \"*$p*\"){[Environment]::SetEnvironmentVariable('Path',\"$p;$c\",'Machine')}"
NVIDIA ドライバのインストール(Windows 上)
NVIDIA ドライバ
NVIDIA ドライバは,NVIDIA製GPUを動作させるための重要なソフトウェアである.このドライバをインストールすることにより,GPUの性能を引き出すことができ,グラフィックス関連のアプリ,AI関連のアプリの高速化が期待できる.
ドライバはNVIDIA公式サイトである https://www.nvidia.co.jp/Download/index.aspx?lang=jp からダウンロードできる.このサイトからダウンロードするときには,グラフィックスカードとオペレーティングシステムを選択する. なお,NVIDIA GeForce Experience を用いてインストールすることも可能である.
【サイト内の関連ページ】
- NVIDIA グラフィックス・ボードの確認
Windows で,NVIDIA グラフィックス・ボードの種類を調べたいときは, 次のコマンドを実行することにより調べることができる.
wmic path win32_VideoController get name - NVIDIA ドライバのダウンロード
NVIDIA ドライバは,以下の NVIDIA 公式サイトからダウンロードできる.
- ダウンロードの際には,使用しているグラフィックス・ボードの型番とオペレーティングシステムを選択する.
NVIDIA CUDA Toolkit 12.8のインストール
- 前提条件(NVIDIA CUDA Toolkit インストール前): NVIDIA GPU,NVIDIA ドライバ,および Build Tools for Visual Studio もしくは Visual Studio が必要である.
- インストール中の注意: なるべく他のウインドウはすべて閉じておくこと.
以下のコマンドを管理者権限のコマンドプロンプトで実行する
(手順:Windowsキーまたはスタートメニュー → cmd と入力 → 右クリック → 「管理者として実行」)。
REM NVIDIA CUDA Toolkit 12.8 をシステム領域にインストール
winget install --scope machine --id Nvidia.CUDA --version 12.8 -e --silent --disable-interactivity --force --uninstall-previous --accept-source-agreements --accept-package-agreements --override "-s -n"

REM 環境変数TEMP, TMPの設定(一時ファイルの保存先を短いパスに変更)
mkdir C:\TEMP
set "TEMP_PATH=C:\TEMP"
setx TEMP "%TEMP_PATH%" /M >nul
setx TMP "%TEMP_PATH%" /M >nul
NVIDIA cuDNN 9.19.0 のインストール(Windows 上)
NVIDIA cuDNN
NVIDIA cuDNN は,NVIDIA CUDA ツールキット上で動作するディープラーニング用ライブラリである。畳み込みニューラルネットワーク (CNN) やリカレントニューラルネットワーク (RNN) など,さまざまなディープラーニングモデルのトレーニングと推論を高速化する。
【関連する外部ページ】
- NVIDIA cuDNN の公式ページ(ダウンロードには Developer Program への登録が必要): https://developer.nvidia.com/cudnn
NVIDIA cuDNN のインストール(Windows 上)の概要
- NVIDIA Developer Program メンバーシップへの加入: cuDNN のダウンロードには無料のメンバーシップ登録が必要である。
NVIDIA Developer Program の公式ページ: https://developer.nvidia.com/developer-program
- 互換バージョンの選択とダウンロード: インストール済みの CUDA ツールキットのバージョン(今回は 12.8)に適合する cuDNN のバージョン(今回は v9.19.0)を選択し,Windows 用のインストーラ(exe)または zip ファイルをダウンロードする。
- インストール: インストーラを使用する場合は,インストーラを実行し,対象の CUDA バージョンを選択してインストールする。zip ファイルを使用する場合は,展開し,中のファイル(
bin,include,lib\x64フォルダ内)を cuDNN のインストールディレクトリ(C:\Program Files\NVIDIA\CUDNN\v9.x)にコピーする。 - 環境変数の設定: cuDNN の
binディレクトリ(C:\Program Files\NVIDIA\CUDNN\v9.x\bin)をシステム環境変数PATHに追加する。必要に応じてCUDNN_PATHも設定する。 - 動作確認: cuDNN ライブラリ(
cudnn*.dll)にパスが通っていることを確認する。
zlib のインストール(Windows 上)
- 次のコマンドを管理者権限のコマンドプロンプトで実行する
(手順:Windowsキーまたはスタートメニュー →
cmdと入力 → 右クリック → 「管理者として実行」)。
次のコマンドは,zlibをインストールし,パスを通すものである.
cd /d c:%HOMEPATH%
rmdir /s /q zlib
git clone https://github.com/madler/zlib
cd zlib
del CMakeCache.txt
rmdir /s /q CMakeFiles
cmake . -A x64 -T host=x64 -DCMAKE_INSTALL_PREFIX=c:/zlib
cmake --build . --config Release --target INSTALL
powershell -command "$oldpath = [System.Environment]::GetEnvironmentVariable(\"Path\", \"Machine\"); $oldpath += \";c:\zlib\bin\"; [System.Environment]::SetEnvironmentVariable(\"Path\", $oldpath, \"Machine\")"
powershell -command "[System.Environment]::SetEnvironmentVariable(\"ZLIB_HOME\", \"C:\zlib\", \"Machine\")"
【関連する外部ページ】
- zlib の公式ページ: https://www.zlib.net/
【関連項目】 zlib
TensorFlow 2.20(GPU 対応可能)のインストール(Windows 上)
TensorFlow 2.20 と GPU サポートについて(Windows)
TensorFlow 2.10 は,Windows ネイティブで GPU をサポートする最後のバージョンである.TensorFlow 2.11 以降で GPU を使用するには,WSL2(Windows Subsystem for Linux 2)上で pip install tensorflow[and-cuda] を実行する必要がある.
Windows ネイティブ環境では,TensorFlow 2.20 は CPU のみで動作する.CPU のみでも学習・推論は可能だが,GPU による高速化が必要な場合は WSL2 の利用を検討すること.
なお,TensorFlow 2.20 は CUDA 12.x を使用する.前準備でインストールした cuDNN 9.19.0 は TensorFlow では使用されない(他の GPU 開発ツールでは利用可能).TensorFlow の GPU 利用時は,tensorflow[and-cuda] が CUDA 12.x ライブラリを pip 経由で自動取得する.
【関連する外部ページ】
- TensorFlow の pip インストール手順(公式): https://www.tensorflow.org/install/pip
インストール手順
- 以下の手順を管理者権限のコマンドプロンプトで実行する
(手順:Windowsキーまたはスタートメニュー →
cmdと入力 → 右クリック → 「管理者として実行」)。 - 使用する Python のバージョンの確認
python --versionTensorFlow 2.20 は Python 3.9〜3.13 に対応している.Python 3.12.x と表示されることを確認する. - pip と setuptools の更新
* 「 python -m pip install ...」は,Pythonのライブラリをインストールするためのコマンド.
python -m pip install -U pip setuptools - パッケージのアンインストール操作
* トラブルの可能性を減らすために,次の操作でアンインストールを行っておく.
python -m pip uninstall -y protobuf tensorflow tensorflow-cpu tensorflow-gpu tensorflow-intel tensorflow-text tensorflow-estimator tf-models-official tf_slim tensorflow_datasets tensorflow-hub keras tf-keras keras-tuner - TensorFlow 2.20 , Keras, scikit-learn, Python 用 opencv-python, pillow, matplotlib, seaborn のインストール
TensorFlow 2.16 以降では,Keras 3(マルチバックエンド版)がデフォルトでインストールされる.従来の Keras 2 API を使用したい場合は
tf-kerasをインストールし,環境変数TF_USE_LEGACY_KERAS=1を設定する.python -m pip install -U protobuf tensorflow tf_slim tensorflow_datasets tensorflow-hub python -m pip install -U tf-keras keras-cv keras-tuner python -m pip install -U numpy pillow pydot matplotlib seaborn pandas scipy python -m pip install -U scikit-learn scikit-learn-intelex python -m pip install -U opencv-python opencv-contrib-python python -m pip install git+https://github.com/tensorflow/docs python -m pip install git+https://github.com/tensorflow/examples.gitTensorFlow 2.10 からの主な変更点:
-
tensorflow: バージョン指定なしで最新安定版(2.20.0)がインストールされる. -
tensorflow_datasets: バージョン固定を外し,TensorFlow 2.20 との互換性を pip の依存関係解決に委ねる. -
tf-keras: TensorFlow 2.16 以降で Keras 2 API を使うためのパッケージ. -
keras-cv: Keras 3 対応版.KerasCV は TensorFlow 2.15 以降で動作する. -
keras-visualizer: メンテナンス停止のため削除. -
keras-contrib(git リポジトリ): アーカイブ済みで TensorFlow 2.20 と非互換のため削除.
-
- Windows の システム環境変数 TF_FORCE_GPU_ALLOW_GROWTH に,true を設定
Windows で,管理者権限でコマンドプロンプトを起動(手順:Windowsキーまたはスタートメニュー >
cmdと入力 > 右クリック > 「管理者として実行」)。次のコマンドを実行
powershell -command "[System.Environment]::SetEnvironmentVariable(\"TF_FORCE_GPU_ALLOW_GROWTH\", \"true\", \"Machine\")"
動作確認
TensorFlow がインストールできたかを確認したい.
- Windows では,コマンドプロンプトを実行.
- TensorFlow のバージョン確認
バージョン番号が表示されれば OK.2.20.0 と表示されることを確認する.
python -c "import tensorflow as tf; print( tf.__version__ )" - TensorFlow パッケージの情報の表示
pip show tensorflow - (GPU を使うとき) TensorFlow からGPU が認識できているかの確認
TensorFlow が GPU を認識できているかの確認は,端末で,次を実行して行う.
python -c "from tensorflow.python.client import device_lib; print(device_lib.list_local_devices())"実行結果の中に,次のように「device_type: "GPU"」があれば,GPUが認識できている.エラーメッセージが出ていないことを確認しておくこと.
Windows ネイティブでの GPU サポートについて: TensorFlow 2.10 が Windows ネイティブで GPU をサポートする最後のバージョンである.TensorFlow 2.11 以降(本記事の 2.20 を含む)で Windows 上で GPU を使用するには,以下のいずれかの方法をとる必要がある.
- WSL2 を使用する(推奨): WSL2 上の Linux 環境で
pip install tensorflow[and-cuda]を実行する.CUDA ライブラリは pip 経由で自動的にインストールされるため,システムへの CUDA ツールキットの個別インストールは不要である. - TensorFlow-DirectML-Plugin を使用する:
pip install tensorflow-directml-pluginで DirectML 経由の GPU アクセスが可能(ただし機能制限あり).
Windows ネイティブ環境で GPU が認識されない場合は,上記が原因である可能性が高い.CPU のみでも TensorFlow の全機能は使用可能であり,学習・推論の実行に支障はない.
- WSL2 を使用する(推奨): WSL2 上の Linux 環境で
行列の掛け算,主成分分析,特異値分解(TensorFlow 2 のプログラム例)(Windows 上)
行列の掛け算
- Windows で,コマンドプロンプトを実行
- エディタを起動
cd /d c:%HOMEPATH%
notepad matmul.py
- エディタで,次のプログラムを保存
このプログラムは,TensorFlowを使用してCPUとGPUでの行列積の計算時間を比較する. [5000, 10000, 15000, 20000] の異なる4通りのサイズの行列を2つ生成し,その行列積を求める.そのとき, 計算時間を測定して結果を表示する.
import os
import tensorflow as tf
import time

def measure_time(func):
    start_time = time.perf_counter()
    result = func()
    end_time = time.perf_counter()
    calculation_time = end_time - start_time
    return calculation_time

def run_matmul(device_type, matrix_size):
    print(f'実行開始 - Matrix Size: {matrix_size}')
    print('device_type の設定:', device_type)

    with tf.device(device_type):
        X = tf.random.uniform((matrix_size, matrix_size), minval=0, maxval=1)
        Y = tf.random.uniform((matrix_size, matrix_size), minval=0, maxval=1)
        calculation_time = measure_time(lambda: tf.matmul(X, Y))

    physical_devices = tf.config.list_physical_devices()
    gpu_devices = tf.config.list_physical_devices('GPU')

    print(f"Running on {device_type}")
    print(f"Available devices: {physical_devices}")
    print(f"Calculation time: {calculation_time:.6f} seconds")
    print()

# GPUの確認,GPUのメモリに関する設定
def set_gpu_config():
    physical_devices = tf.config.list_physical_devices('GPU')
    if len(physical_devices) > 0:
        print("GPU available:", physical_devices)
        for device in physical_devices:
            tf.config.experimental.set_memory_growth(device, True)
    else:
        print("No GPU found. Running on CPU.")

def main():
    set_gpu_config()
    # デバイス名の表示
    device_name = tf.config.list_logical_devices('GPU')
    print("Device name:", device_name)

    matrix_sizes = [5000, 10000, 15000, 20000]
    for size in matrix_sizes:
        print(f'Matrix Size: {size}')
        run_matmul('/GPU:0', size)
        run_matmul('/CPU:0', size)
        print('---')

if __name__ == "__main__":
    main()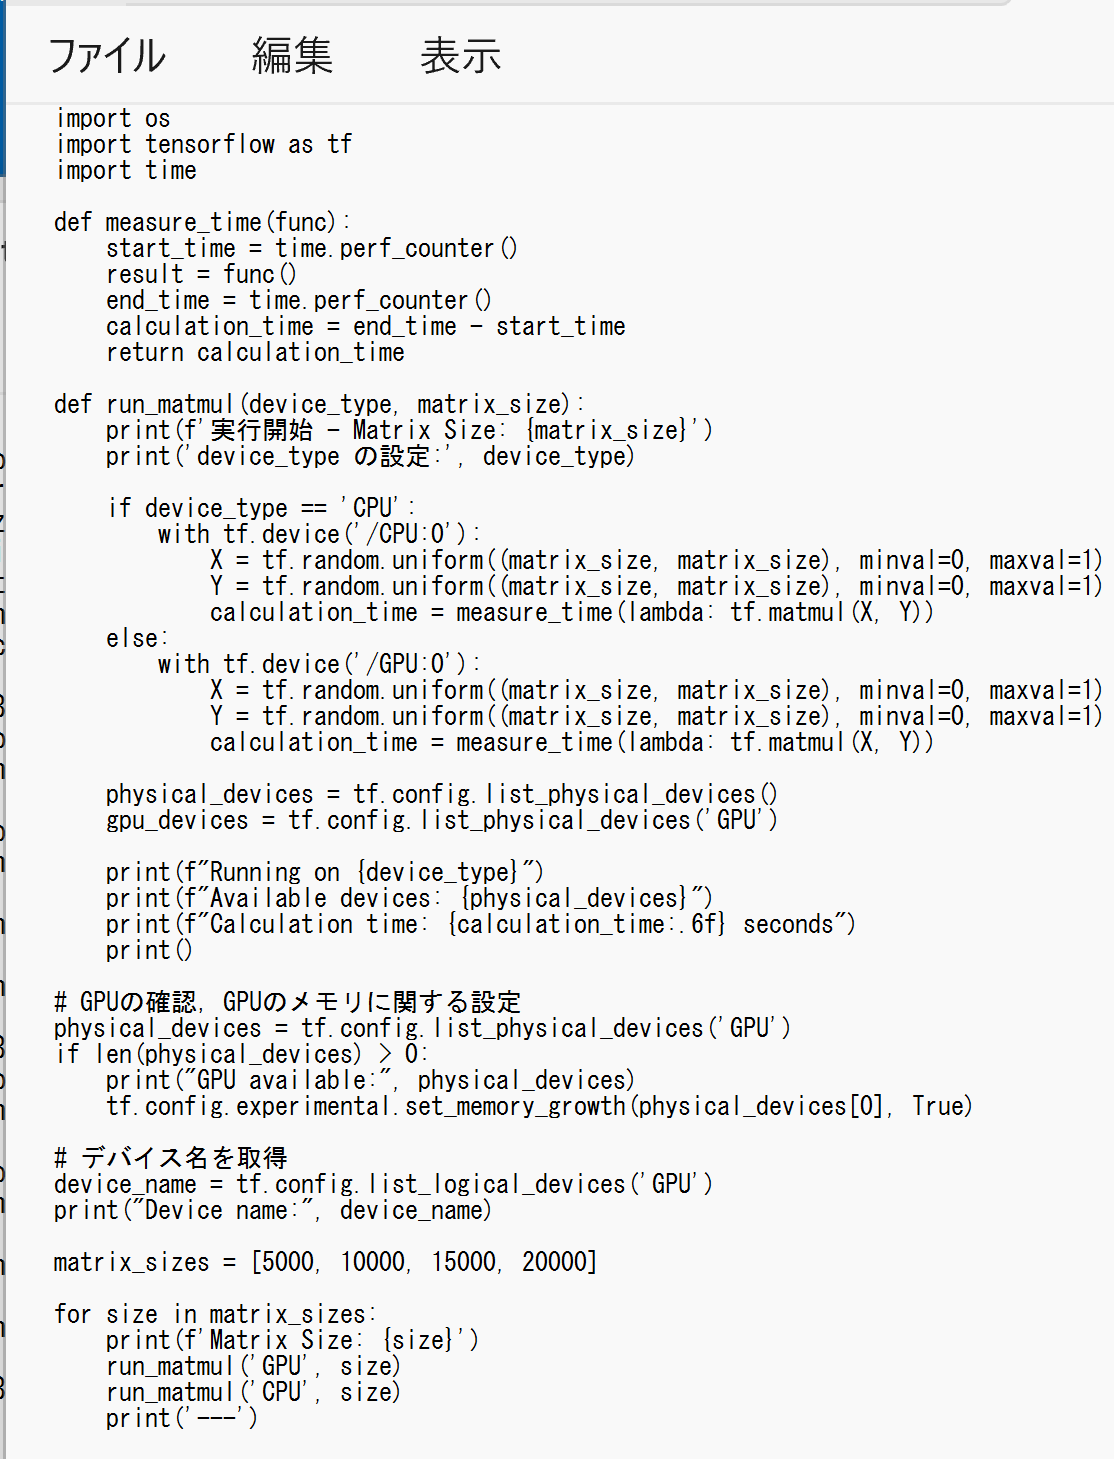
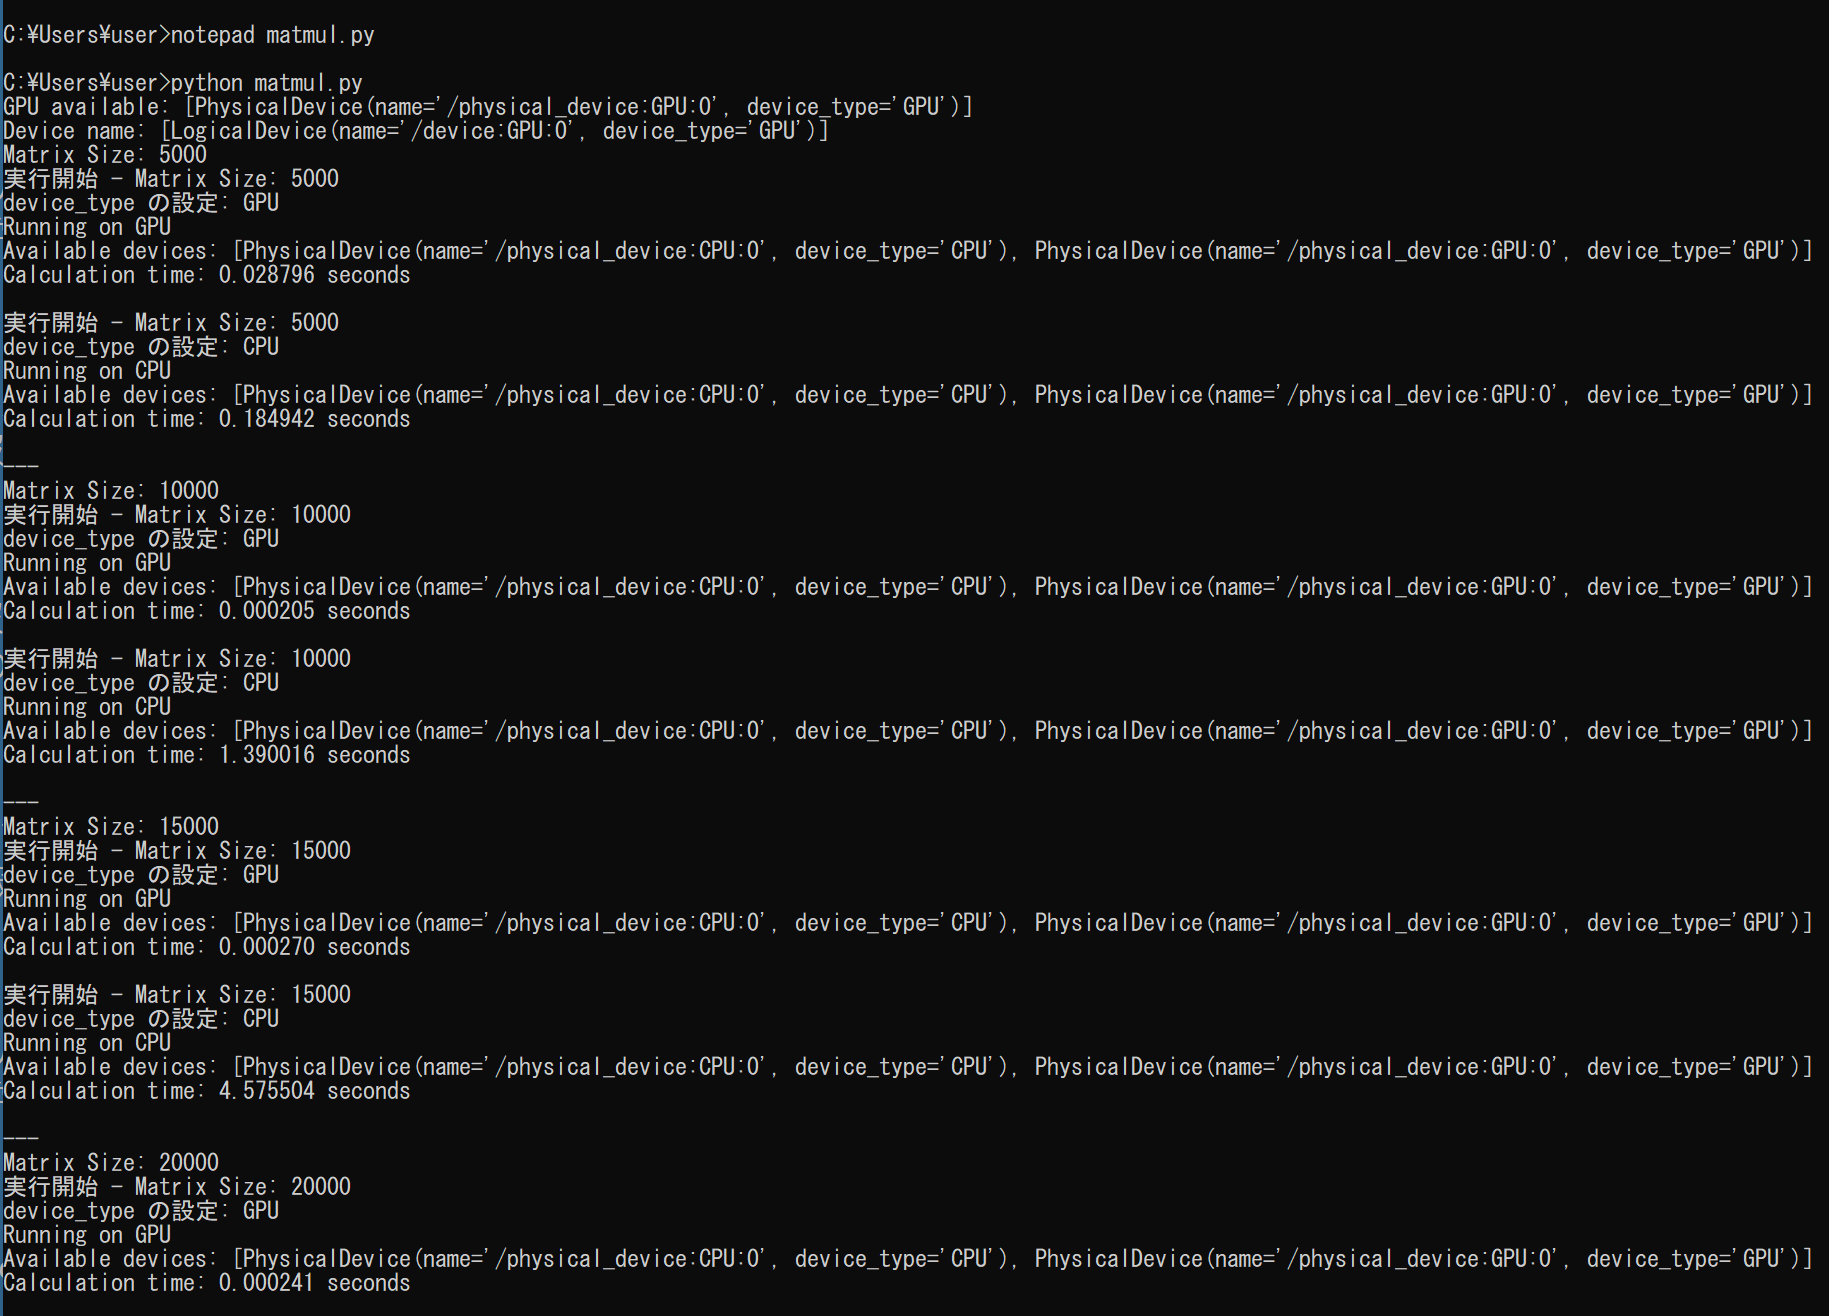
- Python プログラムの実行
プログラムを matmul.pyのようなファイル名で保存したので, 「python matmul.py」のようなコマンドで行う.
python matmul.py
- 結果の確認
主成分分析,特異値分解
- Windows で,コマンドプロンプトを実行
- エディタを起動
cd /d c:%HOMEPATH%
notepad pcasvd.py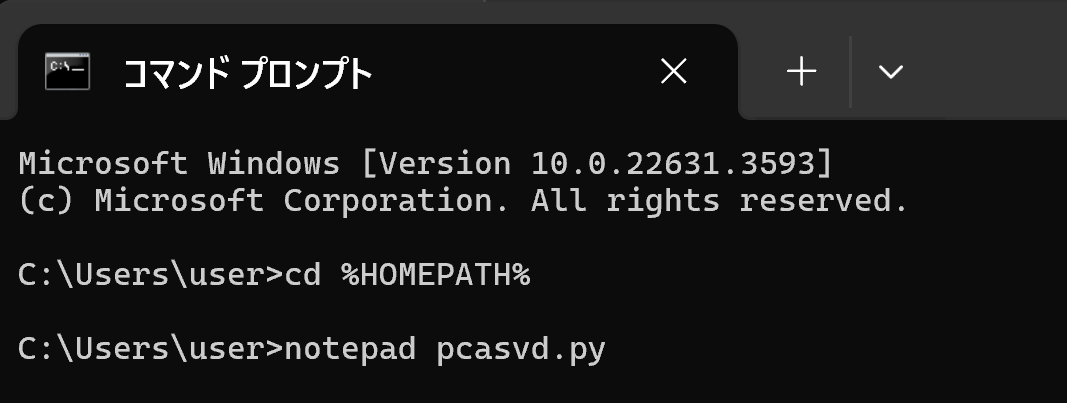
- エディタで,次のプログラムを保存
このプログラムは,TensorFlowを使用して,行列に対してPCA(主成分分析)とSVD(特異値分解)の計算を行い,GPUとCPUでの実行時間を比較する. [1000, 2000, 3000, 4000] の異なる4通りのサイズの行列に対して, PCAとSVDの計算時間を測定し,結果を表示することで,GPUとCPUの性能の違いを確認できる.
import os
import tensorflow as tf
import time

def measure_time(func):
    start_time = time.perf_counter()
    result = func()
    end_time = time.perf_counter()
    calculation_time = end_time - start_time
    return calculation_time

def run_pca_svd(device_type, matrix_size):
    print(f'実行開始 - Matrix Size: {matrix_size}')
    print('device_type の設定:', device_type)
    with tf.device(device_type):
        X = tf.random.uniform((matrix_size, matrix_size), minval=0, maxval=1)
        pca_time = measure_time(lambda: tf.linalg.eigh(tf.matmul(X, X, transpose_a=True)))
        svd_time = measure_time(lambda: tf.linalg.svd(X))

    physical_devices = tf.config.list_physical_devices()
    gpu_devices = tf.config.list_physical_devices('GPU')
    print(f"Running on {device_type}")
    print(f"Available devices: {physical_devices}")
    print(f"PCA calculation time: {pca_time:.6f} seconds")
    print(f"SVD calculation time: {svd_time:.6f} seconds")
    print()

# GPUの確認,GPUのメモリに関する設定
def set_gpu_config():
    physical_devices = tf.config.list_physical_devices('GPU')
    if len(physical_devices) > 0:
        print("GPU available:", physical_devices)
        for device in physical_devices:
            tf.config.experimental.set_memory_growth(device, True)
    else:
        print("No GPU found. Running on CPU.")

def main():
    set_gpu_config()
    # デバイス名の表示
    device_name = tf.config.list_logical_devices('GPU')
    print("Device name:", device_name)

    matrix_sizes = [1000, 2000, 3000, 4000]
    for size in matrix_sizes:
        print(f'Matrix Size: {size}')
        run_pca_svd('/GPU:0', size)
        run_pca_svd('/CPU:0', size)
        print('---')

if __name__ == "__main__":
    main()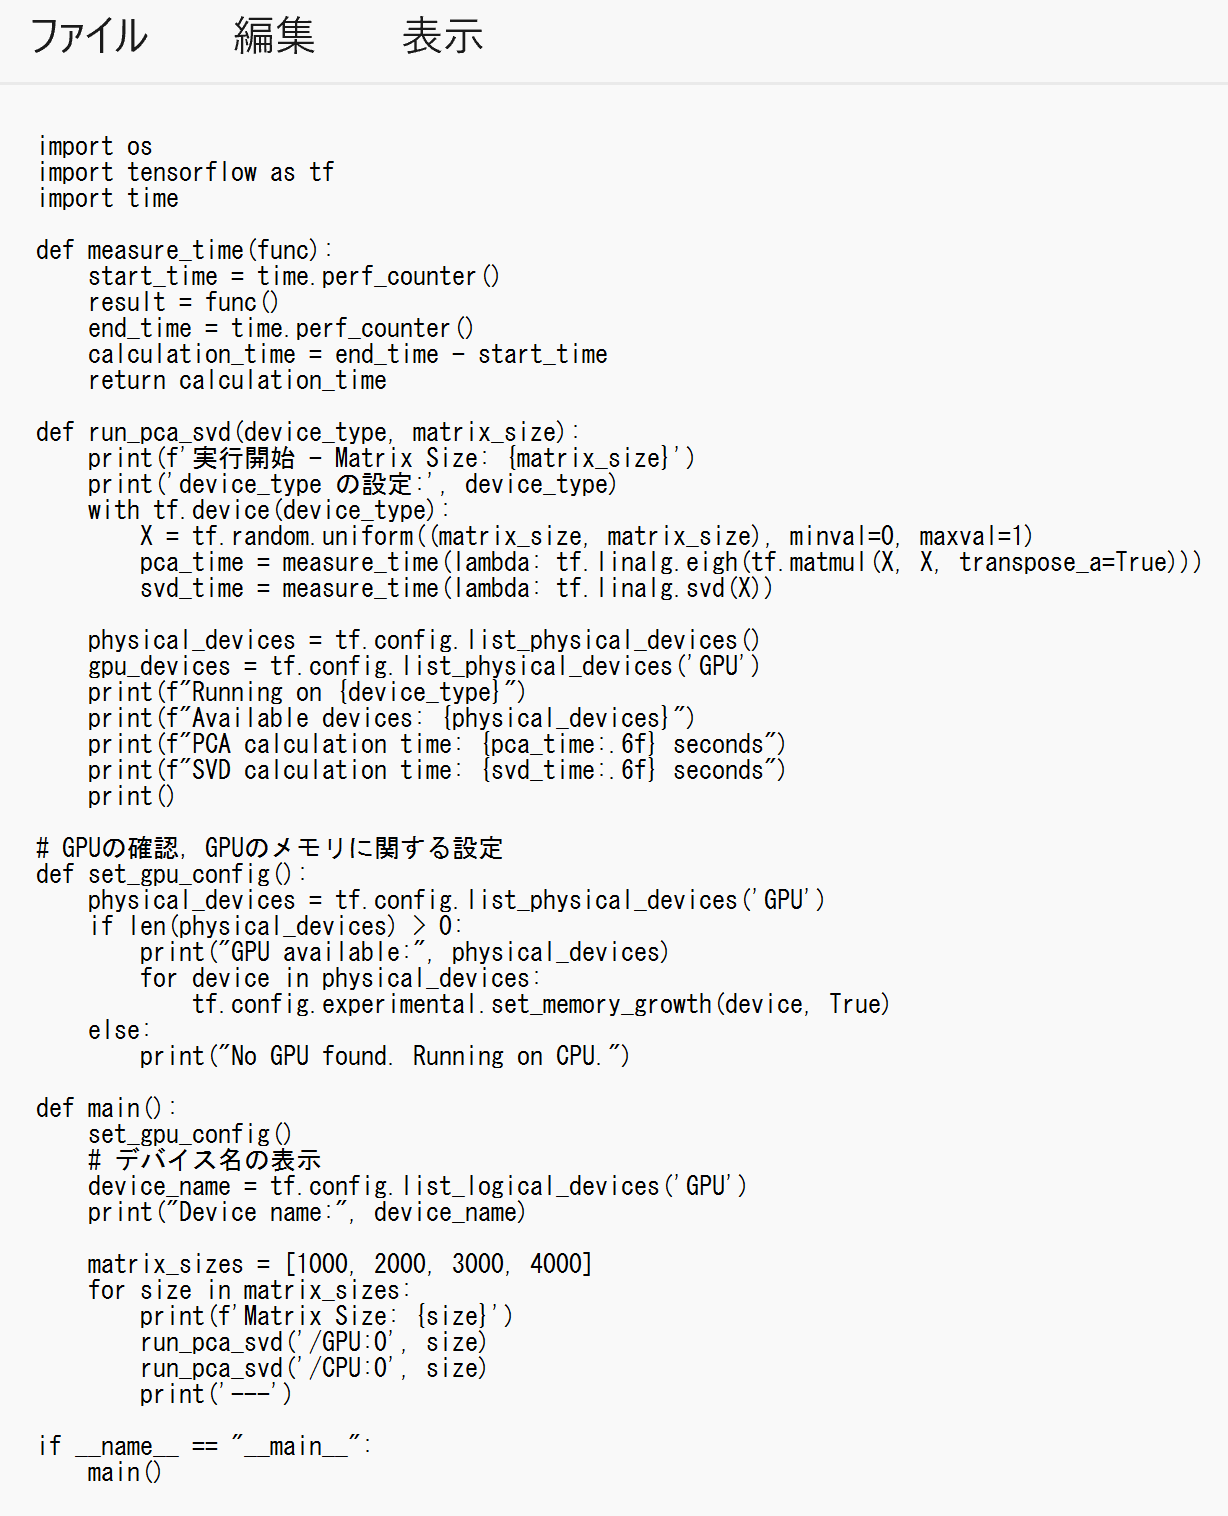
- Python プログラムの実行
プログラムを pcasvd.pyのようなファイル名で保存したので, 「python pcasvd.py」のようなコマンドで行う.
python pcasvd.py
- 結果の確認
ImageNet で学習済みの ConvNeXtBase モデルを用いた画像分類(TensorFlow, Keras を使用)
パソコン接続のカメラを使用
ImageNet で学習済みの ConvNeXtBase モデルを用いた画像分類を行う.
- パソコン接続のカメラを使用するので準備しておく
- 前準備として Python 用 opencv-python のインストール
python -m pip install -U opencv-python opencv-contrib-python - Windows で,コマンドプロンプトを実行
- エディタを起動
cd /d c:%HOMEPATH% notepad convnext.py - エディタで,次のプログラムを保存
このプログラムは,TensorFlow,ImageNet で学習済みのConvNeXtBaseモデルを活用し,カメラから取得した画像をリアルタイムで画像分類します.プログラムでは,GPUの設定,モデルのロード,フレームの前処理,画像分類,結果と推論に要した時間を表示します.カメラからの画像をリアルタイムで画像分類し,その結果をビジュアルに確認できるプログラムです.
【説明】
- set_gpu_config()関数により、GPUの設定を行います。GPUが利用可能な場合は、使用可能なGPUデバイスを表示します。GPUが利用できない場合は、CPUを使用することを表示します。
- preprocess_image()関数により、入力画像の前処理を行います。前処理では、画像のリサイズ、色空間の変換、正規化を行います。
- load_model()関数により、ImageNetで学習済みのConvNeXtBaseモデルをロードします。
- classify_camera_frames()関数で、カメラからの画像を取得し、画像分類を行います。
- 取得した画像をpreprocess_image()関数で前処理します。
- 前処理された画像をモデルに入力し、分類を行います。
- 分類結果から、最も確率の高いクラスの名前と信頼度を取得します。
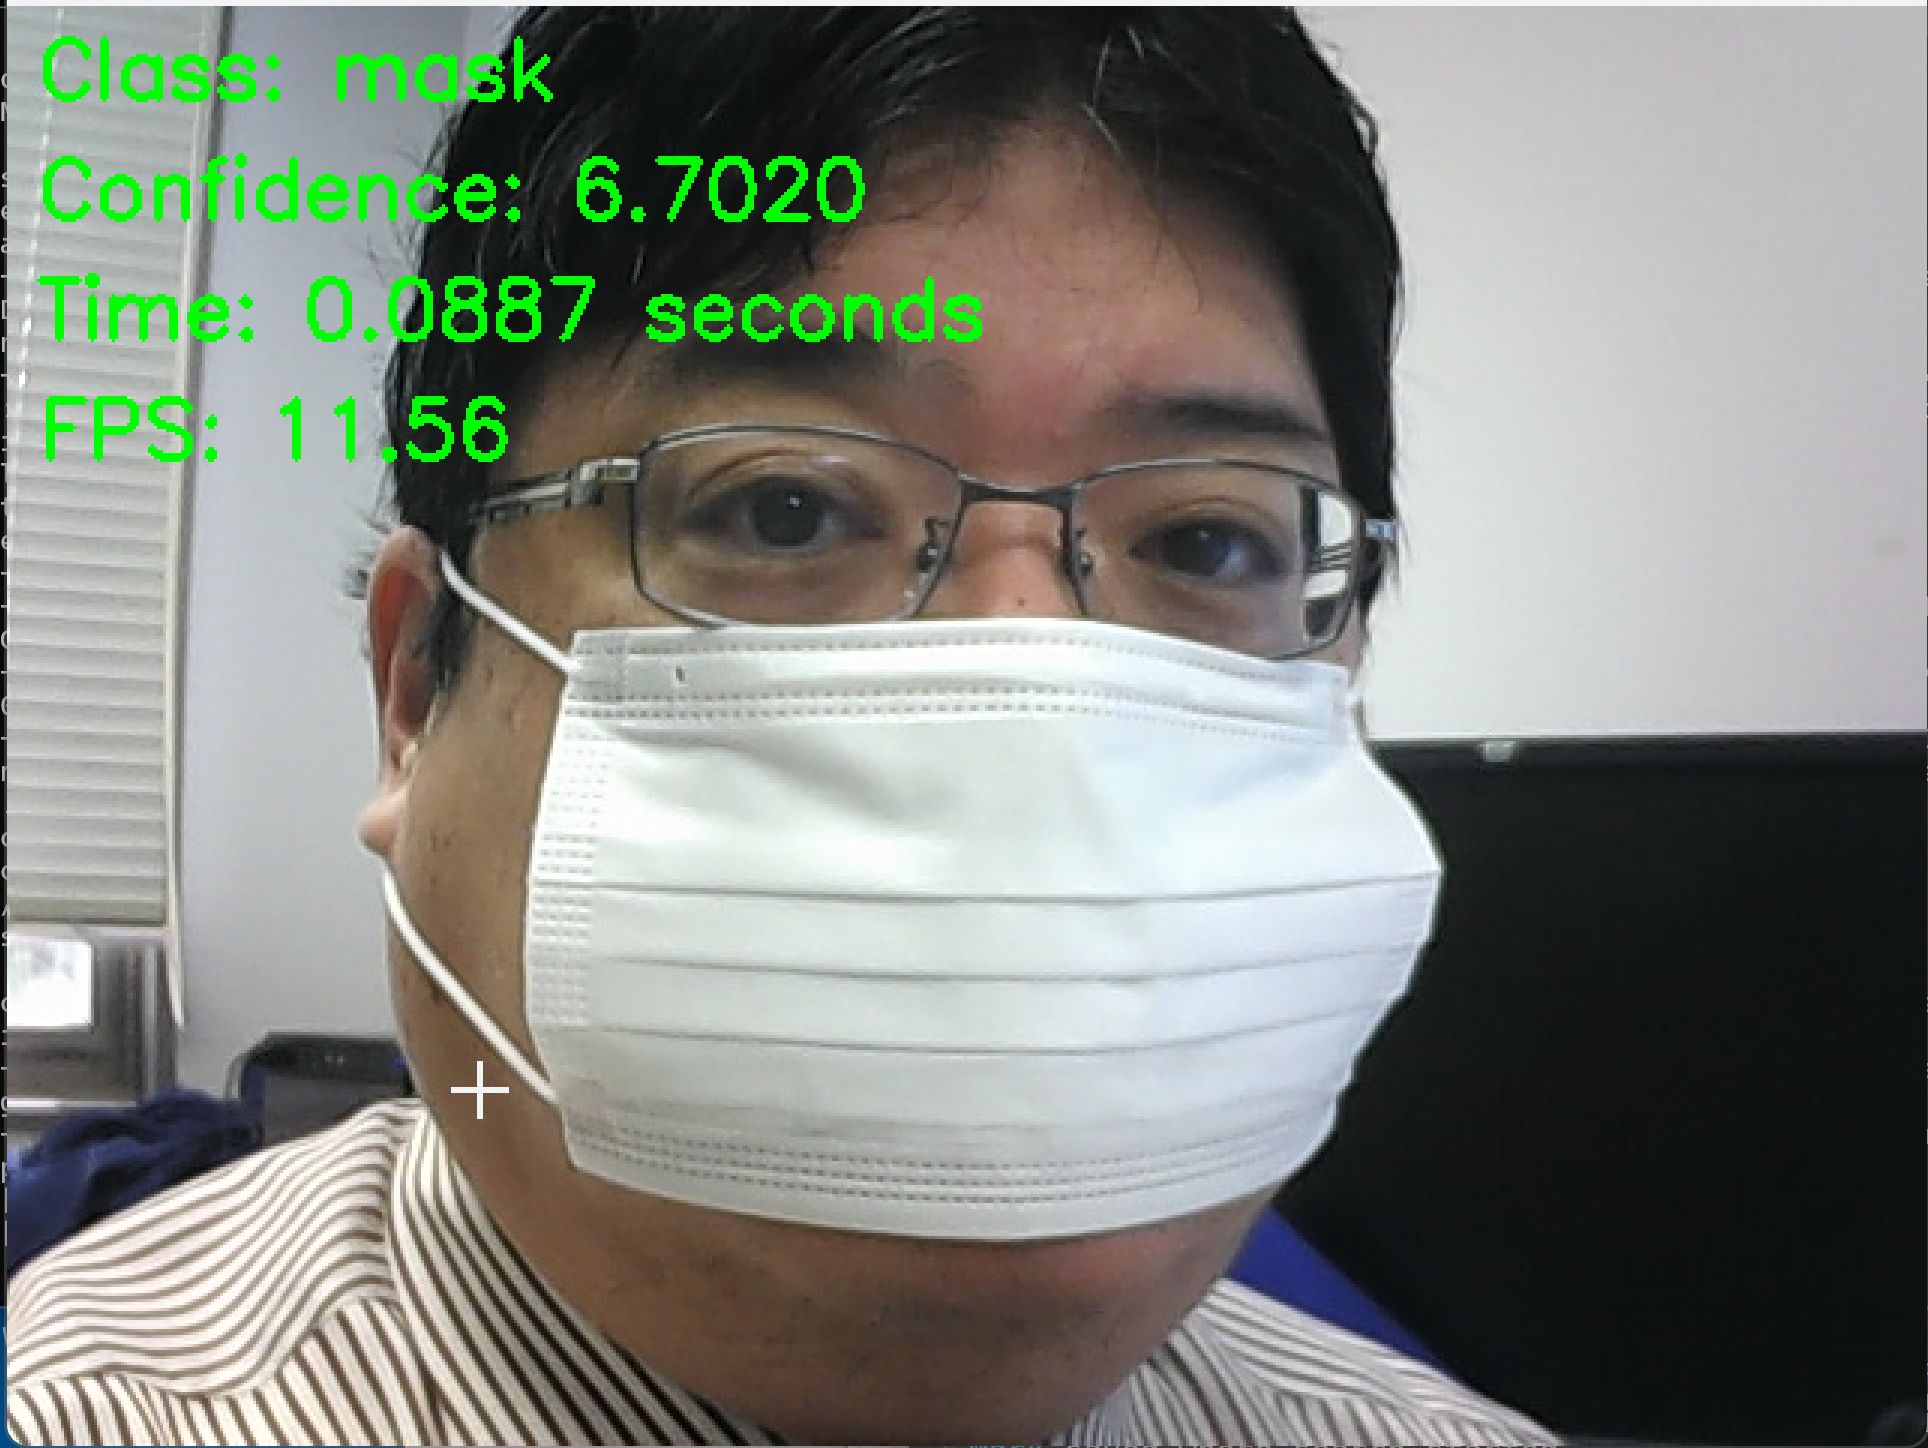
- 結果(クラス名、信頼度、推論時間、フレームレート)を画面上に描画します。
- main()関数で、GPUの設定を行い、モデルをロードし、classify_camera_frames()関数を呼び出してカメラからの画像の分類を開始します。
- 'q'キーが押されるまで、上記の処理を繰り返し行います。'q'キーが押されたら、プログラムを終了します。
【使い方】
- 必要な準備
プログラムを実行する前に、必要なライブラリ(TensorFlow、OpenCV、NumPy、urllib)がインストールされていることを確認してください。
- カメラの設定
プログラムはデフォルトでカメラデバイス0を使用します。 異なるカメラを使用する場合は、cv2.VideoCapture(0)の引数を適切なデバイスIDに変更してください。
- モデルの選択
プログラムはデフォルトでconvnext_baseモデルを使用します。 異なるTensorFlowのモデルを使用したい場合は、MODEL_NAMEの値を変更してください。 モデルによって入力サイズや前処理の要件が異なる場合があるため、注意が必要です。
- 前処理のパラメータ
プログラムはデフォルトでMEANとSTDの値を使用して前処理を行います。 これらの値は、ImageNetデータセットで使用される一般的な値です。 モデルによっては別の値が適切な場合があります。
- GPUの使用
プログラムは、利用可能な場合はGPUを使用します。 GPUが利用可能でない場合は、自動的にCPUにフォールバックします。
- プログラムの実行
プログラムを実行すると、カメラからのリアルタイム画像分類が開始されます。 分類結果、信頼度、推論時間、フレームレートが画面上に表示されます。
- キー操作:
'q'キーを押すとプログラムが終了します。 'p'キーを押すと、画像の分類を一時停止/再開できます。
- プログラムの終了:
'q'キーを押すか、ウィンドウを閉じるとプログラムが終了します。
以上の手順に従って、プログラムを実行してください。カメラからのリアルタイム画像分類を体験できます。
import tensorflow as tf
from tensorflow.keras.applications import ConvNeXtBase
import numpy as np
import time
import cv2
import json
import urllib.request
import os

# ==== 設定 ====
MODEL_NAME = 'convnext_base'
INPUT_SIZE = (224, 224)
MEAN = [0.485, 0.456, 0.406]
STD = [0.229, 0.224, 0.225]
FPS_BUFFER_SIZE = 10
IMAGENET_LABELS_URL = 'https://raw.githubusercontent.com/anishathalye/imagenet-simple-labels/master/imagenet-simple-labels.json'
# =============

def download_imagenet_labels(url: str, filename: str) -> None:
    if not os.path.exists(filename):
        print(f"Downloading {filename} from {url}")
        try:
            urllib.request.urlretrieve(url, filename)
            print(f"Downloaded {filename}")
        except Exception as e:
            print(f"Error downloading {filename}: {str(e)}")
            raise
    else:
        print(f"{filename} already exists.")

# ImageNetのクラスラベルとクラス名のマッピングをダウンロード
try:
    download_imagenet_labels(IMAGENET_LABELS_URL, 'imagenet_class_index.json')
except Exception as e:
    print(f"Error downloading imagenet_class_index.json: {str(e)}")
    exit(1)

# ImageNetのクラスラベルとクラス名のマッピングを読み込み
try:
    with open('imagenet_class_index.json', 'r') as f:
        imagenet_labels = json.load(f)
except Exception as e:
    print(f"Error loading imagenet_class_index.json: {str(e)}")
    exit(1)

# GPUの設定と確認を行う関数
def set_gpu_config():
    physical_devices = tf.config.list_physical_devices('GPU')
    if len(physical_devices) > 0:
        print("GPU available:", physical_devices)
        for device in physical_devices:
            tf.config.experimental.set_memory_growth(device, True)
    else:
        print("No GPU found. Running on CPU.")

# モデルをロードする関数
def load_model():
    model = ConvNeXtBase(weights='imagenet', input_shape=INPUT_SIZE+(3,))
    model.trainable = False
    return model

# モデルの情報を表示する関数
def print_model_info(model):
    print(f"Model: {MODEL_NAME}")
    print(f"Input image size: {INPUT_SIZE}")
    print(f"Number of classes: {len(imagenet_labels)}")

# 画像の前処理を行う関数
def preprocess_image(img):
    img = cv2.resize(img, INPUT_SIZE)
    img = cv2.cvtColor(img, cv2.COLOR_BGR2RGB)
    img = img.astype(np.float32) / 255.0
    img = (img - MEAN) / STD
    img = np.expand_dims(img, axis=0)
    return img

# 画像を分類する関数
def classify_image(model, img):
    preds = model.predict(img)
    class_id = np.argmax(preds)
    class_name = imagenet_labels[class_id]
    confidence = preds[0][class_id]
    return class_name, confidence

# フレームレートを更新する関数
def update_fps(fps_buffer, prediction_time):
    fps_buffer.append(prediction_time)
    if len(fps_buffer) > FPS_BUFFER_SIZE:
        fps_buffer = fps_buffer[-FPS_BUFFER_SIZE:]
    fps = len(fps_buffer) / sum(fps_buffer)
    return fps

# 結果を表示する関数
def display_results(frame, class_name, confidence, prediction_time, fps):
    cv2.putText(frame, f"Class: {class_name}", (10, 30),
                cv2.FONT_HERSHEY_SIMPLEX, 0.9, (0, 255, 0), 2)
    cv2.putText(frame, f"Confidence: {confidence:.4f}", (10, 70),
                cv2.FONT_HERSHEY_SIMPLEX, 0.9, (0, 255, 0), 2)
    cv2.putText(frame, f"Time: {prediction_time:.4f} seconds", (10, 110),
                cv2.FONT_HERSHEY_SIMPLEX, 0.9, (0, 255, 0), 2)
    cv2.putText(frame, f"FPS: {fps:.2f}", (10, 150),
                cv2.FONT_HERSHEY_SIMPLEX, 0.9, (0, 255, 0), 2)

# カメラからのフレームを取得し、分類を行う関数
def classify_camera_frames(model):
    cap = cv2.VideoCapture(0)
    fps_buffer = []
    paused = False

    while cap.isOpened():
        if not paused:
            ret, frame = cap.read()
            if not ret:
                break

            img = preprocess_image(frame)
            start_time = time.perf_counter()
            class_name, confidence = classify_image(model, img)
            prediction_time = time.perf_counter() - start_time
            fps = update_fps(fps_buffer, prediction_time)
            display_results(frame, class_name, confidence, prediction_time, fps)

        cv2.imshow("Camera Classification", frame)

        key = cv2.waitKey(1) & 0xFF
        if key == ord('q'):
            break
        elif key == ord('p'):
            paused = not paused

    cap.release()
    cv2.destroyAllWindows()

def main():
    set_gpu_config()
    model = load_model()
    print_model_info(model)
    classify_camera_frames(model)

if __name__ == '__main__':
    main()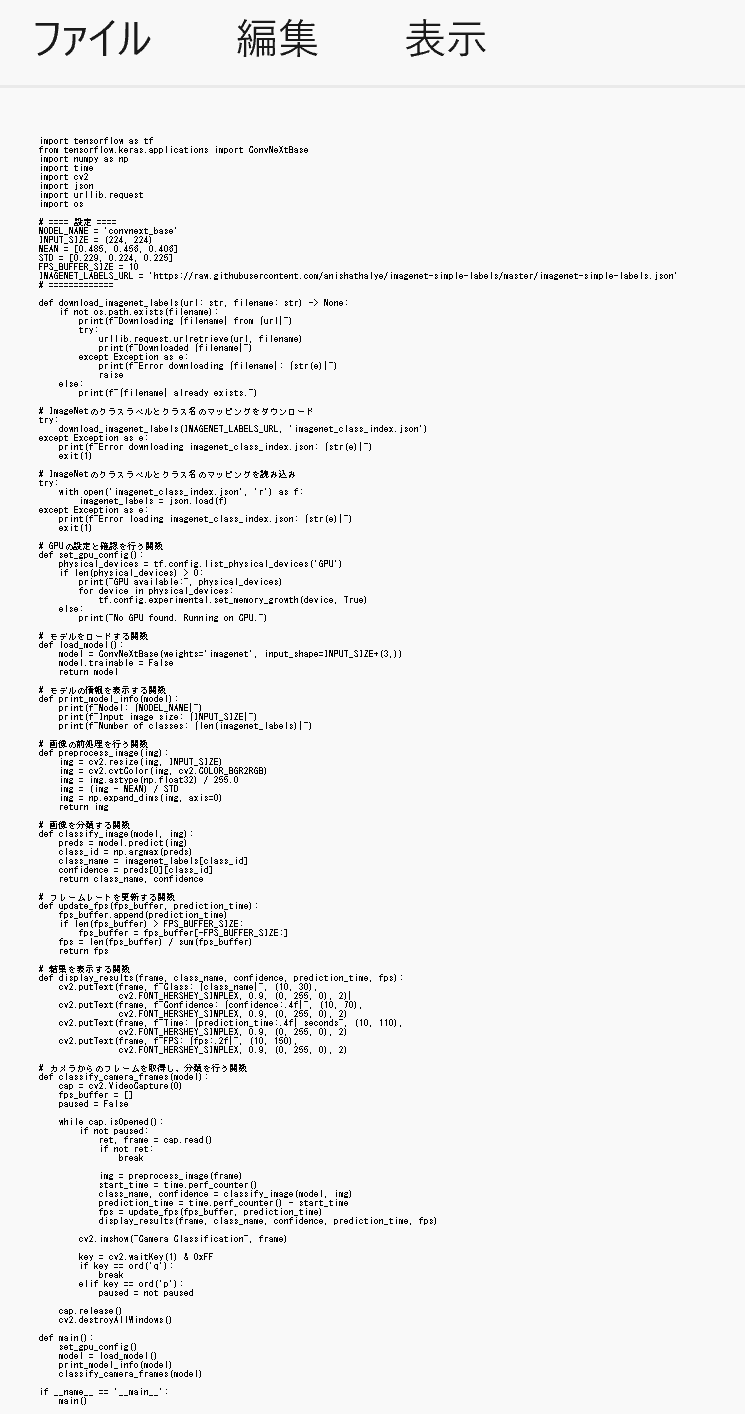
- Python プログラムの実行
プログラムを convnext.pyのようなファイル名で保存したので, 「python convnext.py」のようなコマンドで行う.
python convnext.py
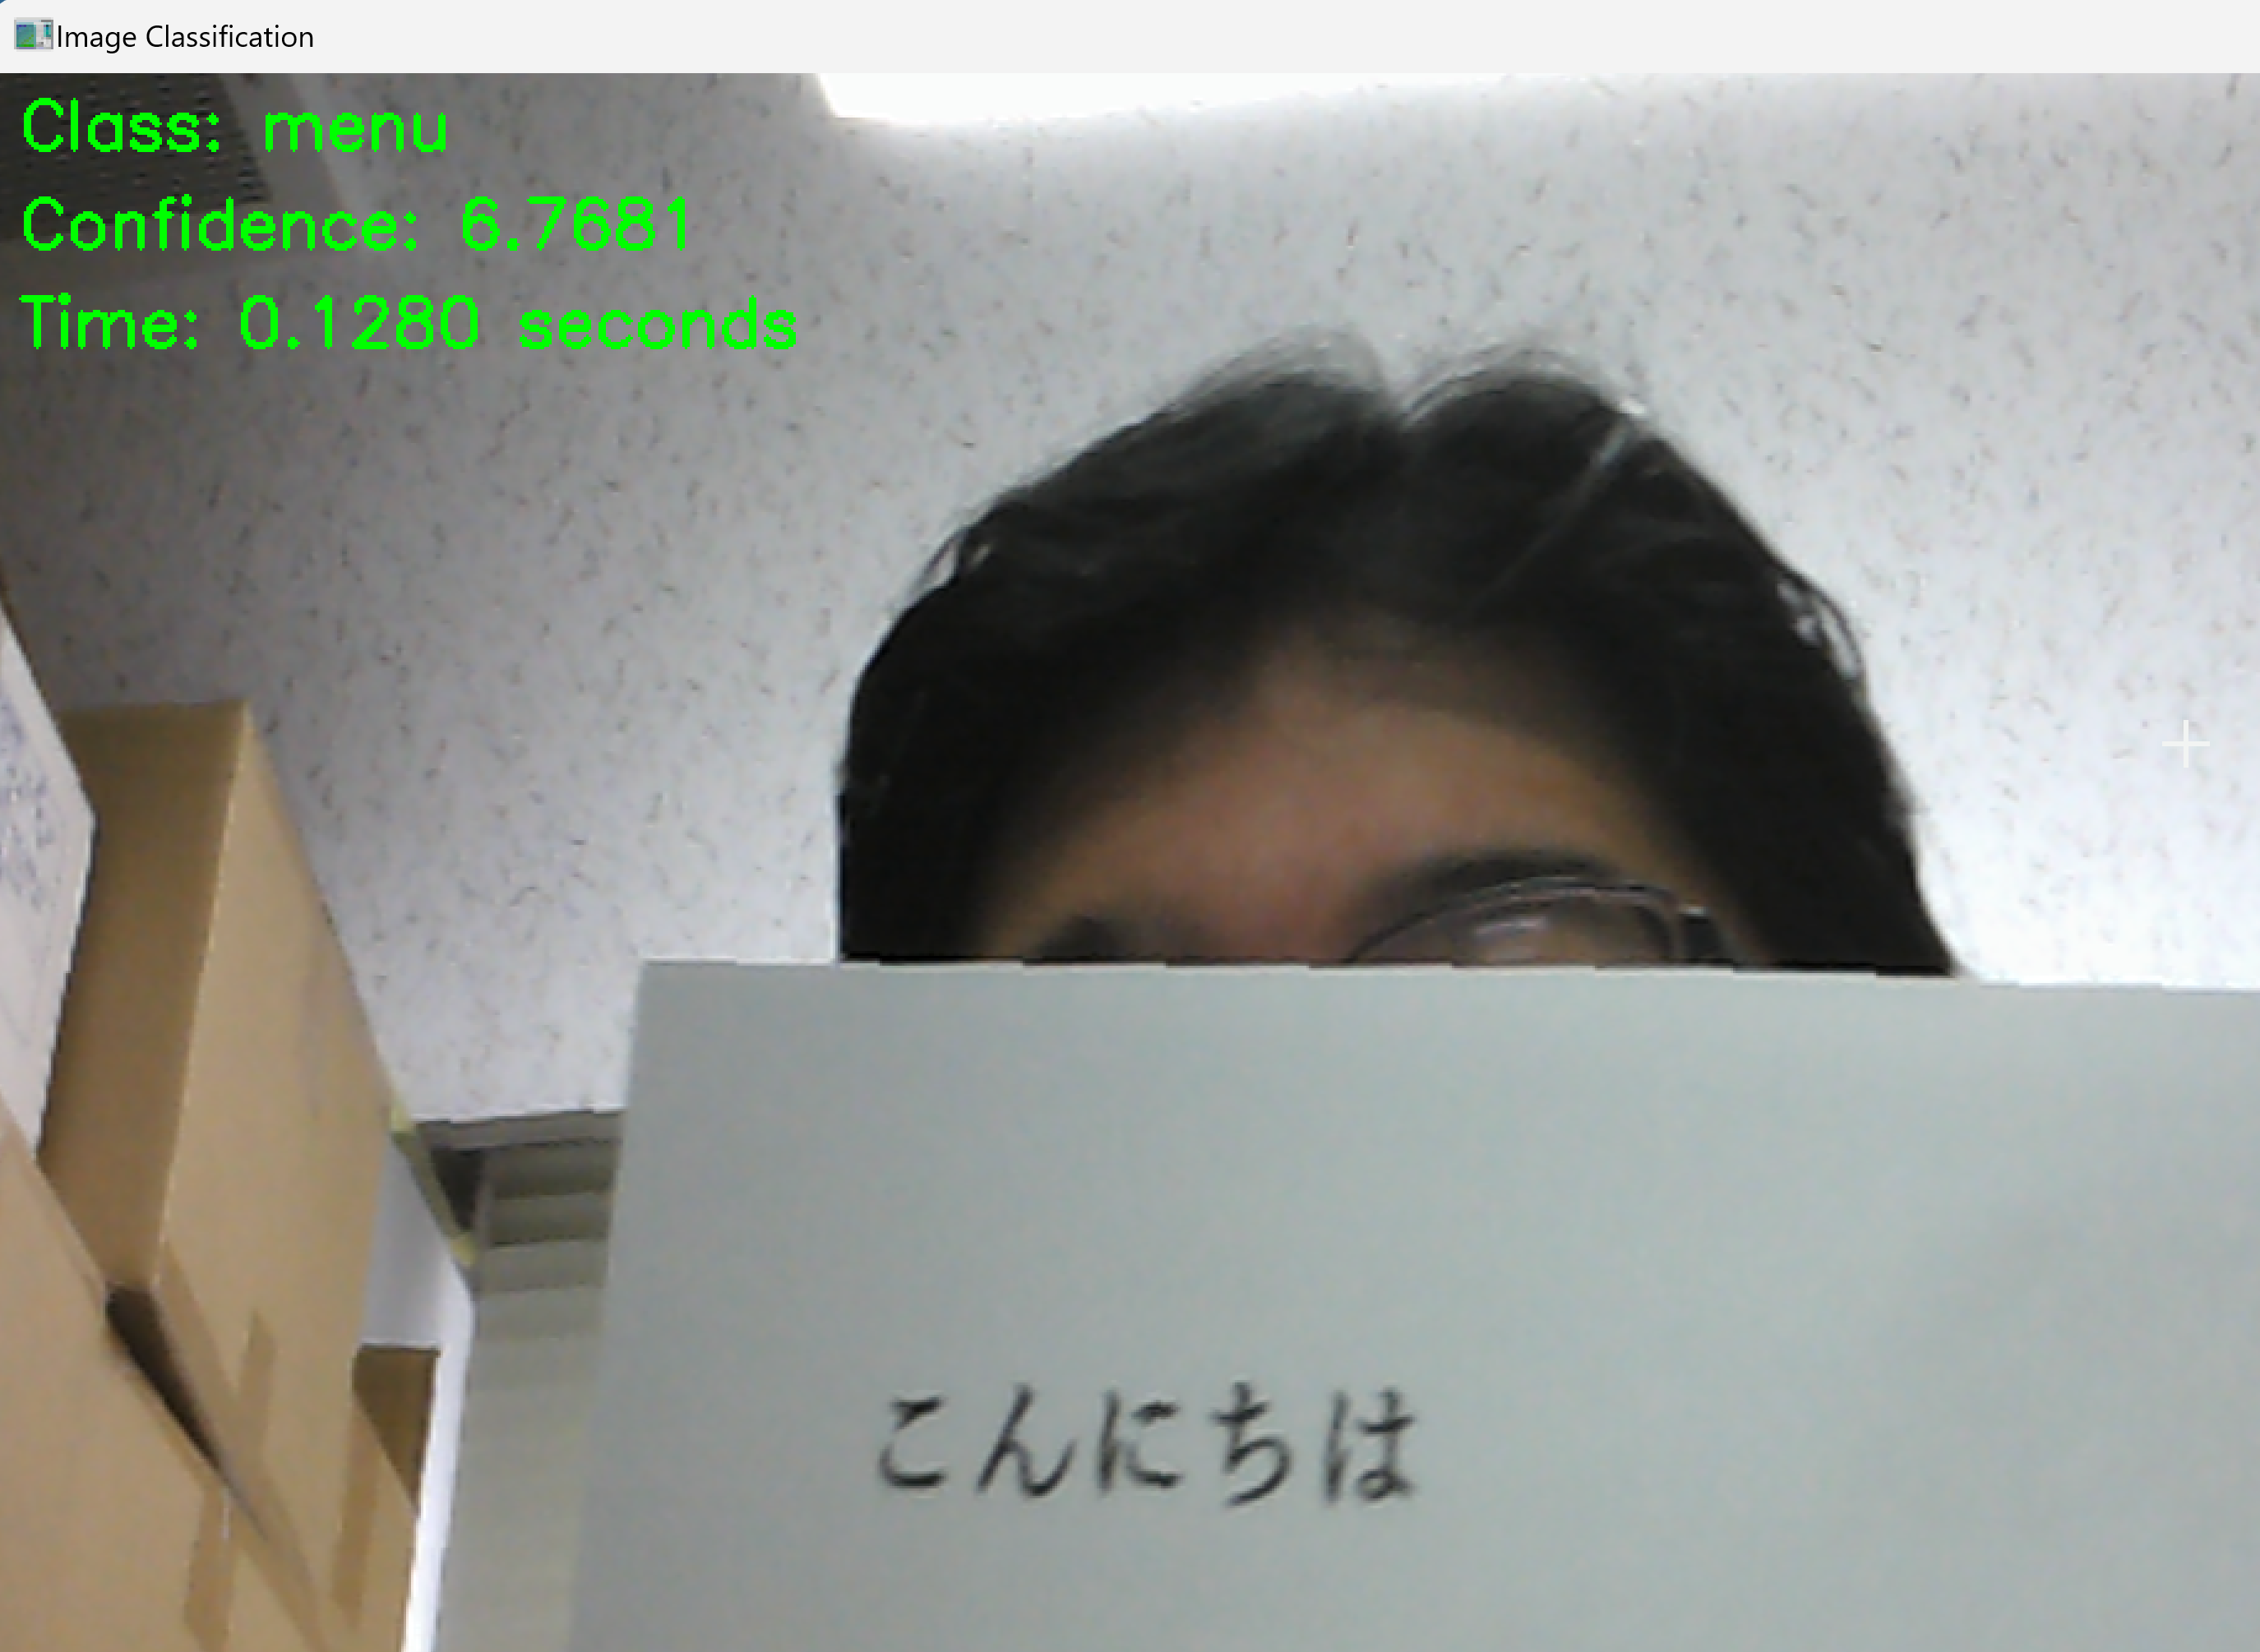
- 結果の確認
終了は q キー
画像ファイルを選択
ImageNet で学習済みの ConvNeXtBase モデルを用いた画像分類を行う.
- Windows で,コマンドプロンプトを実行
- エディタを起動
cd /d c:%HOMEPATH%
notepad convnextimg.py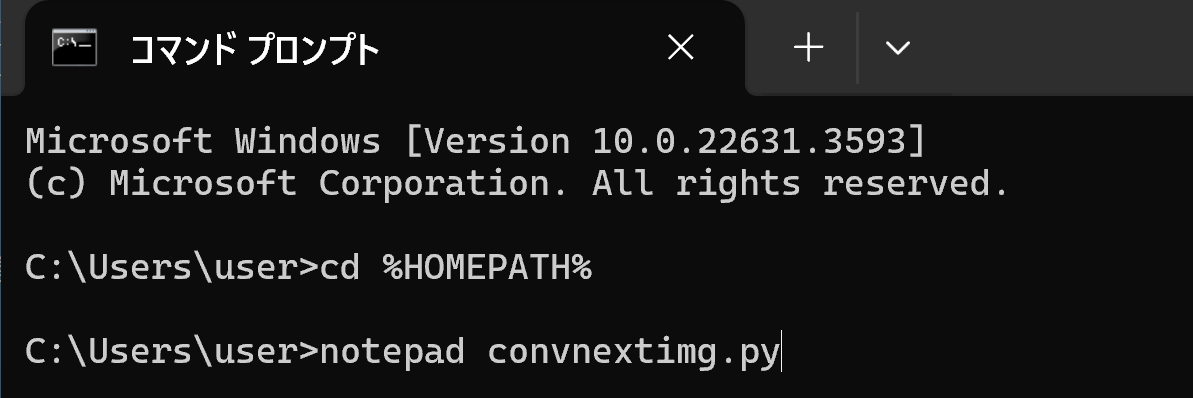
- エディタで,次のプログラムを保存
このプログラムは、TensorFlow、Keras、ConvNeXtBaseモデルを活用し、ユーザが選択した複数の画像について画像分類を行う。プログラムでは、GPUの設定、モデルのロード、画像の前処理、画像分類、結果と推論に要した時間を表示する。主な機能は以下の通りである。
【説明】
- GPUの設定
利用可能なGPUを確認し、GPUのメモリに関する設定を行う。GPUが見つからない場合はCPUで実行される。
- ConvNeXtBaseモデルのロード
ImageNetで学習済みのConvNeXtBaseモデルをロードする。
- 画像ファイルの選択と分類
ユーザーが複数の画像ファイルを選択し、選択された各画像に対して画像分類を実施する。分類結果と推論に要した時間を画像上に描画する。
- 結果の表示
分類されたクラス名、信頼度、推論時間を画像上に重ねて表示する。
- 任意のキーを押すと次の画像に進み、全ての画像の分類が完了すると終了する。
【使い方】
- 必要な準備
プログラムを実行する前に、必要なライブラリ(TensorFlow、Keras、OpenCV、NumPy、urllib、tkinter)がインストールされていることを確認してください。
- モデルの選択
プログラムはデフォルトでconvnext_baseモデルを使用します。 異なるKerasのモデルを使用したい場合は、MODEL_NAMEの値を変更してください。 モデルによって入力サイズや前処理の要件が異なる場合があるため、注意が必要です。
- 前処理のパラメータ
プログラムはデフォルトでMEANとSTDの値を使用して前処理を行います。 これらの値は、ImageNetデータセットで使用される一般的な値です。 モデルによっては別の値が適切な場合があります。
- GPUの使用
プログラムは、利用可能な場合はGPUを使用します。 GPUが利用可能でない場合は、自動的にCPUにフォールバックします。
- プログラムの実行
プログラムを実行すると、画像ファイルの選択ダイアログが表示されます。 分類したい画像ファイルを複数選択し、「開く」をクリックしてください。
import tensorflow as tf
from tensorflow.keras.applications import ConvNeXtBase
import numpy as np
import time
import cv2
import json
import urllib.request
import os
import tkinter as tk
from tkinter import filedialog

# ==== 設定 ====
MODEL_NAME = 'convnext_base'
INPUT_SIZE = (224, 224)
MEAN = [0.485, 0.456, 0.406]
STD = [0.229, 0.224, 0.225]
IMAGENET_LABELS_URL = 'https://raw.githubusercontent.com/anishathalye/imagenet-simple-labels/master/imagenet-simple-labels.json'
# =============

def download_imagenet_labels(url: str, filename: str) -> None:
    if not os.path.exists(filename):
        print(f"Downloading {filename} from {url}")
        try:
            urllib.request.urlretrieve(url, filename)
            print(f"Downloaded {filename}")
        except Exception as e:
            print(f"Error downloading {filename}: {str(e)}")
            raise
    else:
        print(f"{filename} already exists.")

# ImageNetのクラスラベルとクラス名のマッピングをダウンロード
try:
    download_imagenet_labels(IMAGENET_LABELS_URL, 'imagenet_class_index.json')
except Exception as e:
    print(f"Error downloading imagenet_class_index.json: {str(e)}")
    exit(1)

# ImageNetのクラスラベルとクラス名のマッピングを読み込み
try:
    with open('imagenet_class_index.json', 'r') as f:
        imagenet_labels = json.load(f)
except Exception as e:
    print(f"Error loading imagenet_class_index.json: {str(e)}")
    exit(1)

# GPUの設定と確認を行う関数
def set_gpu_config():
    physical_devices = tf.config.list_physical_devices('GPU')
    if len(physical_devices) > 0:
        print("GPU available:", physical_devices)
        for device in physical_devices:
            tf.config.experimental.set_memory_growth(device, True)
    else:
        print("No GPU found. Running on CPU.")

# モデルをロードする関数
def load_model():
    model = ConvNeXtBase(weights='imagenet', input_shape=INPUT_SIZE+(3,))
    model.trainable = False
    return model

# モデルの情報を表示する関数
def print_model_info(model):
    print(f"Model: {MODEL_NAME}")
    print(f"Input image size: {INPUT_SIZE}")
    print(f"Number of classes: {len(imagenet_labels)}")

# 画像の前処理を行う関数
def preprocess_image(img):
    img = cv2.resize(img, INPUT_SIZE)
    img = cv2.cvtColor(img, cv2.COLOR_BGR2RGB)
    img = img.astype(np.float32) / 255.0
    img = (img - MEAN) / STD
    img = np.expand_dims(img, axis=0)
    return img

# 画像ファイルを選択する関数
def select_files():
    try:
        if 'google.colab' in str(get_ipython()):
            from google.colab import files
            uploaded = files.upload()
            image_paths = list(uploaded.keys())
        else:
            root = tk.Tk()
            root.withdraw()
            image_paths = filedialog.askopenfilenames()
    except NameError:
        root = tk.Tk()
        root.withdraw()
        image_paths = filedialog.askopenfilenames()
    return image_paths

# 選択した画像の分類を行う
def classify_selected_images(model):
    image_paths = select_files()
    for image_path in image_paths:
        try:
            img = cv2.imread(image_path)
        except Exception as e:
            print(f"Error reading image {image_path}: {str(e)}")
            continue

        # 画像の前処理
        img_preprocessed = preprocess_image(img)

        # 画像の分類
        start_time = time.perf_counter()
        preds = model.predict(img_preprocessed)
        end_time = time.perf_counter()
        prediction_time = end_time - start_time

        top_pred_index = np.argmax(preds)
        class_name = imagenet_labels[top_pred_index]
        confidence = preds[0][top_pred_index]

        # 結果の表示
        cv2.putText(img, f"Class: {class_name}", (10, 30),
                    cv2.FONT_HERSHEY_SIMPLEX, 0.9, (0, 255, 0), 2)
        cv2.putText(img, f"Confidence: {confidence:.4f}", (10, 70),
                    cv2.FONT_HERSHEY_SIMPLEX, 0.9, (0, 255, 0), 2)
        cv2.putText(img, f"Time: {prediction_time:.4f} seconds", (10, 110),
                    cv2.FONT_HERSHEY_SIMPLEX, 0.9, (0, 255, 0), 2)

        cv2.imshow("Image Classification", img)
        cv2.waitKey(0)

    cv2.destroyAllWindows()

def main():
    set_gpu_config()
    model = load_model()
    print_model_info(model)
    classify_selected_images(model)

if __name__ == '__main__':
    main()
- GPUの設定
- Python プログラムの実行
プログラムを convnextimg.pyのようなファイル名で保存したので, 「python convnextimg.py」のようなコマンドで行う.
python convnextimg.py
- ファイルダイアログが開くので,画像ファイルを選ぶ.
このとき,画像ファイルを複数選ぶことができる.
- 結果の確認
画像分類の結果のクラス名,信頼度(Confidence),処理に要した時間が表示される.