Windows 11の基本設定
【概要】
Windows 11の基本設定について解説する。LLM(大規模言語モデル)の開発・実行環境を整えるための前提として、不要なプリインストールアプリの削除、ディスクのクリーンアップ、空き領域のゼロフィル(削除済みデータの痕跡を消去するデータ消去手法)、長いパス名制限(従来の260文字制限)の緩和、システムサービスの最適化などの設定をコマンドラインから実行する方法に加え、BIOS/UEFIへのアクセス、バックアップと復元、トラブルシューティングについて取り上げる。
【本資料の推奨実行順序と実行上の注意点】
- バックアップとシステムの復元ポイントの作成(2章)
- Windows Updateの適用(3章)
- 不要アプリの整理(4章の手動削除、または5章のWin11Debloatのいずれか一方)
- サービス・機能の最適化(6章)
- DNS・電源・その他の設定(7〜9章)
- ディスククリーンアップ(10章)
コマンドプロンプトとPowerShellの使い分け:本資料では、Windowsに古くから存在するコマンドラインインタープリターであるコマンドプロンプト(cmd.exe)と、スクリプト機能を持つPowerShellの両方を使用する。バッチファイル(.bat)およびreg、sc、netshなどのコマンドはコマンドプロンプトで、Get-AppxPackageやSet-ItemPropertyなどのコマンドレットはPowerShellで実行する。本資料では各操作で使用する方を明示する。
外部スクリプトの実行に関する注意:本資料には、インターネットから取得したPowerShellスクリプト(Win11Debloatなど)を実行する手順を含む。ダウンロードしたスクリプトの即時実行は、配布元のURLが公式リポジトリであることを確認した上で実施すること。可能であれば、スクリプトを一旦保存し、内容を確認してから実行する。
【コマンドプロンプトの管理者権限での起動方法】
本資料の多くの操作では、コマンドプロンプトを管理者権限で起動する必要がある。手順は次のとおりである。Windowsキーを押すか、スタートメニューをクリックし、「cmd」と入力する。表示された「コマンドプロンプト」を右クリックし、「管理者として実行」を選択する。
【目次】
- 重要概念
- 1. BIOS/UEFIメニューへのアクセス
- 2. バックアップと復元
- 3. Windowsの更新
- 4. 不要なプリインストールアプリの削除
- 5. Win11Debloat
- 6. サービスの停止
- 7. DNSサーバーアドレスの設定
- 8. 電源設定の最適化
- 9. その他の設定
- 10. ディスククリーンアップとデフラグ
- 11. システムの一般的な問題と解決方法
【サイト内の関連情報】
重要概念
- LLM(大規模言語モデル):大規模なテキストデータで訓練されたニューラルネットワークモデル。自然言語の理解・生成を行う。本資料の各設定は、LLMの開発・実行環境を整えるための前提となる。
- BIOS/UEFI:PC起動時に最初に動作し、ハードウェアを制御する基盤ソフトウェア(ファームウェア)。起動デバイスの優先順位(ブート順序)、セキュアブート、仮想化機能などを設定する。BIOSは旧来の規格、UEFIはその後継規格であり、現行PCの多くはUEFIを搭載している。
- セキュアブート(Secure Boot):起動時に署名された正規のOSのみを実行させるセキュリティ機能。Windows 11のシステム要件のひとつ。
- レジストリ:Windowsのシステム設定を保存するデータベース。
- システムの復元ポイント:システムファイルとレジストリを特定時点の状態に戻す機能。問題発生時に以前の状態に戻すために使用する。
- Win11Debloat:Windowsの簡素化と最適化を自動で行うPowerShellスクリプト(MITライセンス)。不要なプリインストールアプリの削除、テレメトリの無効化など、手動削除よりも包括的な最適化を行う。
- テレメトリ:使用状況・診断情報をMicrosoftに自動送信する機能。プライバシー保護や通信量削減の観点から無効化が選ばれることがある。
- WSL(Windows Subsystem for Linux):Windows上でLinuxバイナリを実行するためのサブシステム。LLM開発で使用するPythonや各種フレームワークのLinux環境を提供する。
- ターミナル:コマンドを入力するウィンドウの総称。Windows 11標準の「ターミナル」アプリは、コマンドプロンプトやPowerShellを切り替えて使えるホストである。
- コマンドプロンプト(cmd):従来からの標準コマンドライン環境。
- PowerShell:より新しい高機能なコマンドライン環境。
- ゼロフィル:削除済みデータを復元不能にするデータ消去手法。ディスクの空き領域をゼロで上書きすることで行う。
1. BIOS/UEFIメニューへのアクセス
目的:BIOS/UEFI(コンピューターの基本的なハードウェア設定を管理するファームウェア)の設定画面では、起動デバイスの優先順位の変更、セキュアブート(署名されたOSのみ起動を許可するセキュリティ機能)の設定、仮想化機能の有効化などを行う。通常は起動時に特定のキー(F2、Delなど)を押す必要があるが、以下のコマンドを使用することでアクセスできる。
前提条件:本コマンドはUEFIファームウェアを搭載したシステムでのみ動作する。レガシーBIOSのシステムでは機能しない。一般的なコンシューマー向けPCのほとんどはUEFIを搭載しているが、詳細は製造元のマニュアルを参照すること。
管理者権限でコマンドプロンプトを起動する
(手順:Windowsキーまたはスタートメニュー → cmd と入力 → 右クリック → 「管理者として実行」)。
次のコマンドを実行する。
shutdown /r /fw /t 0このコマンドの説明:
- /r: 再起動
- /fw: BIOS/UEFIファームウェア設定画面へ移行
- /t 0: 遅延時間0秒(即時実行)
このコマンドを実行すると、システムが再起動し、BIOS/UEFI設定画面が表示される。なお、/fwスイッチは管理者権限での実行が必須である。
2. バックアップと復元
目的:システム設定を変更する前に、重要なデータのバックアップとシステムの復元ポイントを作成する。問題発生時に以前の状態へ確実に戻せるよう、作業開始前に必ず実施する。
ファイルのバックアップ方法
方法1: エクスプローラーを使用したバックアップ
重要なファイルを外部ドライブにコピーしてバックアップを作成する。
- 外部ドライブ(USBメモリ、外付けHDD、外付けSSDなど)をコンピューターに接続する。
- エクスプローラーを開き、バックアップしたいファイルやフォルダーを選択する。
- 選択したファイルやフォルダーを右クリックし、「コピー」を選択する。
- 外部ドライブを開き、適切な場所で右クリックし、「貼り付け」を選択する。
- コピーが完了するまで待つ。大量のファイルや大容量のファイルの場合は時間がかかる。
方法2: robocopyを使用したバックアップ
コマンドプロンプトを使用してバックアップを作成することもできる。robocopyは、Windowsに標準搭載されたファイルコピーコマンドで、大量ファイルのコピーと中断時の再開機能を備えている。
管理者権限でコマンドプロンプトを起動する
(手順:Windowsキーまたはスタートメニュー → cmd と入力 → 右クリック → 「管理者として実行」)。
次のコマンドを実行する(例:Cドライブのユーザーフォルダー全体をEドライブにバックアップする場合)。
robocopy C:\Users E:\Backup\Users /E /COPYALL /R:3 /W:5 /MT:8このコマンドの説明:
- /E: 空のディレクトリを含むすべてのサブディレクトリをコピー
- /COPYALL: すべてのファイル情報(属性、タイムスタンプ、セキュリティ、所有者情報など)をコピー
- /R:3: 失敗時の再試行回数を3回に設定
- /W:5: 再試行間の待機時間を5秒に設定
- /MT:8: 8スレッドでの並列コピー
システムの復元ポイントの作成
復元ポイントにより、システムファイルとレジストリ(Windowsの設定情報を格納するデータベース)を特定時点の状態に戻すことができる。
事前準備:Windows 11では、システムの保護がデフォルトで無効になっているドライブが多い。復元ポイントを作成する前に、「システムのプロパティ」→「システムの保護」タブで対象ドライブ(通常はCドライブ)を選択し、「構成」から「システムの保護を有効にする」を選択しておく必要がある。
方法1: GUIを使用した作成
- Windowsキーを押し、「復元ポイントの作成」と入力して検索する。
- 「復元ポイントの作成」を選択し、「システムのプロパティ」ウィンドウを開く。
- 「システムの保護」タブを選択する。
- 「作成」ボタンをクリックする。
- 復元ポイントの説明を入力する(例:「システム設定変更前のバックアップ」)。
- 「作成」ボタンをクリックし、復元ポイントの作成が完了するまで待つ。
方法2: PowerShellを使用した作成
PowerShellを管理者として実行する。
次のコマンドを実行する。
Checkpoint-Computer -Description "システム設定変更前のバックアップ" -RestorePointType "MODIFY_SETTINGS"なお、Windowsの既定では、直前の復元ポイント作成から24時間以内は新しい復元ポイントが作成されない。短時間に複数回作成したい場合は、この制限を変更する必要がある。
復元ポイントが作成されたことの確認
復元ポイントが正しく作成されたかは、PowerShellで確認できる。PowerShellを管理者として実行し、次のコマンドを実行する。
Get-ComputerRestorePoint | Format-Table -AutoSize作成した復元ポイントが一覧に表示されれば成功である。Description列に作成時に指定した説明(例:「システム設定変更前のバックアップ」)、CreationTime列に作成日時が表示される。一覧に何も表示されない場合は、システムの保護が有効になっていない(前述の事前準備を参照)か、24時間以内に作成された既存の復元ポイントがあるために新規作成がスキップされた可能性がある。
復元ポイントからの復旧
システム設定の変更後に問題が発生した場合、復元ポイントを使用して以前の状態に戻すことができる。
方法1: GUIを使用した復旧(Windowsが正常に起動する場合)
- Windowsキーを押し、「復元ポイントの作成」と入力して検索する。
- 「復元ポイントの作成」を選択し、「システムのプロパティ」ウィンドウを開く。
- 「システムの保護」タブを選択する。
- 「システムの復元」ボタンをクリックする。
- 「次へ」をクリックし、復元ポイントの一覧から復元ポイントを選択する。
- 「影響を受けるプログラムの検出」をクリックして、復元により影響を受けるプログラムを確認する(任意)。
- 「次へ」をクリックし、復元ポイントの内容を確認する。
- 「完了」をクリックし、システムの復元を開始する。
- システムが再起動され、復元が完了する。
方法2: コマンドプロンプトを使用した復旧(Windowsが正常に起動する場合)
管理者権限でコマンドプロンプトを起動する
(手順:Windowsキーまたはスタートメニュー → cmd と入力 → 右クリック → 「管理者として実行」)。
次のコマンドを実行する。
rstrui.exeシステムの復元ウィンドウが開く。以降は方法1の手順5以降と同様である。
方法3: セーフモードからの復旧(Windowsが正常に起動しない場合)
- Windowsが起動しない場合、電源ボタンを長押しして強制終了し、再度電源を入れる。この操作を2〜3回繰り返すと、自動修復モードが起動する。
- 「詳細オプション」を選択する。
- 「トラブルシューティング」を選択する。
- 「詳細オプション」を選択する。
- 「システムの復元」を選択する。
- 管理者アカウントを選択し、パスワードを入力する。
- 復元ポイントの一覧から復元ポイントを選択し、「次へ」をクリックする。
- 「完了」をクリックし、システムの復元を開始する。
- システムが再起動され、復元が完了する。
【注意事項】システムの復元は、システムファイルとレジストリ設定を以前の状態に戻すが、個人ファイル(ドキュメント、写真、音楽など)には影響しない。ただし、復元ポイント作成後にインストールしたプログラムやドライバーは削除される場合がある。復元を実行する前に、重要なファイルのバックアップを確認すること。
3. Windowsの更新
目的:Windows Updateにより、セキュリティパッチの適用、バグ修正、新機能の追加が行われる。WSL(Windows Subsystem for Linux: Windows上でLinuxバイナリを実行するサブシステム)を使用する場合は、カーネルインターフェースとの互換性維持のためにも更新が必要である。LLM開発でWSL上のPython環境などを利用する場合、WSLの安定動作はOSの更新状態に依存する。
管理者権限でコマンドプロンプトを起動する
(手順:Windowsキーまたはスタートメニュー → cmd と入力 → 右クリック → 「管理者として実行」)。
次のコマンドを実行する。
start ms-settings:windowsupdate
更新状態の確認
適用済みの更新プログラムと最終更新日は、コマンドで確認できる。なお、従来よく用いられたwmic qfeコマンドはWMIC(Windows Management Instrumentation Command-line)の非推奨化に伴い、新しいWindows 11では既定で利用できない場合がある。以下のコマンドを使用すること。
コマンドプロンプトで、適用済み更新プログラムの一覧を確認する。
systeminfo | findstr /C:"KB"または、PowerShellで更新プログラムの一覧と適用日を確認する。
Get-HotFix | Sort-Object InstalledOn -Descending | Select-Object HotFixID, Description, InstalledOnOSのビルド番号を確認する場合は、コマンドプロンプトで次を実行する。Windows Updateの適用後はビルド番号やリビジョンが更新される。
winverあるいは、コマンドプロンプトで次を実行してOSバージョンとビルドを確認する。
systeminfo | findstr /B /C:"OS バージョン" /C:"OS Version"なお、Get-HotFixはコンポーネントベースサービシング(CBS)経由で適用された更新のみを表示するため、すべての品質更新プログラムが一覧に現れるとは限らない。最も確実なのは、設定アプリの「Windows Update」→「更新の履歴」で確認する方法である。
【注意事項】更新によりシステムの安定性が損なわれ、起動不能になる場合がある。更新前に重要データのバックアップを行う。問題が発生した場合は、システムの復元ポイントを使用して復旧する。
4. 不要なプリインストールアプリの削除
目的:Windows 11には多数のプリインストールアプリが含まれている。使用しないアプリを削除することで、ディスク容量の節約、システムリソースの解放、スタートメニューの簡素化を行う。包括的な自動化ツールについては、次章のWin11Debloatを参照すること。本章の手動スクリプトと次章のWin11Debloatは機能が重複するため、いずれか一方を選択して実行する。
方法1: スクリプトによる一括削除
アプリの一括削除を行い、その後、残存しているアプリを一覧表示して確認する。この処理は、以下のスクリプトを用いて実行する。削除されるアプリはスクリプト内に記載しているので、確認し、必要に応じて変更を行った上で実行すること。
- コマンドプロンプトを起動する。
- エディターを起動する(以下のコマンドはユーザーのホームディレクトリに移動し、removeapp.batという名前のバッチファイルをメモ帳で開く)。
cd /d "%USERPROFILE%"
notepad removeapp.bat
- エディターで、次のスクリプトを保存する。
参考ページ: https://elluminetpress.com/2021/03/uninstall-windows-11-apps-in-powershell/
(Net session >nul 2>&1)||(PowerShell start """%~0""" -verb RunAs & Exit /B)
REM Alarms and Clock
powershell -command "Get-AppxPackage *WindowsAlarms* | Remove-AppxPackage"
REM Calculator
powershell -command "Get-AppxPackage *WindowsCalculator* | Remove-AppxPackage"
REM Cortana
powershell -command "Get-AppxPackage *Microsoft.549981C3F5F10* | Remove-AppxPackage"
REM Feedback Hub
powershell -command "Get-AppxPackage *WindowsFeedbackHub* | Remove-AppxPackage"
REM Help and tips
powershell -command "Get-AppxPackage *GetHelp* | Remove-AppxPackage"
REM Maps
powershell -command "Get-AppxPackage *WindowsMaps* | Remove-AppxPackage"
REM Microsoft To-Do
powershell -command "Get-AppxPackage *Todos* | Remove-AppxPackage"
REM Movies and TV
powershell -command "Get-AppxPackage *ZuneVideo* | Remove-AppxPackage"
REM Music app
powershell -command "Get-AppxPackage *ZuneMusic* | Remove-AppxPackage"
REM News app
powershell -command "Get-AppxPackage *BingNews* | Remove-AppxPackage"
REM OneDrive
powershell -command "Get-AppxPackage *OneDriveSync* | Remove-AppxPackage"
REM Photos app
powershell -command "Get-AppxPackage *Windows.Photos* | Remove-AppxPackage"
REM Skype
powershell -command "Get-AppxPackage *SkypeApp* | Remove-AppxPackage"
REM Solitaire Collection
powershell -command "Get-AppxPackage *MicrosoftSolitaireCollection* | Remove-AppxPackage"
REM Spotify
powershell -command "Get-AppxPackage *SpotifyAB.SpotifyMusic* | Remove-AppxPackage"
REM Teams/Chat
powershell -command "Get-AppxPackage *Teams* | Remove-AppxPackage"
REM Weather
powershell -command "Get-AppxPackage *BingWeather* | Remove-AppxPackage"
REM Xbox and related apps
powershell -command "Get-AppxPackage Microsoft.XboxGamingOverlay | Remove-AppxPackage"
powershell -command "Get-AppxPackage Microsoft.Xbox.TCUI | Remove-AppxPackage"
powershell -command "Get-AppxPackage Microsoft.XboxGameOverlay | Remove-AppxPackage"
powershell -command "Get-AppxPackage Microsoft.XboxIdentityProvider | Remove-AppxPackage"
powershell -command "Get-AppxPackage Microsoft.XboxSpeechToTextOverlay | Remove-AppxPackage"
REM Your Phone
powershell -command "Get-AppxPackage *YourPhone* | Remove-AppxPackage"
REM AmazonVideo.PrimeVideo
powershell -command "Get-AppxPackage AmazonVideo.PrimeVideo | Remove-AppxPackage"
REM 削除後に残存しているアプリを一覧表示して確認する
powershell -command "Get-AppxPackage | Select Name"
PAUSE
スクリプトの先頭行は、管理者権限でない場合に管理者権限で再実行するための処理である。各
Remove-AppxPackageコマンドは、現在のユーザーに対してアプリを削除する。末尾のGet-AppxPackage | Select Nameは削除完了後に残存しているアプリを一覧表示し、削除結果を確認するためのものである。
- スクリプトを実行する。
cd /d "%USERPROFILE%"
.\removeapp.bat
- 終了を確認する。
残存アプリが一覧表示され、何かキーを押すと画面が閉じる。
アプリが削除されたことの確認
特定のアプリが削除されたかは、PowerShellで確認できる(例:電卓の場合)。
Get-AppxPackage *WindowsCalculator*何も出力されなければ、そのアプリは現在のユーザーから削除されている。出力がある場合は、まだ残存している。*で囲む検索文字列は、スクリプト内の各Get-AppxPackageに指定したもの(WindowsAlarms、BingWeatherなど)に読み替えること。
方法2: Remove-MS-Store-Appsの使用
次の参考ページを参照してアプリの削除を行う。
参考ページ: https://github.com/Digressive/Remove-MS-Store-Apps
【注意事項】必要なアプリまで削除すると、システムの動作に影響を与える場合がある。削除対象のアプリを確認してから実行すること。電卓やフォトなど日常的に使用するアプリを削除する場合は注意が必要である。
5. Win11Debloat
目的:Win11Debloatは、Windowsの簡素化と最適化を自動で行うPowerShellスクリプトである(MITライセンス)。前章(4章)の手動削除よりも包括的な最適化を行う。前章の手動スクリプトとは併用せず、いずれか一方を選択する。主要機能は次のとおりである。
- 不要なプリインストールアプリの削除
- テレメトリ(Microsoftへの使用状況データ送信機能)の無効化
- 広告・提案機能の停止
- Bing検索やCopilotの無効化
- ファイル拡張子の表示設定
- プライバシー設定の最適化
URL: https://github.com/Raphire/Win11Debloat
手動でプライバシー設定を変更する場合は、設定アプリの「プライバシーとセキュリティ」から各項目を確認すること。
実行方法
PowerShellを管理者として実行する。
次のコマンドを実行する。
& ([scriptblock]::Create((irm "https://debloat.raphi.re/")))このコマンドは、irm(Invoke-RestMethod: 指定URLのコンテンツを取得する)で公式の配布用URLからスクリプトを取得し、[scriptblock]::Createで実行可能なスクリプトブロックに変換し、&(呼び出し演算子)で実行する。https://debloat.raphi.re/は、Win11Debloatの公式リポジトリ(github.com/Raphire/Win11Debloat)が提供する配布用URLである。
【注意事項】上記のコマンドは、外部スクリプトをダウンロードして実行する。配布元URLが公式のもの(debloat.raphi.re、github.com/Raphire/Win11Debloat)であることを確認すること。可能であれば、公式リポジトリからスクリプト一式をダウンロードし、内容を確認してから実行する。本スクリプトはシステム全体に影響するため、実行前に復元ポイントを作成しておくこと。
環境によっては、PowerShellの実行ポリシーによりスクリプトが実行できない場合がある。その場合はPowerShellを管理者として開き、Set-ExecutionPolicy RemoteSigned -Scope CurrentUserを実行してから再試行すること。
6. サービスの停止
目的:使用しないサービスを手動起動に変更することで、システム起動時間の短縮、メモリ使用量の削減、バックグラウンド処理の軽減が期待できる。
サービスの一括設定
サービスの一括設定を行う。この処理は、以下のスクリプトを用いて実行する。ここでは、いくつかのサービスを「start= demand」(手動起動: サービスを必要なときのみ起動する設定)に変更する。設定内容はスクリプト内に記載しているので、確認し、必要に応じて変更を行った上で実行すること。
- コマンドプロンプトを起動する。
- エディターを起動する。
cd /d "%USERPROFILE%"
notepad winservice.bat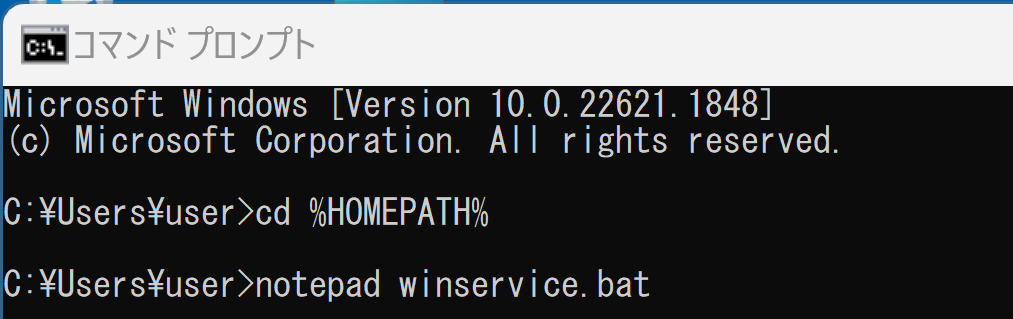
- エディターで、次のスクリプトを保存する。
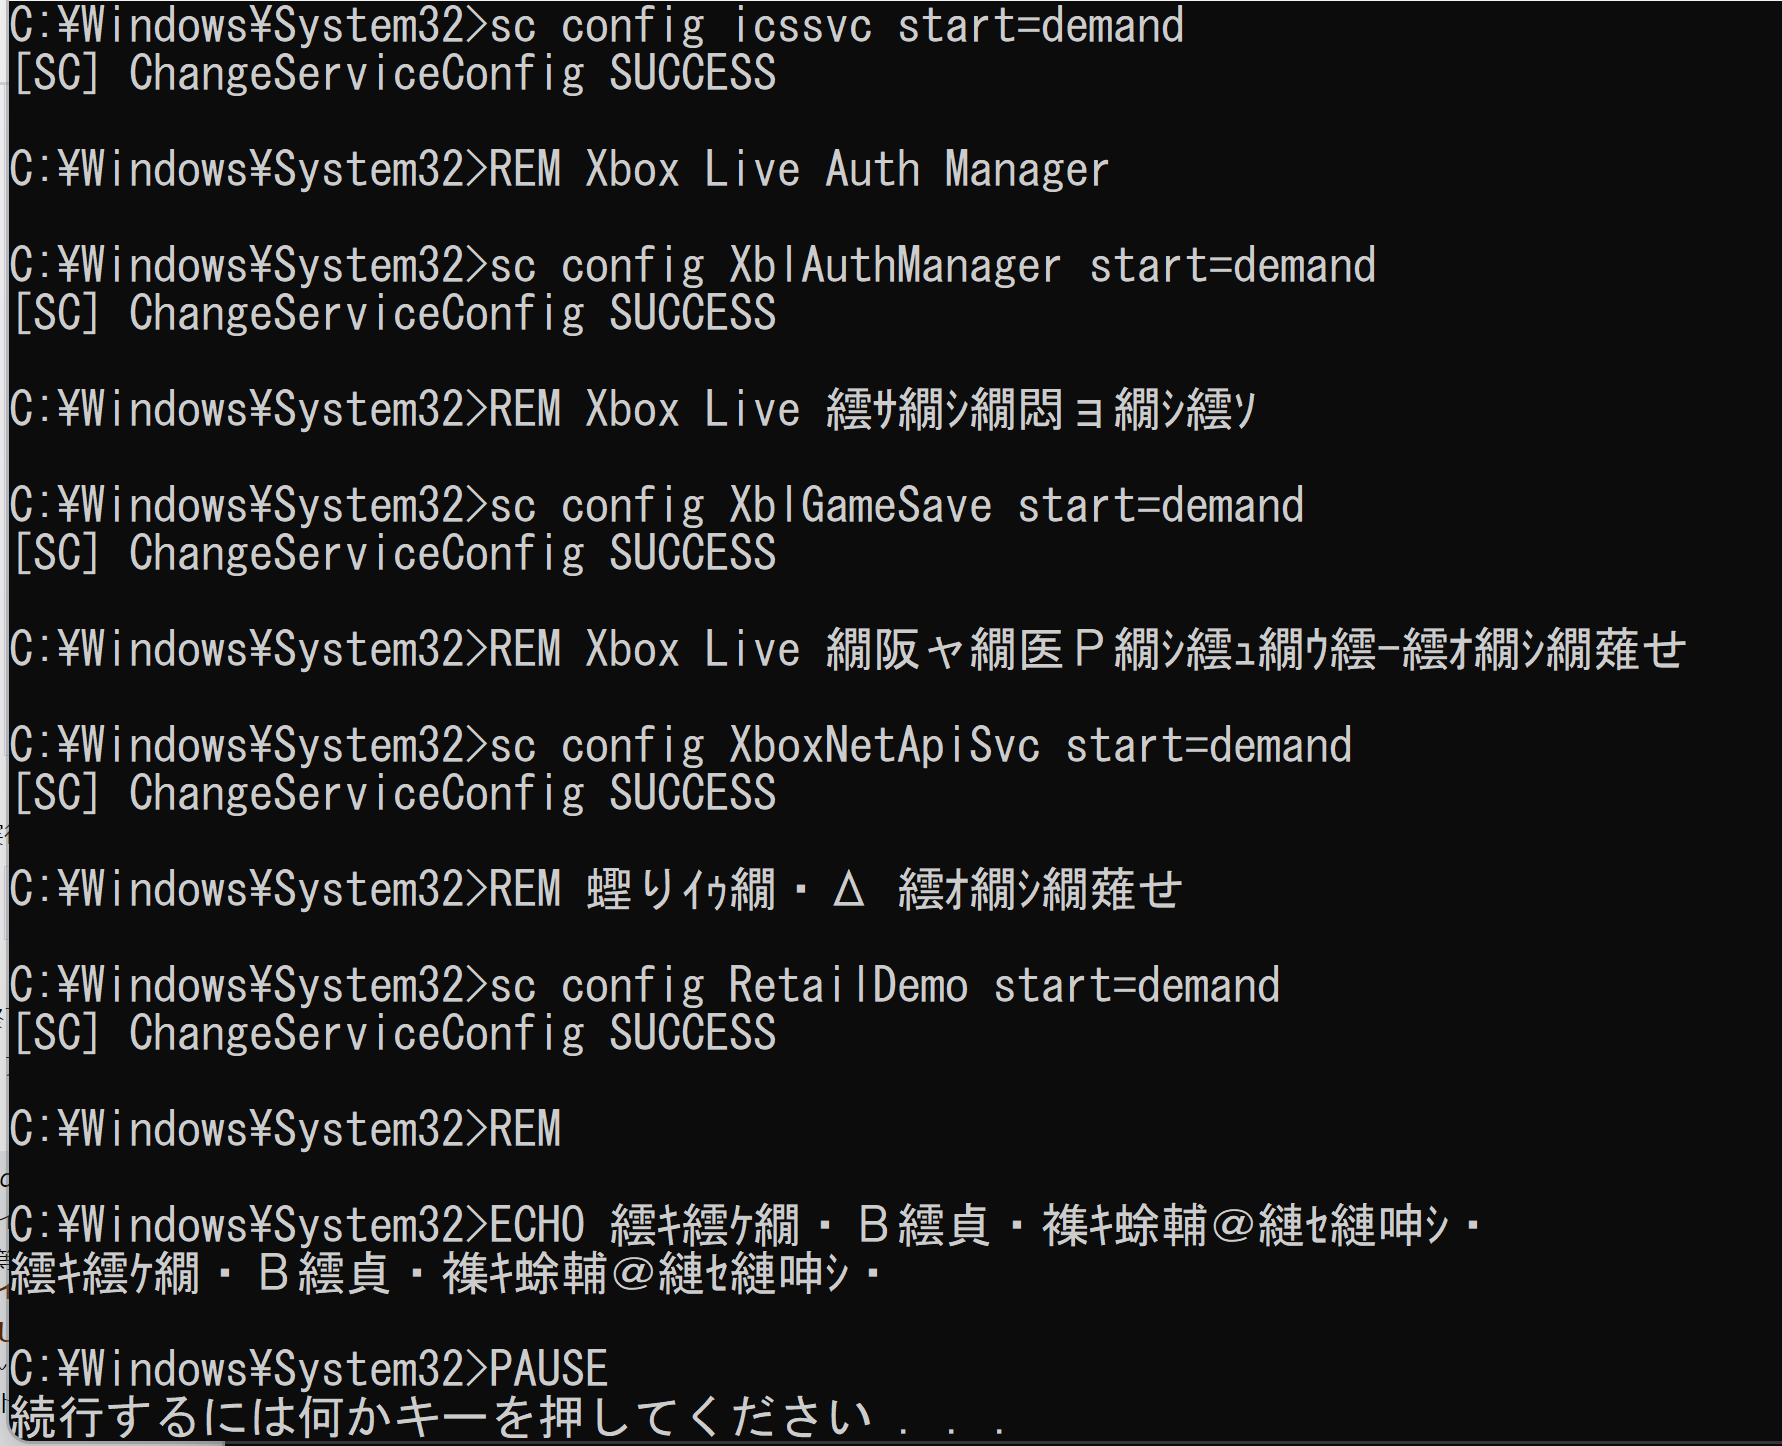
(Net session >nul 2>&1)||(PowerShell start """%~0""" -verb RunAs & Exit /B)
REM ActiveX Installer (AxInstSV)
sc config AxInstSV start= demand
REM AllJoyn Router Service
sc config AJRouter start= demand
REM Connected User Experiences and Telemetry
sc config DiagTrack start= demand
REM Distributed Link Tracking Client
sc config TrkWks start= demand
REM Geolocation Service
sc config lfsvc start= demand
REM Internet Connection Sharing (ICS)
sc config SharedAccess start= demand
REM Link-Layer Topology Discovery Mapper
sc config lltdsvc start= demand
REM Network Connected Devices Auto-Setup
sc config NcdAutoSetup start= demand
REM Peer Name Resolution Protocol
sc config PNRPsvc start= demand
REM Peer Networking Grouping
sc config p2psvc start= demand
REM Peer Networking Identity Manager
sc config p2pimsvc start= demand
REM PNRP Machine Name Publication Service
sc config PNRPAutoReg start= demand
REM SSDP Discovery
sc config SSDPSRV start= demand
REM WalletService
sc config WalletService start= demand
REM Windows モバイル ホットスポットサービス
sc config icssvc start= demand
REM Xbox Live Auth Manager
sc config XblAuthManager start= demand
REM Xbox Live セーブデータ
sc config XblGameSave start= demand
REM Xbox Live ネットワーキングサービス
sc config XboxNetApiSvc start= demand
REM 市販デモ サービス
sc config RetailDemo start= demand
REM
ECHO システムを再起動します
PAUSE
Shutdown /r /t 5 /c "REBOOTING THE SYSTEM"
sc configは、Windowsのサービスの設定を変更するコマンドである。start= demandは手動起動を意味する。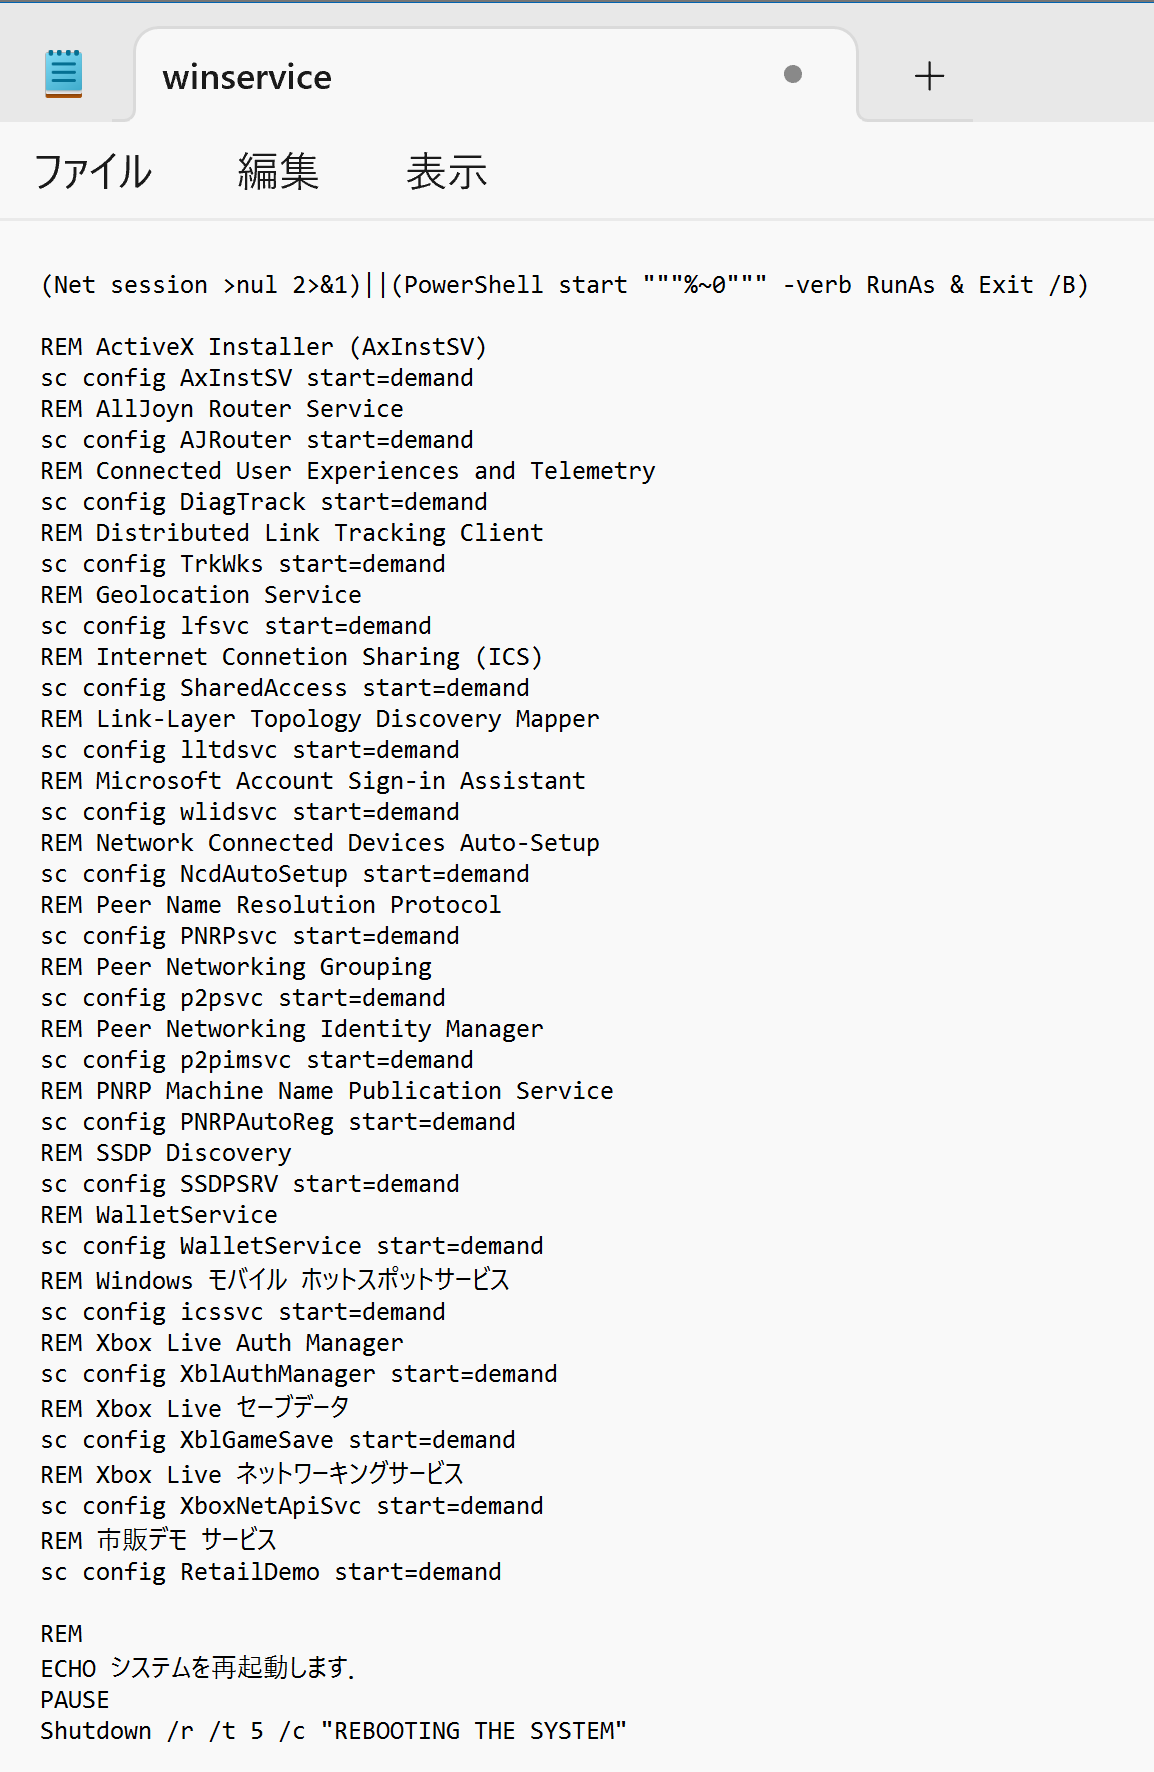
- スクリプトを実行する。
cd /d "%USERPROFILE%"
.\winservice.bat
- 終了を確認する。
設定が完了すると、メッセージが表示される。何かキーを押すと、画面が閉じてシステムが再起動する。
サービスの設定が変更されたことの確認
各サービスの起動の種類は、コマンドプロンプトでsc qcコマンドを使って確認できる(例:DiagTrackサービスの場合)。
sc qc DiagTrack出力のSTART_TYPEが3 DEMAND_START(手動起動)になっていれば、設定が反映されている。2 AUTO_STARTは自動起動を意味する。サービス名は前掲スクリプト内のsc configに指定したもの(AxInstSV、DiagTrackなど)に読み替えること。
各種機能の停止
通知、検索、ウィジェットなどの機能を無効化する。この処理は、以下のスクリプトを用いて実行する。設定内容はスクリプト内に記載しているので、確認し、必要に応じて変更を行った上で実行すること。
- コマンドプロンプトを起動する。
- エディターを起動する。
cd /d "%USERPROFILE%" notepad wincustom.bat - エディターで、次のスクリプトを保存する。
(Net session >nul 2>&1)||(PowerShell start """%~0""" -verb RunAs & Exit /B)
REM トースト通知をオフにする
reg add "HKEY_CURRENT_USER\SOFTWARE\Microsoft\Windows\CurrentVersion\PushNotifications" /v "ToastEnabled" /t REG_DWORD /d "0" /f
REM 通知とアクションセンターをオフにする
reg add "HKEY_CURRENT_USER\Software\Policies\Microsoft\Windows\Explorer" /v "DisableNotificationCenter" /t REG_DWORD /d "1" /f
REM Peopleバーを削除
reg add "HKEY_CURRENT_USER\Software\Policies\Microsoft\Windows\Explorer" /v "HidePeopleBar" /t REG_DWORD /d "1" /f
REM タスクバーで chat を表示しない
reg add "HKEY_CURRENT_USER\Software\Microsoft\Windows\CurrentVersion\Explorer\Advanced" /v "TaskbarMn" /t REG_DWORD /d "0" /f
REM フリップ3Dを起動しない
reg add "HKEY_CURRENT_USER\SOFTWARE\Policies\Microsoft\Windows\DWM" /v "DisallowFlip3d" /t REG_DWORD /d "1" /f
REM インターネットを検索しない
reg add "HKEY_CURRENT_USER\Software\Microsoft\Windows\CurrentVersion\Explorer" /v "NoSearchInternetInStartMenu" /t REG_DWORD /d "1" /f
REM スタートメニュー検索でウェブの検索結果を表示させない
reg add "HKEY_CURRENT_USER\Software\Policies\Microsoft\Windows\Explorer" /v "DisableSearchBoxSuggestions" /t REG_DWORD /d "1" /f
REM Windows 11 ウィジェットを削除する
reg add "HKEY_LOCAL_MACHINE\SOFTWARE\Policies\Microsoft\Dsh" /v "AllowNewsAndInterests" /t REG_DWORD /d "0" /f
REM Windows エラー報告を無効にする
reg add "HKEY_LOCAL_MACHINE\Software\Policies\Microsoft\Windows\Windows Error Reporting" /v "Disabled" /t REG_DWORD /d "1" /f
REM 場所を無効にする
reg add "HKEY_LOCAL_MACHINE\Software\Policies\Microsoft\Windows\LocationAndSensors" /v "DisableLocation" /t REG_DWORD /d "1" /f
REM ようこそ画面を表示しない
reg add "HKEY_LOCAL_MACHINE\Software\Microsoft\Windows\CurrentVersion\Policies\Explorer" /v "NoWelcomeScreen" /t REG_DWORD /d "1" /f
REM
ECHO システムを再起動します
PAUSE
Shutdown /r /t 5 /c "REBOOTING THE SYSTEM"
reg addは、レジストリのキーや値を追加・変更するコマンドである。HKEY_CURRENT_USERは現在のユーザーに関する設定、HKEY_LOCAL_MACHINEはシステム全体の設定を格納するレジストリのルートキーである。 - スクリプトを実行する。
cd /d "%USERPROFILE%" .\wincustom.bat - 終了を確認する。
何かキーを押すと、画面が閉じてシステムが再起動する。
【注意事項】サービスの停止や機能の無効化は、システムの動作に影響を与える場合がある。ネットワーク関連のサービスを停止すると、Windowsの基本機能が使用できなくなる場合がある。各サービスの役割を理解した上で、必要なサービスのみを停止すること。問題が発生した場合は、システムの復元機能で以前の状態に戻す。
7. DNSサーバーアドレスの設定
目的:DNS(Domain Name System: ドメイン名をIPアドレスに変換する仕組み)サーバーを変更することで、名前解決の高速化やプライバシー保護が期待できる。以下の例では、Cloudflareの公開DNSサーバー(1.1.1.1、1.0.0.1)を設定する。
DNSサーバーの変更
-
管理者権限でコマンドプロンプトを起動する (手順:Windowsキーまたはスタートメニュー →
cmdと入力 → 右クリック → 「管理者として実行」)。 - 次のコマンドを実行する。
rem 有効状態の各ネットワークアダプターのDNS設定を変更
for /f "tokens=1,2,3*" %i in ('netsh interface show interface') do (
    if "%i"=="Enabled" (
        netsh interface ipv4 set dnsservers name="%l" static 1.1.1.1
        netsh interface ipv4 add dnsservers name="%l" 1.0.0.1 index=2
    )
)
rem DNS キャッシュをクリア
ipconfig /flushdns
このスクリプトは「有効(Enabled)」状態のインターフェースに対してDNS設定を変更する。
tokens=1,2,3*の*指定により、%lにはインターフェース名が複数語にわたる場合(例:「Wi-Fi 2」)を含めて正しく格納される。特定のインターフェースのみを対象にしたい場合や確実を期す場合は、後述のとおりnetshを直接呼び出して個別に設定する。なお、バッチファイル内で実行する場合は、変数の%を%%に置き換える必要がある(例:%%i、%%l)。上記はコマンドプロンプトに直接入力する場合の記法である。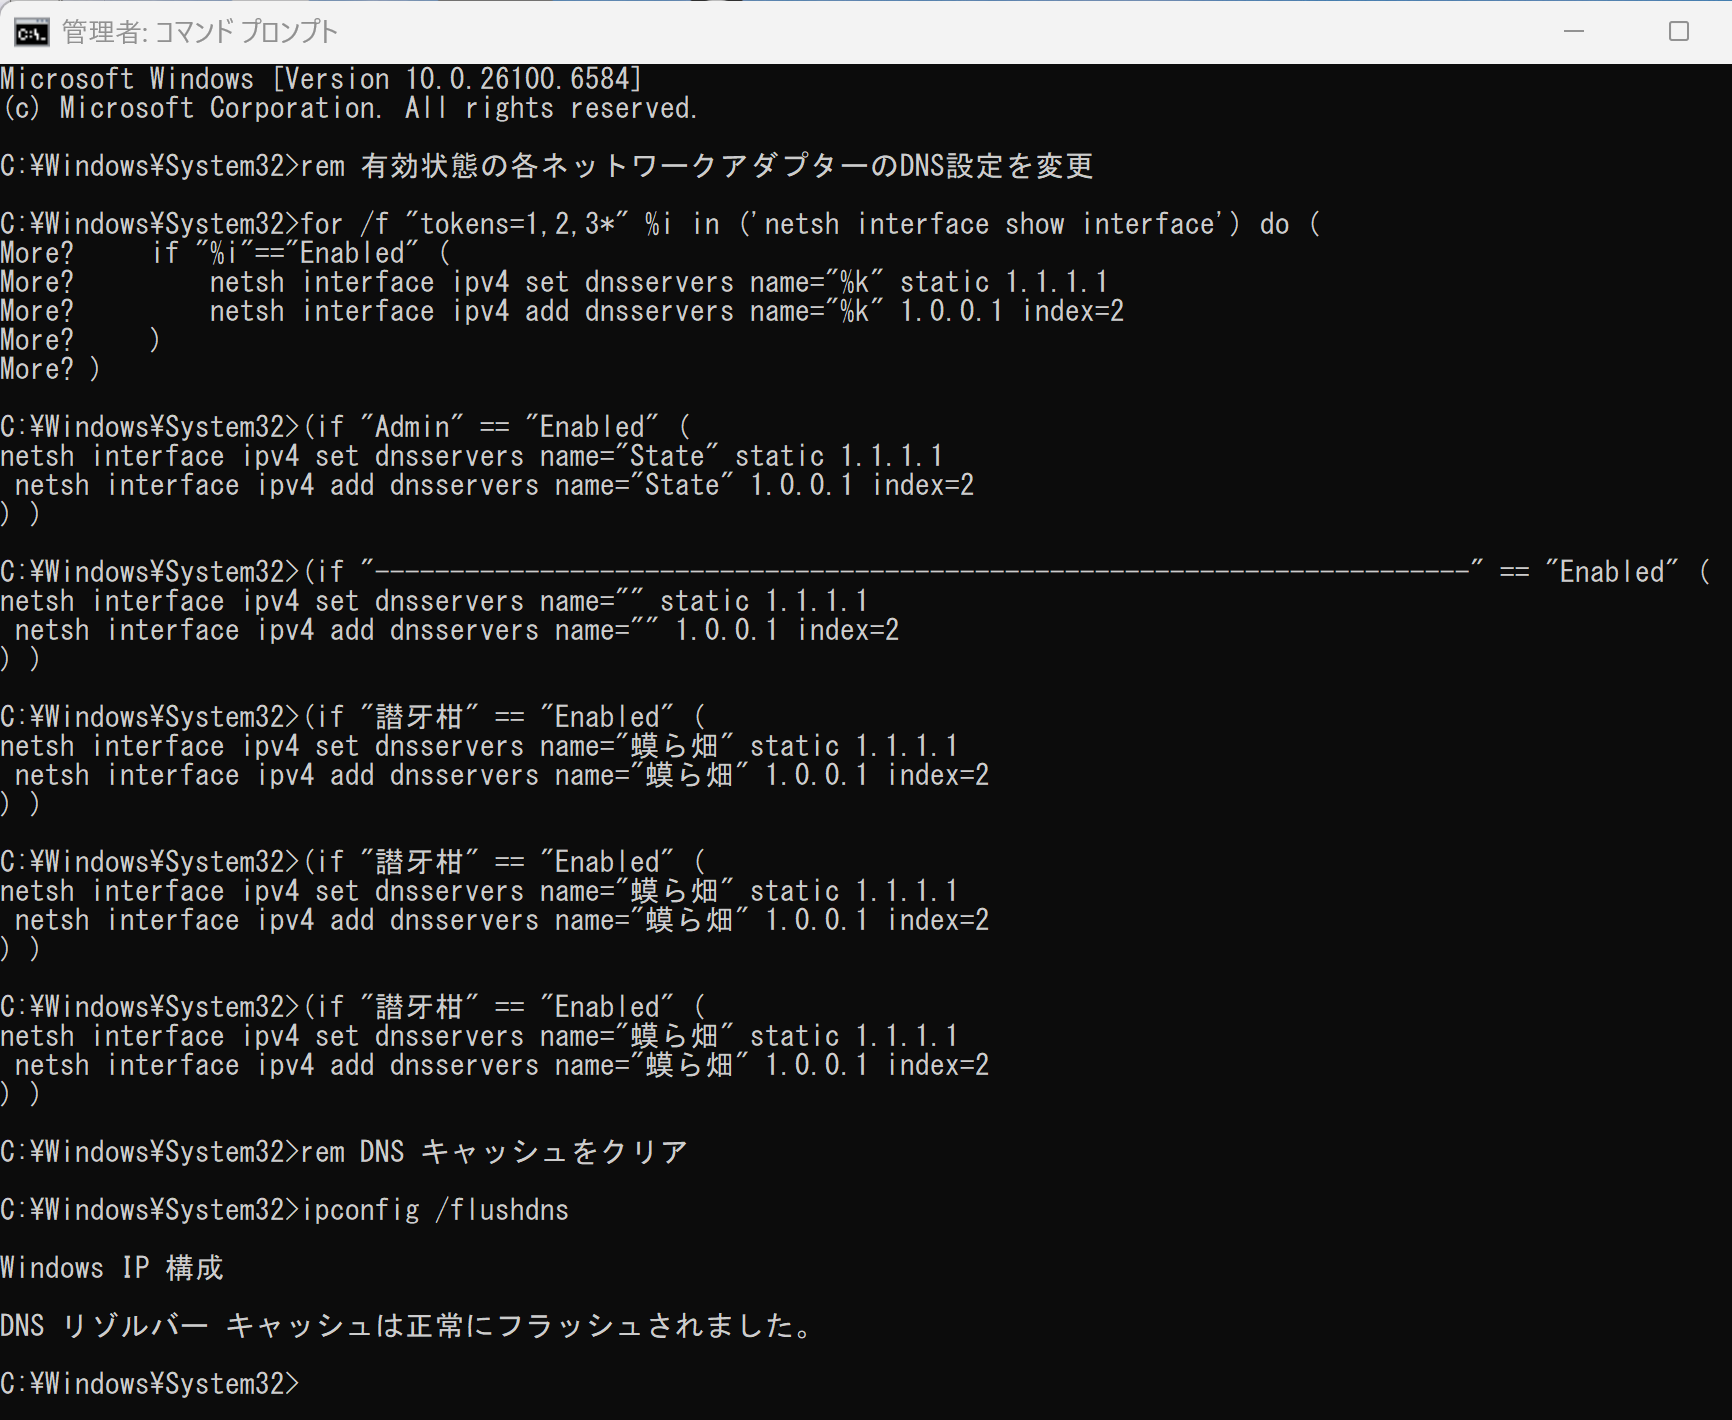
個別のインターフェースに対して直接設定する場合の例(インターフェース名が「イーサネット」の場合):
netsh interface ipv4 set dnsservers name="イーサネット" static 1.1.1.1
netsh interface ipv4 add dnsservers name="イーサネット" 1.0.0.1 index=2
ipconfig /flushdns
なお、これらのDNS設定はいずれも即時反映されるため、再起動は不要である。
DNS設定が反映されたことの確認
設定したDNSサーバーアドレスは、コマンドプロンプトで確認できる。次のコマンドを実行する。
netsh interface ipv4 show dnsservers各インターフェースに対し、「統計的に構成されたDNSサーバー」(環境により「Statically Configured DNS Servers」)として1.1.1.1と1.0.0.1が表示されれば成功である。DHCPによる自動取得の場合は「DHCP 構成」(「DHCP configured」)と表示される。
特定のインターフェースのみを確認する場合は、インターフェース名を指定する(例:「イーサネット」)。
netsh interface ipv4 show dnsservers name="イーサネット"あわせて、次のコマンドでもDNSサーバーを含むIP構成全体を確認できる。
ipconfig /all設定を元に戻す方法
DNS設定をDHCP(IPアドレスやDNSサーバーのアドレスを自動的に取得する仕組み)による自動取得に戻す場合は、以下のコマンドを実行する。
for /f "tokens=1,2,3*" %i in ('netsh interface show interface') do (
    if "%i"=="Enabled" (
        netsh interface ipv4 set dnsservers name="%l" dhcp
    )
)
ipconfig /flushdns【注意事項】企業や学校などの組織内ネットワークでは、独自のDNSサーバーが設定されている場合がある。変更前にネットワーク管理者に確認すること。インターネット接続に問題が発生した場合は、上記の方法で設定を元に戻す。
8. 電源設定の最適化
目的:電源プランを変更することで、システムパフォーマンスの向上または省電力を実現できる。デスクトップPCでは「高パフォーマンス」、ノートPCではバッテリー寿命を考慮して「バランス」が用いられることが多い。
現在の電源プランの確認
管理者権限でコマンドプロンプトを起動する
(手順:Windowsキーまたはスタートメニュー → cmd と入力 → 右クリック → 「管理者として実行」)。
次のコマンドを実行する。
powercfg /list現在アクティブな電源プランには、アスタリスク(*)が表示される。各プランは長い識別子(GUID)で管理されており、後述のコマンドではこのGUIDを指定する。
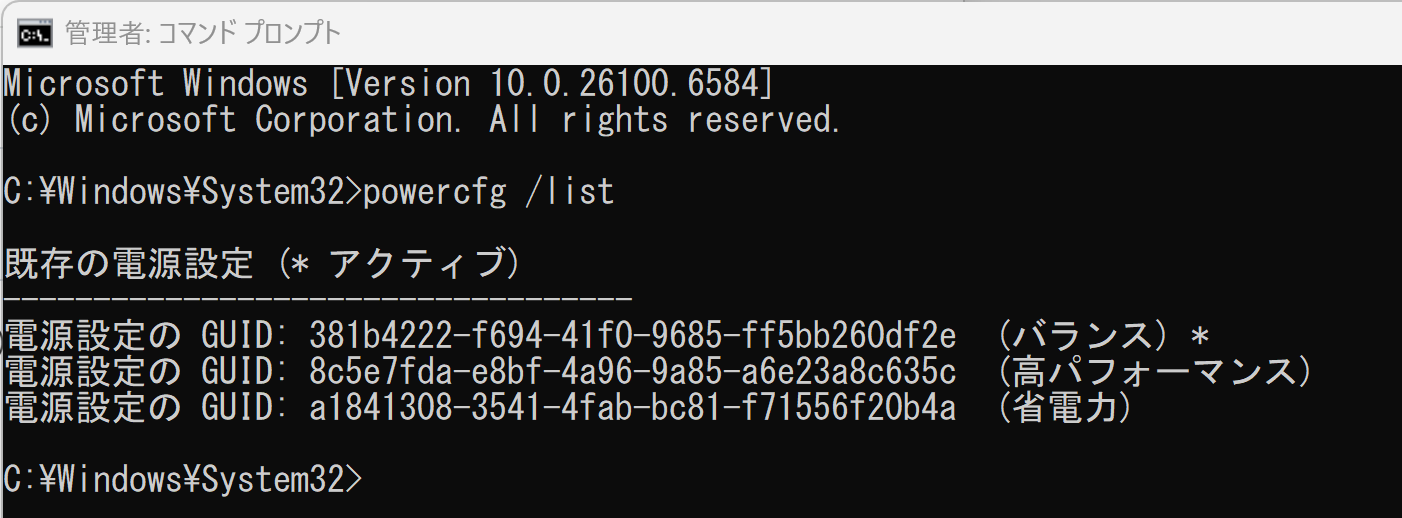
電源プランの変更
「高パフォーマンス」に変更する場合は、次のコマンドを実行する。
powercfg /setactive 8c5e7fda-e8bf-4a96-9a85-a6e23a8c635c「バランス」に戻す場合は、次のコマンドを実行する。
powercfg /setactive 381b4222-f694-41f0-9685-ff5bb260df2e「省電力」に変更する場合は、次のコマンドを実行する。
powercfg /setactive a1841308-3541-4fab-bc81-f71556f20b4aこれらの設定はいずれも即時反映されるため、再起動は不要である。
【注意事項】ノートPCで「高パフォーマンス」を使用すると、バッテリー消費が増加する。また、環境によっては一部の電源プランが表示されない場合がある。その場合は、設定アプリの「システム」→「電源とバッテリー」から設定を行う。
9. その他の設定
- ファンクションキーの無効化
目的:F1キーによるヘルプ表示など、意図しないキー入力を防止する。下記スクリプトはF1〜F12をすべて無効化する例である。
副作用に関する注意:F2(ファイル名の変更)、F5(更新)、F11(全画面)など、F1以外のファンクションキーには標準的なショートカットとしての用途がある。下記の例ではF1〜F12を一括無効化しているため、必要なキーは残す形でScancode Map(キーの入力を別のキーに置き換えるためのレジストリ設定)を編集すること。
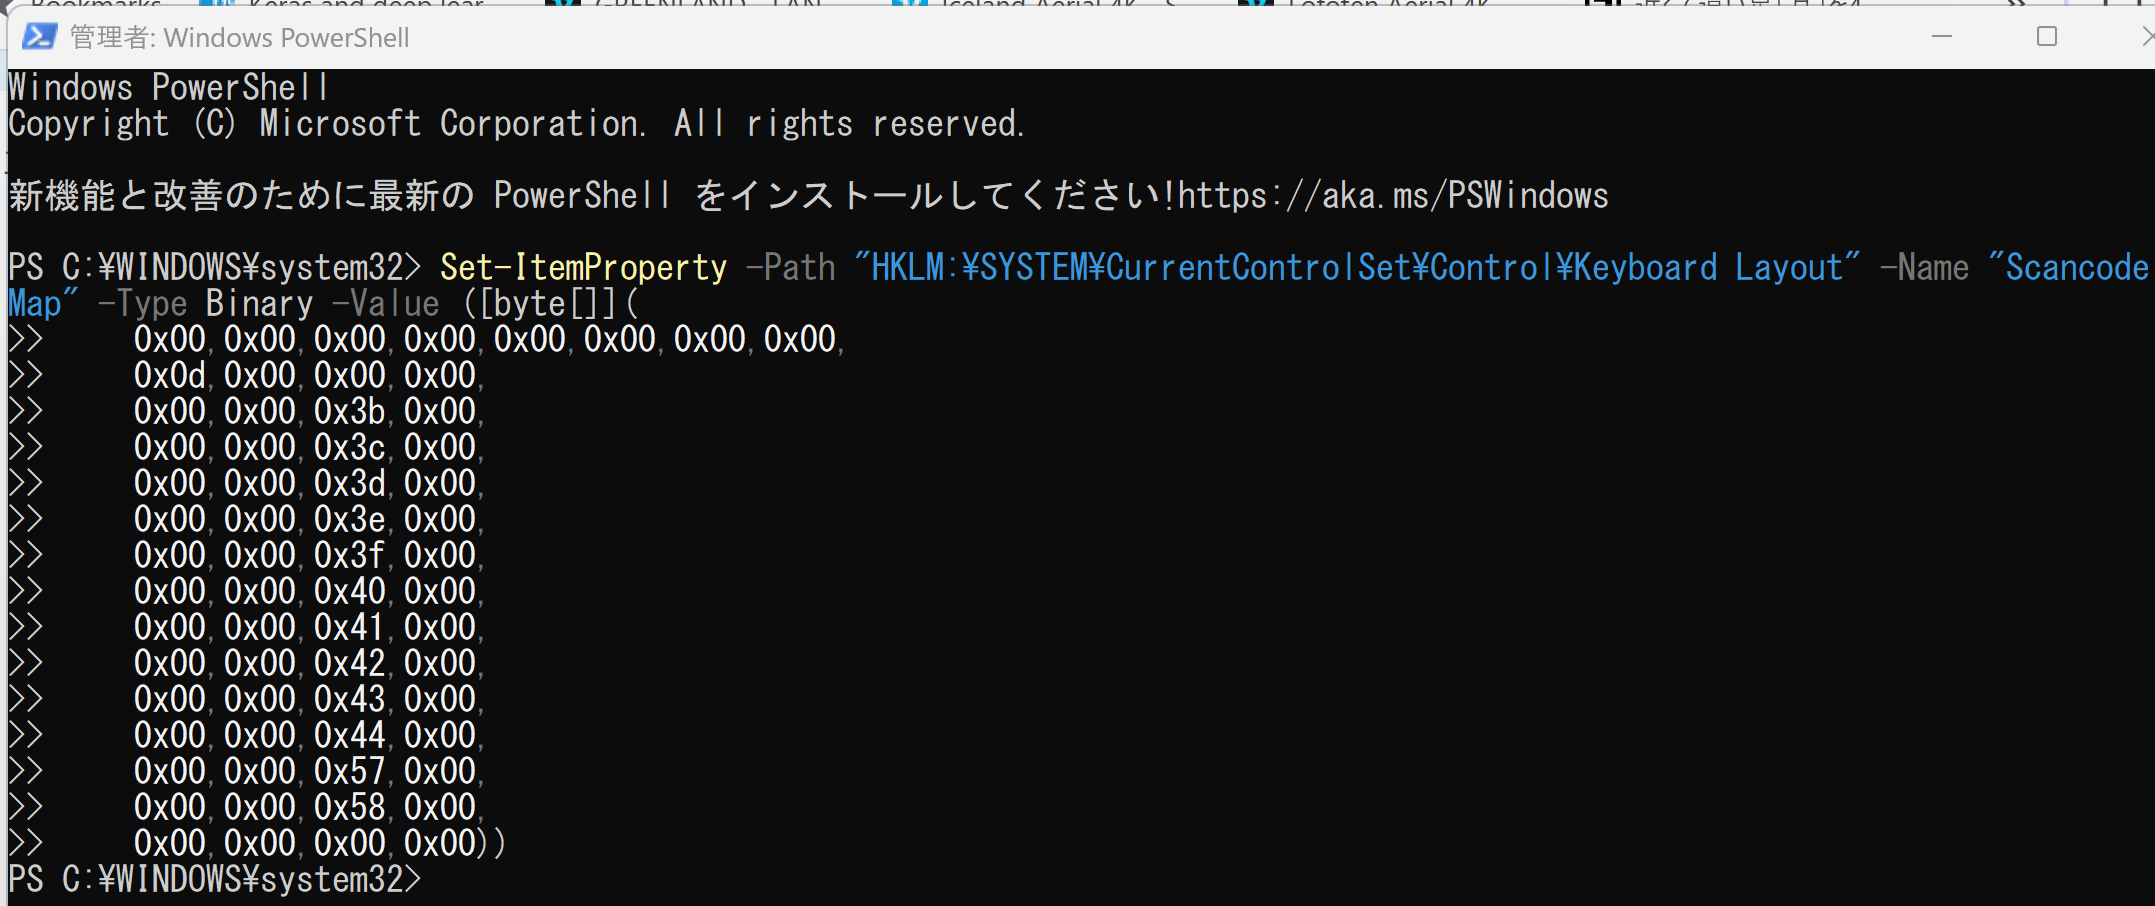
PowerShellを管理者として実行し、次のコマンドを実行する。
Set-ItemProperty -Path "HKLM:\SYSTEM\CurrentControlSet\Control\Keyboard Layout" -Name "Scancode Map" -Type Binary -Value ([byte[]](
    0x00,0x00,0x00,0x00,0x00,0x00,0x00,0x00,
    0x0d,0x00,0x00,0x00,
    0x00,0x00,0x3b,0x00,
    0x00,0x00,0x3c,0x00,
    0x00,0x00,0x3d,0x00,
    0x00,0x00,0x3e,0x00,
    0x00,0x00,0x3f,0x00,
    0x00,0x00,0x40,0x00,
    0x00,0x00,0x41,0x00,
    0x00,0x00,0x42,0x00,
    0x00,0x00,0x43,0x00,
    0x00,0x00,0x44,0x00,
    0x00,0x00,0x57,0x00,
    0x00,0x00,0x58,0x00,
    0x00,0x00,0x00,0x00))
このバイト列は、先頭からヘッダー8バイト、エントリ数(無効化する12キー+終端1=13、16進で
0x0d)、続いてF1からF12までのスキャンコード(F1=0x3b〜F10=0x44、F11=0x57、F12=0x58)を0へ割り当てる定義、末尾の終端エントリ4バイトから成る。各エントリは[送り先スキャンコード2バイト][元のスキャンコード2バイト]の形式であり、リトルエンディアン(最下位バイトを先に格納する形式)で記述する。送り先を0x0000(無効)にすることでキーを無効化する。F1キーのみを無効化する場合は、エントリ数が1個(+終端1=計2、16進で
0x02)となる。次のコマンドを使用する。Set-ItemProperty -Path "HKLM:\SYSTEM\CurrentControlSet\Control\Keyboard Layout" -Name "Scancode Map" -Type Binary -Value ([byte[]]( 0x00,0x00,0x00,0x00,0x00,0x00,0x00,0x00, 0x02,0x00,0x00,0x00, 0x00,0x00,0x3b,0x00, 0x00,0x00,0x00,0x00))この設定を反映するには、システムの再起動が必要である。
設定を元に戻す場合は、PowerShellを管理者として実行し、次のコマンドを実行する。システムの再起動が必要である。
Remove-ItemProperty -Path "HKLM:\SYSTEM\CurrentControlSet\Control\Keyboard Layout" -Name "Scancode Map" - Windowsのパス長制限の解除
目的:従来の260文字制限(MAX_PATH: Windowsで標準的に課せられているファイルパス長の上限)を解除し、長いファイルパスを扱えるようにする。深い階層のフォルダー構造や長いファイル名を使用する開発環境(LLM関連のPythonパッケージ、機械学習フレームワーク、Node.jsの
node_modulesなど)で必要となる。管理者権限でコマンドプロンプトを起動する (手順:Windowsキーまたはスタートメニュー →
cmdと入力 → 右クリック → 「管理者として実行」)。次のコマンドを実行する。
reg add "HKEY_LOCAL_MACHINE\SYSTEM\CurrentControlSet\Control\FileSystem" /v "LongPathsEnabled" /t REG_DWORD /d "1" /fこの設定を反映するには、システムの再起動が必要である。
設定が反映されたことは、コマンドプロンプトで次のコマンドを実行して確認できる。
reg query "HKEY_LOCAL_MACHINE\SYSTEM\CurrentControlSet\Control\FileSystem" /v "LongPathsEnabled"LongPathsEnabled REG_DWORD 0x1と表示されれば有効化されている。0x0の場合は無効である。なお、この値が有効でも、長いパスに対応していないアプリケーション(古い設計のものなど)では、依然として260文字を超えるパスを扱えない場合がある点に注意すること。設定を元に戻す場合は、次のコマンドを実行する。システムの再起動が必要である。
reg add "HKEY_LOCAL_MACHINE\SYSTEM\CurrentControlSet\Control\FileSystem" /v "LongPathsEnabled" /t REG_DWORD /d "0" /f - Windowsエクスプローラーで隠しファイルの表示、ファイル名拡張子の表示
目的:ファイル名拡張子(.pdf、.pptxなど)と隠しファイルを表示する。ファイルの種類を把握でき、システムファイルへのアクセスも可能になる。
管理者権限でコマンドプロンプトを起動する (手順:Windowsキーまたはスタートメニュー →
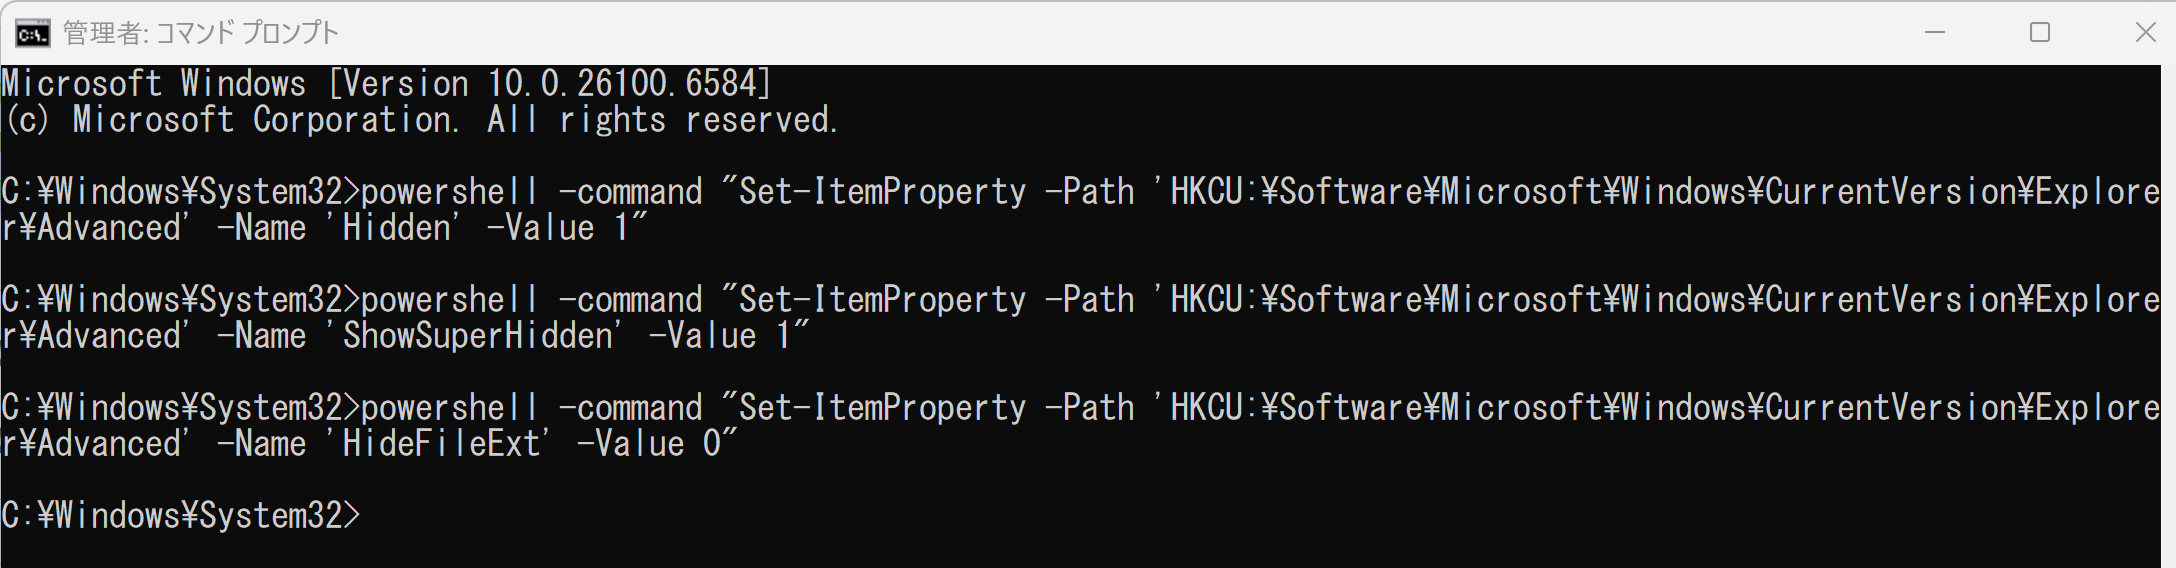
cmdと入力 → 右クリック → 「管理者として実行」)。次のコマンドを実行する。
powershell -command "Set-ItemProperty -Path 'HKCU:\Software\Microsoft\Windows\CurrentVersion\Explorer\Advanced' -Name 'Hidden' -Value 1"
powershell -command "Set-ItemProperty -Path 'HKCU:\Software\Microsoft\Windows\CurrentVersion\Explorer\Advanced' -Name 'ShowSuperHidden' -Value 1"
powershell -command "Set-ItemProperty -Path 'HKCU:\Software\Microsoft\Windows\CurrentVersion\Explorer\Advanced' -Name 'HideFileExt' -Value 0"
この設定は、エクスプローラーの再起動、または一度サインアウトして再度サインインすると反映される。システムの再起動でも反映される。
設定が反映されたことは、コマンドプロンプトで次のコマンドを実行して確認できる。
reg query "HKCU\Software\Microsoft\Windows\CurrentVersion\Explorer\Advanced" /v Hidden reg query "HKCU\Software\Microsoft\Windows\CurrentVersion\Explorer\Advanced" /v ShowSuperHidden reg query "HKCU\Software\Microsoft\Windows\CurrentVersion\Explorer\Advanced" /v HideFileExtHiddenが0x1(隠しファイルを表示)、ShowSuperHiddenが0x1(保護されたオペレーティングシステムファイルを表示)、HideFileExtが0x0(拡張子を表示)であれば、表示設定が有効になっている。元に戻した場合は、それぞれ0x2、0x0、0x1と表示される。設定を元に戻す(隠しファイルと拡張子を非表示にする)場合は、次のコマンドを実行する。
powershell -command "Set-ItemProperty -Path 'HKCU:\Software\Microsoft\Windows\CurrentVersion\Explorer\Advanced' -Name 'Hidden' -Value 2"
powershell -command "Set-ItemProperty -Path 'HKCU:\Software\Microsoft\Windows\CurrentVersion\Explorer\Advanced' -Name 'ShowSuperHidden' -Value 0"
powershell -command "Set-ItemProperty -Path 'HKCU:\Software\Microsoft\Windows\CurrentVersion\Explorer\Advanced' -Name 'HideFileExt' -Value 1"
【注意事項】隠しファイルの表示を有効にすると、システムファイルが表示されるため、誤った削除や変更を行わないよう注意すること。
10. ディスククリーンアップとデフラグ
目的:ディスククリーンアップで不要ファイルを削除し、空き容量を確保する。デフラグ(最適化)は、HDD上のファイル断片化を解消し、読み書き速度を向上させる。ゼロフィルは、削除済みデータを復元不能にし、セキュリティを向上させる。
- ディスククリーンアップ
管理者権限でコマンドプロンプトを起動する (手順:Windowsキーまたはスタートメニュー →
cmdと入力 → 右クリック → 「管理者として実行」)。対話的にクリーンアップ対象を選んで実行する場合は、次のコマンドを実行する。
cleanmgr /sageset:1
cleanmgr /sagerun:1
このコマンドの説明:
- /sageset:1: 番号1のプロファイルとして、削除対象を選択するダイアログを表示する。一度設定すれば次回以降の選択は不要
- /sagerun:1: 番号1のプロファイルで指定された対象を削除する
ディスク容量が極端に少なく、緊急のクリーンアップが必要な場合に限り、次のコマンドを使用する。ユーザーへの確認なしに静音モードで動作し、限定的な対象のみを自動削除する。削除内容を選択できない点に注意すること。
cleanmgr /verylowdisk - デフラグと、Cドライブの空き領域のゼロフィルを行う。
事前確認:以下のdefragコマンドはHDD専用である。SSDで実行するとSSDの寿命を縮める。実行前にPowerShellで次のコマンドを実行し、ドライブの種別(MediaType)を確認すること。
Get-PhysicalDisk | Format-Table FriendlyName, MediaType, SizeMediaTypeが「HDD」の場合のみ、続くdefragおよびsdeleteを実行する。「SSD」の場合は実行しない(詳細は注意事項を参照)。
sdeleteは、Microsoft Sysinternalsが提供するセキュアな削除ツールである。事前にダウンロードが必要である。
sdeleteのURL: https://learn.microsoft.com/ja-jp/sysinternals/downloads/sdelete
管理者権限でコマンドプロンプトを起動する (手順:Windowsキーまたはスタートメニュー →
cmdと入力 → 右クリック → 「管理者として実行」)。sdeleteのZIPファイルを展開し、
sdelete.exeがあるフォルダーへ移動するか、sdelete.exeをPATHの通ったフォルダーに置いてから実行する。HDDの場合のみ、次のコマンドを実行する。
defrag C: /X
sdelete.exe -accepteula -z C:
defragコマンドの説明:
- C:: 対象ボリュームをCドライブに限定(全ボリュームを対象とする
/Cオプションは、SSDが含まれる場合に害を及ぼすため使用しない) - /X: 空き領域の統合を実行
sdeleteコマンドの説明:
- -accepteula: 使用許諾(EULA)への同意をコマンドライン引数で行う。このオプションを省略すると、初回実行時に対話的なプロンプトが表示されて処理が停止する
- -z: 空き領域をゼロで上書きする
- C:: 対象ボリュームをCドライブに限定(全ボリュームを対象とする
【注意事項】SSD(ソリッドステートドライブ)を使用している場合、デフラグは不要であり、SSDの寿命を縮める。SSDではWindowsが自動でTRIM(SSDに削除済みブロックを通知し、性能を維持するコマンド)を実行しているため、defragおよびゼロフィル(sdelete -z)は実行しないこと。HDDの場合でも、ゼロフィルには長時間を要する場合があるため、時間に余裕があるときに実行する。
11. システムの一般的な問題と解決方法
システムで発生する一般的な問題と解決方法を以下に示す。
- Wi-Fi接続の問題
- 設定 → ネットワークとインターネット → 詳細なネットワーク設定から診断を実行する
- ネットワークのリセットまたはネットワークアダプターの再構成を実施する
- アプリのインストールの問題
- 設定 → Windows Update で最新の更新プログラムを適用する
- 設定 → アプリ → インストールされているアプリから修復または再インストールを実行する
- アプリケーションの互換性診断を実施する
- ディスプレイ設定の問題
- 設定 → システム → ディスプレイから表示設定を調整する
- デバイスマネージャーでディスプレイドライバーを最新版に更新する
- システムパフォーマンスの低下
- タスクマネージャー(Ctrl+Shift+Esc)でシステムリソースの使用状況を確認する
- 設定 → システム → ストレージからストレージ最適化を実行する
- 設定 → アプリ → スタートアップから不要なアプリケーションの自動起動を無効にする
【注意事項】ハードウェアの故障やドライバーの問題が原因の場合、ソフトウェア的な対処では解決できない場合がある。問題が解決しない場合は、システムの復元機能で以前の正常な状態に戻すか、専門家に相談する。